Introduction
An OCI reserved public IP is persistent, remaining active even beyond the lifetime of the instance to which it is assigned. Unlike ephemeral public IPs, reserved public IPs can be unassigned and reassigned to other instances as needed, making them a flexible and reusable networking resource.
The OCI Console provides a user-friendly web interface to reserve public IP addresses. These addresses can be provisioned from:
- Oracle’s default public IP pool, or
- A custom BYOIP (Bring Your Own IP) pool created for your tenancy.
However, the OCI console only allows you to reserve one IP at a time. While this limitation is manageable for small-scale requirements, it becomes challenging when you need to reserve many public IPs.
This blog demonstrates how to simplify and automate the reservation of multiple public IPs in OCI using Terraform. The provided Terraform configuration dynamically provisions Reserved Public IP Addresses. It allows you to specify the number of public IPs to create, and automatically assigns sequential names like `PublicIP-1`, `PublicIP-2`, etc.
Starting from a clean slate, we currently do not have any reserved IPs.

This Terraform code creates multiple **reserved public IP addresses** in an OCI compartment. You can customize the number of public IPs to be created using a variable.
Prerequisites
Before running this code, ensure you have:
- Terraform installed.
- An Oracle Cloud Infrastructure (OCI) account.
- OCI API Key set up with:
- Tenancy OCID
- User OCID
- Fingerprint
- Private API Key file path
Terraform Configuration
The below Terraform block configures the OCI provider. Update the placeholders ( ocid1.tenancy…, ocid1.user…, etc.) with your actual OCI details. The region is specified in the provider block, replace “us-sanjose-1” with your desired region. Ensure your selected region has capacity for reserved public IP addresses.
terraform {
  required_providers {
    oci = ">= 1.3.0"
  }
}
provider "oci" {
  region = "us-sanjose-1"
  tenancy_ocid = "ocid1.tenancy.oc1.xxxxx "
  user_ocid = "ocid1.user.oc1.xxxxx "
  fingerprint = "xxxx"
  private_key_path = "/Users/xxx/xxxx.pem"
}
This code uses the following variable, change the value of the variable based on the number of public IPs you want to reserve from the pool.
![]()
variable "num_public_ips" {
  description = "Number of public IPs to create"
  type        = number
  default     = 10  # Change to the desired number of public IPs
}
The following Resource block creates n (as defined in variable above) number of reserved public IP addresses in the given compartment. It uses a for loop which dynamically creates multiple resources and converts a list (PublicIP-1 to PublicIP-n) into a set of keys using toset.
resource "oci_core_public_ip" "test_public_ip" {
  for_each = toset([for i in range(var.num_public_ips) : "PublicIP-${i + 1}"])
  compartment_id   = "ocid1.compartment.oc1..xxxxxx"        # Replace with actual compartment OCID
  lifetime         = "RESERVED"
  display_name     = each.key                    # Sequential name (PublicIP-1, PublicIP-2, ...)
  public_ip_pool_id = "ocid_of_public_ip_pool"    # Replace with actual public IP pool OCID
Each public IP is named sequentially: PublicIP-1, PublicIP-2, and so on, based on the loop.
Code Execution
Initialize Terraform
terraform init
Customize Variables
Verify the region in provider.tf matches the intended target (e.g., ap-singapore-1 or us-sanjose-1).
Modify variable or
pass num_public_ips as a CLI argument.
terraform apply -var=“num_public_ips=10“
Apply the Configuration
terraform apply
Verify Reserved IPs in your Oracle Cloud Console.
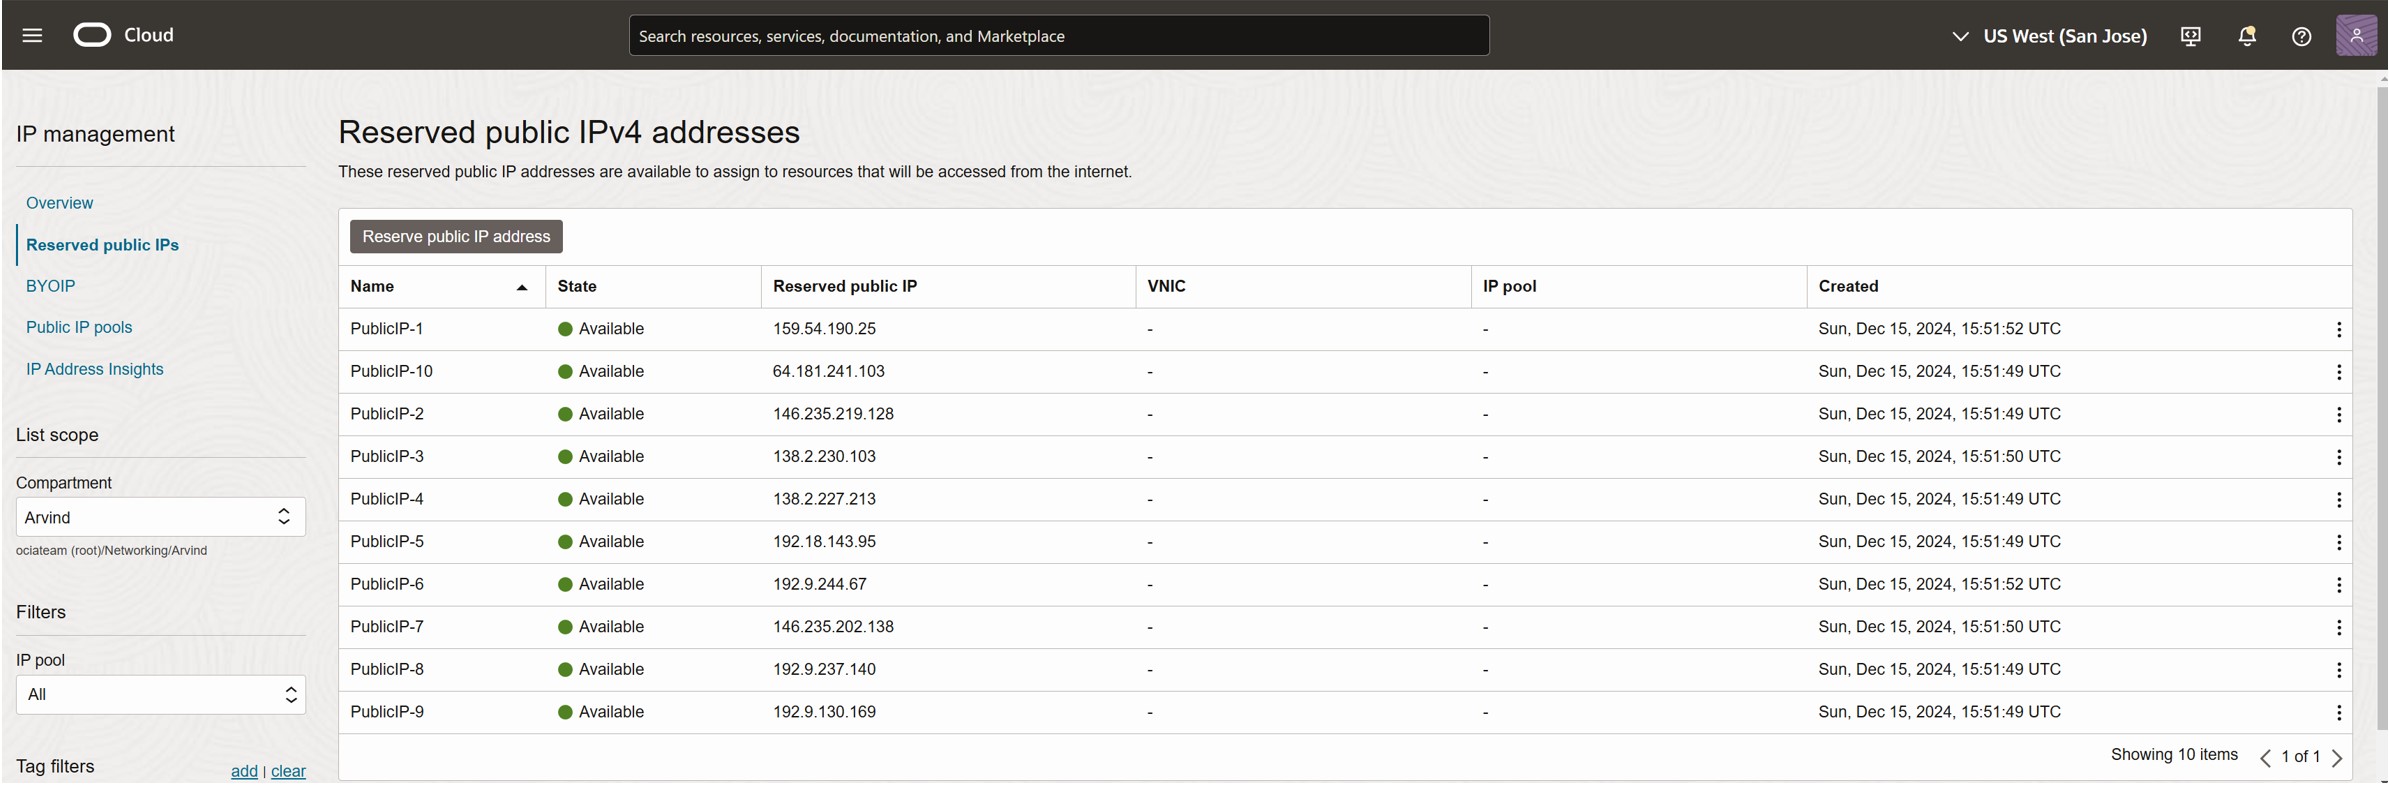
Below is a sample output where variable was set to the default value of 10 public IPs.
Recommendation
- Check for reserved public IP capacity in the target region.
- Confirm the compartment_id is valid and has necessary permissions.
This completes our test for automating the OCI Reserved Public IP with Terraform successfully. Please note that while this blog particularly focuses on Terraform, OCI provides you with the flexibility to use the CreatePublicIp API and OCI SDK in a script with your favorite programming language, such as Java, Python, Go, etc.
Thank you for reading this blog. Hope you enjoyed it!