In this blog, we will unravel the significance of database logs and how Oracle Logging Analytics emerges as an ally in extracting valuable insights from the database logs. We will explore the intricacies of collecting logs from various Oracle databases, spanning across Linux and Windows environments and delving into the area of the Exadata Database system. These logs hold the key to unlocking powerful insights revealing the inner workings of your database’s activities.
Oracle Logging Analytics, a versatile and robust offering capable of channeling logs from a variety of log sources, with databases being a prominent among them. We leverage Logging Analytics’ ability to transform scattered log entries into a unified, coherent narrative, offering a comprehensive overview of your database operations.
In this series, we will walk you through the pre-work required to prepare your environment, followed by a step-by-step guide on dowloading and installing the Management agent, a key tool for fetching database logs. Additionally, we cover the process of creating corresponding entities and log sources in OCI Logging Analytics, which enables the parsing of incoming log data. Finally, we show you how to leverage the Database Audit Dashboard to unlock valuable insights from your log data. By end of this series, you’ll be equipped with the knowledge to successfully set up and utlize these powerful tools to enhance your database monitoring and auditing capabilities.
Blog Content Guide
- IAM Policies for the Management Agent
- Download Management Agent on the Database Host
- Install Management on the Database Host
- Ingest Database Logs
- Unlocking Hidden Insights from Ingested Database Logs
- References
IAM Policies for the Management Agent
The Management Agent is a powerful tool that facilitates seamless log retrieval from database sources for analysis within Logging Analytics. To ensure smooth operations, the appropriate IAM policies must be in place, granting the necessary permissions to the IAM group intended for working with the Management Agent. These policies encompass permissions for managing agents, install keys, and dynamic groups. Additionally, the creation of dynamic groups specifically for management agents is crucial, along with the implementation of corresponding policies to enable log collection and metric ingestion for agents within these groups. This section discusses these IAM Policies and Dynamic Groups.
- Add policies to allow a group to work with management agents and install keys in the given compartment.
ALLOW GROUP <group_name> TO MANAGE management-agents IN COMPARTMENT <compartment_name>
ALLOW GROUP <group_name> TO MANAGE management-agent-install-keys IN COMPARTMENT <compartment_name>
ALLOW GROUP <group_name> TO READ METRICS IN COMPARTMENT <compartment_name>
ALLOW GROUP <group_name> TO READ ALARMS IN COMPARTMENT <compartment_name>
ALLOW GROUP <group-name> TO READ USERS IN TENANCY
Note: For more details on Management Agent Pre-requisites refer to: https://docs.oracle.com/en-us/iaas/management-agents/doc/perform-prerequisites-deploying-management-agents.html - Ensure that the following policies are created for your Logging Analytics user group.
ALLOW GROUP Logging-Analytics-User-Group TO MANAGE management-agents IN COMPARTMENT <compartment_name>
ALLOW GROUP Logging-Analytics-User-Group to MANAGE management-agent-install- keys IN TENANCY
ALLOW GROUP Logging-Analytics-User-Group TO READ METRICS IN COMPARTMENT <compartment_name>
ALLOW GROUP Logging-Analytics-User-Group TO READ USERS IN TENANCY
Note: Logging-Analytics-User-Group is an example user group
- Creating a Management Agent Dynamic Group if it already doesn’t exist
ALL {resource.type=’managementagent’, resource.compartment.id='<management_agent_compartment_OCID>’}
- Create IAM policies for Management-Agent-Dynamic-Group to enable log collection and metrics generation.
ALLOW DYNAMIC-GROUP Management-Agent-Dynamic-Group TO USE METRICS IN TENANCY
ALLOW DYNAMIC-GROUP Management-Agent-Dynamic-Group TO {LOG_ANALYTICS_LOG_GROUP_UPLOAD_LOGS} IN TENANCY
If the dynamic group is under a domain, then include the domain in the policy statement. For example,
ALLOW DYNAMIC-GROUP <identity_domain_name>/Management-Agent-Dynamic-Group TO USE METRICS IN TENANCY
ALLOW DYNAMIC-GROUP <identity_domain_name>/Management-Agent-Dynamic-Group TO {LOG_ANALYTICS_LOG_GROUP_UPLOAD_LOGS} IN TENANCY
Note: If you use the Set Up Ingestion wizard to configure the Management Agent for log collection, then some of the above policy statements are added automatically.
Download Management Agent on the Database Host
In this section, we’ll dive into the crucial step of acquiring the right Management Agent for your database environment. With multiple versions available, it is essential to download the correct one to ensure seamless integration and optimal performance. By the end of this section, you’ll have the correct version of Management Agent in hand along with the corresponding response file which is essential for agent installation.
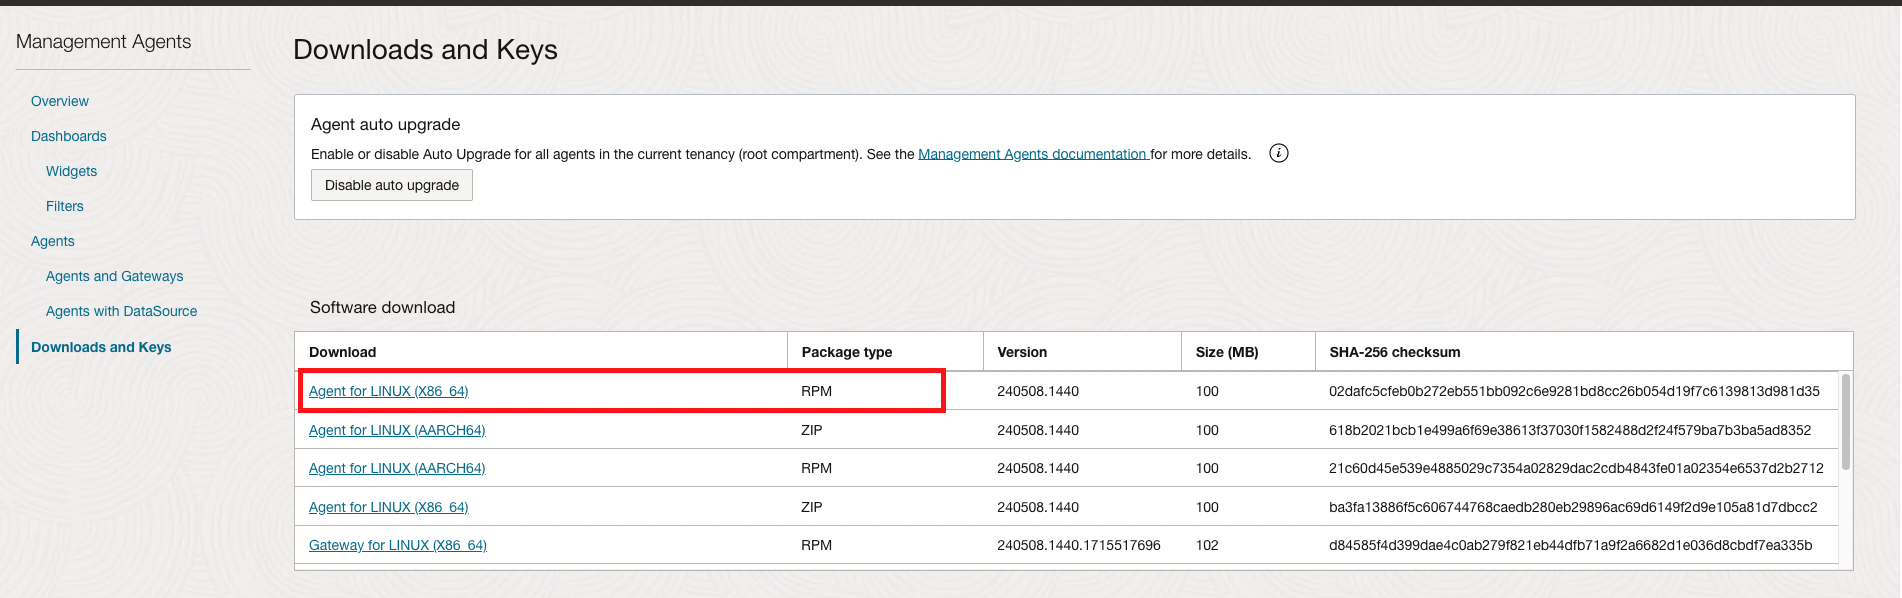
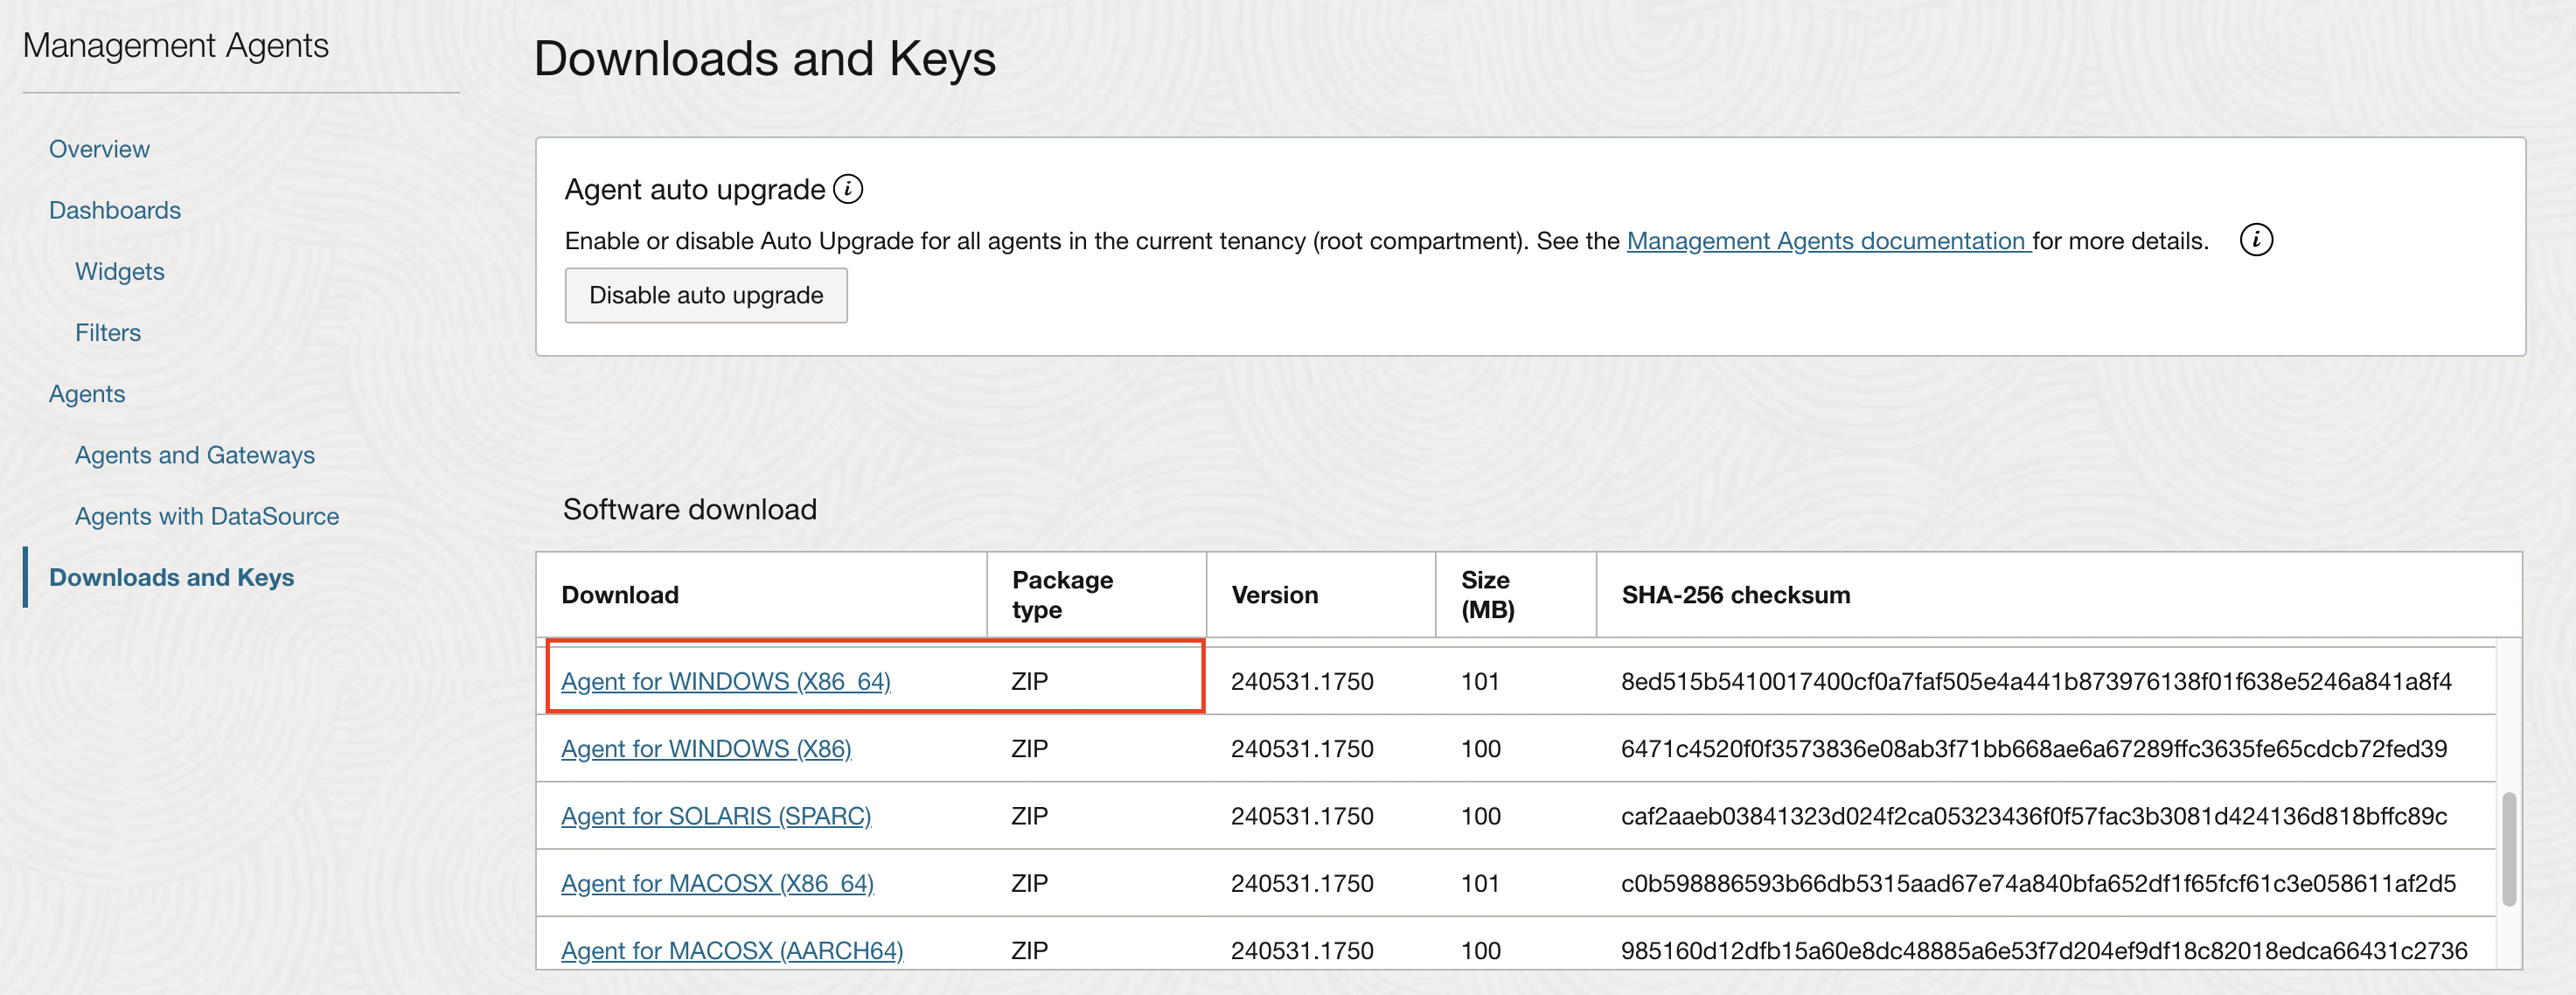
Log in to the OCI console and navigate to Observability & Management -> Management Agents -> Downloads & Keys. For a Linux based Oracle Database, Download Agents for LINUX (X86_64). For a Windows based Oracle Database, download Agent for Windows (X86_64).
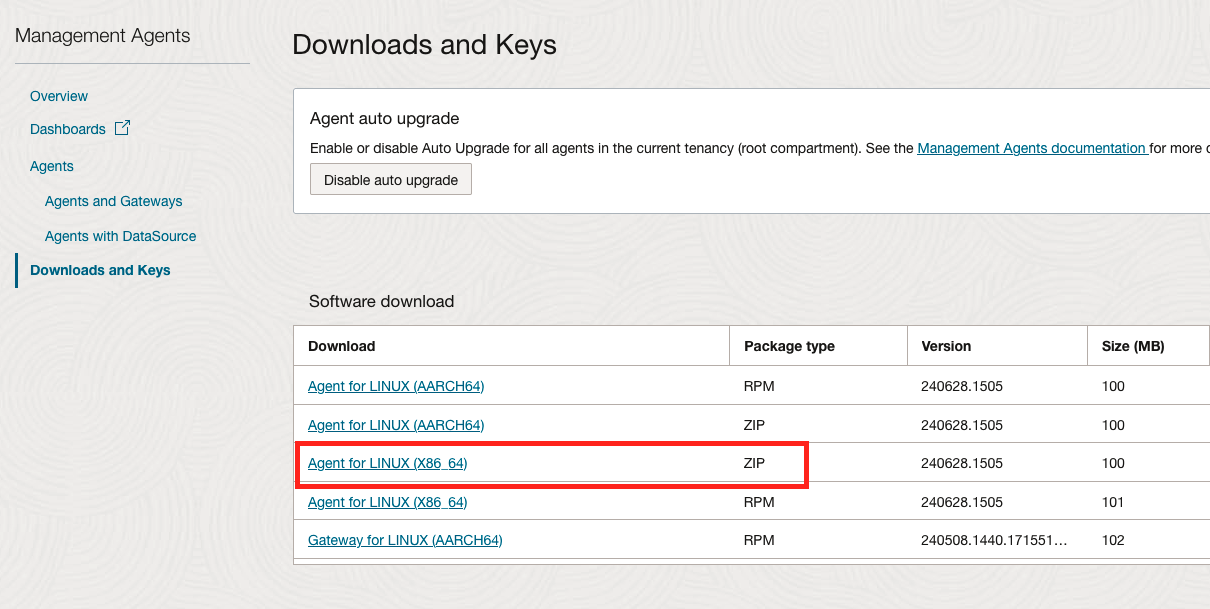
For Exadata Database Service in OCI, Cloud@Customer or on-premises deployments, Download Agent for LINUX (X86_64) ZIP type from Software download section.
Exadata Database Service only supports ZIP package type because Exadata Cloud lifecycle activities look for unknown rpms and will remove before patching. To avoid losing the agent and having to reinstall, the Management Agent needs to be installed using the ZIP method. Do not use the rpm method.
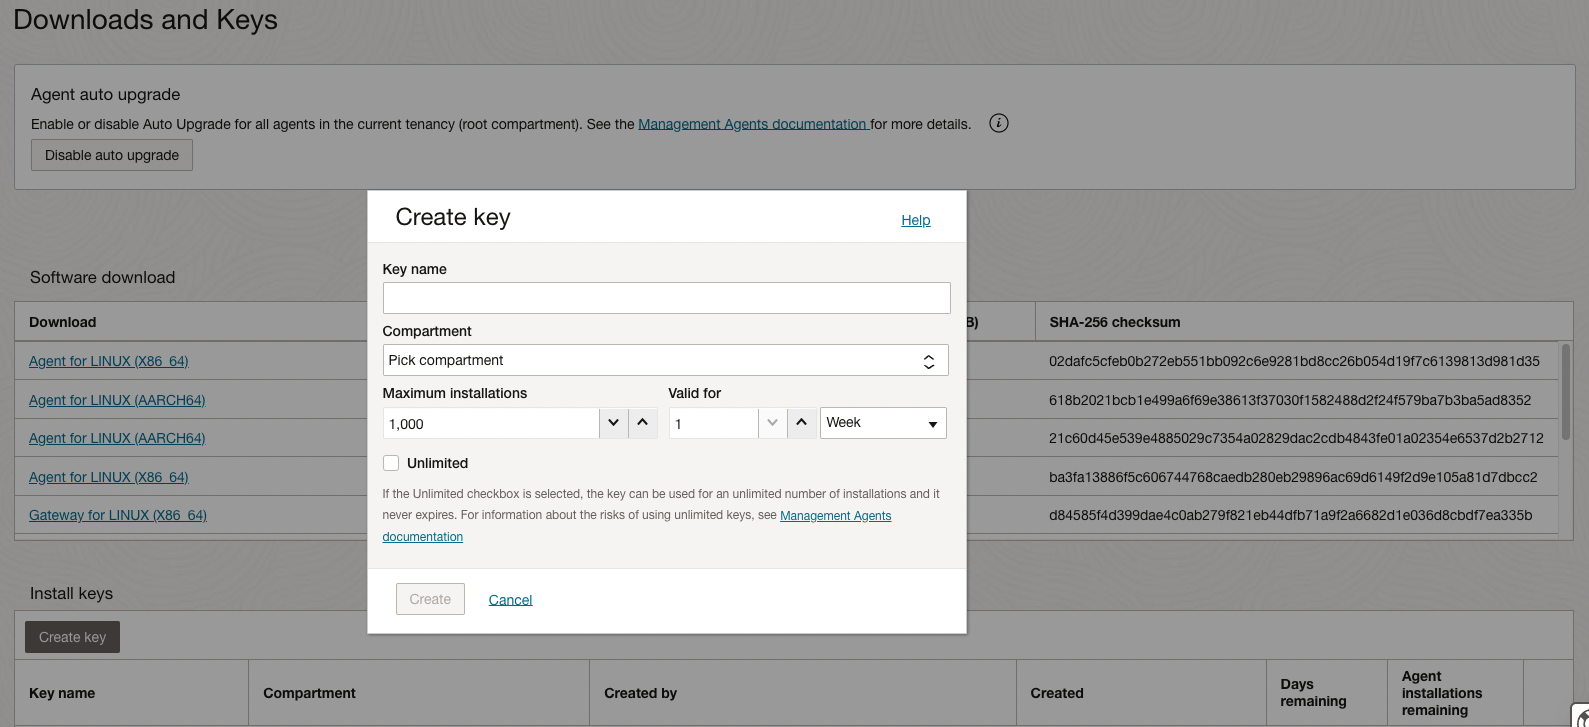
Before we start the management agent installation process, a crucial pre-install step is to download the Install Key to a file. This is useful to download the response file which will be used for the Management Agent installation on the database host.
On the Management Agents home page, click on Downloads and Keys -> Create Key. Provide Key name, choice of Compartment, Maximum installations allowed for this key. Once they Install Key is created, navigate to the Install Key pane, click on the three dots on the right side and select Download Key to File.
Note: Oracle recommends to keep the life time of an Install Key to a minimum required time and limited number of agents.

Install Management Agent on the Database Host
With the necessary files in, we are ready to proceed with the installation of Management Agent.In this section, we will delve into the installation process, walking you through each key step and highlighting important considerations.
Install Management Agent on Linux Database Host
As a best practice, move the management agent installation rpm file and downloaded response file to a tmp directory on the database host so that it can be deleted once the install is complete. Edit the response file to provide the required information such as Agent Display Name, uncomment any tag properties and uncomment the agent parameters that you require for your specific agent configuration and update the agent parameter value if needed.For example, in current implementation, uncomment and set Service.plugin.logan.download=true in the response file. This will enable Logging Analytics plugin for management agent.
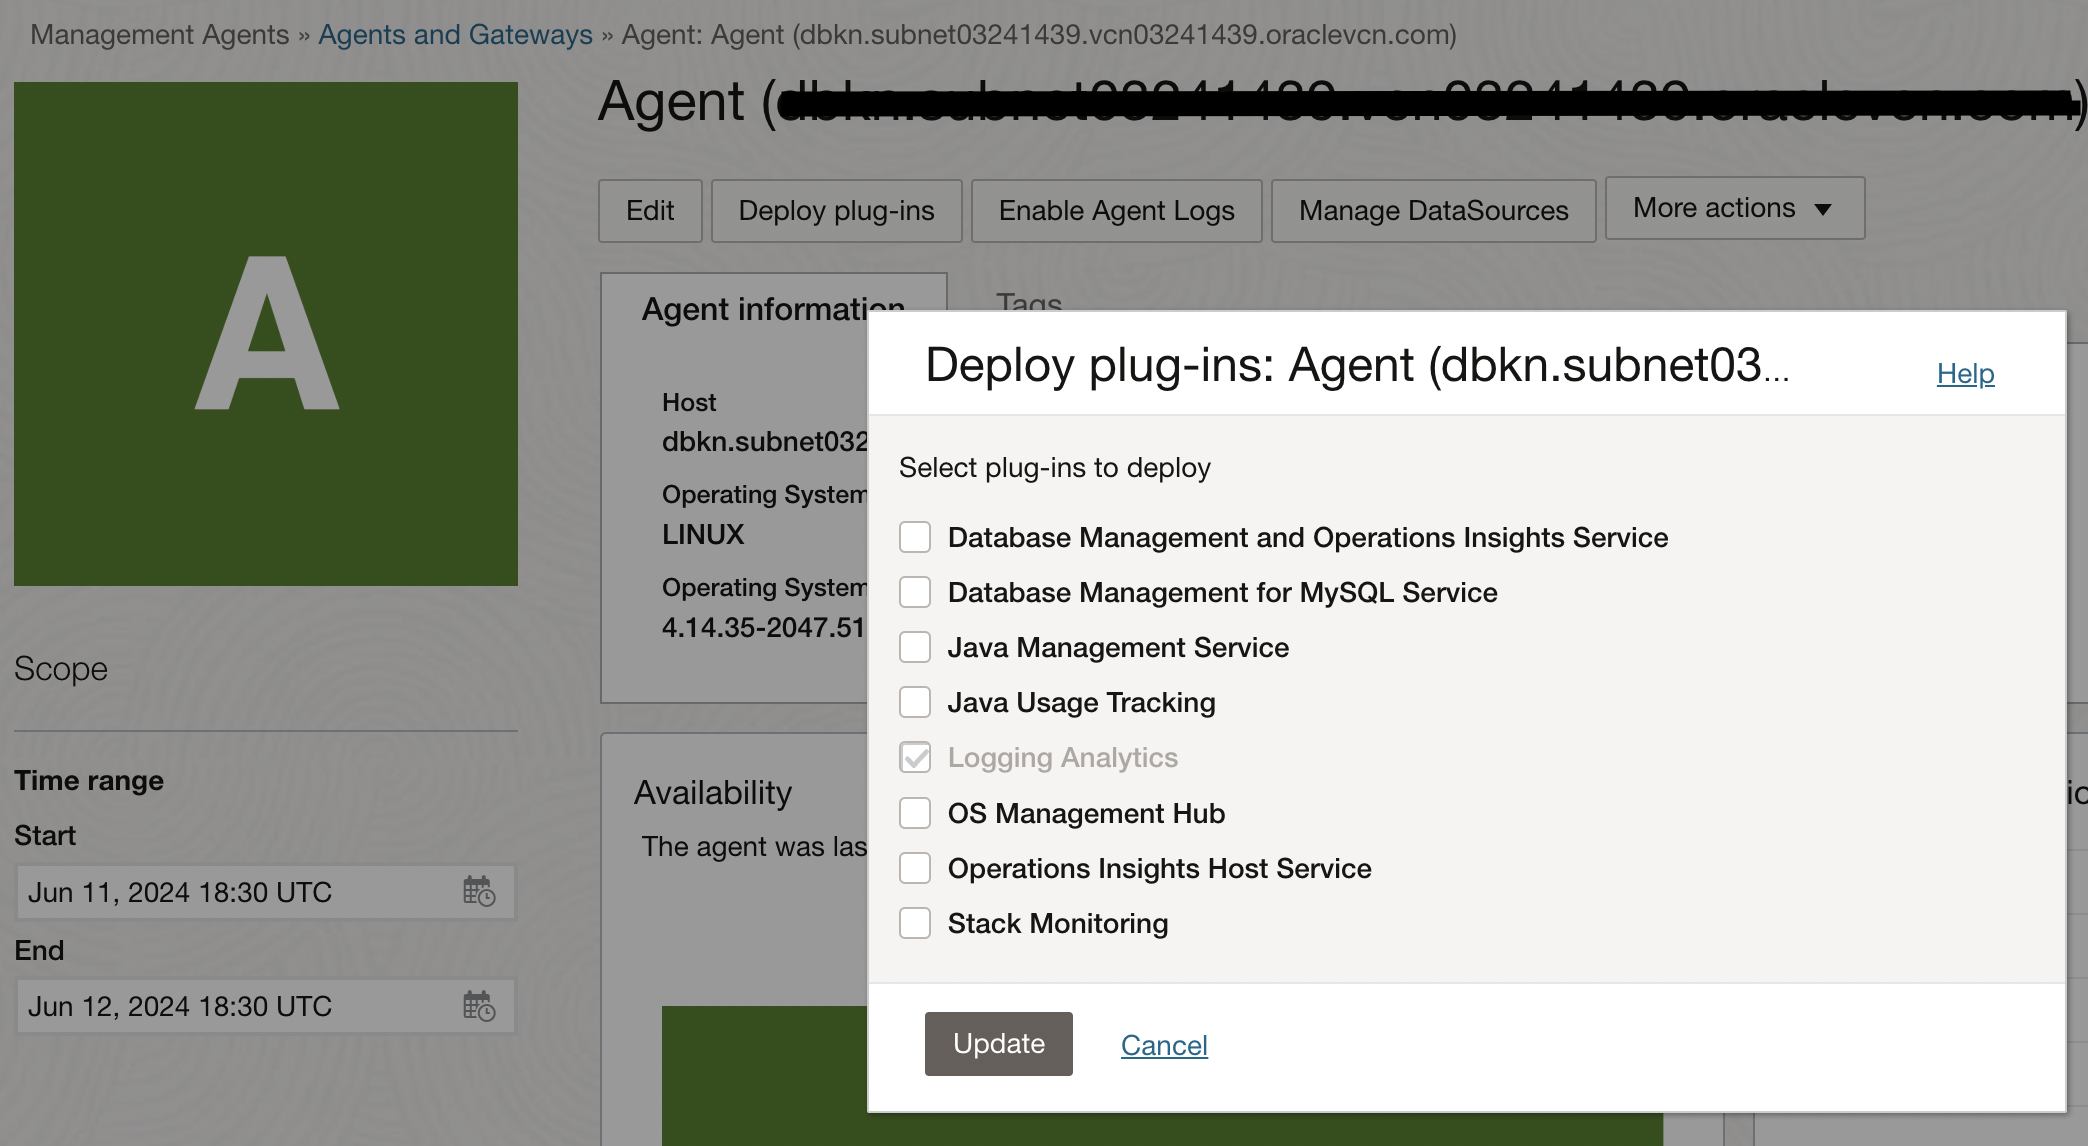
Plugins can also be enabled via the OCI console after the agent has been installed. To do that, navigate to Observability & Management -> Management Agent -> Agents and click on the name of the agent installed on the database host. Click on Deploy Plug-ins and select Logging Analytics.
To complete the installation of Management Agent software, login with a user with sudo privilege on the host and run the following command:
- sudo rpm -ivh <rpm_file_name.rpm>
This is the expected output:
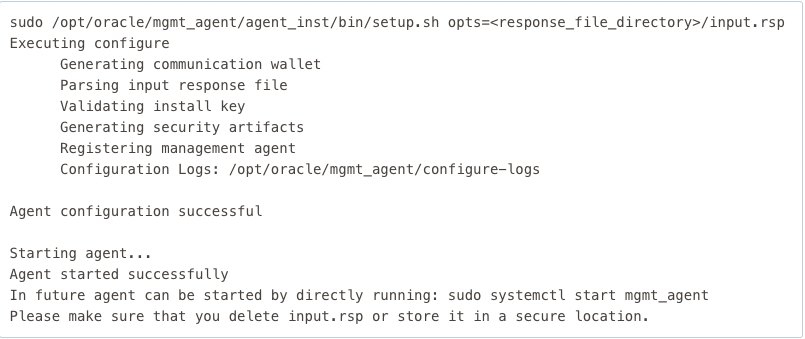
Note : A new user called mgmt_agent is created. This will be the management agent user. All agent files are copied and installed by mgmt_agent user. The agent install base directory is the directory where the agent is installed. The directory is created as part of the agent installation process under /opt/oracle/mgmt_agent directory.
Ensure READ Access of the Logs for Management Agent User
With the Management Agent installed, it is essential to configure agent user with the correct access rights to read logs without compromising security and compliance.In this section we will look at necessary steps to ensure management agent user has the necessary permissions and privileges.
- First you can check the current granted file permissions for the management agent user, mgmt_agent by running the following command as an opc user:
- sudo -u <agentuser> /bin/bash -c “cat <log file with complete path”>
If the management agent user cannot read the log files, then use one of the following methods (in the order of best practice) to make the log files readable to the management agent. Use Access Control Lists (ACLs) to enable the cloud agent user to read the log file path and log files. Ensure that the full path to the log files is readable through the ACL.
- Grant the management agent user READ access to the required log file:
- sudo setfacl -m u:<agentuser>:r <path to the log file/log file name>
- Grant the READ and EXECUTE permissions to each folder in the log file path:
//set read, execute permissions on folders other than parent folder
sudo setfacl -m u:<agentuser>:rx <path to the folder>
//set read, execute permissions with recursive options on parent folder
sudo setfacl -R m y:<agentuser>:rx <path to the folder>
//set read, execute permissions with default option to allow all future log files created under this folder to be readable
sudo setfacl -d -m u:<agentuser>:rx <path to the folder>
- For nfs mount, it may not be possible to give READ and EXECUTE permission to the agent user to read the log files or folders. In such cases, add the agent user to the log file group:
- usermod -a -G <group of log file> <agentuser>
- Grant Restart the management agent after running the above command.
Place the management agent and the product that generates the logs in the same user group, and make the files readable to the entire group. Restart the agent. Make the log files readable to all users. For example, chmod o+r <file>. You may have to give executable permission to the parent folders. For example, chmod o+rx <parent folder>.
Install Management Agent on Windows Database Host
In order to install management agent on a windows base database host, navigate to the directory where you have downloaded the management agent software and unzip it to any preferred location. To install and configure the management agent, login as an Administrator user, open a Command Prompt window and run the following command:
- installer.bat <full_path_of_response_file>
The output will look similar to the following:
-
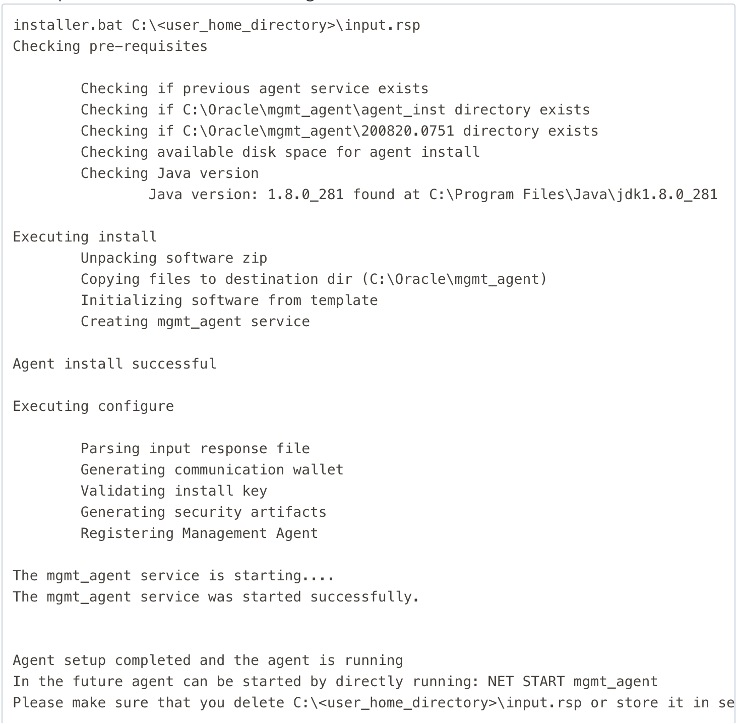
Figure 8: Management Agent Install Output on Windows Database
Install Management Agent on Exadata Database Service Dedicated Infrastructure or Exadata Database Service Cloud@Customer
Oracle Exadata Database Service delivers proven Oracle Database capabilities on purpose-built, optimized Oracle Exadata infrastructure in the public cloud and on Cloud@Customer. Built-in cloud automation, elastic resource scaling, security, and fast performance for all Oracle Database workloads helps you simplify management and reduce costs. It is a crucial component for enterprises seeking to optimize their database performance and efficiency.
Given the complexity of managing an Exadata system, observability and monitoring are essential to achieving operational readiness. Comprehensive observability enables administrators to gain deep insights into system performance, detect anomalies, and address potential issues before they escalate into significant problems. To achieve comprehensive observability and management of Exadata systems, we recommend utilizing OCI Observability and Management (O&M) services such as Management Agent Cloud Service, Database Management Service, Ops Insights, and Logging Analytics. These services enable the collection and ingestion of Exadata system metrics and log data across various environments, including OCI, Cloud@Customer, and on-premises deployments.
- Download the Management Agent in ZIP format and transfer ZIP file to all Exadata cluster nodes (Do not use the RPM installation for Exadata deployments including on-premises, Cloud@Customer, and Oracle Cloud Infrastructure)
- Due to the limited space on /opt, always create a symlink and install on /u02 (i.e. /u02/app/oracle/mgmt_agent)
- Create the Management Agent install directory on an external volume
- $ sudo mkdir -p /u02/app/oracle/mgmt_agent
- Create a symbolic link in the /opt/oracle directory to point to the external volume
- $ sudo ln -s /u02/app/oracle/mgmt_agent /opt/oracle/mgmt_agent
- Unzip the Management Agent software Linux ZIP file to the install_dir
- $ sudo mkdir -p /u02/app/oracle/mgmt_agent/install_dir
- $ unzip /home/opc/<mgmt_agent_zip_file> -d /u02/app/oracle/mgmt_agent/install_dir
- Switch to a root shell, set the environment variable OPT_ORACLE_SYMLINK = true, and install the Management Agent software as root user.
- Set JAVA_HOME if it’s not set properly
- $ sudo /bin/bash
- $ export OPT_ORACLE_SYMLINK=true
- $ ./installer.sh <full_path_of_response_file>
- Validate you have installed the agent with the certified ZIP method and correct install location
- Use systemctl status to view agent status and binary location
- # systemctl status mgmt_agent
- cat agent configuration and look for ZIP
- # cat /opt/oracle/mgmt_agent/agent_inst/config/security/resource/agent.package | grep packageType=ZIP
- Use rpm -qa to ensure the rpm version was not installed
- Use systemctl status to view agent status and binary location
- Enable Service Plug-ins available for Exadata Database Service
- Database Management and Ops Insights Service
- Logging Analytics
- Configure the Management Agent in accordance with appropriate resource requirements in the table below for the size of your environment
- Edit the properties file opt/oracle/mgmt_agent/agent_inst/config/emd.properties and add the required parameters into the additional properties section
| Sample Environment | Disk | CPU | Additional Configuration Parameters | Large log directories with > 10k files | |
|---|---|---|---|---|---|
| Idle (no plugins) |
1 GB |
64MB |
< 1% |
|
#for large log volume on any size environment loganalytics.enable_large_dir=true |
| Small (1-2 CDB with 1 PDB each) |
1 GB |
256 MB |
< 4% |
|
|
| Medium (12 CDBs, 40 PDBs) |
2 GB |
1 GB |
< 1% |
#Sender properties senderManagerMaxDiskUsedTotal=1000 # Connection pooling properties clientConnectionPool.SERVICE_INVOKING.defaultMaxConnectionsPerRoute=50 |
|
| Large (22+ CDBs, 145+ PDBs) |
3 GB |
2 GB |
< 1.5% |
#Sender properties senderManagerMaxDiskUsedTotal=2000 # Connection pooling properties clientConnectionPool.SERVICE_INVOKING.defaultMaxConnectionsPerRoute=50 |
For more details and important considerations when installing Management Agent on Exadata Cloud, see OCI : Observability & Management Support For Exadata Cloud Doc ID 3015115.1 on My Oracle Support.
Ingest Database Logs
In this section, we will look at the process of ingesting database logs as collected by the management agent into OCI Logging Analytics where we can analyze and visualize log data to gain deeper insights. For a Linux Database, we will look at the process of ingesting both file and table based logs and then move on to the Windows database to ingest the table based logs into Logging Analytics.
For Linux Based Oracle Database: Ingesting File Based Logs
Create Database Entity in Logging Analytics:
In logging analytics, entities play a crucial role as the represt the sources of log data such as hosts, applications and services. Entities provide a way to categorize and correlate log events. By defining entities, we can create a logical model of our infrastructure, making it easier to identify trends, patters and anomalies in our log data.
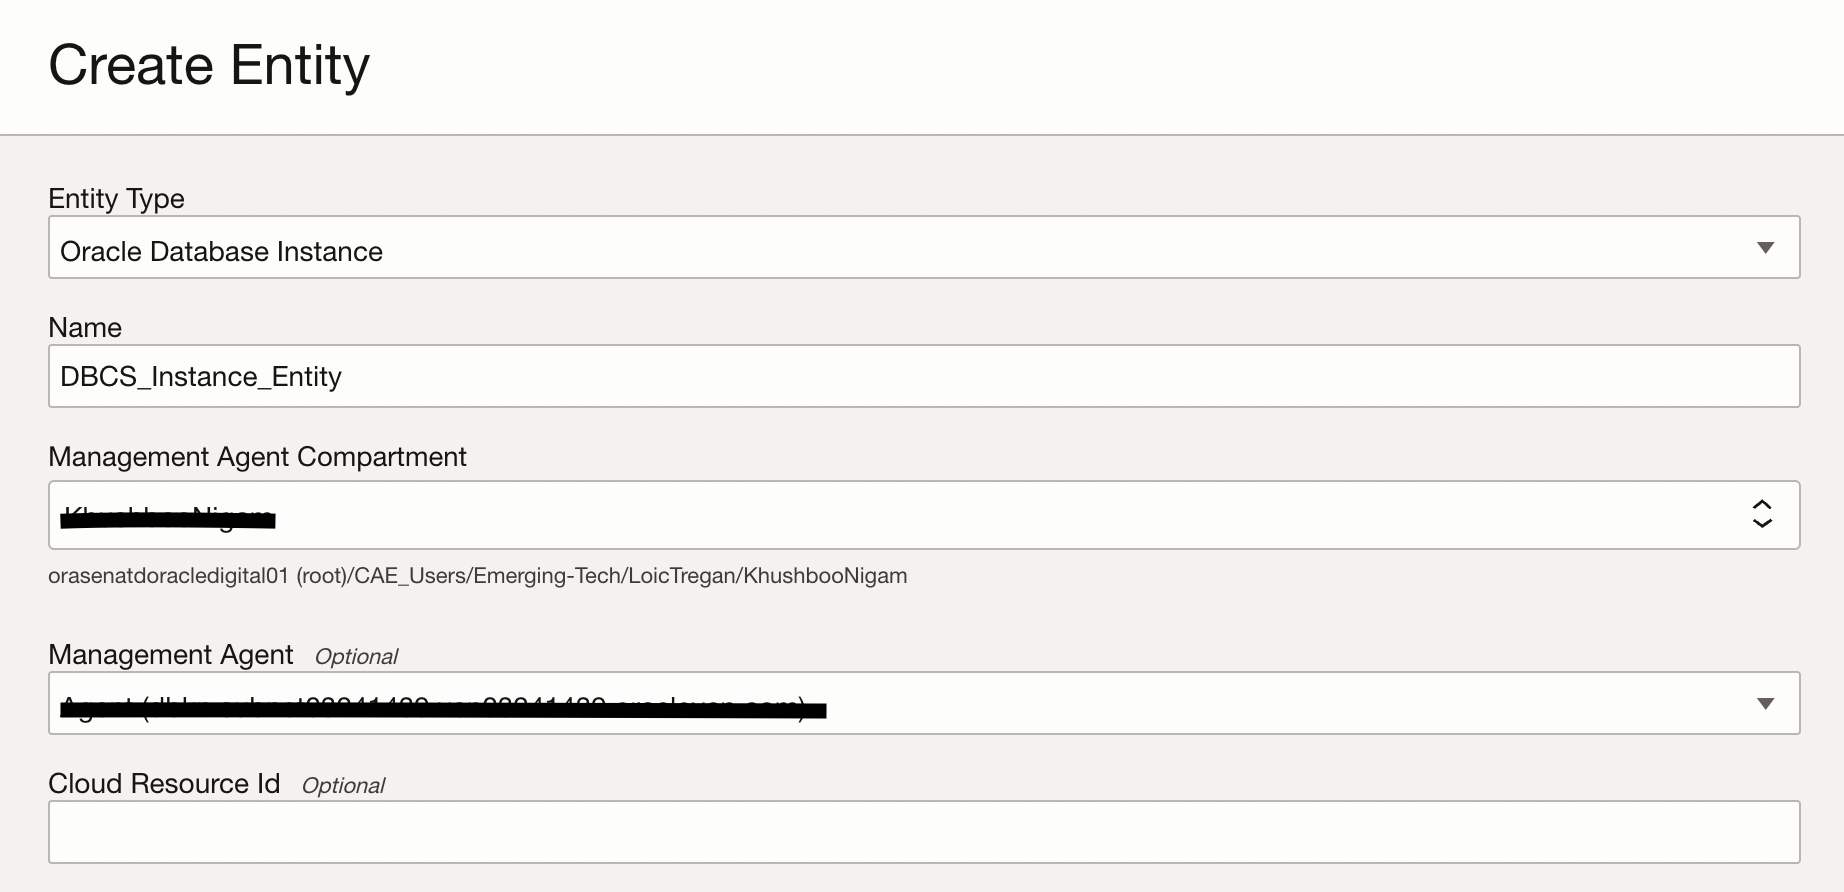
In order to create an Entity for your Linux database, navigate to Observability & Management. Under Logging Analytics, click Administration. Click Entities and Click Create Entity. Enter Entity Type as Oracle Database Instance. Enter desired name. Select Compartment where Management Agent resides and choose the corresponding management agent associated with the database.
The next section while creating Database Entity is to provide details related to the destination of log files we intend to bring to Logging Analytics.

Note: To determine value such as adr_home, oracle_home in the above step, login to the database and use the following command:
SQL> set line 200 pages 2000
SQL> select * from v$diag_info;
To determine values such as audit_file_dest run the following command after logging in to the database:
SQL>show parameter audit
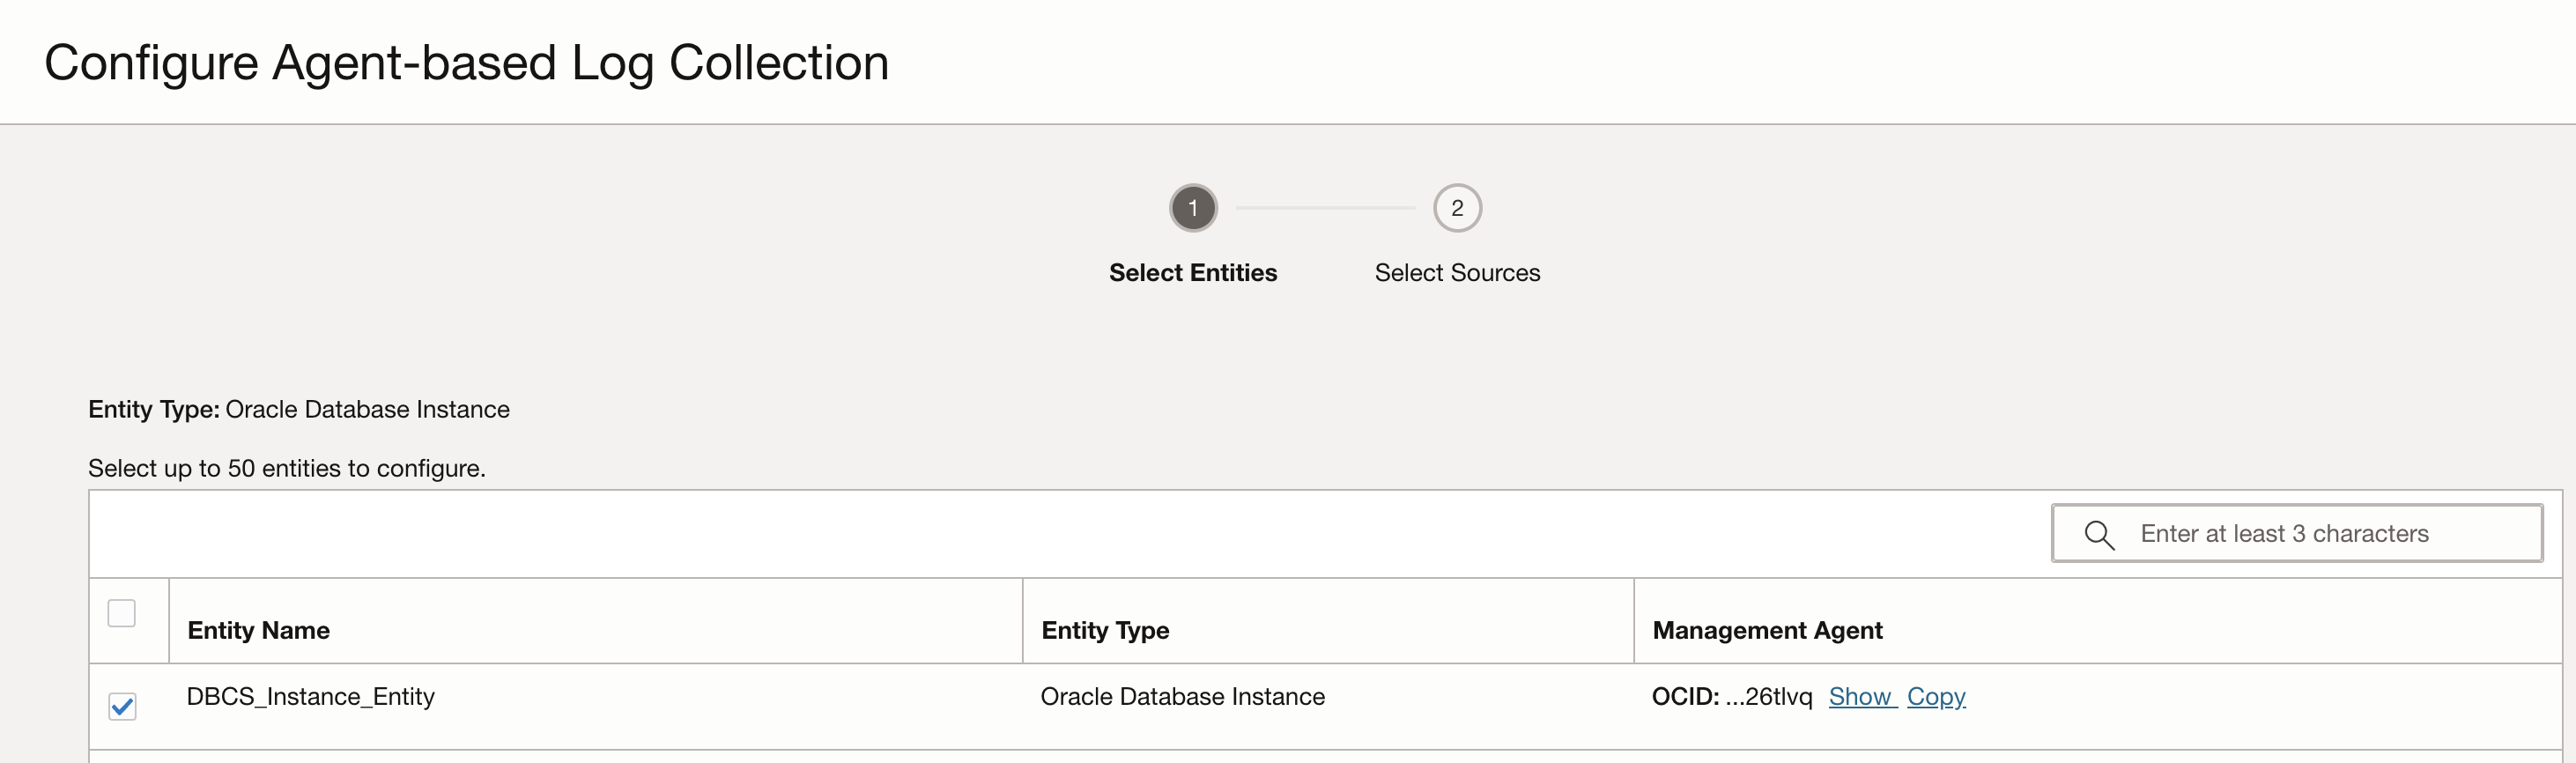
Entity-Source Association:
In logging analytics, entity-source association is a critical step in unlocking the full potential of log data. By linking log sources to specific entities we can establish a clear connection between the log data and the systems or components that generated it. While on the Entity page, Click on the Associated Sources, Add Association and select the Entity Name. In the next page, select the Log Source to associate with the Entity. In this case, for file-based logs, Database Audit Logs of type File is the Log Source.
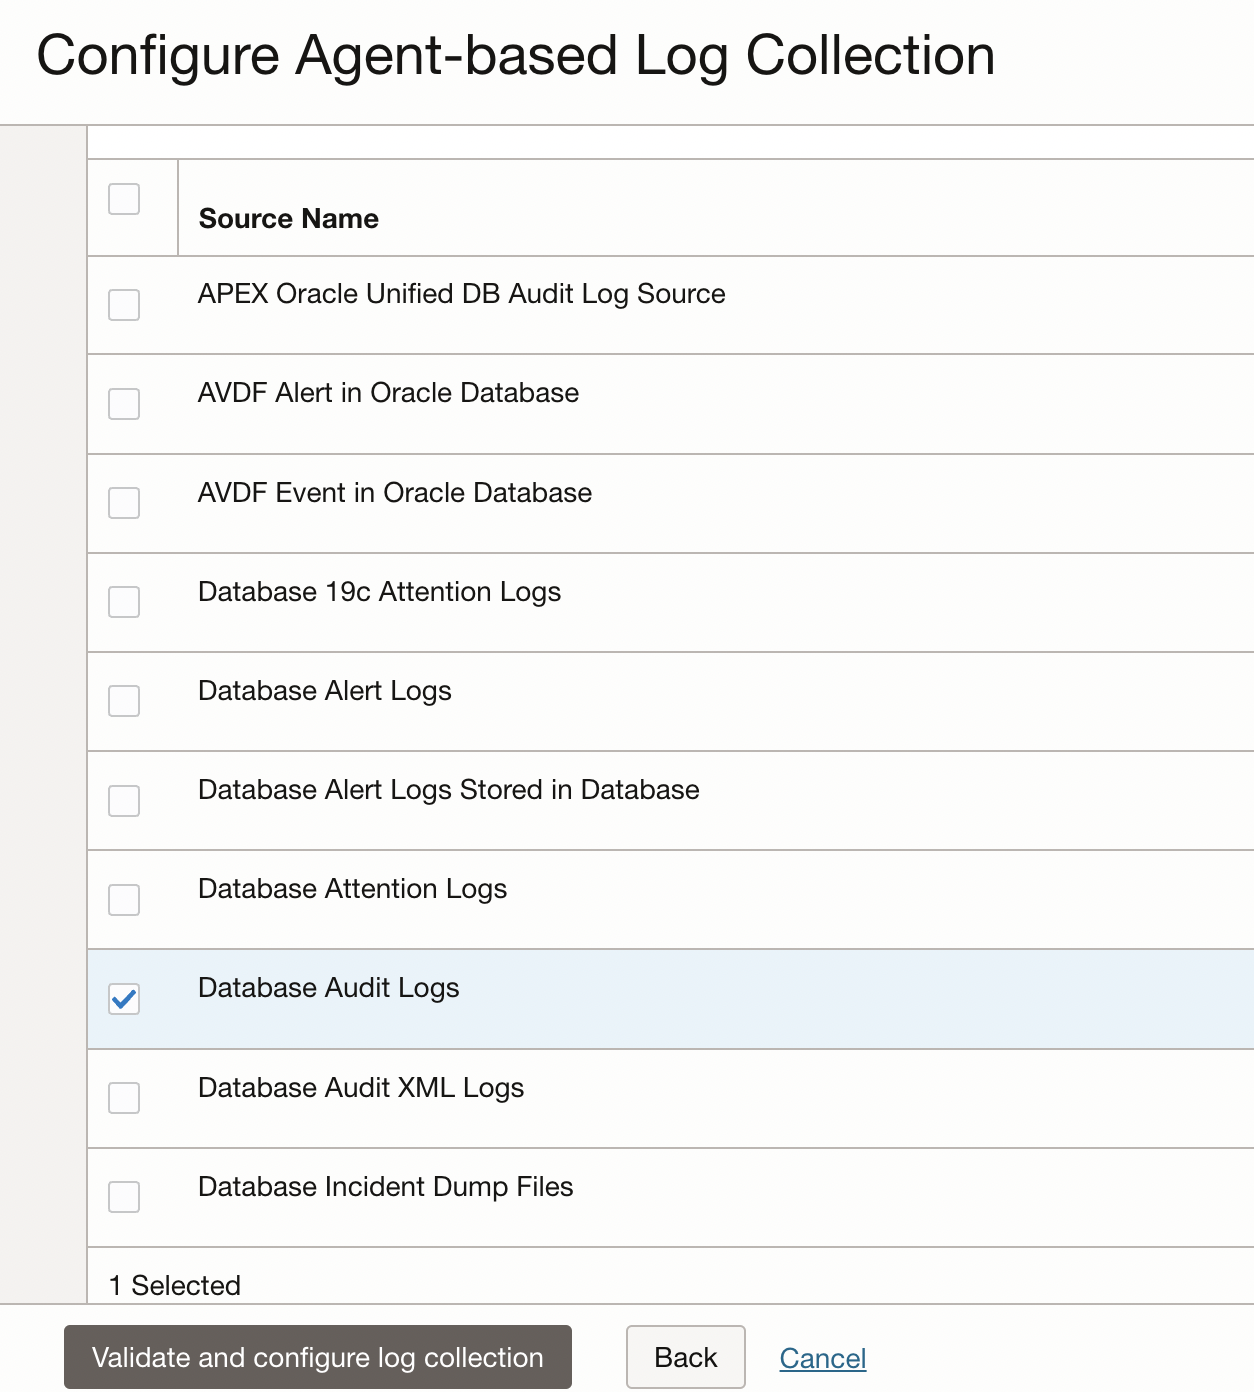
Click on Validate and configure log collection. Click on View in Log Explorer to navigate to the log explorer and take a look at the logs.
Enable reading large files
Additional configuration might be required for Management Agent to read and upload large files to Logging Analytics. To enable that, follow the steps below:
- 1. ssh into the database host and switch to root user by using the following command.
sudo -su root - 2. Switch to the config directory to locate the emd.properties file.
cd /opt/oracle/mgmt_agent/agent_inst/config/ - 3. Edit emd.properties to add the following statement to all large files upload.
loganalytics.enable_large_dir=true - 4. Stop and start the management agent by running the following commands.
systemctl stop mgmt_agent
systemctl start mgmt_agent -
For Linux Based Oracle Database: Ingesting Table Based Logs
-
Create Database Entity in Logging Analytics:
-
Creating an entity while ingesting table based logs is a similar process as an entity creation for ingesting file based logs. It differs in terms of property values. This database entity requires providing details such as oracle_home, port, service_name and sid.
-
Figure 13: Entity Creation for Linux Database Instance
-
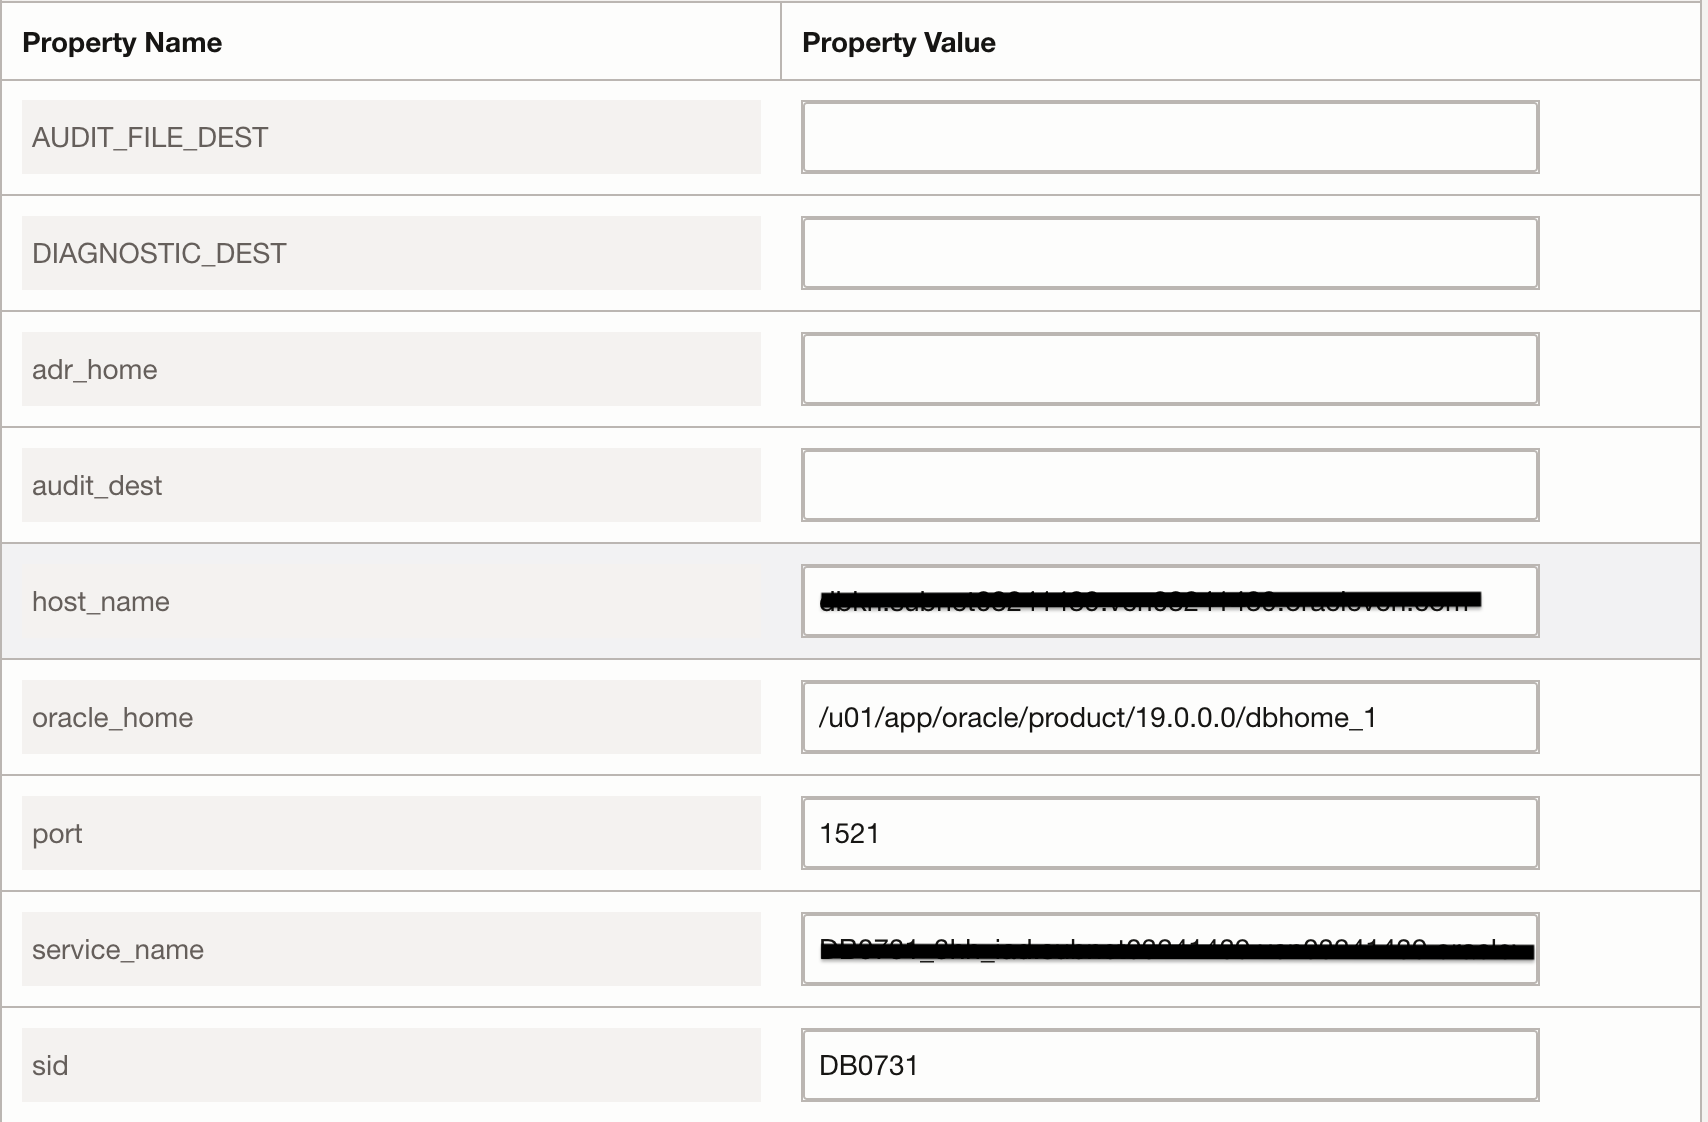
Figure 14: Property Value for Table based Logs Ingestion Note: To determine value such as adr_home, oracle_home in the above step, login to the database and use the following command:
-
SQL> set line 200 pages 2000
-
SQL> select * from v$diag_info;
-
SQL> select * from v$diag_info;
-
Entity-Source Association:
In this case, for table-based logs, Oracle Unified DB Audit Log Source Stored in Database 12.2 of type Database is the Log Source.
-
Figure 15: Entity Selection while associating with Source -

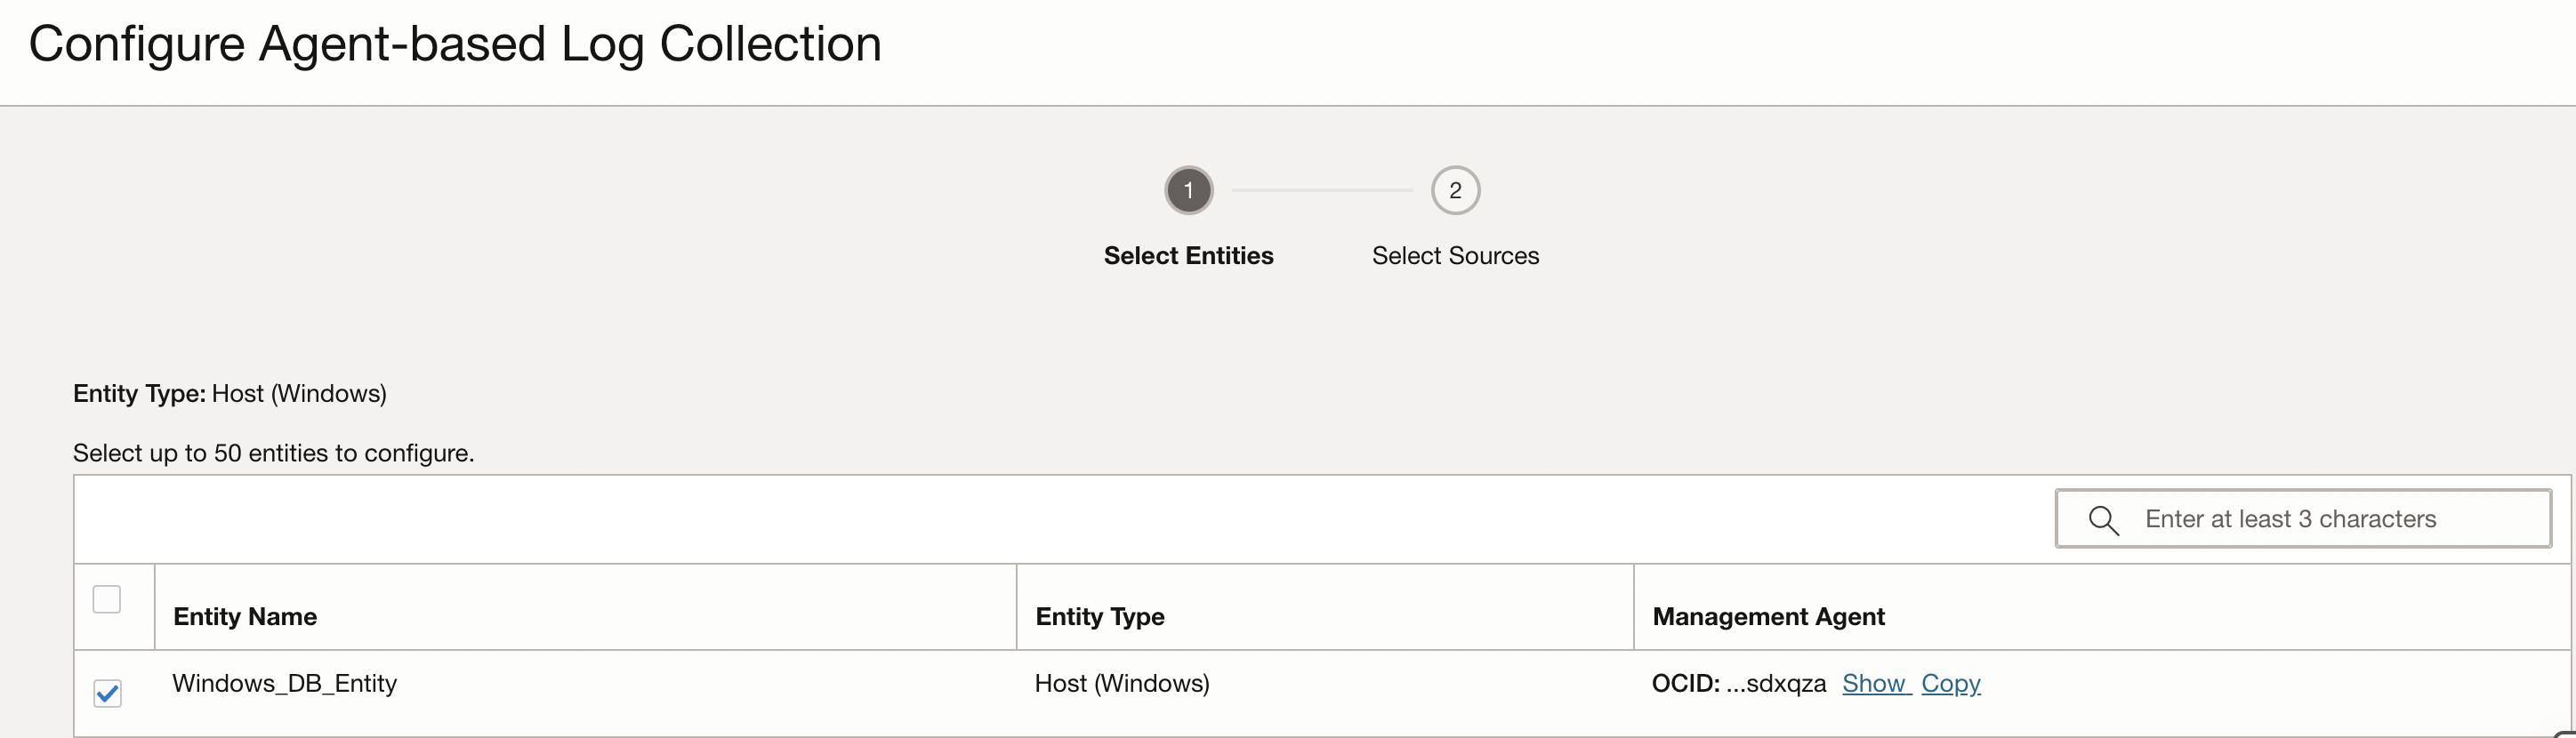
For Windows Based Oracle Database
Create Database Entity in Logging Analytics:
In order to create an Entity for your Windows database, navigate to Observability & Management. Under Logging Analytics, click Administration. Click Entities and Click Create Entity. Enter Entity Type as Host(Windows). Enter desired name. Select Compartment where Management Agent resides and choose the corresponding management agent associated with the database. The only property value required by this entity is the Event ID which is set to 34 specifying audit trail events for database.
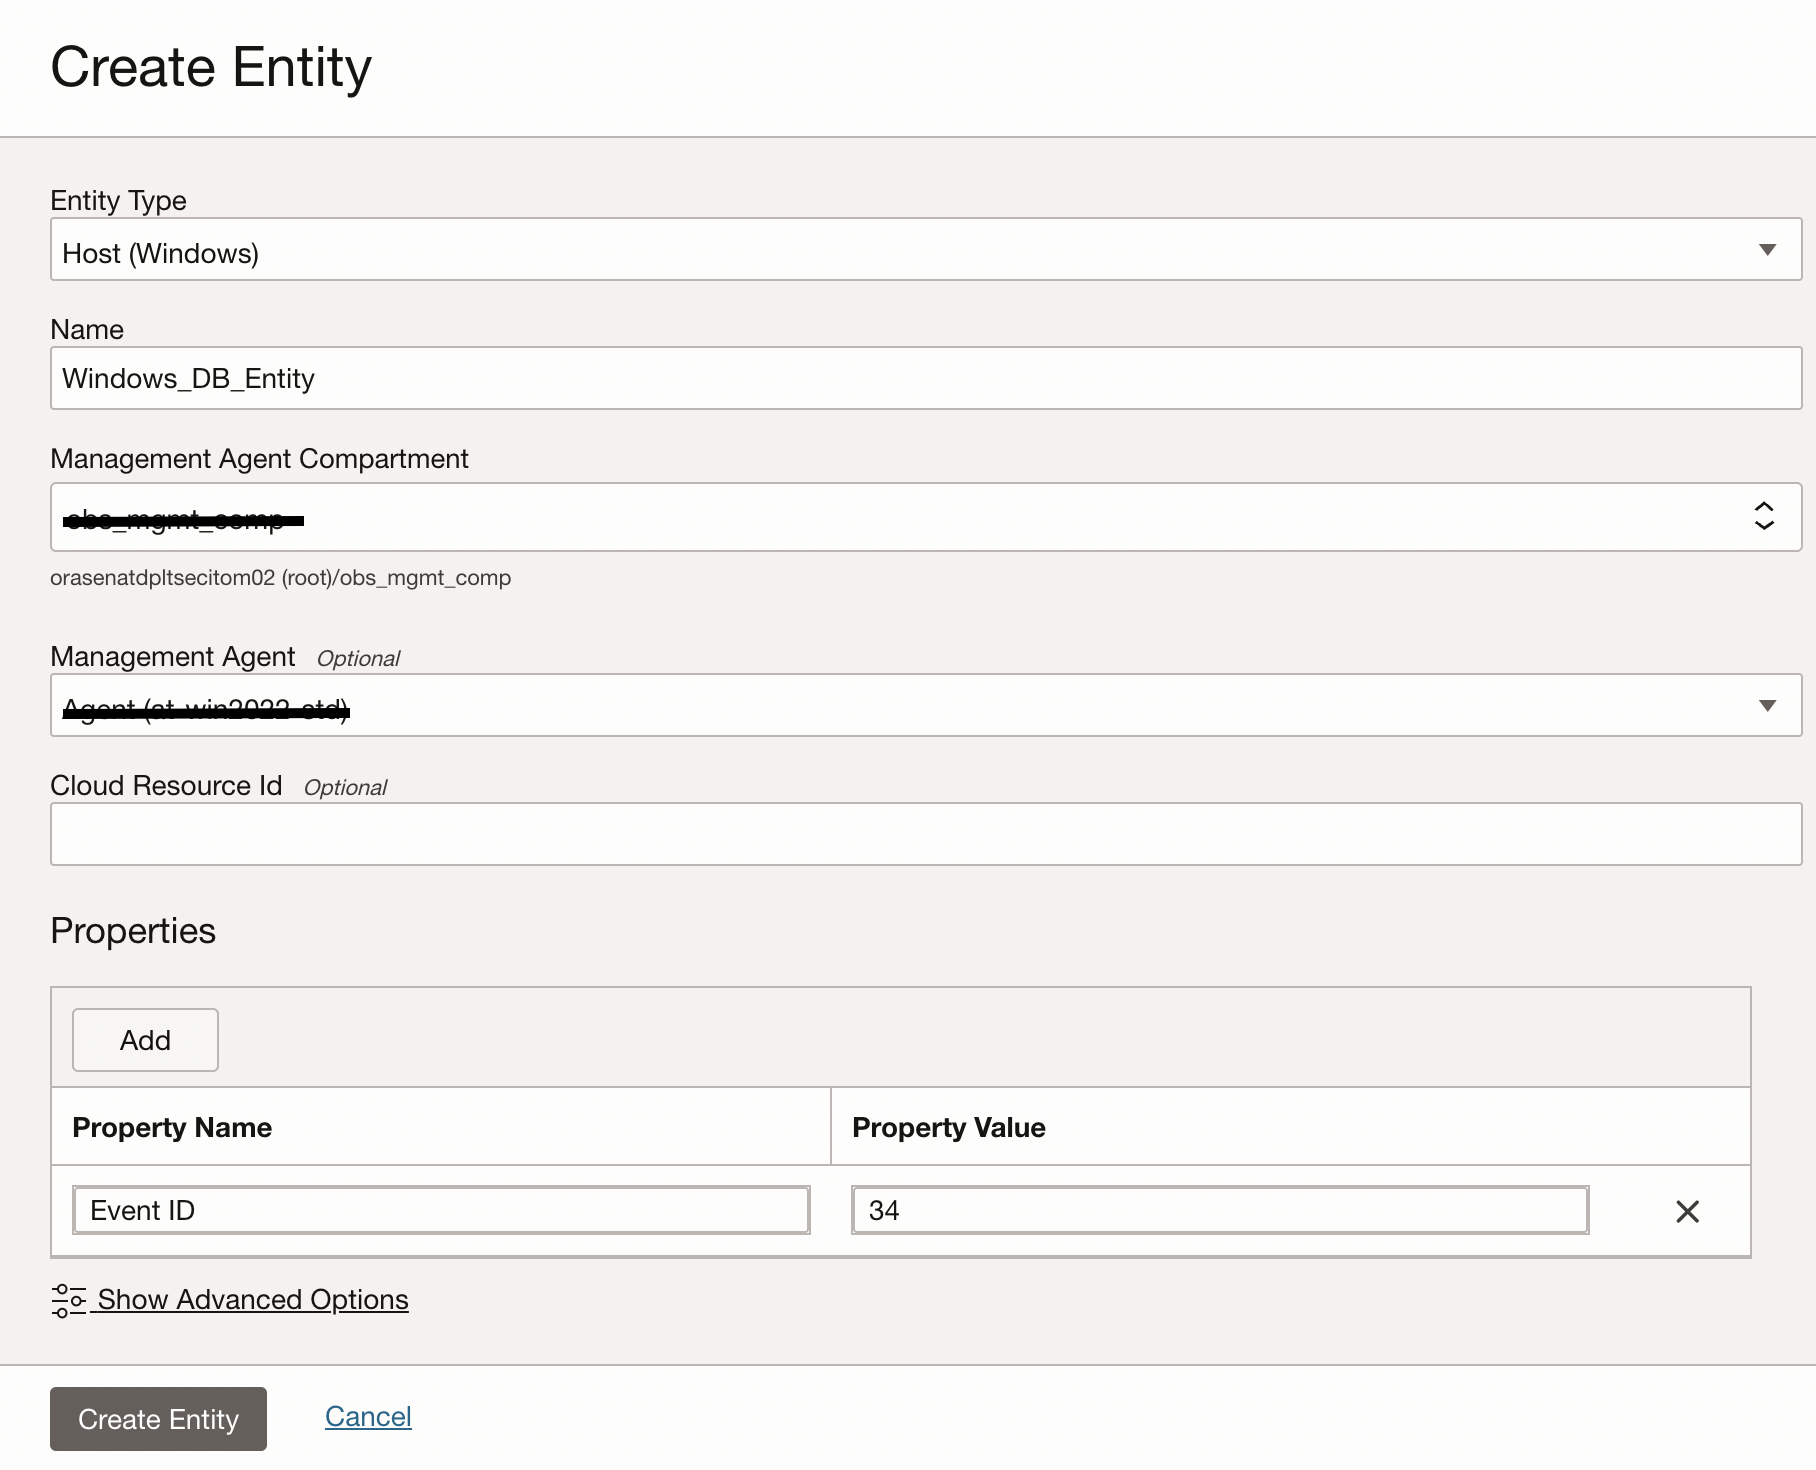
Note: Oracle Database for Windows problems and other significant occurences are recorded as events in an application log. Event number 34 specifies an audit trail event. These events are recorded if the parameter AUDIT_TRAIL is set to db(true) or os in the initialization parameter file.
Entity-Source Association:
In this case, for a windows database instance, Windows Application Events is the Log Source.
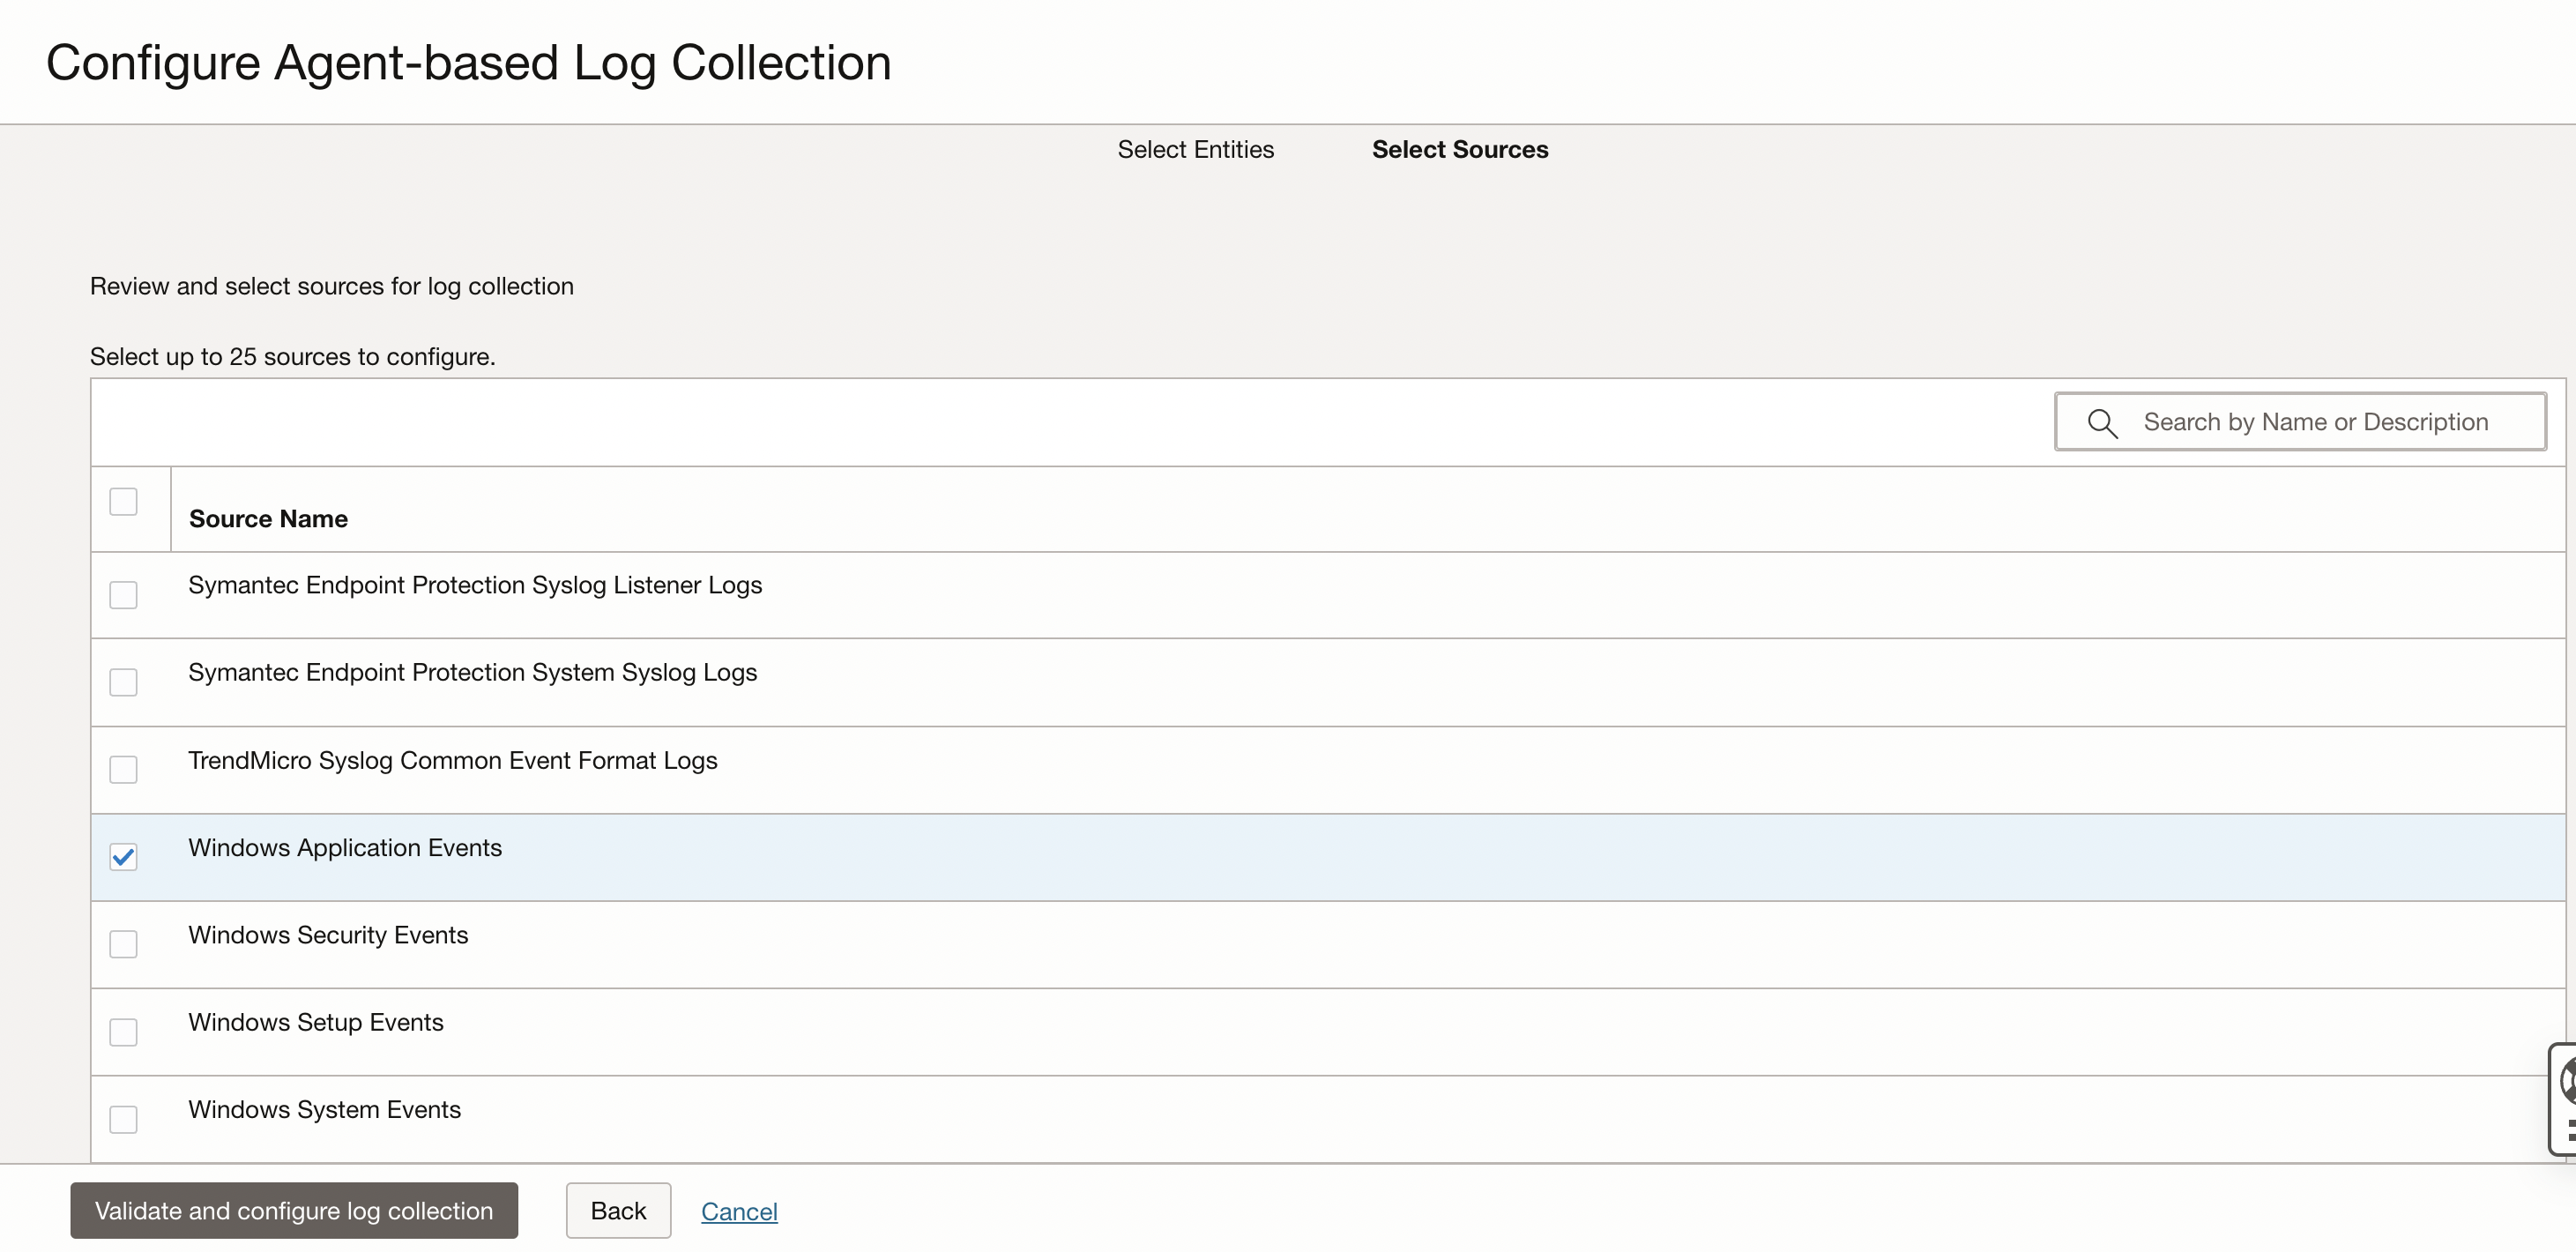
Click on Validate and configure log collection. Click on View in Log Explorer to navigate to the log explorer and take a look at the logs.
Unlocking Hidden Insights from Ingested Database Logs
By collecting and analyzing database logs, organizations can gain a deeper understanding of their database activity, identify potential security threats, optimize performance, and make data-driven decisions. But, with the sheer volume and complexity of log data, it can be overwhelming to extract meaningful insights.
That’s where the Database Audit Analysis dashboard in Logging Analytics comes in.
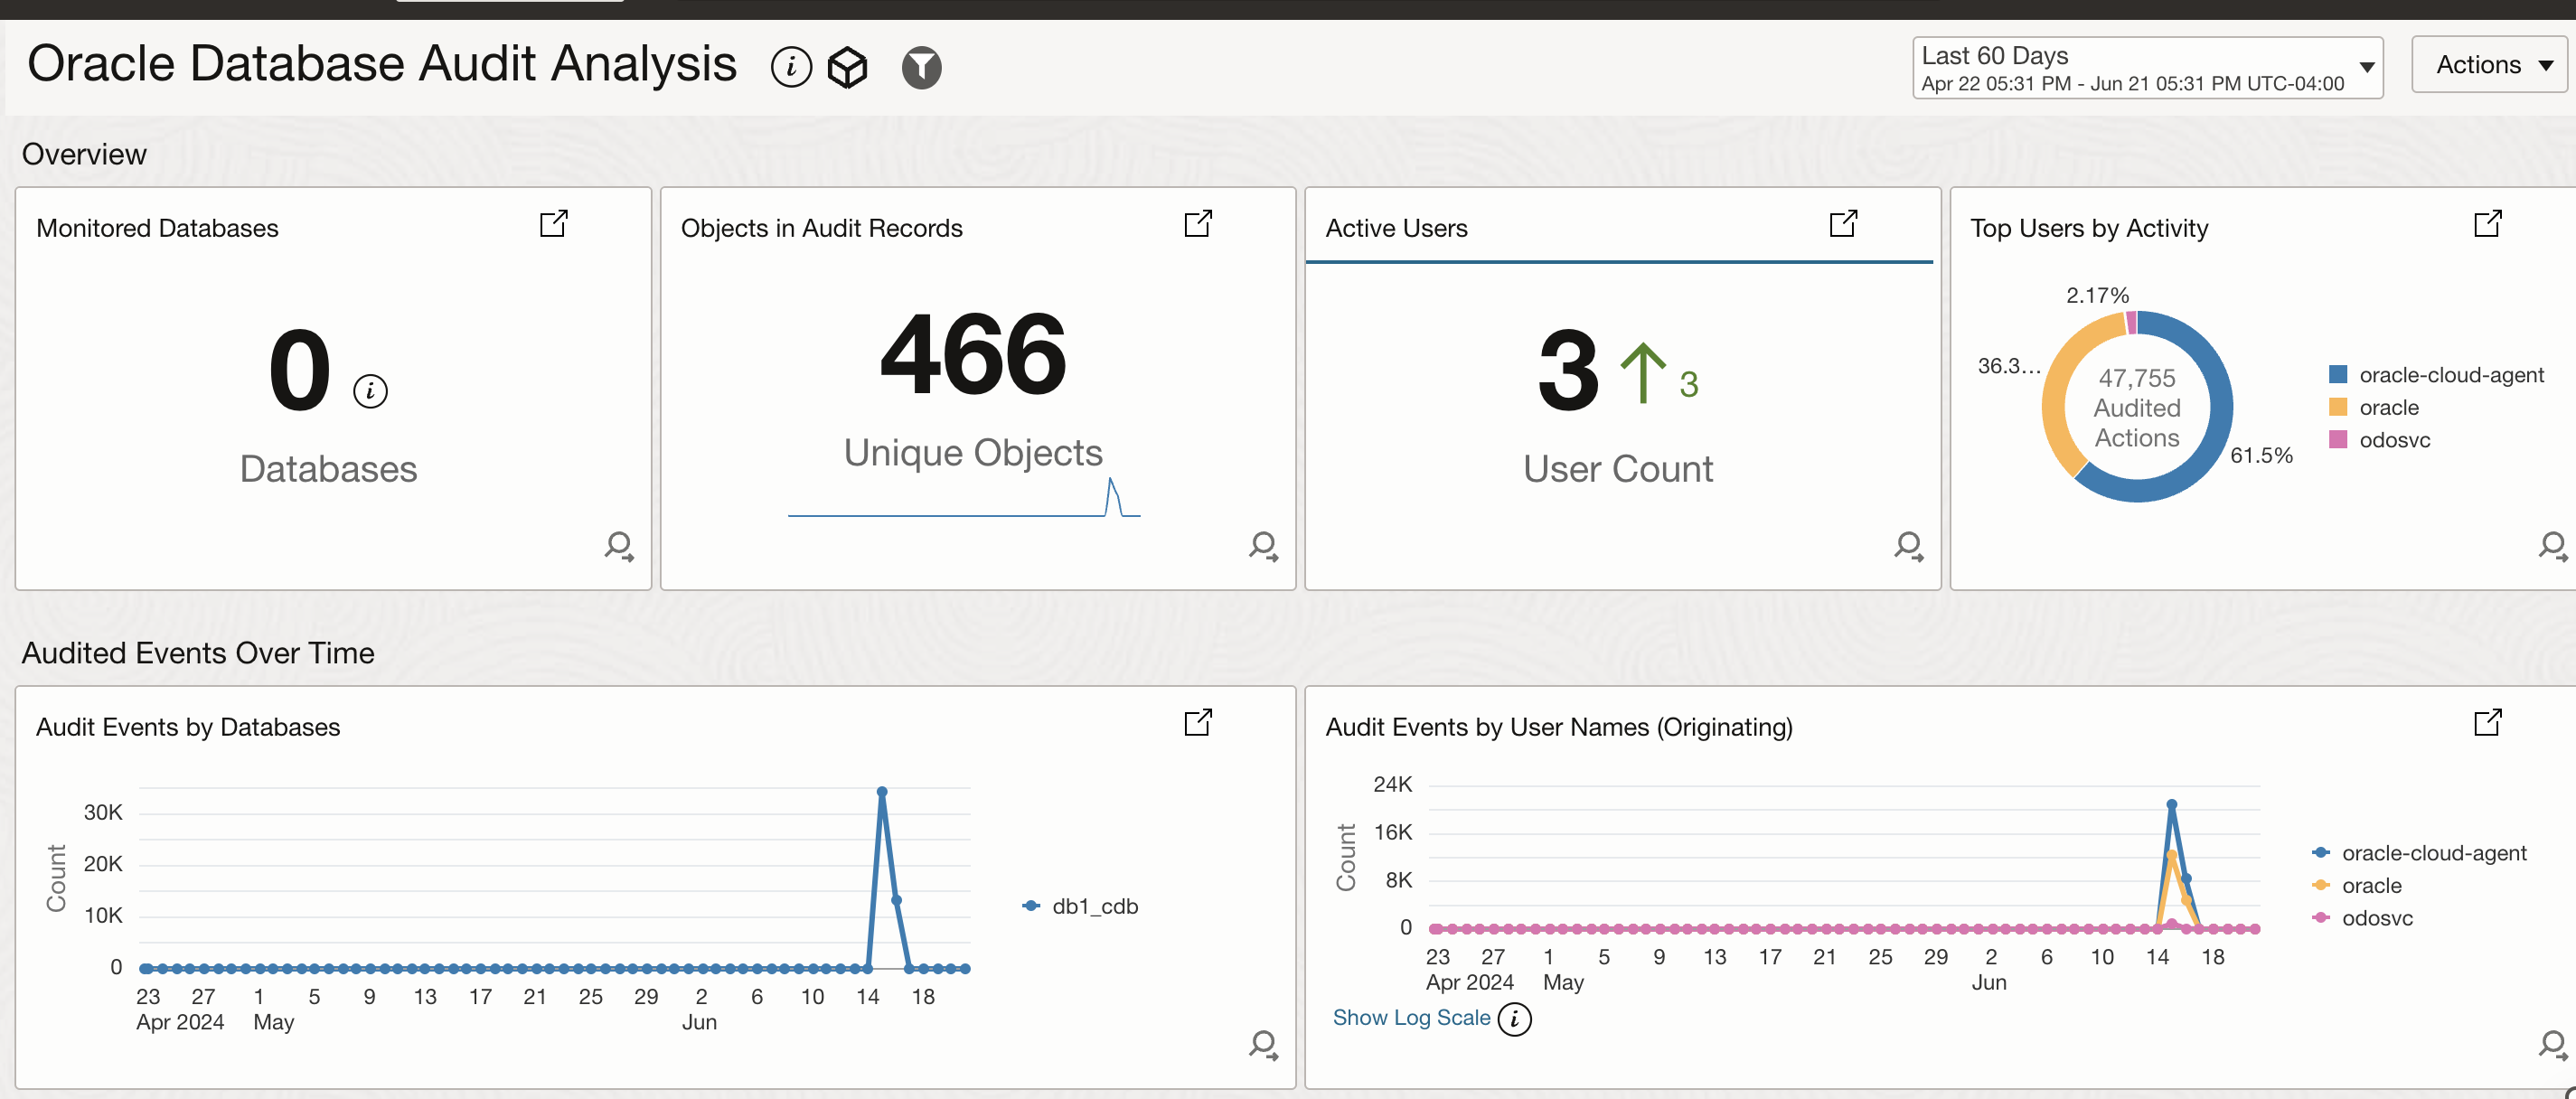
Database Audit at a Glance
In the first image below, you can see that the database audit dashboard showcases the following:
- Monitored Databases: Get a bird’s-eye view of your database landscape, with a clear count of monitored databases and their respective status.
- Audited Object Trends: Dive into the heart of your database activity, with a detailed count and trend analysis of Oracle Database Audited Objects found in your database audit logs. This includes insights into which objects are being accessed, modified, or queried, helping you identify potential security risks and performance bottlenecks.
- Most Active Users: Identify the most active users across your databases, along with their access patterns and behavior. This critical information enables you to detect and respond to potential security threats, optimize user access, and improve overall database performance.
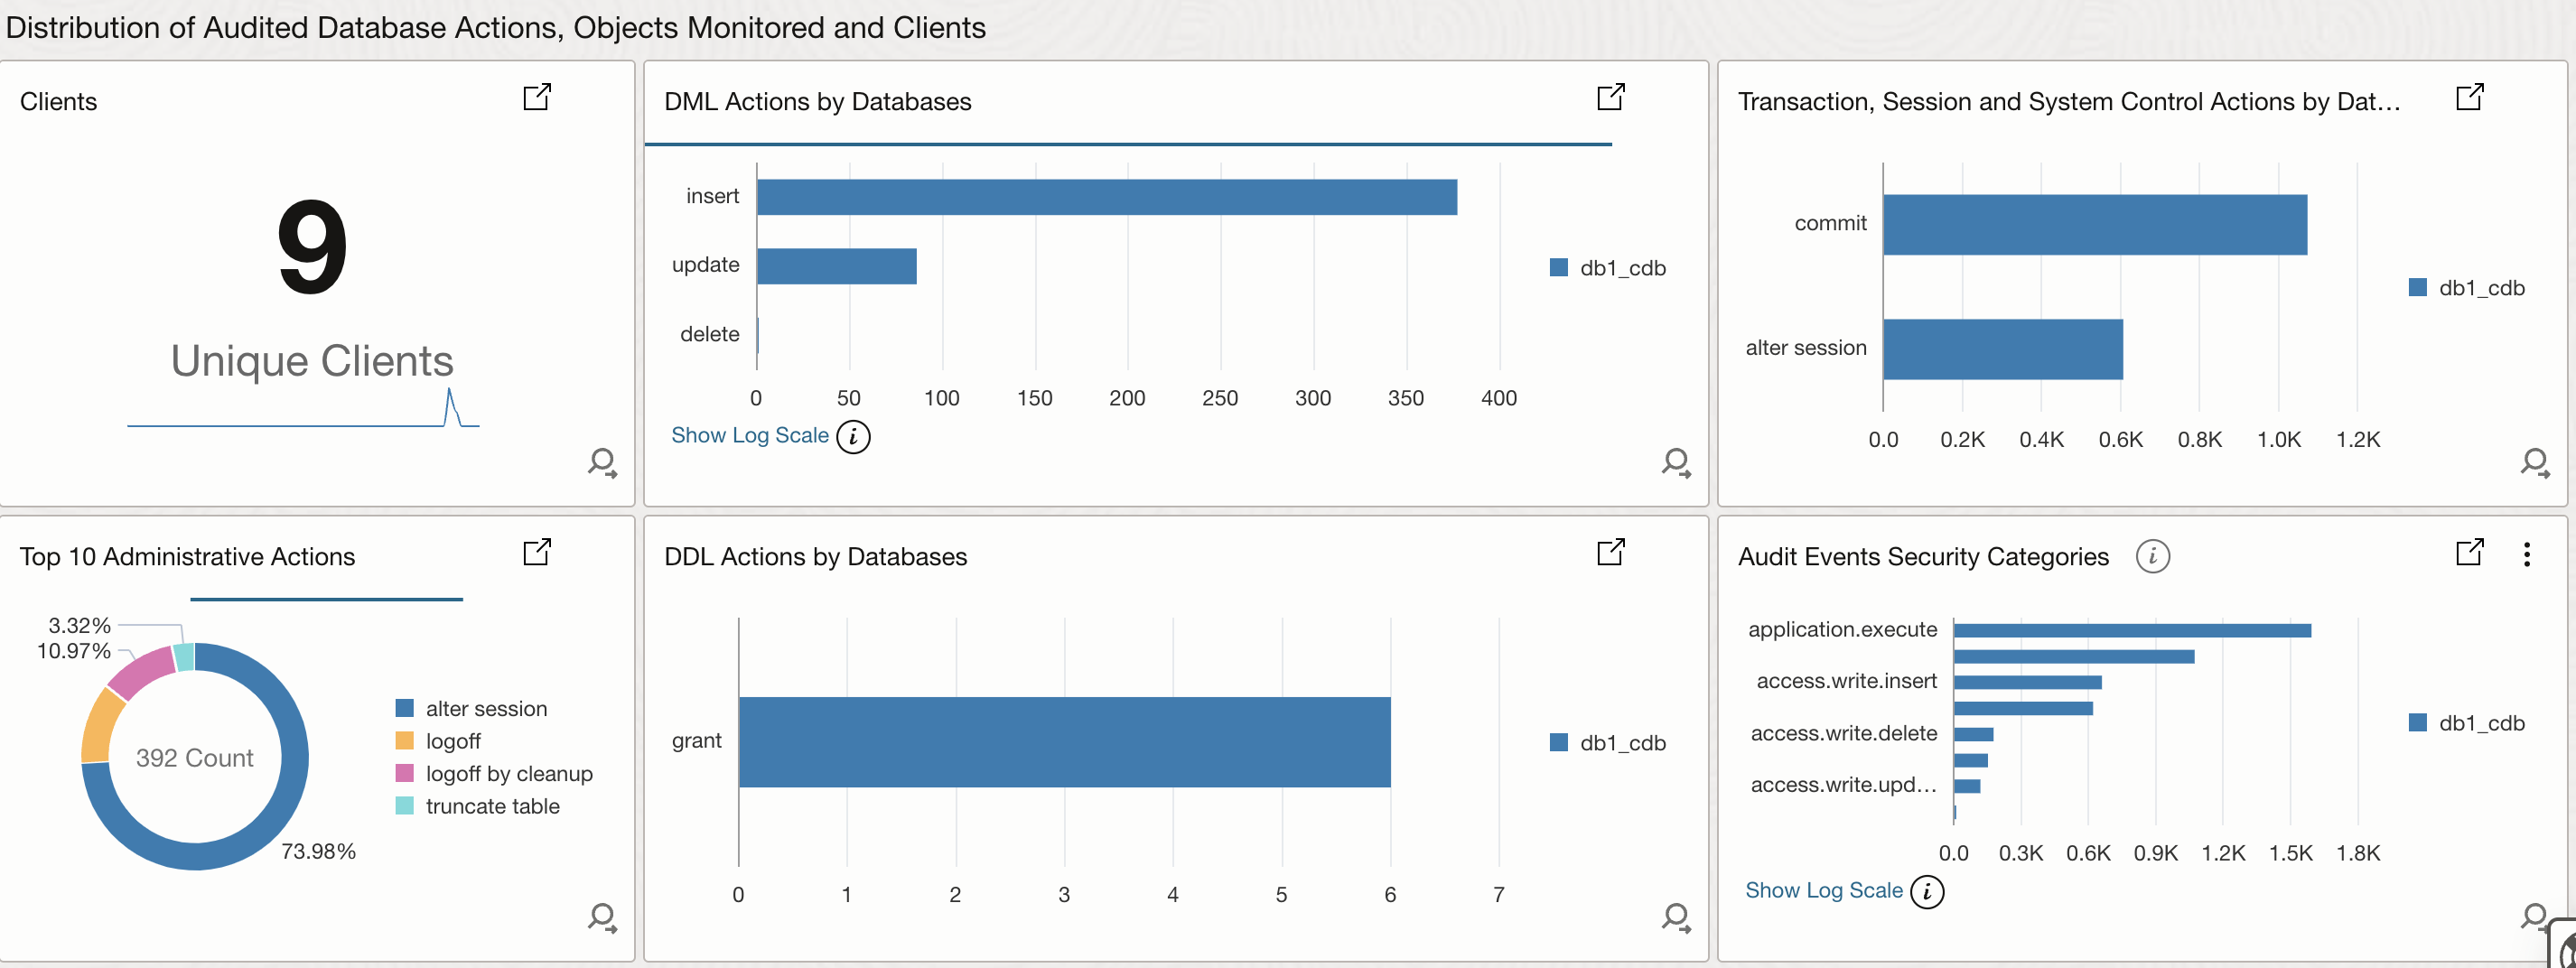
Uncovering Hiddern Patterns
In the second image, Database Audit dashboard help you uncover hidden patterns and trends in your Oracle database auditable events such as
- Identify Unique Clients: Discover the unique clients and applications interacting with your database, providing valuable insights into database usage and access patterns.
- DML Action Analysis: Drill down into the specifics of DML (Data Manipulation Language) actions, such as INSERT, UPDATE, and DELETE operations, to identify potential data breaches, unauthorized changes, or performance bottlenecks.
- Top 10 Administrative Actions: Get a clear view of the top 10 administrative actions performed on your database, including GRANT, REVOKE, and ALTER operations, helping you identify potential security risks and areas for improvement.
- DDL Actions by Database: Get a detailed view of DDL (Data Definition Language) actions performed on your databases, including CREATE, ALTER, and DROP operations. This enables you to track changes to database schema, identify potential security risks, and optimize database performance.
- Audit Events by Security Category: Visualize audit events grouped by security categories, such as Authentication, Authorization, and Data Access. This provides a clear understanding of potential security threats, enabling you to identify and respond to anomalies, unauthorized access, and data breaches.
Conclusion
In this blog series, we’ve covered various aspects of preparing your environment and setting up tools to monitor and audit your databases in Oracle Cloud Infrastructure (OCI). From pre-work and requirements gathering to downloading, installing, and configuring the Management Agent, followed by creating entities and log sources in OCI Logging Analytics, you’ve learned step-by-step how to set up the necessary components. By following these guides, you should now have the skills to successfully collect and analyze critical database logs, enabling you to monitor and audit your database with greater efficiency and accuracy.The ability to collect and analyze database logs is an essential aspect of database management and maintenance. With the proper setup and utilization of tools like the Management Agent and Logging Analytics in OCI, you can ensure that your database operations are well-monitored and audited, helping you identify and address potential issues, mitigate security risks, and ensure compliance with various regulations.
References
- Perform pre-requisites for deplying management agent
- Install Management Agents
- Allow Continuous Log Collection Using Management Agents
- Set Up Continuous Log Collection From Your Hosts
- Set Up Database Instance Monitoring
Acknowledgements
Amine Tarhini