Consulting Solutions Architect, Business Intelligence
Background
This article outlines the steps to configure Oracle Analytics Cloud (OAC) with Data Gateway to connect to Teradata.
At the time of writing, the supported data source for Teradata as outline here is Remote Data Connectivity. Remote Data Connectivity includes both Data Gateway and Remote Data Connector. This blog will only cover Data Gateway, as it is the preferred method to connect until Private access channel becomes available for Teradata.
The steps in the blog have been tested on:
* VMware Workstation 16.1.2 Player for Windows 64-bit Operating Systems (16.1.2 build-17966106)
* Oracle Analytics Cloud (OAC) 105.6.0 – Version 6.0
* Oracle Data Gateway 6.0
* SUSE Linux Enterprise Server 11 (x86_64) – SLES 11 Service Pack 3+
* Oracle Analytics Client Tools 6.0.0 [aka Oracle BI Administration Tool Version 12.2.6.0.0]
* Windows 10 Pro 64-bit (host for VM)
The blog is divided into five sections:
1) Install Teradata Express for VMware
2) Install Data Gateway on TDE 16.20 SLES 11 for VMware
3) Configure Data Gateway with Teradata
4) Configure Data Visualization (DV) Connection with Teradata
5) Configure Developer Client Tool for OAC with Teradata
Install Teradata Express for VMware
Download Teradata VM
If you don’t have access to a Teradata Production instance, download the Teradata Express trial from here.
Note: The Teradata Express trial is not to be used for Production purposes. The thought behind using the Teradata Express trial is so developers can do a quick test with Teradata and OAC and possibly debug issues without needing access to a Teradata Production environment.
In a Production environment it is not recommended to installed Data Gateway directly onto the Teradata Server. Install Data Gateway on another box, as close to the Teradata instance as practical for latency reasons.
In a Production Teradata environment Data Gateway would never be installed on the same server as Teradata. Traditionally, Teradata ships a proprietary appliance that the customer moves to their data center. No other software is generally installed on this appliance. For cloud deployments, Teradata manages the entire stack and does not allow clients OS access to the VM stack. In addition, there are typically multiple servers that make up a single instance, connected using a round-robin load balancer that’s included with Teradata.
As earlier stated, these VM instructions are directed at those wanting to do some quick testing with OAC + Teradata. That said, many of the Data Gateway and OAC steps will be very useful for those installing Teradata in a Production environment.
The blog was tested on TDE 16.20 SLES 11 for VMware, downloaded from here.
Download VMware Workstation 16.1.2 Player for Windows 64-bit Operating Systems from here.
Install VMware, extract the Teradata image, and open the image in VMware.
Configure Teradata VM
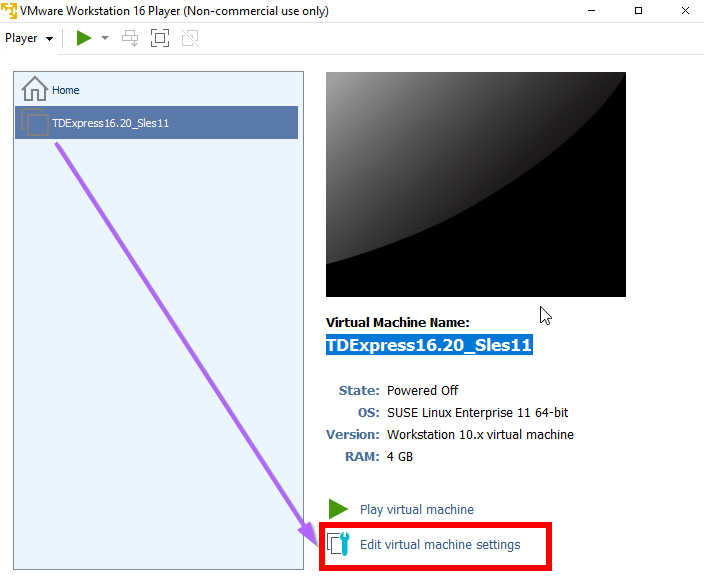
Once open, click on Edit virtual machine settings.
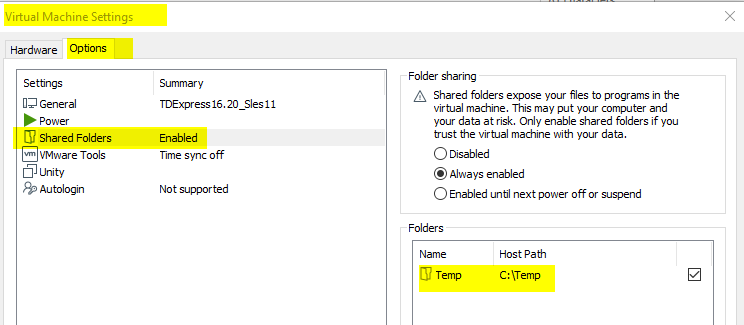
Setup a Shared Folder on the host.
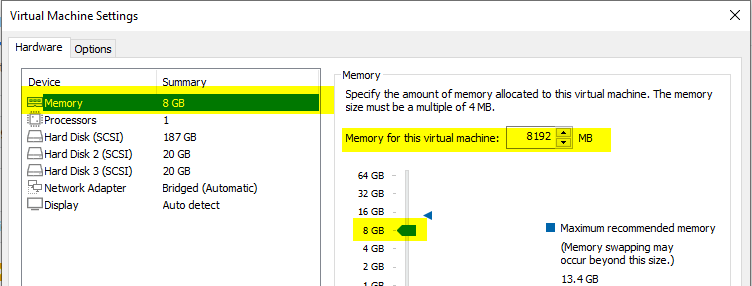
Increase the allocated memory to 8GB if Viewpoint is needed.
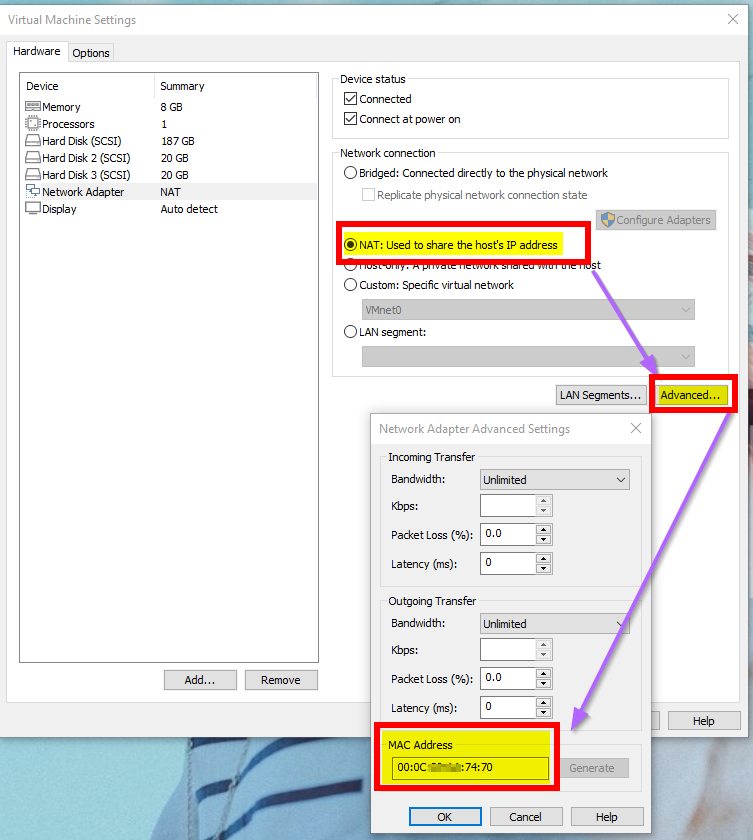
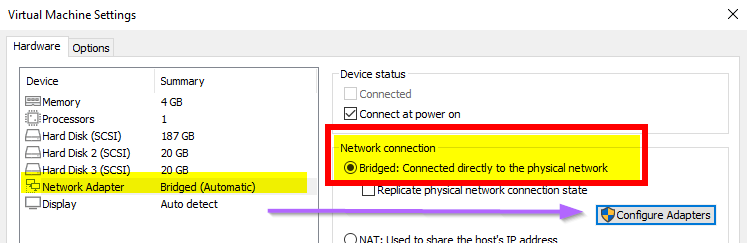
Note: This blog was tested with NAT. It is advisable to use NAT so that a Static IP can be easily set.
From the Hardware tab, select Network Adapter, check NAT, click Advanced, click Generate, and take a note of the MAC Address. The MAC Address will be used to define the Static IP.
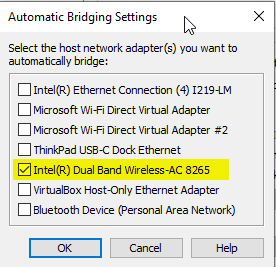
If for some reason NAT is not configurable and Bridged is the only option, be sure to uncheck unused adaptors.
Set VM Static IP
Open NotePad with Run as Administrator.
Open vmnetdhcp.conf found in either: C:\Documents and Settings\All Users\Application Data\VMware or C:\ProgramData\VMware. (It is a mirror and only needs to be updated in one spot.)
Look for the available IP range under “Virtual ethernet segment 8”.
i.e. range 192.168.153.128 192.168.153.254;
After “host VMnet8” and before the final “# End” specify the fixed IP. Copy the MAC address from the previous step. i.e.
Note: The underscore was removed from the hostname to avoid any complications associated with special characters in the name. The hostname isn’t important here. It uses the hardware ethernet description to tie to the MAC address of the VM.
Update C:\Windows\System32\drivers\etc\hosts
192.168.153.130 TDExpress1620_Sles11
Note: The underscore is present in the host name here. This doesn’t need to match the Static IP hostname exactly.
Restart VMware DHCP Service.
After logging back in to the VM, network restart was ran. Not sure if this is necessary – but was ran as a precaution.
/etc/init.d/network restart
Test VM Connectivity
Power/start the VM. Log in as root/root.
Confirm that the Static IP has been applied using: ifconfig
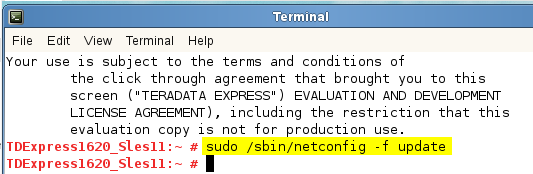
Confirm that internet access is available through Firefox.
If no internet is available, it may be resolved by running: sudo /sbin/netconfig -f update
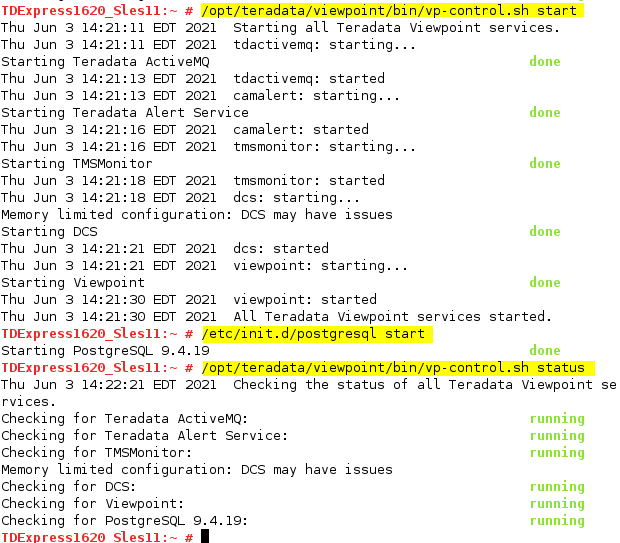
Start Teradata
Testing showed it to be more reliable to start the Teradata services manually.
If necessary, use ifconfig to get the IP to bring up the config user interface.
During testing, it seemed be easier to run from the host Chrome browser (using an IP address), rather than the VM Linux Firefox browser.
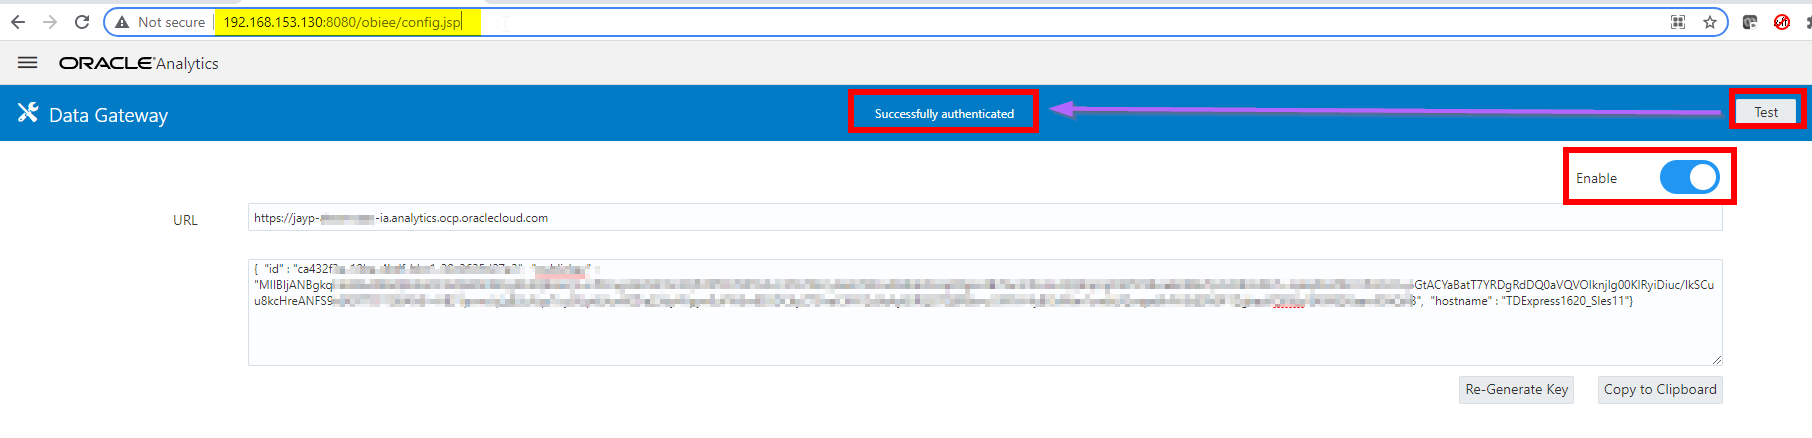
Data Gateway Config – Accessed from: http://192.168.153.130:8080/obiee/config.jsp
OAC Config – Accessed from: DV -> Console -> Remote Data Connectivity
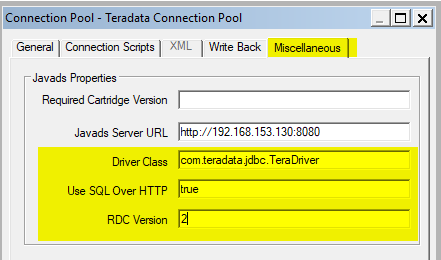
It is necessary to download the Teradata JDBC driver.
Follow Steps in – OAC : Connection To Teradata DB In DV/RDG Using Native User/LDAP User Failed With Error: “Failed to save the connection. Internal query error” (Doc ID 2601452.1).
Download Registered Teradata JDBC Driver(TeraJDBC__indep_indep.16.20.00.12.zip) from the Teradata portal from here.
Extract and copy driver to Teradata / Data Gateway server.
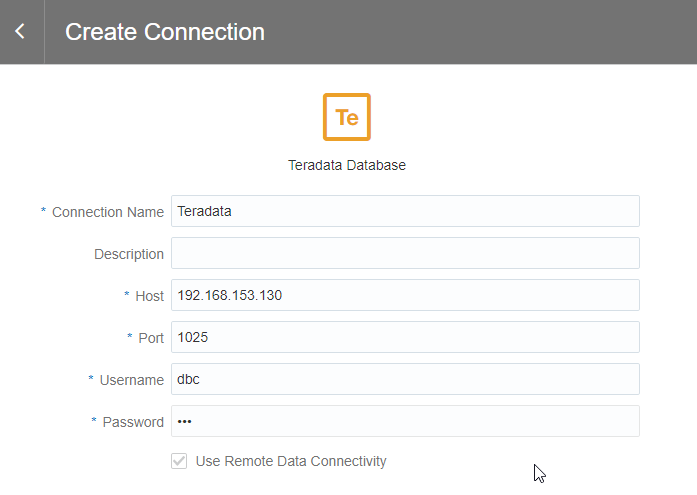
Configure Data Visualization(DV) Connection with Teradata
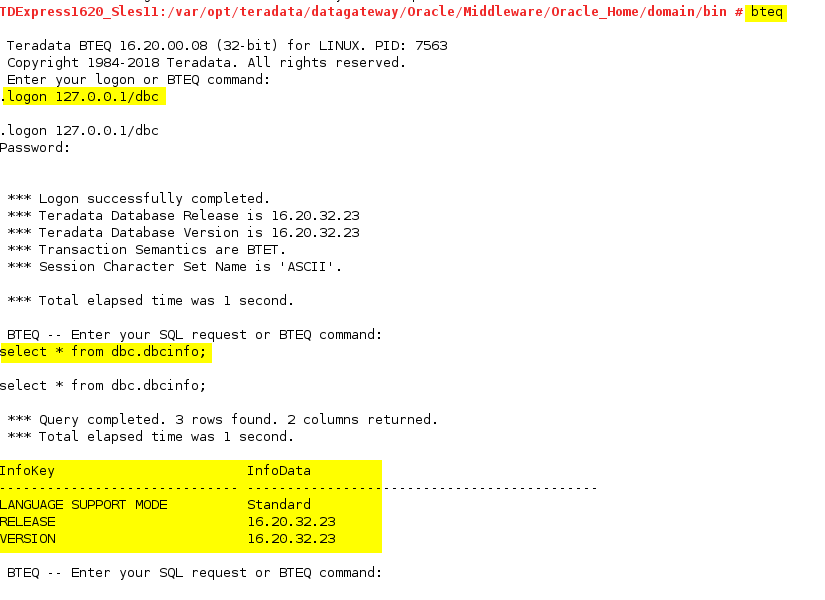
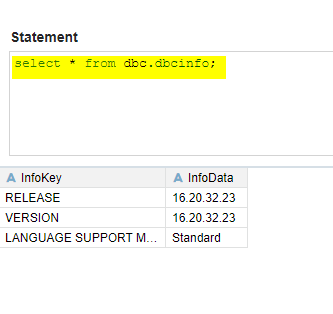
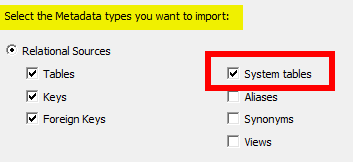
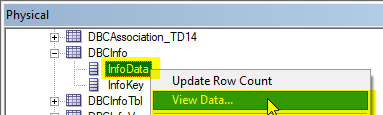
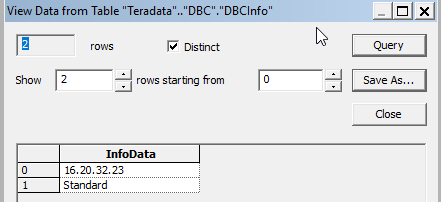
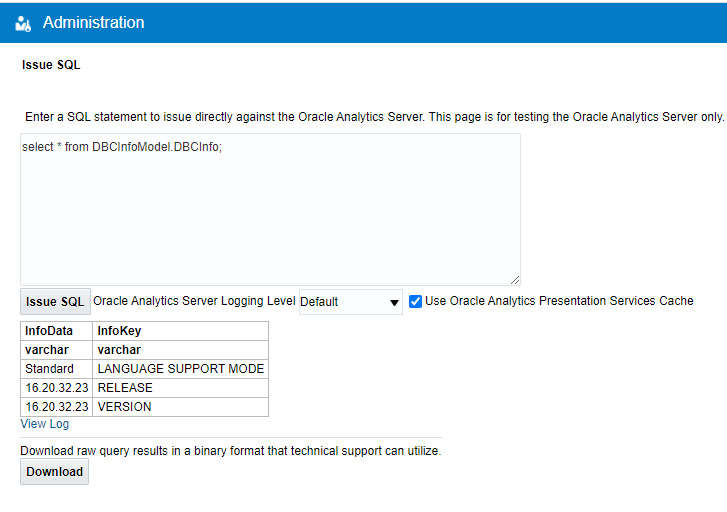
DV is currently designed not to display Teradata System tables. Therefore, the DBC tables are not available and a message will be displayed that says “Table listing not available”. To test DV create some new tables that are non-System tables or run a Manual DV Query.
From DV Manual Queries can be ran successfully.
select * from dbc.dbcinfo;
Configure Developer Client Tool for OAC with Teradata
Follow the instructions in “Follow Steps in Configure and Register Data Gateway for Reporting” found here.
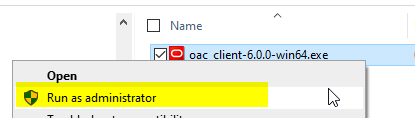
If an RPD (repository file) will be used to develop with, download the Developer Client Tool for OAC from here.
It is recommended that the Client Tool version match or be higher than the OAC version.
Unzip and run the .exe with “Run as Administrator”.
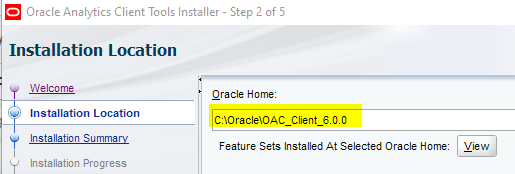
It is recommended to include the Client Tool version number in the install home directory.
This allows for multiple versions of the Client Tool to be installed and easily identified.
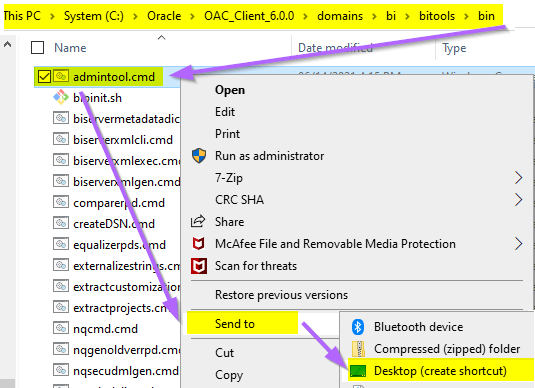
It can be helpful to create a shortcut on the Desktop to: <OracleBIClient>\bi\bitools\bin\admintool.cmd.
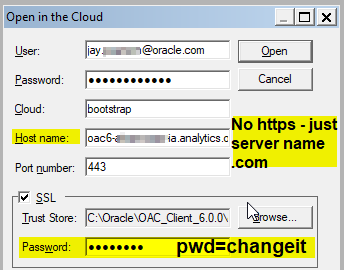
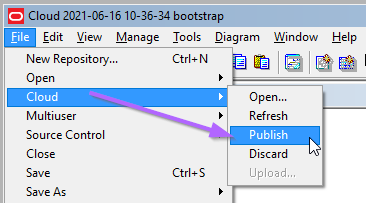
Connect the Admin Tool to the Cloud: File -> Cloud -> Open
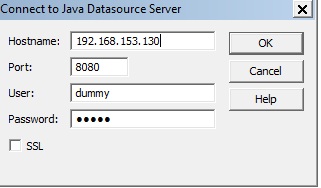
Get IP and Port where Data Gateway is running using Data Gateway status.sh or ifconfig.
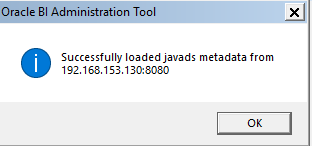
Run File -> Load Java Data Sources.
Enter Data Gateway IP and Port. User & Password can be anything (as it is not used).
If the Administration Tool is installed on a different machine than the Remote Data Gateway follow instructions in “Failed to read data from Java Datasource server” Error While Connecting to Remote Server (Doc ID 2744281.1)
Based on Teradata authentication method either follow: “Steps To Connect to Teradata Database using Teradata Native User From RPD” or “Steps To Connect to Teradata Database using Teradata LDAP User From RPD” found in (Doc ID 2601452.1).
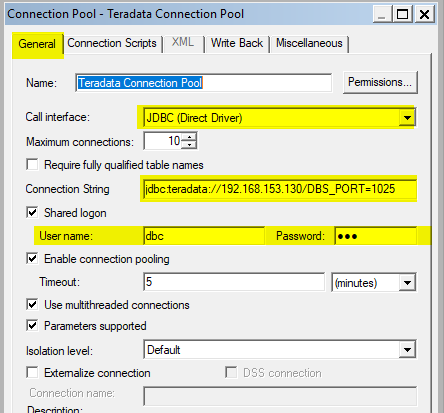
Screen shots below are based on Teradata Native User connection to the Teradata Express VM.
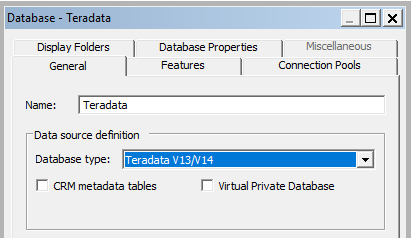
In the Physical Layer -> Right Click -> New Database -> Provide Name -> Select Database Type
Teradata V13/V14 was selected – as it was the closest to V16 available.
Right click on the newly created database -> New Object -> Connection Pool
Provide a unique name, select Call interface = JDBC (Direct Driver), enter Teradata User Name / Password.