OCI Public Network Load Balancer
Public Network Load Balancer Introduction:
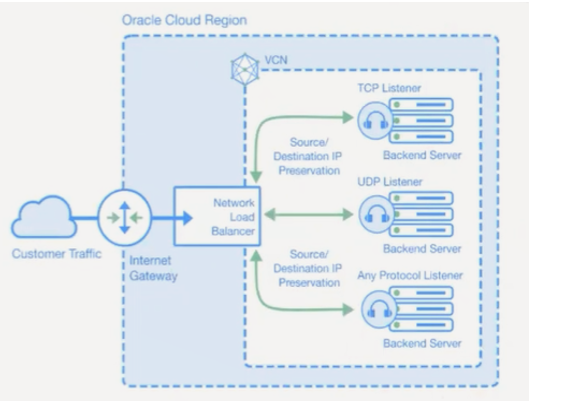
The Network Load Balancer service offers a load balancing with your choice of a regional public or private IP address that can scale up or down with no bandwidth configuration requirement.
To accept the traffic from the internet, create a Public Network Load Balancer.
Public Network Load Balancer Creation:
Login to the OCI dashboard.
Open the navigation menu and click Networking.
Under Overview, click Load Balancer, and then Create Load Balancer.

Select Network Load Balancer and click on Create Load Balancer.
Add Details
Please enter a name and select public visibility for creating a public load balancer.
To assign a public IP address, we have two options available. For this demo, I chose Ephemeral IPv4 Address, which is temporary and existing for the resource’s lifetime.
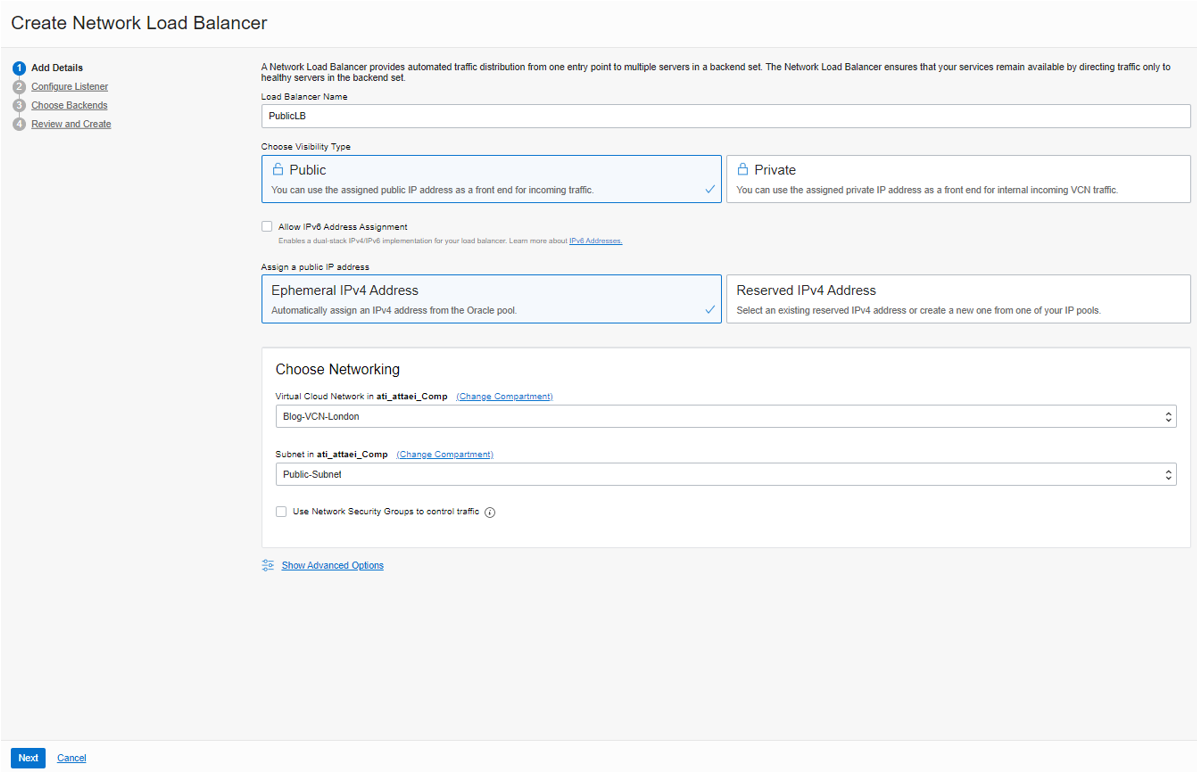
Choose VCN and Subnet, then click on “Next.”
Configure Listener
We have a listener here; A Listener is a logical entity that checks for incoming traffic on the load balancer’s IP address. You can configure a listener’s protocol and port number.
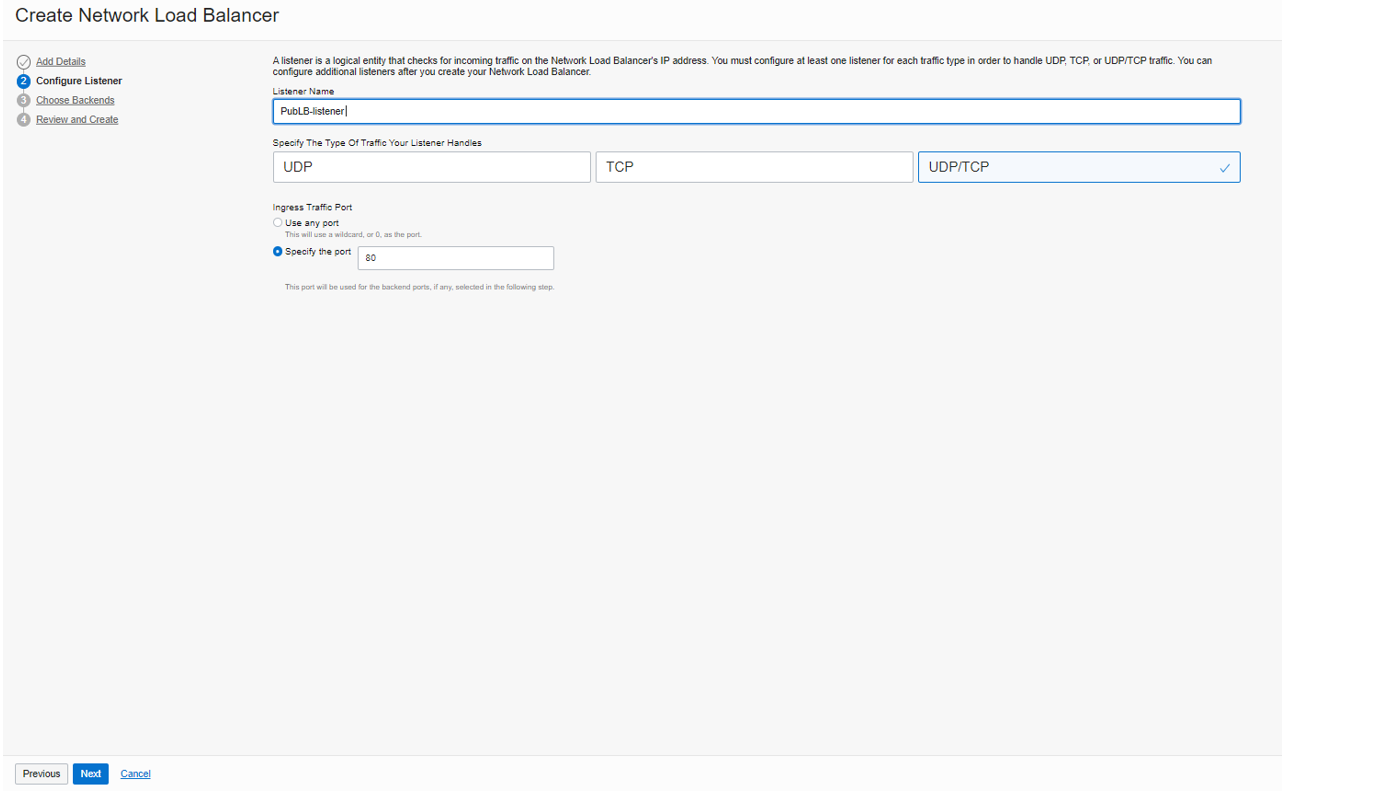
To continue, please enter a name, and select the listener protocol options UDP, TCP, or both.
I selected UDP/TCP and specified port number 80 for it.
Note: The Network Load Balancer supports multi-protocols on the same listener (TCP & UDP on Public Network Load Balancer)
And click on “Next”.
Choose Backends
We have a Backend Set here; the Backend Set is a logical entity defined by a load balancing policy, a health check policy, and a list of backend servers.
To continue, please enter a name, and Select Backend Servers from your available VMs options. (I selected my two public VMs, which I have already created for this blog).
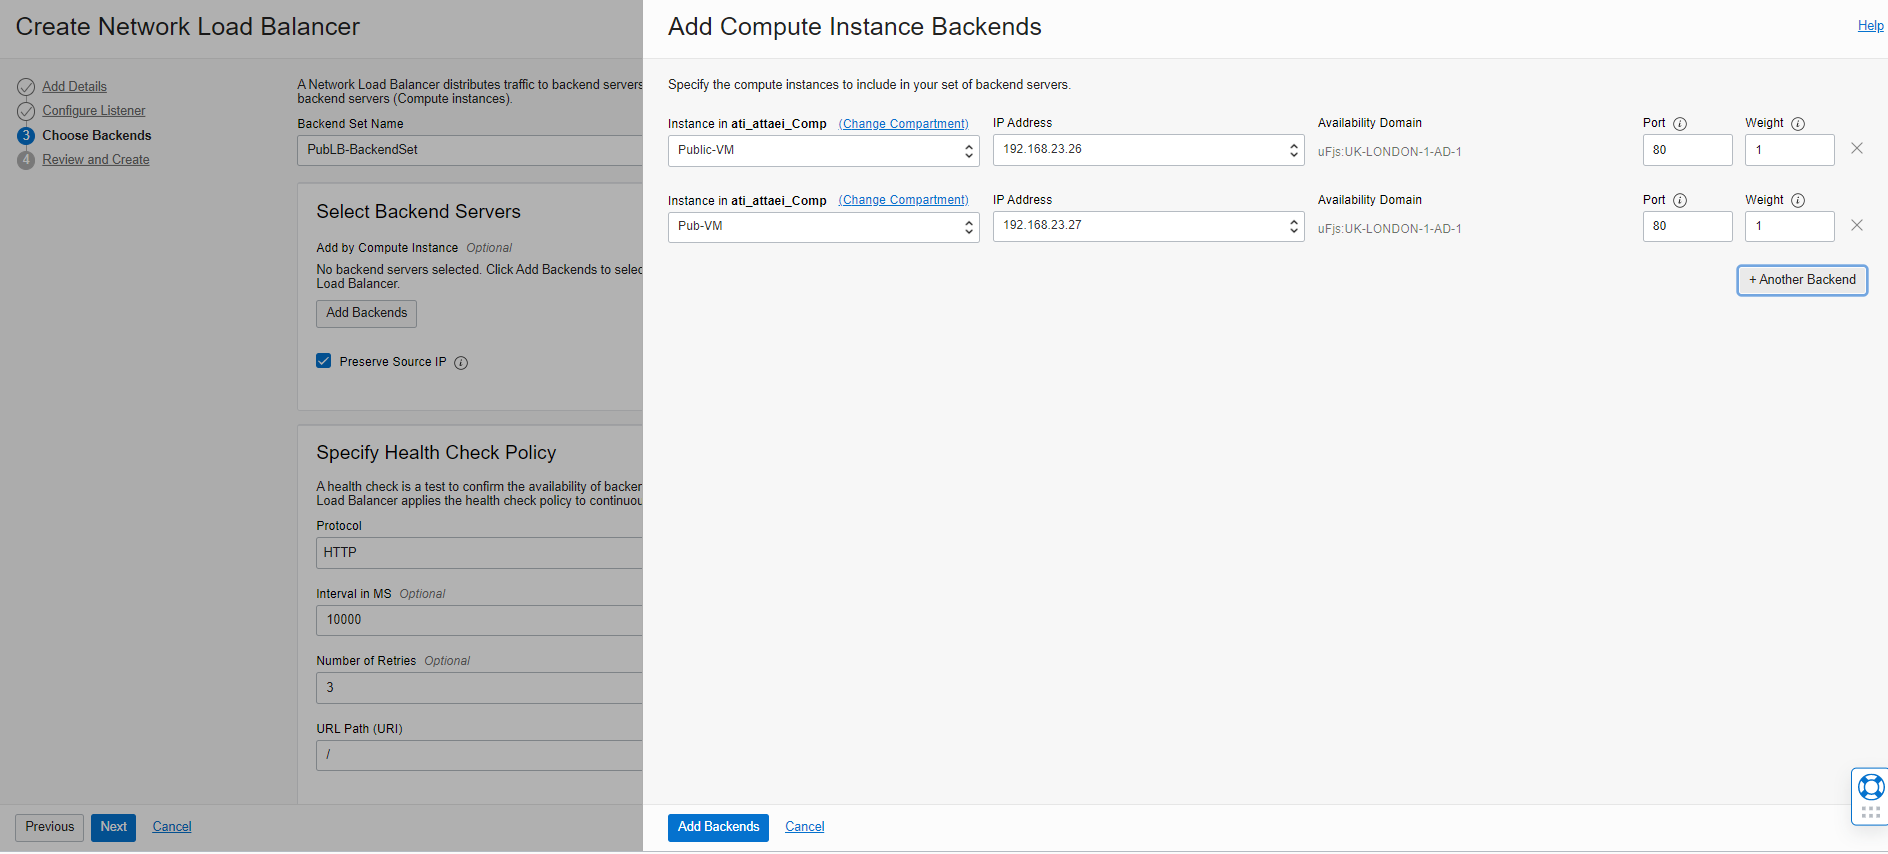
After you select an instance/s (VM), you can specify Port and Weight.
Note: The Backend Server port is required. By specifying that, we determine where the Load Balancer must direct traffic. I chose TCP port 80.
Note: Backend servers with a higher weight receive a larger proportion of incoming traffic.
Now Click on “Next.”
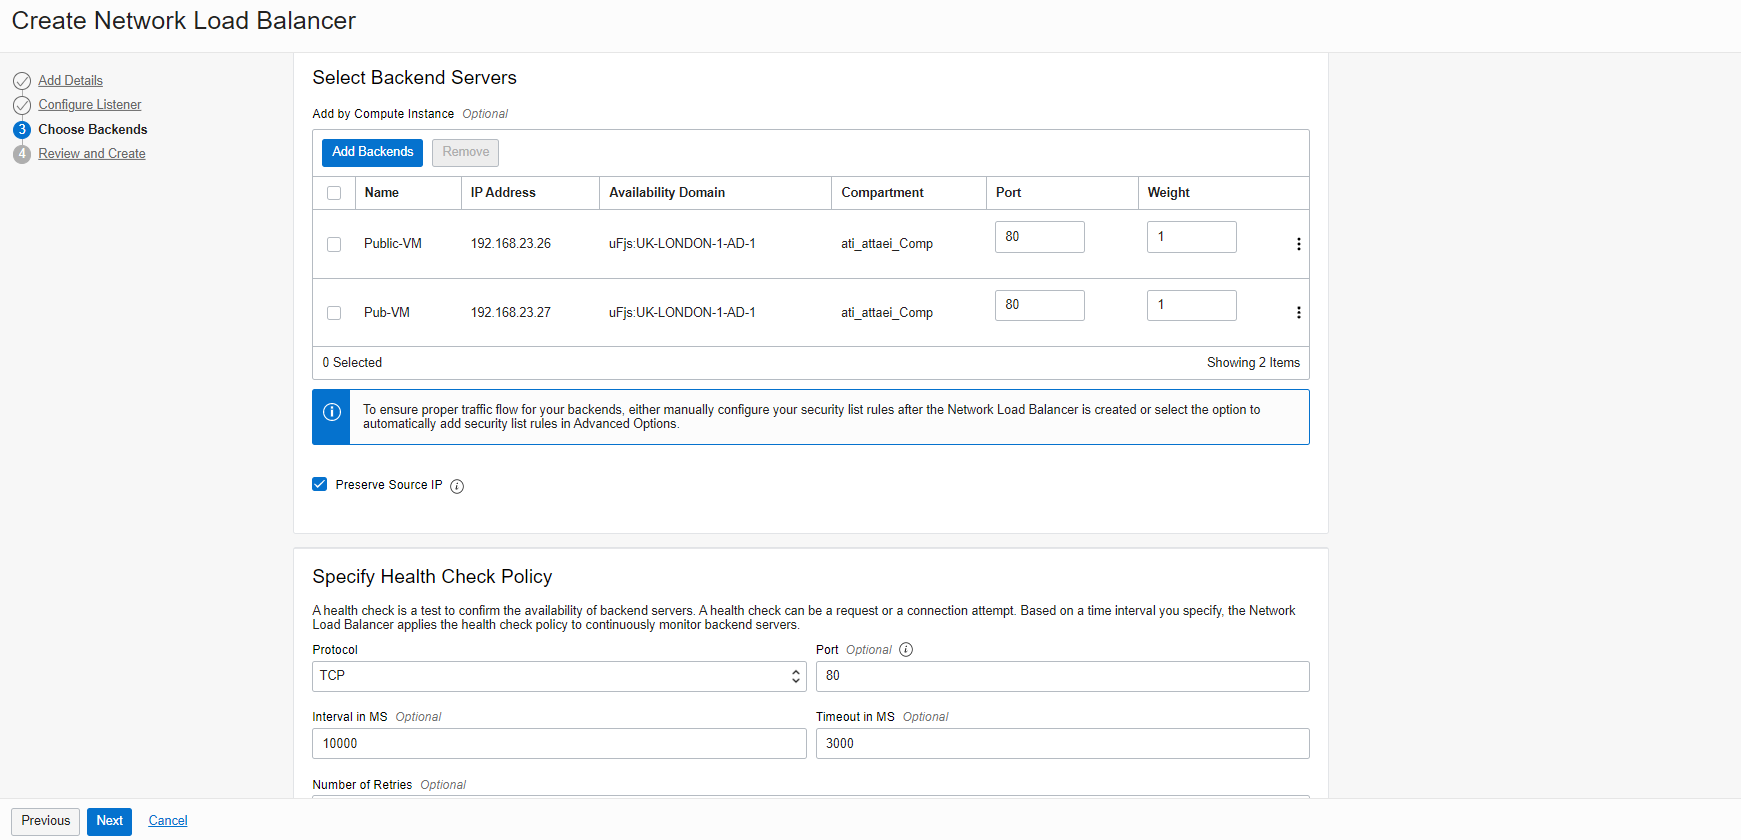
As you see above, the preserve source IP is enabled, which means the Network Load Balancer will preserve the source IP of the packet when it is forwarded to the backends, and the backends will see the original Source IP.
Specify Health Check Policy
This backend configuration section describes how to set up and use health checks to determine the availability of backend servers for a network load balancer.
You can configure TCP-Level or HTTP-Level health checks for your backend servers.
1. TCP-Level health checks attempt to make a TCP connection with the backend servers and validate the response based on the
connection status.
2. HTTP-Level health checks send requests to the backend servers at a specific URI and validate the response based on the status code,
or entity data (body) returned.
For my blog, I selected TCP protocol with port 80!
To continue, we have Advanced Options available right under the Health Check Policy config section, in which we have Security List and Load Balancing Policy there.
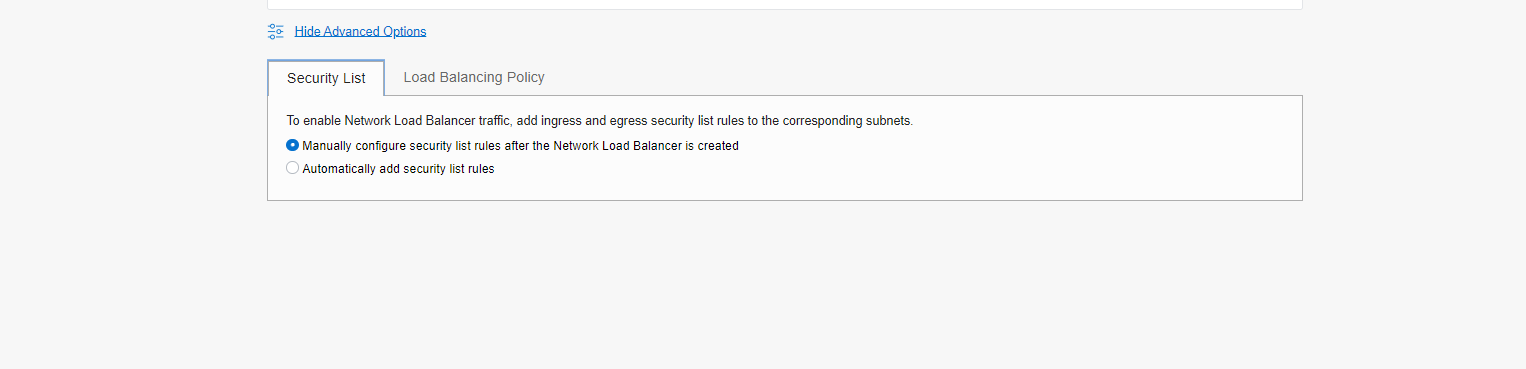
Security List
For Security List, you have two options available.
1. Manually configure security list rules after the Network Load Balancer is created.
2. Automatically add security list rules.
For my blog, I selected option 2, in which Load Balancer will add the required rule automatically to the Load Balancer VCN security list.
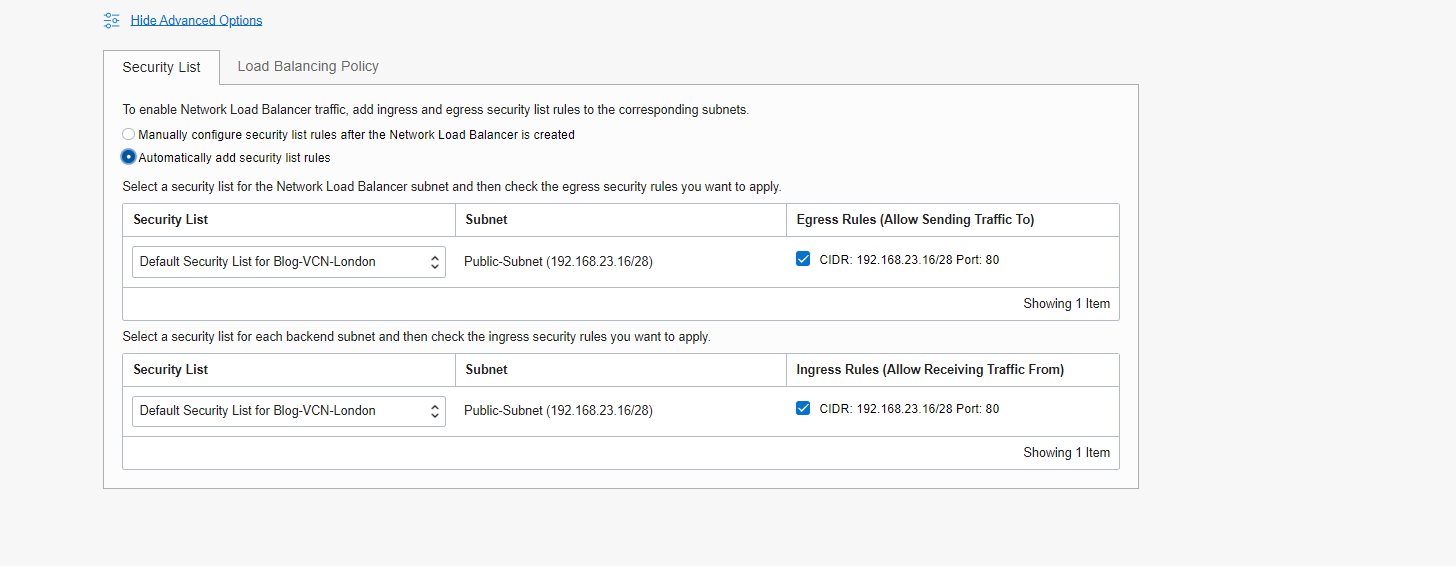
Please check the link below if you need more information.
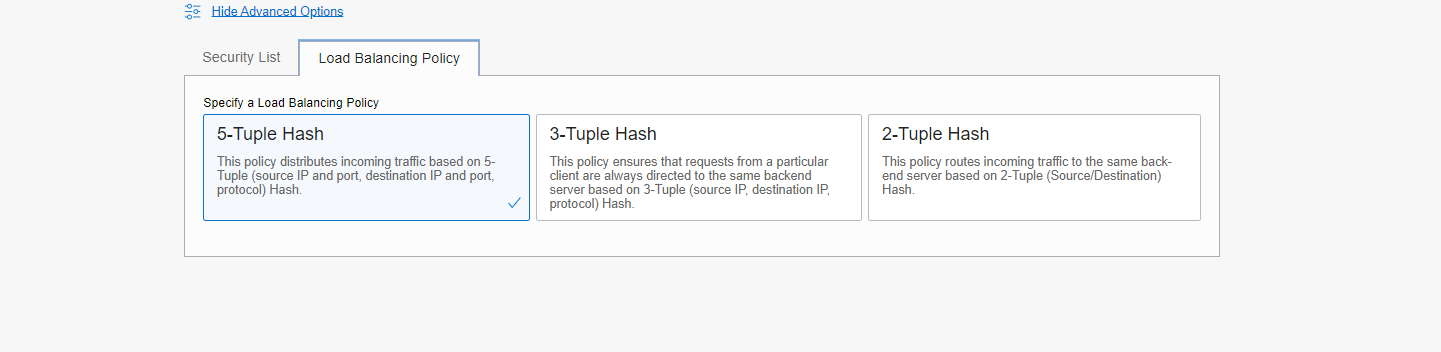
Load Balancer Policy
Network Load Balancer Load Balancing Policy consists of three policies listed below:
1. 5-Tuple Hash: This policy distributes incoming traffic based on a 5-Tuple (source IP and port, destination IP and port, protocol) Hash.
(Default Policy Option).
2. 3-Tuple Hash: This policy ensures that requests from a particular client are always directed to the same backend server based on a 3-
Tuple (source IP, destination IP, protocol) Hash.
3. 2-Tuple Hash: This policy routes incoming traffic to the same backend server based on the 2-Tuple (Source/Destination) Hash.
For my blog, I selected 5- Tuple Hash. This is also the default policy option for Load Balancer.
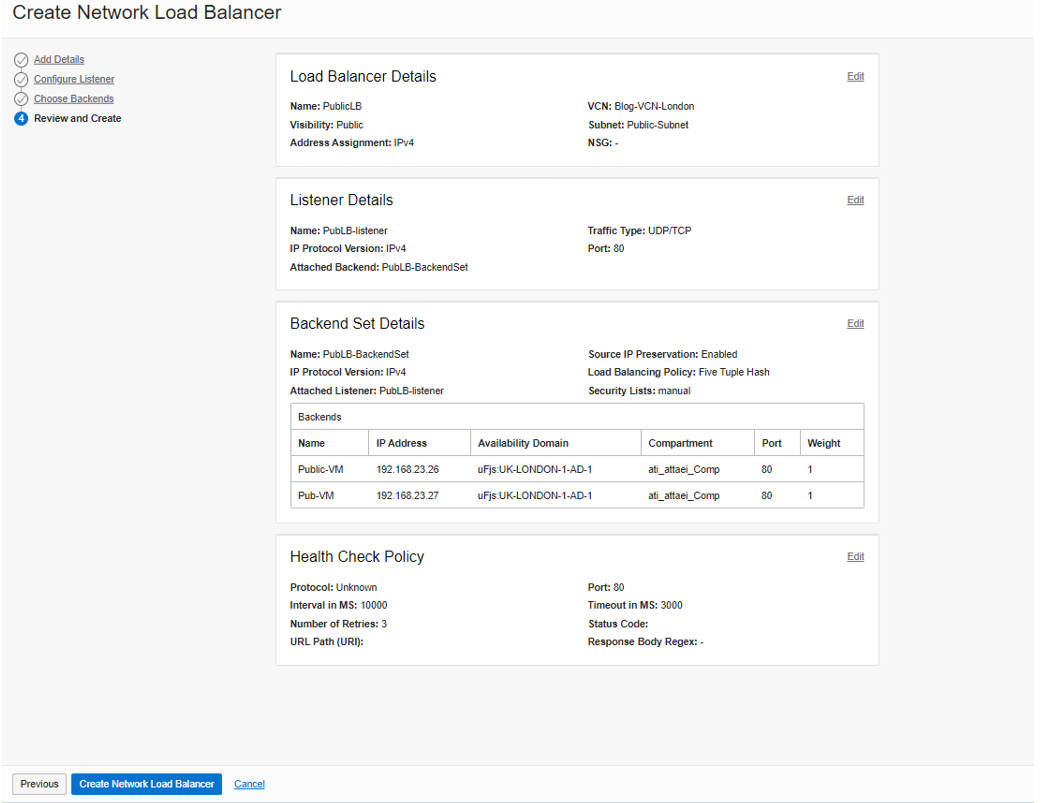
Review and Create
Review your configuration and click on “Create Network Load Balancer.”
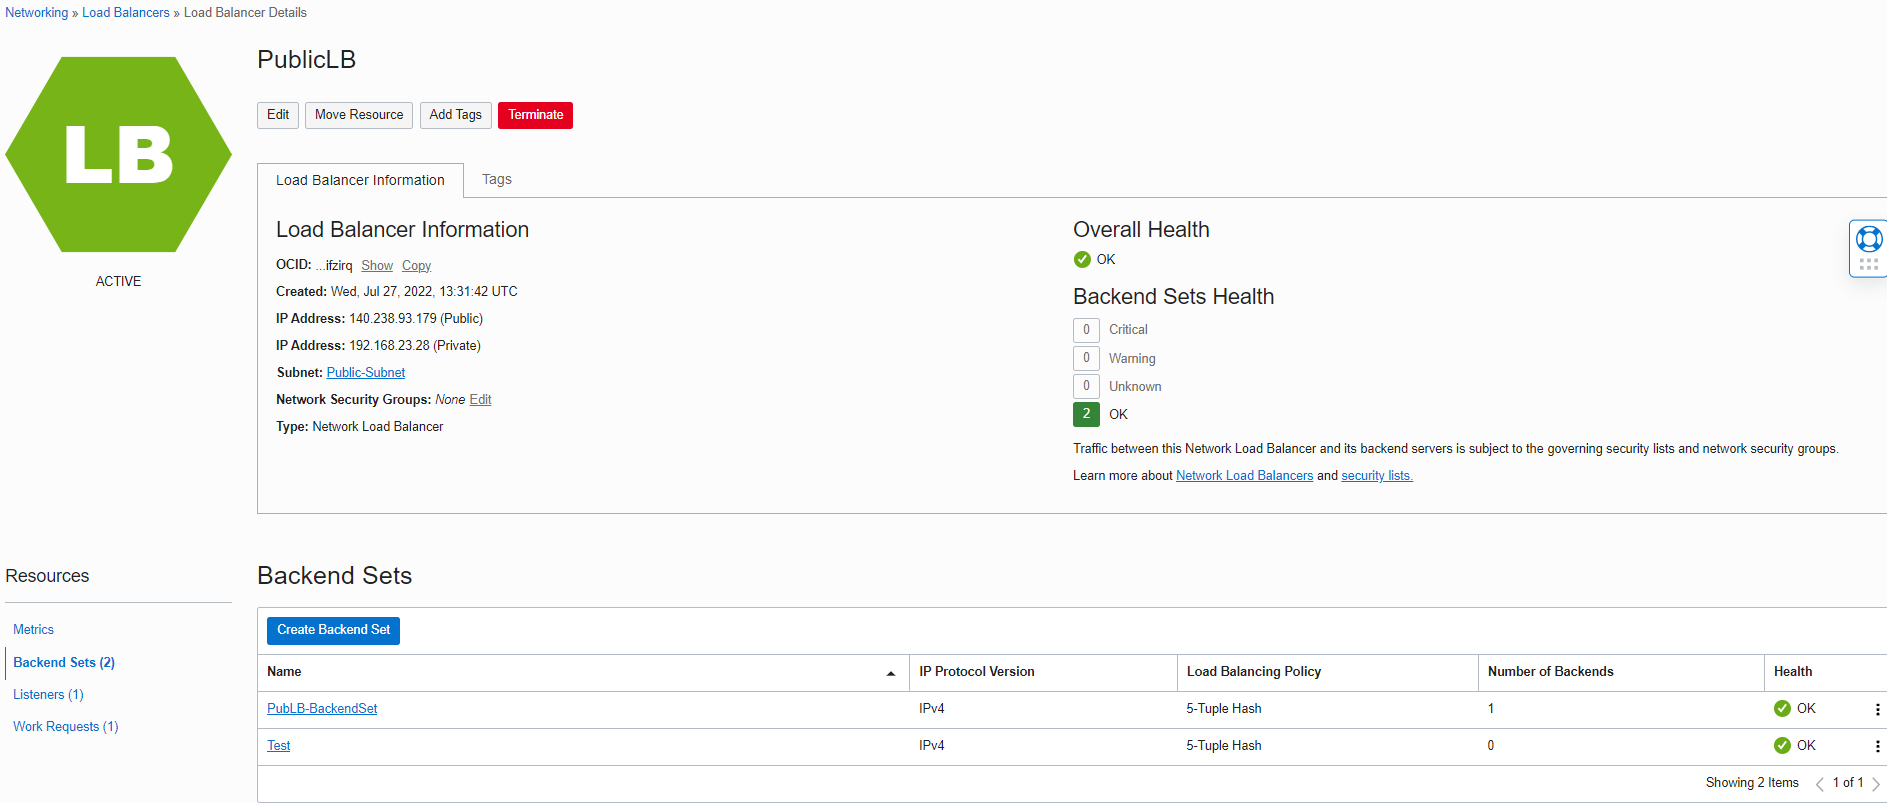
Here is what we have after creating the “Public Load Balancer.”
Network Load Balancer Overall Health:
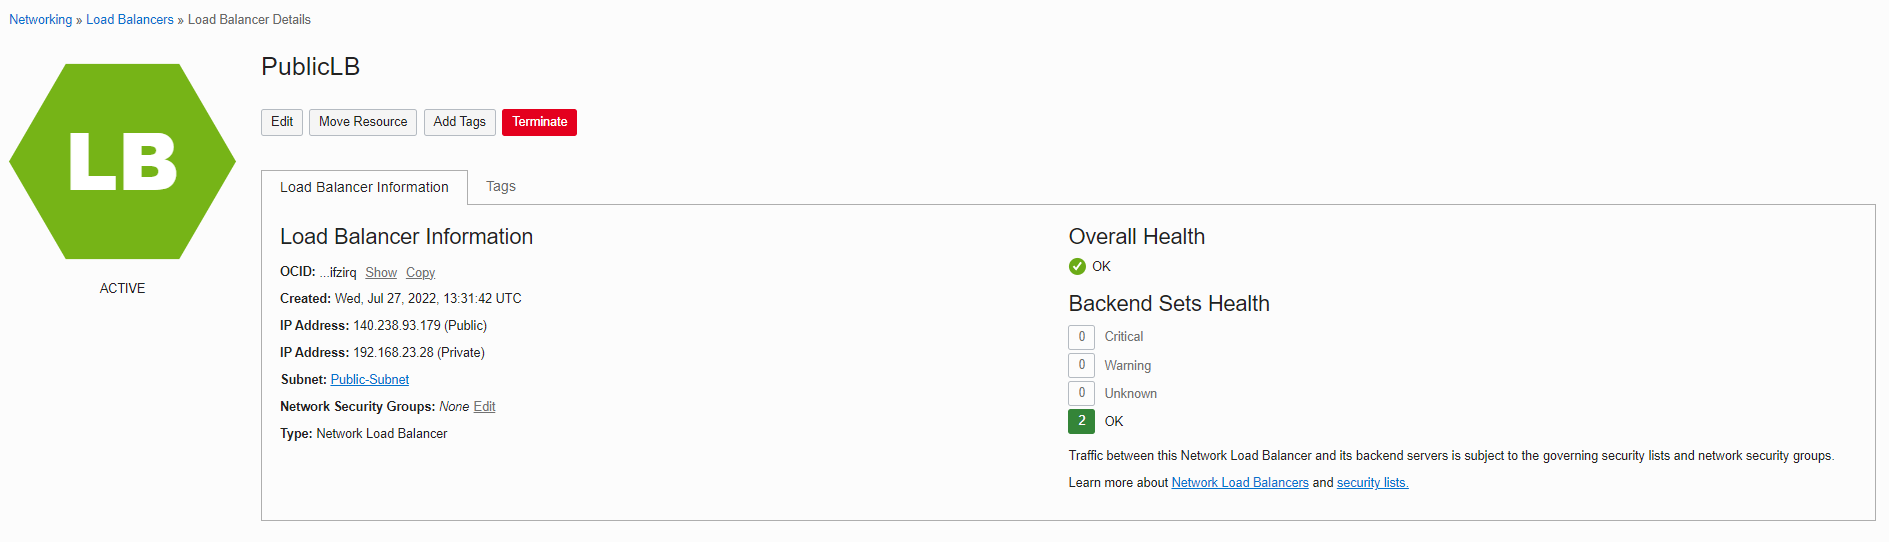
Note: Public load balancer is highly available in a region, which means it would be available and scalable when one of the availability domains has an outage.
Public Load Balancer Use Cases and Best Practices:
1. Public Network Load Balancer as a front-end to DNS servers
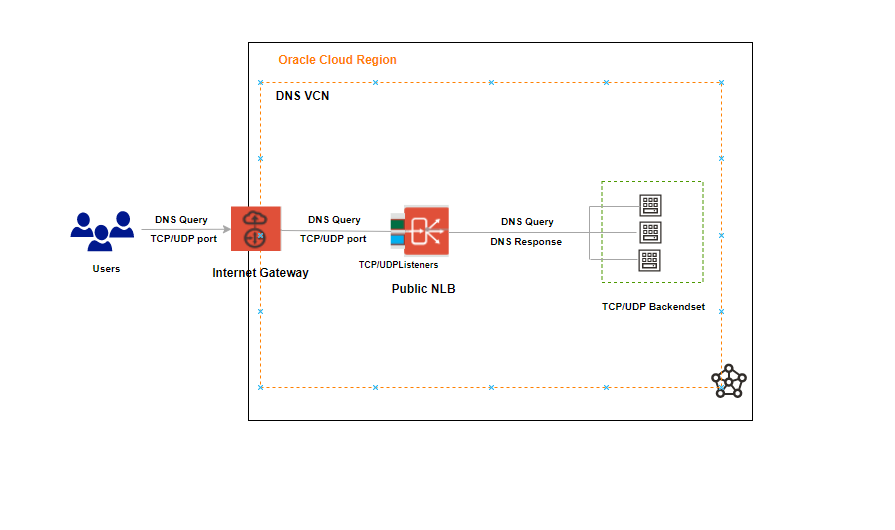
The Domain Name System (DNS) often serves as the phone book for the Internet by translating human-friendly computer hostnames into IP addresses.
As you see above, users or DNS clients are trying to reach the Network Load Balancer from the on-premises. When the DNS query (also known as a DNS request) gets to the OCI’s Public Network Load Balancer, the load balancer distributes the DNS traffic across several servers while the servers inside the Backend Set listen on port 53 of both TCP and UDP protocols.
In the end, the Backend Set servers resolve the DNS request and send a DNS response.
2. Public Network Load Balancer as a front-end to a video conferencing application
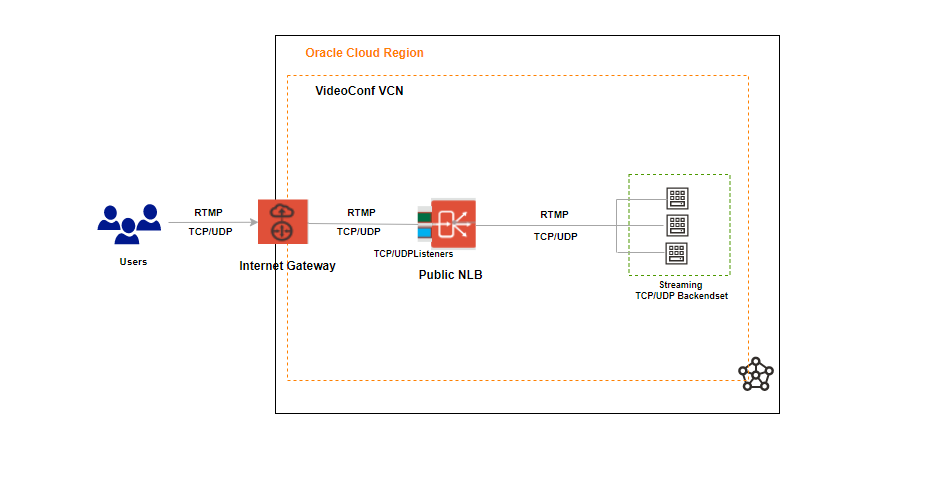
RTMP is a TCP-based protocol that maintains persistent connection and allows low-latency communication.
Consider an OCI customer hosting a cloud-based video-conferencing application. We can deploy an Network Load Balancer that load balance client TCP traffic between the servers inside the Backend Set and load balance UDP traffic to streaming servers for streaming media to the client.
The WebRTC – Video Streaming over OCI Network Load Balancer would be another use case scenario for Public Network Load Balancer.
Best Practices
1. When you create a network load balancer, you must specify the backend server/s (Compute Instances) to include in each backend
set. The load balancer routes incoming traffic to the backend server/s based on the policy you specified for the backend set, protocol
type, and port number.
2. Each backend set can only be associated with a single listener and needs to be compatible with backend servers related to the backend
set, which means when you have enabled TCP port 80 on your listener, your backend servers must be configured for TCP port 80, and
your Health check needs to set on TCP port 80.
3. If you use any Network Load Balancer protocol and enabled port as Any, you need to specify your backend sets server/s to use the Any port rule, or if you
are using the specific rule, you need to select your backend sets to use that rule (Protocol type and port number).
Things to consider when using Health Check
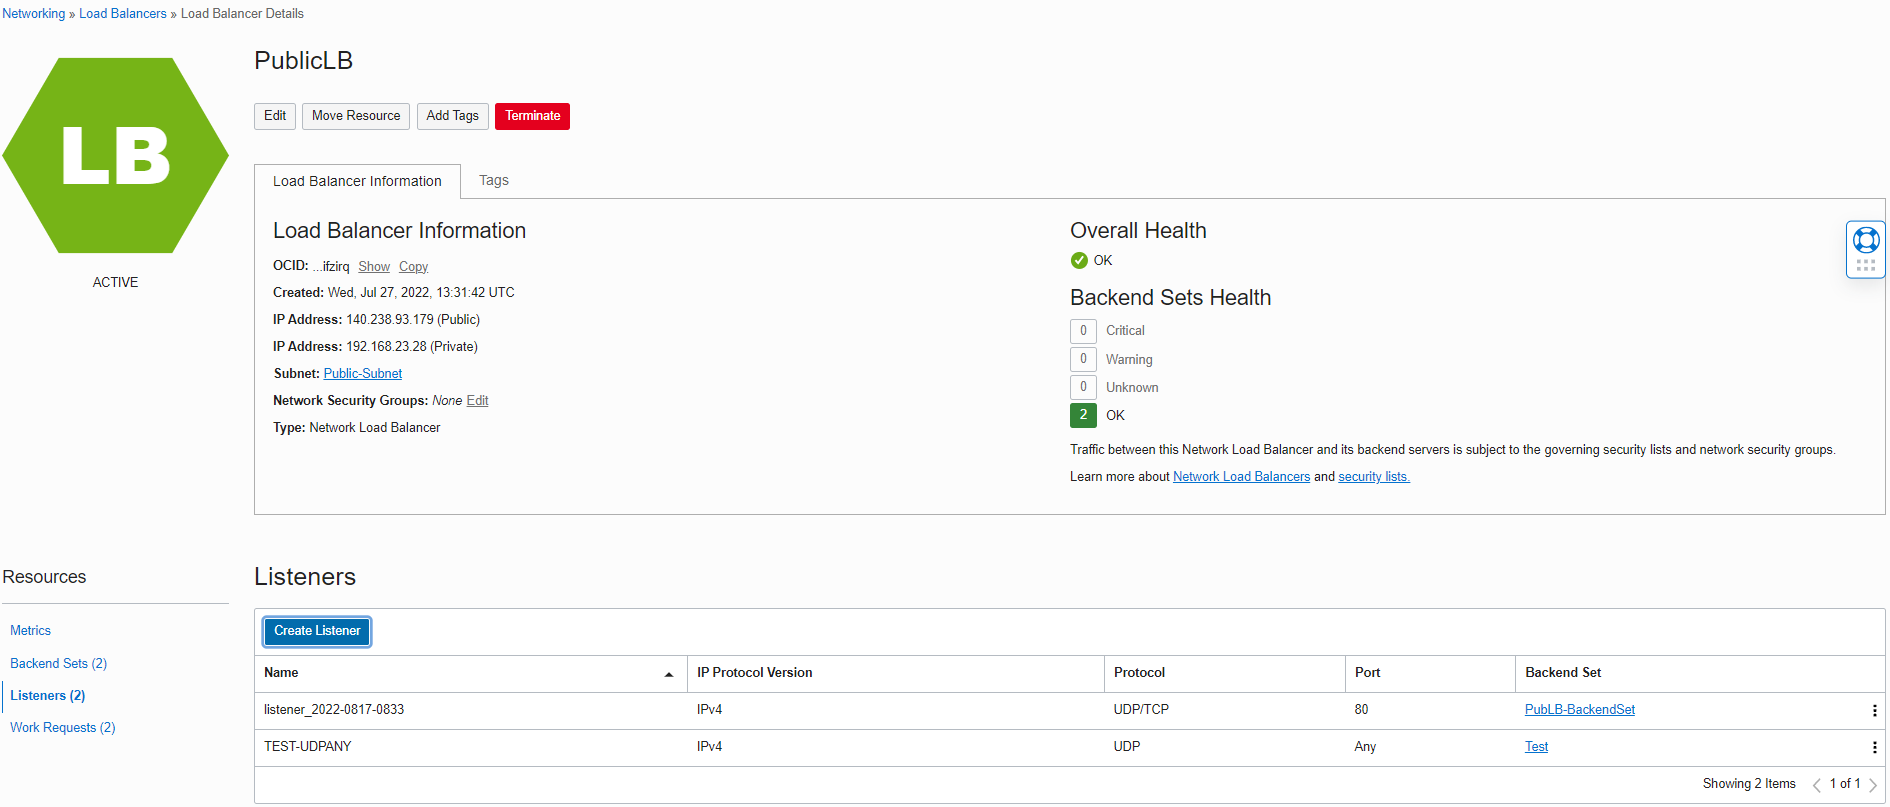
To demonstrate the consideration, I did add one more Backend Sets to my blog Network Load Balancer and named it Test.
For the next step, I created the new Listener on UDP protocol, selected port as Any, named it TEST-UDPANY, and associated Test Backend Set with this new Listener.
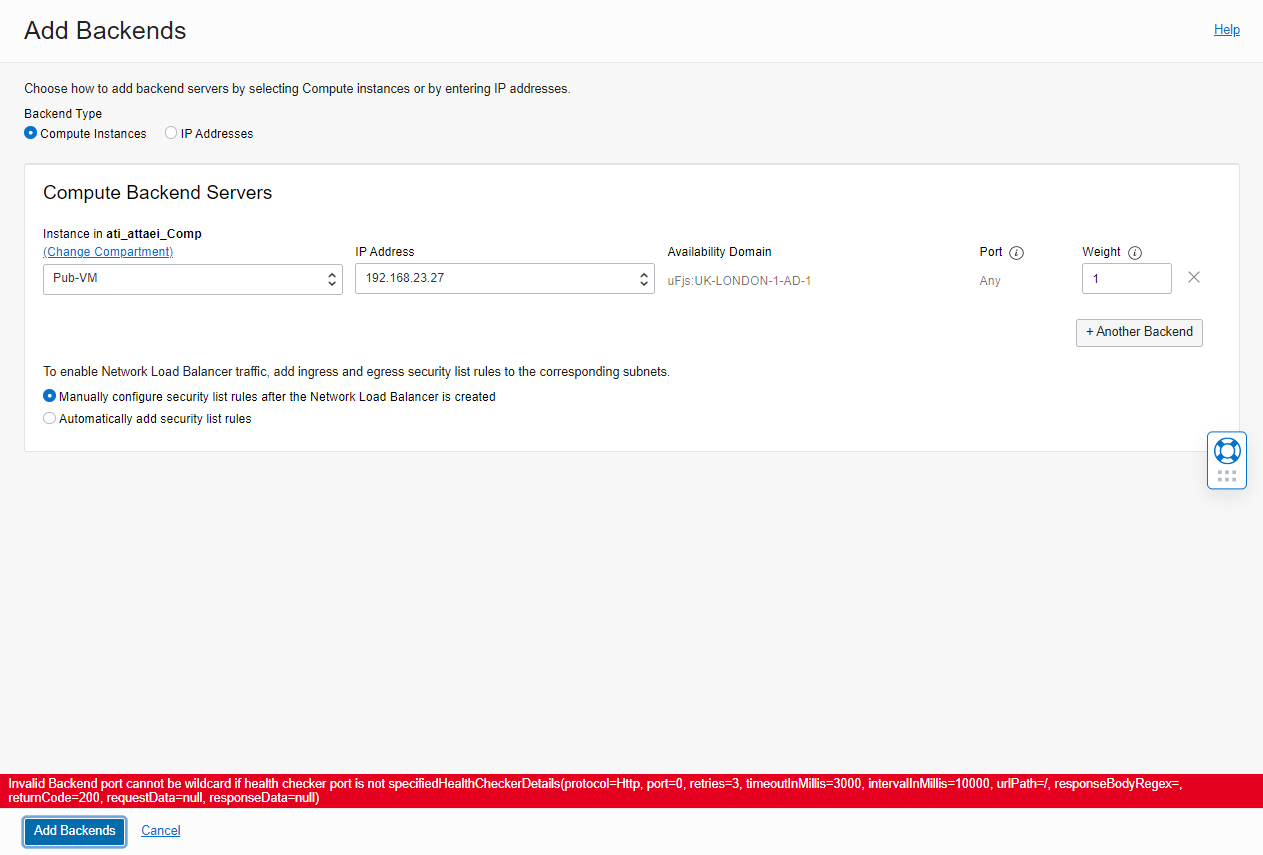
Then, I navigated to the Test Backend Set to add one backend server.
As you see, I got the error below.
” Invalid Backend port cannot be wildcard if health checker port is not specifiedHealthCheckerDetails(protocol=Http, port=0, retries=3, timeoutInMillis=3000, intervalInMillis=10000, urlPath=/, responseBodyRegex=, returnCode=200, requestData=null, responseData=null)”
I closed the error window, navigated to my Test Backend Set, and clicked on “Update Health Check.”
As you see below, the Health Check port number shows as “0”.
This means Network Load Balancer allows us, by default, to enable the Any-Any listener and Backends, but The Health Check doesn’t know which port it needs to use.
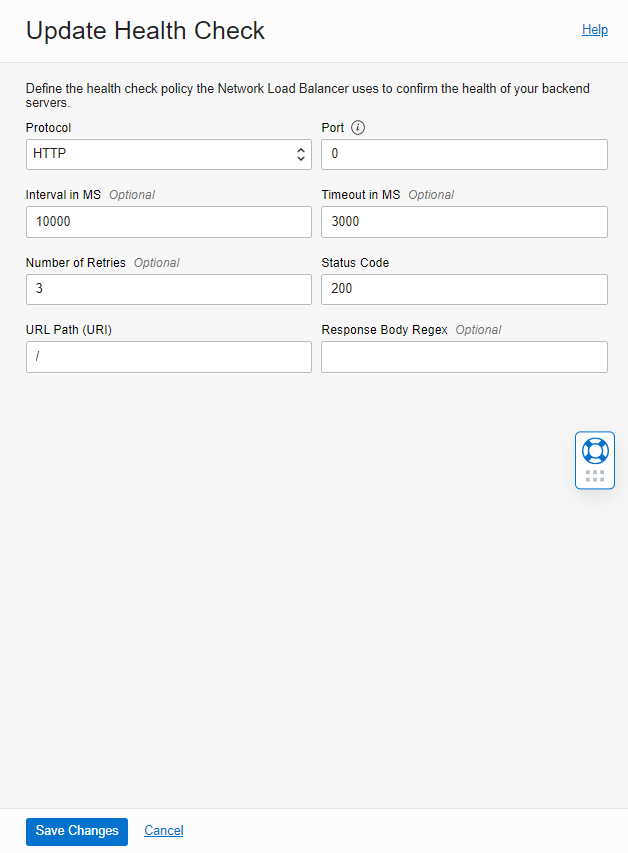
Note: When we create Backend Set, we need to specify Health Check Policy. Leave the port number blank to have a health check on each port specified by the backend, or define a port there that will be used for all backends in the set. A port is mandatory if the listener has Any port.
I left a port blank for my blog to demonstrate the error above to you.
I updated the Health Check to use TCP port 80 to check the server’s health!
Testing:
• Install Apache HTTP Server
I installed Apache HTTP server on the VMs in load balancer’s backend servers, by the commands below.
” sudo yum install httpd ”
” sudo service httpd start ”
Note: To allow the Overall Health Check path (which Shows Green with OK status), you must ensure the host-based firewall is configured correctly!
In my case, just for blogging purposes, I disabled the firewall by the command below.
” sudo service firewalld stop ”
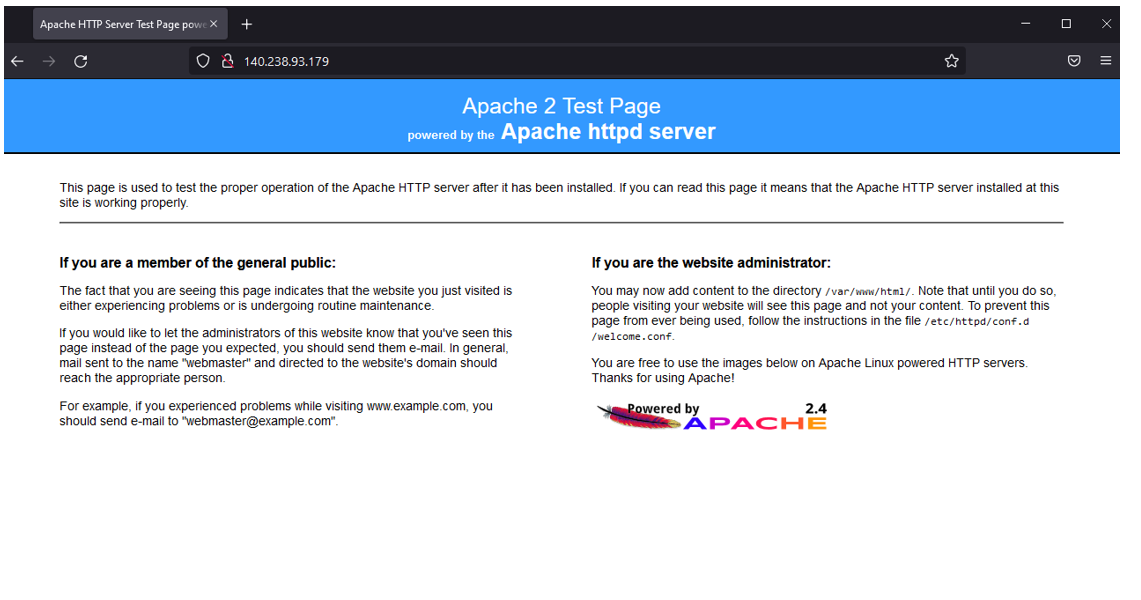
However, I won’t recommend that in the production environment. As you see below, if you copy and paste the Network Load Balancer public IP address to any browser (I used Firefox), you’ll see your Apache server test page that you just installed on your backend servers.
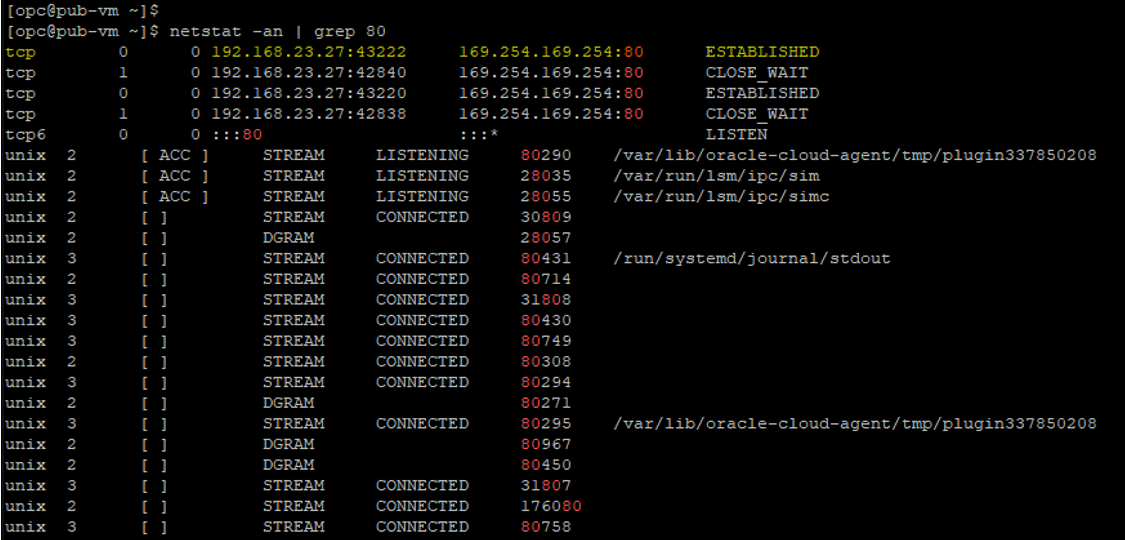
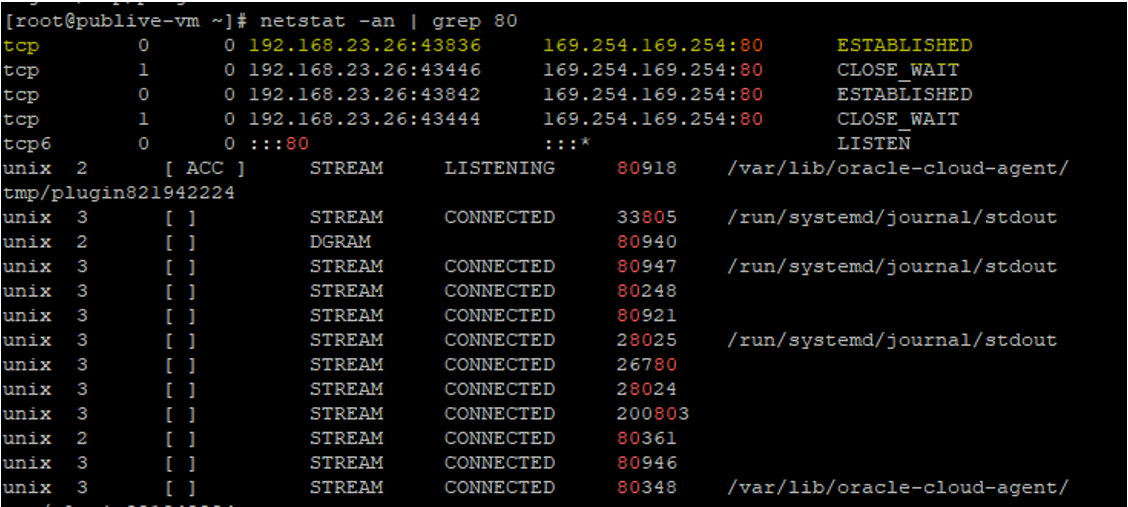
• Display TCP/IP Connections
I displayed connections and listening ports for our current TCP/IP connection by the command below.
“netstat -an | grep 80”
Blog Agenda links
OCI Public Network Load Balancer
OCI Private Network Load Balancer
I hope you enjoyed it!