In this new blog post we will discuss about a very powerful OCI Security feature called Bastion as a Service or for short, Bastion.
The Bastion service is a fully managed OCI service and allows the secure connection from a host on the Internet to the VCN private resources without the need to have a DMZ subnet with Linux or Windows VMs acting as jump hosts.
We will explore the type of connections allowed by the Bastion together with the step-by-step configuration and testing scenarios.
The Bastion documentation can be found in our public documentation at this link: OCI Bastion Service
Ready? Let’s go!
Bastion Overview
Bastions are public facing services and let authorized users connect from specific IP addresses to target resources using Secure Shell (SSH) sessions. When connected, users can interact with the target resource by using any software or protocol supported by SSH. For example, you can use the Remote Desktop Protocol (RDP) to connect to a Windows host, SSH to connect to a Linux instance or use Oracle Net Services to connect to a database.
Targets can include resources like Compute Instances, DB Systems and Autonomous Transaction Processing Databases.
A bastion is associated with a single VCN. You cannot create a bastion in one VCN and then use it to access target resources in a different VCN.
The Bastion service supports two Session types:
- Managed SSH Session (the Bastion plugin must be enabled on the Oracle Cloud Agent)
- SSH Port Forwarding Session
Networking Topology
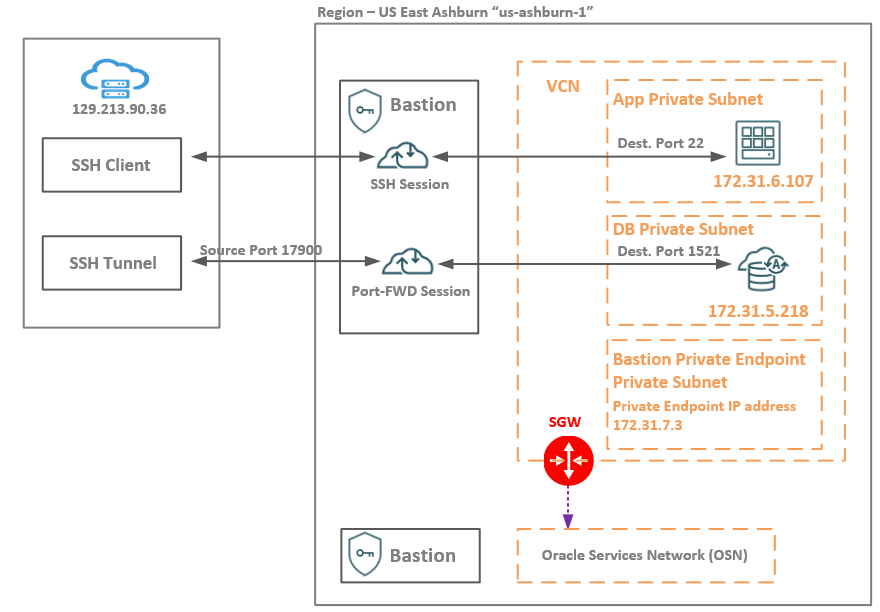
We will use two private subnets defined for App and DB with an App Linux VM listening on TCP port 22 at 172.31.6.107 and a DB system listening on TCP port 1521 port at 172.31.5.218.
The Bastion Private Endpoint dedicated private subnet is not mandatory. I preferred to have a dedicated private subnet for the Private Endpoint create by the Bastion in the configuration process. Note that, the Bastion is a public service managed by OCI and in order to send the tunneled traffic to OCI private targets we need the private endpoint siting in a private subnet. You can actually any existing subnet from your VCN in the Bastion configuration process.
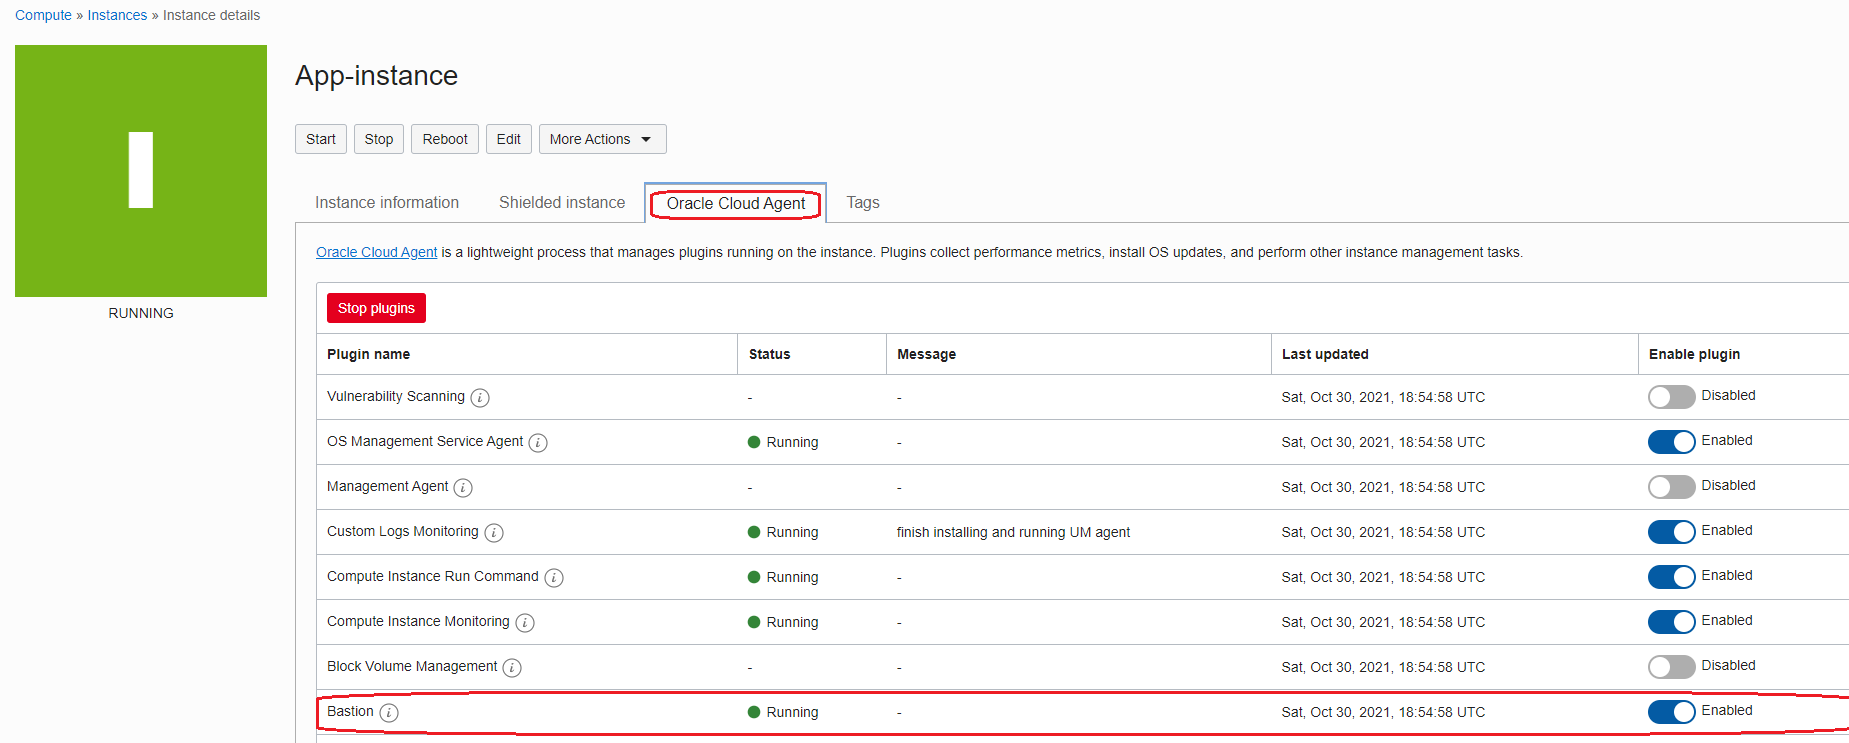
Important note: for the Managed SSH Session, the Bastion plugin must be enabled and in the running state. We will use this type of sessions for the App VM. In order for the Bastion plugin to be enabled we need to have a route in the route table associated to the App private subnet for All Oracle Services Network with the SGW as a next-hop. Also the NAT Gateway can be used as a next-hop for a default route but this might conflict with any existing default routes you might have, so, the SGW is the best and simple way for enabling the Bastion plugin.
After enabling the Bastion plugin it should have the below state:
Bastion Configuration
Go to Identity & Security -> Bastion -> Create bastion
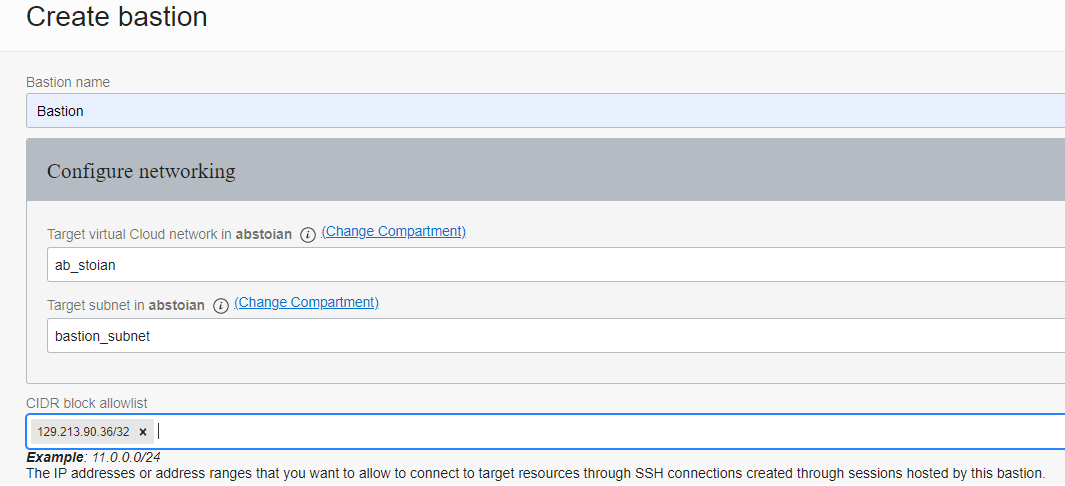
I have whitelisted the public IP address of the Internet host, so only this host will be allowed when any SSH Session to App VM or SSH Port Forwarding to the DB system will be initiated.
Once the Bastion is created, in the bastion_subnet, the Private Endpoint IP address is created:
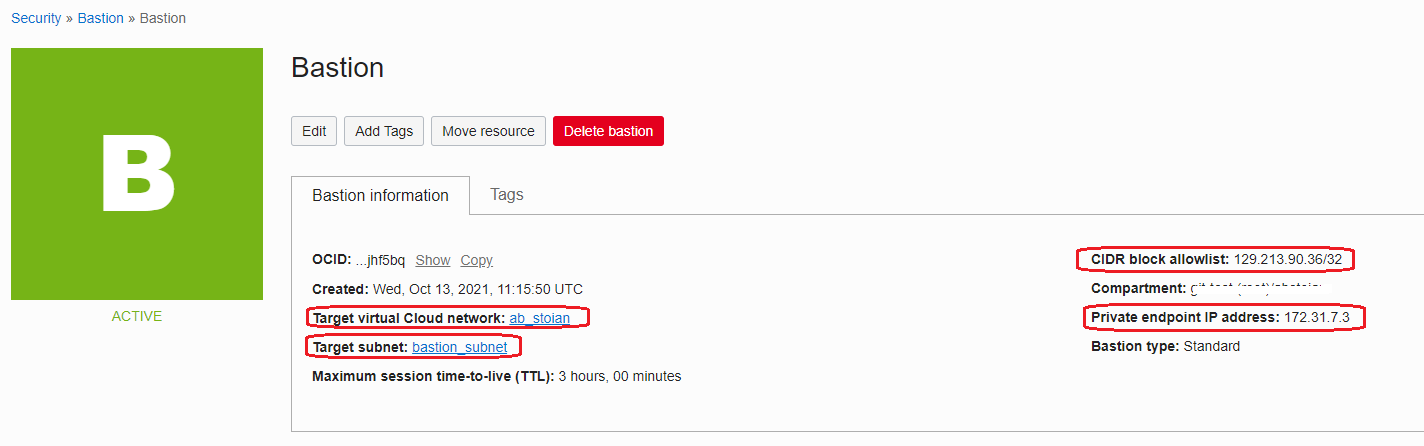
Once the Bastion is created, it can be used for accessing the VM, DB and ATP in the VCN specified in the creation process. That being said, make sure the subnet where the private endpoint of the Bastion is created permits in the Security List(s) or NSG(s) associated, an Egress security rule to permit the traffic to flow to the VCN CIDR space or to the desired target subnets.
On the other hand, the target subnets must permit the traffic from the private endpoint IP address, in our example 172.31.7.3.
Session Configuration
Managed SSH Session
Under the Bastion created at the preceding step, click on Create Session:

The lifetime of the session will be for 180 minutes, after 180 minutes the session will be automatically deleted. The maximum session lifetime is 180 minutes and the minimum lifetime is 30 minutes.
After the SSH session reaches the Active state, copy the SSH command we need to use:

ssh -i <privateKey> -o ProxyCommand=”ssh -i <privateKey> -W %h:%p -p 22 ocid1.bastionsession.oc1.iad.amaaaaaakztqlnaafosanmsy7cs7o7hgeodzfnacpxbamybd5x3pod52goba@host.bastion.us-ashburn-1.oci.oraclecloud.com” -p 22 opc@172.31.6.107
<privateKey> needs to be replaced with the SSH private key file name created on the Internet host.
Let’s check to see if the SSH session is working from our Internet host:

We are connected to our private VM using the Bastion session. As we can see from the above output, our previous attempt to connect, was from 172.31.7.3, which is the private IP address of the Bastion private endpoint.
SSH Port Forwarding Session
For this example we will use a DB system listening on port 1521. For analyzing in depth what is happening, on the DB we will use tcpdump to check if the TCP 3-Way Handshake is successfully completed.
Under the Bastion created at the preceding step, click on Create Session:
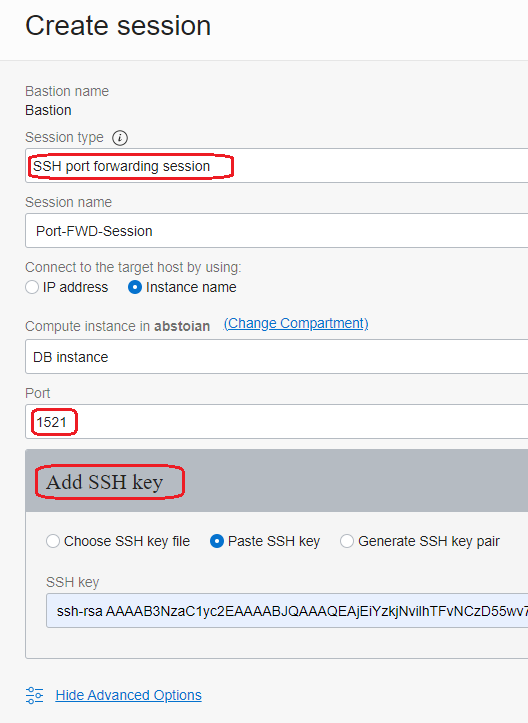
Wait for the session to enter the Active state and copy the SSH command. The command will have the following format:
ssh -i <privateKey> -v -N -L <localPort>:172.31.5.218:1521 -p 22 ocid1.bastionsession.oc1.iad.amaaaaaakztqlnaa2h77kxkdgvo62blnaejpcc67es7hezqvlahnxuatn57q@host.bastion.us-ashburn-1.oci.oraclecloud.com
<privateKey> needs to be replaced with the private key file created on the Internet host.
<localPort> needs to be replaced with a free TCP port on the local machine, in this example I will use 17900.
Important note: when running the command, look for a very important line in the debug (debug1: pledge: network), this line tells that the SSH tunnel is ready to be used:

Do not close this terminal.
Now, we can test the connection using our Port Forwarding session. Open a new terminal on the Internet host and use the SSH command to connect to localhost using the local port 17900.
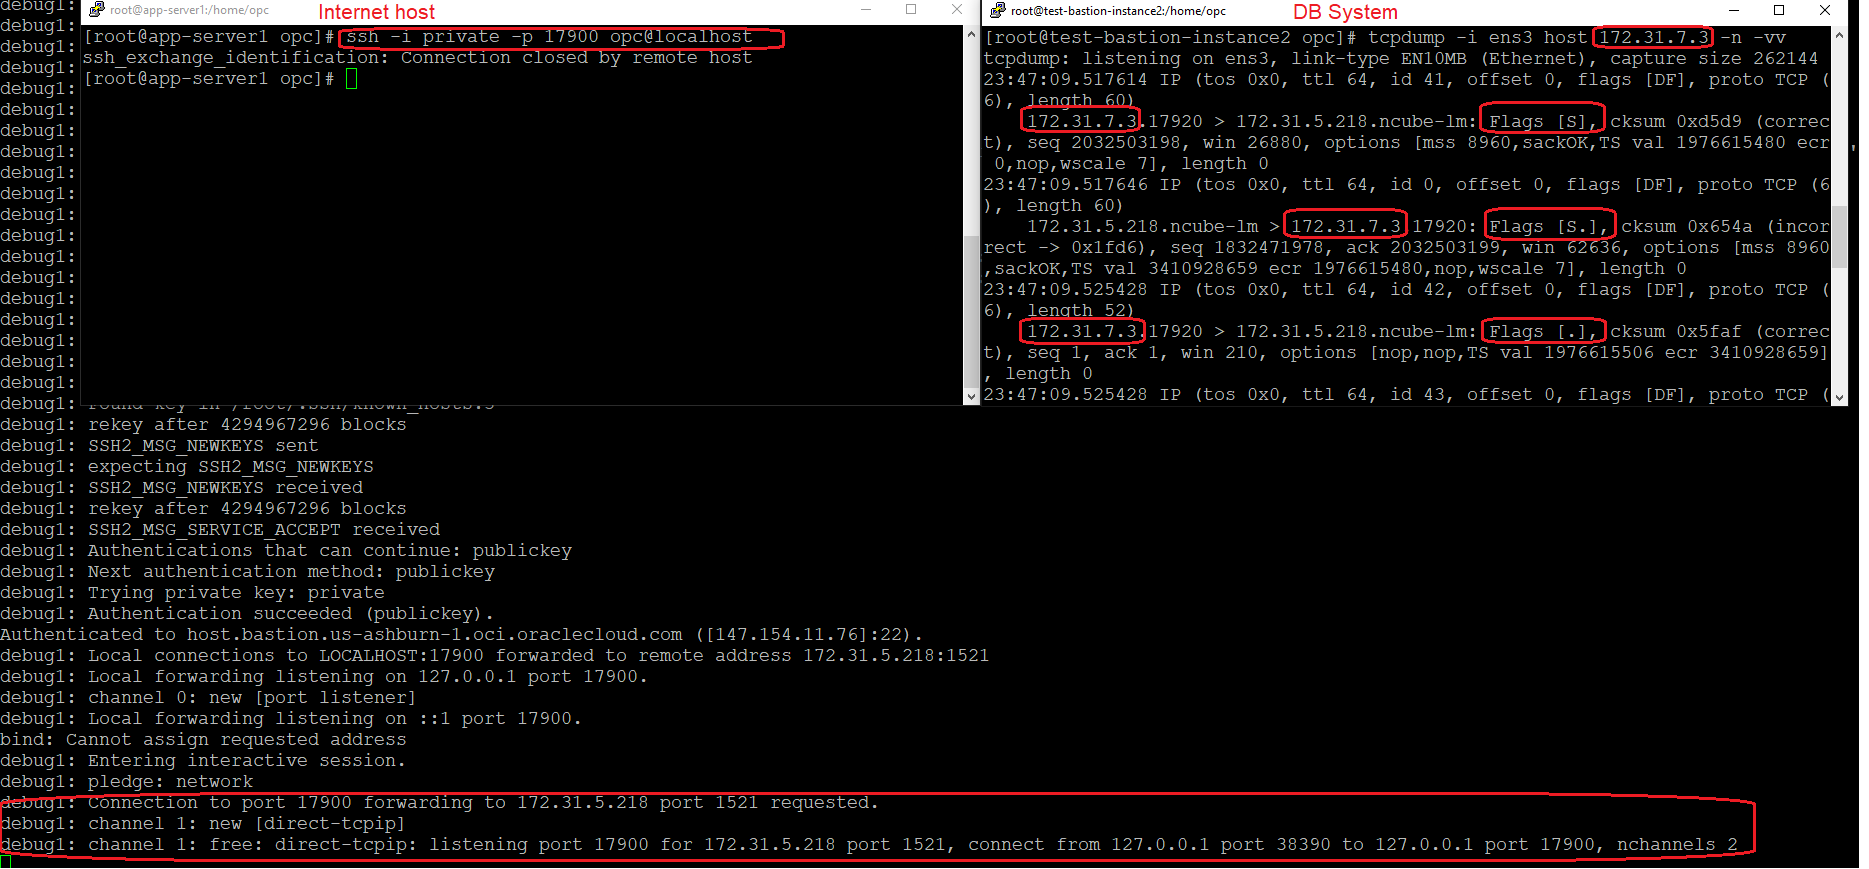
The TCP 3-Way Handshake is completed successfully and the tcpdump confirms the connection is successfully established on port 1521.