Introduction
Identity propagation has been a much desired feature in Oracle Integration Cloud (OIC). With the latest update, it is now supported out of the box. This blog describes a test run of this feature with a step-by-step guidance on configurations.
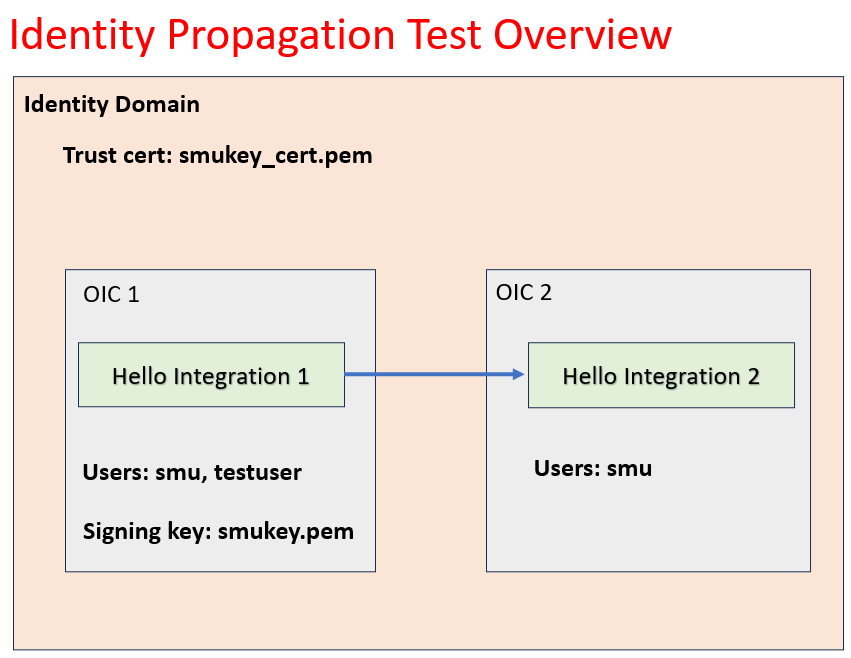
In this simple demonstration, we use two different OIC instances. Each OIC instance hosts a simple hello integration that simply return a hello string. The first hello integration OIC instance 1 uses a REST adapter to invoke the second hello integration. We will configure the REST adapter to propagate identity automatically. We will use two users in this test. One user has access to both integrations while a second user has access only to the first integration. The image below shows an overview of the test case.
Signing Key and Certificate Pair
The first artifact we need to create is a signing key and certificate pair. We will explain their usage in the following sections.
Create the Signing Key and Certificate Pair
I used the following series of commands in Linux to generate my key (smukey.pem) and certificate (smukey_cert.pem) files in the PEM format.
# generate key pair using JAVA keytool
keytool -genkey -keyalg RSA -alias smukey -keystore smukey.jks -storepass welcome1 -validity 3650 -keysize 2048
# export the cert from the jks store using JAVA keytool
keytool -exportcert -alias smukey -file smukey.cer -keystore smukey.jks -storepass welcome1
# import jks key and cert input a pkcs store
keytool -importkeystore -srckeystore smukey.jks -srcstorepass welcome1 -srcalias smukey -destalias smukey -destkeystore smukey.p12 -deststoretype PKCS12 -deststorepass welcome1 -destkeypass welcome1
# export the key from pkcs12 store to pem format
openssl pkcs12 -in smukey.p12 -nodes -nocerts -out smukey.key
# convert a der format cert into pem format
openssl x509 -inform der -in smukey.cer -out smukey_cert.pem
# convert a der format key into pem format
openssl rsa -outform der -in smukey.key -out smukey.pem
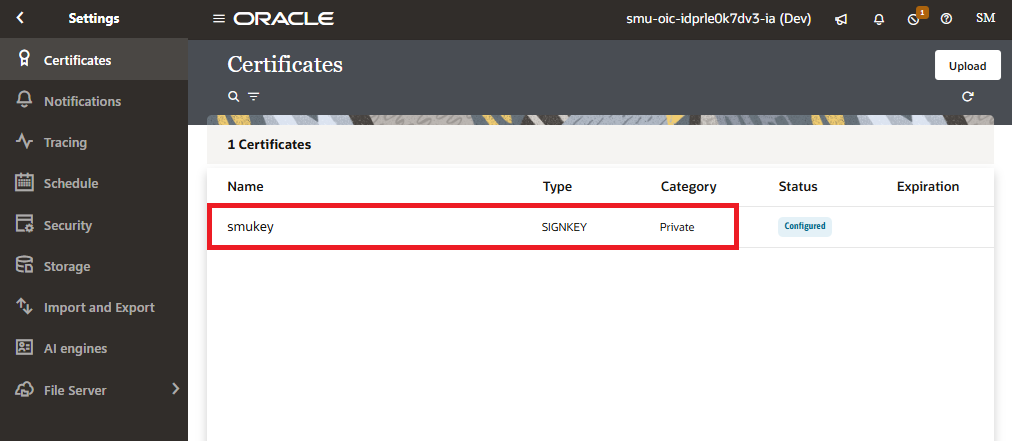
Import Signing Key into OIC
The signing key is required in OIC1. It is used to sign the JWT token created by OIC1. The signed token contains a user identity and is sent to OIC2 for authentication during the REST invocation.
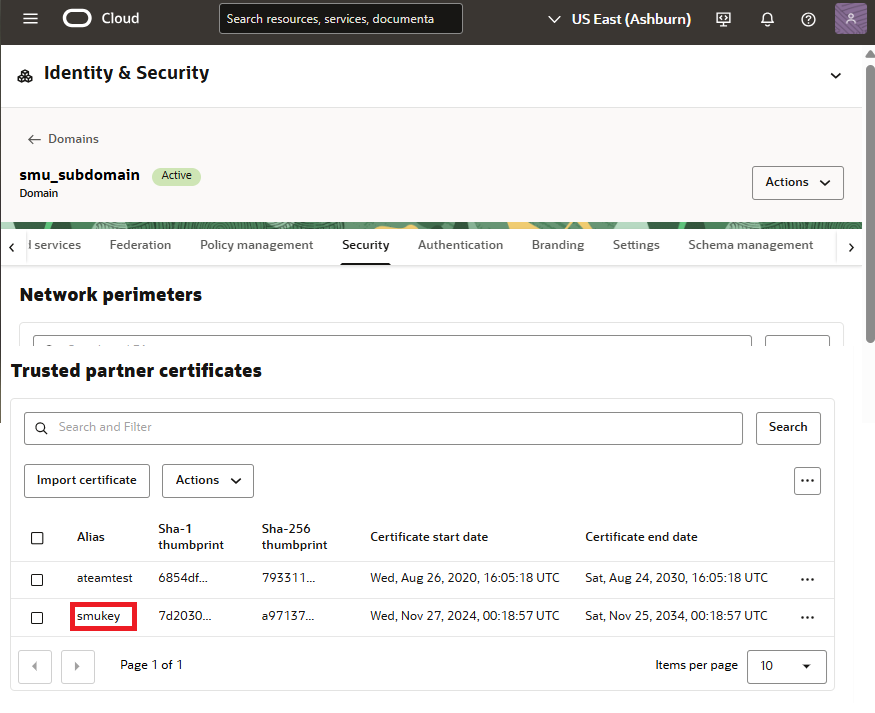
Import Trust Certificate into Identity Domain
OIC2 instance resides in an identity domain. The identity domain handles user authentication. When the Hello Integration 1 calls the Hello Integration 2 with a signed JWT token, the identity domain must trust the key that signs the token. We can establish this trust relationship by importing the certificate of the signing key into the trust store of the identity domain.
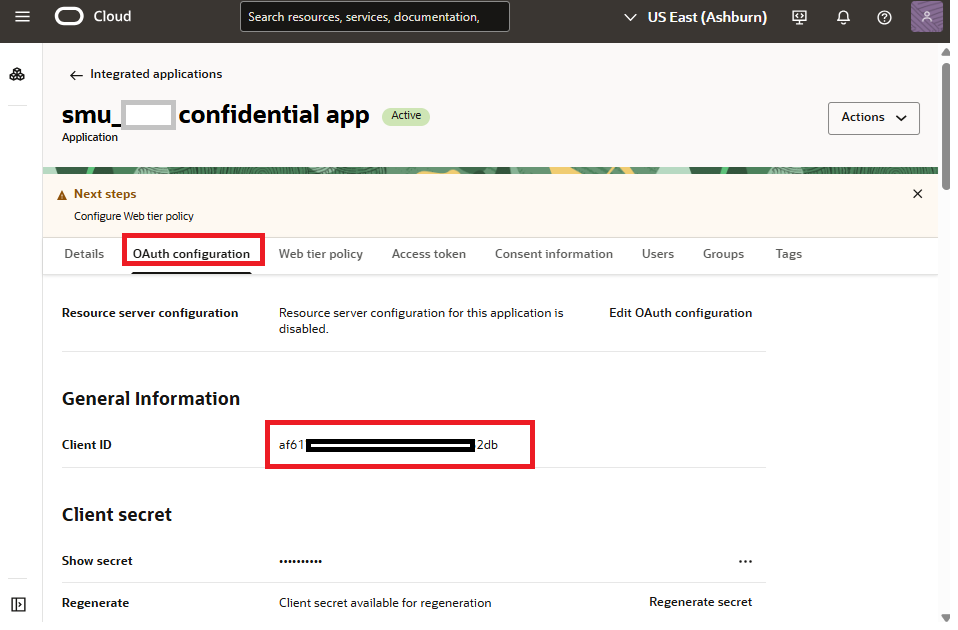
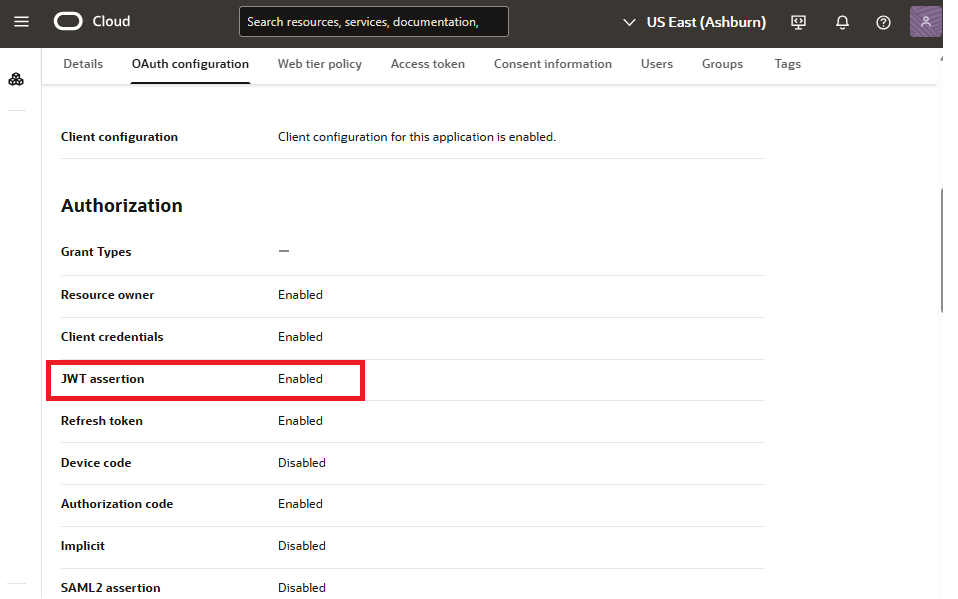
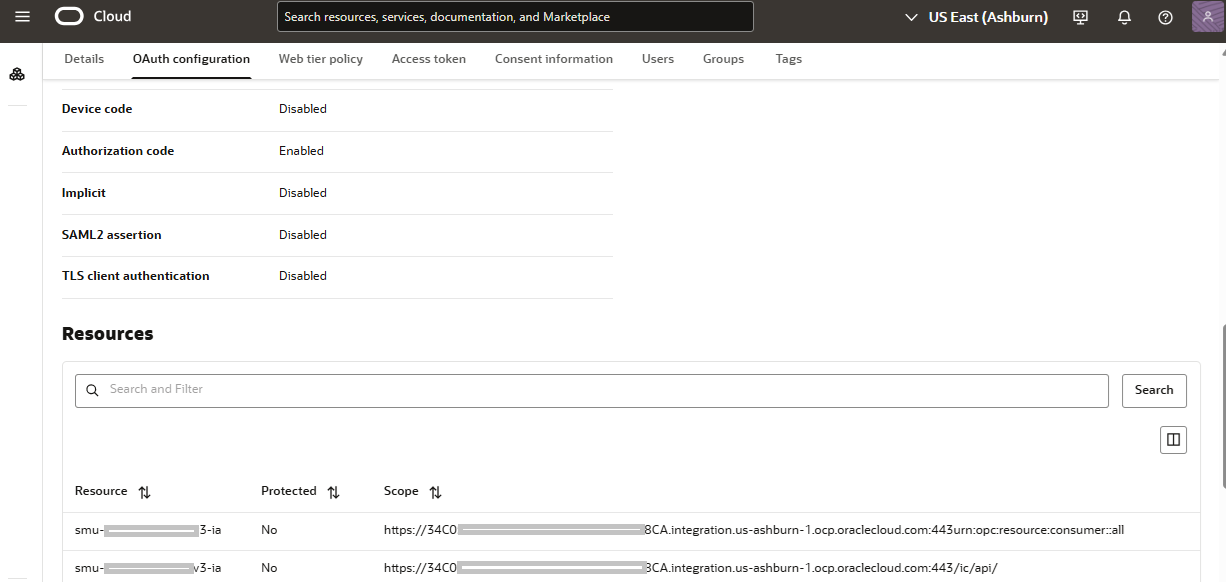
Client Confidential App in Identity Domain
The next artifact we need is a confidential client application for the OIC2 instance in the identity domain. The confidential client app for OIC2 is where we enable OAuth based authentication to connect to OIC2. In this client application, we enable JWT assertion grant type for OAuth authentication. We also define the scope for OIC2. The following images show some details of the configuration.

REST Adapter Configuration
After we have all the above configurations in place, we can now create the REST adapter connector in OIC1. The picture below shows my adapter configuration.
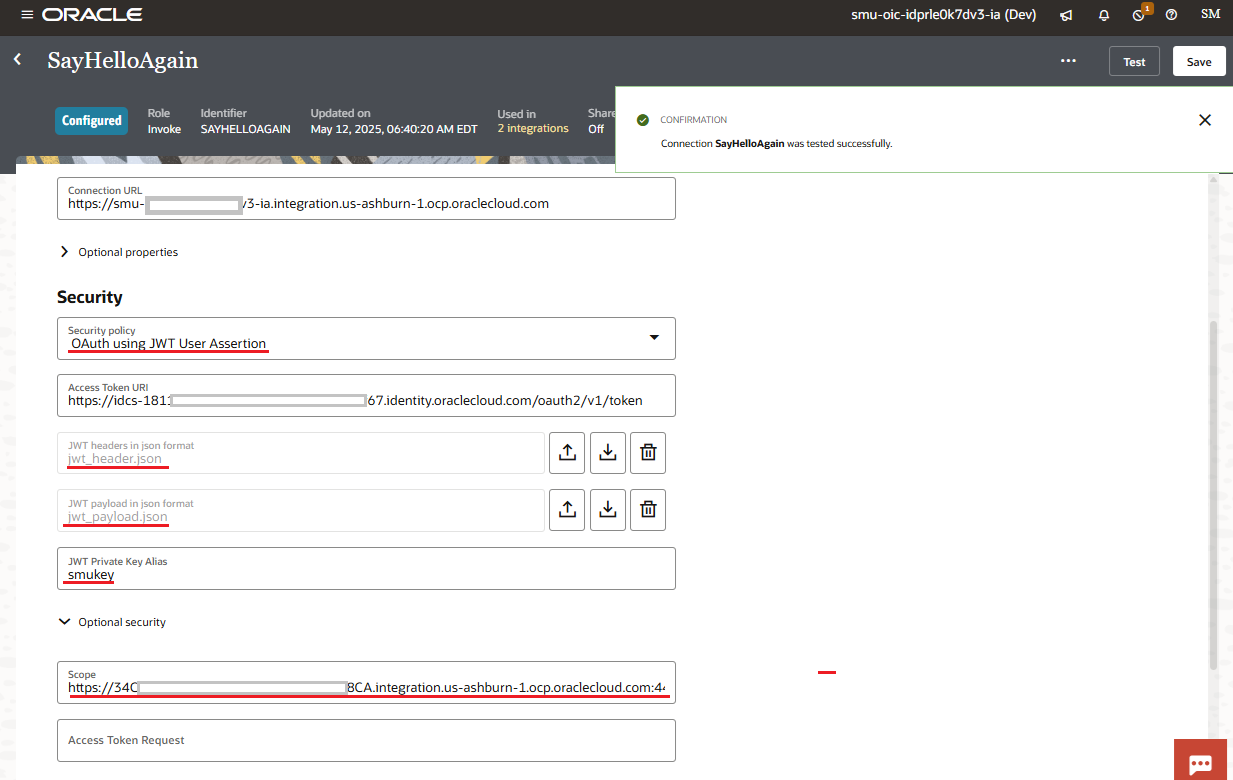
Security Policy
The security policy must be set to OAuth using JWT User Assertion.
JWT Private Key Alias
This value must match the name of the signing key imported to OIC1.
JWT Header and Payload JSON Format
While the JWT header and payload attribute names are standard, their values are mostly provider dependant. The following header and payload work in Oracle OCI identity domain.
JWT Header
{
  "alg": "RS256",
  "typ": "JWT",
  "kid": "smukey" // Must match the alias of the trust certificate imported into the domain
}
JWT Payload
{
  "sub": "valid username", // Must be a valid user name, otherwise, conntection test fails
  "iss": "af61741e6cd943ccbb8f9f25a87432db", // Must be the Client ID of the confidential client application for OIC2
  "aud": "https://identity.oraclecloud.com/", // This value is fixed
  "iat": 123, // This attribute is required but value is not used
  "exp": 123 // This attribute is required but value is not used
}
Integrations
Hello Integration 1
The first integration simply calls Hello Integration 2. If successful, it adds the response from Hello Integation 2 to the final response payload. If failed, it adds a failure message to the final response.

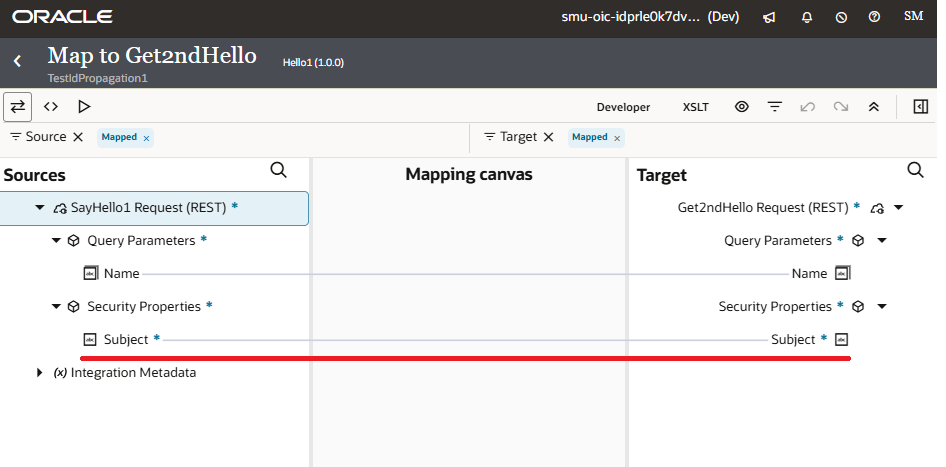
Data Mapping to Propagate Identity in Hello Integration 1
To enable identity propagation, Security Properties are added to both the Sources and Target of the mapping activity. We must map the Subject field of the Security Properties from Soures to Target.
Hello Integration 2
Hello Integration 2 is a simple integration that returns a hello message.
Test with Postman
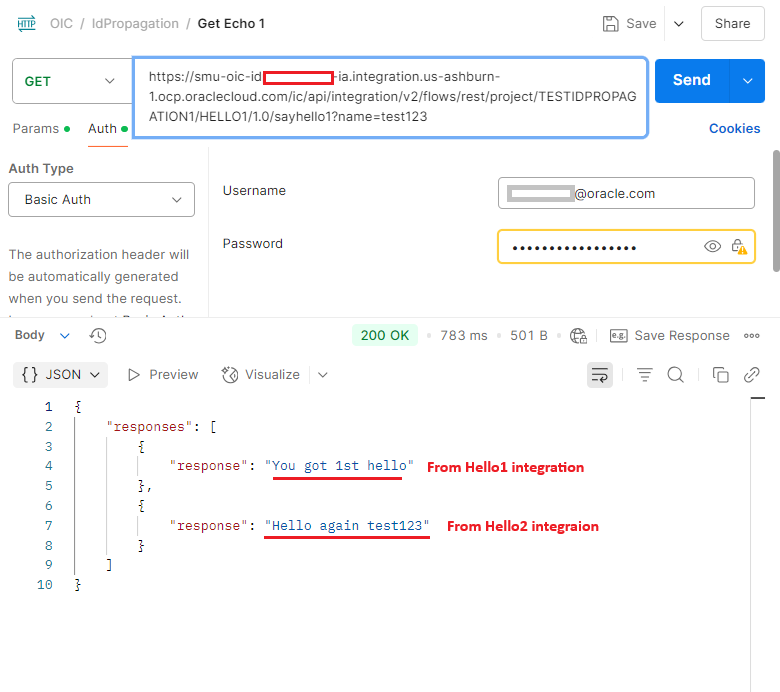
Test with user smu
This test is successful as user smu exists in both OIC1 and OIC2.
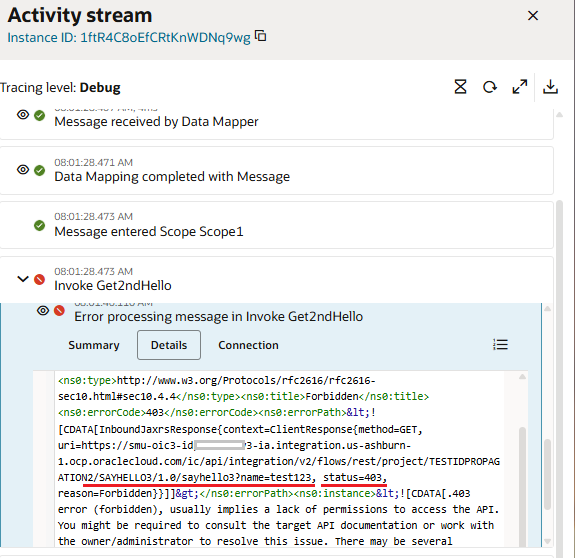
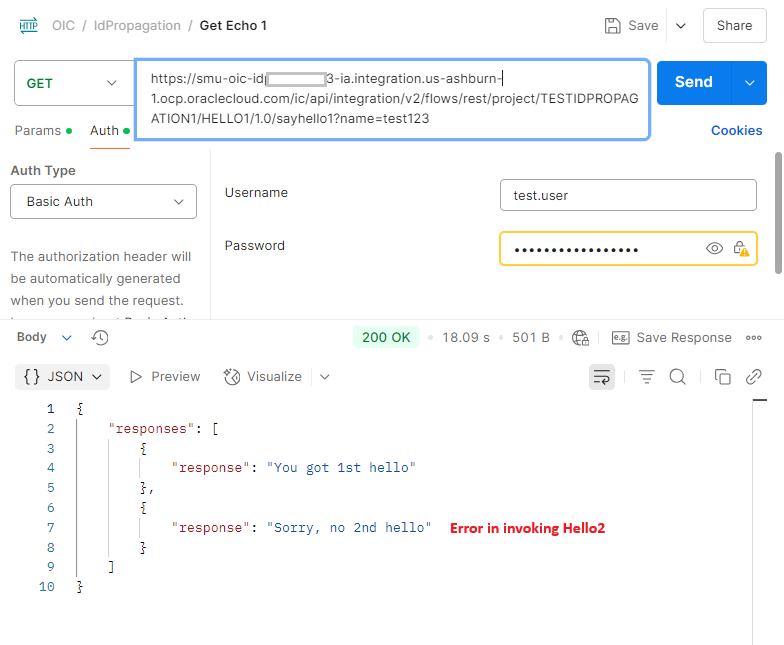
Test with user testuser
This test fails because testuser only exists in OIC1.
Verify Error Status Code in OIC1
To complete this demonstration of identity propagation, we will check the activity stream in OIC1 for the actual error code. We can see in the below image, the error is a result of lack of authorization for the testuser.