Introduction
In one of my former blogs I’ve written about a mechanism to download and parse the EXTRACT JSON log files via various scripts. If you are not familiar with this concept then its strongly recommended to start with reading that blog first. Also before entering the explanation of the proposed new approach lets conclude what the previous blog was offering as a solution:
- EXTRACT JSON files were downloaded by a Shell script from UCM and stored locally on a server or alternately on a cloud resource
- Via a Node.js sample application described inside that article, all existing EXTRACT JSON files were read and the data were consolidated in memory
- These data were rendered as HTML by this sample application and visualized via an Express.js Web Server accessible in a browser
- That specific approach had no built-in functionality to refresh the shown data – for a refresh another download of data and program restart was required
- Last but not least the solution uses no components that will require an additional licensing from Oracle side as BICC and UCM in Oracle SaaS are free of charge – all the mentioned other components are available as public Third Party Software
This blog is used to provide an alternate solution that will solve some of the limitations mentioned above, but also introduce an new approach that will allow
- a more dynamic reading from the BICC output directory
- using the capabilities to read the content of this BICC output directory again without stopping the Express.js service
- the creation of a high sophisticated UI in any tool that is able to consume REST services
- using the recent OCI services to store BICC output and to run the Node.js application in the cloud
As we will use OCI native components here, the suggested solution requires a subscription to the services used in the proposed architecture.
Solution Architecture Design
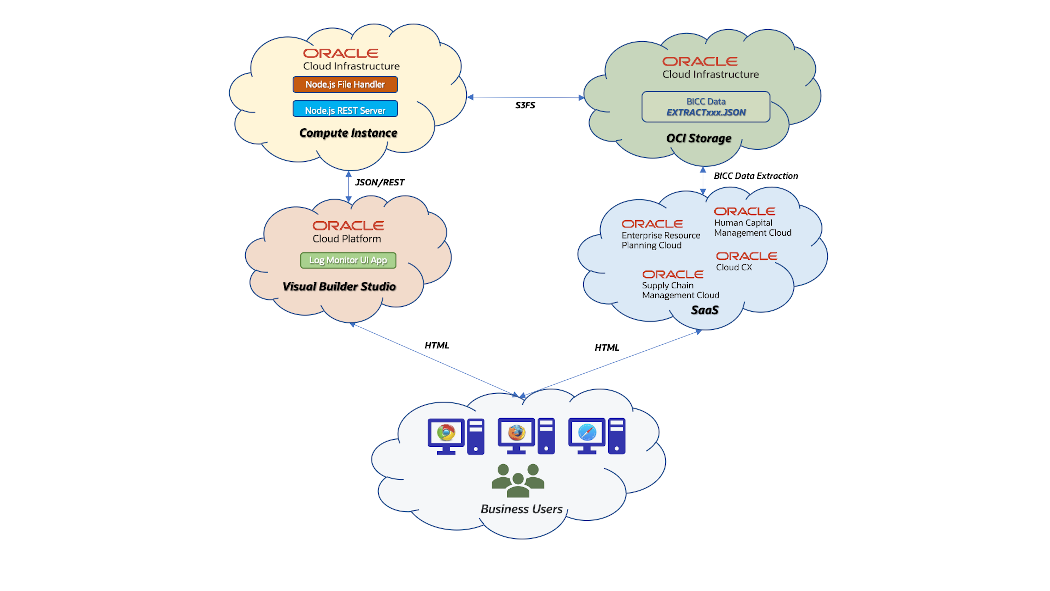
BICC in SaaS can be configured to store the extract files on an OCI Object Storage. We have already some existing A-Team Chronicles articles like this that describe the according configuration. In opposite to UCM, the files on OCI Object Storage can be used like in a file system while UCM is a document container. That means, we need no dedicated script that performs the downloading from UCM before we can start accessing and processing these files. OCI Object Storage has an AWS S3 compatibility and a storage bucket can be mounted as a remote file system in a Linux machine. This article provides more details how to implement such a mount.
Once configured in BICC the EXTRACT JSON files will be located in that bucket together with the MANIFEST files and the ZIP files containing the extracted data. These files can be processed from the Node.js application running in a Linux VM and being installed on an OCI Compute Instance. This bucket must be mounted as mentioned above into a local directory using the S3FS protocol. The sample application will read all the JSON files from this directory (the mounted network resource) and process the information in a similar way as provided in my previous blog. The main changes in this blog are covering basically some new features like the refresh of data, providing the availability of a set of REST API’s and obsolete the hard-coded HTML rendering. The dedicated views on these data are implemented by offering various REST API’s via Koa.js.
The source code of this application has been published on GitHub under this URL:
https://github.com/oracle-samples/sample.bicc-extract-logs-server-sample
Ulrich Janke, Jan 4th 2023
These REST API’s can be used for multiple other purposes like the feeding of Analytical Applications, embedding them into Integration Flows or using them for Data Visualization. As a sample for Data Visualization I have added a brief section with screenshots that are suggesting how to use these services in an Oracle Visual Builder (VB) environment – mainly as an alternative to the static HTML rendering like explained in my previous blog. Providing a full-blown UI sample in VB Studio would exceed the scope of a blog like this. In case there is a significant interest for such a blog writing, then please leave an according comment at the end of this page!
In the following sections I’ll explain the single components more in detail. For all of the exposed components we have plenty of other documentation available – blogs, service documentation or even an OCI certfication process will help understanding these details. In the sense to keep focusing on the essentials – the end to end flow from BICC to visualizing the EXTRACT JSON log files – I’ve kept the further explanations as short as possible. The definite intention of this article is to share some ideas and give some guidelines for an according configuration to be used by everyone in the Oracle community who wishes to evaluate a similar scenario. A related article discussing the options to secure the access to these proposed REST services has been published here.
Configuration of OCI Object Storage and Creation of a Bucket
As a first step in the configuration process we have to create an OCI Object Storage caused by the fact that we need these connection information later when configuring the External Storage in BICC. The following activities give a high level overview of the steps being required to create a bucket that can be used as a remote container in BICC. As shown in screenshot below this configuration starts with an OCI Compartment where the OCI Object Storage will reside in. For our sample its sufficient to create a “plain” Compartment as documented on Oracle Docs. The goal is to create a Bucket in the Object Storage as explained in this document.
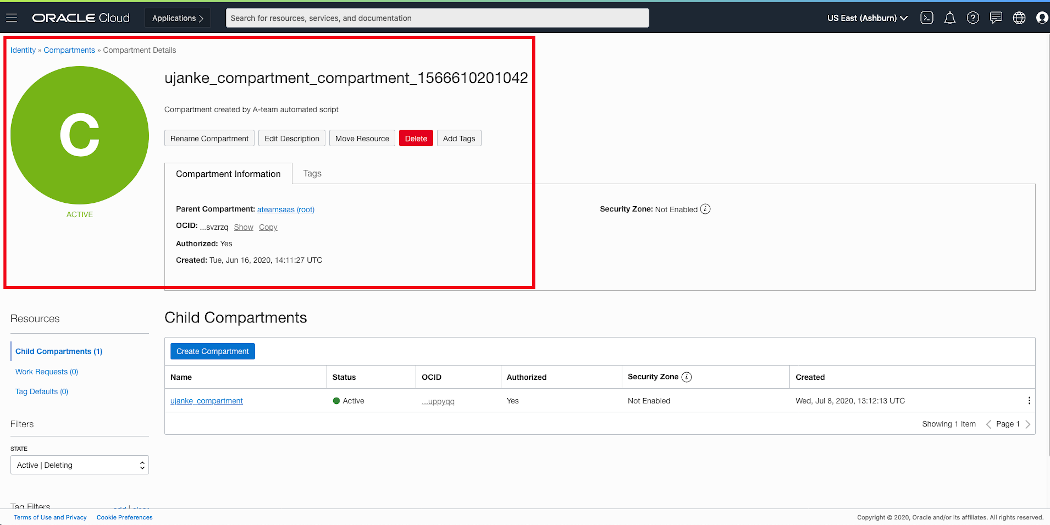
OCI Compartment definition
Once an Object Storage is accessible, the next step is to create a Bucket to be used for BICC extracts. The detailed documentation for the creation of a Bucket can be found here. The visibility of this Bucket is defined as Private here, as the BICC extracts will very likely contain sensitive data. It is the customers responsibility to define their privacy scope according to their requirements!
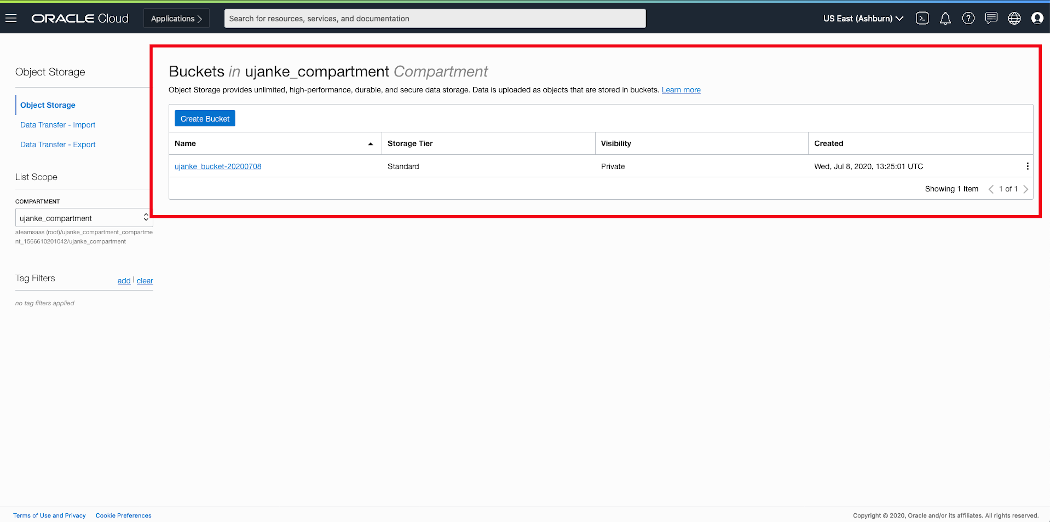
OCI ObjectStorage Overview – Bucket configured
The overview below provides some details about the actual Bucket configuration including the parameter OCID as we will need that value in the next step. As one configuration step it is required in BICC to enter this value in the setup for the external storage. In the screenshot below we can also see how the extraction files are listed in this container.
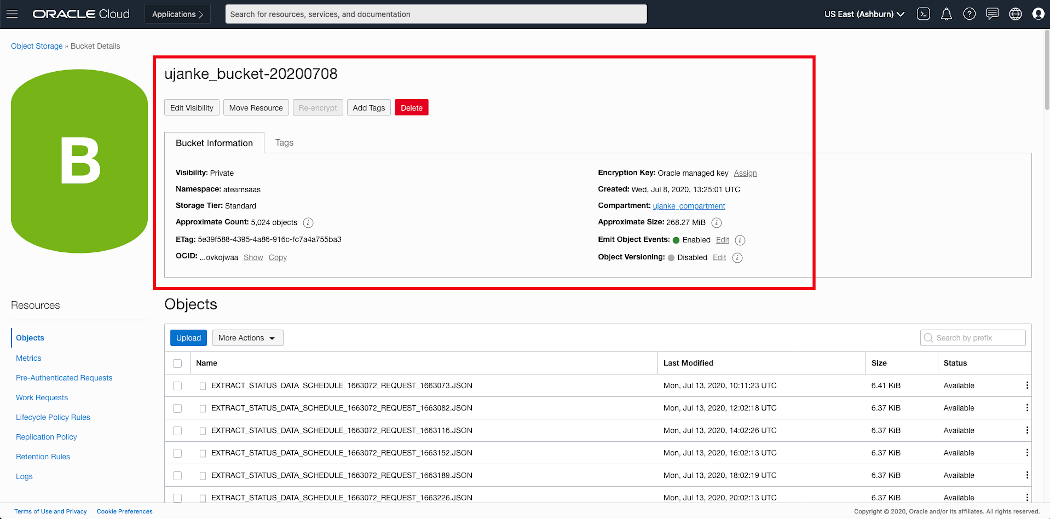
OCI ObjectStorage – Bucket Details
Once this initial storage configuration has been done in OCI, we are ready to configure the external storage in BICC in order to save the output of those extraction runs in that Bucket.
Configuring BICC to use OCI Object Storage
In Oracle SaaS we have to create the remote container as an External Storage inside the BICC Console. For less experienced users this BICC documentation would be a good starting point to understand the usage and administration of BICC.
A privileged user with a role as BICC Admin assigned, has to open the configuration page by clicking on the Configure External Storage icon like shown below. Such a new configuration can be added by using the menu item OCI Object Storage Connection as being available on that page.
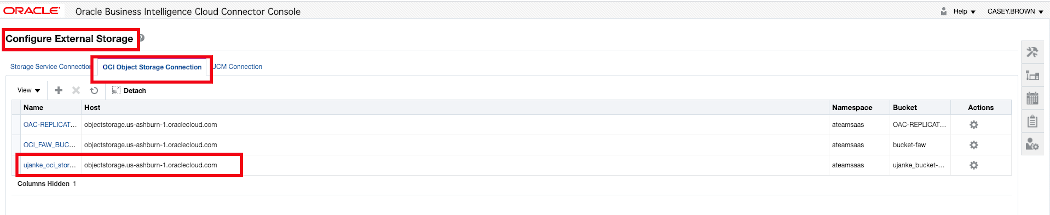
BICC external storage definition 1 of 2
The single configuration items for an OCI Object Storage connection have been documented here. As mentioned earlier in this article there is also a blog existing on A-Team Chronicles which shares more details.
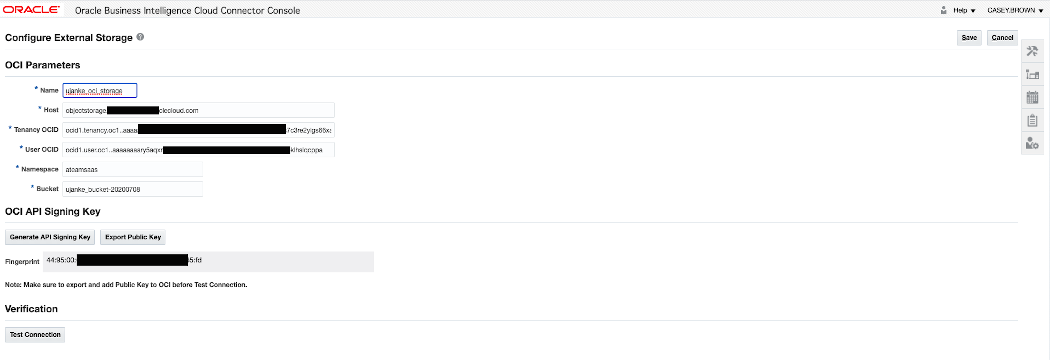
BICC external storage definition 2 of 2
Once configured, the external storage can be chosen as the output target – either as a default value or for dedicated extracts. The entire output of an extraction run will be located in that target: the zip files containing the data, the MANIFEST files with the metadata and the EXTRACT JSON files with the run statistics.
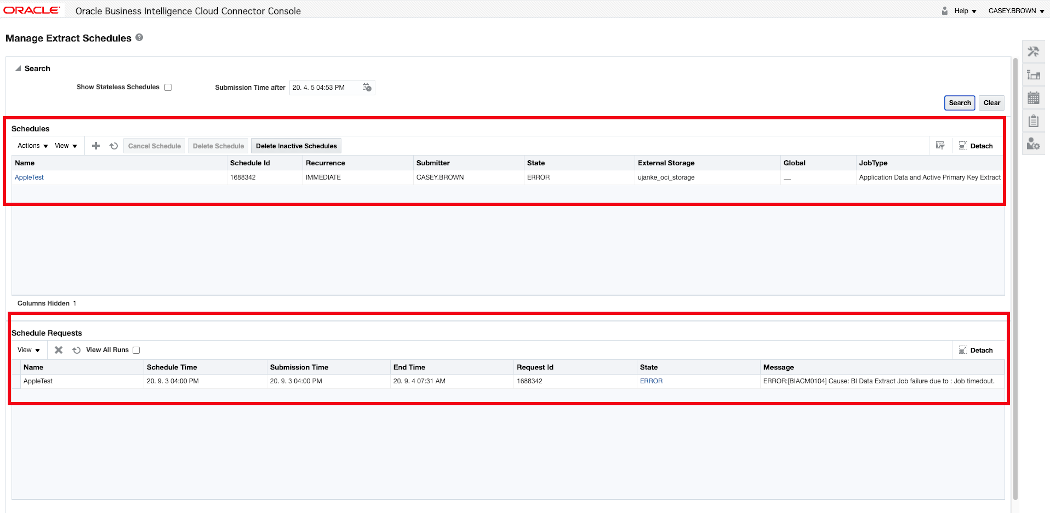
BICC extract schedule
By finishing the BICC configuration like shown above, all steps were done to ensure we can use a container in the cloud to store the extraction output for further processing. The next sections will be used to give an overview how this file processing and the REST API consumption was implemented.
Creation and Configuration of a Compute Instance to run a Linux VM
As a base for further processing of the BICC Extract JSON files we need a Compute Instance that will run a Virtual Machine. As you will see further below, we will use Node.js and Express.js inside this VM to run the sample application. Useful instructions how to use OCI Compute can be found via the online documentation here. In theory this VM can run a Windows or a Linux OS, but some components like the S3FS package are probably not available under Windows. Honestly this hasn’t been checked for this article and so I’ve used Linux as an OS.
Probably it is also worth to mention that we can use alternate components in this entire solution architecture by chosing a Docker image instead of a Linux VM. As we see, there are multiple choices and also a Docker image would have some advantages for the instance management. Moreover the entire solution is enabled for a CI/CD usage and the hosting VM/Image and OS can be used according to the implementers preferences. However, for this sample, I’ve chosen to strictly use a Compute Instance that runs a Linux VM.
In the screenshoot below you can see some of the paramaters being used for the sample Compute Instance. The instance is available from the Internet via its Public IP Address. In next section we take a deeper look into the network configuration as being required for our use case.
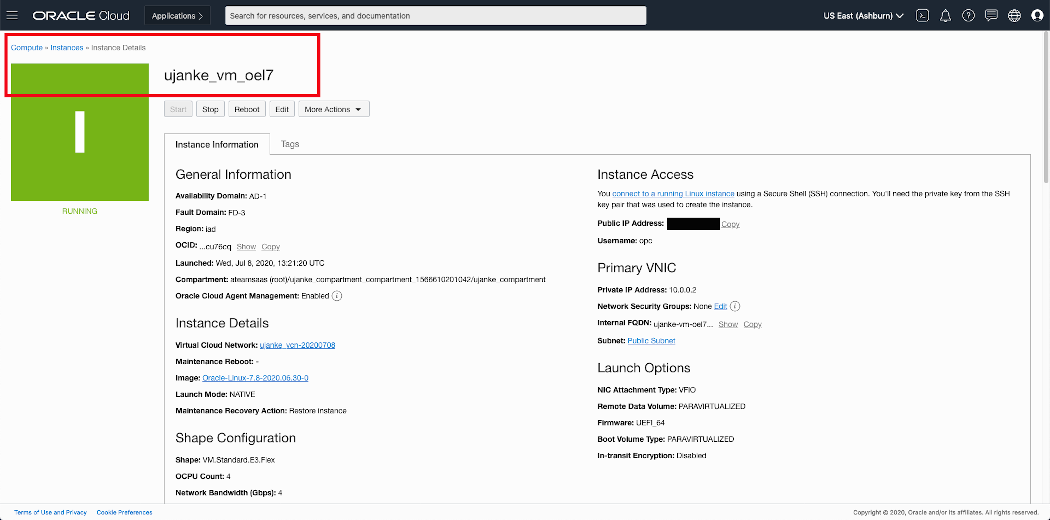
Overview of OCI Public Cloud Linux VM configuration
Once this instance has been created there are i.e. some typical tasks that are useful before continuing with the next steps as :
- Install the latest OS patches
- Install a Linux user that will own and run the application
- Create a directory to be mounted later as S3FS filesystem
- …
Any sizing options like number of OCPU’s, memory etc. can be handled flexibly according to the estimated volumes of files being processed, the expected/planned number of web sessions, the frequency of data refreshs and similar. The further configuration steps are listed below in detail.
Various other configurations: VCN, S3FS, Node, Express etc
VCN configurations
The configuration below reflects an evaluation environment with quite low security restrictions. This is caused by the fact that we are focusing on an end-to-end scenario with a limited scope on an enhanced security setup in VCN like port or IP address locks. In a real-world or production environment these unrestricted settings are not recommended. More information about networking capabilities to improve the security standards can befound in the OCI Networking Documentation.
This Compute Instance has a Public IP Address and the Linux VM has a Private IP Address. While the outbound IP traffic is open through NAT, the challenge is to open the inbound traffic too, to allow an access for the REST API’s via http. The single steps below can be used as a sample configuration path to open the bi-directional network traffic completely to the Linux machine. For this purpose we have to create a VCN configuration as shown below.
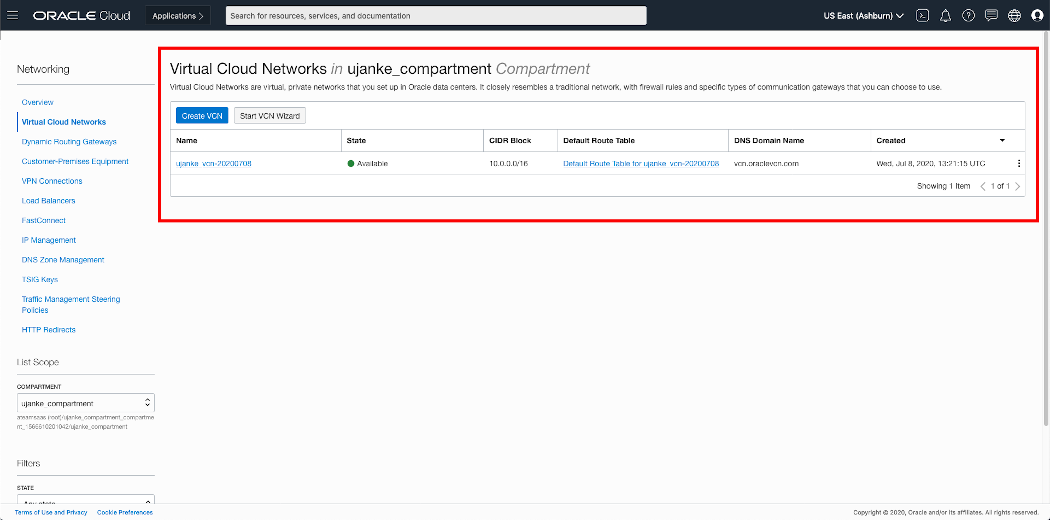
Overview of OCI Linux VM network configuration
As shown in the screenshot below, there must be a subnet existent for the Private IP Address inside the Linux VM. In our test configuration the assigned private IP address is 10.0.0.1 and therefore the configured CIDR Block must be 10.0.0.0/24.
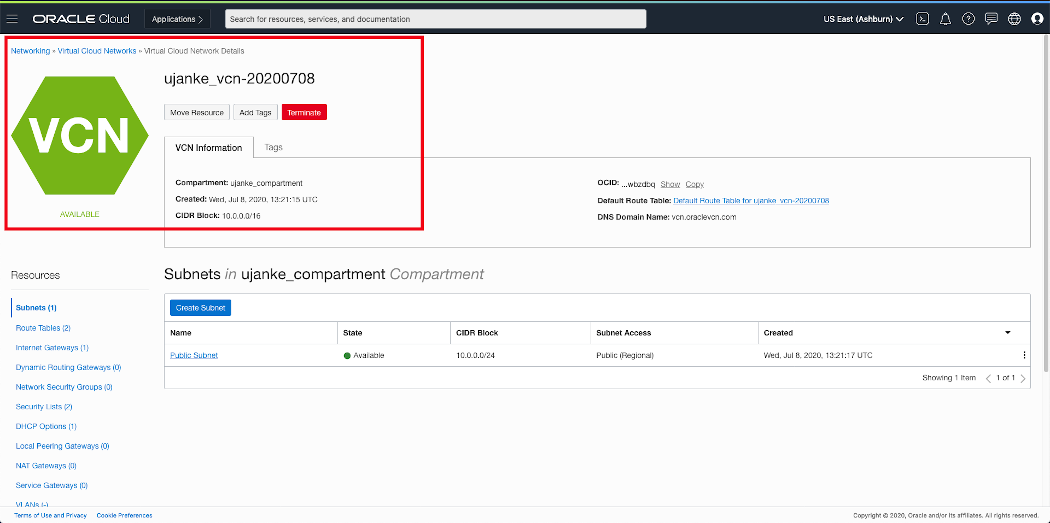
Overview of OCI Public Cloud Linux VM configuration
For this sample architecture we’ve configured a Default Route Table with a Route Rule defining 0.0.0.0/0 as destination and of target type Internet Gateway.
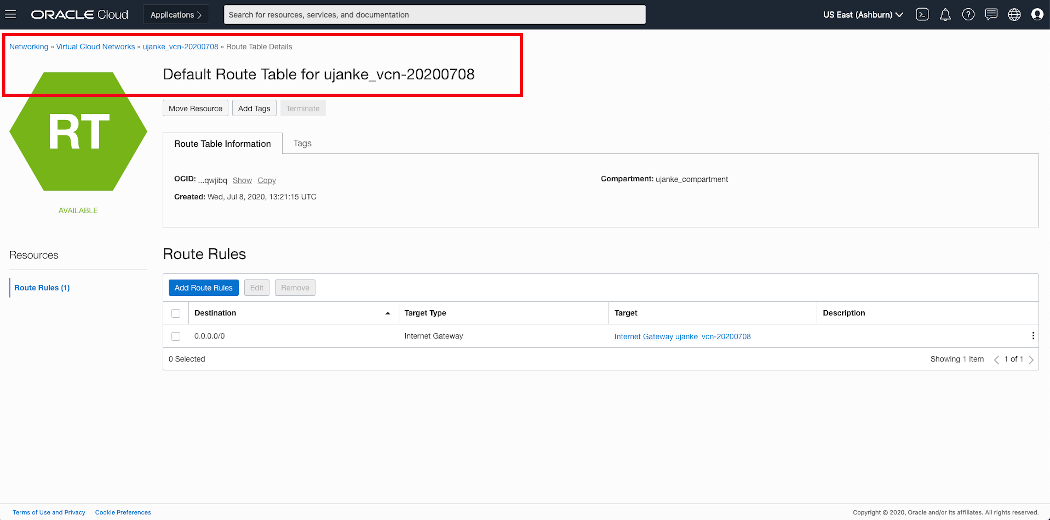
Overview of VCN Default Route Table configuration
Another resource to configure are the DHCP Options. Here we created a default resource using a DNS Type of Internet and VCN Resolver with a standard search domain vcn.oraclevcn.com.

Overview of VCN DHCP options configuration
In another configuration step we have to create an Internet Gateway that will be used as a target for a new Route Rule to be created. The Internet Gateway has no further configuration options. The destination for this Route Rule must be 0.0.0.0/0 with a target for the previously created Internet Gateway. This will be used to redirect the outbound and inbound IP traffic between private and public networks.
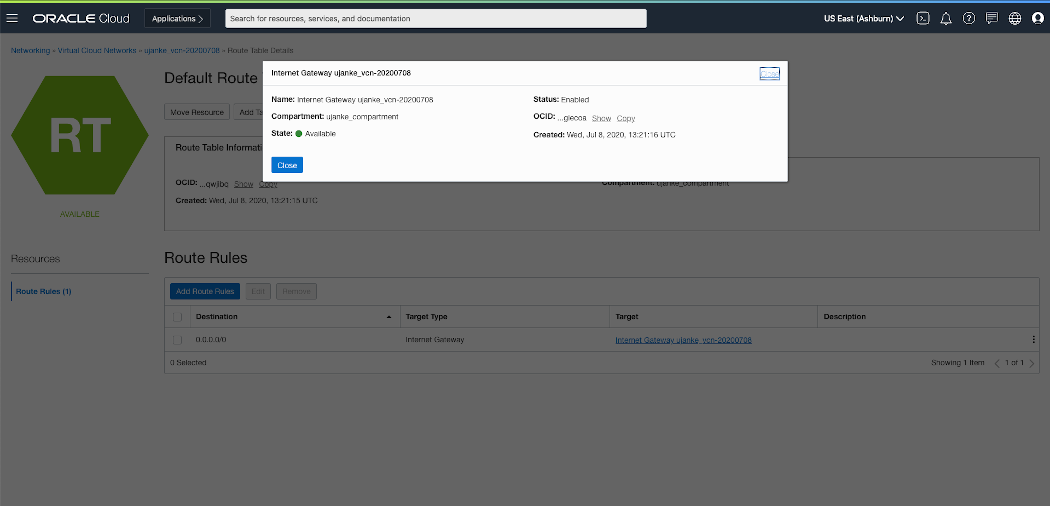
Route Rule for a VCN Internet Gateway configuration
Once the Internet Gateway and Routing Rules are existent we must create in another step a Security List (in screenshot below named ujanke_http_virt_server) that defines the security rules for the http communication we intend to run. This Security List will contain rules for inbound (Ingress) and outbound (Egress) IP traffic.

Overview of VCN Security Lists configuration
As mentioned further above, this test/evaluation configuration has no hard restrictions. If those would be implemented i.e. the Ingress/Egress rules would be used to set tighter boundaries to control the traffic. In our case the both rules are not strict at all and so they both look very similar. The Egress Rule rule is defined as Not Stateless with a Destination 0.0.0.0/0 for all protocols and ports. This will set no limitations for the outbound traffic.

Overview of VCN Security Lists Egress Rules configuration
Similar to the Egress Rule above we will set the Ingress Rule to the least restrictions on the inbound traffic. As shown below this rule is similar to the Egress Rule we’ve created above.
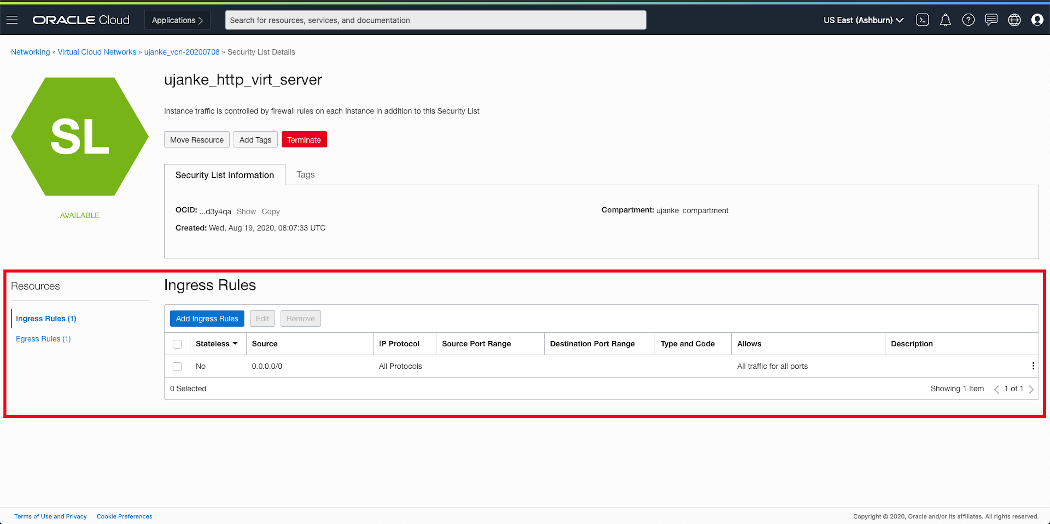
Overview of VCN Security Lists Ingress Rules configuration
For our special case of an evaluation purpose it is intended to keep especially the inbound traffic very flexible. It will be controlled from inside our Linux machine by the internal firewall. The provisioning of these REST API’s will be implemented via an Node.js and Express.js application where the source code is/will be available on GitHub. The details for this configuration are explained in the sections below.
Network configuration in Linux VM
After creating the VCN configuration, the firewall in the Linux VM must be opened for the TCP/IP port run by the Web Server. The application will listen by default on port 3000, but it can be controlled by a parameter to use another port. It is necessary to open the network port for the application to be accessible from outside the Linux machine. This can be achieved by running a command like this:
sudo firewall-cmd --permanent --zone=public --add-port=3000
firewall-cmd --reload
Obviously when intending to run the Web Server on another port, then the command above must use the other port number instead of the number 3000.
If not controlled by a program parameter, the Web Server will run on the local loopback IP address 127.0.0.1. This is not useful in an OCI Compute Instance and so it makes sense to use the private IP address as such a parameter. Alternately, and more comfortably, it would also make sense to create a hostname inside the Linux VM for the private address in the /etc/hosts. As shown below an entry would look like this as been taken from our test environment:
10.0.0.2 myuser-vm-oel7.subnet.vcn.oraclevcn.com myuser-vm-oel7
Only by using the private IP address as a program parameter, the Web Server will be reachabe from outside as we’ve configured it in previous VCN setup. The usage of a hostname has some advantages as that will allow scripting using a name being independent from physical IP addresses.
S3FS configurations
A very important piece in this architecture is the ability to access the BICC output directly in a file system. As shown above, the BICC output files are located in a bucket in an OCI Object Storage. An elegant method to access these files is the ability in OCI Object Storage to provide an AWS S3 compatibility. By installing the Linux package s3fs-fuse-1.86-2.el7.x86_64 we achieve the capability to mount the remote bucket via S3FS as a local folder. The executable program name is s3fs. The local mount point (/home/myuser/bicc_files as shown below) must exist or be created before the script below will run successfully.
#!/bin/sh

s3fs myuser-bucket /home/myuser/bicc_files \
  -o passwd_file=/home/myuser/.passwd-s3fs \
  -o url=https://myuser.compat.objectstorage.datacenter.oraclecloud.com \
  -o nomultipart \
  -o use_path_request_style
Details about all the program parameters can be, as usual, obtained by running with the –help parameter.
Node.js and Express.js installation
An additional configuration step inside the Linux VM is the installation of Node.js and Express.js before the application can be run. There are multiple ways to install these packages. One option could be yum as long as their exist a software repository that provides the required minimum on versions: Node.js 12.19 and Express.js 4.17.1. If these requirements can’t be met then an alternate solution could be a better choice:
- Install npm as available from https://nodejs.org
- If not included then install package fs via command npm install fs –save-bundle
- Finally install Express.js by running npm install express –save-bundle
Node.js and Express.js as BICC Log REST Server …
Once the application has been started there are several REST API’s avaiable giving certain views on the BICC extract log data. These are samples and can obviously be modified or extended as the source code for this sample application is available on GitHub. The API’s listed below are providing some views on top of the consolidated log data as being processed using all the existing EXTRACT JSON files.
- reportStatsREST -> return the statistics and summaries of all processed files
- byDateREST -> return all log information ordered by run date
- byNameREST -> return all log information ordered by VO name
- bySchedIDREST -> return all log information ordered by Schedule ID
- byFailStatusVOREST -> return all log information of failed extracts ordered by VO name
- byFailStatusDateREST -> return all log information of failed extracts ordered by run date
- refreshDataREST -> initiate another file reading and processing to refresh the REST data
For a built-in online documentation I’ve created an index.html file that will be displayed when opening the Web Server page in a browser without the virtual path of an existing web service. Here is a sample: the Public IP Address of our Linux VM has been registered locally in a hosts with a hostname like my-bicc-rest-server. With the URL http://my-bicc-rest-server:3000 opened in a web browser, the page below will appear, describing the single REST API’s and giving a sample of their JSON payloads.
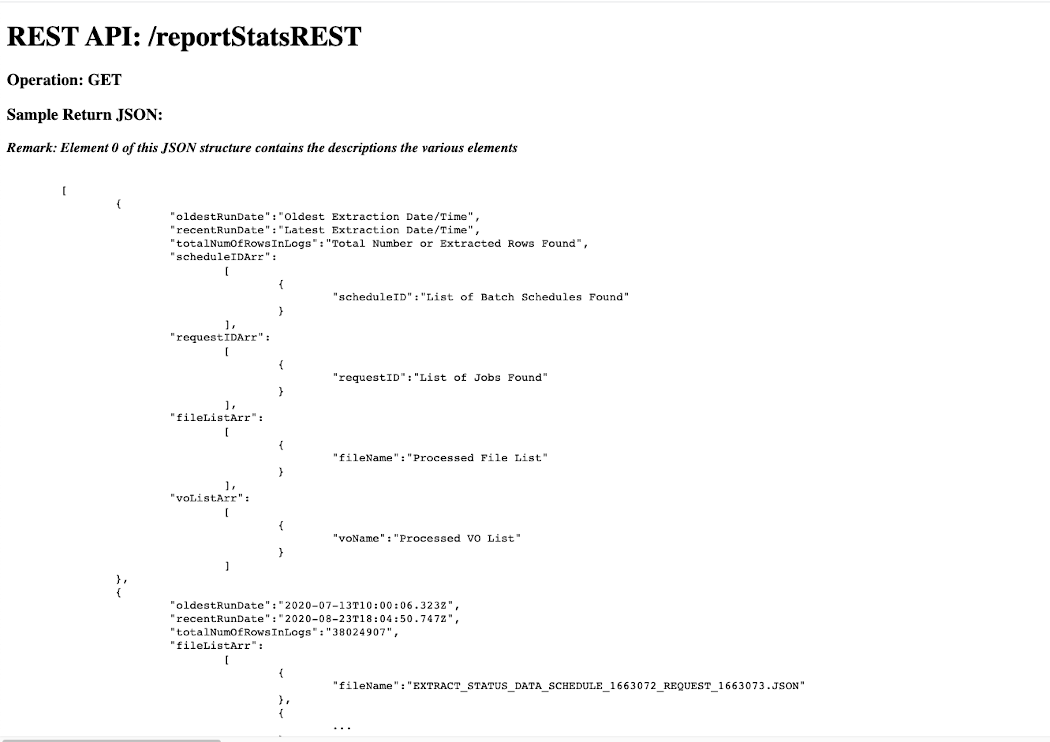
BICC Log REST overview page – index.html
Usually the REST API’s will be invoked programmatically by tools like curl or others. As usual it is also possible to open these URL’s in a browser to ensure the target is available or for function testing and validation purposes. In case the API works as expected and there are data existing, you will see a resulting page similar to shown below.
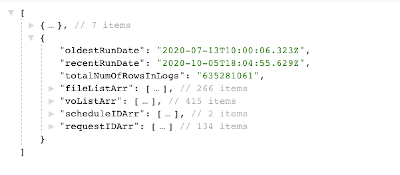
Log REST sample JSON Page – overview
The JSON payload consists of a number of arrays containing views on the log data. The very first (zero) element of this structure contains usually some static elements: the array column headers. Those can also be used in the further data visualization tasks as column headers for the visible data. However there is no MLS support with the given approach as these values are in English only. If MLS is a requirement, the column headers can’t probably being used.
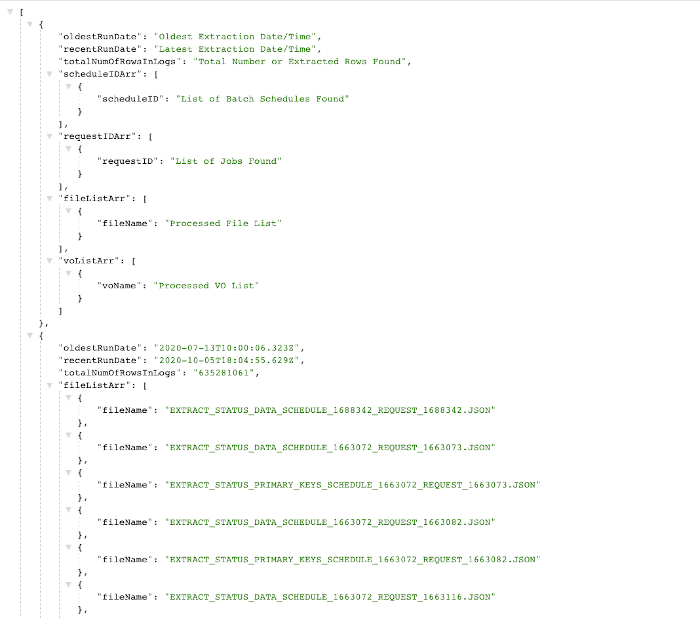
Log REST sample JSON Page – details
The program collects all data found into JS arrays and creates program structures as separate internal arrays that will be returned as JSON content when invoking the various REST calls.
After processing these JSON files, a REST server will be started via Express.js with the following specifications:
- if not specified differently by a parameter the listening port of this server is 3000
- if not specified differently by a parameter the listing IP address is 127.0.0.1
- if not specified differently by a paramter there is no log output
- if the given directory is not accessible or can’t be opened, the program execution will be stopped with an according status message
- if no specific REST API is given – means just opening the URL in a browser as is – a static index.html will be opened and shown, providing a documentation about the available services
- if no suitable JSON files exist, but might be produced at a later time, the REST API refreshDataREST can be used to reread the directory and to rebuild the internal structures
- the refreshDataREST call can be executed at any time or also scheduled to ensure the latest files will be processed
- none of the REST API’s requires a parameter and all of them are called by using a GET method
The following fields are read and processed as read from the various JSON files:
- name
- status
- runDate
- queryDurationInSec
- extractDurationInSec
- uploadDurationInSec
- totalDurationInSec
- rowCount
- errorMessage
To execute the program run on command line:
node biccLogServer.js
In case the program has been started like shown above, the web site can be opened in a browser on a local host by using the following URL with the loopback address:
http://127.0.0.1:3000
If running the program without any parameter the caller will receive a standard usage message listening the available paramaters.
$ node biccLogServer.js
Error: insufficient number of arguments!
Usage: /usr/local/bin/node biccLogServer.js <dir> [port=<1024...65554>] [log=<y|Y>] [host=<server>]
  <dir>           -> <Directory containing EXTRACT JSON Log Files>
  [port=<value>]  -> web listening port - default value = 3000 [optional]
  [log=<y|Y>]     -> console log y|Y - default value = no [optional]
  [host=<server>] -> host name or IP addr REST server will listen -
      the default is 127.0.0.1 [optional]
The application will remain running in foreground until being interrupted by Ctrl-C. It has been tested and it works to run the program via a nohup command on Linux and to put it into the background without interruptig.
If the refresh of log data is a demand, it can achieved by running a command like this:
curl http://127.0.0.1:3000/refreshDataREST
All other API calls in a real-life environment using local hostnames would be executed like this command and retrieve a JSON payload on command line:
curl http://my-bicc-rest-server:3000/byNameREST
Obviously there are many other ways to get use of these JSON data. One sample will be briefly explained below where we use Oracle Visual Builder for the further processing of data. Other samples would be invocations from Oracle Integration Cloud, Oracle Process Cloud or any 3rd party applications that can consume REST payloads for any follow-up tasks.
BICC Log Visualization via Visual Builder
All the previous configurations are culminating now into a situation where we have a Web Server up and running that delivers BICC log information via a set of REST API’s. As just one sample for an UI integration I’d like to highlight the potential usage in Oracle Visual Builder. By intention I did avoid in my sample code the wrapping by a security layer for authentication and session management. Not that this is not important. Just the opposite is true! But the intention was to keep this architecture blueprint as simple as possible – even more in an end to end flow that includes so many components.
For our VB sample it means we can register these custom BICC log services without any additional config like providing login credentials or security tokens. In a real-live or production environment this is obviously not recommended. Also with respect to this quite complex blog I won’t provide a full-blown UI application. Its intended to provide just some basic ideas how the creation of such an application can be initiated. I’m definitely not a talented UI designer and so I’ll leave this a creative lesson for everyone who is ambitioned to get it done.
As the screenshot below demonstrates, we’re creating a web application in VB that will use out REST services.
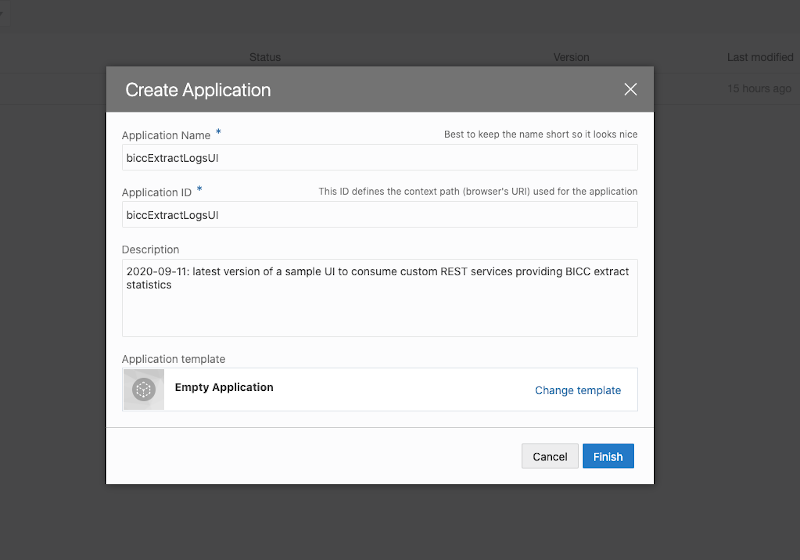
Sample VB App Creation
As shown in screenshot below we can register in VB the Web Server we’re running to provide the REST services. We’ve to use the Public IP Address of our Linux VM including the port for this service.
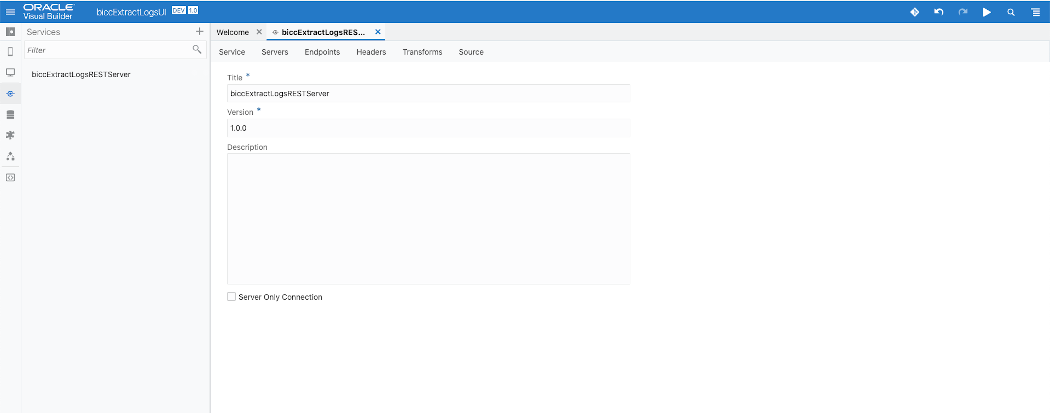
Sample VB App Service Creation for BICC Log REST Server 1 of 2
The methods we’re using to invoke these REST services is GET and we usually retrieve many JSON entries per call. This is a configuration we have to enter when creating a Service Connection as shown in screenshot below.
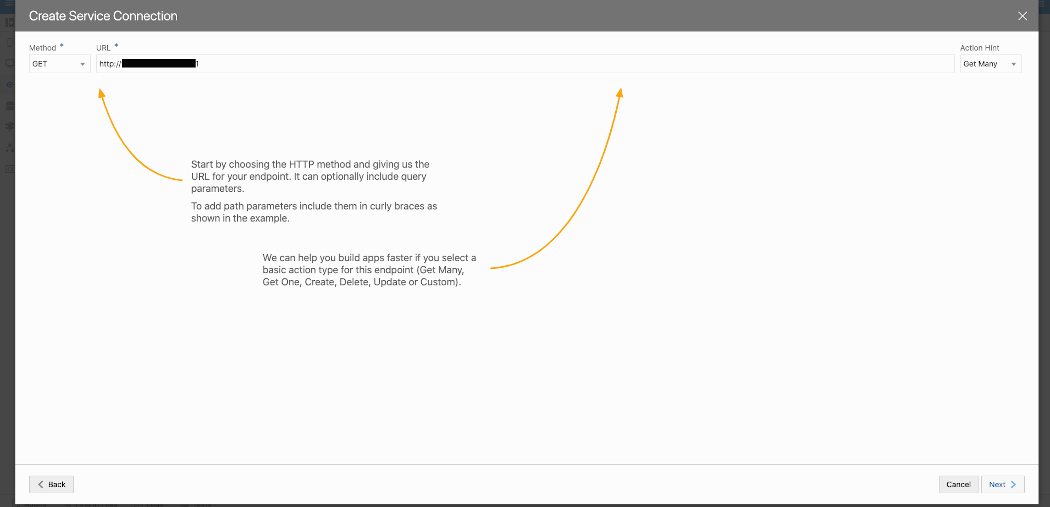
Sample VB App Service Creation for BICC Log REST Server 2 of 2
Once the Service Connection has been created, we can register REST Endpoints for that service. The screenshot below shows how these endoints will appear in VB once we finished that task. From now on these services can be used for UI layouting. There is a broad variety of options to make a use of these services when creating UI pages. In case of a significant interest we will consider a dedicated blog highlighting the steps to implement these features.
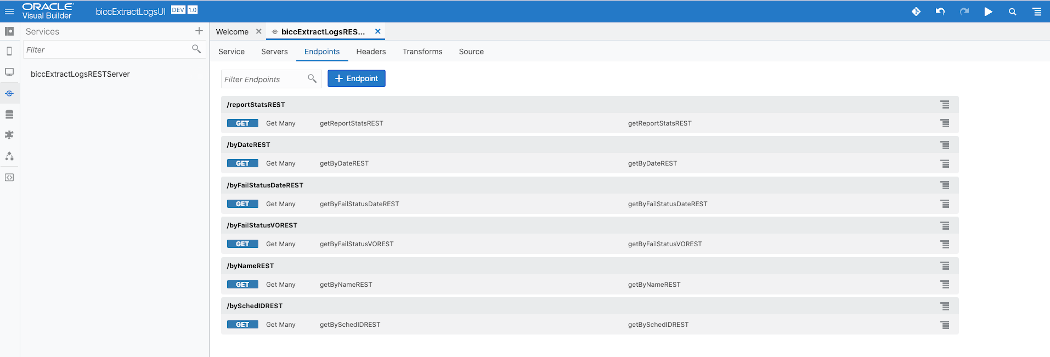
Sample VB App Service List
I’ve mentioned above that the UI design is an important, but also quite highly specialized or even a complex task. The last screenshot in this article shows a hint how to use a set of buttons that could control the appearance of the specific views. As mentioned: there are obviously plenty of options to create fancy UI’s and as such, those activities should be seen as an activity worth to be handled in an extra blog.
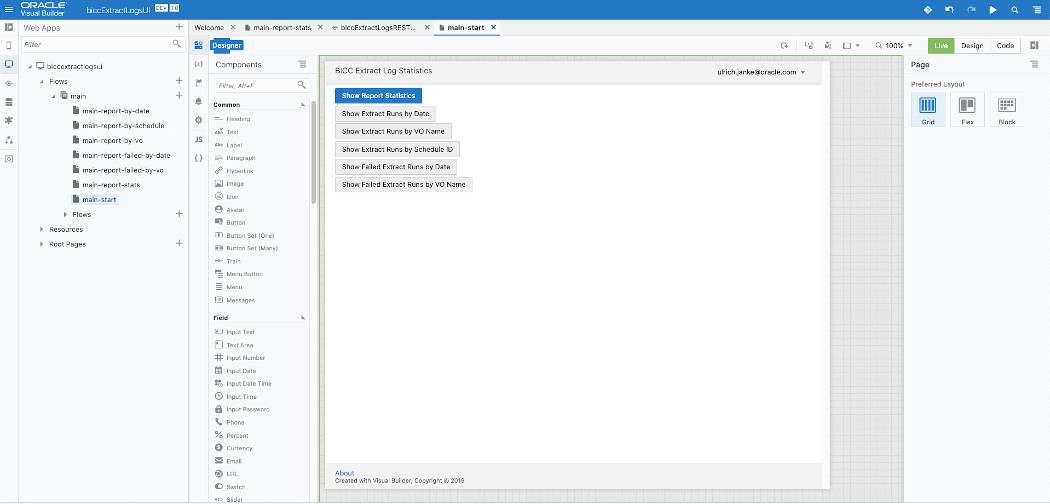
Sample VB App UI Page Design
Conclusion
The purpose of this article was to propose an architecture that uses an OCI native approach to consume BICC extraction output log files in JSON format and to process them. The focus had been set on two main topics: 1) exposing an end-to-end architecture including all participating components and 2) to implement a sample application running on Node.js and Express.js that processes these log data by providing a set of REST API’s. Once such an architecture is in place, we can consider other solutions that could make a use of the enhanced capabilities by using a Cloud Native approach. Any ideas are welcome about any solutions to be evaluates similar to this one. Please use the Comments button below to make suggestions and share ideas about use cases to be handled in future blogs.