Overview
This article is a follow-up to a previous blog about BICC Extract Logs Monitoring on OCI Native. In that article I’ve described how OCI native services can be used to track the BICC status log files and how to provide these information via a set of REST API’s for further external processing. The proposed architecture used a simplified architecture with no security features involved. Main reasons to keep the security out of scope of the previous article were the following as listed below:
- The intention was to keep the complexity of the previous article manageable.
- The provided code sample was intended to provide an ability to run generically without any dependencies at any device for evaluation and testing purposes – from local PC to to OCI Compute Instance
- Adding specific security features into the Javascript code itself has the risk of creating dependencies that might or could require the need for rework in case security standards are changing, leaks being found or technologies are changing
- Nevertheless its admitted that we have to secure this solution via an alternate path – we have to avoid that the REST API’s can be invoked in real-world scenarios by consumers which are not authenticated or via http traffic that is not encrypted
- As the original sample was introduced as a component in an OCI eco-system we will add the security features via embedding the solution into some additional OCI components in order to add the required functionalities
In the following sections we’ll walk step by step through the various configuration activities after starting with an introduction into the proposed Security Architecture first.
Introducing a Security Architecture
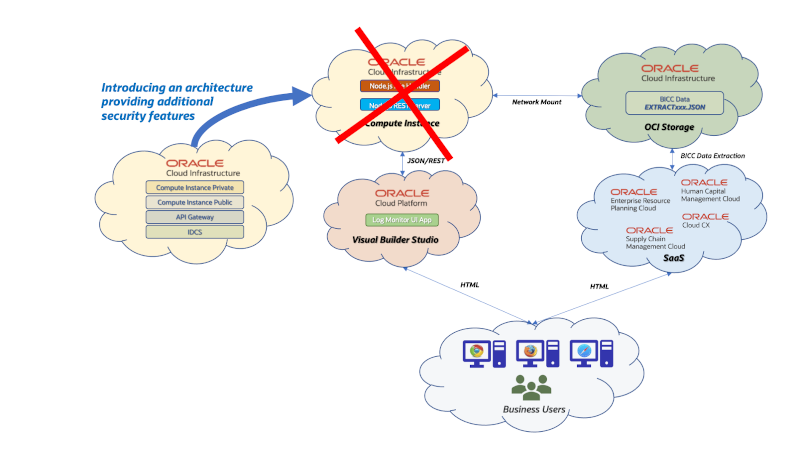
In the architecture I’ve proposed in the previous blog, we were using several OCI components that were processing SaaS BICC log information and eventually providing s set of REST API’s for being used by other applications. The Node.js and Express.js program was focusing on the algorithm to read files, render the information according to the API structure and to provide features for a data refresh. The code does not include any security routines and is not using an https protocol either. The sample can run without any bigger efforts to configure user acces, registration of certificates or similar. Its obvious that such a sample won’t stand the security requirements as mentioned of a customers production environment. We have two choices now:
- to add a security functionality to the code with the risk of continuous rework whenever standards are changing and also to blow-up the number of code lines or
- to change the architecture in a way that these services can only be invoked in a secure way.
Need for an additional security layer” onclick=”image("https://cdn.app.compendium.com/uploads/user/e7c690e8-6ff9-102a-ac6d-e4aebca50425/432fb530-3b2b-4456-98d6-492309951e2a/Image/a38d21f2ab45f426f9a7239fb1946af9/01_20210105_architecture_l.png")” src=”/wp-content/uploads/sites/134/2025/11/01_20210105_architecture_s.png”>
Where a security layer should be located
In OCI we have a couple of service offerings that will perfectly fit in here like API Gateway for the hardening of the service access and IDCS for an embedding of these services into the security layer of an OCI instance. Saying this, we must start fine-tuning the components formerly used as our Compute Instance that hosts the Node.js and Express.js application. Instead of running just one single compute instance we will add more services here:
- One Compute Instance that has a public IP address and can be reached from the internet. This Linux VM will be used as a bastion server located in the same VNC as the other components
- Another Compute Instance, declared as private, will reside in the joined VNC, but has no public IP address. For maintenance operations like code updates, starting and stopping of services it can only be accessed from the bastion server
- API Gateway must be used for the deployment of public and secured REST API’s. This deployment will reside in the same VNC as both Linux VM’s and therefore it has an access to the private REST API’s. It will then publish these services with all required security features available.
- IDCS is always existent in an OCI environment and underlying the entire security architecture. We will create a custom application in IDCS to provide a controlled access to the REST services deployed created in API Gateway.
Users or services may get an access granted via IDCS and we can ensure that these API’s work in a secure mode this way without adding any new codeline into the JS application or also without modifying the sources.
Requirements for an Architecture Change
The components in this new architecture are shown below in detail:
- The Private VM can’t reached from outside the VCN and is meant to run the Express.js and Node.js code. The REST API’s are running strictly internal. This is a pre-condition to ensure these unprotected internal API’s will be registered and mapped in API Gateway before published as protected REST services.
- The Public VM is located in the same VCN like the Private VM, but has also an additional public IP address. Via this virtual machine the private machine is accessible for the maintenance of the software artefacts providing these REST API’s. The role of this server can bee seen as those of a Bastion Host.
- Every single REST API that is meant to be published, must be registered in an API Gateway deployment. This deployment itself will be hardened with a security setup that will be explained further down below in this article.
- Once these API’s were configured in API Gateway they will be registered next within a custom application in IDCS. That will give access permissions to groups and users in an OCI environment.
- Users and groups with an access given via IDCS can consume these REST API’s. Those could be primarily used by tools like OIC or VBCS, but will also be available for any other consumers who can handle an OAuth authentication.
- The maintenance operations like starting, stopping of services or software release management or bug fixing will be managed by a small group of experts who have access via the Public VM. The security setup for these maintainers can be kept independently from the security setup described above.

Details of an additional Security Layer
The configuration of this architecture will be explained more in detail below. As discussed this architecture will introduce a number of other cloud resources in order to segregate the duties for the security hardening as mentioned. This can be seen as the better alternative in opposite to add security code into the application program itself. With Oracle OCI all these features are available depending on the cloud services subscriptions by a customer.
Configuring Public/Private Compute Cloud instances
As shown above in our architecture figure, we need two Compute Cloud instances – one as a bastion host and another one to run the Node.js/Express.js application. The screenshot below shows the two existing virtual machines – one with a public IP address and the other one remaining strictly internally.
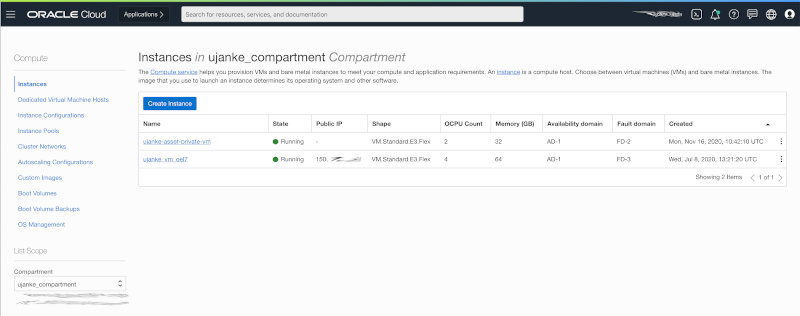
Creating a Public and a Private VM
The private instance is responsible to cover a potentially high workload and should be sized accordingly. In our sample below we’re good with an average sizing, but that might differ on the various customer use cases we can imagine. Here its a JS server that reads and parses BICC status log files and provides the consolidated data as REST API’s.
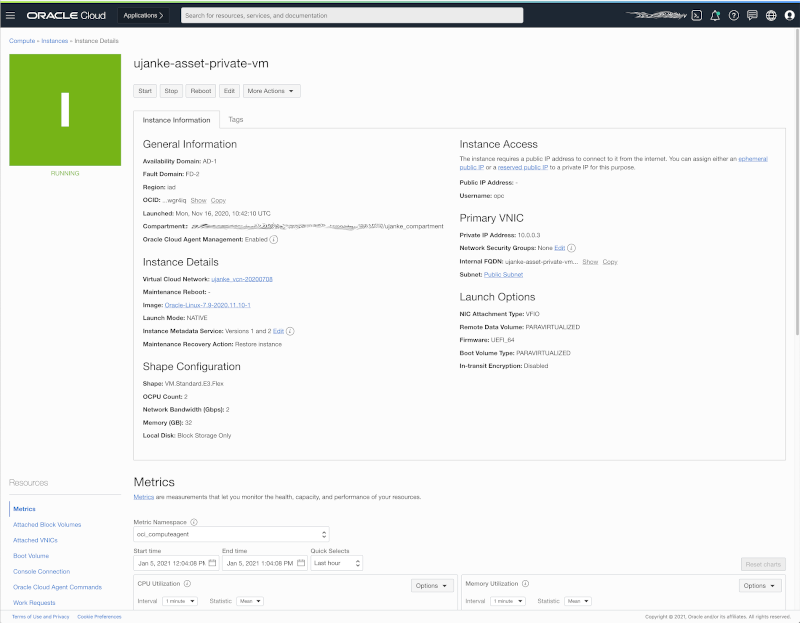
Private VM Details
As mentioned earlier on, both instances belong to the same VCN configuration. In theory there could be two different VCN’s being used with a correct and according routing setup. But as we will see later for the configuration of API Gateway, it will be helpful if at least those both components exist in same VCN. Still: with an according routing setup it would also work if not using the same VCN.
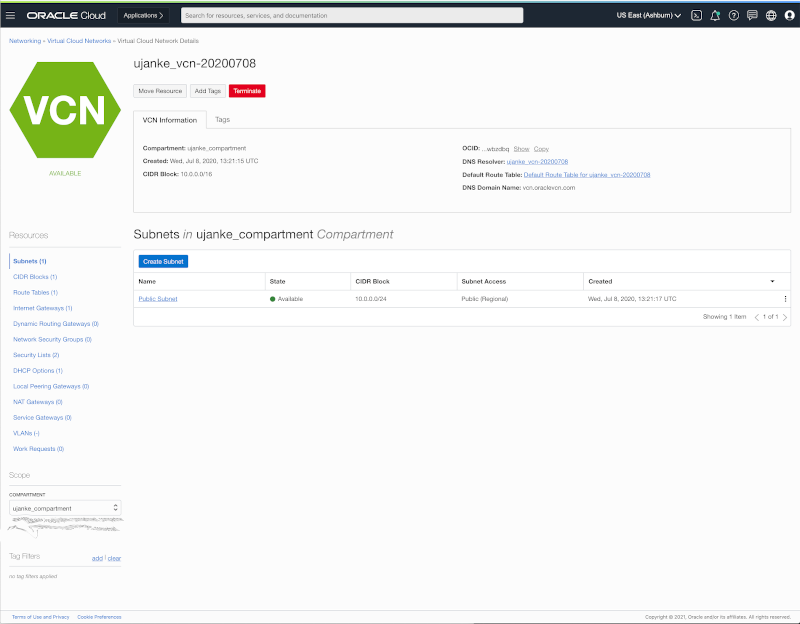
Public and Private VM sharing the same VCN
As shown below the Application hosting VM has no public IP address.
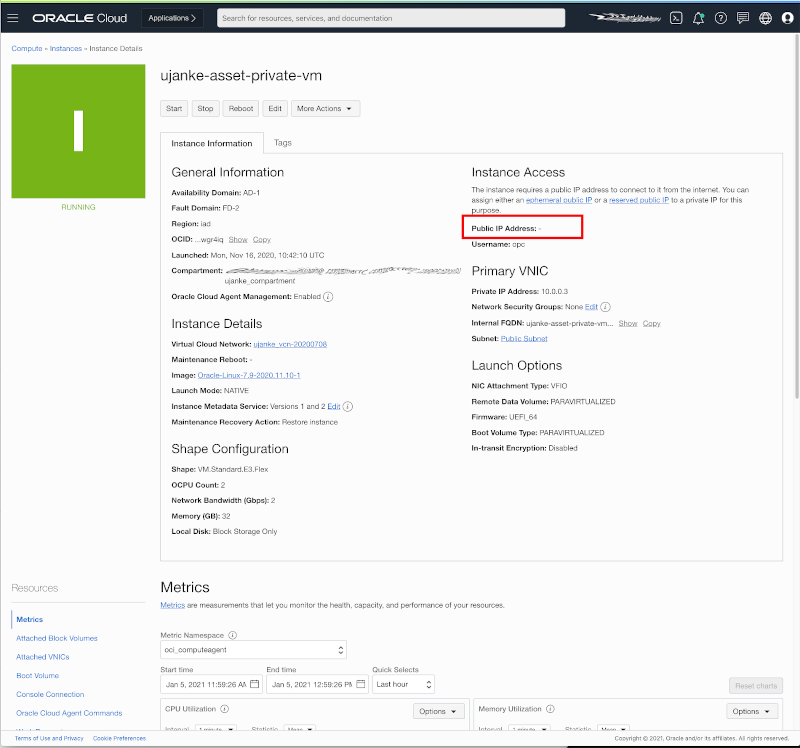
No Public IP address for the Private VM
Summarizing the changed architecture of the Public Cloud configuration as explained above, it turns out that we are reusing all components as introduced in previous blog. Under bottom line the main change is the introduction of a bastion server and the joint use of the underlying VCN.
Configuration of an API Gateway Deployment
As a next configuration step we will expose the insecure REST service as secure API’s via API Gateway. For this setup we have to start with a new Gateway configuration as shown in screenshot below.
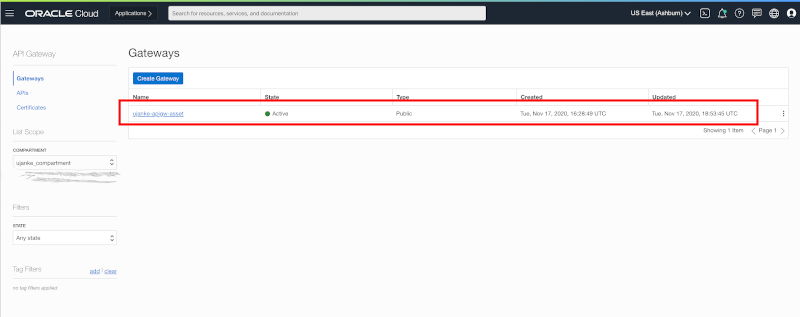
Creating an API Gateway Configuration for the BICC Logs REST API’s
Once done, we have to create an API Gateway deployment as a next step. The deployment will implement the mapping for the internal REST API’s and every single API meant to be published must be registered there.
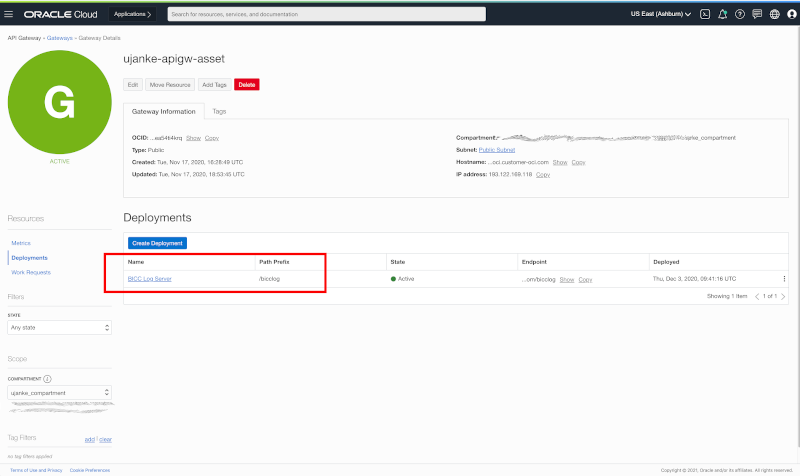
Creating an API Gateway Configuration for the BICC Logs REST API’s
The following multi-page configuration starts with the gathering of deployment level. We will start first with the input of the API Request Policies. The settings were made as shown below:
- Token Header requires an Authorization
- Anonymous access is denied – an invocation of any of the published REST API’s requires a valid authentication via IDCS
- The Bearer Token is of type JWT and will be obtained from IDCS – as issuer we have to use the URL https://identity.oraclecloud.com/
- As the audience we have to configure the Custom App registration URL in IDCS for this deployment
The activity mentioned in last bullet point above creates a challenge for our configuration: to enter this URL we must have this deployment being already registered in IDCS. But that is only possible after the configuration of this API Gateway deployment has been finished. To resolve this issue it is possible to leave the Authentication section open at the beginning and to finish the deployment configuration first. Once done, we will configure the custom app registration in IDCS as a next step as explained further down below in this article.
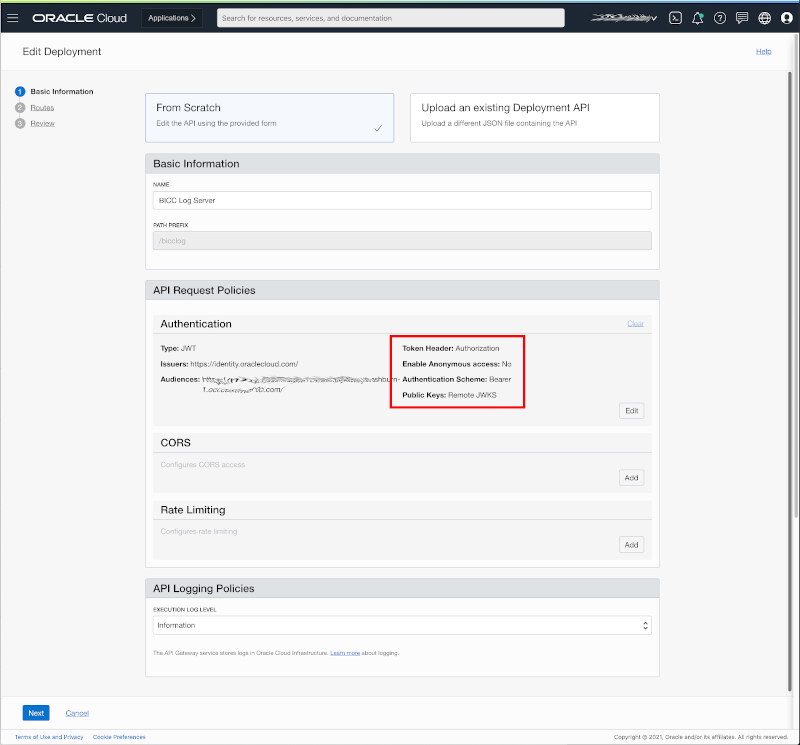
Configure the Authentication Policy to JWT using Bearer Tokens
The screenshot below shows the configuration page to enter the Authentication Policy values.
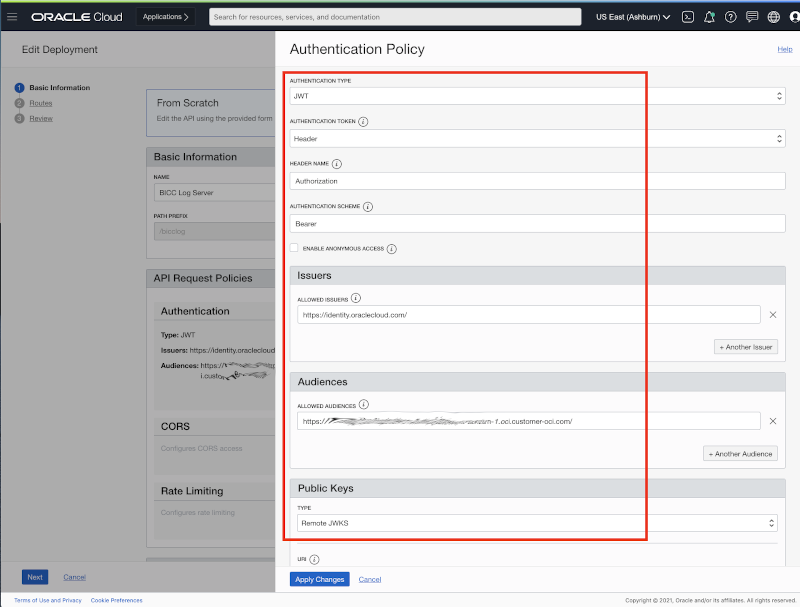
Details of Authentication Policy configuration to to use JWT Bearer Tokens
As a next configuration step every single REST API’s must be registered in API Gateway – called Routes. API Gateway and the REST API’s belong to the same VCN and therefore the internal/private IP addresses can be reached via this route and will be published as a public service through this deployment.

Creating a Route for each published REST API
Every single route must be configured individually in terms of using a specific method, timeouts etc.

Route details showing that this REST API is private and secured
Once these routes are fully configured, we’re ready to enter the the registration of a custom app in IDCS. That will ensure only authorized users or groups will be able to invoke the published REST API’s.
Setup a Custom App in IDCS
Registering a custom application in IDCS is a very sensitive activity that requires Administrator rights. In the following explanation we will see how such a registration can be performed for the API Gateway deployment we’ve done before. The IDCS Dashboard has a component showing all existent Applications and Services that will include also custom applications.
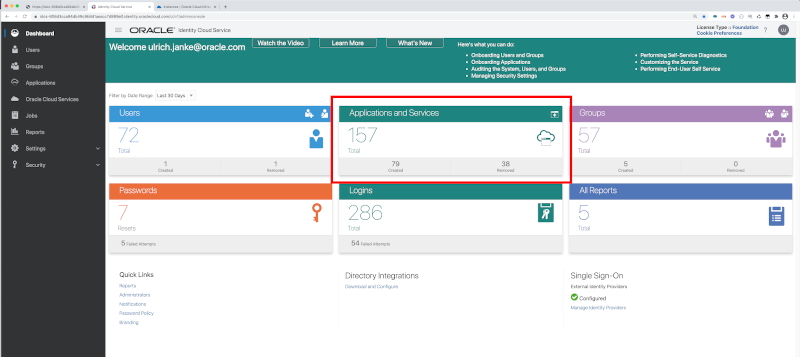
Start with the IDCS Dashboard
After finishing the setup for our registration of the API Gateway deployment it will be visible, searchable and editable like all other apps and services. The screenshot below shows the target situation we’re going to achieve with the following setup steps.

Showing a Custom App registration once finished
The configuration starts by creating a new custom application and a new page will open up as shown below. Some of the configuration activities can skipped while others are essential. We’ll explain the steps that have to be done in order to have the application registered successfully. No further configuration steps are required in the Details page than entering the Application Name as shown below.
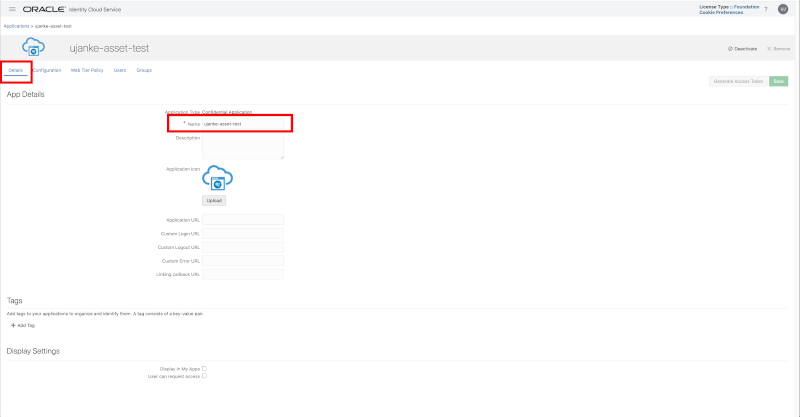
Custom Application registration – Details
The Configuration page below will be used to enter the most setup data for the registration of resources, authentication and authorization information. Further down below the single configuration steps will be explained in detail.
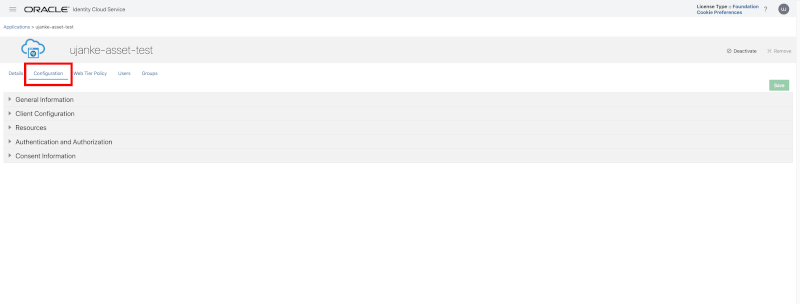
Custom Application registration – Configuration
In the section General Information we will find the information for the Client ID and Client Secret that will be used to obtain the Bearer Token from IDCS. The Client Secret can get regenerated in this page and the usage to obtain a Bearer Token will be shown in the next section using a sample in Postman.
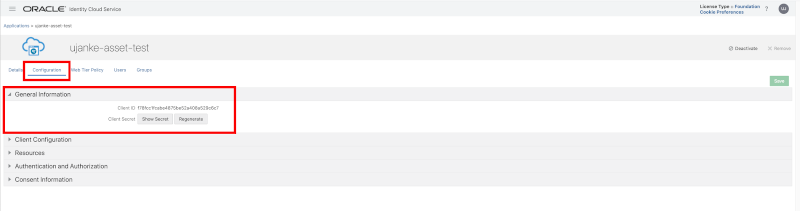
Custom Application registration – General Information
In section Client Configuration we configured the following values:
- Choose Register Client to enable the registration of the services belonging to the API Gateway deployment
- Allowed Grant Types chosen for our configuration are Resource Owner and Client Credentials
- Under Token Issuance Policy the value Specific must be chosen as an entry for Authorized Resources
- Finally the API deployment resources must be added as a Scope – as shown via a registration sample below the root path (here https://<API GW Deployment>/bicclog) must be registered, but also every single API like https://<API GW Deployment>/bicclog/reportStatsREST
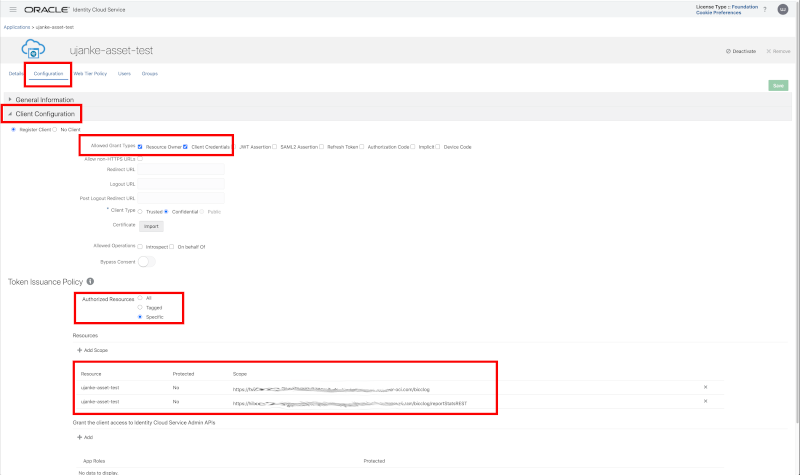
Custom Application registration – Client Configuration
Similar as shown above, we have to register every single API under the Resources section. There, we will add every single REST API as configured in the API Gateway deployment to the list of configured API’s that are protected by OAuth. For this purpose we will register resources via Add Scope to this group of API’s. Important for this configuration: via the mandatory field Primary Audience the common URL for all of these API’s must be entered, while the scope entries below are relativ to this URL. Other commonly used parameters are the token related expiration and refresh timings.
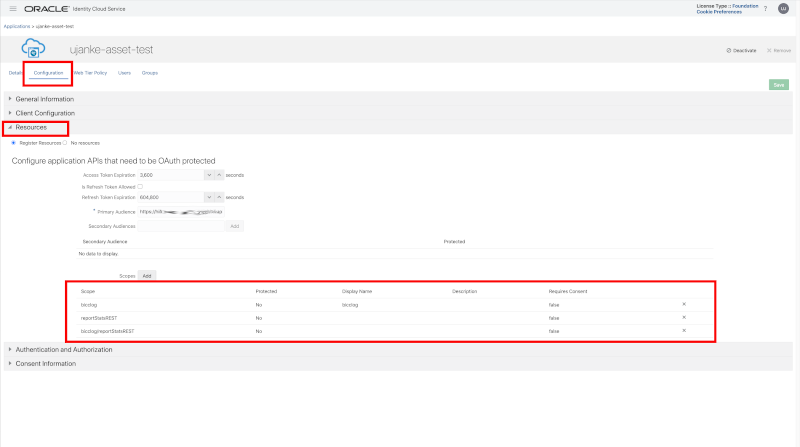
Custom Application registration – Resources details configuration
As shown below we did not configure any specific Web Tier Policies in this sample.
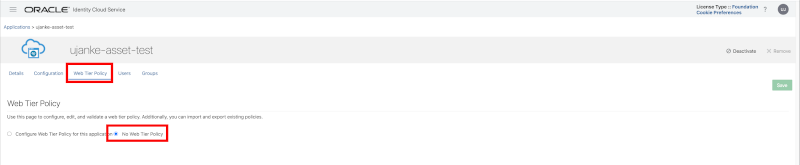
Custom Application registration – Web Tier Policy
At the end of this IDCS Custom App setup we must assign the configured resources to dedicated users and/or groups. That will grant access to these secured REST API’s to a number of specific users.
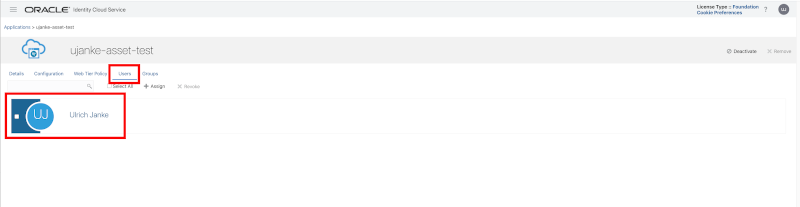
Custom Application registration – Users
In this sample we assigned the permissions to just one user and left the group entry unset.
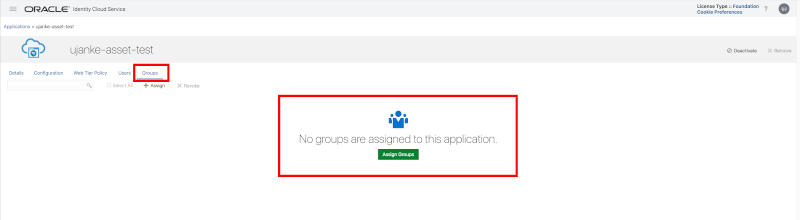
Custom Application registration – Groups
Now, after finishing the creation of a custom IDCS App, the REST API’s can’t be accessed anymore without an authentication and authorization. As mentioned above, latest now its also possible to update the API Request Policies in API Gateway with the specific information in the Audiences field.
Testing the secure BICC Log REST Server API …
After performing the security setup above we got a set pf protected API’s that can only be used by users and groups being authorized via IDCS. As explained, this was possible without any modification in the source code of the the application. From here the REST API’s can be invoked from other cloud based services like Visual Builder or Oracle Integration Cloud.
For a simple test of these protected API’s we use Postman as shown below. It will demonstrate how to login to IDCS to obtain a bearer token before invoking a protected REST API.
This test scenario is two-fold:
- By using the tenant specific IDCS URL we’re obtaining the bearer token
- This access token will be we used to invoke the protected REST API
As shown in screenshot below we have to configure and run a POST call first by using the URL as it comes in the format https://idcs-<ID>.identity.oraclecloud.com/ui/v1/signin and can be obtained from the login page of this tenancy. When using Postman, we have to provide a manual authentication method where we have to enter a username and password that can be obtained from the IDCS configuration page for our custom application. The sample below shows how these values must be entered in the Authorization tab.
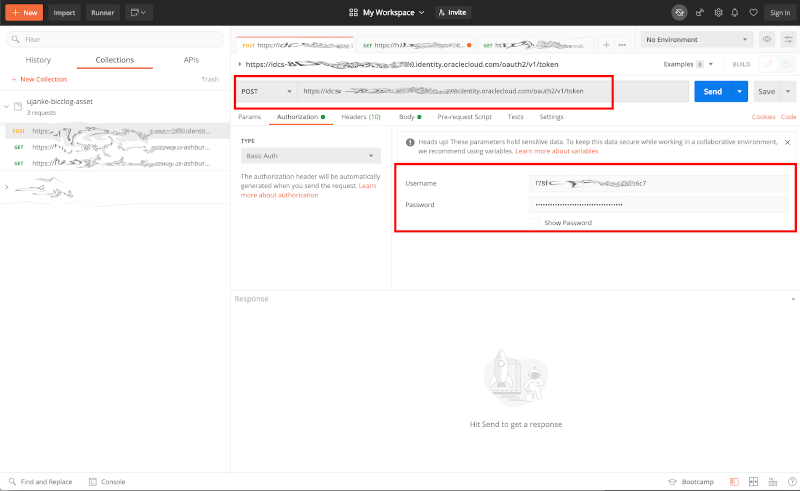
Testing via Postman – entering the IDCS credentials to obtain a token
The screenshot below shows how these values for username and password can be obtained in IDCS.
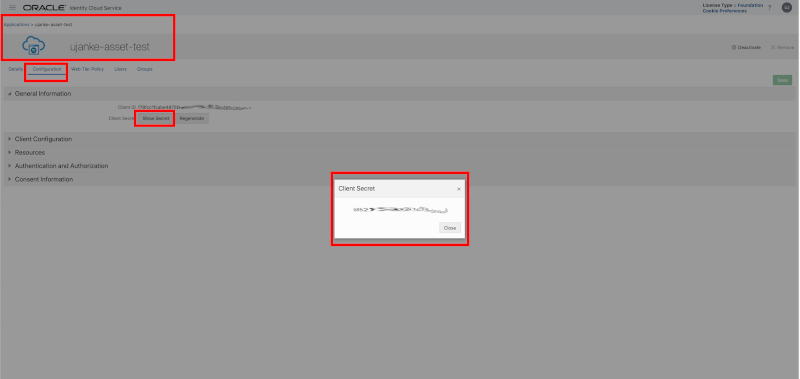
Testing via Postman – How to obtain the Client Secret in IDCS
Before running the request we have to set an additional parameter: the Body must contain an entry scope that contains the resource for which we’re obtaining the token. Obviously that must be an entry that has been configured in IDCS in the custom app setup. As shown in sample below we’re using the URL of a protected REST API in API Gateway ending with bicclog/reportStatsREST.

Testing via Postman – entering the scope credentials to obtain a token
A successful execution of this call will return a JSON structure that contains the value for an access_token. This is the token we need in our second step to make the API call. We must also ensure to use application/x-www-form-urlencoded as Content-Type in the request header.
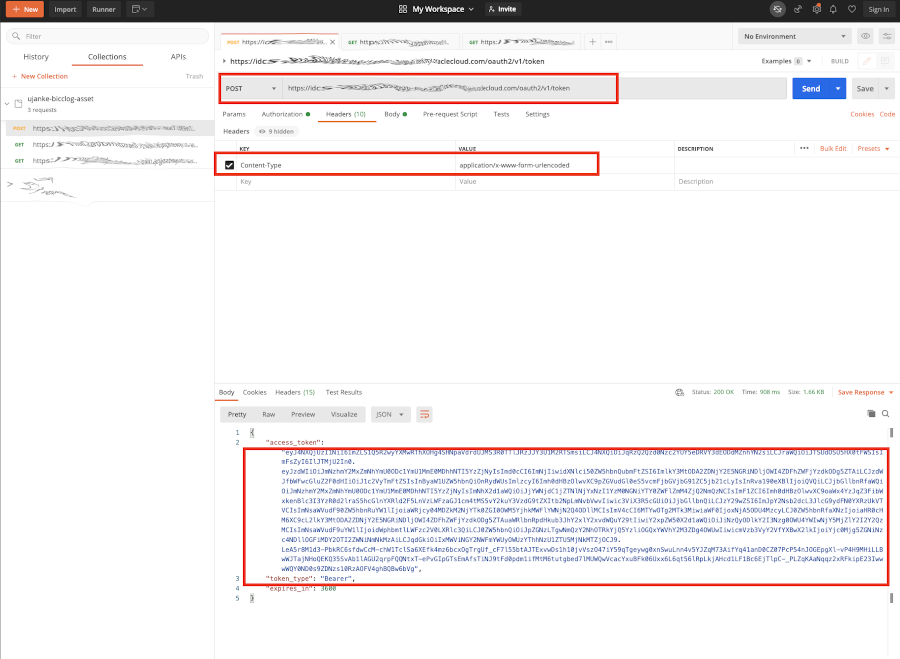
Testing via Postman – Receiving the Bearer Token
An alternative way to obtain this access_token would be a curl command execution as shown below. It uses the same authorization values and other information as shown above in Postman. Instead of passing a basic authentication via client user id and password we are providing a base64 encoded entry for these both values.
curl --location --request \
  POST 'https://idcs-806R0.identity.oraclecloud.com/oauth2/v1/token' \
  --header 'Content-Type: application/x-www-form-urlencoded' \
  --header 'Authorization: Basic Zjc4ZmNjMW89nHopvZjYWJ0MGY2LWFjZjgtNjEzYWQ2MTMzOTA1' \
  --data-urlencode 'grant_type=client_credentials' \
  --data-urlencode  \
  'scope=https://hfjeken.apigateway.us.oci.cust-oci.com/bicclog/reportStatsREST'

{"access_token":"eyJ4NXQjUzI1NiI6ImZLS1Q5R2wyYXMwRThXOHg4SHNpaVdrdUJMS3R0TTlJRzJJY3U1M2RTSmsiLCJ4NXQiOiJqRzQ2Qzd0Nzc2YUY5eDRVY3dEODdMZnhYN2siLCJraWQiOiJTSUdOSU5HX0tFWSIsImFsZyI6IlJTMjU2In0.eyJzdWIiOiJmNzhmY2MxZmNhYmU0ODc1YmU1MmE0MDhhNTI5YzZjNyIsImd0cCI6ImNjIiwidXNlci50ZW5hbnQubmFtZSI6ImlkY3MtODA2ZDNjY2E5NGRiNDljOWI4ZDFhZWFjYzdkODg5ZTAiLCJzdWJfbWFwcGluZ2F0dHIiOiJ1c2VyTmFtZSIsInByaW1UZW5hbnQiOnRydWUsImlzcyI6Imh0dHBzOlwvXC9pZGVudGl0eS5vcmFjbGVjbG91ZC5jb21cLyIsInRva190eXBlIjoiQVQiLCJjbGllbnRfaWQiOiJmNzhmY2MxZmNhYmU0ODc1YmU1MmE0MDhhNTI5YzZjNyIsImNhX2d1aWQiOiJjYWNjdC1jZTNlNjYxNzI1YzM0NGNiYTY0ZWFlZmM4ZjQI6Imh0dHBzOlwvXC9oaWx4YzJqZ3FibWxkenBlc3I3YzR0d2lraS5hcGlnYXRld2F5LnVzLWFzaGJ1cm4tMS5vY2kuY3VzdG9tZXItb2NpLmNvbVwvIiwic3ViX3R5cGUiOiJjbGllbnQiLCJzY29wZSI6ImJpY2Nsb2dcL3JlcG9ydFN0YXRzUkVTVCIsImNsaWVudF90ZW5hbnRuYW1lIjoiaWRjcy04MDZkM2NjYTk0ZGI0OWM5YjhkMWFlYWNjN2Q4ODllMCIsImV4cCI6MTYxMzE0NzM0NCwiaWF0IjoxNjEzMTQzNzQ0LCJ0ZW5hbnRfaXNzIjoiaHR0cHM6XC9cL2lkY3MtODA2ZDNjY2E5NGRiNDljOWI4ZDFhZWFj9403f0pefhB679RlbnRpdHkub3JhY2xlY2xvdWQuY29tIiwiY2xpZW50X2d1aWQiOiJiNzQyODlkY2I3Nzg0OWU4YWIwNjY5MjZlY2I2Y2QzMCIsImNsaWVudF9uYW1lIjoidWphbmtlLWFzc2V0LXRlc3QiLCJ0ZW5hbnQiOiJpZGNzLTgwNmQzY2NhOTRkYjQ5YzliOGQxYWVhY2M3ZDg4OWUwIiwicmVzb3VyY2VfYXBwX2lkIjoiYjc0Mjg5ZGNiNzc4NDllOGFiMDY2OTI2ZWNiNmNkMzAiLCJqdGkiOiIxMWViNmQ0NzA5ZGQ1ZDc4YWMyZjdmM2FhY2IxYjk1ZCJ9.tDuyQSDRoZsJ5N7cAusllfuVcmnEQMJ9QNTYIdaLaSnRpVNSWRX3IsxTOkX266Y9AYjGhwND4Pqo86VZMnQOes3kLRqPpgEnXUym_bDGKVgZ13sc0sgAPcmvSLS1j4srAYKua8njL3hP82UIdqIJop3npFFoSapFY3DqjYkLY8XijxXQgn76tHPRusmvRv1Gvy_Y_blbY3koCOh5oAVhyeYlPhuuyOWkEn2FX3CTYUTgpMCwfnZaiquHfBVraSOUlvg1k_6HEI42HiJNvIGvzvNPLUokxN_pdS-BwoLaeb8XpZ_tbtSq8pZ30jI3l57hBt-GJKdu_hpKhaI36butug","token_type":"Bearer","expires_in":3600}
Once we retrieved the bearer token,< we can now perform a GET request to invoke the protected REST API. As shown below we have to choose Bearer Token as authorization type. Afterwards we have to copy the access_token from previous call and paste the value into the token field. Once finished we are ready to perform the request.
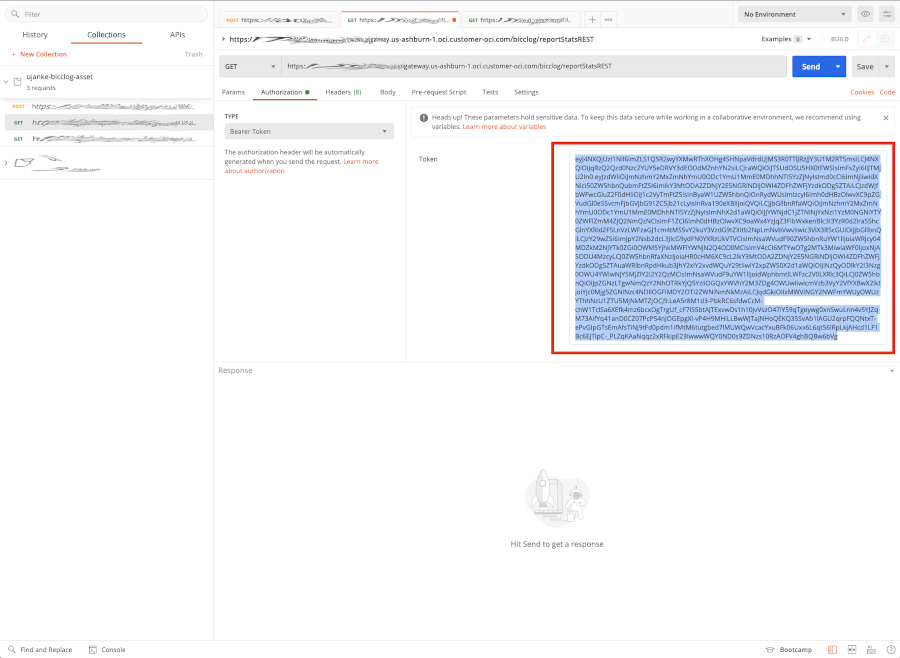
Testing via Postman – Using the Bearer Token in REST API Call
Like shown below, a successful invocation will result to obtain the output as expected.
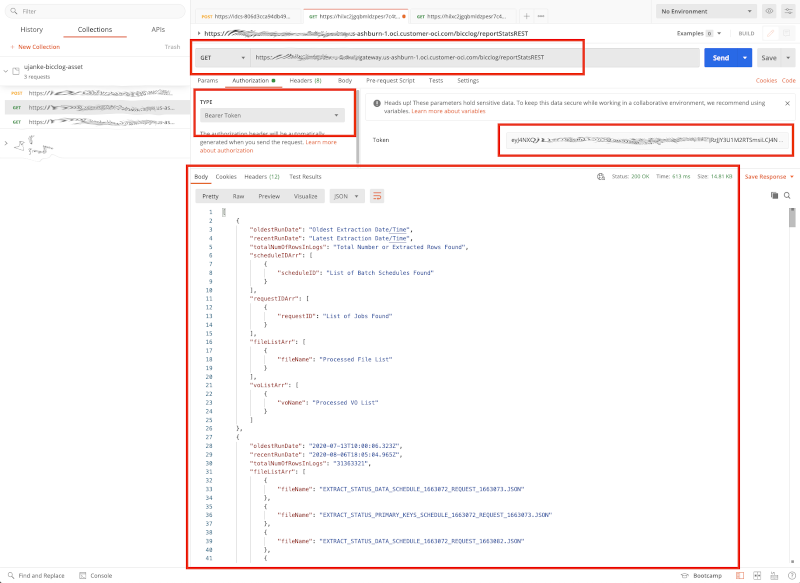
Testing via Postman – Results of a successful REST API Call
Same as shown above also here we can perform an alternate run on the command line by using another curl call.
curl --location --request \
  GET 'https://hfjeken.apigateway.us.oci.cust-oci.com/bicclog/reportStatsREST' \
  --header 'Content-Type: application/x-www-form-urlencoded' \
  --header 'Authorization: Bearer eyJ4NXQjUzI1NiI6ImZLS1Q5R2wyYXMwRThXOHg4SHNpaVdrdUJMS3R0TTlJRzJJY3U1M2RTSmsiLCJ4NXQiOiJqRzQ2Qzd0Nzc2YUY5eDRVY3dEODdMZnhYN2siLCJraWQiOiJTSUdOSU5HX0tFWSIsImFsZyI6IlJTMjU2In0.eyJzdWIiOiJmNzhmY2MxZmNhYmU0ODc1YmU1MmE0MDhhNTI5YzZjNyIsImd0cCI6ImNjIiwidXNlci50ZW5hbnQubmFtZSI6ImlkY3MtODA2ZDNjY2E5NGRiNDljOWI4ZDFhZWFjYzdkODg5ZTAiLCJzdWJfbWFwcGluZ2F0dHIiOiJ1c2VyTmFtZSIsInByaW1UZW5hbnQiOnRydWUsImlzcyI6IOlwvXC9pZGVudS5vcmFjbGVjZC5jb21cLyIsIna190eXBlIjoiQVQiLCJjbGllbnRfaWQiOiJmNzhmY2MxZmNhYmU0ODc1YmU1MmE0MDhhNTI5YzZjNyIsImNhX2d1aWQiOiJjYWNjdC1jZTNlNjYxNzI1YzM0NGNiYTY0ZWFlZmM4ZjQ2NmQzNCIsImF6hdw9wjkd9eIHjiZko90897NJ90znZizOlwvXC9oaWx4YzJqZ3FibWxkenBlc3I3YzR0d2lraS5hcGlnYXRld2F5LnVzLWFzaGJ1cm4tMS5vY2kuY3VzdG9tZXItb2NpLmNvbVwvIiwic3ViX3R5cGUiOiJjbGllbnQiLCJzY29wZSI6ImJpY2Nsb2dcL3JlcG9ydFN0YXRzUkVTVCIsImNsaWVudF90ZW5hbnRuYW1lIjoiaWRjcy04MDZkM2NjYTk0ZGI0OWM5YjhkMWFlYWNjN2Q4ODllMCIsImV4cCI6MTYxMzE2NTM5MSwiaWF0IjoxNjEzMTYxNzkxLCJ0ZW5hbnRfaXNzIjoiaHR0cHM6XC9cL2lkY3MtODA2ZDNjY2E5NGRiNDljOWI4ZDFhZWFjYzdkODg5ZTAuaWRlbnRpdHkub3JhY2xlY2xvdWQuY29tIiwiY2xpZW50X2d1aWQiOiJiNzQyODlkY2I3Nzg0OWU4YWIwNjY5MjZlY2I2Y2QzMCIsImNsaWVudF9uYW1lIjoidWphbmtlLWFzc2V0LXRlc3QiLCJ0ZW5hbnQiOiJpZGNzLTgwNmQzY2NhOTRkYjQ5YzliOGQxYWVhY2M3ZDg4OWUwIiwicmVzb3VyY2VfYXBwX2lkIjoiYjc0Mjg5ZGNiNzc4NDllOGFiMDY2OTI2ZWNiNmNkMzAiLCJqdGkiOiIxMWViNmQ3MTBmNDQwNTYyYWMyZmNmY2M4M2VmNGI2NCJ9.Ejh-X0YA5EjRJOwSgm86CBiJeNKhdOLMhoEWNvxyxiWY1mJVHJ1a3RP-gVQsd65WcjP2UoTelYV8e4af5-SuJOW4h0IacnrADNAcAax1JDcUxpc8rsdptc8_6yitFlsx_POOe_mAuEIdp4hsmmCyxQBvPmP59F3aUaAZabOzckFDPjambQIbx_XGXMS5ZUFtUEQmIIG_koUgpv8m5XgDtjzVxU4mtbiYJ1XqPCXtT4EVQtJKyvgXI4MbAQURFOV3Cg1gLThZ0GYFIXXCSpRcxglasEc-FJYQGkbMh9w2xODOgCyp2lCimaWcAPwAN0ESjofnfGnQPMkkHVEJa-DqPg'

[{"oldestRunDate":"Oldest Extraction Date/Time","recentRunDate":"Latest Extraction Date/Time","totalNumOfRowsInLogs":"Total Number or Extracted Rows Found","scheduleIDArr":[{"scheduleID":"List of Batch Schedules Found"}],"requestIDArr":[{"requestID":"List of Jobs Found"}],"fileListArr":[{"fileName":"Processed File List"}],"voListArr":[{"voName":"Processed VO List"}]},{"oldestRunDate":"2020-07-13T10:00:06.323Z","recentRunDate":"2020-08-06T18:05:04.965Z","totalNumOfRowsInLogs":"31363321","fileListArr":[{"fileName":"EXTRACT_STATUS_DATA_SCHEDULE_1663072_REQUEST_1663073.JSON"},{"fileName":"EXTRACT_STATUS_PRIMARY_KEYS_SCHEDULE_1663072_REQUEST_1663073.JSON"},{"fileName":"EXTRACT_STATUS_DATA_SCHEDULE_1663072_REQUEST_1663082.JSON"},{"fileName":"EXTRACT_STATUS_PRIMARY_KEYS_SCHEDULE_1663072_REQUEST_1663082.JSON"},{"fileName":"EXTRACT_STATUS_DATA_SCHEDULE_1663072_REQUEST_1663116.JSON"},{"fileName":"EXTRACT_STATUS_PRIMARY_KEYS_SCHEDULE_1663072_REQUEST_1663116.JSON"},{"fileName":"EXTRACT_STATUS_DATA_SCHEDULE_1663072_REQUEST_1663152.JSON"},{"fileName":"EXTRACT_STATUS_PRIMARY_KEYS_SCHEDULE_1663072_REQUEST_1663152.JSON"},{"fileName":"EXTRACT_STATUS_DATA_SCHEDULE_1663072_REQUEST_1663189.JSON"},{"fileName":"EXTRACT_STATUS_PRIMARY_KEYS_SCHEDULE_1663072_REQUEST_1663189.JSON"}, ...
The tests, as shown above, ensure that we have entered a valid configuration. That means the protected API’s can also be invoked from tools like Oracle Integration Cloud or Visual Builder once a user has signed into the OCI tenancy and given the required access to these API’s via IDCS. An alternate documentation how this testing via Postman could be performed, is available via this A-Team blog.
Conclusion
This article was meant to explain how an unprotected REST API can be secured using standard OCI identity management capabilities without any code changes required. Important to remember that for a native usage of these REST API calls by OCI offerings like VBCS or OIC a common IDCS environment must be used. That way the manual retrieval of a bearer token is not necessary. Alternately, for 3rd party applications, the bearer token can be obtained as described above. Last but not least many thanks to Max and Olaf for their contribution and support!