*This post was originally published on 8/23/2021
The purpose of this blog is to show how to establish a Remote Peering Connection (RPC) between two Dynamic Routing Gateways (DRG) located in two different tenancies. The DRGs can be located in the same or different regions.
We are assuming you have a basic understanding of networking, and you are familiar with OCI Networking (DRG, RPC, VCNs, subnets, security lists, routing, and IAM Policies). A prerequisite for this solution to work is that you are using the enhanced DRG. A DRG created before June 2021 (or April 2021 in San Jose and Montreal regions) must be upgraded before you can connect it to multiple VCNs, use it in cross-tenancy peering scenarios, or modify the internal routing policies. This upgrade process does not change the DRG’s OCID. Check the Upgrading DRG section for your reference.
You can also watch the video below for a complete walk-through of this process:
Overview
For the purpose of this blog we will use the diagram below where we have two tenancies in the same region. The same process applies if the tenancies are in different regions. Each tenancy has its own VCN, with a subnet, and its own DRG.
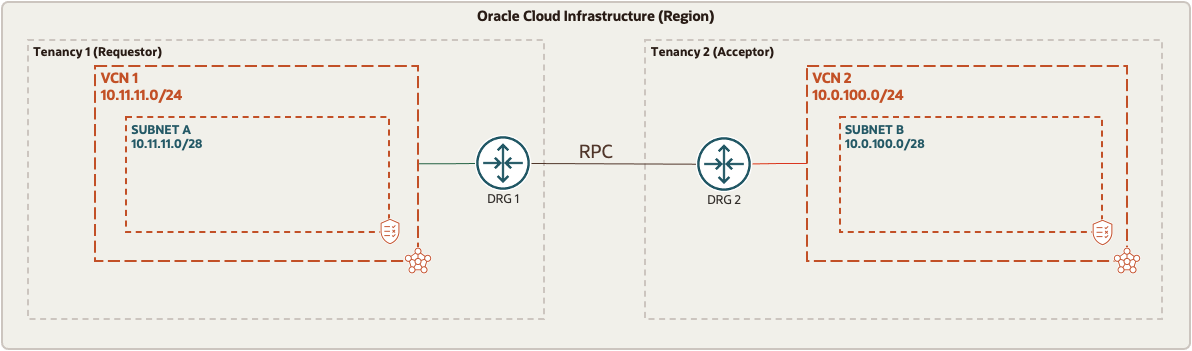
To establish the connection between the two tenancies, one tenancy is designated as the REQUESTOR, and the other tenancy is designated as the ACCEPTOR. For the purpose of this blog Tenancy 1 is the REQUESTOR while Tenancy 2 is the ACCEPTOR. Note that the peering relationship is initiated from the REQUESTOR tenancy. The administrator for each tenancy needs to configure their own tenancy for the connection to work. Each administrator needs to collect and share with each other the OCID information in the table below. This is the information used for this exercise
| Tenancy 1 | |
|---|---|
| Role | Requestor |
| Tenancy OCID | ocid1.tenancy.oc1..aaaaaaaaa3qmjxr43tjexx75r6gwk6vjw22er…… |
| Requestor Group | This user group should exist or be created on the Requestor tenancy. Users who will perform this task should be part of this group – Network-Admins |
| Requestor Group OCID | ocid1.group.oc1..aaaaaaaa2pyncdt6xgrguak5w3zqh36kncsvha2d…… |
| Compartment | The compartment where the RPC will be deployed – Network1 |
| Acceptor RPC OCID | N/A |
| Tenancy 2 | |
| Role | Acceptor |
| Tenancy OCID | ocid1.tenancy.oc1..aaaaaaaamy3a46ljb5gdtruftfg7xtuatc5ymgeo…… |
| Requestor Group | This is just a name that the acceptor will give to the group of users from the Requestor tenancy – RequestorGrp |
| Requestor Group OCID | N/A |
| Compartment | The compartment where the RPC will be deployed – Network2 |
| Acceptor RPC OCID | ocid1.remotepeeringconnection.oc1.iad.aaaaaaaai3glhe2hrbk7phgs5wcbx…….. |
Policies
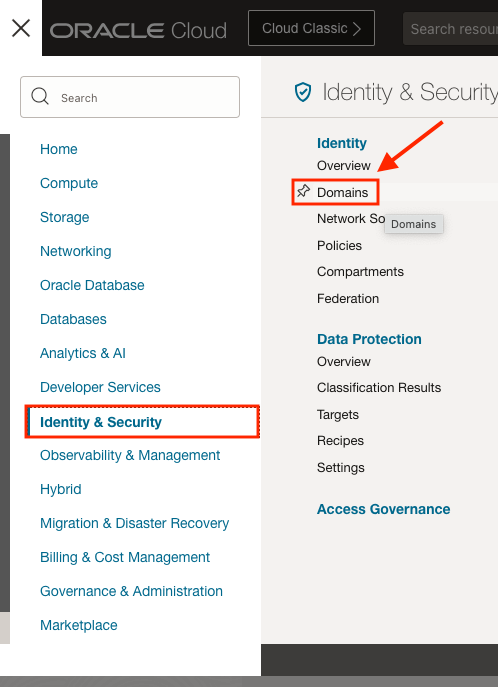
Once you have collected and exchange the OCID information; each administrator will create their respective policy at the root level of their tenancy. Many OCI tenanices are now using Identity Domains which requires the IAM Policy to be updated accordingly. A quick way to check if your tenancy is enabled for Identity Domains is to check in the console menu. Select the top-left hamburger menu, select Identity & Security in the left menu, and look for Domains in the Identity column:
Below we will provide the IAM policy format for both tenancies with and without Identity Domains enabled.
Non-Identity Domain Tenancy Policy Template
Policy Requestor (implemented by the requestor):
Define tenancy Acceptor as <acceptor-tenancy-ocid>
Allow group <requestor-group-name> to manage remote-peering-from in compartment <requestor-compartment-name>
Endorse group <requestor-group-name> to manage remote-peering-to in tenancy Acceptor
Policy Acceptor (implemented by the acceptor):
Define tenancy Requestor as <requestor-tenancy-ocid>
Define group <requestor-group-name> as <requestor-group-ocid>
Admit group <requestor-group-name> of tenancy Requestor to manage remote-peering-to in compartment <acceptor-compartment-name>
Using the data provided on our table above, the polices will look like this
Policy Requestor (implemented by the requestor):
Define tenancy Acceptor as ocid1.tenancy.oc1..aaaaaaaamy3a46ljb5gdtruftfg7xtuatc5ymgeo……
Allow group Network-Admins to manage remote-peering-from in compartment Network1
Endorse group Network-Admins to manage remote-peering-to in tenancy Acceptor
Policy Acceptor (implemented by the acceptor):
Define tenancy Requestor as ocid1.tenancy.oc1..aaaaaaaaa3qmjxr43tjexx75r6gwk6vjw22er……
Define group RequestorGrp as ocid1.group.oc1..aaaaaaaa2pyncdt6xgrguak5w3zqh36kncsvha2d……
Admit group RequestorGrp of tenancy Requestor to manage remote-peering-to in compartment Network2
Identity Domain Tenancy Policy Template
Policy Requestor (implemented by the requestor):
Define tenancy Acceptor as <acceptor-tenancy-ocid>
Allow group <requestor-domain-name/requestor-group-name> to manage remote-peering-from in compartment <requestor-compartment-name>
Endorse group <requestor-domain-name/requestor-group-name> to manage remote-peering-to in tenancy Acceptor
Policy Acceptor (implemented by the acceptor):
Define tenancy Requestor as <requestor-tenancy-ocid>
Define group <requestor-group-name> as <requestor-group-ocid>
Admit group <requestor-group-name> of tenancy Requestor to manage remote-peering-to in compartment <acceptor-compartment-name>
Using the data provided on our table above, the polices will look like this
Policy Requestor (implemented by the requestor):
Define tenancy Acceptor as ocid1.tenancy.oc1..aaaaaaaamy3a46ljb5gdtruftfg7xtuatc5ymgeo……
Allow group CorpDomain/Network-Admins to manage remote-peering-from in compartment Network1
Endorse group CorpDomain/Network-Admins to manage remote-peering-to in tenancy Acceptor
Policy Acceptor (implemented by the acceptor):
Define tenancy Requestor as ocid1.tenancy.oc1..aaaaaaaaa3qmjxr43tjexx75r6gwk6vjw22er……
Define group RequestorGrp as ocid1.group.oc1..aaaaaaaa2pyncdt6xgrguak5w3zqh36kncsvha2d……
Admit group RequestorGrp of tenancy Requestor to manage remote-peering-to in compartment Network2
One final note is if your RPC resources will be located more than one child compartment level deep (nested), you will need to use a colon (‘”:“) to specify its parent compartment in the policy. For example, if the RPC in the Requestor tenancy is in a nested child compartment we would need to update the policy in the second line like so:
Policy Requestor Without Nested Child Compartment (implemented by the requestor):
Allow group CorpDomain/Network-Admins to manage remote-peering-from in compartment Network1
Policy Requestor With Nested Child Compartment (implemented by the requestor):
Allow group CorpDomain/Network-Admins to manage remote-peering-from in compartment Network1:RemotePeerConnections
RPC Configuration
Once the policies are created, each administrator will create the RPC on each tenancy
Requestor

Acceptor

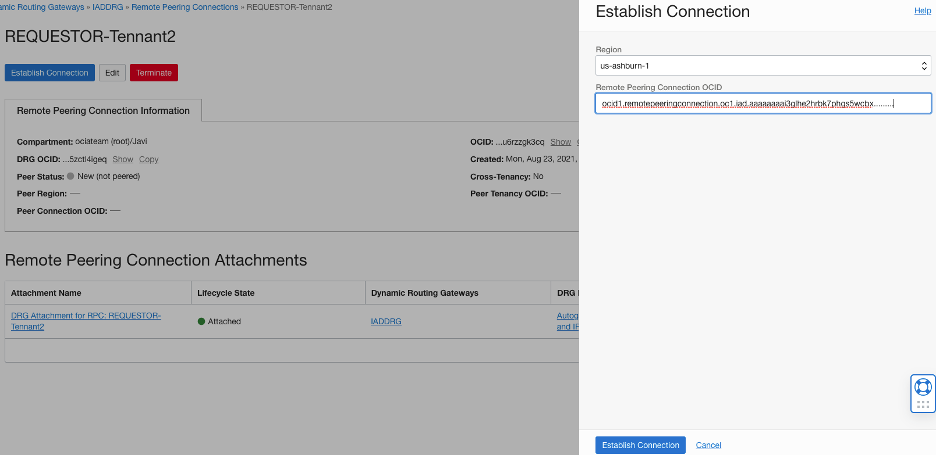
From the Requestor console, click the RPC “REQUESTOR-Tennant2” link, click the Establish Connection button and enter the region for the RPC you are trying to establish connectivity to and the OCID for the remote RPC (ACCEPTOR-Tennant1), click Establish Connection
If everything is configured correctly, Peer Region status will change to Pending (Orange), and then to Peered (Green). If something is incorrectly configured it will show as Invalid (Red) and you will need to delete the RPCs on both ends and try again. Check the policies and the OCIDs to make sure it is configured properly.
Requestor

Acceptor

Once the peering relationship is done, you can go to either DRG, click DRG Route Tables, click “Autogenerated Drg Route Table for VCN attachments” and click on “Get All Route Rules” you should see routes from the other tenancy.

References
Dynamic Routing Gateways (DRGs)
IAM policies related to DRG peering
Remote VCN Peering using an RPC
Check other blogs from Javier Ramirez