This guide outlines the end-to-end process for integrating PeopleSoft (PT 8.62) with OCI Identity Domains. This includes instructions on user-setup and configurations in both OCI and PeopleSoft. Once done, any authorized user (local or federated) of the domain can access PeopleSoft APIs using an OCI issue bearer token.

1. Setting up the users
In PeopleSoft, the user reconciliation happens by matching OCI username with the email address of a user in the PeopleSoft system.
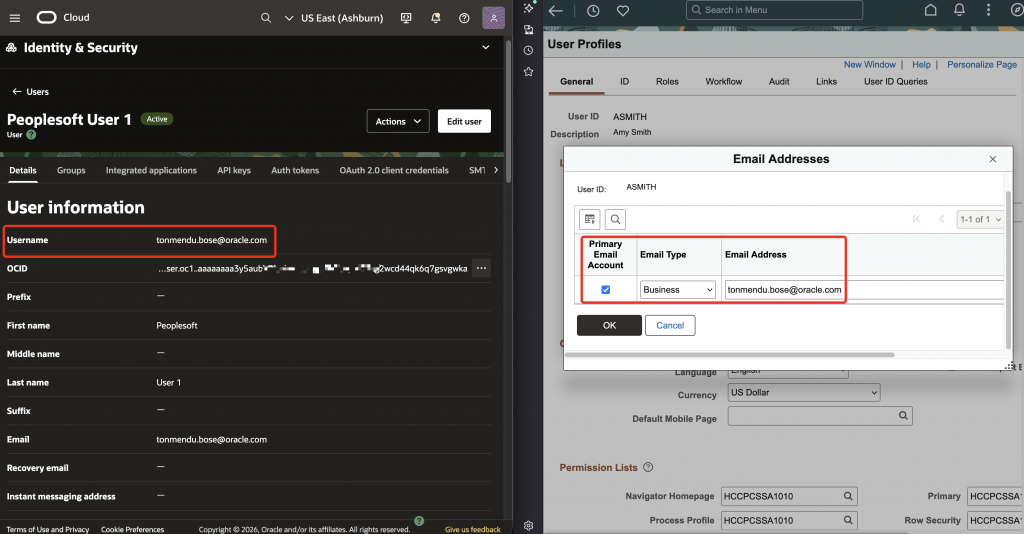
Since IAM sets the ‘sub’ (subject) claim value as the username, it is important to have a valid email address here. This can be configured depending upon the user lifecycle process.
- If the users are created locally in OCI, ensure that the username is equal to the email.
- If users are provisioned from another Identity Provider through SCIM, ensure that email value at source is correctly mapped to the OCI username.
For example, Microsoft Entra ID uses userprincipalname (UPN) as the unique identifier. UPN is the default mapping to the target OCI username. UPN should be set to email in this case.
More details here: Use Microsoft Entra ID for user/group management in OCI IAM.
In PeopleSoft console, update the user with the correct permission in the ‘Roles’ tab. We are using ‘EOAG1000‘ (AG Composer Admin) as an example.
2. OAuth resource & client configurations in OCI IAM
We will need the OCI client & resource to configure the OAuth handshake parameters within the IAM domain. This helps in configuring the audience & scope correctly.
- Create OAuth resource:
- Primary audience: https://peoplesoftcs.XXX.defaultpublicvc.oraclevcn.com:9000/PSIGW/RESTListeningConnector/XXX/
- Scopes: read
- Create OAuth client:
- Application type: Confidential
- Allowed Grants: Authorization Code, Refresh Token.
- Redirect URI: https://peoplesoftcs.XXX.defaultpublicvc.oraclevcn.com:9000/PSIGW/RESTListeningConnector/XXX/pt_sec_authtoken.v1/callback
- Resources: Add the respective scope from the resource app
3. PeopleSoft REST API configurations in console
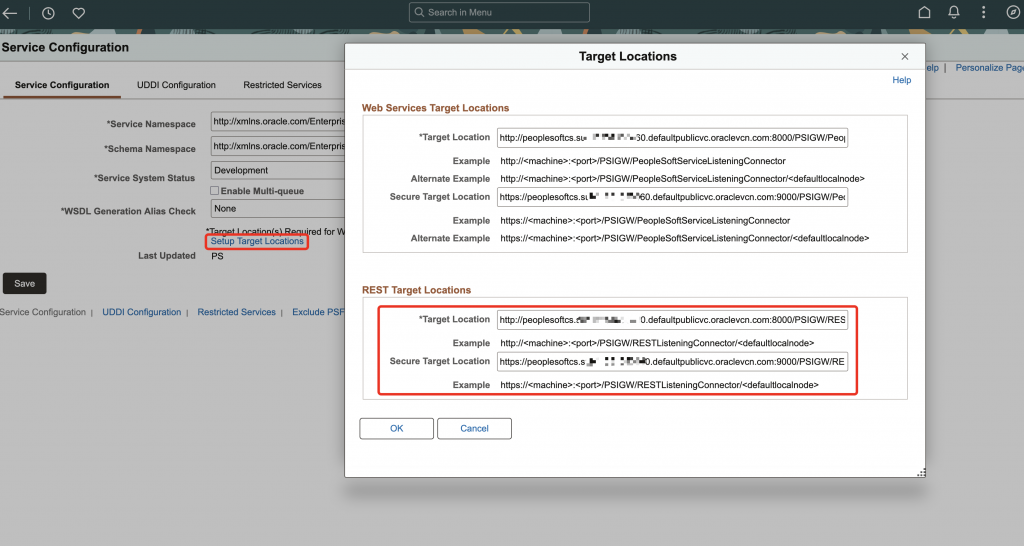
Service Configuration
- In your PeopleSoft instance, navigate to Menu > PeopleTools > Security > Integration Broker > Service Configuration
- Populate the REST locations:
- Target Location: http://peoplesoftcs.XXX.defaultpublicvc.oraclevcn.com:8000/PSIGW/RESTListeningConnector/XXX
- Secure Target Location: https://peoplesoftcs.XXX.defaultpublicvc.oraclevcn.com:9000/PSIGW/RESTListeningConnector/XXX
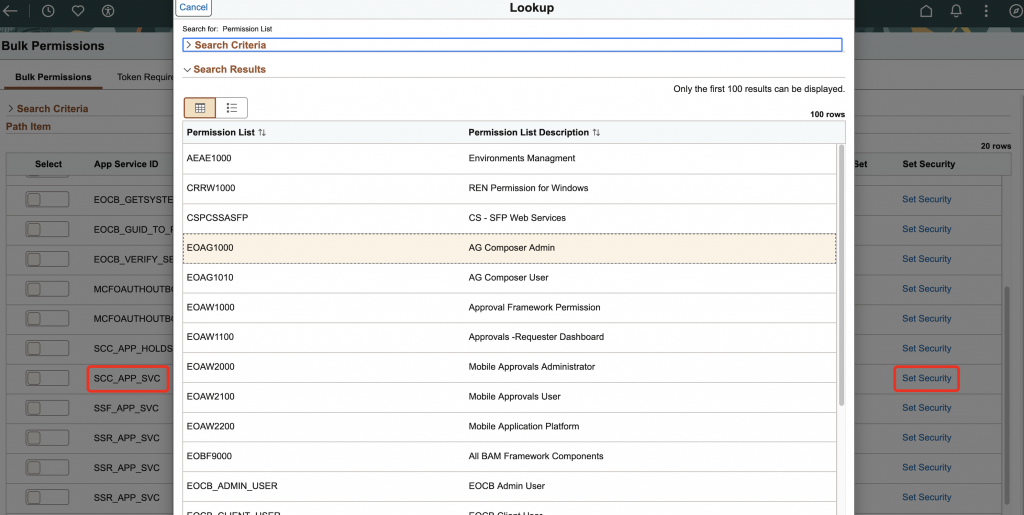
Application Services Security
- In your PeopleSoft instance, navigate to Menu > PeopleTools > Integration Broker > Application Services > Application Services Security
- Under ‘Bulk Permissions‘ tab, look for the App Service & click ‘Set Security’. For our demo, we are using the ‘SCC_APP_SVC‘ service and the permission EOAG1000 referenced earlier.
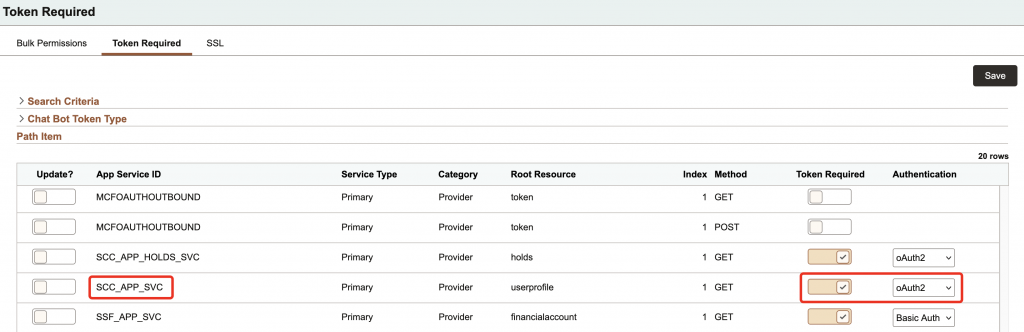
- Under ‘Token Required’ tab, look for the App Service & toggle ON the button for ‘Token Required’. Change the ‘Authentication’ method to ‘oAuth2‘.
Service Operation Definitions
- In your PeopleSoft instance, navigate to Menu > PeopleTools > Integration Broker > Service Operation Definitions
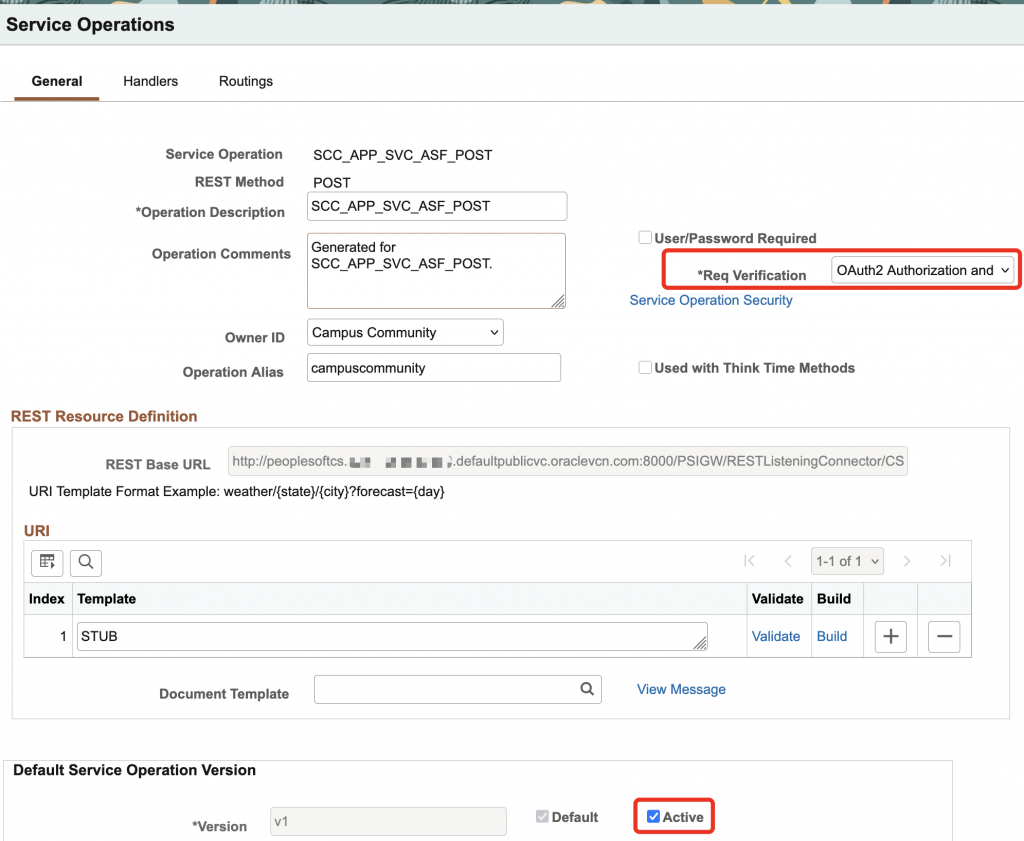
- Search & open the service operation for the service. This would be ‘SCC_APP_SVC_ASF_POST’ in this case.
- Configure the below details:
- [General]
- Req Verification: ‘OAuth2 Authorization and SSL’
- Default Service Operation Version: Put a check on ‘Active‘
- [Handlers]
- Validate that handler status is ‘Active’
- [Routings]
- Validate that routing status is ‘Active’
- [General]
OAuth resource configuration in PeopleSoft
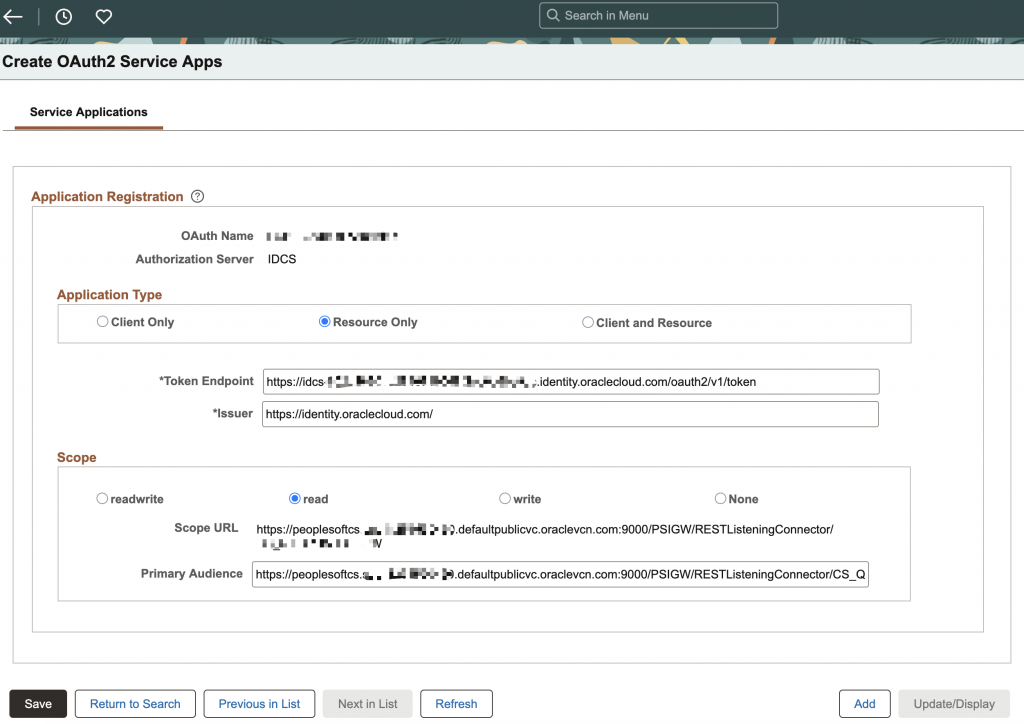
- In your PeopleSoft instance, navigate to Menu > PeopleTools > Security > OAuth2 Administration > Create OAuth2 Service Apps
- Configure the below details:
- Application Type: Resource Only
- Token Endpoint: https://idcs-XXX.identity.oraclecloud.com/oauth2/v1/token
- Issuer: https://identity.oraclecloud.com/
- Scope: read
- Scope URL: This should be pre-populated based on service configuration.
- Primary Audience: https://peoplesoftcs.XXX.defaultpublicvc.oraclevcn.com:9000/PSIGW/RESTListeningConnector/XXX/
4. PeopleSoft instance-level configurations
Access the PeopleSoft instance through SSH.
- As sudo admin, ensure traffic is allowed through firewall on port
9000(change IP & port as required).
sudo firewall-cmd --permanent --add-rich-rule='rule family="ipv4" source address="10.0.0.0/16" port port=9000 protocol=tcp accept'
sudo firewall-cmd --reload- Logon as
psadm2user.
sudo su - psadm2- Navigate to
WEB-INFdirectory and edit theintegrationGateway.propertieswith the IAM domain details. Refer to this documentation for more guidance: Using the integrationGateway.properties File
ig.log.level=5
ig.JSONWebKey=https://idcs-XXX.identity.oraclecloud.com:443/admin/v1/SigningCert/jwk
ig.CloudSite=https://idcs-XXX.identity.oraclecloud.com:443
ig.AuthorizationServer=IDCS- As a best practice, restart the Application (APPDOM) & Web (PIA) servers. As the psadm2 user, use psadmin command for domain administration.
- Important logs are available in the below path, however this may vary based on the version.
/home/psadm2/psft/pt/8.62/webserv/peoplesoft/applications/peoplesoft/PSIGW.war/WEB-INF
/home/psadm2/psft/pt/8.62/appserv/APPDOM/LOGS
5. Testing the authentication
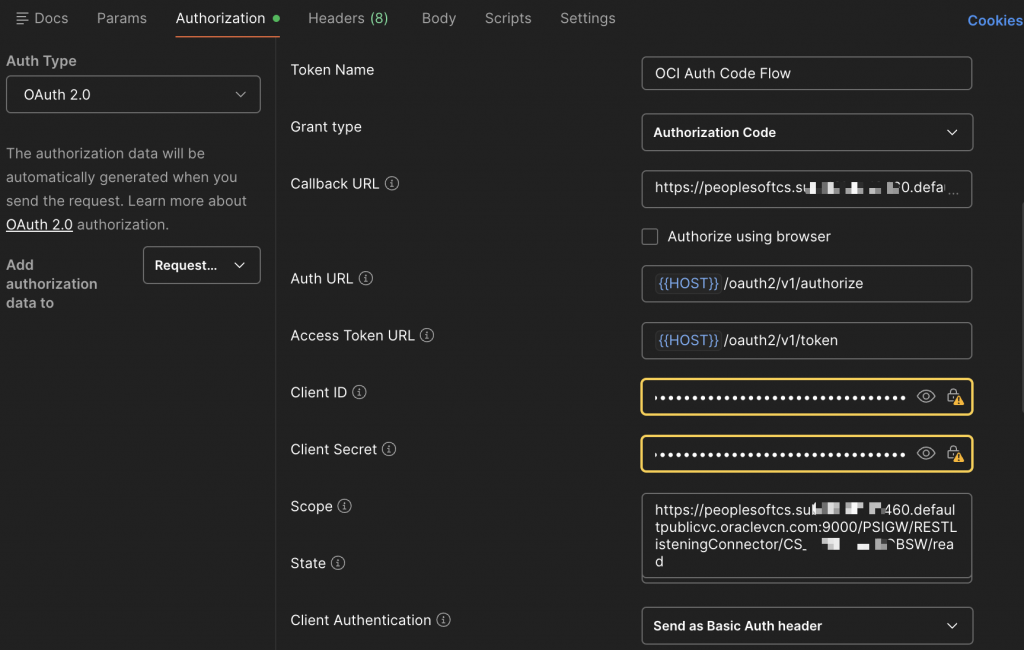
- Step A: Obtain Access Token (AT) using Authorization-Code flow. Any valid local/federated user can be used here.
- Step B: Use the AT in the authorization header to access the PeopleSoft API ‘campuscommunity’. Below is a sample curl command.
curl --location 'https://peoplesoftcs.XXX.defaultpublicvc.oraclevcn.com:9000/PSIGW/RESTListeningConnector/XXX/campuscommunity.v1/userprofile/getuserprofile' \
--header 'Authorization: Bearer XXX'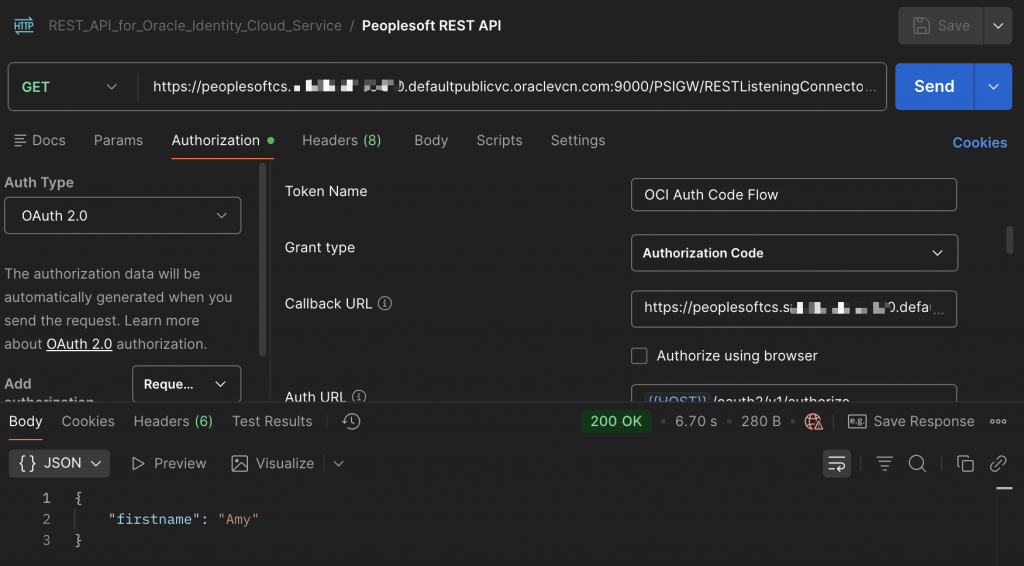
Conclusion
Integrating PeopleSoft APIs with OCI IAM opens up opportunities to allow both local & federated users access to REST services securely. Additionally, the IAM service offers modern security controls that help in further streamlining access. Read more on Overview of Identity and Access Management.
Authors
- Tonmendu Bose, Senior Cloud Engineer
- Jyoti Shah, Master Principal