Introduction
Oracle recently announced a new VTAP (Virtual Test Access Points) feature which provides customers with the ability to mirror traffic from one OCI resource (source) to another OCI resource (target). This enables customer use cases such as:
- Monitoring and Forensic Analysis
- Security and Networking Analytics
- Network and Application Performance Management
- Compliance
- Packet Capture to assist in Troubleshooting
This blog will go over an example of how to set this up for the purposes of troubleshooting, however the steps can be used to accomplish any of the use cases above.
First, let’s review some of the relevant components of the new VTAP service.
VTAP Source
The VTAP source is the resource that you want VTAP to monitor the traffic on. When you setup a VTAP, traffic on the VTAP source will be mirrored and sent to the VTAP target for further analysis. Currently, the below OCI resources are supported for VTAP sources. Please reference our VTAP documentation links at the bottom of this blog for an updated list of suported VTAP sources as Oracle may add supported resources in the future.
- A single compute instance Virtual Network Interface Card (VNIC) in a subnet
- A Load Balancer
- A Database system
- An Exadata Virtual Maching (VM) Cluster
- An Autonomous Data Warehouse instance using a private endpoint
VTAP Target
The VTAP target is the resource that you want the mirrored traffic to be sent to for further analysis. Currently, the only supported VTAP target is an OCI Network Load Balancer (NLB). As part of the Network Load Balancer configuration, you would have one or more backends that would receive the mirrored packets and would perform the analysis. In our troubleshooting example, we are going to use a simple Linux instance as the backend that we can run tcpdump or wireshark to view or analyze the mirrored traffic.
NOTE: Traffic captured at the VTAP source is encapsulated in VXLAN according to RFC 7348 and then sent to the VTAP target (NLB) via UDP port 4789. Therefore, you must configure a UDP port 4789 listener on your NLB.
Capture Filter
The Capture Filter gives you the ability to tell the VTAP exactly what traffic you would like mirrored at the VTAP source. A VTAP must have a Capture Filter, and the Capture Filter must have at least one rule.
Example Scenario
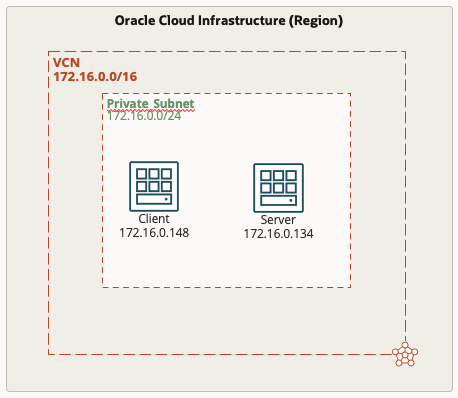
In our example, we want to create a VTAP for the purpose of helping us troubleshoot network connectivity. The diagram below illustrates our environment and current setup, as you can see this is a very simple example. We have a single private subnet that has two instances, a client and a server. The scenario is that the client is trying to communicate with the server and is unsuccessful. We want to capture some packets to see if they are even getting to the server.
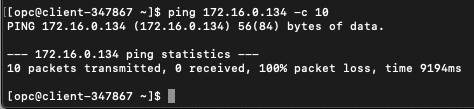
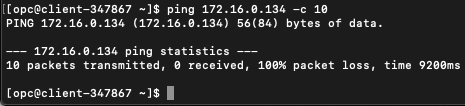
For connectivity, we are going to just use Internet Control Message Protocol (ICMP), as you can see below I attempted to send 10 ICMP packets from the client machine to the server machine and 0 were received with 100% packet loss.
Provision the VTAP
Now, let’s provision a VTAP so that we can mirror traffic from the server to a Linux instance where we can run a tcpdump to see if we see ICMP arriving at the server. The diagram below illustrates the VTAP components, and the steps are outlined as well.
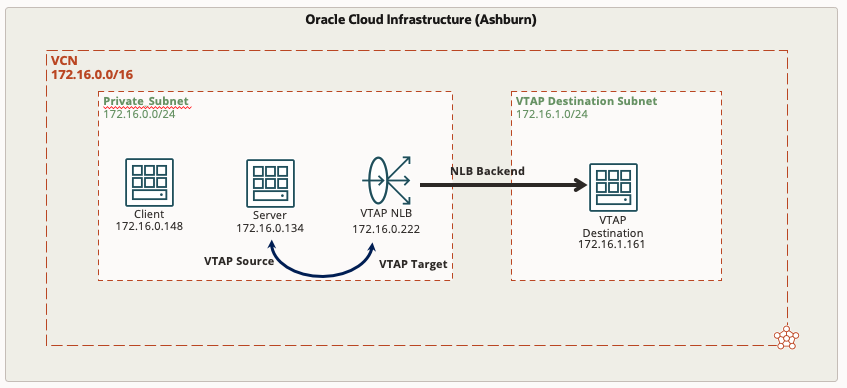
- Provision a new Linux instance (VTAP Destination)
- Provision a Network Load Balancer
- Create a listener on UDP port 4789
- Create a backend set
- Add the new Linux host as a backend
- Create a VTAP
- In your VCN, click on VTAPs on the left side under Resources
- Click the blue Create VTAP button
- Give it a name (Optional)
- Select the source type, in our scenario it’s an Instance VNIC
- Select the subnet, in our scenario it’s the Private Subnet
- Select the VNIC, in our scenario it’s the Server VNIC (172.16.0.134)
- Select the target Resource type, in our scenario it’s the Network load balancer (172.16.0.222)
- Select the Target subnet, in our scenario it’s the Private Subnet
- Select the NLB, in our scenario it’s 172.16.0.222
- Under Capture Filter, select Create New Capture Filter
- Give the Capture Filter a name (Optional)
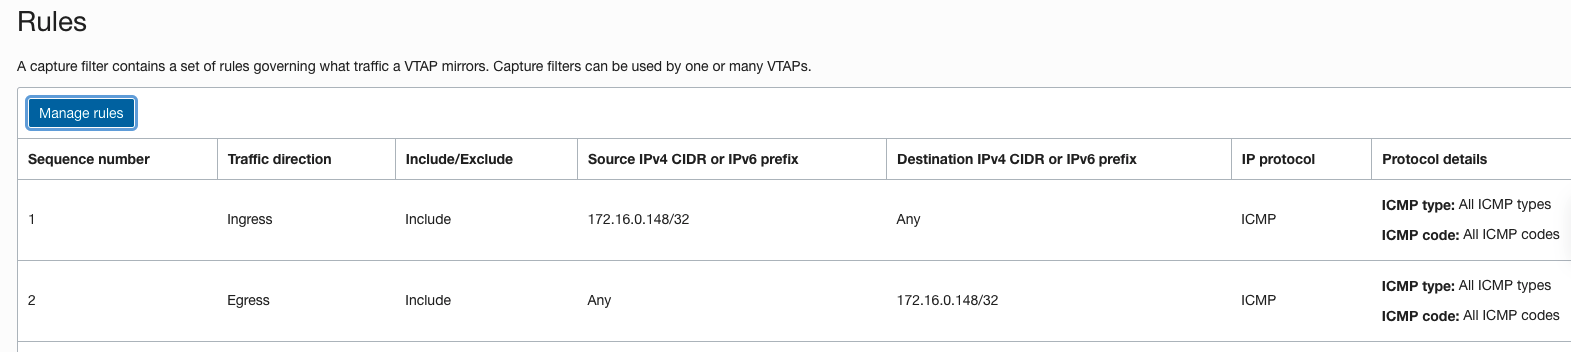
- Add Rules, for our scenario we are interested in seeing ICMP packets that are both sourced from the client and destined to the client. Our capture filter will have an ingress rule for ICMP with a source IP 172.16.0.148 and an egress rule for ICMP with a destination IP 172.16.0.148. Alternatively, you could have a capture filter for any/any which will mirror all traffic, but for our troubleshooting we are going to filter specifically for ICMP to/from the client only.
NOTE: After you create a VTAP, it will be in the Stopped state and will not mirror traffic until you start it. Click on the VTAP Name and click the Start button at the top to start the VTAP.
The VTAP I created is below:

The Capture Filter Rules I created are below
Troubleshooting
Now we are ready to troubleshoot. We will open SSH sessions to the client instance and the new Linux instance (backend). On the client instance we will initiate ICMP again, if the server received those ICMP packets on it’s VNIC, the VTAP should mirror those packets to the new Linux instance and we can see them using a simple tcpdump.
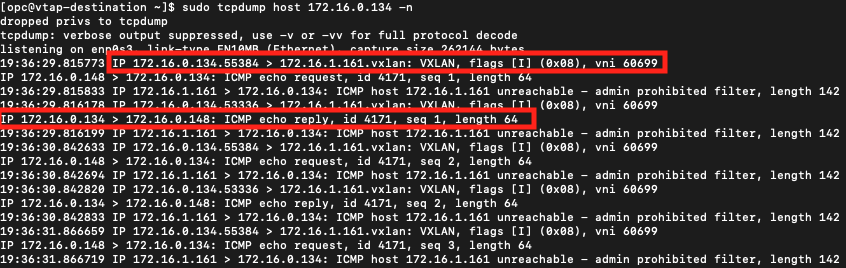
As you can see below, my ICMP pings still did not get a reply from the server as expected. But I also did not see anything on the Linux instance, which indicates the server never received anything from the client.
ICMP from client to server
tcpdump from Linux instance

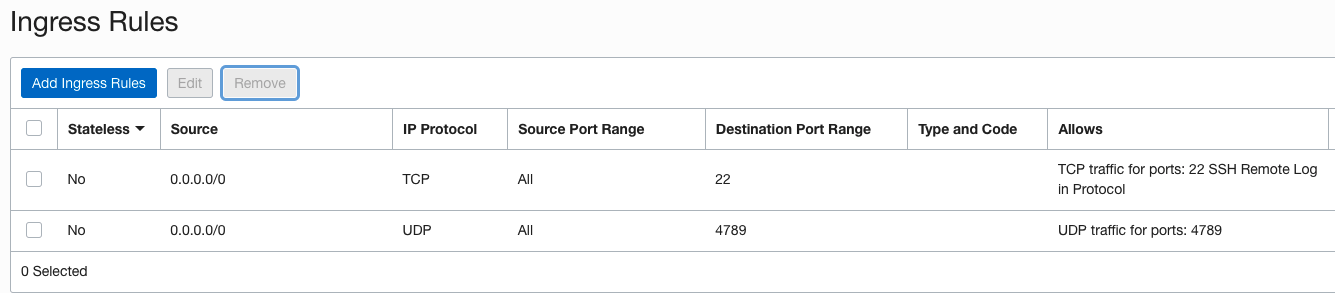
One reason that ICMP packets are not being received on the server could be the Security List for the subnet does not have a rule allowing ICMP. If we take a look at the current Security List rules for the Security List applied to the Private Subnet you can see we do not have any ICMP allowed. The only thing allowed is SSH and UDP 4789 which is required for the VTAP to send to the NLB.
We may have found the issue, so let’s add a rule to allow ICMP ingress and let’s test the ICMP again and see if we see the packets on the Linux instance now.
- In the Security List, click Add Ingress Rules
- Source Type is CIDR
- Source CIDR is 172.16.0.0/24
- IP Protocol is ICMP
- Click the blue Add Ingress Rules button
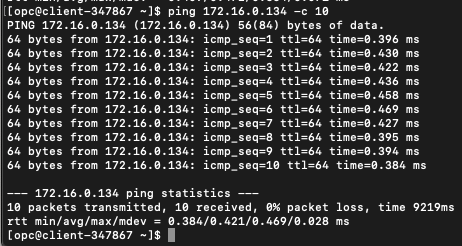
Now we will try the ICMP again, and you can see below that they are working now.
ICMP from client to server
We can now see the packets on our tcpdump showing the successful ICMP packets to/from the client/server. Notice that we can see both the VXLAN packets from the Server to the Linux instance and we can also see the ICMP packets to and from the client and server.
tcpdump from Linux instance