Validation
-
ODI Version 12.2.1.4.200721.1540
-
Oracle DB System 19.7.0.0
Introduction
When ODI developers connect to the ODI studio, they can edit the connection parameters. In particular, they can manually select the Work Repository that they will connect to. Repository access can be password protected, but for security reasons it is best to not even list repositories that users should not have access to. This post will detail the necessary steps to make sure that only authorized repositories are listed in the ODI login detail window.
Restricting Visibility of Work Repositories in ODI
The techniques described in this post will only be available to ODI users that have the required privileges to access the ODI Security navigator: Supervisors and Security Administrators. If you want to experiment with the instructions described in this post, make sure that you do indeed have these privileges.
First, let’s make sure that we all agree on what we are trying to achieve here in restricting the list of repositories that is visible to the user.
Objective
If we can prevent ODI users from seeing repositories that they are not allowed to access, we can guarantee that they will not be able to connect to these repositories (independently of passwords that may have been set to further secure access to these, which is a separate topic).
What we are trying to achieve here is the following: when a user wants to connect to an ODI repository, the login screen will show up. If the user clicks on either the green plus sign (to create a new login profile) or clicks on the pencil button (to edit the current login profile) it is possible to edit the connection details. This is represented by action (1) in figure 1.
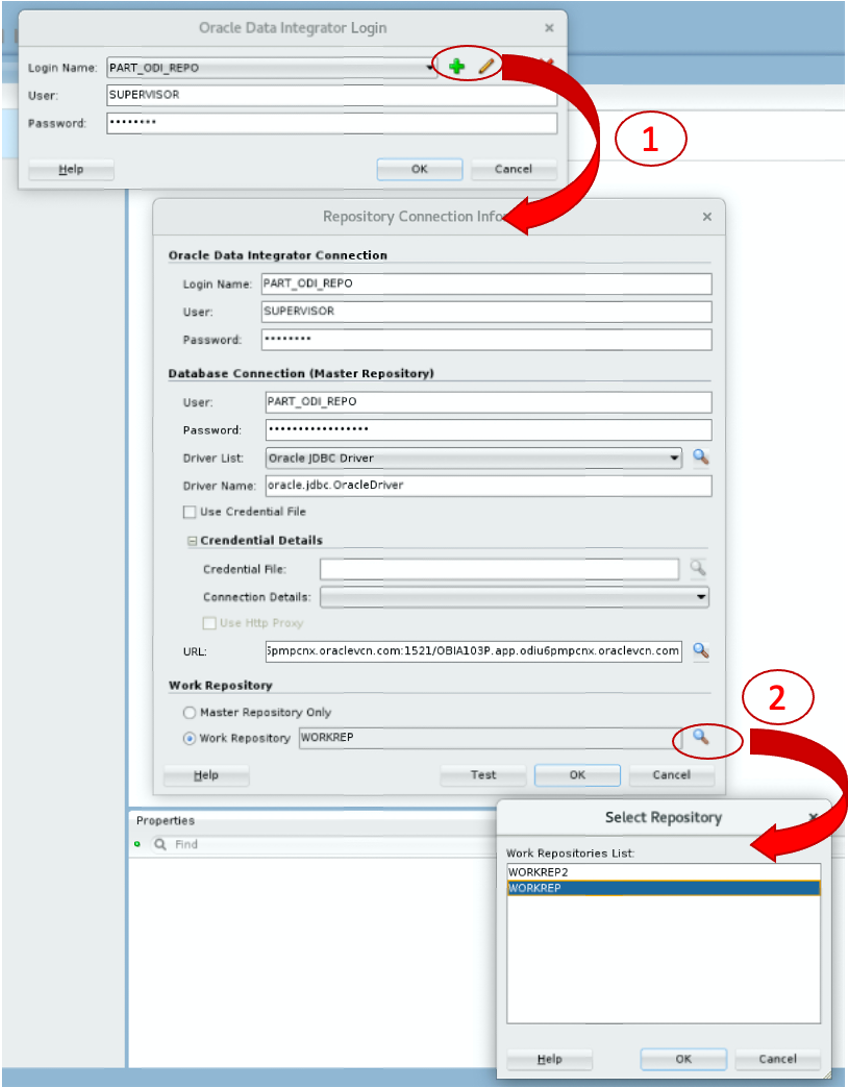
Figure 1: Editing the login profile
When the user now clicks on the magnifying class next to the work repository entry, ODI connects to the Master Repository and will list all Work Repositories, as shown with action (2) in figure 1. Or more specifically, ODI lists all authorized Work Repositories. We will now see how to define what is authorized or not.
Creating a new Non-Generic profile
The first step if we want to limit which objects are visible to an ODI user is to define a non-generic profile. Non-generic profiles are typically prefixed with the letters NG to differentiate them from the generic ones: for instance, ODI ships out of the box with an NG Designer profile. What makes a profile generic is that users have the same privileges on all objects: if I have the privilege to edit interfaces, this means that I will have the right to edit any interface in ODI Studio. With a non-generic profile, the privileges that I will be granted will only be valid for objects that have been explicitly granted to me (or objects that I have created myself if I have the required privileges to do so).
Since we want to restrict the user’s ability to view the complete list of Work Repositories at connection time, we will create a non-generic Connect profile, following these steps:
-
Select the ODI Security navigator. If you have previously closed the Security Navigator, you can restore it from the main menu View / ODI Security Navigator.
Figure 2: The Security Navigator
-
Right-click on the CONNECT profile and select Duplicate Selection: ODI creates a new profile called Copy of CONNECT.
-
Double-click on the new profile to rename it. The best practice is to prefix the profile with NG and to append the name of your company at the end of the name, so that you make it obvious to other security administrators that this profile is non-generic and does not come out of the box. In figure 3 below, you will see that I have named mine NG CONNECT XOF.
-
Expand the new profile to list all objects. At the bottom of the list of objects you will see an entry for Work Repositories.
-
Expand Work Repositories: you should now see the View method.
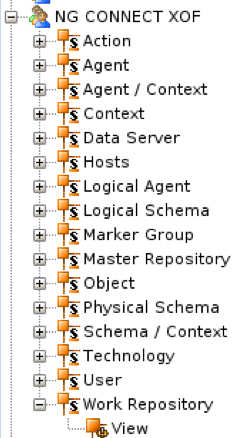
Figure 3: Expanded details of the new profile
-
Double-click the View method and deselect the Generic Privilege check-box.
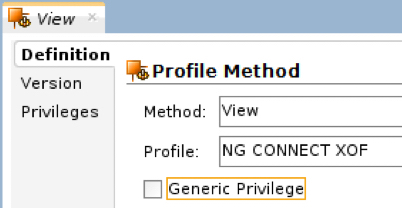
Figure 4: Deselect the generic privilege
-
Save the changes on the view method.
Making the view method non-generic is what makes the entire profile a non-generic profile.
Assigning the new privilege to a user
We now need to assign this new profile to our developers in lieu of the CONNECT privilege. Drag and drop the new profile on each developer’s name and select Yes when you are prompted to grant this profile to the user. You can then add any other profile in order to complete the privileges for that user.

Figure 5: User with NG CONNECT profile
If we were to stop here, these users would not be able to see any Work Repository: we still need to assign them the authorized repositories.
Assigning authorized repositories to the user
Once the new privilege has been assigned to the developers, you have to drag and drop the work repository name from Topology onto the user name in the Security module. To perform this operation, we have to dissociate the Security navigator from the other navigators. Step (1) in figure 6 below shows how to grab the tab of the Security navigator to move that navigator outside of the panel.
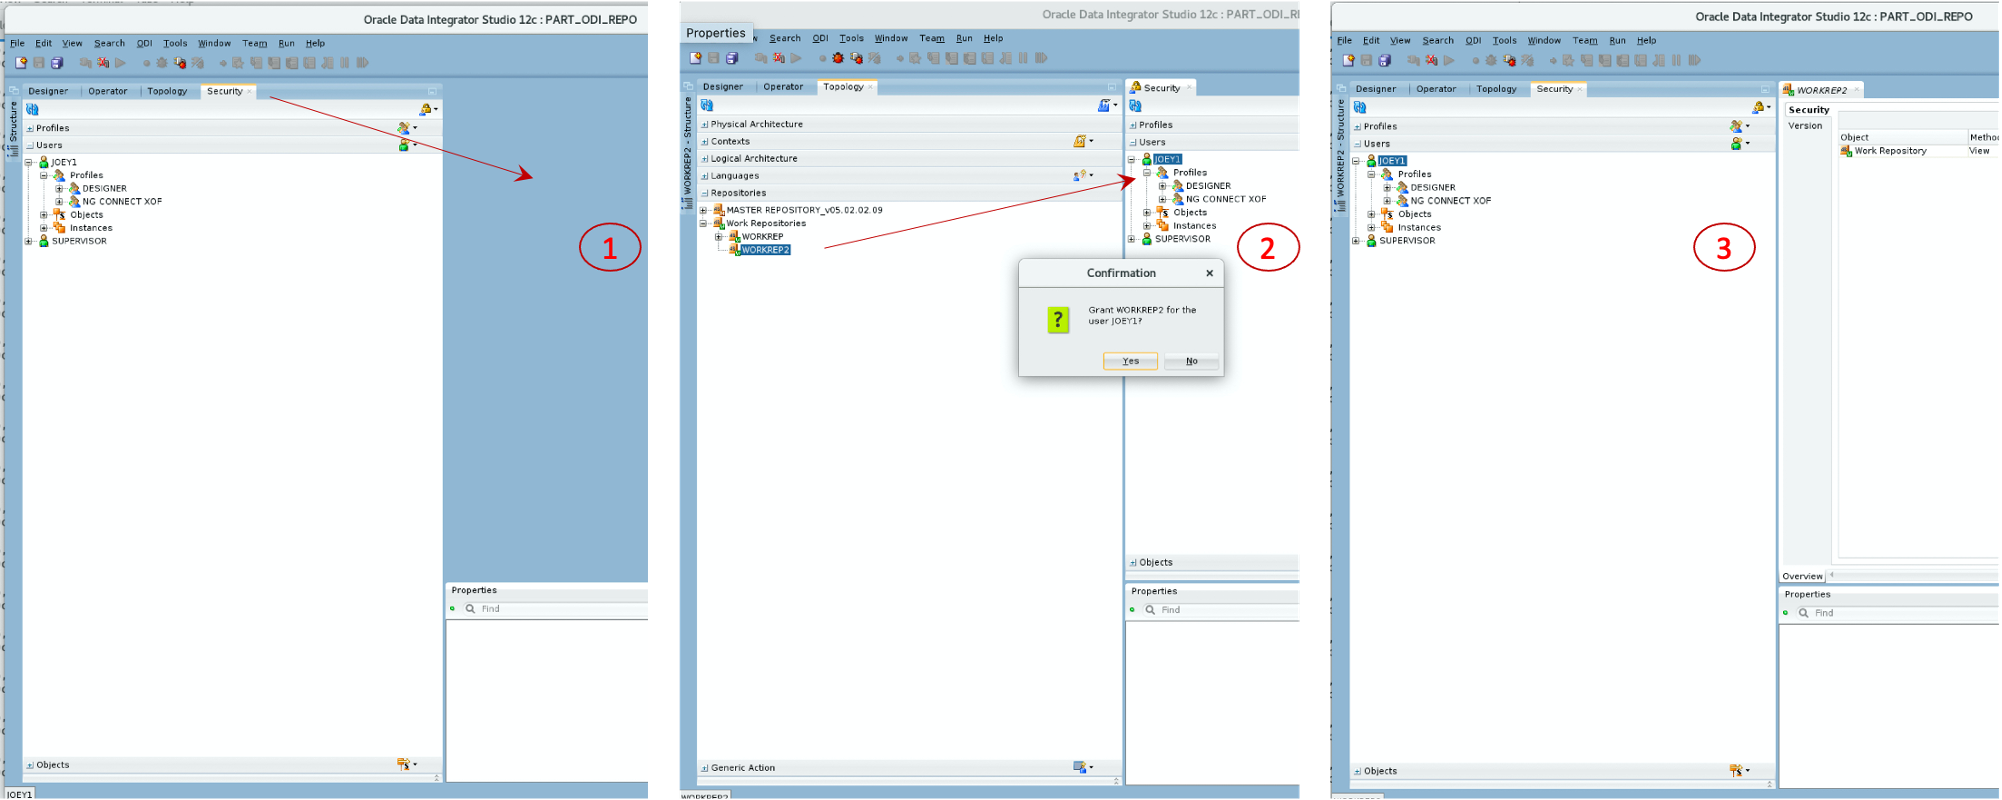
Figure 6: Dissociating the Security navigator from other navigators
Now that the Security navigator is separated from the other navigators, you can drag and drop any object from the other navigators on the user names. For this exercise, we want to drag and drop the authorized Work Repository onto the User name as illustrated in step (2) of Figure 6 above.
If you want to move the Security navigator back with the other navigators once you are done assigning individual objects, grab the Security tab again, and move your mouse over the center of the navigator panel on your left. When you see a blue rectangle right in the middle of the panel as shown in step (3) of Figure 6, you can release the mouse and the Security navigator will be back where it was originally.
When you drag and drop the repository on the user, you are prompted to confirm that you want to grant this privilege to the user: select Yes. You then have to “activate” the privilege. There are two possible options in that activation window, make sure to select the bigger check-mark as highlighted in Figure 7. If you roll your mouse over the activation icons, the proper icon will show “allow all methods in all repositories”. Only this option will work, the alternative would require the selection of a repository, which we are restricting here.

Figure 7: Activate the repository
You can now save the object definition and try to connect with the user whose repository selection has been limited. When this user will try to edit the connection to the repository in the ODI Studio, only the allowed repository will be visible (WORKREP2 in figure 8, which you can contrast with the privileges of SUPERVISOR in Figure 1).
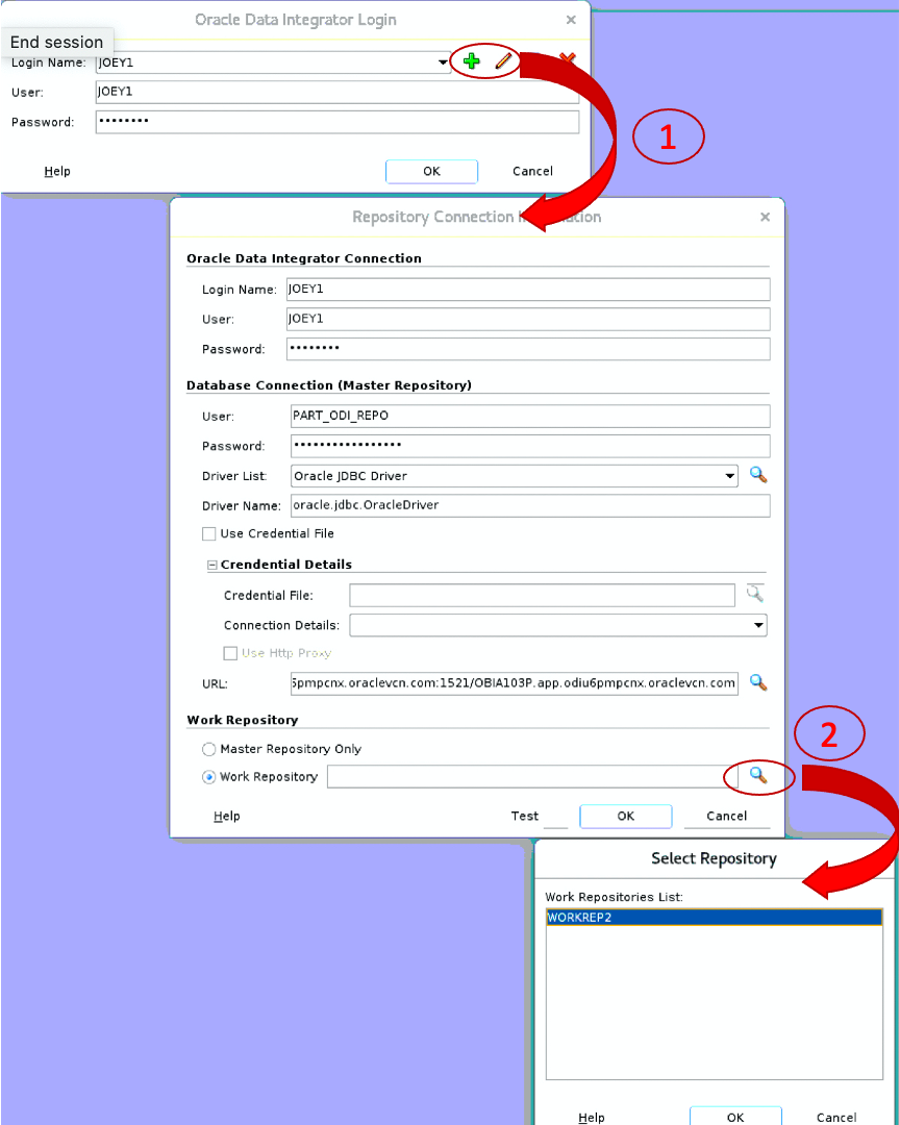
Figure 8: Restricted list of repositories
Obviously, for a complete security profile you will still have to assign regular privileges to the different users in addition to this NG_CONNECT profile: DESIGNER, OPERATOR, TOPOLOGY ADMIN, etc.
Conclusion
As we have seen in this step by step example, it is possible to configure users’ security to restrict their privileges so that they only see and access authorized Work repositories even if these repositories are defined in the same Master repository: the Non-Generic option of the profiles and objects’ methods gives us this level of flexibility.
For more ODI best practices, tips, tricks, and guidance that the A-Team members gain from real-world experiences working with customers and partners, visit “Oracle A-Team Chronicles for ODI”.
First published on 2013-05-15