Overview
The purpose of this document is to guide you through deployment of Oracle SD-WAN Edge in OCI. This document describes the necessary steps to establish connectivity with other Oracle SD-WAN sites but does not get into the actual configuration of policies, WAN optimization, security, and other advance features. Oracle SD-WAN Edge is based on Talari software which can be obtain from the Oracle Market Place.
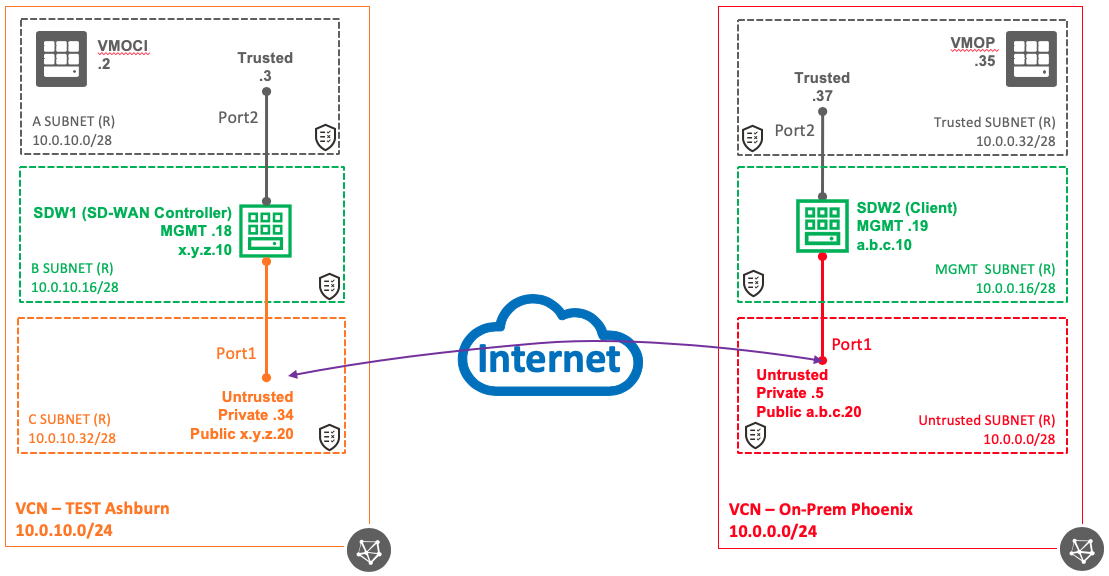
This lab includes two sites. One site will act as the SD-WAN Controller (also referred to as the Network Control Node or NCN) and the other side as the client. When you deploy Oracle SD-WAN Edge in OCI the default VNIC associated with the VM will be your management interface. Then you can add other VNICs to represent your WAN (untrusted) and LAN (trusted) interfaces as needed.
For the purpose of this lab, each VM will have 3 VNICs so plan accordingly when instantiating the VM. The diagram below is used for the purpose of this lab. As you can see each site has 3 subnets: Trusted (black), management (green), and Untrusted (red/orange).
Instantiate Oracle SD-WAN Edge
The first step is to instantiate an Oracle SD-WAN Edge in OCI. This process is the same if you are deploying a Controller or a client. The Controller should be the first site you create in the configuration.
- Log into the Oracle Console
- Select Compute, Instances from the main menu
- Click Create Instance
- Give a name to the instance
- Click Change Image, select Partner Images tab, select Oracle SD-WAN Edge Virtual Appliance. This document was created using version 8.2.1.0.0 GA 01282020. During the initiation process you can upgrade to a newer version or install a patch as needed
- Click Select Image
- Click Change Shape, select VM.Standard 2.4. This is the minimum required shape for Oracle SD-WAN Edge. Please check the documentation for the supported platforms and performance (Page 1-2)
- Click Select Shape
- Select the Compartment, VCN, Subnet compartment, and subnet where you want to deploy the VM. Remember that the default VNIC associated with the VM is your management interface
- Select Assign a Public IP Address if you are going to manage the device from the Internet
- The management port does not provide security, so it is recommended that a Bastion host is used to protect the management interface when managing from the Internet.
- Assign SSH keys so you can SSH to the device for management
- Click the show Advance Options link, select the Networking tab
- Check the Hardware-Assisted (SR-IOV) Networking option
- Click Create
- When the instance is provisioned, select attached VNICs
- In this step you will create the additional VNICs required for your configuration. Per the diagram above the VM needs two additional VNICs. Remember the order of the VNICs as later on you will need to associate them in the Oracle SD-WAN configuration. If you forget the order, you can check the MAC address for each VNIC and correlate them with the Oracle SD-WAN configuration
- Click Create VNIC, give it a name (Untrusted or WAN), select the VCN, select the subnet, check Skip Source/Destination Check, check Assign a Public IP address. This is very important as this is the public IP address that will be use by the Oracle SD-WAN Edge to establish the connectivity with the rest of the devices to form the SD-WAN overlay. This is only done on the Untrusted or Internet facing interface
- Click Save Changes
- Click Create VNIC, Give it a name (Trusted or LAN), select the VCN, select the subnet, check Skip Source/Destination Check
- Click Save Changes
- Once the VNICs have been added, you should have something like the picture below
- Reboot the instance
- Repeat these steps for any additional device deployed in OCI

You are done deploying the instance within OCI. The next step is to configure the Oracle SD-WAN Edge. In the lab this is a new deployment, therefore the first step is to configure the SD-WAN Controller (NCN) and then the client. If you are just adding a client you can skip the next two sections and go directly to the Apply Client Configuration section. All configurations are done from the SD-WAN controller so this and all configurations will be done by logging into the Controller in OCI. You will apply configurations to client locations in later steps.
SD-WAN Controller Configuration
The Controller is the appliance (or virtual appliance) that will manage the SD-WAN overlay. The also works as a client to allow data flow through its site. If you are adding a site to your existing deployment there is no need for you to perform this section and the following.
- HTTPS to Oracle SD-WAN Edge device
- Initial user ID is talariuser
- Initial password is talari-[first 8 characters of OCID string]
- From the Oracle Console, get the OCID for the VM you instantiated in the previous section as your SD-WAN Controller. For example: ocid1.instance.oc1.iad.anuwcljrkztqlna……….47q then the password will be talari-anuwcljr
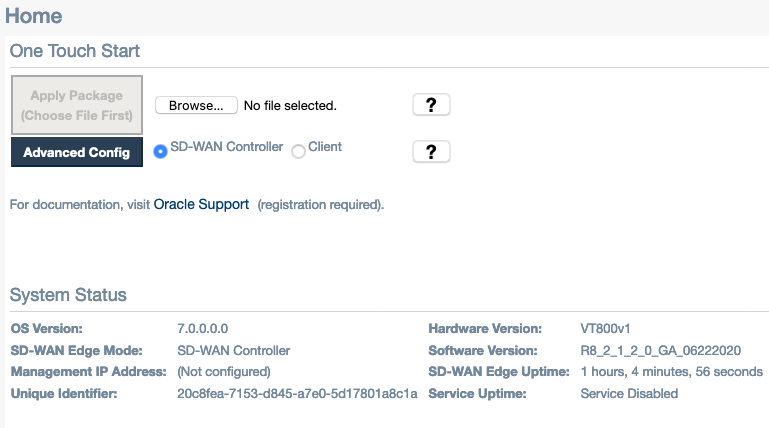
- On the home screen select SD-WAN Controller and click Advanced Config
- Select Go To Configuration Editor
- Go through the simple tutorial if you like otherwise close it
- Click the New button on the top left corner
- Click the + Site button. You will need to create a site for every site that is participating in the SD-WAN overlay. Por the purpose of this lab, first create a site for the SD-WAN Controller (Ashburn) and then create a site for the client (Phoenix). The information entered in the Configuration Editor is based on the diagram above
- Site Name – Ashburn
- Site Template – None
- Security key – Leave it as is
- Model – VT800 (Virtual Appliance)
- Mode – Primary SD-WAN Controller
- Click Add
- Click Save/Save As button on top and give it a name to this configuration (Initial)
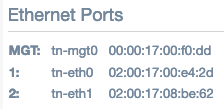
- Next step is to configure the interfaces. Here is where you have to remember in which order you created the VNICs in the Oracle console for the VM. If you don’t remember you need to match the MAC address in the Oracle Console and in the Edge GUI. Click the back button on your browser couple times until you see the Oracle Communications logo in the top left corner. Click System Information, in the middle you will see a section called Ethernet Ports. The SD-WAN edge names the ports 1, 2, etc. Here you can see the MAC address and you can correlate to the info provided on the Oracle Console. In this case Port1 is Untrusted, and Port 2 is trust
- To return to the Configuration Editor, expand the configuration section on the left menu, select Configuration Editor
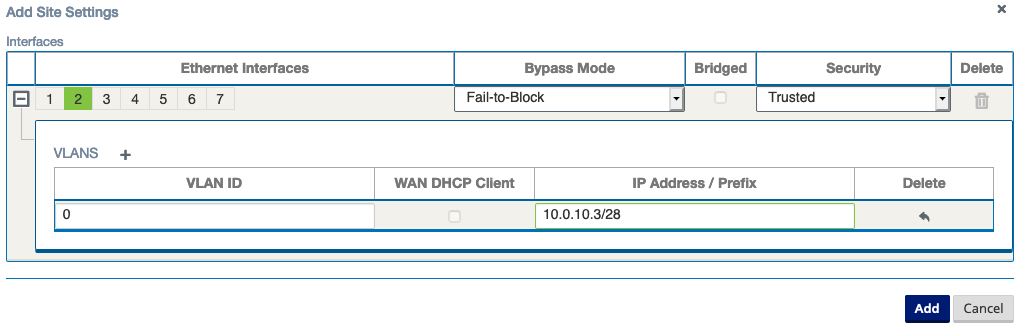
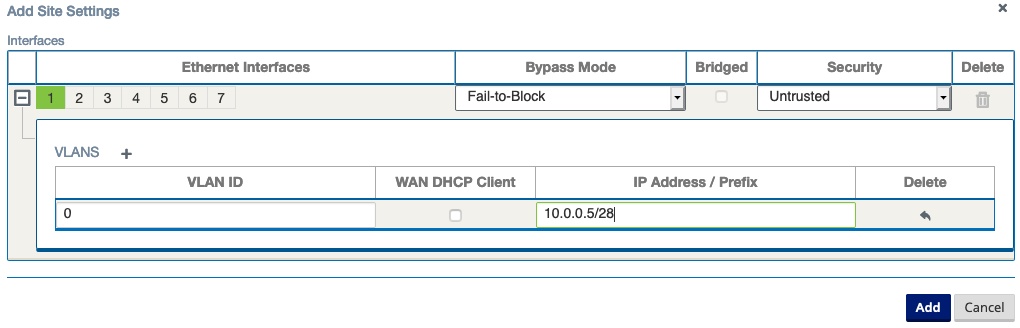
- Click the + sign on the Interfaces section and create the Untrusted interface using port 1. To add IP information click the + sign next to VLANS. Then click Add
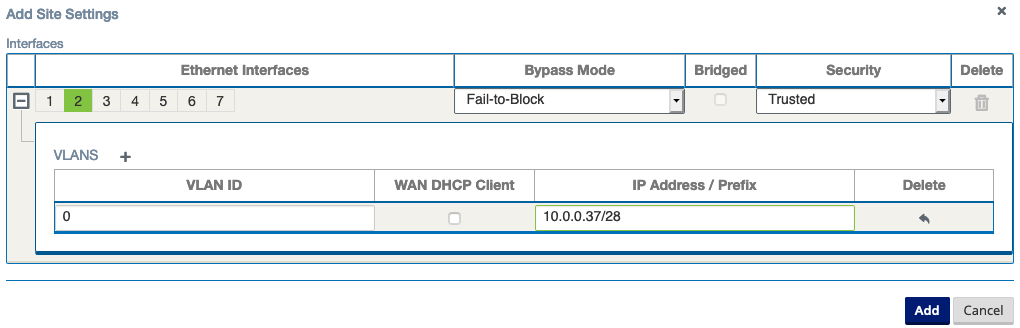
- Click the + sign on the interface section again and create the Trusted interface using port 2 and then click Add
- Click the + sign on the WAN Links section and create the Internet Link
- Give a name to the WAN link, is recommended to use the site name at the beginning
- Virtual Interface is the Untrusted port or port 1
- Gateway is the first IP of the Oracle VCN subnet where the VNIC is created
- Public IP address is the public address assigned by OCI when the VNIC was created
- Ingress and Egress rate depends of the capacity of the SD-WAN edge based on the shape. For this exercise let’s have it configured as 100Mbps
- Click Add
- Your SD-WAN Controller site should look like this with no errors. We are not adding any static routes as the subnets are directly connected
- Click the + sign on the Interfaces section and create the Untrusted interface using port 1. To add IP information click the + sign next to VLANS. Then click Add
- Click Save/Save As button on top and give it a name to this configuration (Initial)
- Click the + Site button. Now let’s create a site for the client (Phoenix). The information entered in the Configuration Editor is based on the diagram above
- Site Name – Phoenix
- Site Template – None
- Security key – Leave it as is
- Model – VT800
- Mode – Client
- Click Add
- Next step is to configure the interfaces
- Click the + sign on the Interfaces section and create the Untrusted interface using port 1. To add IP information click the + sign next to VLANS. Then click Add
- Click the + sign on the interface section again and create the Trusted interface using port 2 and then click Add
- Click the + sign on the WAN Links section and create the Internet Link
- Give a name to the WAN link, is recommended to use the site name at the beginning
- Virtual Interface is the Untrusted port or port 1
- Gateway is the first IP of the Oracle VCN subnet where the VNIC is created
- Public IP address is the public address assigned by OCI when the VNIC was created
- Ingress and Egress rate depends of the capacity of the SD-WAN edge based on the shape. For this exercise I have configured as 100Mbps
- Click Add
- Your client site should look like this with no errors. We are not adding any static routes as the subnets are directly connected
- Click the + sign on the Interfaces section and create the Untrusted interface using port 1. To add IP information click the + sign next to VLANS. Then click Add
- Repeat steps 11 and 12 for any other site in your network
- Click Save/Save As button on top and give it a name to this configuration (Initial)


Apply SD-WAN Controller Configuration
Now that the configuration is created, you need to apply this configuration to the SD-WAN Controller and enable the SD-WAN service in order for the SD-WAN Controller to work and control the SD-WAN overlay. Similarly you have to do for any client site.
- From the Configuration Editor, click Export
- Destination – Change Management Inbox
- Reason – Give it name
- Click Export
- On the top of your screen a message in green appears with a link to Change Management. If you missed the message, click Configuration on the left menu, and then select Change Management
- The Change Management screen appears, click the Begin button on the right side (middle of the screen)
- On this screen you can upload new images or patches. For these exercise we are applying patch 8.2.1.2.0. You can get patches from Oracle Support. Browse for the patch file and click Upload. You will also see here that the configuration “Initial” we created in the previous section is now selected
- Click the Next button. It will show another screen as it verifies the config, click OK. It will also ask you to accept the End User License Agreement. Click OK
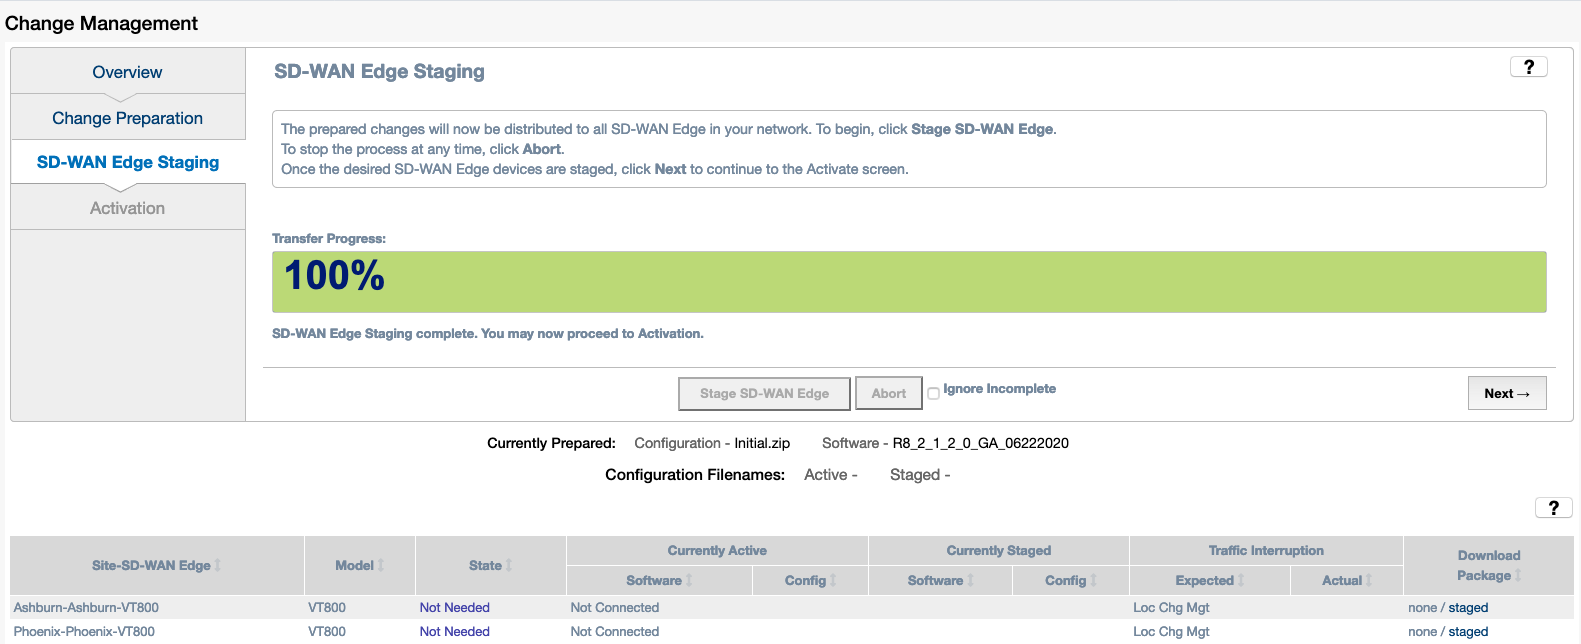
- On the next screen click the Stage SD-WAN Edge button. It will show a process bar as it reads the configuration file and the sites created. Sites will appear in the bottom
- Click Next
- Click Activate Staged. This will activate only the SD-WAN Controller as the client does not have connectivity to the SD-WAN Controller yet. You will activate the client in the next section. Accept the message that appeared on the screen
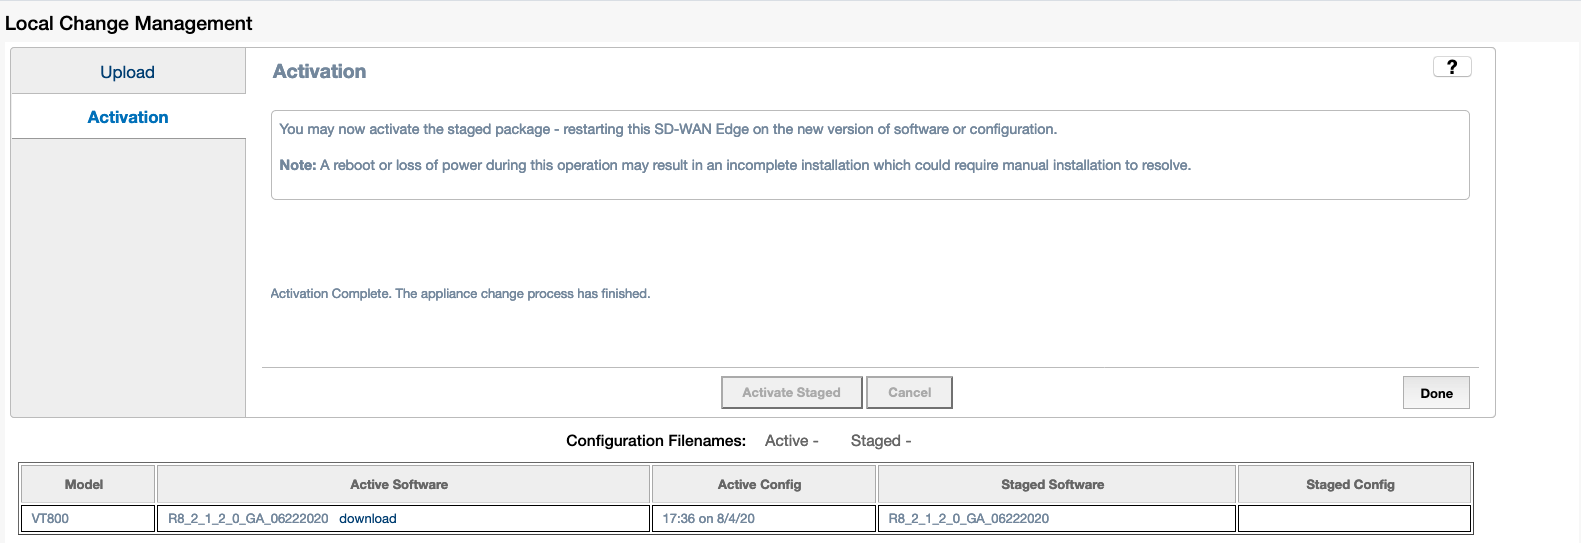
- Now that the config have been sent to the local SD-WAN Controller, you need to activate it. Note that you are on Local Change Management now as you will apply the configuration locally. Click Activate Staged, accept message. It takes about 180s to perform this task
- Click Done. It will take you to the home screen, but it will show services disabled
- Click Manage SD-WAN Edge from the left menu
- Click Enable / Disable Services
- Click Enable, it takes couple seconds to enable the services
- Next screen will show other services that you can enable now that SD-WAN is enabled
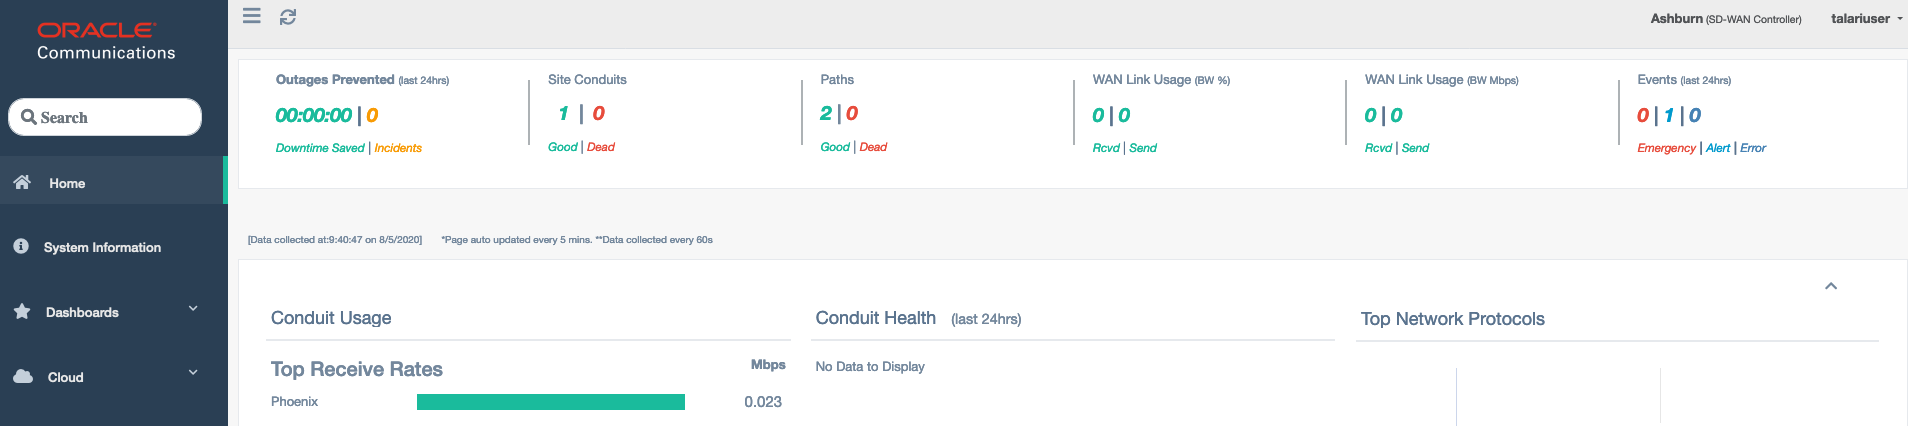
- Click Home from the left menu and you will see some statistics and connections down as there are no other sites active


Proceed to the next section to activate and configuration for the client site (Phoenix)
Apply Client Configuration
In the SD-WAN Controller configuration section we also configure the Phoenix site which is our client site. If you have an environment already running you then created a site to be deployed in OCI. In this section you will enable the client site using that configuration.
- As the Oracle SD-WAN edge NCN or client is deployed in OCI, remember to update the routing and security lists on your VCN to allow the traffic between the SD-WAN devices to communicate. Based on the design for this lab make sure to allow traffic between x.y.z.20 (SD-WAN Controller) and a.b.c.20 (Client) in the security list. Oracle SD-WAN uses Port UDP 2156 for communication. If you have more devices on your SD-WAN overlay, you need to allow the traffic between all of them.
- Log into the SD-WAN Controller
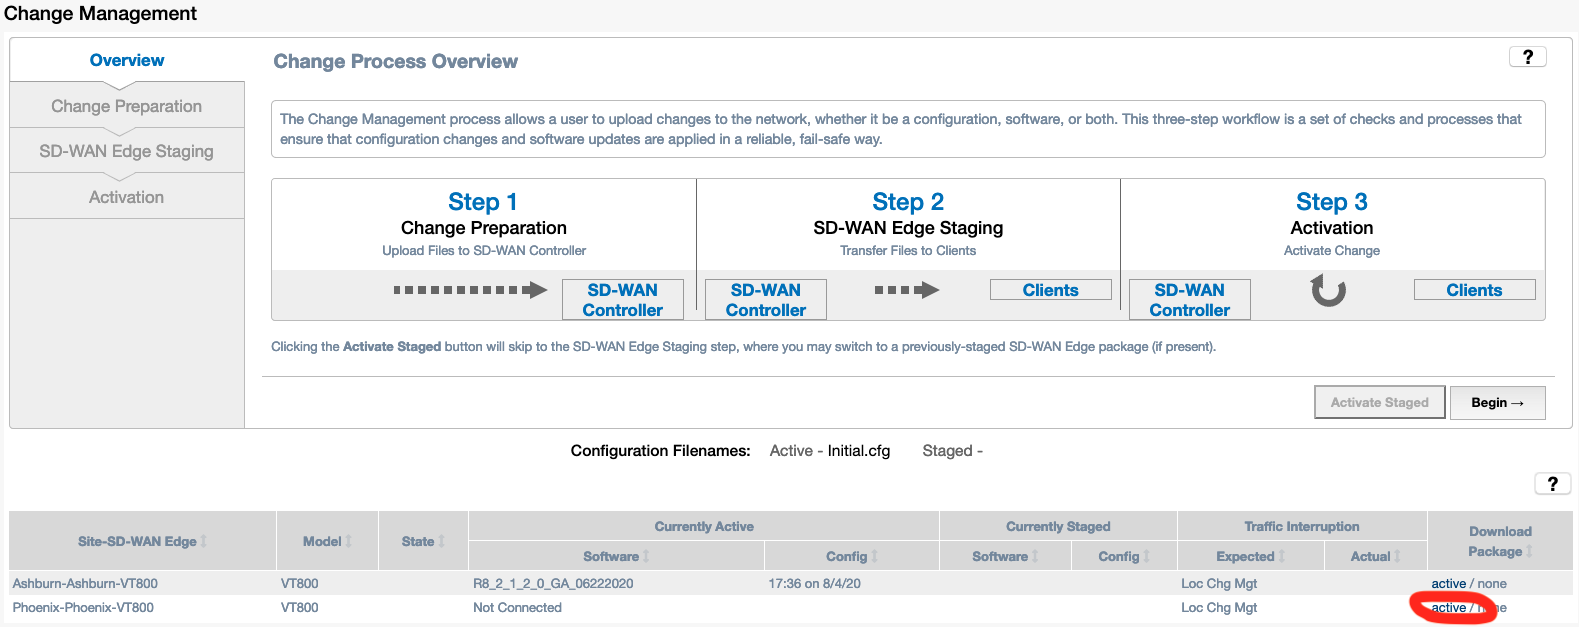
- Select Configuration from the left menu, Select Change Management
- Click the active link for the client site. This will download the configuration file for the client site. Save it to your local hard drive
- Log into the Oracle SD-WAN Edge for your site
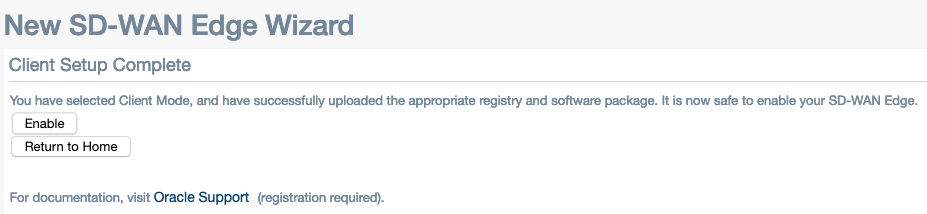
- The home screen will show the initial configuration screen. Click the Browse button and select the file saved on the previous step
- Select the Client option
- Click the Apply Package button. This will upload the configuration file to this device an enable the configuration. This will take a minute or so
- Now that the configuration is uploaded, the next step is to enable the SD-WAN service. In the screen presented, click Enable
- Once the SD-WAN service is enabled, you can enable other services
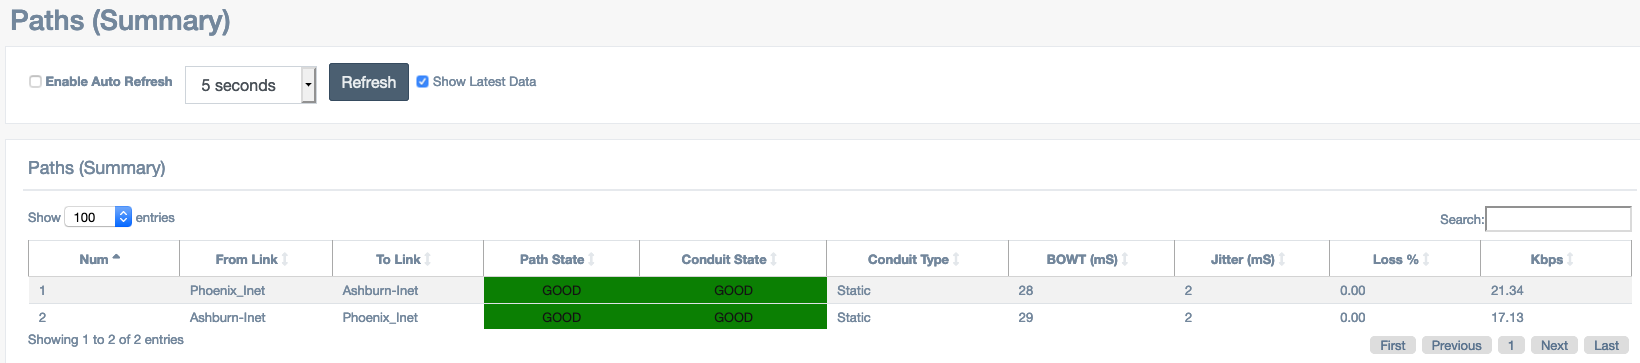
- If you select Home from the menu on the left you can see the SD-WAN overlay is built to the SD-WAN Controller. Conduits and paths are created
- On the search field on the top left corner type path and then select Path Summary. Here you can see the state of your paths and some statistics on each direction about the health of the path


Now that connectivity is established between the SD-WAN devices, let’s do some testing.
Connectivity Test
Using the diagram for our lab let’s try to ping from VMOCI in Ashburn to VMOP in Phoenix and back. To perform the test make sure the security lists on your VCN is allowing the traffic between these two endpoints. Routing also needs to be updated accordingly as follow:
| Ashburn A Subnet Route Table | Phoenix Trusted Subnet Route Table |
| Target Type – Private IP Destination CIDR Block – 10.0.0.32/28 Target Selection – 10.0.10.3 |
Target Type – Private IP Destination CIDR Block – 10.0.10.0/28 Target Selection – 10.0. 0.37 |

Below are the traceroute and ping results of the test
| Ashburn |
[opc@vmoci ~]$ traceroute 10.0.0.35 traceroute to 10.0.0.35 (10.0.0.35), 30 hops max, 60 byte packets 1 10.0.10.3 (10.0.10.3) 0.973 ms 0.949 ms 0.932 ms 2 10.0.0.5 (10.0.0.5) 62.219 ms 62.208 ms 62.193 ms 3 10.0.0.35 (10.0.0.35) 62.543 ms !X 62.502 ms !X 62.499 ms !X [opc@vmoci ~]$ ping 10.0.0.35 PING 10.0.0.35 (10.0.0.35) 56(84) bytes of data. 64 bytes from 10.0.0.35: icmp_seq=1 ttl=62 time=61.6 ms 64 bytes from 10.0.0.35: icmp_seq=2 ttl=62 time=60.8 ms 64 bytes from 10.0.0.35: icmp_seq=3 ttl=62 time=61.0 ms 64 bytes from 10.0.0.35: icmp_seq=4 ttl=62 time=61.0 ms ^C --- 10.0.0.35 ping statistics --- 4 packets transmitted, 4 received, 0% packet loss, time 3004ms rtt min/avg/max/mdev = 60.871/61.156/61.612/0.370 ms [opc@vmoci ~]$ |
| Phoenix |
[opc@vmop ~]$ traceroute 10.0.10.2 traceroute to 10.0.10.2 (10.0.10.2), 30 hops max, 60 byte packets 1 10.0.0.37 (10.0.0.37) 0.530 ms 0.560 ms 0.544 ms 2 10.0.10.34 (10.0.10.34) 61.475 ms 61.474 ms 61.464 ms 3 10.0.10.2 (10.0.10.2) 61.450 ms !X 61.420 ms !X 61.411 ms !X [opc@vmop ~]$ ping 10.0.10.2 PING 10.0.10.2 (10.0.10.2) 56(84) bytes of data. 64 bytes from 10.0.10.2: icmp_seq=1 ttl=62 time=61.1 ms 64 bytes from 10.0.10.2: icmp_seq=2 ttl=62 time=61.4 ms 64 bytes from 10.0.10.2: icmp_seq=3 ttl=62 time=60.8 ms 64 bytes from 10.0.10.2: icmp_seq=4 ttl=62 time=61.3 ms ^C --- 10.0.10.2 ping statistics --- 4 packets transmitted, 4 received, 0% packet loss, time 3004ms rtt min/avg/max/mdev = 60.807/61.173/61.400/0.334 ms [opc@vmop ~]$ |
The below screen shots show the home screen for each device where you can see the status for the conduits and paths and some statistics
SD-WAN Controller
Client

Reference
Oracle SD-WAN Aware – Here you can find the following documents
- Features Guide
- Installation Guide
- Release Notes
Oracle SD-WAN Edge – Here you can find the following documents
- Features Guide
- High Availability Guide
- Release Notes
- Security Guide
- Virtual Appliance Guide
