Introduction
Identity Cloud Services (IDCS) 18.2.4 introduced an all new authentication API that allows customers to build their own login application. Those new APIs allow you to do username and password authentication, federation, social login and multi factor authentication.
The API is implemented as a state machine that steps through the initial authentication and then proceeds through Multi-factor Authentication (MFA) if needed. The state machine also handles enrolling users in MFA if they have not previously done so. The entire set of calls needed to actually log a user in can be confusing for customers so the A-Team built a sample login app (referred as “Login App” elsewhere in this document) that covers all of the basic use cases.
The Login App is actually more than a sample as one of the key design goals was to build a “widget” that customers could download, customize by editing just one or two simple files (HTML and/or CSS), and then deploy straight away. We specifically wanted to make it so customers didn’t need to actually bother with the REST APIs.
The core of the Login App is a JavaScript SDK that wraps the REST calls and hides the state machine. On top of that we built a JavaScript library that builds the screens and collects the user input. And finally we took that and built HTML and CSS that presents those screens to the user. By breaking the app into those components we were able to make something that can be easily customized to meet the needs of 90+% of customers just by editing HTML or CSS, and by editing one JavaScript file can be tweaked or extended by the 8% or 9% who may want a different screen flow or do some custom integration, and still leave a useful little library for the 1% of customers who need something really different.
In one sentence, “the Login App is an easy-to-customize Single Page Application (SPA) that consumes IDCS authenticating APIs via the provided JavaScript SDK”.
For usage information, please check the OBE (Oracle By Example) tutorial available at http://www.oracle.com/webfolder/technetwork/tutorials/obe/cloud/idcs/idcs_authn_api_obe/authn-api.html, where you can also find a pointer to the available source code on Github.
Login App Features
The following features are available in the Login App:
1. Login Form with Social Login;
2. All MFA factors with Enrollment;
3. User Self-Registration;
4. Password Reset;
5. Localized to following languages: English, Brazilian Portuguese, Spanish, German, Italian, Danish, Norwegian Bokmål and Hindi. All provided on a best-effort basis;
6. UI is responsive, i.e., it adapts appropriately if displayed on mobile devices;
Authentication Flow
The Login App authenticates users independently of the type of application that they are interacting with, be it OpenID Connect (OIDC) compliant, SAML based or even one that integrates via a Secure Form Fill (SFF).
This is how a typical authentication flow occurs with the Login App:
1. Anonymous user access to an IDCS-enabled application triggers IDCS authentication;
2. IDCS redirects the browser (via POST) to the server side Login App;
3. The server side Login App acquires an access token from IDCS and redirects the user browser to an HTML page that loads the client side JavaScript;
4. The client side implements the SPA that consumes IDCS authenticating APIs via the provided JavaScript SDK;
5. The client side handles all responses from IDCS and reacts accordingly for performing user authentication, including MFA enrollment;
6. Once the user authenticates, an IDCS session is created and a session cookie is set in the browser. At this point, the Login App has completed its job and a different type of token is sent to the IDCS-enabled application depending on its integration mechanism.
7. If the application is OIDC compliant, an authorization code is sent to the application via a callback URL. It is the responsibility of the application exchanging the authorization code for an Identity Token;
7′. If the application is SAML based, IDCS issues a SAML assertion and sends it to the app through a browser POST;
7”. If the application is based on a Secure Form Fill, IDCS replays the stored credentials to the application.
Note: It’s worth mentioning that the Login App works with any PaaS applications that use IDCS natively.
JavaScript SDK
The SDK contains the necessary methods to interact with the authenticating endpoints supported by the IDCS APIs. It’s worth mentioning that sso/v1/sdk/authenticate API takes a different numbers of input parameters combination and accounts for more than 90% of all use cases. In order to facilitate understanding and make implementation easier, we’ve decided to come up with specific methods for each factor and step (enrollment or credential submit), even though they end up invoking the aforementioned API.
For instance, there are methods like postCreds, postOTP, enrollSecurityQuestions that essentially get input data from the Login App and build the necessary payload for invoking the sso/v1/sdk/authenticate API.
The API response is interpreted and eventually sent back to the Login App that reacts appropriately based on its own UI requirements.
The SDK currently is mostly a browser-based JavaScript implementation with no 3rd-party libraries or frameworks. There’s one crucial aspect that requires server-side code, which accounts for bootstrapping, where an access token is initially acquired from IDCS and made available to the client-side. The server-side code has been built for Node.JS, but it can obviously be re-written in any other suitable technology, like PHP, Python, Java, etc.
Required Configuration in IDCS
From IDCS standpoint, the Login App is a confidential OAuth client. As such, it requires an application entry in IDCS with some specific grants.
1. Allowed Grant Types: Client Credentials;
2. Admin App Roles: Signin, Self Registration, Verify Email, Forgot Password, Reset Password;
How to Customize
UI Structure
The Login App UI has a content area and a side bar. The side bar slides to the left and to the right, revealing either Self Registration related forms or Login related forms, where main content is displayed.
What can be customized?
Pretty much any UI item can be customized in the Login App, including fonts, colors, logo, background, icons and displaying messages. Additionally, the sliding effect can also be removed.
For instance, here’s the Out of the Box Look and Feel and a custom one right next:
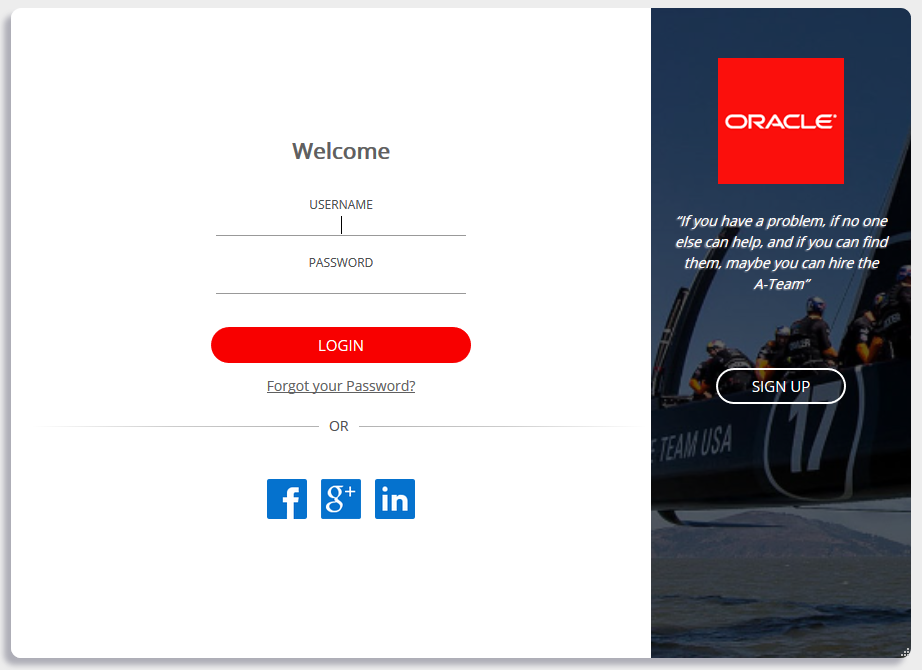
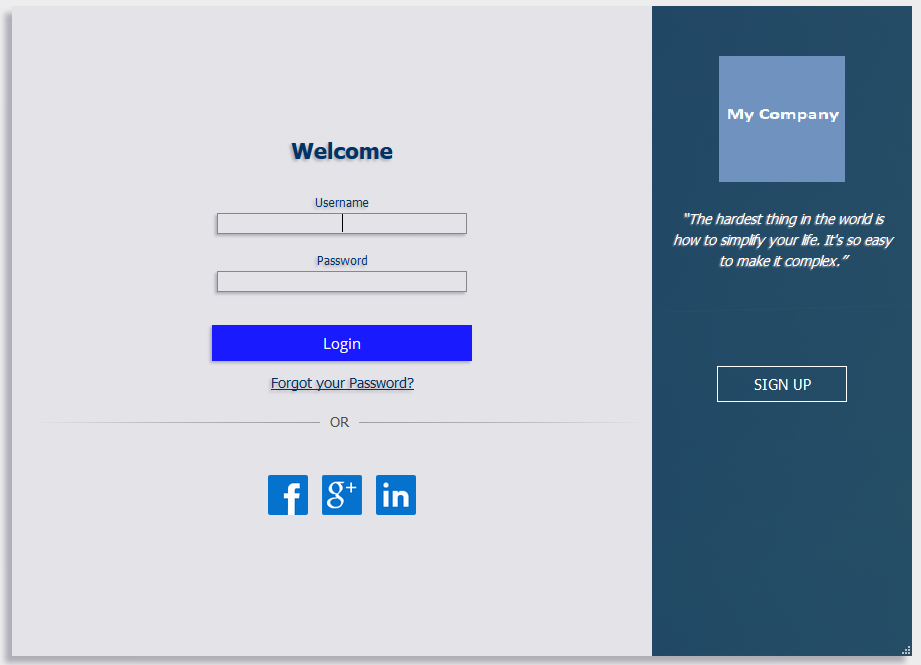
1. Colors and fonts are customized in the custom css file.
2. The background and logo images in the side bar are provided as image files named, respectively, “background.png” and “logo.png” in the shipped Login App. They can be replaced by simply replacing the image contents and preserving the file names.
3. The Social Identity Provider icons, by default, are the ones defined in IDCS, but can also be overwritten in the application.
4. Changing the sliding effect requires changing the signin.html page. The side bar contents are completely contained in the signin.html page.
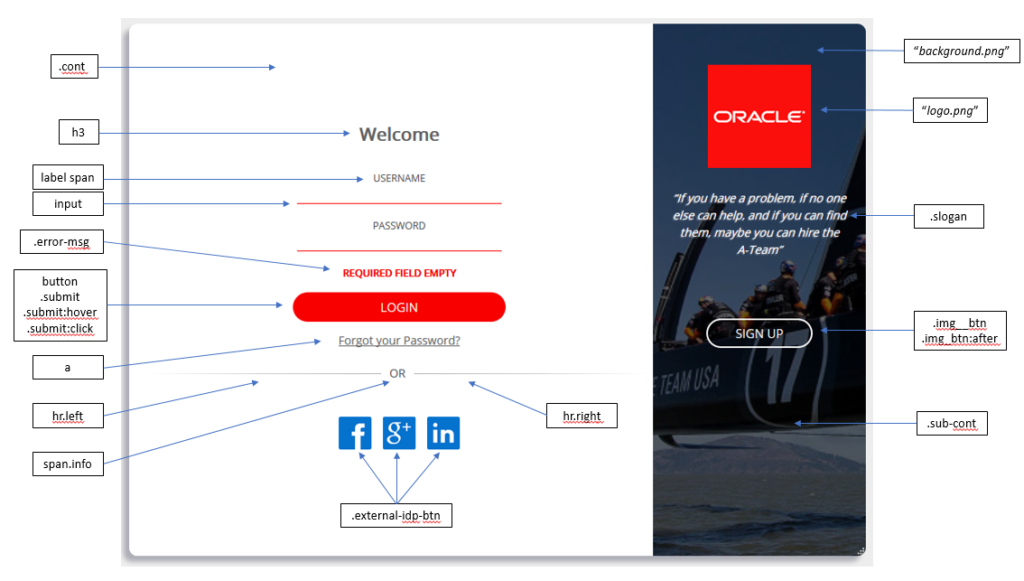
Main CSS Elements in the UI
For reference, here are the main CSS elements and images (quoted italics) that are applied to the login page:
How to Add a New Language
The Login App is Out of the Box localized to 8 languages on a best-effort basis. Each supported language has a corresponding .js resource file that gets loaded according to the preferred language configured in the user’s browser.
Adding a new language means adding a new .js file with the appropriate translations (see en.js for guidance) and also adding the appropriate language code in the list of supported languages in loadResource.js file.
Building your Custom Look and Feel from Scratch
The HTML + CSS provided with the app provides an easily customizable experience but more or less assume a “2 panels” style of interface for login and self registration. Some customers may wish to do more advanced customization – for example removing the self registration or placing the login and self registration on one screen.
The login app and registration apps are intentionally segregated to allow for these sorts of changes. Each app, when loaded, looks for a specific <div> by id and replaces it with content of its own. The login app replaces signin-div and the register app replaces signup-div.
Which means that the simplest HTML file that can actually operate would be as follows:
<!DOCTYPE html> <html lang="en" > <head> <meta charset="UTF-8"> <link href="./css/loader.css" rel="stylesheet" id="loader-css"> </head> <body> <div id="signin-div"/> <div id="signup-div"/> <body> <!-- the JS files should be placed BELOW the HTML content, inside BODY --> <script src="./js/loadResource.js"></script> <script src="./js/idcsSelfRegSDK.js"></script> <script src="./js/registerApp.js"></script> <script src="./js/idcsAuthnSDK.js"></script> <script src="./js/loginApp.js"></script> </html>
If you want to remove the self registration (or move it to another file) you can simply remove the idcsSelfRegSDK.js and registerApp.js files as well as the signup-div.
A Note about Code Workflow
If one wants to go beyond UI customization and needs to provide a different experience in terms of navigation and forms sequencing (which we think is a very rare scenario, by the way), code must be changed.
On a high level, the Login App follows the MVC design pattern and can be illustrated as per the diagram below.
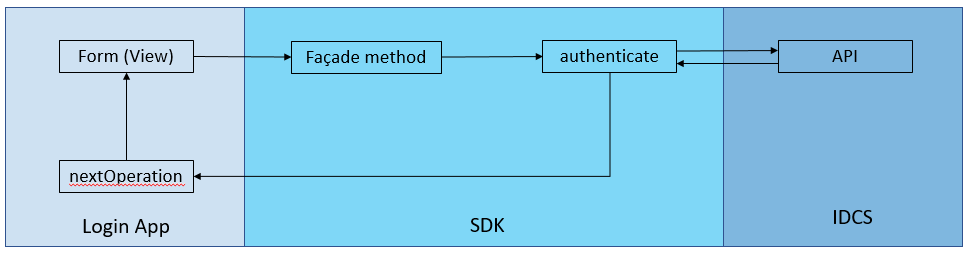
In summary, a form (or view) in the Login App calls one of the Façade methods (postCreds, postOtp, enrollSecurityQuestions, etc) in the SDK, that invoke the authenticate method, that in turn makes the REST API calls to IDCS. The response is sent to the Login App’s nextOperation method, that decides the next view to display.
While we don’t provide specific customization instructions at this point, the main spot to look at is the Login App’s nextOperation method. It is the app main controller, being the interpreter of IDCS API state machine, deciding which form (view) to show based on the API responses.
Ending Remarks
After reading this post, we encourage people to look at the Oracle-By-Example tutorial, check out the source code, adapt it to their own needs or, in some extreme situation, use it as the basis for developing their own application, as the authentication APIs are the way to go when one needs to customize the login experience beyond the out of the box capabilities in IDCS.
This post has been jointly written by Andre Correa and Chris Johnson.