Introduction
Welcome to part 2 of this blog series. The first part which covers the implementation approach for a Custom REST API, is here. Assuming you already have a custom REST API in place, this blog will guide you through the process of enabling Guided Journey in a Fusion Cloud HCM UI.
Steps to Associate the Custom REST API with a Guided Task
Here are the high-level steps:
-
Configure the Journey Integrations Task
-
Create a Guided Journey Task and Associate the Integration
-
Enable the
ORA_PER_GUIDED_JOURNEYS_ENABLEDProfile Option -
Enable the Integration in Redwood UI
Let’s look into the steps in detail.
1. Configure the Journey Integrations Task
a. On the Fusion home page, navigate to the My Client Groups tab.
b. Under QUICK ACTIONS, click Show More.
c. In the Employment area, select the Checklist Templates quick action.
d. In the Checklist Templates page, go to the Integrations tab, then click Add.
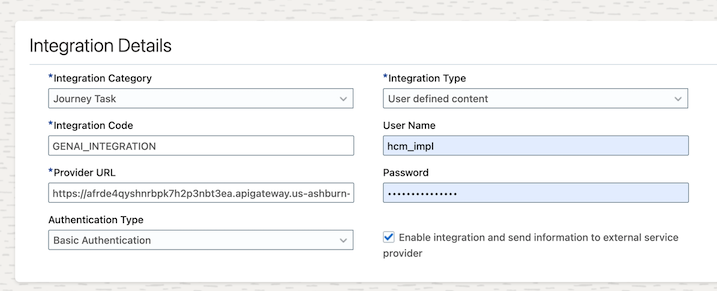
e. Enter the Required Values:
- In the respective fields, input the following values:
- Integration Category: Select “Journey Task.”
- Name: Provide a user-defined name for the integration. This name will be available in the list of values when configuring the journey task.
- Integration Type: Choose “User defined Content.”
- Provider URL: Enter the URL of the custom REST API. Example, the API Gateway endpoint configured in the part 1 of the blog.
https://afr.....apigateway.us-ashburn-1.oci.customer-oci.com/genai/extension?assignmentid={AssignmentId}&trusttoken={TrustToken}&personid={PersonId} - Username: Input the username needed to invoke the custom REST API.
- Authentication Type: Select the appropriate authentication method for the REST API.
- Password: Enter the password required for API invocation.
- Select the option, Enable integration and send information to external service provicer.
2. Create a Guided Journey Task and Associate the Integration
Follow these steps:
-
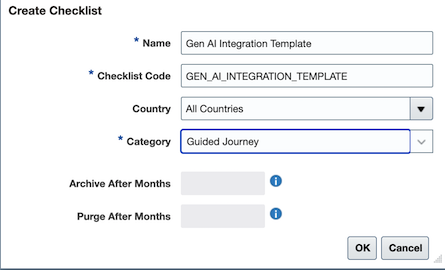
Select Checklist template and create a new template.
-
Provide a meaningful name and Checklist Code for the template.
-
Select Category as Guided Journey.
-
After entering the details, click OK to save and create the guided journey task.
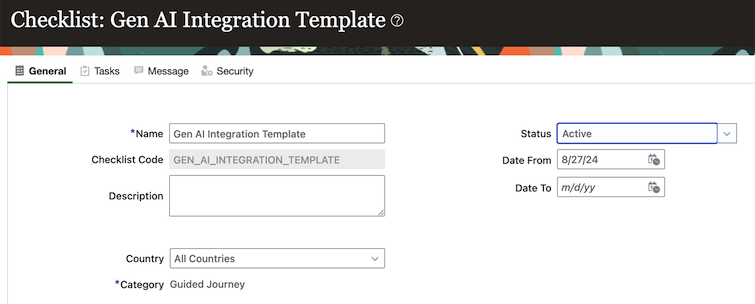
5. In the next screen, select Status as Active and Click Save.
6. Create a New Task
- Navigate to the Tasks tab.
- Click on the + icon to create a new task.
- Enter a Name and Code: Provide a meaningful name and a unique code for the task.
- Select Task Type: Choose “User Defined Content” as the task type.
- Select Configuration: Set the Configuration field to the Integration Code you defined earlier.
- Set Modal Window Properties:You can customize the modal window that opens during the Guided Journey using the Set Modal Window Properties option. Here’s how to specify the properties:
width: The width of the modal window in pixels. The default value is 500.
height: The height of the modal window in pixels. The default value is 350.
modal: Determines if the window is modal or not. Set this to Y for a modal window (which prevents interaction with the parent page while open) or N for a non-modal window.
resize: Allows users to resize the window. Set this to Y to enable resizing, or N to disable it.
For example, for a modal window with a width of 400 pixels and a height of 300 pixels that can be resized, use the following configuration:
width=400;height=300;modal=Y;resize=Y

3. Enable profile option
- Guided Journeys can be enabled using the
ORA_PER_GUIDED_JOURNEYS_ENABLEDprofile option. To do this:- Navigate to the Setup and Maintenance work area.
- Use the Manage Administrator Profile Values task.
- Change the profile value to
Y.
- Note that Guided Journeys are supported on Redwood pages.
4. Enable the integration in Redwood Page
- Edit the Page in Visual Builder Studio (VB Studio):
The types of modifications you can make to a Redwood page in VB Studio depend on the specific page you’re editing.
For detailed guidance, refer to the documents:
Extending HCM Redwood Applications Using Visual Builder Studio – Technical Brief
Extending HCM Redwood Applications Using Visual Builder Studio – Supported Use Cases.pdf
- Enabling Guided Journeys in Your Pages:
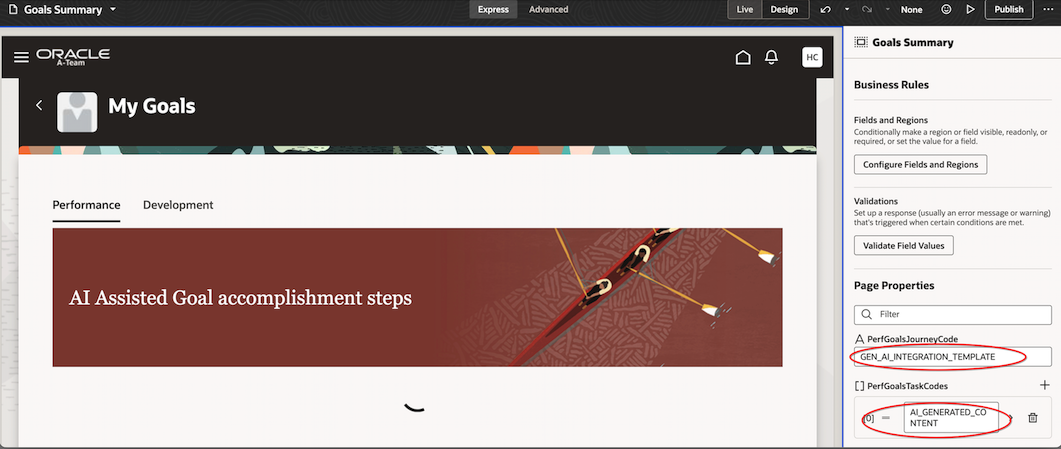
In the VB Studio Designer, navigate to the Page Properties tab and locate the following constants with these descriptions:
• Page-Level Journey Constant– Controls the display of the guided journey at the page-level. Set it with the guided journey code available in the checklist template.
• Page-Level Journey Task Constant– Controls the display of the guided journey tasks at the page-level. Set it with the task codes available in the checklist template. Use the comma as separator to display many tasks.
• Section-Level Journey Constant– Controls the display of the guided journey in the <section name> section. Set it with the guided journey code available in the checklist template where section name is the region in the page where you want to enable a guided journey.
• Section-Level Journey Task Constant– Controls the display of the guided journey tasks in the <section name> section. Set it with the task codes available in the checklist template, using a comma as a separator to display multiple tasks. <section name> refers to the region on the page where you want to enable the guided journey.
Once you’ve made your changes, publish them to apply the updates.
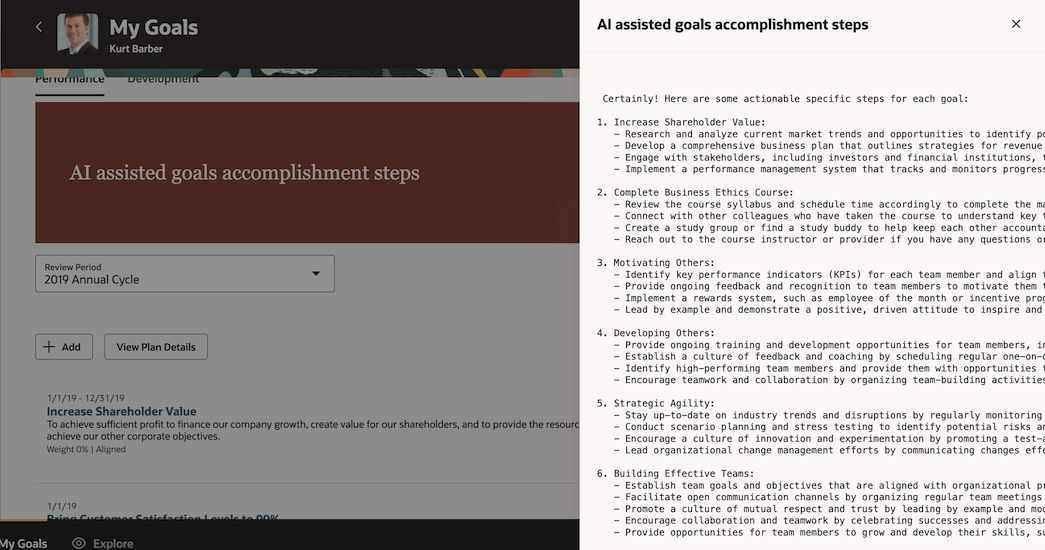
In the example below, the Journey Code is added as Page-Level Journey Constant to Goals Summary page, and the link “AI Assisted Goal Accomplishment Steps” appears at the header level.
Displaying AI-Generated Content in the Guided Journey
Once you have published the changes, you can interact with the Guided Journey task by clicking on the header label associated with it. This action will open a modal window displaying the AI-generated content.
In this example, the prompt sent to the OCI Generative AI service was:
Given the data that contains details of performance goals, use the GoalName and Description of the goals. Then, for each GoalName, provide a set of actionable specific steps that could help achieve them effectively. Goals details are here: {hcm_api_response_json}"
Here’s a breakdown of how it works:
-
Prompt to OCI Generative AI: The prompt instructs the OCI Generative AI service to use the
GoalNameandDescriptionfrom the performance goals data to generate actionable steps for each goal. -
API Response Data: The
{hcm_api_response_json}placeholder is replaced with the actual JSON response from the API call:https://<your hostname:port>/hcmRestApi/resources/latest/performanceGoals?fields=Description,GoalName&onlyData=trueThe API request includes the token of the logged-in user in the header for authentication.
By leveraging the data from the performance goals API, the OCI Generative AI service creates tailored, actionable steps that are displayed in the modal window.