Introduction
F5 Networks provides an Application Delivery Networking platform that works with the Oracle Cloud Infrastructure. BIG-IP VE is a security services platform designed for delivering speed, availability, and security for business-critical applications and networks. F5 and Oracle together help you rapidly deploy application services securely.
In this three-part blog series, we will discuss the steps needed to deploy and configure a single F5 BIG-IP VE on the OCI Cloud. A future blog post will cover the deployment of High Availability using two BIG-IP VE instances in a cluster.
This blog series will consist of 3 parts –
Part 1 – Preparing the OCI Environment for an F5 BIG-IP VE deployment
Part 2 – Deploying a BIG-IP VE Instance in OCI
Part 3 – Configuring and testing the BIG-IP Instance
Topology Architecture Diagram
We will use the following topology as a reference for this deployment. The diagram shows a multi-NIC deployment of a BIG-IP VE instance, configured with a Management IP for management of the BIG-IP instance, a Virtual server IP address on the External subnet for publishing an application and accepting traffic, along with the various interface Self-IP addresses for each subnet on the BIG-IP VE. Traffic flows from clients through the BIG-IP VE to the backend servers.
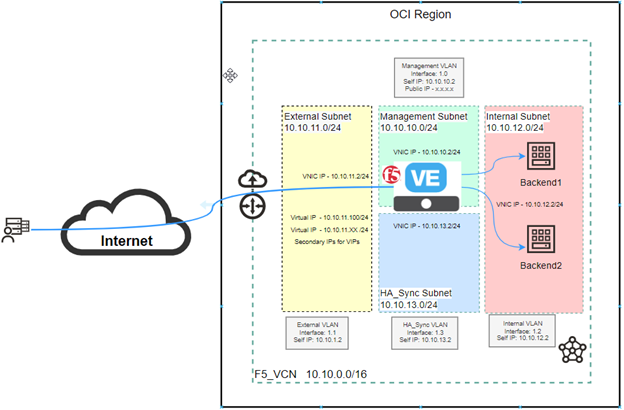
This deployment shows four subnets:
- A management subnet, where you can access the Configuration utility to configure BIG-IP VE. This can be a public subnet and hence the BIG-IP VE can be managed from the Internet.
- An external, public subnet, where we create a virtual server to accept incoming traffic from the Internet.
- An internal, private, or public subnet, where the application servers reside.
- A Failover private subnet which will be used later for High Availability when we deploy a cluster.
All subnets, IP addresses, and VNICs are created on the OCI portal first, and then when a BIG-IP VE is deployed you create the corresponding objects for the same IP addresses on the various VNICs and subnets in the BIG-IP VE configuration. Self IP’s on the F5 will correspond to the IP addresses allocated to the VNICs when creating the F5 instance.
Preparing the OCI Environment
Based on the topology diagram, the following IP addressing schema will be used –

To create a multi-NIC setup, you must first create a VCN in OCI where all your subnets and F5 Compute instance will reside.
Here is the summary of the steps needed to be followed:
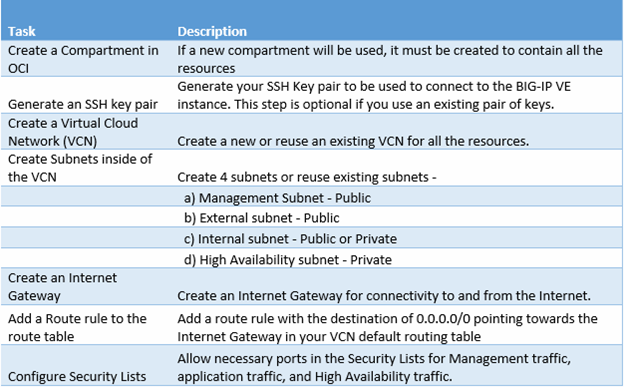
Create a compartment in OCI for the Resources
Login to your OCI tenancy, on the left-hand side top Hamburger menu, click on Identity and Security, and then click on Compartments. Create a compartment for the resources that will be used as part of this setup.

Create a Virtual Cloud Network (VCN)
If you plan on using an existing VCN use that or else create a new VCN by navigating to the Networking section and then clicking on Virtual Cloud Networks. Create a VCN by providing it with a name and a CIDR Block. You can leave all other settings to default.

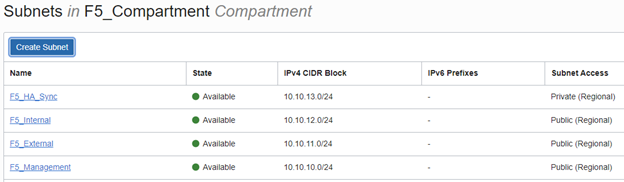
Create Subnets in the VCN
Once the VCN is created click on the VCN and then on the left menu click subnets. Create four subnets as shown in the topology diagram. It is a best practice to use Regional subnets versus AD-specific subnets. Create Public and Private subnets as shown below.
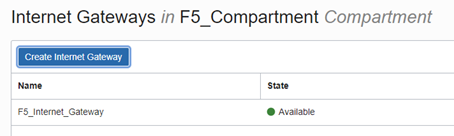
Create an Internet Gateway
Under the Networking section, click on Virtual Cloud Networks and then click on the VCN you created. From the left menu, click Internet Gateways. Type a Name for the Internet Gateway and click Internet Gateway.
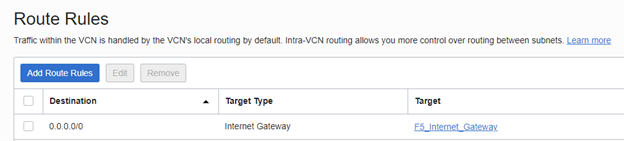
Create Route Rule for the Internet Gateway
Under the Networking section, click on Virtual Cloud Networks and then click on the VCN you created. From the left menu, click Route Tables. Click the Default Route table for the VCN you created and add a Route rule. The route rule consists of a 0.0.0.0/0 CIDR block with the target as the Internet Gateway you created in the preceding step.
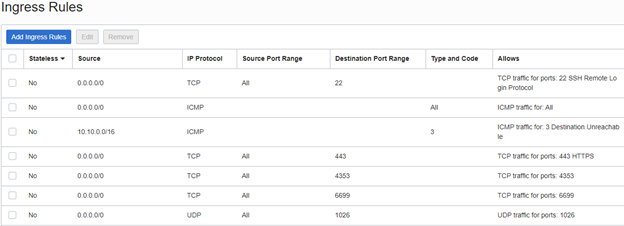
Configure Security List for the VCN
You can create individual security lists for each subnet to be more specific. However, as this is a basic setup you can configure the Default Security list which will be used for all subnets in the VCN. Under the Networking section, click on Virtual Cloud Networks and then click on the VCN you created. From the left menu, click Security Lists. Click on the Default Security List for the VCN you created and add Ingress rules. The ingress rules in this example allow HTTPS, ICMP, and other BIG-IP HA related traffic through the lists. Leave the Egress security list at default as it allows all outgoing traffic to be permitted. In a Production Network, you would tighten the security rules to allow only what is essential and use Subnet specific Security Lists.

Conclusion
In this post, we configured the steps needed for preparing the OCI environment to deploy a multi-NIC BIG-IP VE. IP address planning, subnets, and naming nomenclature is a key part of this step. Part 2 of this series will detail the steps involved to deploy the F5 BIG-IP VE instance and then later followed by the configuration and testing.