Introduction
This post is a continuation of previously written Part 1 and Part 2. This post will outline the steps that need to be configured on the BIG-IP VE configuration utility to successfully deploy and configure a BIG-IP VE instance.
In the previous parts of the series, we configured the OCI Network and launched a BIG-IP VE instance. Here we will configure the same instance with the necessary configuration to perform basic load balancing to backend application servers.
Configuration of BIG-IP VE
Configure the BIG-IP VE so that traffic passes through the Application Delivery Controller to your application servers in the backend. The following tasks will need to be performed –
- Set the admin and root password
- License BIG-IP VE
- Provision BIG-IP VE
- Create VLANs
- Create self IP addresses for VLANs
- Create a pool of backend servers
- Create a virtual server
- Test the traffic through the Virtual Server
Set the Admin and Root Password
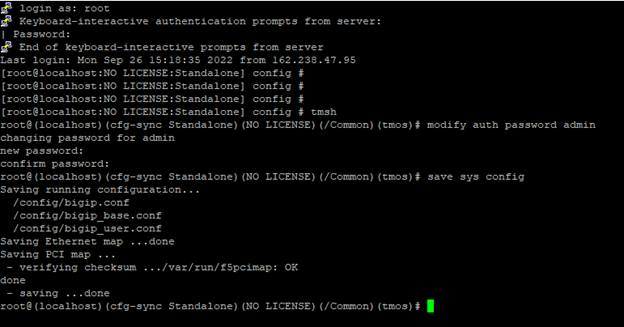
Once you SSH to the Public IP of the management interface and log in with root and default as the password, you are asked to change the root password as shown below.

Once the root password is changed you can then change the admin password by going into the tmsh and executing the modify auth password admin command as below and then entering the passwords. Once that is done save the config using the save sys config command and quit.
License the BIG-IP VE
You must enter license information before you can use BIG-IP VE.
- Open a web browser and log in to the BIG-IP Configuration utility by using https with your Primary VNIC’s public IP Address, for example: https: <external-ip-address>. The username is admin and the password is the one you set in the previous step via CLI.
- On the Setup Utility Welcome page, click Next.
- On the General Properties page, click Activate.
- In the Base Registration key field, enter the case-sensitive registration key from F5. You can get a trial License from F5 to test this setup.
For Activation Method, if you have a production or Eval license, choose Automatic and click Next. If you chose Manual, do the following:
- In Step 1: Dossier field, copy all the text, and then Click here to access F5 Licensing Server.
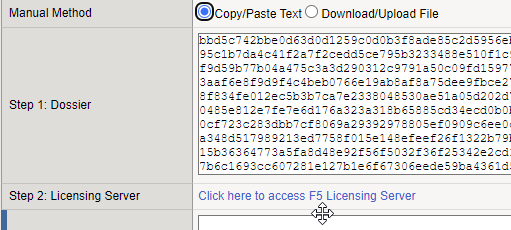
b. A separate web page opens.
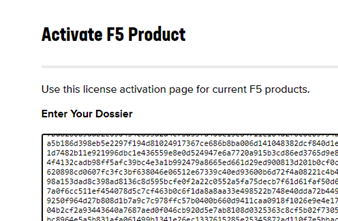
c. On the new page, click Activate License.
d. In the Enter your dossier field, paste the text, and then click Next.
5. Accept the agreement and click Continue.
6. On the Activate F5 Product page, copy the license text in the box. Return to the BIG-IP Configuration utility and paste the text into the License field and click Next.
7. The BIG-IP VE system registers the license and logs you out. When the configuration change is successful, click Continue to provision BIG-IP VE.
Provision BIG-IP VE
- You must select the modules you want to run on the BIG-IP Configuration Utility.
- On the Resource Provisioning screen in BIG-IP click Next after selecting the modules.
- On the Device Certificates screen, click Next.
- On the Platform screen, in the Admin Account field, reenter the admin password and click Next. You can also configure the Hostname and Time zone over here.
- Once you enter the password you are logged out and required to log back in.
- When you log back in, on the Setup Utility -> Network screen, in the Advanced Network Configuration area, click Finished.
Configure VLANs
In the BIG-IP VE you must create an external, internal and HA_Sync VLANs that correspond with the subnets and VNICs you created on the OCI side.
On the Main tab, click Network -> VLANs and then Create the VLANs as follows. Keep the tagging as untagged for all the 3 VLANs and the interfaces accordingly.

Configure Self IP Addresses
Create the Self IP addresses for the External, Internal and the HA_Sync VLAN. The self IP addresses will need to correspond to the Private IP addresses of the VNICs when the BIG-IP VE instance was created.
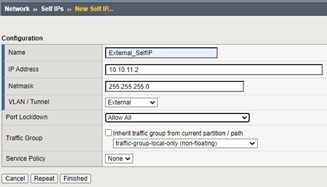
- In the BIG-IP VE Configuration utility, on the Main tab, click Network -> Self Ips
- Configure all Self IP’s with the IP address, Netmask, VLAN and Port Lockdown information. For port lockdown, you can configure Allow All as this is test environment. An example for external is shown. Configure the Internal and HA_Sync similarly.
Configure Pool and Pool Members
The pool members are the actual backend servers to which the traffic will be load balanced.
- On the Main tab, click Local Traffic -> Pools and Click Create.
- In the Name field, type pool_http.
- For Health Monitors, move http from the Available to the Active list.
- Choose the load balancing method or retain the default setting.
- In the New Members section, in the Address field, type the IP address of the application server.
- In the Service Port field, type a service port, for example, 80 and then click Add. The list now contains the member.
- Add additional pool members as needed and click Finished.
Create a Secondary Private IP to be used for Virtual Server
The Virtual server IP address that will be used on the BIG-IP VE will need to be configured as a secondary Private IP address on the external VNIC of the instance. As shown in the topology diagram any VIP that will be configured in the F5 will first need to be created as a Secondary Private IP address on the External VNIC.
- To create the same, Under Compute, click Instances and then click the BIG-IP VE instance.
- On the left menu, click Attached VNICs, and then click the F5-External VNIC.
- In the left menu, click IP Addresses, and then click Assign Secondary Private IP Address.
- Type in the IP address in our example 10.10.11.100. Use a Public IP address if this VIP will be accessed over the Internet. Select the Reserved Public IP option in that case and Click Assign.

Create a Virtual Server
A virtual server listens for the incoming traffic destined for the external IP address. A virtual server needs to be created which then points to the pool for load balancing.
Click Local Traffic -> Virtual Servers. Click Create and configure the Virtual server accordingly.
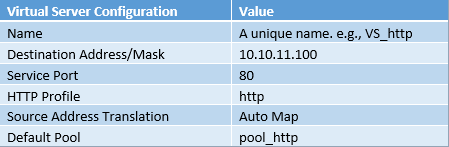
Once done Click Finished.
Traffic to the BIG-IP VE external IP address that we created for the Virtual Server will now go to the pool members.
Test the Virtual Server by accessing the Public IP address using a browser on Port 80.
Conclusion
In this series of blogs, we demonstrated how to configure a single multi-NIC instance of an F5 BIG-IP Virtual Edition on the Oracle Cloud Infrastructure. What we covered in the posts contains a very basic setup of 4 VLANs – External, Internal, Management, and HA_Sync. You can however use the same principles to configure a complex environment with multiple VLANs and Virtual Servers.
We will be covering a High Availability deployment using a cluster of two BIG-IP VE’s in a future post. So, stay tuned!