Introduction
Beginning with Oracle Enterprise Manager Cloud Control 13c Release 5 (13.5), embedded BI Publisher reporting functionality is not available by default as with previous versions. To use BI Publisher reporting functionality, you need to install a standalone instance of Oracle Analytics Server (OAS), previously called Oracle Business Intelligence Enterprise Edition (OBIEE). Similarly, BI Publisher, which was part of OBIEE, has been renamed Oracle Analytics Publisher (OAP). Detailed instructions for installing and configuring a standalone OAS/OAP system for use with OEM 13.5 are documented in the following technical brief:
The document is comprehensive in that it covers different OEM setup use cases, especially with regards to authentication. For example, different chapters address environments where OEM uses repository based authentication, LDAP authentication, SSO with LDAP, etc. The document also covers migrating customized reports and schedules when upgrading from OEM 13.4 to 13.5.
This blog post is not a replacement for the above document. The goal of this post is to document a subset of instructions from the document for a setup where:
- OEM is using the default repository based authentication
- OEM version is 13.5, and there’s no requirement to migrate custom reports or schedules from an earlier version
For our purpose, we’ll start with the flow diagram in chapter 6. Based on the diagram, we will use the following chapters:
- CHAPTER 8. COMPLETE STEPS TO INSTALL AND CONFIGURE OAS
- CHAPTER 10. OAS FOR EM REPOSITORY-BASED SECURITY
- CHAPTER 14. CONFIGURATION OF REQUIRED OAS DATASOURCE(S)
- CHAPTER 18. UPLOADING ENTERPRISE MANAGER PROVIDED REPORTS
A typical use case for this article is when you have provisioned an OEM 13.5 instance from OCI marketplace, and want to augment it with an OAS instance in your tenancy. Note OAS requires a database to store its own schemas. This can be a separate database or you can use the OEM repository database. This article will use a separate database. To simplify the instructions, we will provision an Oracle database 19c marketplace image, and install OAS on the same instance. In this case OAS and its repository are collocated. This may be adequate for a pre-prod or just a simple installation. In general, for a production environment, Oracle recommends to install OAS on a separate instance from its repository database (the installation instructions in this article still apply).
Finally, we will also install a Grafana server on the OAS instance, and deploy the OEM app for Grafana version 4.0 (the latest as of the date this article was written).
Licensing
Oracle Analytics Server for use with Oracle Enterprise Manager:
- Licensing for the database instance is covered under Oracle Enterprise Manager Restricted-use License as long as it used solely for OAS. However, OCI charges for resources used by the compute instance will apply.
- Enterprise Manager includes restricted use of OAS for use with Enterprise Manager functions and interfaces only. This restricted OAS license allows reporting only against the Enterprise Manager repository and against data dictionary (including AWR and AWR Warehousing data) of target databases. In order to report against other data sources, it is necessary to have the OAS license.
- Some Enterprise Manager Management packs include OAS reports that use a different data source. The license to use these reports is provided as part of the license for the relevant management pack. The following document provides information on the Enterprise Manager management packs, the corresponding licensed reports, and how these reports can be accessed: Oracle Business Intelligence Publisher/Oracle Analytics Server Licensing with Oracle Enterprise Manager Cloud Control 13c
Grafana Server for use with Oracle Enterprise Manager:
- A license to Oracle Enterprise Manager is a prerequisite to license and use Oracle Enterprise Manager App for Grafana.
- A license to Grafana Server is a prerequisite to license and use Oracle Enterprise Manager App for Grafana.
- You do NOT receive a license to use Grafana under your agreement with Oracle. All Grafana service, products, and/or software, must be separately licensed and obtained from Grafana Labs. Reference: Oracle Enterprise Manager App for Grafana Licensing Information.
Provision an Oracle Database 19c from OCI Marketplace
In the OCI console, navigate to Marketplace and search for “Oracle Database”. Select “Oracle Database – Single Instance” and choose the default version from the drop-down list. Agree to the terms and conditions and click “Launch Instance”. Following are fields you should change from default values:
- Instance Name: oas
- Shape: You can start with the default values (2 OCPU, 32 GB of memory). You can always modify them later if needed
- In the “Primary VNIC Information” section, choose your VCN and subnet, then click on “Show advanced options” and enter “oas” for hostname
- Add your SSH keys and click “Create”
Once the instance is provisioned, log in using an SSH client (such as putty) as user opc.
Add the OEM hostname to /etc/hosts file:
Your OEM instance is known in your VCN DNS resolver by its fully qualified hostname. For our purpose, we will add an entry in the OAS instance “/etc/hosts” file with a reference to the short hostname “oms1”, e.g.:
<Private IP of your OMS host> oms1
Install required OS package(s):
The OAS installer will check for required OS packages. On the database marketplace image, “gcc-c++-4.8.2″ is not installed by default, so we’ll install it now:
sudo yum install gcc-c++
Set up firewall rules:
sudo firewall-cmd –list-ports
<this should be initially empty>
sudo firewall-cmd –add-port 9500/tcp # To be removed after configuring domain for SSL
sudo firewall-cmd –add-port 9501/tcp # BI WebLogic domain console port
sudo firewall-cmd –add-port 9503/tcp # OAS port
sudo firewall-cmd –add-port 1521/tcp # Database listener port. Needed for discovering and monitoring the database with OEM.
sudo firewall-cmd –runtime-to-permanent
Download Oracle Software
1) Download software from Oracle Delivery Cloud:
https://edelivery.oracle.com/osdc/faces/SoftwareDelivery
Search for “Oracle Analytics Server 6.4.0” (Download Package):
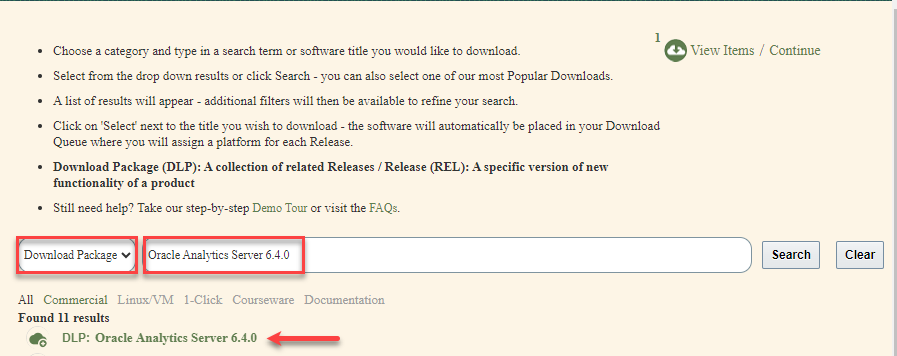
Click on “DLP: Oracle Analytics Server 6.4.0” to add it to the download list.
Search for “Oracle JDK 1.8.0” (Release):
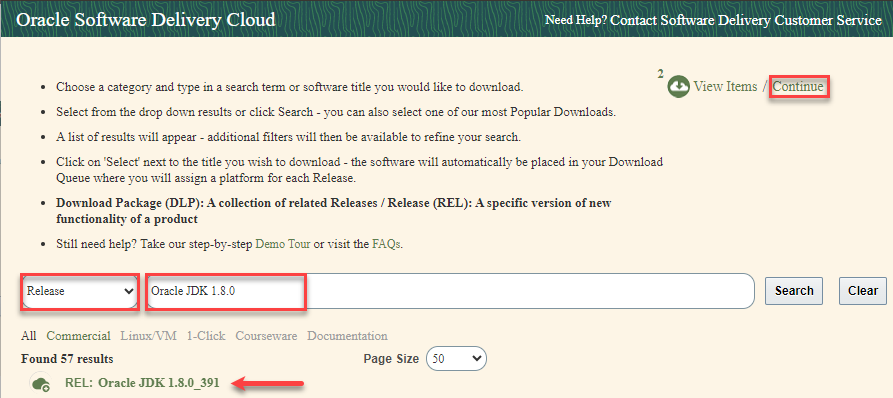
Click on “REL: Oracle JDK 1.8.0_391” to add it to the download list.
Click “Continue”.
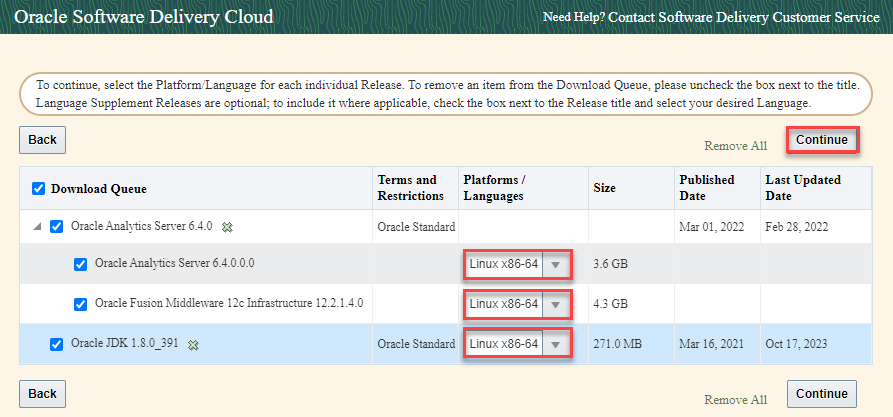
Select “Linux x86-64” for the platform and click “Continue”.
On the next screen, accept the license agreement and click “Continue”.
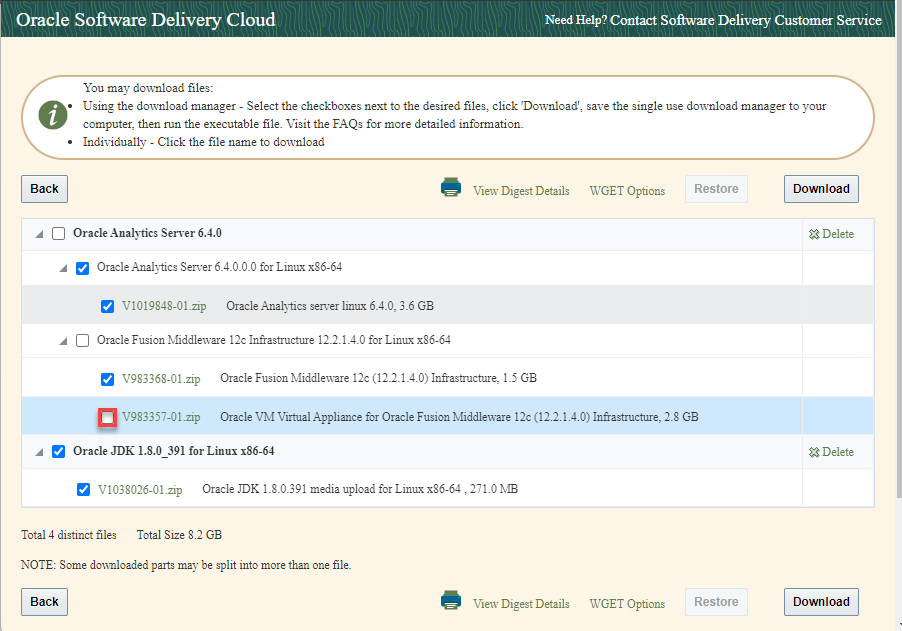
Uncheck file “Oracle VM Virtual Appliance for Oracle Fusion Middleware 12c (12.2.1.4.0) Infrastructure”.
Download the other 3 files manually by clicking on each file name, or use download manager as described on the page:
- V1019848-01.zip: Oracle Analytics server linux 6.4.0
- V983368-01.zip: Oracle Fusion Middleware 12c (12.2.1.4.0) Infrastructure
- V1038026-01.zip: Oracle JDK 1.8.0.391 media upload for Linux x86-64
2) Download patches from My Oracle Support
Latest OPatch:
https://support.oracle.com/rs?type=doc&id=1587524.1
- p28186730_1394213_Generic.zip (OPATCH 13.9.4.2.13)
Latest quarterly CPU patches for FMW 12.2.14 (as of the writing of this page):
Critical Patch Update (CPU) Patch Advisor for Oracle Fusion Middleware – Updated for July 2023 (Doc ID 2806740.2)
Click on “FMW Infrastructure / WebLogic Server” link in the left hand-side navigation bar
Patch 35679623: WLS STACK PATCH BUNDLE 12.2.1.4.230806
- p35679623_122140_Generic.zip
Patch 35503128: ADF BUNDLE PATCH 12.2.1.4.230615
- p35503128_122140_Generic.zip
Patch 34809489: PS4 : CVE-2021-42575
- p34809489_122140_Generic.zip
Patch 35159582: OWSM BUNDLE PATCH 12.2.1.4.230308
https://support.oracle.com/epmos/faces/PatchDetail?patchId=35159582
- p35159582_122140_Generic.zip
(Note: this patch supersedes the patch mentioned in the document (Patch 33618954: OWSM BUNDLE PATCH 12.2.1.4.211129)
Patch 34542329 FMW Control 12.2.1.4 SPU/Merge for Consolidated Updates
- p34542329_122140_Generic.zip
Patch 33950717 OPSS BUNDLE PATCH 12.2.1.4.220311
- p33950717_122140_Generic.zip
Patch 35432543 WebCenter Core Bundle 12.2.1.4.230525
- p35432543_122140_Generic.zip
When done, upload all files to the newly provisioned database instance, which will be our OAS host, and place in a temporary directory (e.g., /tmp/oas64).
Create an OAS Environment File
When you sudo as oracle user on the newly provisioned OAS instance, the environment is set for the Oracle database running on the instance. For convenience, create a simple environment file in the home directory of the oracle user. You can use this to set your environment for OAS as needed:
vi setEnvOAS
export ORACLE_BASE=/u01/app
export MW_HOME=$ORACLE_BASE/oasmw
export ORACLE_HOME=$MW_HOME
export JAVA_HOME=$ORACLE_BASE/jdk
export BI_DOMAIN_HOME=$MW_HOME/user_projects/domains/bi
export PATH=$JAVA_HOME/bin:$MW_HOME/oracle_common/common/bin:$BI_DOMAIN_HOME/bin:$PATH
echo “OAS environment set”
You can then set your environment to OAS as follows:
source setEnvOAS
or simply:
. setEnvOAS
Install and Configure OAS
This section is based on chapter 8 from the OAS installation document. In the following instructions, we will note the sections of the OAS document we use in this configuration.
CHAPTER 8. COMPLETE STEPS TO INSTALL AND CONFIGURE OAS
Assuming the downloaded compressed files are in temporary directory /tmp/oas64. As user oracle, set your environment for OAS and create OAS middleware directory:
. setEnvOAS
mkdir ~/stage; mkdir $ORACLE_BASE/oasmw
Section 8.1 – Installation of a supported Java Development Kit (JDK) [JDK8: u251 or newer]
cd ~/stage; unzip /tmp/oas64/V1038026-01.zip
cd $ORACLE_BASE; tar xvzpf ~/stage/jdk-8u391-linux-x64.tar.gz; mv jdk1.8.0_391 jdk
Section 8.2 – Installation of Fusion Middleware Infrastructure
Install FMW and Infrastructure and OAS 6.4 using an X-Window enabled terminal.
Install FMW Infrastructure:
cd ~/stage; rm -r *; unzip /tmp/oas64/V983368-01.zip; java -jar ~/stage/fmw_12.2.1.4.0_infrastructure.jar
When prompted for the Oracle Home, provide the following path:
Oracle Home=/u01/app/oasmw
Section 8.3 – Installation of the OAS binaries into the existing WebLogic Middleware Home
Install OAS 6.4:
cd ~/stage; rm -r *; unzip /tmp/oas64/V1019848-01.zip; java -jar ~/stage/Oracle_Analytics_Server_Linux_6.4.0.jar
When prompted for the Oracle Home, provide the following path:
Oracle Home=/u01/app/oasmw
Leave everything else at default values.
Apply FMW Patch:
Check current OPatch version:
$ORACLE_HOME/OPatch/opatch version
OPatch Version: 13.9.4.2.1
Update OPatch:
cd ~/stage; rm -r *; unzip /tmp/oas64/p28186730_1394213_Generic.zip
cd 6880880; java -jar ./opatch_generic.jar -silent oracle_home=$ORACLE_HOME
Check which patches are currently installed in the middleware home:
$MW_HOME/OPatch/opatch lsinventory
Interim patches (3) :
Patch 31555397
Patch 31032676
Patch 30657796
Create a backup of MW Home:
cd $ORACLE_BASE
tar -cvzpf ~/oasmw-backup-pre-patch.tar.gz oasmw/
Apply the following patches in order:
1) Patch 35679623: WLS STACK PATCH BUNDLE 12.2.1.4.230806:
cd ~/stage; rm -r *; unzip /tmp/oas64/p35679623_122140_Generic.zip
cd WLS_SPB_12.2.1.4.230806/tools/spbat/generic/SPBAT
./spbat.sh -phase precheck -oracle_home $ORACLE_HOME
./spbat.sh -phase apply -oracle_home $ORACLE_HOME
2) Patch 35503128: ADF BUNDLE PATCH 12.2.1.4.230615:
cd ~/stage; rm -r *; unzip /tmp/oas64/p35503128_122140_Generic.zip
cd 35503128; $ORACLE_HOME/OPatch/opatch apply
3) Patch 34809489: PS4 : CVE-2021-42575:
cd ~/stage; rm -r *; unzip /tmp/oas64/p34809489_122140_Generic.zip
cd 34809489; $ORACLE_HOME/OPatch/opatch apply
4) Patch 35159582: OWSM BUNDLE PATCH 12.2.1.4.230308:
cd ~/stage; rm -r *; unzip /tmp/oas64/p35159582_122140_Generic.zip
cd 35159582; $ORACLE_HOME/OPatch/opatch apply
5) Patch 34542329 FMW Control 12.2.1.4 SPU/Merge for Consolidated Updates
cd ~/stage; rm -r *; unzip /tmp/oas64/p34542329_122140_Generic.zip
cd 34542329; $ORACLE_HOME/OPatch/opatch apply
6) Patch 33950717 OPSS BUNDLE PATCH 12.2.1.4.220311
cd ~/stage; rm -r *; unzip /tmp/oas64/p33950717_122140_Generic.zip
cd 33950717; $ORACLE_HOME/OPatch/opatch apply
7) Patch 35432543 WebCenter Core Bundle 12.2.1.4.230525
cd ~/stage; rm -r *; unzip /tmp/oas64/p35432543_122140_Generic.zip
cd 35432543; $ORACLE_HOME/OPatch/opatch apply
Create a backup of MW Home:
cd $ORACLE_BASE
tar -cvzpf ~/oasmw-backup-post-patch.tar.gz oasmw/
Section 8.5.6- Configuration of OAS into the WebLogic Domain, along with the required Database schema objects
Using an X-Window terminal
Configure OAS:
$MW_HOME/bi/bin/config.sh
On the “components” screen, uncheck “Oracle Analytics Server”. Leave “Oracle Analytics Publisher” checked.
On the “Define Domain” screen, ensure the following values are set as follows:
Domain Directory: /u01/app/oasmw/user_projects/domains
Domain Name: bi
Domain Home: /u01/app/oasmw/user_projects/domains/bi
Choose a password for user weblogic: ***
Click next
On the “Database Schema” screen, choose “Create new schemas”
Schema prefix: oas
Schema password: (your password of choice)
Database Type: Oracle Database
Username: SYS
Password: (SYS password in the database marketplace image)
Simple connect string: oas:1521:orclpdb
Keep the default selection on the remaining screens and click “Configure”
When this step is complete, you can access the console from a browser. For convenience, you may want to add an entry to your local hosts file (“C:\Windows\System32\drivers\etc\hosts” on Windows) as follows:
<Public IP address of the OAS VM> oas
You can now access the domain as follows:
http://oas:9500/console
(Otherwise specify the public IP address of your OAS instance)
Click “Lock & Edit” in the “Change Center” (Top Left)
Click “Servers” in the “Domain Structure” menu in the left hand-side toolbar (expand “Environment”)
Click “AdminServer”
Check the “SSL Listen Port Enabled” (Keep the “Listen Port Enabled” checkbox checked)
Click Save
Click “Servers”
Click “bi_server1”
Check the “SSL Listen Port Enabled” (Keep the “Listen Port Enabled” checkbox checked)
Click Save
Click “Activate Changes” in the “Change Center”
Click “Servers”
Under “Summary of Servers” in the main area of teh screen, click the “Control” tab
Check the “AdminServer’ and “bi_server1” checkboxes and click the “Restart SSL” button
Now click “Logout” and access the domain on the SSL port:
https://oas:9501/console
Accept the browser warning and continue to the site.
You can now disable access to the http port 9500 on the OS command line. As user opc:
sudo firewall-cmd –remove-port 9500/tcp
sudo firewall-cmd –runtime-to-permanent
Configure OAS for EM Repository-Based Security
This section is based on chapter 10 from the OAS installation document. In the following instructions, we will note the sections of the OAS document we use in this configuration.
CHAPTER 10. OAS FOR EM REPOSITORY-BASED SECURITY
10.1 Create required DBMS roles and grant to required EM administrators
Create the required roles, and minimal role grants, on the Enterprise Manager repository database:
Login to the EM repository database host, as user opc:
The OAS server will access the EM repository database on port 1521, so we need to open the port on the Linux firewall:
sudo firewall-cmd –add-port=1521/tcp
sudo firewall-cmd –runtime-to-permanent
Now switch to user oracle:
sudo su – oracle
[oracle@oms1 ~]$ . oraenv
ORACLE_SID = [oracle] ? emrep
sqlplus / as sysdba
alter session set container=EMPDB
REM Create base roles
create role XMLP_ADMIN;
create role XMLP_DEVELOPER;
create role XMLP_SCHEDULER;
REM Create Role Hiearchy
grant XMLP_DEVELOPER to XMLP_ADMIN;
grant XMLP_SCHEDULER to XMLP_ADMIN;
grant MGMT_USER to XMLP_ADMIN;
grant XMLP_SCHEDULER to XMLP_DEVELOPER;
grant MGMT_USER to XMLP_DEVELOPER;
REM Sysman gets super admin
grant XMLP_ADMIN to sysman;
10.2 Preparation for upload of Oracle Provided Reports
REM Create base EMBIP roles
create role EMBIPADMINISTRATOR;
create role EMBIPAUTHOR;
create role EMBIPSCHEDULER;
create role EMBIPVIEWER;
REM Create Role Mapping
grant XMLP_ADMIN to EMBIPADMINISTRATOR;
grant XMLP_DEVELOPER to EMBIPAUTHOR;
grant XMLP_SCHEDULER to EMBIPSCHEDULER;
grant MGMT_USER to EMBIPVIEWER;
REM Ensure SYSMAN is an OAS Super Administrator
grant EMBIPADMINISTRATOR to SYSMAN;
exit;
10.4 Configure OAS for ‘Database Security Model’
10.4.1 Step 1 – Login to OAS
https://oas:9503/xmlpserver
username/password: weblogic/***
10.4.2 Step 2 – Click on the Administration link
In the far right hand-side of the OAS user interface, just to the right of the Open link, single click on the user icon. In the drop-down menu that is shown, choose Administration.
10.4.3 Step 3 – Security Configuration (located under Security Center)
After the Administration link is pressed, the Administration screen is shown. Underneath the Security Center label, choose Security Configuration.
10.4.4 Step 4 – Enable the local Superuser
Due to the complexities associated with these steps, and the possibility of accidentally locking yourself out of OAS, it is highly recommended to temporarily enable the local SuperUser. This special account is not designed to be utilized for running or scheduling reports, but only to administer OAS. Proceed with these steps to enable this special account:
Click the check-box next to Enable Local Superuser.
Enter a username and password, for example:
- User: SuperUser (or another username of your choice)
- Password: ***
10.4.6 Step 6 – Setting the OAS Security Model to “Oracle Database”
Skip the “Authentication” section: Make sure that ‘Use Single Sign-On’ and ‘Use LDAP’ are not checked.
Scroll down to the Authorization section and fill in the appropriate fields.
In the Security Model field, select “Oracle Database” from the drop-down list.
Fill in the appropriate connect descriptor for the Enterprise Manager repository database:
- Connection String: jdbc:oracle:thin:@//oms1:1521/empdb
- Administrator Username: sysman
- Administrator Password: <sysman password>
- Database Driver Class: Leave blank (it defaults to Database Driver Class)
- Click Apply
Sign out from OAS (we’ll restart the server after the next task).
Login again to the OAS WebLogic domain with user weblogic:
https://oas:9501/console
- Click on “Servers” under “Environment” in the “Home Page” section (or expand “Environment” in the left hand-side navigation bar)
- In the “Summary of Servers” section, click on the “Control” tab
- Click on the “bi_server1” checkbox and click “Shutdown”->”Force Shutdown now”
- Confirm, after a few seconds, refresh until the status shows “shutdown”
- Click on the “AdminServer” checkbox and click “Shutdown”->”Force Shutdown now”
- Confirm, you will be presented with the “Server Shutdown” page
Restart the server on the command line (refer to “Manage Server Start and Stop” below)
Login to OAS again, but this time as user SYSMAN, not weblogic:
https://oas:9503/xmlpserver
username/password: sysman/<sysman password>
You should get the OAS home page.
Configure Required OAS Data Sources
This section is based on chapter 14 from the OAS installation document. In the following instructions, we will note the sections of the OAS document we use in this configuration.
CHAPTER 14. CONFIGURATION OF REQUIRED OAS DATASOURCE(S)
Create the EM Repository data source:
14.1 Step 1 – On the OMS host
[oracle@oms1 ~]$ $OMS_HOME/bin/emctl config oms -change_view_user_pwd
Enter Repository User’s Password : <SYSMAN Password>
Enter MGMT_VIEW User’s Password : ***
Successfully changed MGMT_VIEW User’s password.
Restart OMS:
$OMS_HOME/bin/emctl stop oms -all
$OMS_HOME/bin/emctl start oms
14.2 Step 2 – OAS Datasource Configuration Steps
Login to OAS as SYSMAN
https://oas:9503/xmlpserver
In the far right hand-side of the OAS user interface, just to the right of the Open link, single click on the user icon. In the drop-down menu that is shown, choose Administration
Under “Data Sources” click “JDBC”
Remove the existing “Oracle BI EE” data source
Click “Add Data Source”
14.2.5 Part 5 – Fill in the required details
- Data Source Name: EMREPOS
- Driver Type: Oracle 12c
- Database Class: oracle.jdbc.OracleDriver
- Connection String: jdbc:oracle:thin:@//oms1:1521/empdb
- Use System User: Do Not Check
- Username: MGMT_VIEW
- Password: ***
- Pre Process Function: sysman.gc$bip.bip_set_em_user_context(:xdo_user_name)
- Post Process Function: Leave Blank
- Client Certificate: Leave Blank
- Use Proxy Authentication: Leave Blank
- Click “Test Connection”
Scroll down the page to the “Security” section
- From the “Available Roles” list, select “EMBIPVIEWER” and “MGMT_USER”
- Move the 2 items to the “Allowed Roles” list
- Click “Apply” on the top right of the page
Add a data source for the sample reports:
Under “Data Sources” click “File”
- Click “Add Data Source”
- Data Source Name: Samples Data Files
- Full Path of Top-level Directory: /u01/app/oasmw/user_projects/domains/bi/bidata/components/bipublisher/repository/DemoFiles
- Click “Apply” on the top right of the page
Upload Enterprise Manager Default Reports
This section is based on chapter 18 from the OAS installation document. In the following instructions, we will note the sections of the OAS document we use in this configuration.
CHAPTER 18. UPLOADING ENTERPRISE MANAGER PROVIDED REPORTS
In this step you’ll download the EM provided reports from the OEM 13.5 OMS host, save them to your local workstation, then upload them to OAS using the GUI console.
The base framework reports are bundled in this file:
$OMS_HOME/sysman/jlib/’Enterprise Manager Cloud Control.xdrz’
The Plugins deployed on your OEM may have also deployed their own reports. For each plugin, the reports are bundled in a file with the same name (‘Enterprise Manager Cloud Control.xdrz’). To list those reports:
cd $OMS_HOME/plugins/
ls -1 oracle.sysman.*.plugin_13.5*/metadata/bipublisherreport/emreports/*.xdrz
oracle.sysman.am.oms.plugin_13.5.1.0.0/metadata/bipublisherreport/emreports/Enterprise Manager Cloud Control.xdrz
oracle.sysman.cfw.oms.plugin_13.5.1.0.0/metadata/bipublisherreport/emreports/Enterprise Manager Cloud Control.xdrz
oracle.sysman.db.oms.plugin_13.5.1.0.0/metadata/bipublisherreport/emreports/Enterprise Manager Cloud Control.xdrz
oracle.sysman.emas.oms.plugin_13.5.1.0.0/metadata/bipublisherreport/emreports/Enterprise Manager Cloud Control.xdrz
oracle.sysman.emct.oms.plugin_13.5.1.0.0/metadata/bipublisherreport/emreports/Enterprise Manager Cloud Control.xdrz
oracle.sysman.emfa.oms.plugin_13.5.1.0.0/metadata/bipublisherreport/emreports/Enterprise Manager Cloud Control.xdrz
oracle.sysman.xa.oms.plugin_13.5.1.0.0/metadata/bipublisherreport/emreports/Enterprise Manager Cloud Control.xdrz
(your list may vary depending on how many plugins you have deployed).
To ease the process, create the following directory structure on the OMS host, in the “/tmp” directory:
cd ~
mkdir /tmp/reports; cd /tmp/reports; mkdir base am cfw db emas emct emfa xa
The first sub-directory (base) will hold the base framework reports bundle. The other sub-directory names are based on the plugin abbreviation in the file names above (3rd component of the file name).
Copy the base EM framework reports bundle, which is located at $OMS_HOME/sysman/jlib/’Enterprise Manager Cloud Control.xdrz’:
cp $OMS_HOME/sysman/jlib/*.xdrz /tmp/reports/base
Copy the plugin reports. Note the list below depends on which plugins you have deployed on your installation of OEM:
cd $OMS_HOME/plugins/
cp oracle.sysman.am.oms.plugin_13.5.1.0.0/metadata/bipublisherreport/emreports/*.xdrz /tmp/reports/am
cp oracle.sysman.cfw.oms.plugin_13.5.1.0.0/metadata/bipublisherreport/emreports/*.xdrz /tmp/reports/cfw
cp oracle.sysman.db.oms.plugin_13.5.1.0.0/metadata/bipublisherreport/emreports/*.xdrz /tmp/reports/db
cp oracle.sysman.emas.oms.plugin_13.5.1.0.0/metadata/bipublisherreport/emreports/*.xdrz /tmp/reports/emas
cp oracle.sysman.emct.oms.plugin_13.5.1.0.0/metadata/bipublisherreport/emreports/*.xdrz /tmp/reports/emct
cp oracle.sysman.emfa.oms.plugin_13.5.1.0.0/metadata/bipublisherreport/emreports/*.xdrz /tmp/reports/emfa
cp oracle.sysman.xa.oms.plugin_13.5.1.0.0/metadata/bipublisherreport/emreports/*.xdrz /tmp/reports/xa
When done, each folder will contain exactly one file, with the same name “Enterprise Manager Cloud Control.xdrz”.
Change permission for ease of downloading by user opc:
cd /tmp/reports; chmod 644 */*.xdrz
cd /tmp
zip -r reports.zip reports
Download the reports.zip file to your local workstation and unzip it.
Section 18.5 Upload Oracle Provided Out-of-box Reports to standalone OAS
Login to the standalone OAS as a user with OAS Administrator privileges (SYSMAN), then:
- Click on “Catalog”
- Click on “Shared Folders” in the left hand-side navigation bar
- Make sure “Shared Folders” is highlighted
- Click on the “Upload Resource” icon just above the navigation bar
- Click “Choose File” and select the reports file to upload. Start with the base framework (under reports/base)
- Ensure you select “Overwrite Existing file” and click “Upload”
- Repeat steps 3 – 6 for the other plugins. Choose the other plugin reports file in step 5.
This completes setting up OAS for use with OEM 13.5.
Install Grafana Server version 9.2 and Deploy OEM App for Grafana version 4.0
Grafana is an open source technology used for metric analytics & visualization. The Oracle Enterprise Manager app for Grafana allows you to integrate Enterprise Manager’s metric data (collected from multiple managed targets and stored in the Enterprise Manager repository) with any other data sources you may have access to.
When deployed, the Oracle Enterprise Manager app for Grafana lets Enterprise Manager become a data source for Grafana. The Enterprise Manager Oracle Management Service (OMS) is in direct communication with the Grafana server, transferring target metric and configuration data stored in the Oracle Management Repository (OMR).
Step 1: Setup OMS Host for OEM App for Grafana
Execute the following emctl commands:
emctl set property -name oracle.sysman.db.restfulapi.grafana.enable -value true -sysman_pwd <sysman password>
emctl set property -name oracle.sysman.db.restfulapi.grafana.executesql.repository.query.enable -value true -sysman_pwd <sysman password>
emctl set property -name oracle.sysman.db.restfulapi.grafana.executesql.target.query.enable -value true -sysman_pwd <sysman password>
Create or use a monitoring user in OEM:
This user will be used in the Grafana data source to connect to OEM. You can use an existing user with a minimal set of privileges for monitoring, or create a new user for this purpose. For example:
Username/Password: grafana/***
Role: EM_ALL_VIEWER
Step 2: Install Grafana Server on your OAS host
Although the current version of Grafana server is 10.x, we’ll install version 9.2.20 since the OEM App for Grafana documentation states that it is certified with Grafana Server 9.2.
Login to your OAS host as user opc:
sudo yum install -y https://dl.grafana.com/enterprise/release/grafana-enterprise-9.2.20-1.x86_64.rpm
We’ll use the default port for Grafana which 3000, so we’ll open it on the Linux firewall:
sudo firewall-cmd –add-port=3000/tcp
sudo firewall-cmd –runtime-to-permanent
Start the server with systemd:
To start the service and verify that the service has started:
sudo systemctl daemon-reload
sudo systemctl start grafana-server
Configure the Grafana server to start at boot:
sudo systemctl enable grafana-server
Access the Grafana server homepage and change the default password:
http://oas:3000/
Username/Password: admin/admin (default)
change password: ***
Set up Grafana HTTPS for secure web traffic:
Reference: https://grafana.com/docs/grafana/latest/setup-grafana/set-up-https/
sudo openssl genrsa -out /etc/grafana/grafana.key 2048
sudo openssl req -new -key /etc/grafana/grafana.key -out /etc/grafana/grafana.csr
You are about to be asked to enter information that will be incorporated into your certificate request.
There are quite a few fields but you can leave some blank. For some fields there will be a default value, If you enter ‘.’, the field will be left blank.
—–
Country Name (2 letter code) [XX]:.
State or Province Name (full name) []:.
Locality Name (eg, city) [Default City]:.
Organization Name (eg, company) [Default Company Ltd]:.
Organizational Unit Name (eg, section) []:.
Common Name (eg, your name or your server’s hostname) []: Grafana (or another name of your choice)
Email Address []:.
Please enter the following ‘extra’ attributes to be sent with your certificate request
A challenge password []:.
An optional company name []:.
sudo openssl x509 -req -days 3650 -in /etc/grafana/grafana.csr -signkey /etc/grafana/grafana.key -out /etc/grafana/grafana.crt
sudo chown grafana:grafana /etc/grafana/grafana.crt
sudo chown grafana:grafana /etc/grafana/grafana.key
sudo chmod 400 /etc/grafana/grafana.key /etc/grafana/grafana.crt
You need to make updates to the Grafana initialization file and restart the Grafana server for these changes to take effect. We’ll do both in the next step after we deploy the OEM app for Grafana.
Step 3: Download and Deploy the OEM App for Grafana to your OAS Host
Access the Grafana download page on oracle.com:
https://www.oracle.com/enterprise-manager/technologies/grafana/#
Download oracle-emcc-app-4.0.0 , certified with Grafana Version 9.2.0
Store the downloaded file in a staging directory on your OAS host, such as /tmp/EM_App_Grafana_40
Deploy the app:
sudo /usr/sbin/grafana-cli –pluginUrl /tmp/EM_App_Grafana_40/V1035357-01.zip plugins install oracle-emcc-app
Allow Loading the OEM app which is unsigned. Uncomment the line below and specify the OEM app for Grafana:
sudo vi /etc/grafana/grafana.ini
allow_loading_unsigned_plugins = oracle-emcc-app,oracle-emcc-datasource
Also, uncomment and update the following lines in the same file for the SSL configuration to take effect:
[server]
protocol = https
domain = oas
cert_file = /etc/grafana/grafana.crt
cert_key = /etc/grafana/grafana.key
Restart Grafana Server:
sudo systemctl restart grafana-server
Step 4: Add an Enterprise Manager Data Source and View Pre-Defined Dashboards
Access the Grafana server at:
https://oas:3000/
From the Grafana home page, select “Configuration” -> “Plugins”. A list of available Grafana plugins displays.
Choose Oracle Enterprise Manager App from the list. The Enterprise Manager App Enable and Disable options are displayed.
Click Enable.
From the left hand-side tool bar, choose “Configuration” -> “Data Sources”.
Click Add data source. A list of data source types is displayed.
Select Enterprise manager data source (under “Others”), and enter:
https://oms1:7799 (do not add “/em” at the end of the URL)
For username and password, enter the username created in OEM earlier to connect to Grafana.
View Predefined Dashboards:
From the left hand-side tool bar, select “Dashboards” -> “Browse Dashboards”. Open the “General” folder to view the Oracle supplied dashboards installed with the app.
Manage Server Start and Stop
OAS
To start or stop the OAS server, use the following commands as user oracle:
. setEnvOAS
- $BI_DOMAIN_HOME/bitools/bin/start.sh
- $BI_DOMAIN_HOME/bitools/bin/stop.sh
The commands produce a lot of output to the terminal screen. If that’s undesirable, one way to suppress the output is as follows:
- $BI_DOMAIN_HOME/bitools/bin/start.sh >/dev/null
- $BI_DOMAIN_HOME/bitools/bin/stop.sh >/dev/null
Note it takes a few minutes for the OAS server to start, and about a minute to stop. You can wrap the commands in two simple shell scripts and echo the time before and after:
vi start_oas.sh:
echo “Starting OAS. This should take 2 to 3 minutes …”
date ‘+%d-%b-%Y %I:%M %p %Z’
/u01/app/oasmw/user_projects/domains/bi/bitools/bin/start.sh >/dev/null
echo “OAS started.”
date ‘+%d-%b-%Y %I:%M %p %Z’
vi stop_oas.sh:
echo “Stopping OAS. This should take about a minute …”
date ‘+%d-%b-%Y %I:%M %p %Z’
/u01/app/oasmw/user_projects/domains/bi/bitools/bin/stop.sh >/dev/null
echo “OAS stopped.”
date ‘+%d-%b-%Y %I:%M %p %Z’
Grafana
The Grafana server is automatically started when the VM is started. To start or stop it manually, use the following commands as user opc:
- sudo systemctl start grafana-server
- sudo systemctl stop grafana-server
Reference
-
Installing and Configuring Oracle WebLogic Server and Coherence
-
- Click on “FMW Infrastructure / WebLogic Server” on the left hand-side navigation bar
- Required patches are those for “WebLogic Server 12.2.1.4” and “FMW Infrastructure 12.2.1.4”