OCI multicast is available as a solution offered by our partner swXtch.io and ready to be used directly from the OCI Marketplace. Creating a high performance multicast network it’s simpler than ever using the OCI IaaS and swXtch.io multicast capabilities. A new series of blogs will be dedicated to Multicast on OCI powered by swXtch.io where we will analyze the multicast deployment from basic to advanced scenarios.
swXtch.io provides an application that implements a Cloud Based Virtual Switch – cloudSwXtch. cloudSwXtch consists of a software-based network switch and a virtual NIC service called xNIC. Together, these components create a virtual overlay network on top of a standard cloud network. The IP multicast feature is supported by the overlay network created. With cloudSwXtch, existing user applications and services, that expect standards-based IP multicast, will work on any cloud without requiring any code changes.
Features supported by cloudSwXtch:
- Multicast – cloudSwXtch enables true and seamless IP-multicast. cloudSwXtch uses the industry standard IGMPv2/v3 for its management of multicast group membership.
- Single Source Multicast (SSM) – Traditionally, Single Source Multicast (SSM) is a method for delivering multicast packets in which the only packets that are delivered to the receiver are those originating from a specific source address requested by the receiver. This can be accomplished as either a consumer command for swxtch-perf, the cloudSwXtch-based tool for simulating traffic movement, or via an external application.
- Protocol Conversion and Fanout – cloudSwXtch supports a unique feature called protocol conversion and fanout. This feature is useful when a user’s multicast application needs to stream to an endpoint that does not support multicast or it is not possible to install an xNIC in the endpoint. cloudSwXtch can map a multicast group address to a unicast address. Similarily, a unicast input to cloudSwXtch can be mapped to a multicast group enabling mulitple endpoints to consume the original unicast input stream. Protocol Fanout converts many packet protocols and distributes them out as if they were multicast; freely integrating multicast, unicast and Secure Reliable Transport (SRT) streams while making the network more efficient and reducing egress costs.
- SMPTE 2022-7 and High Availability (HA) – High Availability (HA) protects users against data path errors by sending the same stream through as many as eight different distributed data paths. It compares packet reception from the multiple paths, detects dropped packets and reconstructs the output stream in the correct order. This feature is compliant with SMPTE 2022-7 for media workflows.
- Mesh – Multiple cloudSwXtches can be connected together in a mesh for routing throughout in the cloud network. This includes cloudSwXtches in any topology across all dispersed network locations (different VCNs, regions, clouds, subnets, etc.). Additionally, a mesh allows cloudSwXtch to scale vertically.
- Ground to Cloud <==> Cloud to Ground – A user can connect their On-Prem network to their cloudSwXtches in the Cloud via the bridge application.
-
wXcked Eye for Monitoring and Configuration – cloudSwXtch also provides its users with visibility down to the packet level for enhanced Monitoring and Quality of Service (QoS). wXcked Eye is the cloudSwXtch monitoring UI tool that enables users to deeply audit the performance of their cloudSwXtch network. Each cloudSwXtch performs complete packet capture.
In addition, wXcked Eye also provides users with an additional avenue to configure the cloudSwXtch environment for mesh, high availability, protocol conversion and fanout, and precision time protocol. A REST API is provided to help users manage and control their network in their own way.
-
Precision Time Protocol (PTP) – Precision Time Protocol (PTP) is a cloudSwXtch feature that facilitates clock synchronization between agents connected to the network. The cloudSwXtch acts as the Master Node, passing on the information gained from the true clock source to the Follower Nodes or agent end points.
You can find some other very useful information about cloudSwXtch using the official documentation page (you will need to create an account to access the documentation).
That being said, let’s proceed by creating the cloudSwXtch, installing the xNICS on couple of VMs and run the IP multicast traffic. Then, we will add into the picture the cloudSwXtch HA mechanism.
The networking diagram used for our initial deployment is listed below:

cloudSwXtch installation
A cloudSwXtch instance must have 2 VNICs. However, both VNICs can share a single subnet for control and data plane communications or can use different subnets. In our deployment we will use the same subnet for placing the two VNICs, one for control (the first one) plane traffic and another for data plane traffic.
The NAT Gateway will be used for cloudSwXtch-1 update after it is deployed.
The OCI Marketplace contains the image that needs to be used, it is listed as follow:
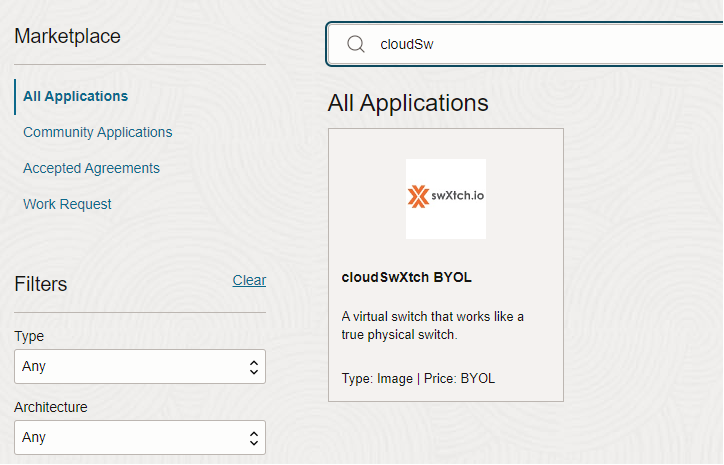
From here, we will use the Launch Instance option to create the compute instance running the cloudSwXtch software. As of now, the version in the Marketplace is 2.0.15. After the cloudSwXtch-1 is deployed, we will use the upgrade option to install v2.1.2. The target version v2.1.2 will assure that all the functions will work as expected.
The first VNIC will be used for control plane traffic.
It is recommended to use at least four OCPUs and 64GB of memory on an Intel VM.Standard3.Flex shape. Please make sure Hardware-assisted (SR-IOV) networking option is enabled before launching the instance.
After the cloudSwXtch-1 enters the Running state, we can add the secondary VNIC. After the VNIC is added, just record the IP and MAC addresses from the OCI WebUI, we will need it later to configure the second VNIC on cloudSwXtch-1.
To add the secondary VNIC, under the /etc/netplan create the file named 02-datanic-static-config.yaml (you need to make sure you are including the correct information based on your IP and MAC addresses for the secondary VNIC):

After the above file is created with the correct information, just apply the configuration with the command: sudo netplan apply
cloudSwXtch-1 has the firewall enabled. Open the file /etc/iptables/rules.v4 in an editor and locate the following two lines:
-A INPUT -p all -s 10.0.128.0/24 -j ACCEPT
-A INPUT -p all -s 10.0.192.0/24 -j ACCEPT
Replace the two CIDRs above with your xnic-vm subnets. In our case we use:
-A INPUT -p all -s 10.0.1.0/24 -j ACCEPT
-A INPUT -p all -s 10.100.16.0/21 -j ACCEPT
Save the file and reboot the instance.
After the reboot, the data interface will be initialized together with the firewall rules.
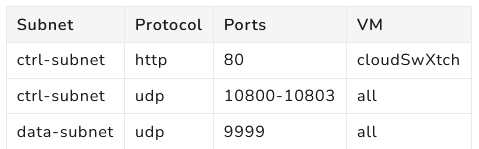
The xNIC software (we will discuss later about xNIC) and the cloudSwXtch communicate with each other using the following protocols and ports. These firewall exceptions must be allowed in the xNIC VMs and the cloudSwXtch VM (if the firewall VMs is active) plus in the Security Lists or NSGs within OCI:
As you recall, we need to upgrade our cloudSwXtch-1 to v2.1.2. For performing the upgrade process the following command will be used: sudo /swxtch/swx update -i localhost -v v2.1.2

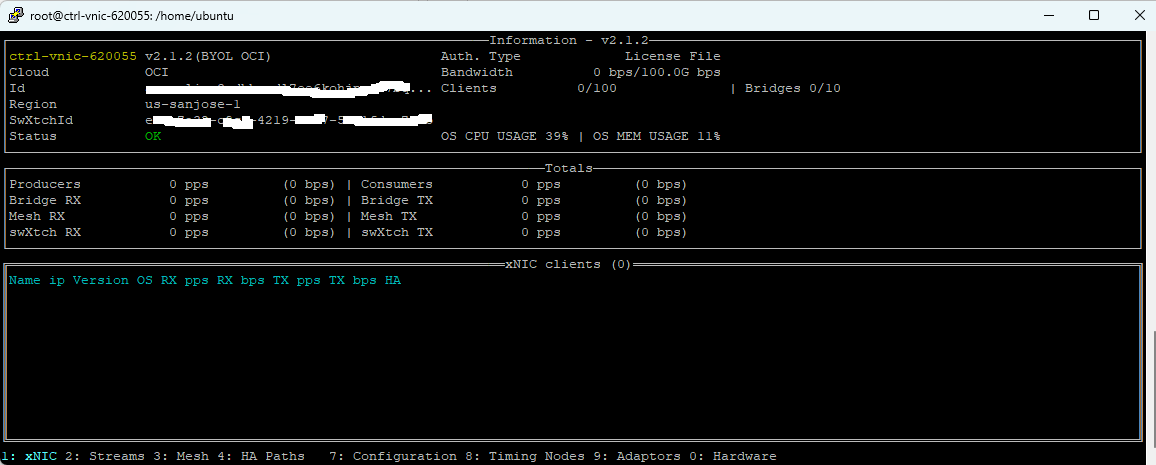
After the upgrade was performed we will need to go to the licensing part. Using the command sudo /swxtch/swxtch-top you will have access to the most important information provided by the multicast controller (we will extensively use this command in our journey):
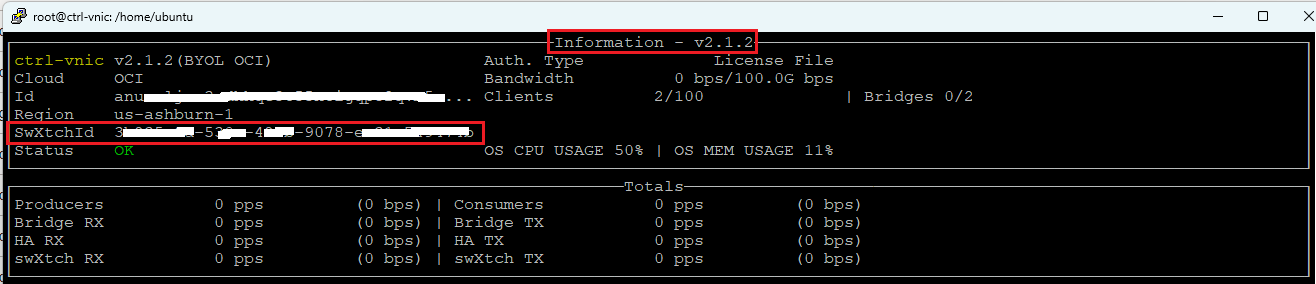
For every cloudSwXtch you might use in your multicast network, record the SwXtchID marked with red in the above picture. Contact swxtch.io and provide the SwXtchID(s) for obtaining the license. A license will be delivered for each and every cloudSwXtch based on SwXtchID. In order to license a cloudSwXtch you need to create the following file: sudo vim /swxtch/license.json and copy the entire content from the license file obtained from swxtch.io. Save the file you created and from now, your cloudSwXtch is licensed and can be used in your cloud multicast network.
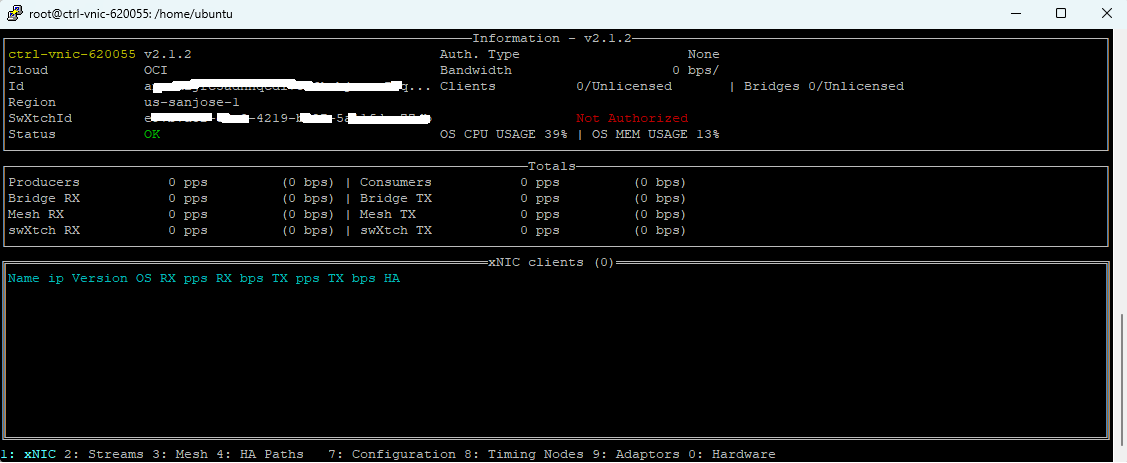
Below you will see the difference between a licensed vs non-licensed cloudSwXtch (using the /swxtch/swxtch-top command):
Non-licensed cloudSwXtch:
Licensed cloudSwXtch:
Repeat the same procedure for cloudSwXtch-2, we will use it later for HA.
xNIC software instalation
As we recall, the xNIC software must be run on each virtual machine that is to be part of the IP multicast network. xNIC will not be installed on a cloudSwXtch or a cloudSwXtch Bridge.
At the time of writing, the xNIC software can be installed on hosts which meet the following requirements:
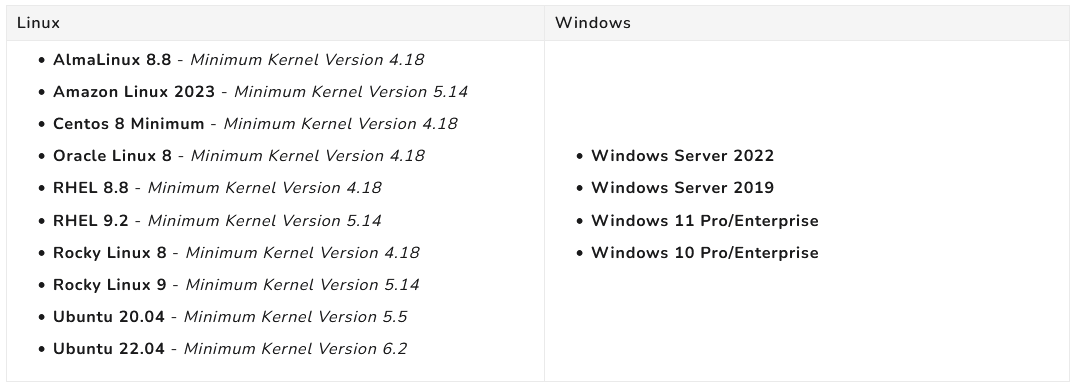
In our tests we will use Oracle Linux 8 on xnic-vmx where x is from 1 to 4 (depicted in the above networking topology).
To install the xNIC on a VM which meets the above requirements the command curl -v http://<cloudSwXtch ctrl-IP address>/services/install/swxtch-xnic-install.sh | bash will be used.
Note: From any xNIC VM the IP connectivity to the cloudSwXtch control plane IP address must work, otherwise the xNIC software install will fail.
In our scenario the cloudSwXtch-1 control plane VNIC IP address is 10.0.0.135, so, the command to install the xNIC software on all our VMs is:
curl -v http://10.0.0.135/services/install/swxtch-xnic-install.sh | bash
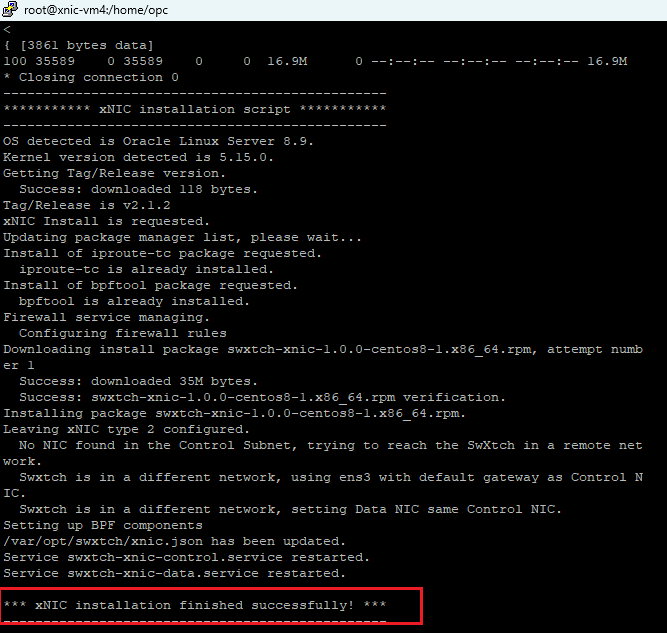
A successful installation of the xNIC software looks like below:
After all the VMs got the xNIC software we can use the /swxtch/swxtch-top command on cloudSwXtch-1 to verify the xNIC clients:
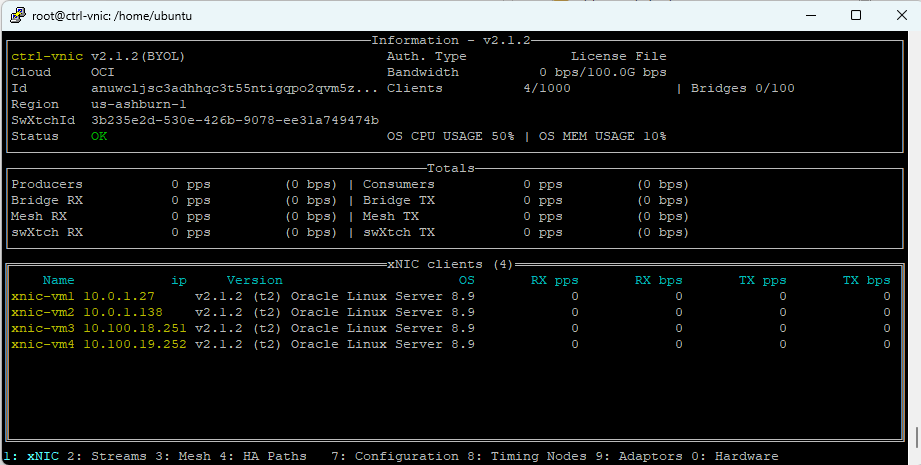
We can clearly see in yellow that all our xNIC clients are successfully listed.
We have a similar command like /swxtch/swxtch-top that can be used directly on the xNIC clients to get the same information (in case you do not have any access to your cloudSwXtch), the command is:
swxtch-top dashboard –swxtch <swxtch-ip-address>
Let’s try it on xnic-vm1:
swxtch-top dashboard –swxtch 10.0.0.135
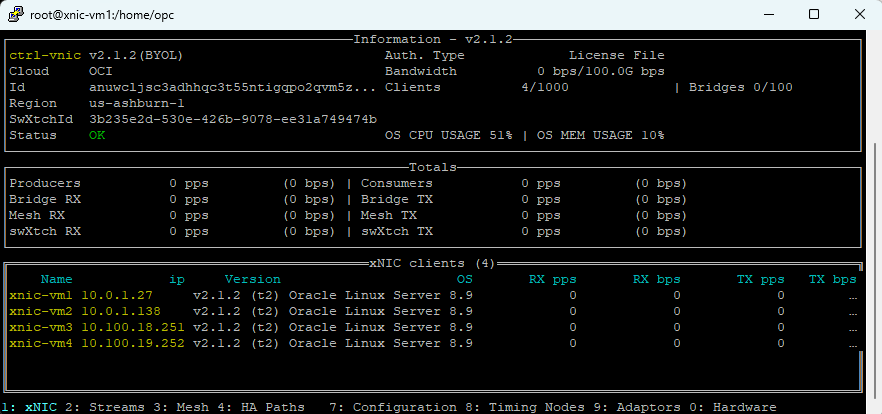
So, the same information is obtained directly from the xNIC clients.
In this blog post we learned how to perform the initial configuration for cloudSwXtch and xNIC multicast producers/consumers. This is a very important step to have a working multicast solution. In the next multicast blogs we will learn to configure the HA, we will introduce the wXcked Eye WebUI capabilites, test the multicast traffic and other very useful multicast capabilities. Stay tuned!