Hi! In this blog entry, we will talk about using your own custom domain and certificates to access OCI Object Storage with the help of an F5 Load Balancer.
OCI Object Storage
OCI Object Storage works with buckets and objects inside the buckets. You can access these objects using two domains:
a) The standard URL in the format:
https://objectstorage.[region].oraclecloud.com/n/[namespace/tenancy]/b/[bucket name]/o/[object name]
b) The endpoint dedicated to your tenancy:
https://[namespace/tenancy].objectstorage.[region].oci.customer-oci.com/n/[namespace/tenancy]/b/[bucket name]/o/[object name]
Regardless of the URL used, the domains are Oracle-owned, they use Oracle SSL Certificates and they point to Oracle-owned public IPs. Let’s see how we can change that.
Custom domain
At this moment, the Object Storage (OS) service does not support custom domains natively. That means we need the help of another service or appliance to proxy the connection. The reason we need it is because of HTTPS. The OS endpoints have certificates that only work with the domains presented above. If you try any other domain (like your own, pointed to the public IPs of OS) the SSL handshake will fail and access will not work.
Without going into too much detail, SSL uses two constructs for the handshake: Server Name Indication (SNI) and the HOST header inside the HTTPS packet. If one of these two mismatch the server configuration (hosted domain), the handshake will fail. So what can we do? While this can be approached in many ways, I’ll present two:
a) Use a CDN to proxy the connection between your clients and OCI Object Storage. Most CDNs provide this feature out of the box, you just need to configure the client-facing domain, provide certificates, and point to Object Storage as an Origin.
b) Use another server to proxy the connection. There are many options here, like Web Server software, HTTP Proxy software, or Application Load Balancers. In this blog, I will show you how to do it with an F5 Load balancer.
So what exactly do we need to do? Well, we need to reverse proxy the connection. What does that mean? It means we need to put the Load Balancer on the path between the client and OCI Object Storage. The Load balancer will terminate the SSL connection for the client (thus fulfilling the SNI requirement), then it will rewrite the HOST header in the packets and connect to Object Storage to retrieve data on behalf of the client (thus resolving the header issue).
Let’s jump directly into the demo.
Demo
For the demo part, I will use the following:
– A Public Bucket in OCI Object Storage in OCI Frankfurt called DEMO-Bucket; the bucket holds a file called OCI.png. The URL for this bucket would be https://objectstorage.eu-frankfurt-1.oraclecloud.com/n/ociateam/b/DEMO-Bucket/o/OCI.png. Note that private buckets can also be used.
– A public domain record, storage.oci-lab.cloud, which I will use to retrieve data from Object Storage;
– The required certificate, certificate chain and key for storage.oci-lab.cloud.
– An F5 load balancer deployed in OCI with the relevant IAAS infrastructure (VCN, Subnets, Route tables).
Let’s put all of this in a diagram:

Now that we know what we need to build, let’s start deploying. I’ll discuss some of the points briefly, in the interest of space.
OCI build:
1. Deploy a VCN, an Internet Gateway, a Nat Gateway and a Service Gateway inside the VCN.
2. Deploy one Public subnet for F5 management; the route associated table should have 0.0.0.0/0 targeting the Internet gateway.
3. Deploy one Public subnet for the F5 Outside interface; the route associated table should have 0.0.0.0/0 targeting the Internet gateway.
4. Deploy one Private subnet for the F5 Inside interface; the route associated table should have (At least) Object Storage targeting the Service Gateway. I would also recommend adding 0.0.0.0/0 to the Nat Gateway (Optional).
5. Configure the security lists to allow the traffic. For simplicity, you can use the same Security List for all subnets and create an “Allow 0.0.0.0/0” rule for both ingress and egress flows.
F5 build and configuration:
1. Deploy an F5 Load balancer using this guide. You will need an F5 account to get the image and a trial license. This tutorial focuses on what to configure on the F5 and will work for both a single F5 and an F5 cluster.
2. Make sure the F5 has at least these two traffic interfaces: Outside (on the Public subnet) and Inside (on the Private subnet).
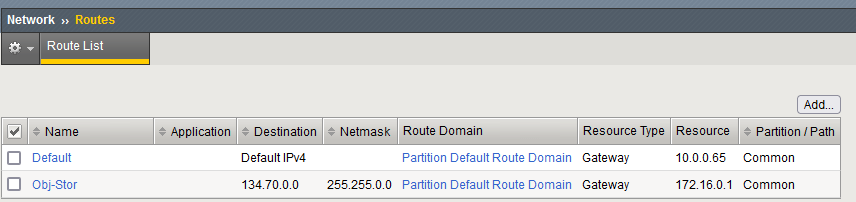
3. Once the F5 is deployed and has the relevant interfaces attached and configured we will need to adjust routing. The F5 needs only two routes for this demo:
– A default route 0.0.0.0/0 on the Outside interface, next hop is the 1st IP in the Public Subnet
– 134.70.0.0/16 on the Inside interface, next hop is the 1st IP in the Private Subnet
Note: 134.70.0.0/16 is the OCI allocated CIDR for Object Storage, for all regions. For the Inside interface route, you can put the OBJ Storage IPs of the current region or the full /16 to cover all regions. This way, you can have the F5 in a different region than the Object Storage bucket. Also, note that you need the NAT Gateway if the F5 and the Object Storage are in different regions.
4. F5 certificates.
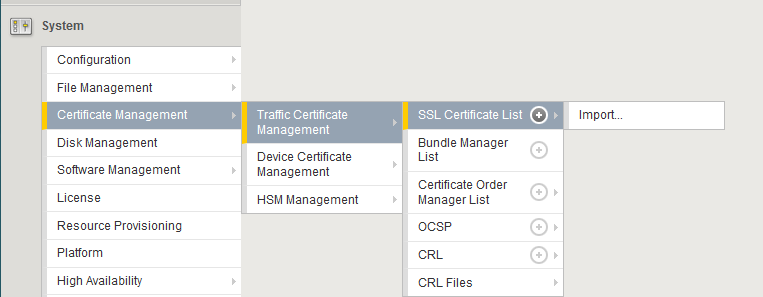
We will need to add the required certificates for the hostname you want to use. For this demo, I am using storage.oci-lab.cloud. Go to System -> Certificate Management -> Traffic Certificate Management -> SSL Certificate List -> Import and add the 3 items.
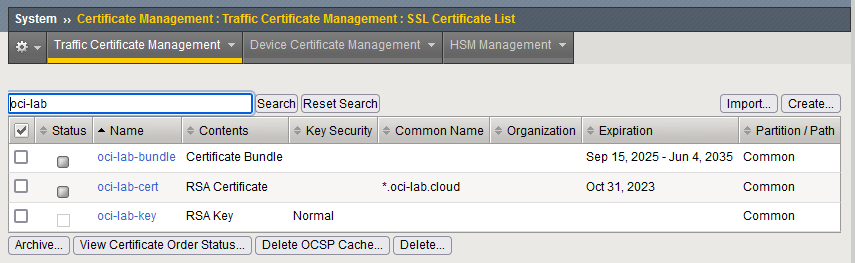
We will need to import:
– The certificate for storage.oci-lab.cloud which we call the leaf;
– The CA bundle -> all Intermediate certificates up until and including the root certificate;
– The Private Key of the certificate.
When you are done, you should see all 3 as imported:
5. The Client SSL Profile.
Using the certificates imported in the step above we need to create a client SSL profile which we will add to the Virtual Server. Go to Local Traffic -> Profiles -> SSL -> Client. Press Create on top-right. Give it a name and select Custom.
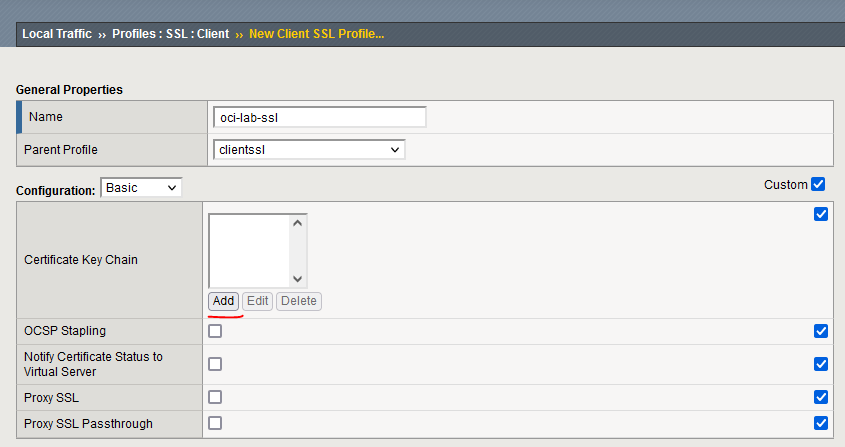
After you press Add, fill the fields with the imported data:
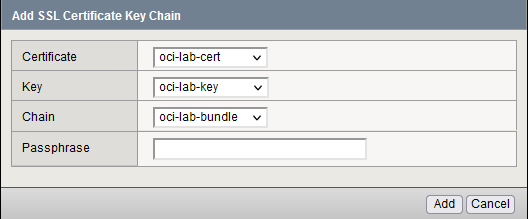
Press Finished. We will also need a Server SSL profile but the default one will work just fine so no need to create a custom one.
6. The backend/pool.
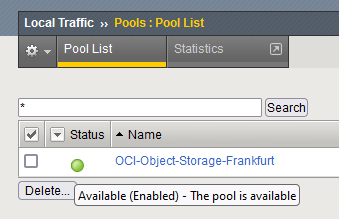
Next, we will need to define the Object Storage as a Pool (Backend) for the F5. Go to Local Traffic -> Pools -> Pool List. Press Create. The nice thing is we can add an FQDN Member, virtually adding all Object Storage nodes in one go. Fill the template as in the picture:
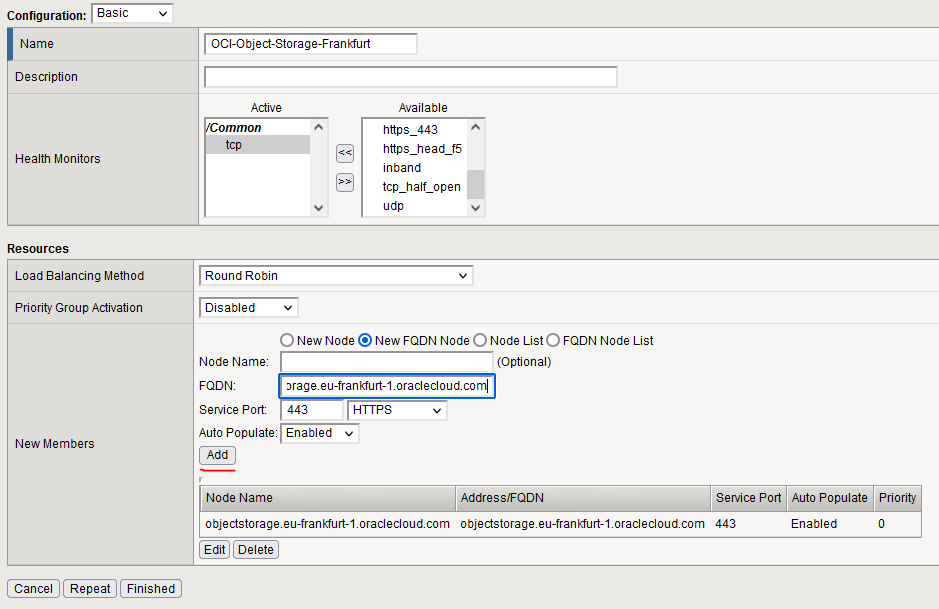
Once done, make sure the Pool turns green which will tell us the F5 can reach Object Storage.
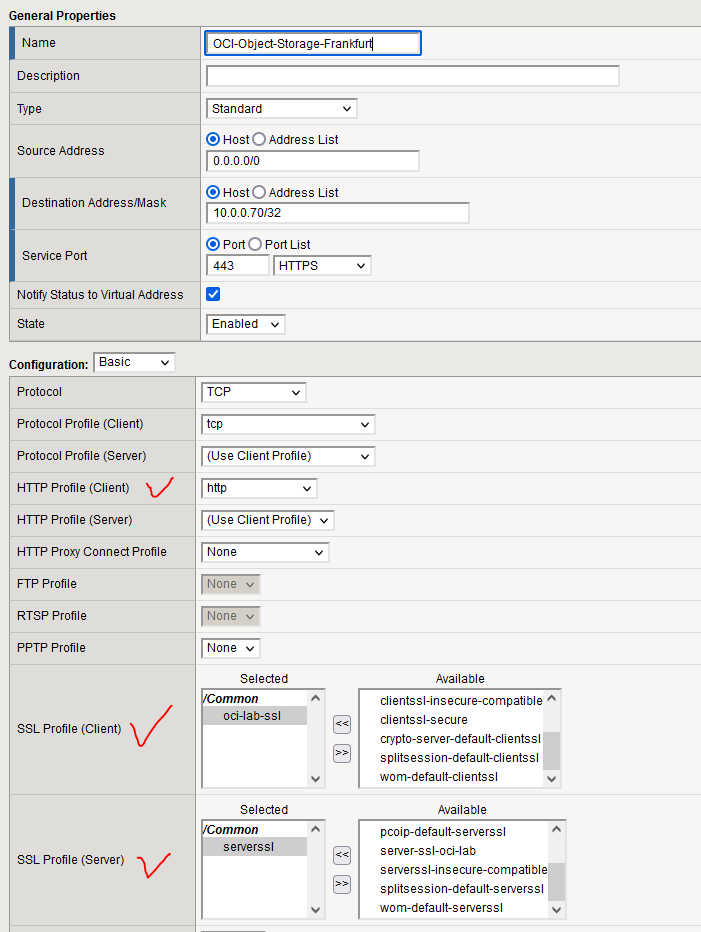
7. The Virtual Server
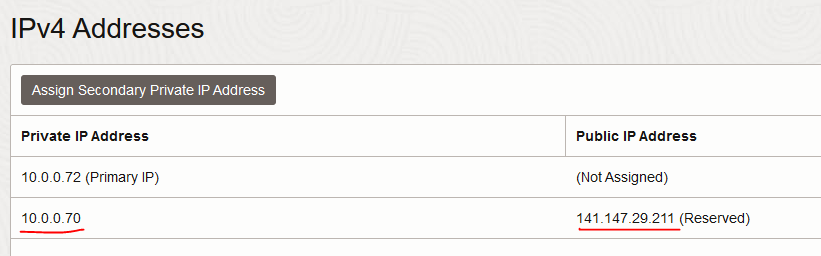
Now let’s create the Virtual Server. You can use the Outside interface IP but I prefer to add secondary IPs to that interface which I use specifically for Virtual Servers. Add a secondary private IP to the interface and assign a Public IP to it. We will use the private IP in the Virtual Server configuration and the Public IP in the DNS configuration.
Next, go to Local Traffic -> Virtual servers and create a new VS. Take special care with the following:
– Use http Client Profile
– Use the previously created Client SSL Profile
– Use the default Server SSL Profile
– Source address translation – Auto Map
– Default Pool – the pool we created earlier
– Default Persistence Profile (optional) – Hash
– The rest can remain on default
![]()

After you press Finished, make sure the VS turns green.
8. The mighty iRule.
Now let’s create an iRule that will change the host header. Go to Local Traffic -> iRules and create the following iRule:
when HTTP_REQUEST {
  if { ([string tolower [HTTP::host]] equals "storage.oci-lab.cloud") }{
    HTTP::header replace Host "objectstorage.eu-frankfurt-1.oraclecloud.com"
  }
}
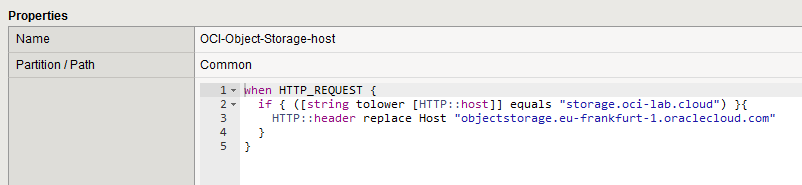
The iRule is pretty self-explanatory. Replace the items from my example with your own hostname. Also, make sure you use the correct regional FQDN for the Object Storage.
Next, let’s add this iRule to the Virtual Server. Click the VS created earlier, go to the Resource tab and add the iRule.

And we’re done. Let’s test it by swapping
https://objectstorage.eu-frankfurt-1.oraclecloud.com/n/ociateam/b/DEMO-Bucket/o/OCI.png
with
https://storage.oci-lab.cloud/n/ociateam/b/DEMO-Bucket/o/OCI.png
Also, make sure you point your public DNS to the F5 Public IP. As seen previously, my Public IP is 141.147.29.211 so storage.oci-lab.cloud points to that.
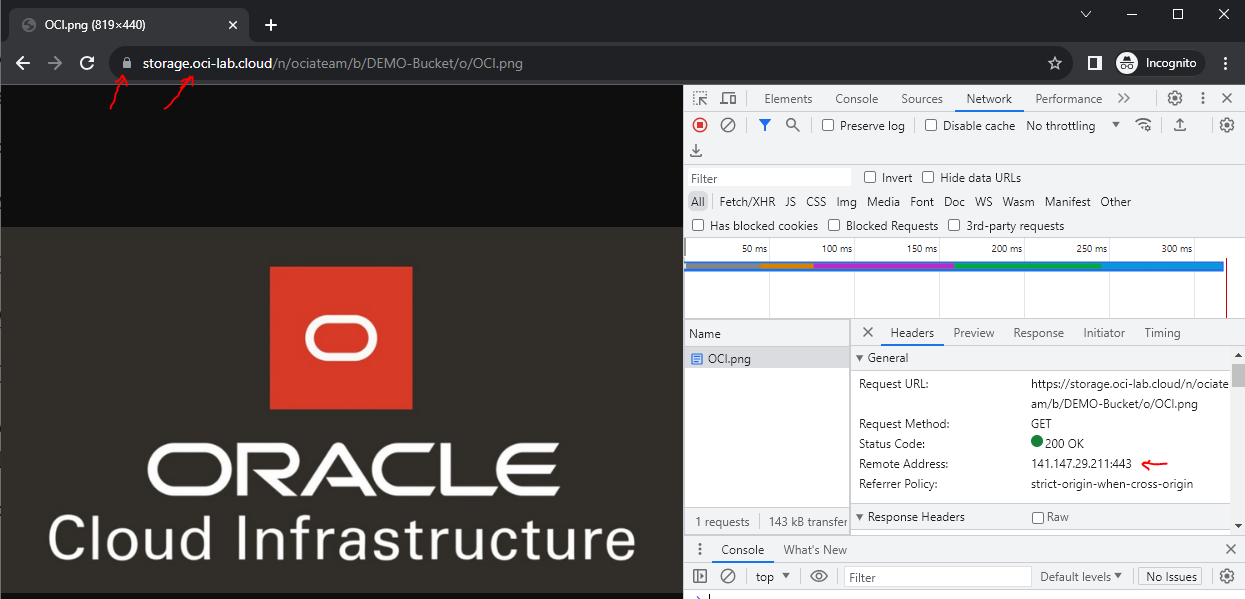
As we can see, everything worked, we have accessed Object Storage using a custom domain.
One more enhancement
Everything we previously did will allow me to use storage.oci-lab.cloud for all the buckets in the region. But what if I want to point storage.oci-lab.cloud to a single bucket and not use the lengthy URL, making it a true Vanity URL. What if I want to transform
https://objectstorage.eu-frankfurt-1.oraclecloud.com/n/ociateam/b/DEMO-Bucket/o/OCI.png
into
https://storage.oci-lab.cloud/OCI.png ?
We can easily do this with another iRule, like below:
when HTTP_REQUEST {
    if { [HTTP::uri] starts_with "/" } {
        set uri [string map -nocase {"/" "/n/ociateam/b/DEMO-Bucket/o/"} [HTTP::uri]]
        HTTP::uri $uri
    }
}
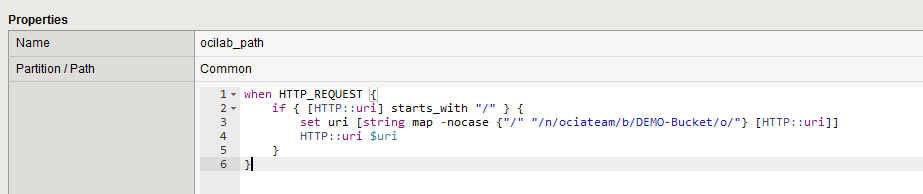
Create a new iRule with the above and add it to the virtual server. Let’s see if it works.
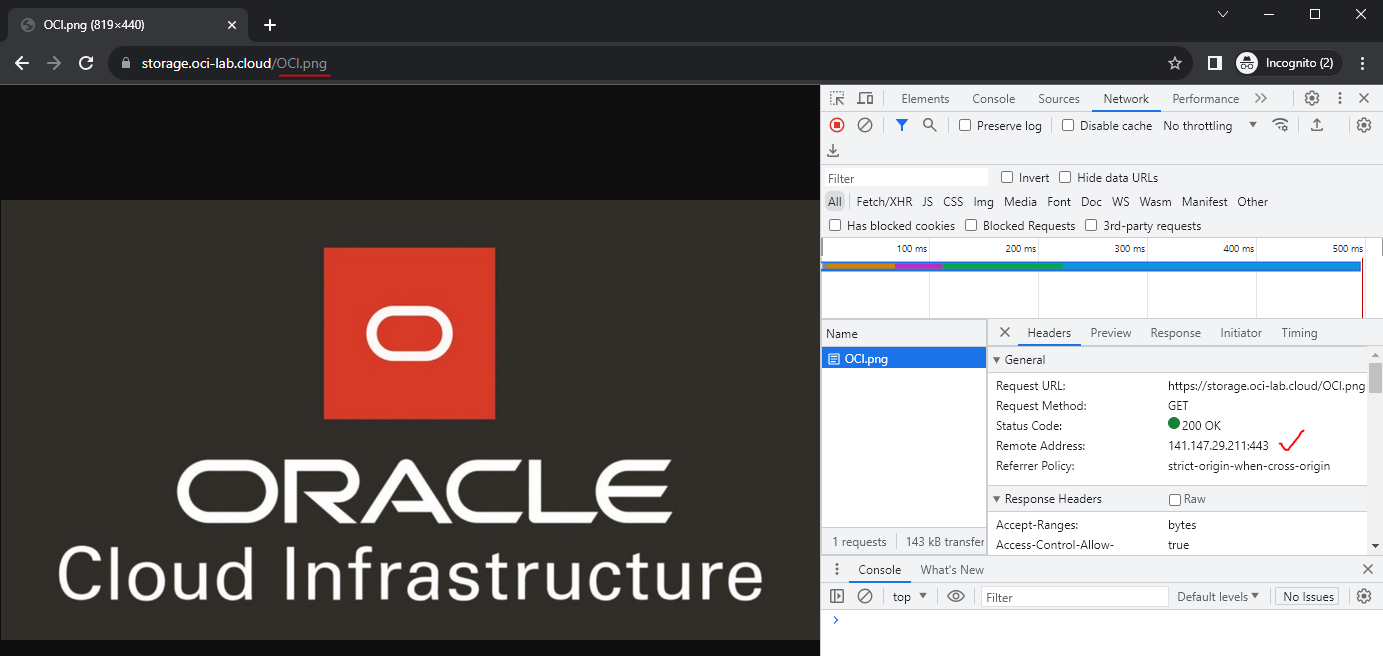
Success! The path is now restricted to a single bucket and the URL is much simpler.
