Some time back I had written a blog post “Securing Oracle Analytics Cloud REST API with OCI IAM OAuth 2.0 Device Authorization Grant” about using OAuth 2.0 Device Authorization Grant, informally the “device flow”, for protecting Oracle Analytics Cloud REST API. In this blog post, I will be taking a similar approach but protecting Oracle Integration Cloud (OIC) integrations exposed as REST API instead.
OIC REST Adapter
OIC enables easy integration between diverse applications. It provides many application specific adapters for smooth development. It also provides a REST Adapter to expose application functionality as REST API. The REST Adapter can be used for both trigger as well as invocations. However, the focus of this blog post will be on the REST Adapter used as trigger. The REST Adapter when used as trigger supports OAuth 2.0 access token (issued by OCI IAM) to grant access to the REST API. REST APIs are typically used in ‘b2b’ contexts. That is, a client application, maybe a script, invoking the REST API of the server. It usually does not require an actual user context. However, OIC requires that the access token (AT) has a user context. There are few ways you can do that – roping in the user in the OAuth authorization flow – but the device flow is the most optimal in this situation. Refer to Chris’s post on device flow where he discusses various use cases including this one.
Echo integration
OIC provides some sample integrations; ‘Echo‘ is one of them. Echo as the name implies, echoes back whatever data is supplied when it is triggerred. And Echo is already front-ended by the REST Adapter thus exposing it as a REST API. We will be using the Echo sample to demostrate the device flow.
I will not go into the specifics of configuring OIC; that is readily available in the documentation. After defining an OIC instance, add the Echo sample. Running the sample will produce the following output.
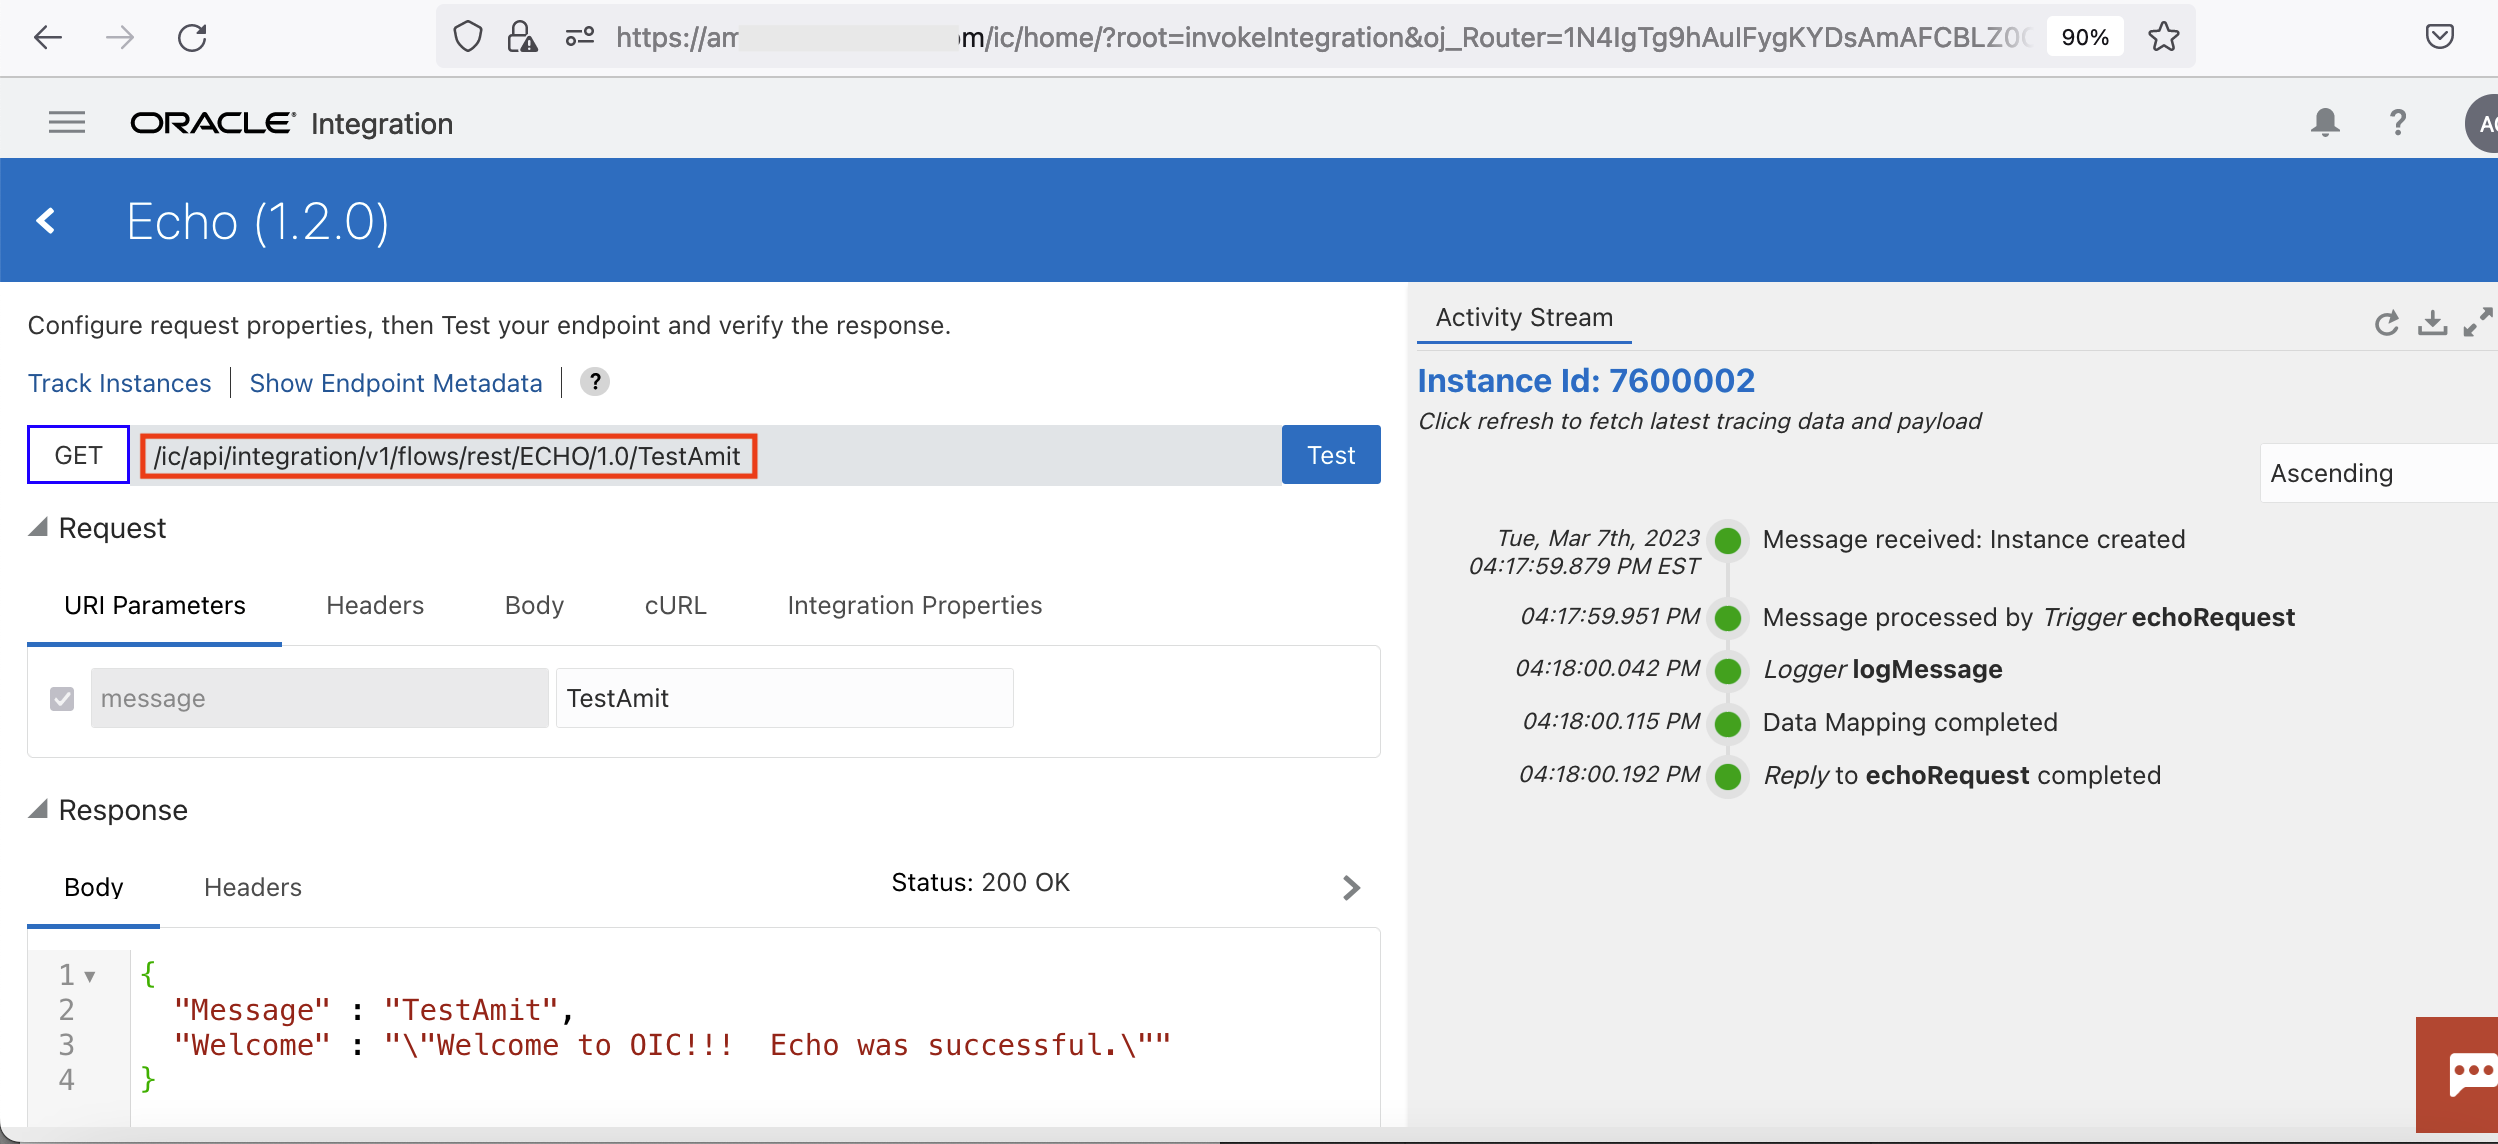
Fig 1
The figure above shows the REST endpoint of the Echo application. Also notice that the message sent to Echo (“TestAmit”) gets reflected back in the response. Clicking the endpoint metadata tab above will display all the REST endpoint particulars.
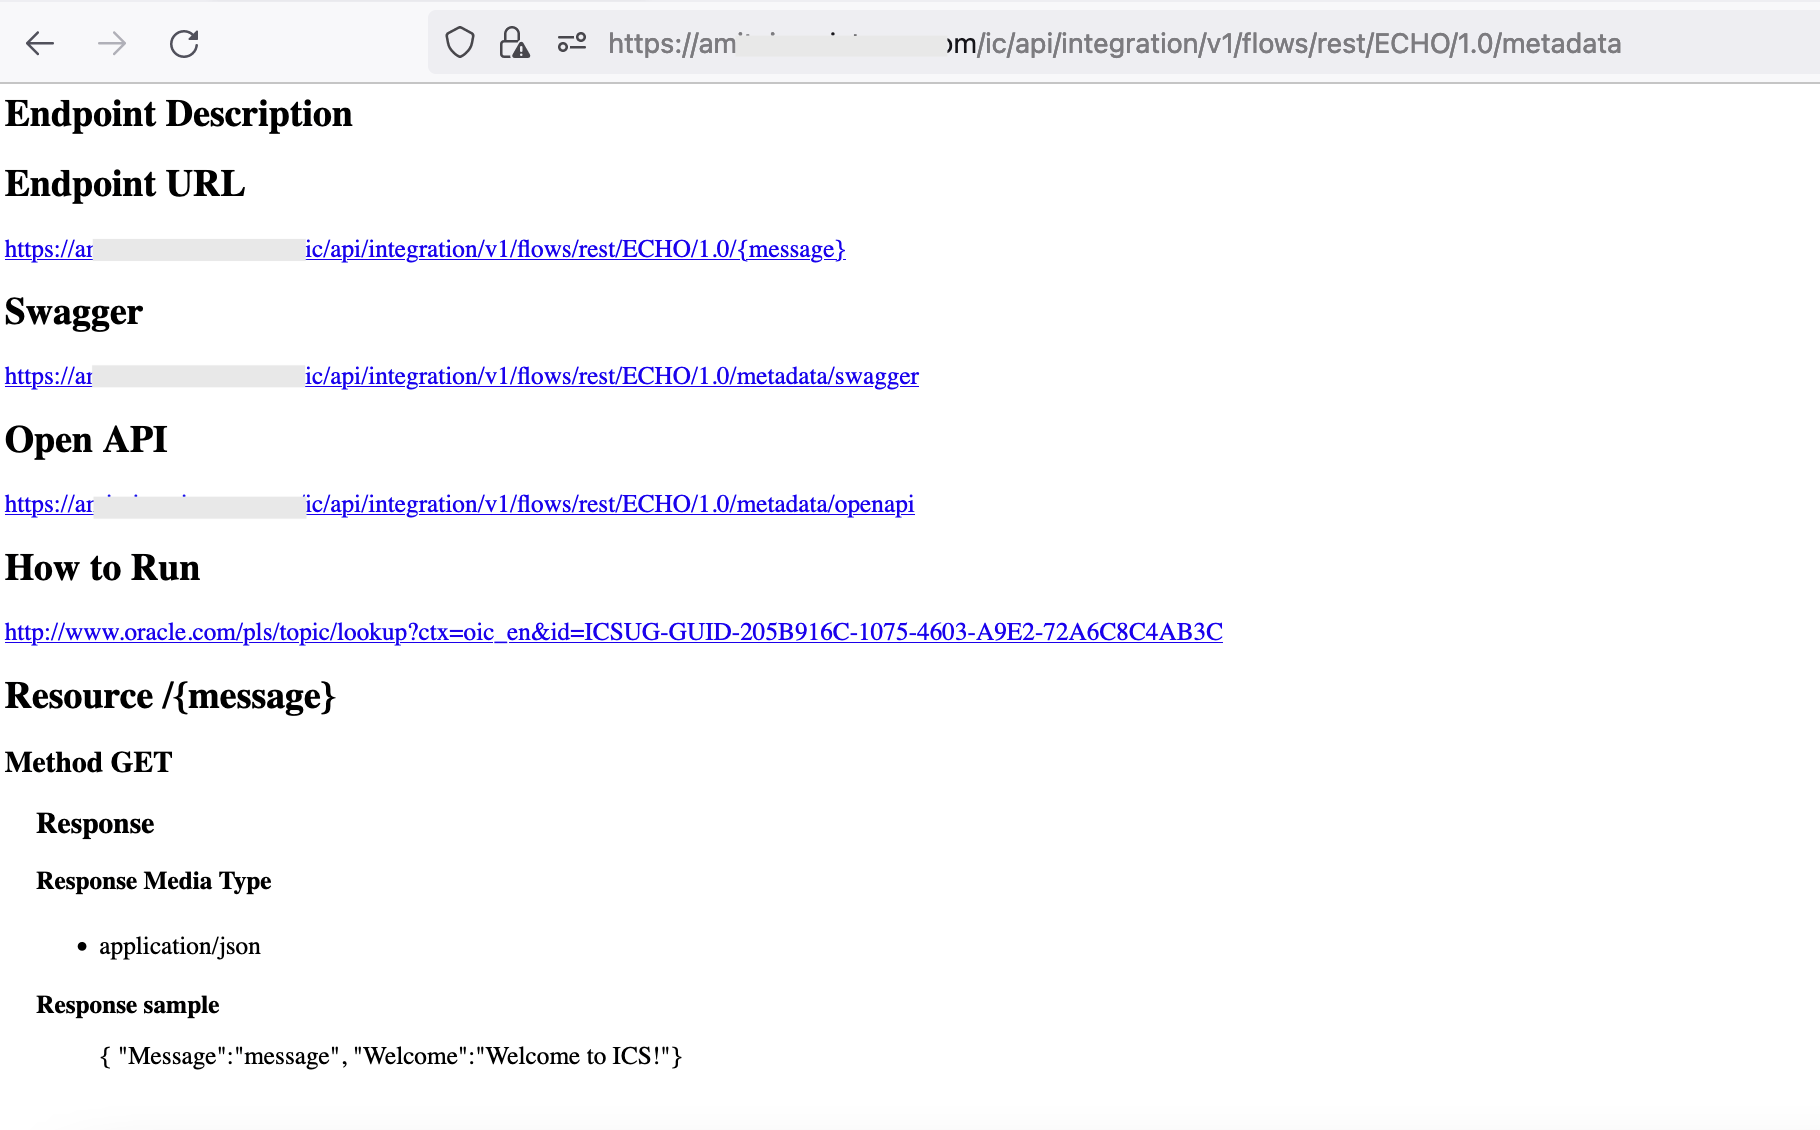
Fig 2
Hence for the Echo integration, the REST endpoint is [/ic/api/integration/v1/flows/rest/ECHO/1.0/]. The metadata also specifies the format of the response, which aligns with the actual message from Echo in Fig 1.
OIC and Client Application Configuration in OCI IAM
After creating a new OIC instance, the ‘Resources’ section of the corresponding OIC application in OCI IAM will show something similar to the following:
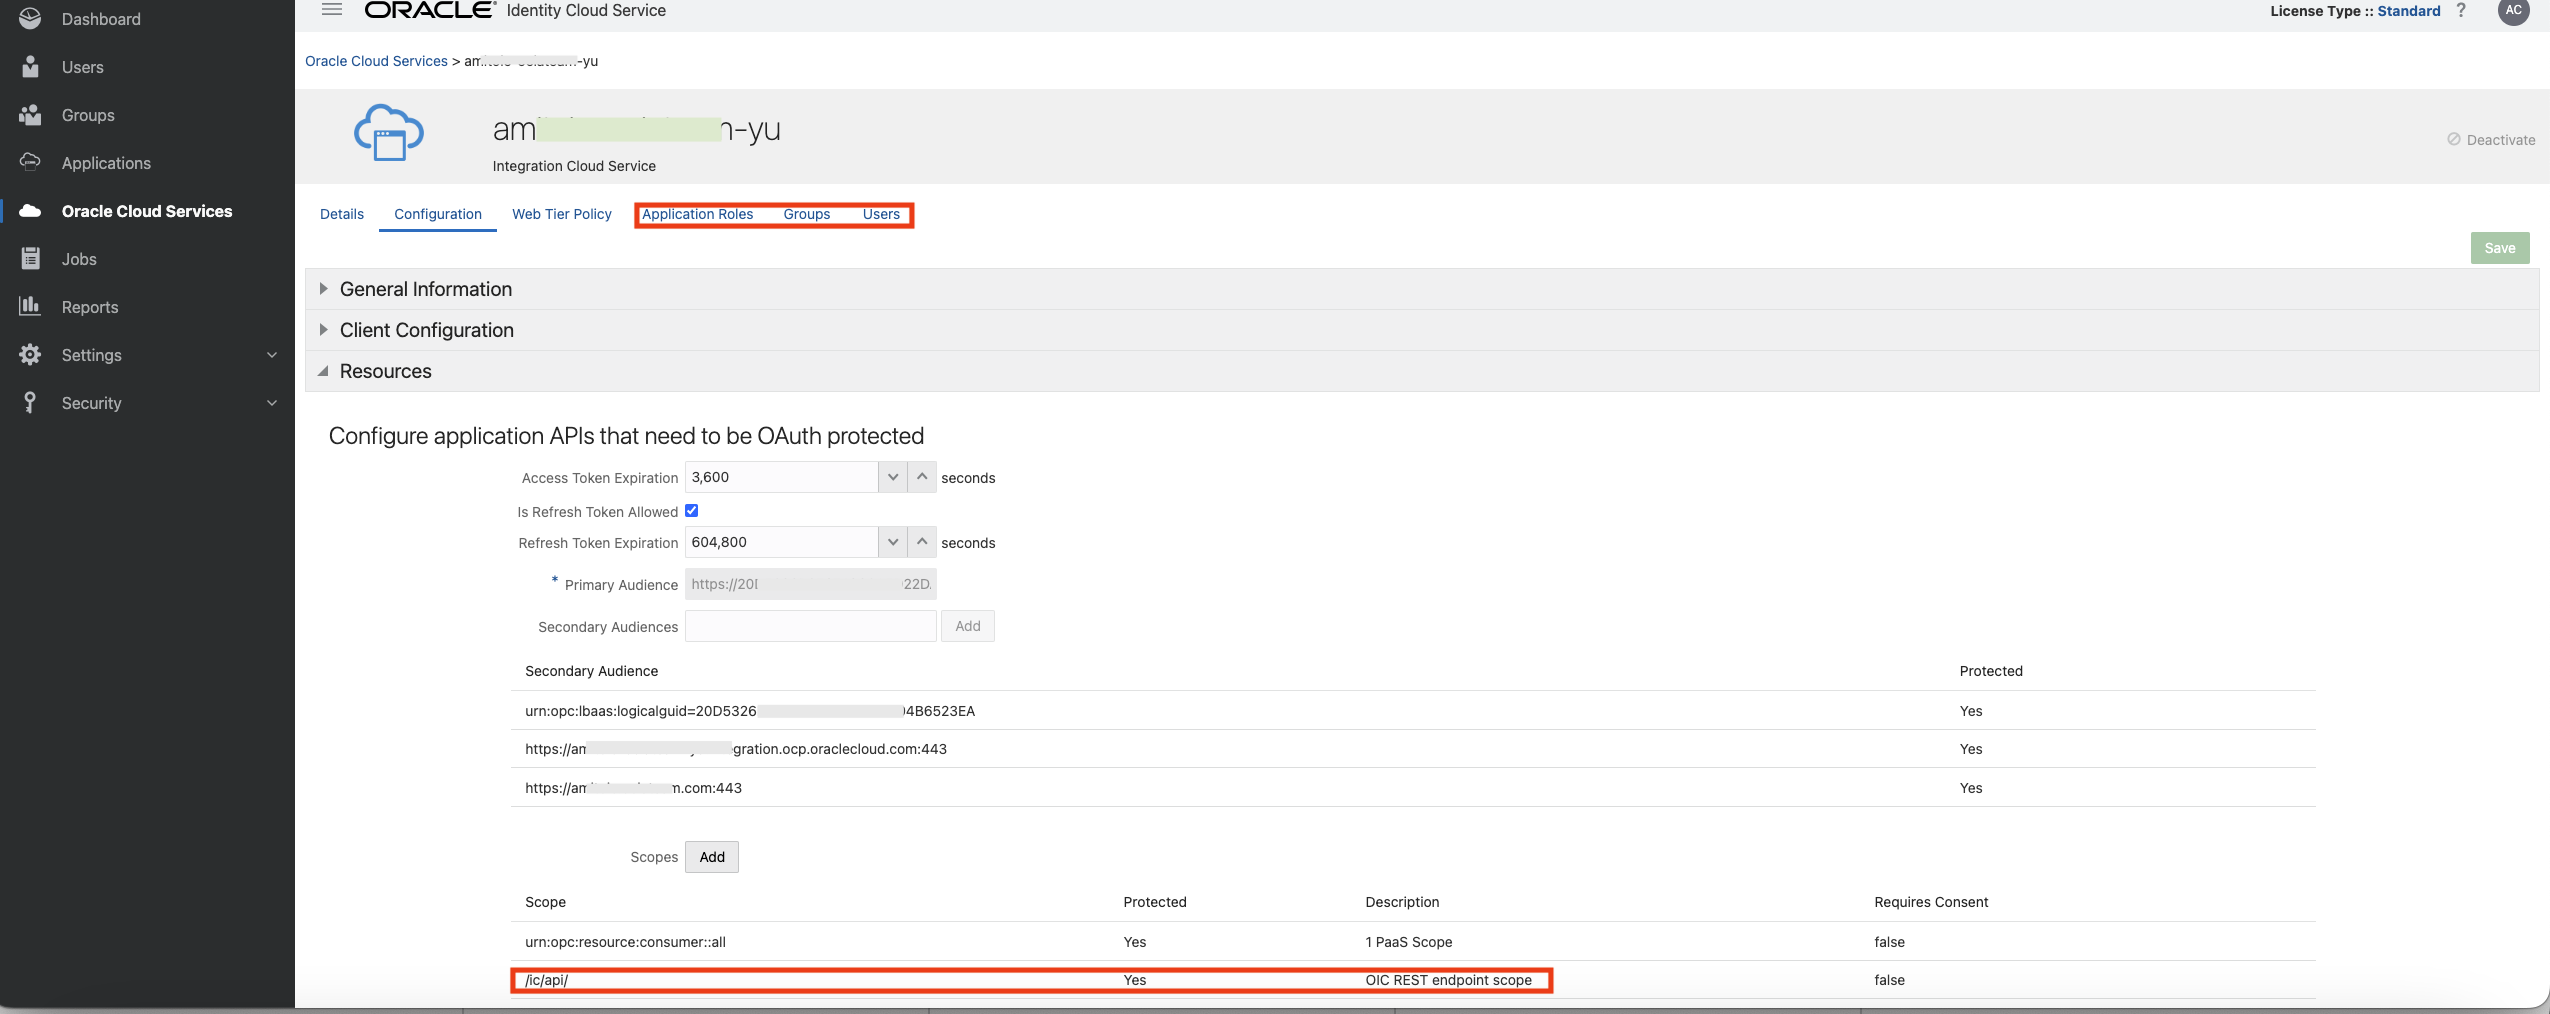
Fig 3
The ‘Resources’ section refers to OIC’s OAuth 2.0 resource server specific configuration. Two points to note in the above figure – i) under Application Roles, I have added my user account with certain role, and ii) the scopes supported by the OIC includes the REST endpoints “/ic/api”.
Next define the client application which will invoke the OIC REST API.
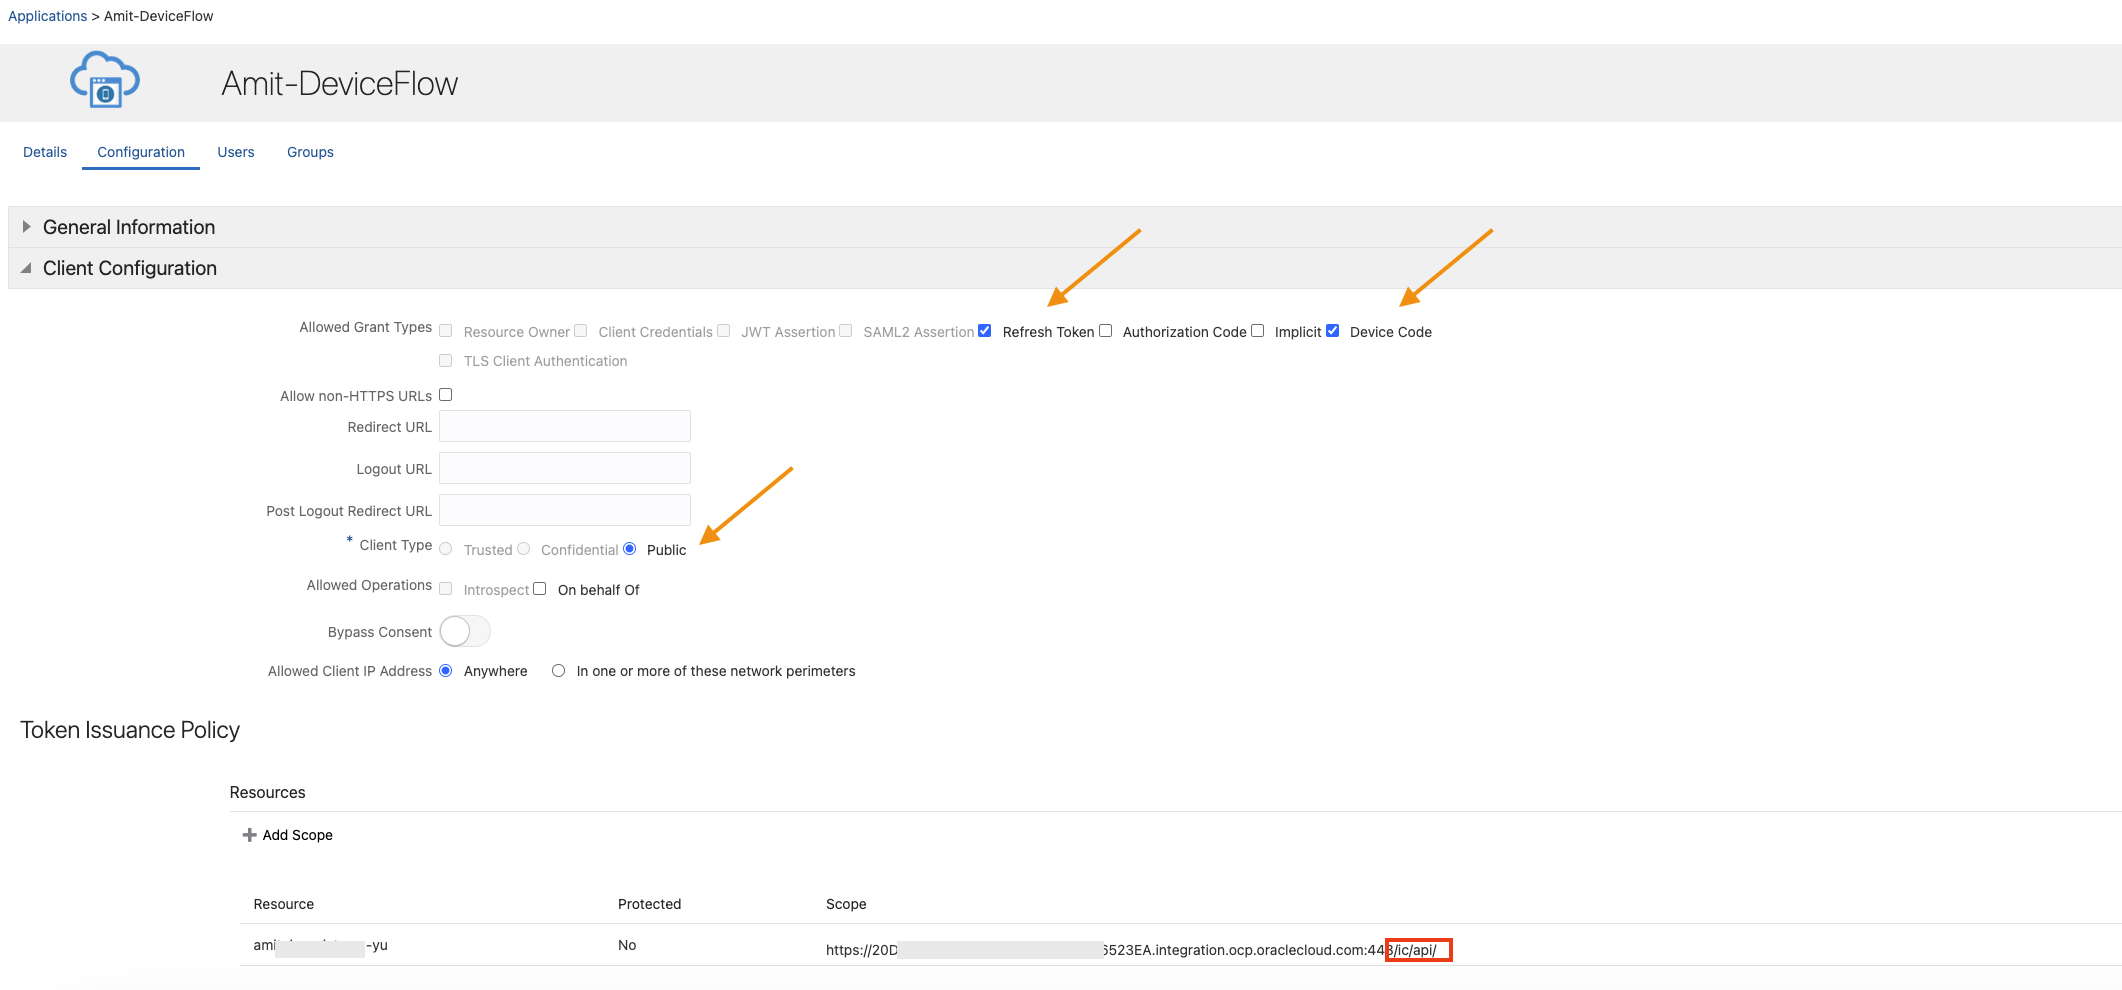
Fig 4
Note that the ‘Client Type’ is ‘Public’ and ‘Refresh Token’ and ‘Device Code’ are selected as grant types. Also, the scope of this application is limited to the scopes of the OIC application.
The Device Flow
The mechanics of the device flow is explained in detail by Chris in his blog post. Follow the steps enumerated in that post, except in ‘Step 1:Get a code’ section, use the following POST data:
| { “response_type”: “device_code”, “scope”: “offline_access https://20D53**************************B6523EA.integration.ocp.oraclecloud.com:443/ic/api/”, “client_id”: 6b173c40d8314c0586beaf8faa5efc5c } |
Fig 5
Note that the scope includes the OIC application scope as defined in Fig 4. Also, the scope includes ‘offline_access’. This will enable OCI IAM to send the refresh token (RT) along with the AT. So why is refresh token needed? Usually AT has a short expiry time. In Fig 3, the AT expiration is set to 1 hr (default value). The application can use the RT (which has longer lifespan) to fetch a new AT while accessing the OIC whenever the AT expires without user involvement.
The AT received is as follows (only few fields are included):
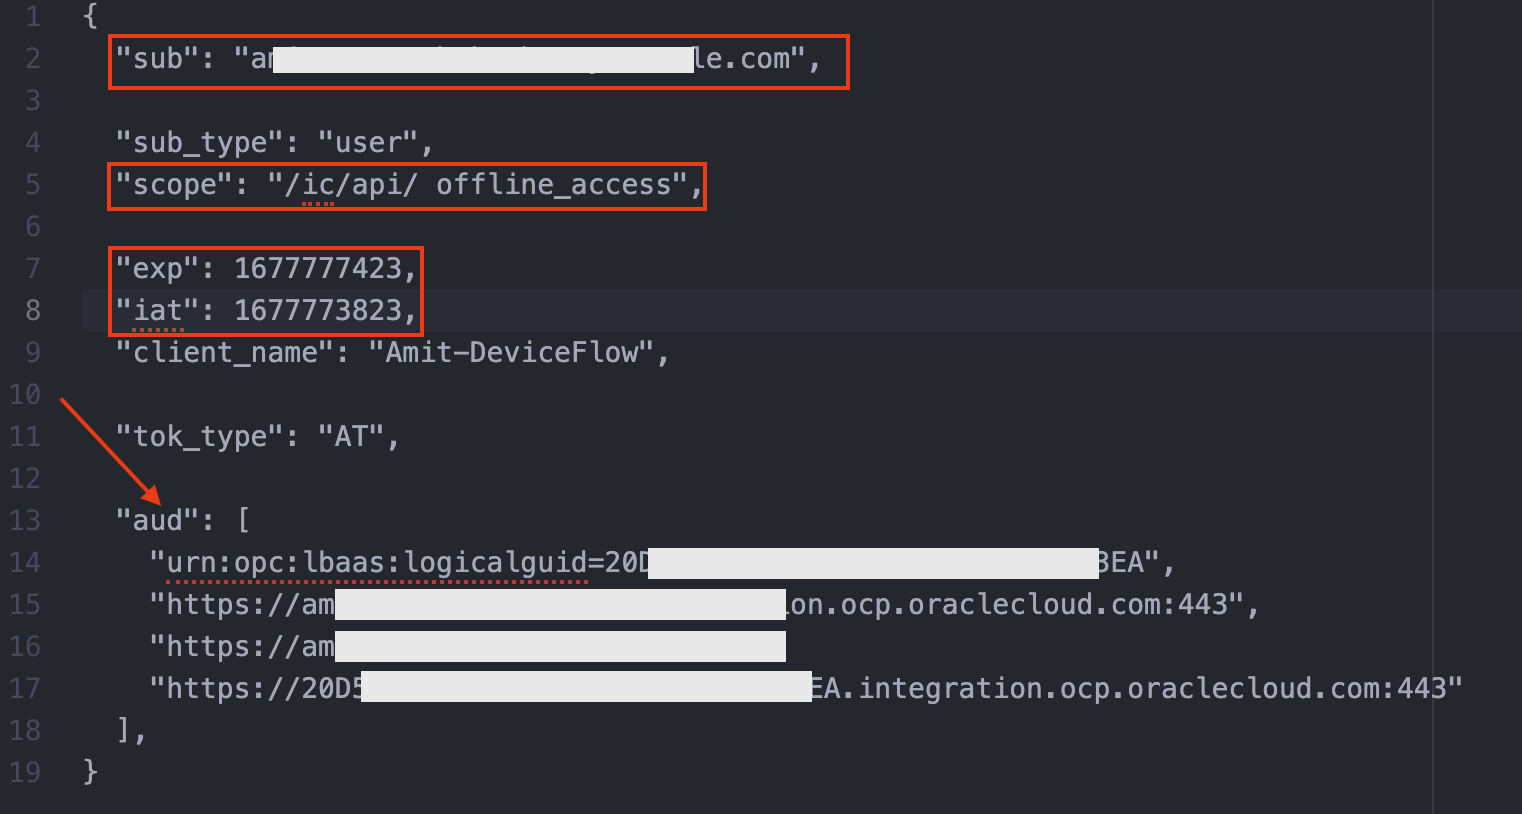
Fig 6
Note that the AT includes the user context in the ‘sub’ field. The AT also includes timestamps ‘iat’ and ‘exp’. The ‘scope’ field includes the scope specified in the application configuration, Fig 4. The audience field ‘aud’ includes the audience as of the OIC resource server, Fig 3.
Once the AT is received, invoke Echo’s REST endpoint using the curl command. The AT is sent in the ‘Authorization’ header.
| curl –location –request GET –insecure -H ‘Accept: application/json’ ‘https://a**********.integration.ocp.oraclecloud.com/ic/api/integration/v1/flows/rest/ECHO/1.0/TestAmit’ –header ‘Authorization: Bearer <Acess-Token-Using-Device-Flow>‘ |
Fig 7
The output will be as follows:
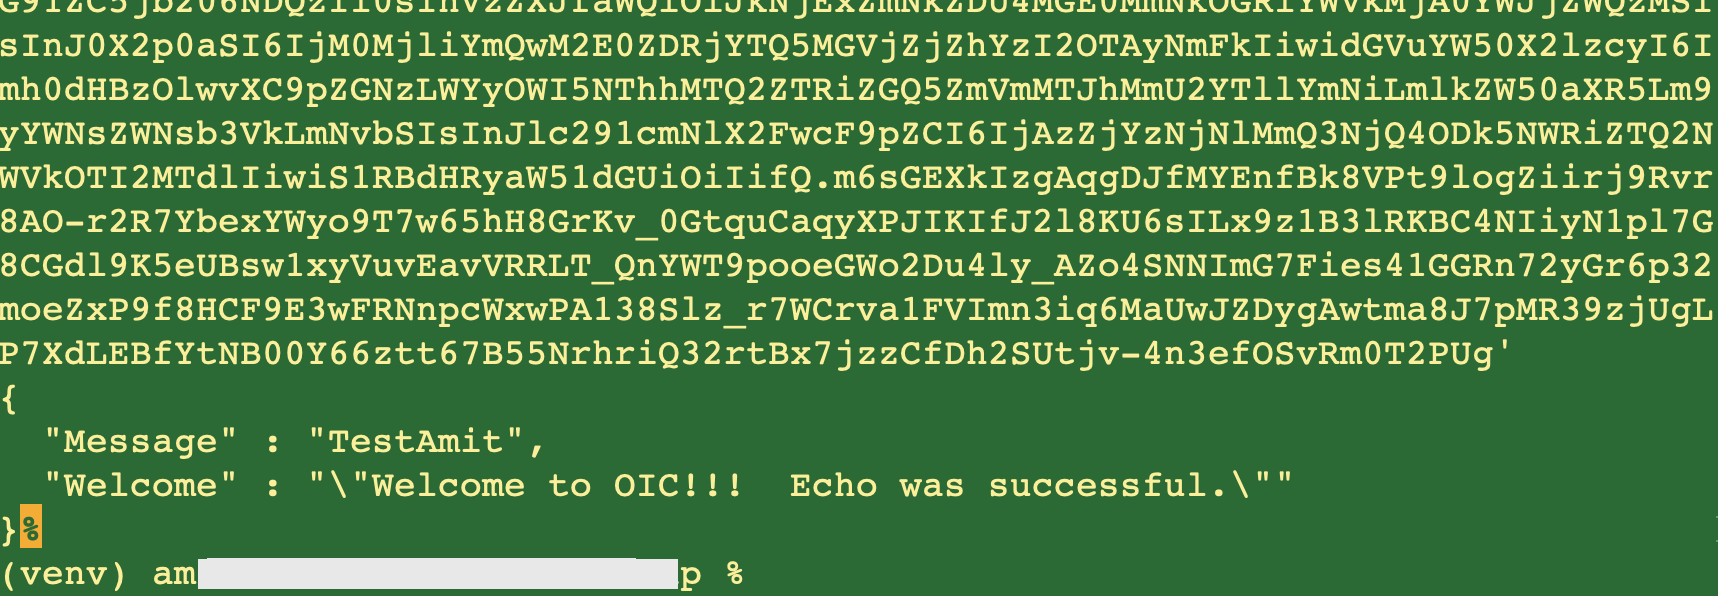
Fig 8
In the above figure notice that the response matches the one while executing the Echo app within the OIC console (Fig 1).
Summary
In this blog post, we used OAuth 2.0 device flow to fetch an AT and used it to invoke the REST endpoint of the sample integration Echo. The device flow is a cleaner and simpler approach in fetching an AT and using it for all REST endpoints of OIC integrations. Hope you enjoyed the post and will use it going forward!