Rclone bills itself as “…a command-line program to manage files on cloud storage.” It is utilized to integrate cloud storage from a variety of different providers, including OCI Object Storage. We are going to use rclone as an intermediary between our linux operating system and Object Storage. Data will be available on both the instance disk as well as our target Object Storage Bucket. This will allow us to combine the best parts of our filesystem and Object Storage, such as the near limitless amount of available storage. Let’s begin!
Create a Compute Instance
We start by creating a compute instance in OCI on a Virtual Cloud Network (VCN) subnet where we have SSH access, either via Internet Gateway or a private channel. This VCN should have a Service Gateway that will allow private access to the Oracle Services Network for the purposes of accessing Object Storage over OCI network fabric. I chose to use Oracle Linux 8 on one of the low-cost ARM shapes for my deployment. You can change the shape depending on your desired chipset, memory, and processing needs.

That didn’t take long. Next, we will need an Object Storage Bucket to write files to.
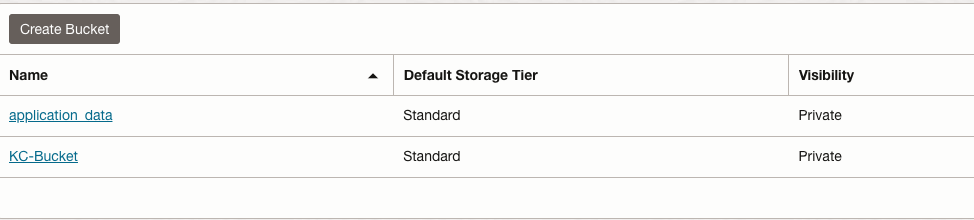
Create an Object Storage Bucket
Create the bucket we want to use to store our data. It should be of type Standard storage. Make sure it’s set to private, unless you want to store everyone else’s data as well.
Next, we need to make sure our pieces can play nicely together. Namely, will we manage permissions for the instance to C(reate) R(ead) U(pdate) D(elete) objects in Object Storage. The answer is using Dyamic Groups to assign our instance an Instance Principal, then write policies to give it the ability to work with our new bucket.
Create a Dynamic Group
We create a dynamic group to bind policies to our instance. In this example, we are using only a single instance, so we identify that instance by OCID (think Oracle Cloud ID). All things in OCI have an OCID, and we find the OCID of our compute instance created earlier, and insert it into the correct spot in our Dynamic Group Rules:
All {instance.id = '<instance_ocid>'}

Next, we bind our Dynamic Group to a set of permissions using a Policy.
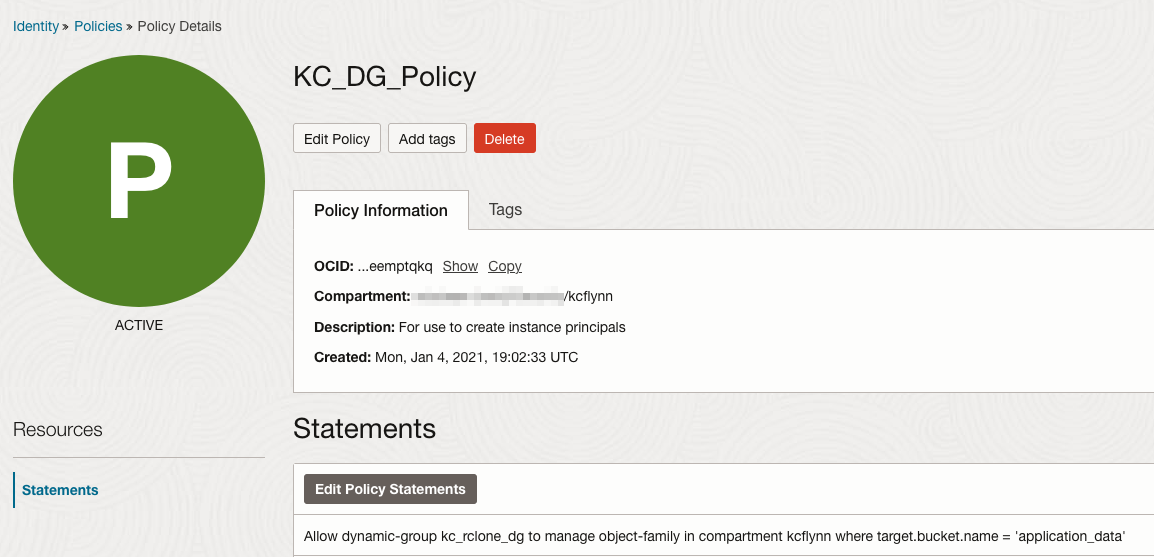
Create a Policy for Object Storage Access
This is where we assign permissions for members of the Dynamic Group we just created. We will create a policy with a statement that allows the instance running rclone to interact with the specific bucket we want to mount. Scoping access to the bucket will allow us to mount the filesystem without the risk of exposing data in other Buckets. Replace the below statement with the name of your dynamic group, compartment where the bucket resides, and bucket name.
Allow dynamic-group <dynamic_group_name> to manage object-family in compartment <compartment_name> where target.bucket.name = '<bucket_name>'
We now have all our pieces in place to make this solution work. Now, we will move from the console and into the terminal.
Installing Packages & Configuration File
We will SSH into our instance using the opc user with sudo access. From there, we will install rclone and fuse using the command:
sudo yum-config-manager --enable ol8_developer && sudo yum install -y rclone fuse fuse3
Next, we will create a conventient symlink to our /usr/bin directory for rclone using the command:
sudo ln -s /usr/bin/rclone /sbin/mount.rclone
Create a directory for rclone at /etc/rclone and user your editor of choice to create an /etc/rclone/rclone.conf file. The file should look something like this (without the comments):

Our profile is titled data in this instance. The type and provider fields should be set to oracleobjectstorage and instance_principal_auth respectively. The other fields are going to depend on your environment.
- Namespace is the Object Storage Namespace for your tenancy. If you don’t know where to find it, check out the docs here
- Compartment is going to be the OCID of the compartment (Found in Identity & Security > Compartments) containing the target Object Storage Bucket
- Region is going to be the OCI Region Identifier of the target bucket
Test the Installation
Now that all our pieces are in place, we will use the rclone mount command to mount the directory locally. Running the following commands will mount the remote filesystem (OCI Object Storage):
Create the mount location like any other directory, for example:
sudo mkdir -p /opt/mnt/application_data
Once our mount location is created:
sudo rclone mount \
    <rclone_profile>:<object_bucket> <mount_location> \
    --allow-other \
    --cache-dir /tmp/rclone/cache \
    --config /etc/rclone/rclone.conf \
    --dir-perms 0770 \
    --file-perms 0660 \
    --log-file /var/log/rclone.log \
    --log-level ERROR \
    --tpslimit 50  \
    --umask 0117 \
    --vfs-cache-mode writes \
    --vfs-fast-fingerprint &
Edit fstab
Next, let’s mount the storage editing our /etc/fstab (mount_location must be an existing directory):
<rclone_profile>:<object_bucket> <mount_location> rclone rw,umask=0117,nofail,_netdev,args2env,config=/etc/rclone/rclone.conf,uid=1000,gid=1000,file_perms=0760,dir_perms=0770,allow_other,vfs_cache_mode=writes,cache_dir=/tmp/rclone/cache 0 0
![]()
Most of these settings are going to be in the rclone mount command that we ran previously, and have the exact same effects. The uid and gid are set to 1000, allowing the opc user to own the files and directories in the mount location. Once your fstab is edited:
sudo mount -av
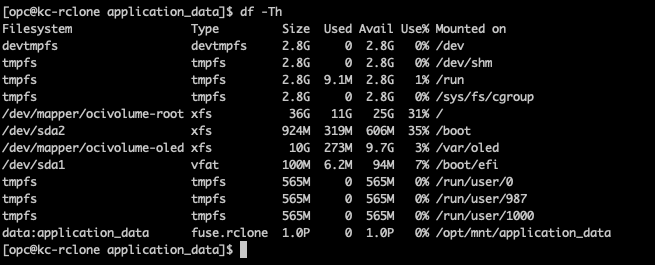
We can run df -Th to look at our new mounted filesystem.
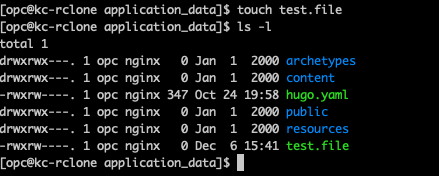
Add Files
Begin adding data and watching it magically appear in the chosen object storage bucket. I added a static site I had been working with as a test:

And checking on our bucket:

Add a new file to the file to our directory:
Watch it appear in our bucket:

Wrapping Up
Rclone is a great tool for bridging the gap between disk storage and cloud storage. Although we are not diving deep into the Rclone configuration options, we have created a small proof of concept allowing us to use cloud storage on our Oracle Linux 8 machine. We now have storage with all the advantages of both a local filesystem and Oracle Object Storage.
For more information on how to use Rclone, check out the Rclone documentation including this excellent tutorial from the Rclone team.