Welcome to the continuation of the blog series where we will configure and test connectivity between a remote client and a server hosted in OCI using OpenVPN. Let’s get right to it!
Here are the steps we will follow to get the configuration instantiated:
0.) Prerequisites
1.) Configure the OpenVPN Server and Client Certificates using EasyRSA
2.) Configure the OpenVPN Server on VyOS
3.) Generate a Client Configuration
4.) Routing and Firewall Configuration for VyOS and OCI
Prerequisites
– Follow the first guide in this series to integrate VyOS into OCI
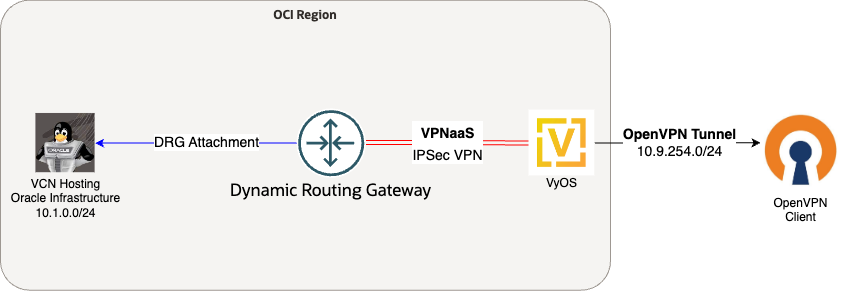
Diagram of Deployment
1.) Configure the Certificates Using EasyRSA
Let’s start with the “harder” part first. We will generate self signed certificates for the OpenVPN server that are necessary for the configuration. The Easy-RSA tool built in to VyOS makes building a certificate simple.
Copy the EasyRSA configuration to a new working directory.
cd /config/easyrsa
Use this one-liner to clean up the example variable file and output the necessary variables we need for this configuration.
Edit the vars file and add the pertinent information using your favorite text editor (nano or vim). Here is what my variable file looked like after modifying the blank values.
set_var EASYRSA_REQ_COUNTRY “US”
set_var EASYRSA_REQ_PROVINCE “North Carolina”
set_var EASYRSA_REQ_CITY “Carolina Beach”
set_var EASYRSA_REQ_ORG “Copyleft Certificate Co”
set_var EASYRSA_REQ_EMAIL “jake@example.net”
set_var EASYRSA_REQ_OU “Oracle Cloud”
set_var EASYRSA_KEY_SIZE 2048
set_var EASYRSA_REQ_CN “OpenVPN”
Run the following commands to generate the OpenVPN keypair
I needed to manual generate the .rnd file with openssl, since EasyRSA did not generate it for me
EasyRSA will reference the vars file where you inserted data. You can just press enter several times to use the variables from this file. Run these commands one at a time.
Copy the cryptography files that EasyRSA generated to a directory accessible to OpenVPN
sudo cp pki/ca.crt /config/auth/openvpn
sudo cp pki/dh.pem /config/auth/openvpn
sudo cp pki/private/vyos_hub.key /config/auth/openvpn
sudo cp pki/issued/vyos_hub.crt /config/auth/openvpn
Now that the OpenVPN server keypair is generated, we can use EasyRSA to build a client keypair. This command builds the client certificate and adds the client “client1” as the CN of the certificate. This command will need to be run for every new client that needs to connect to the OpenVPN server.
2.) Configure the OpenVPN Server on VyOS
Configure the OpenVPN interface
set interfaces openvpn vtun10 local-port 1194
set interfaces openvpn vtun10 persistent-tunnel
set interfaces openvpn vtun10 protocol udp
Configure the route to push to your client (your OCI networks) for split tunneling.
Configure your OpenVPN tunnel network. This should be a unique network, and needs to be advertised by BGP to be reachable. We will configure the BGP portion in the next step.
Set the location of the certificate files you created earlier.
set interfaces openvpn vtun10 tls cert-file /config/auth/openvpn/vyos_hub.crt
set interfaces openvpn vtun10 tls key-file /config/auth/openvpn/vyos_hub.key
set interfaces openvpn vtun10 tls dh-file /config/auth/openvpn/dh.pem
I created an OVPN configuration template on VyOS so that I can download it to the client with the keypair bundle and added this to the PKI folder of VyOS so I can download it with the rest of the cryptography files to the client. You will see this named main.ovpn. For each client, the cert and key file will need to be updated with the correct name.
proto udp
remote-cert-tls server
verb 2
dev tun0
cert client.crt <—-this file name needs to match what the client downloads
key client.key <—-this file name needs to match what the client downloads
ca ca.crt
remote PUBLIC_IP_OF_VYOS 1194
Copy the ca.crt, client.crt, client.key and main.ovpn file you created. I’m using SCP to securely copy this to my client, but this might differ for you. There are sensitive details in this file bundle. Make sure to copy these over a secure connection.
I needed to change “client.crt” to “client1.crt” and “client.key” to “client1.key” on the client machines OVPN config file. Afterwards, the OVPN configuration should be able to load into the OVPN client.
4.) Routing and Firewall Configuration for VyOS and OCI
Advertise the OpenVPN tunnel network via BGP in VyOS
Within OCI, configure the following:
– Allow “UDP/1194” on the associated security list or network security group for VyOS
– Configure a static route in the VCN route table towards the DRG for 10.9.254.0/24 if you are not using the DRG as a default gateway
Verification and Testing
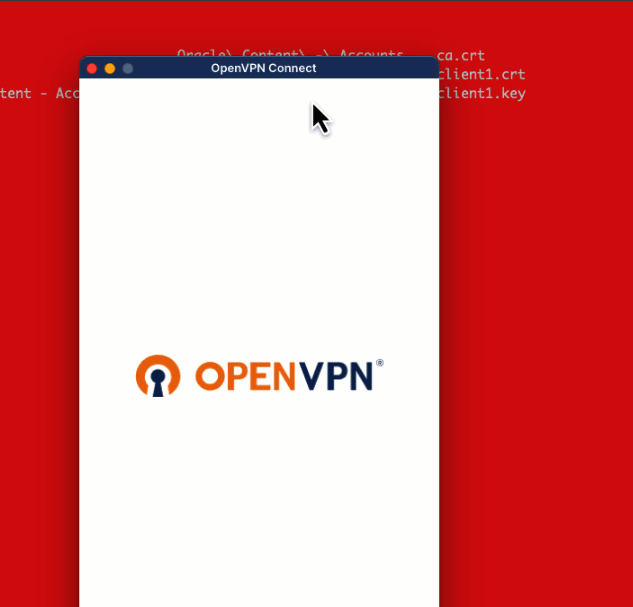
Let’s push the main.ovpn file to the OpenVPN client, and make sure that the client can connect to the OpenVPN server we just created.
Once the client is connected, you should be able to reach the OCI subnet with your client!

I performed some quick tests over the OpenVPN network, and I’m getting good results for single client, single stream performance.
[opc@super-oracle-instance ~]$ iperf3 -c 10.9.254.6 -bidir
Connecting to host 10.9.254.6, port 5201
– – – – – – – – – – – – – – – – – – – – – – – – –
[ ID] Interval Transfer Bitrate Retr
[ 5] 0.00-10.00 sec 219 MBytes 184 Mbits/sec 74 sender
[ 5] 0.00-10.03 sec 217 MBytes 181 Mbits/sec receiver
Final Thoughts
I hope you found the OpenVPN deployment was useful! Reference the Connecting to Oracle Cloud using VPNs blog series to get more information on how to integrate VyOS with OCI, and additional considerations.
