
Introduction
If you have been following recent OCI press releases, you have likely come across the availability of Oracle Database Service for Azure (OSDA). This is an exciting, collaborative partnership with Microsoft that serves as a momentum shift towards multi-cloud adoption and interoperability. If you have not already, I would encourage reading up on that new capability – because this blog is not about that at all. With that said, this blog aims at highlighting another strategic integration between both cloud service providers – that being the enhancements of Database Security for Applications leveraging Azure EntraID OAuth2 tokens.
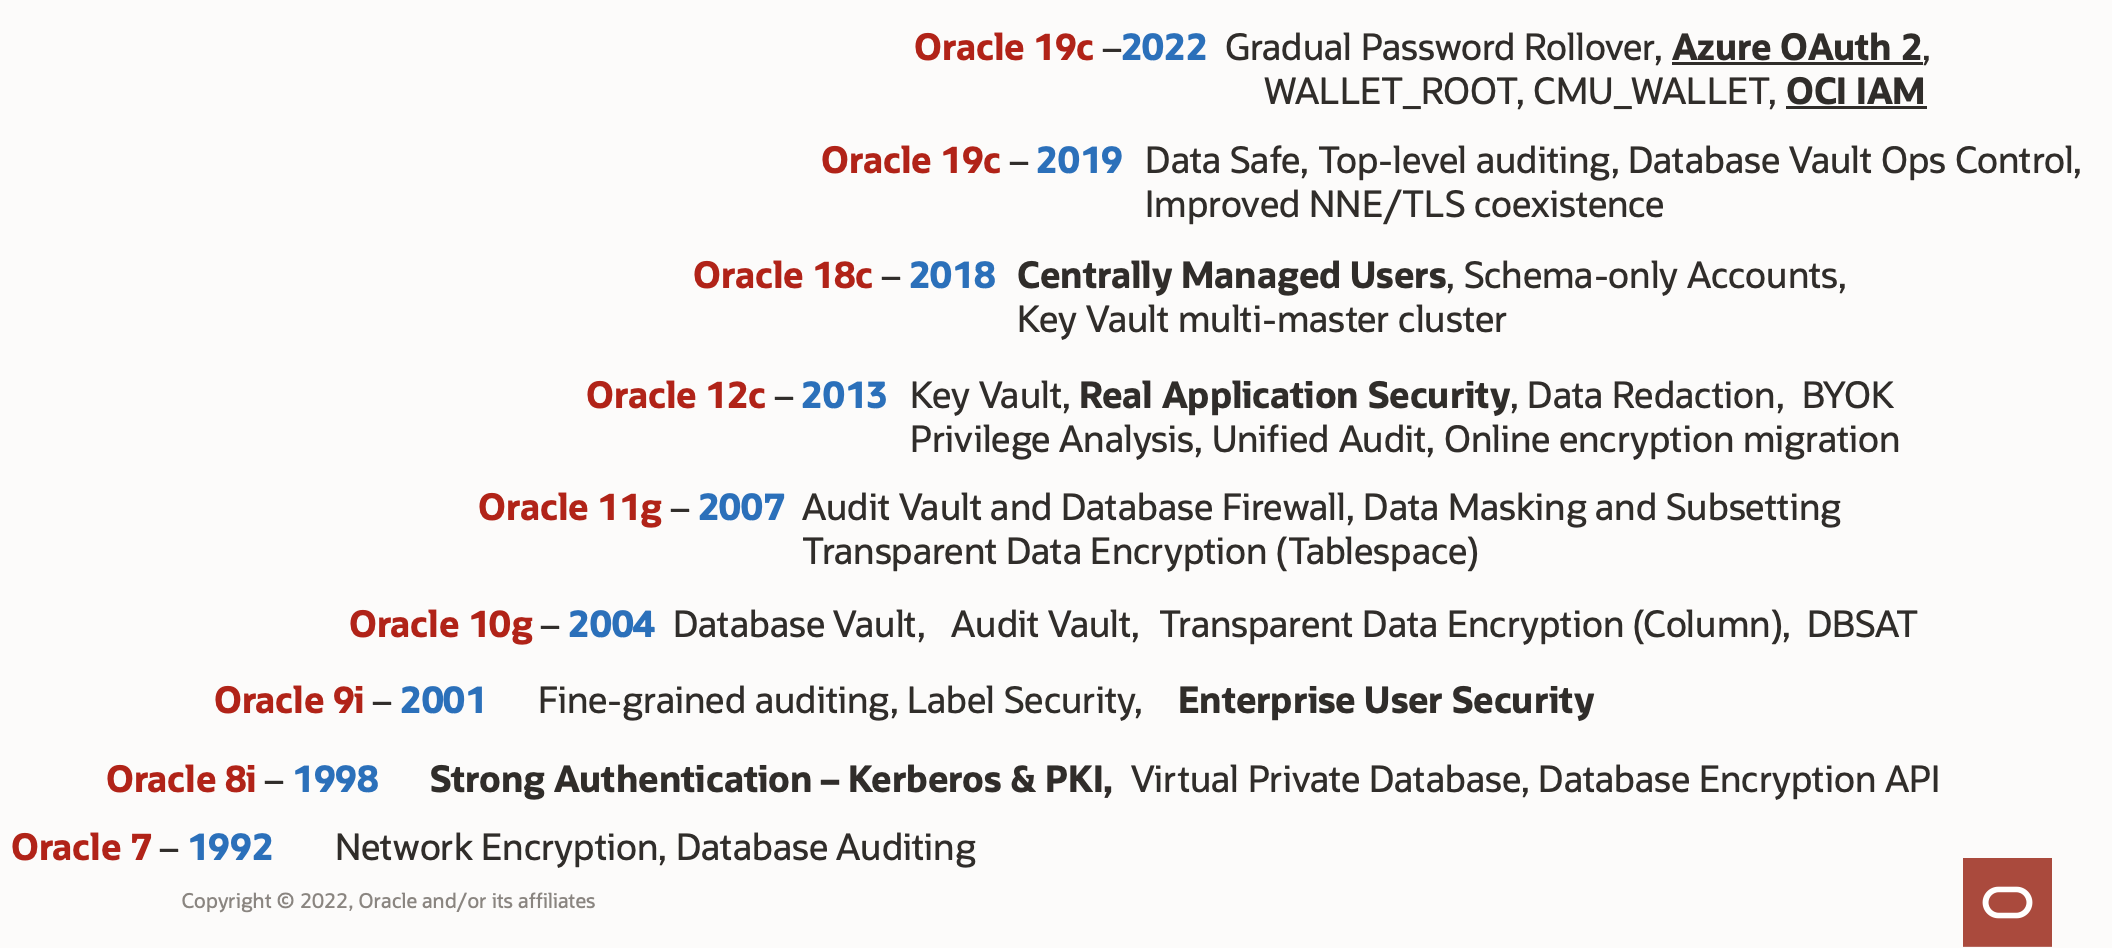
First, let’s understand why the adoption of Azure and OCI IAM OAuth2 tokens as a credential is so important. To do that, we have to take a look into how the Oracle database security has progressed over the years through an Identity and Access Management lens. Over the years, the Oracle database has incorporated various standards-based authentication protocols and patterns. Still to this day, Kerberos, PKI and RADIUS still are widely adopted protocols used for secure authentication for database users across the enterprise. Now with the adoption of OCI IAM and Azure EntraID tokens, the database adds a new modern protocol – OAuth2. This post is not to overcast any shadow on the extensive security enhancements that have been developed over the past 3 decades. It is intended to highlight the continuous investment which allows the Oracle database to be a north star for best-in-class data security and protection.
Why is identity propagation important?
So, what’s the big deal? Two words – Identity Propagation. If we take a common architecture that most security practitioners have been trying stay in front of since the resurrection of client-side applications, then you can relate to the challenges of identity propagation for a 3-tiered application. One of the most prominent design considerations is to first solve how propagation of the authenticated user is preserved from the Application, to the Service Layer, and then finally to the Data Layer – all without relying a single overly privileged service account.
The main reason that you want your database queries to execute as the originally logged-in user, as opposed to a service account, is Authorization. To ensure a user is only able to see or modify data that they are authorized would generally require the user to be authenticated directly to the database. Moreover, the best place to enforce data security and prevent data leakage – is going to occur nearest to the data – aka the bullseye. In order to achieve that, you will need the preserve the identity of the original caller, as well as ensure that there is not a way to override the call with another username prior to invoking the database. Fortunately, Oracle database has solved that problem long ago – since the 9i days – with a feature known as Proxy Users. In short – Proxy Users allows your service to connect to the database using a service principal that has least-privilege access such as CONNECT, then asserts the application user to the databased which assumes the user roles and privileges.
Now, within 19c for Autonomous Database – we can now use the same Identity Provider (in this case Azure) to authenticate the users from the front-end application and preserve that token through the entire call stack. Not only does this enhancement afford itself to a stronger security pattern – it also makes development and operations easier. Gone are the days of maintaining using service account credentials, storing those credentials in a Secrets Vault, or having to rotate those credentials to ensure compliance. The demonstration and setup that I will cover below is illustrated in the following diagram.
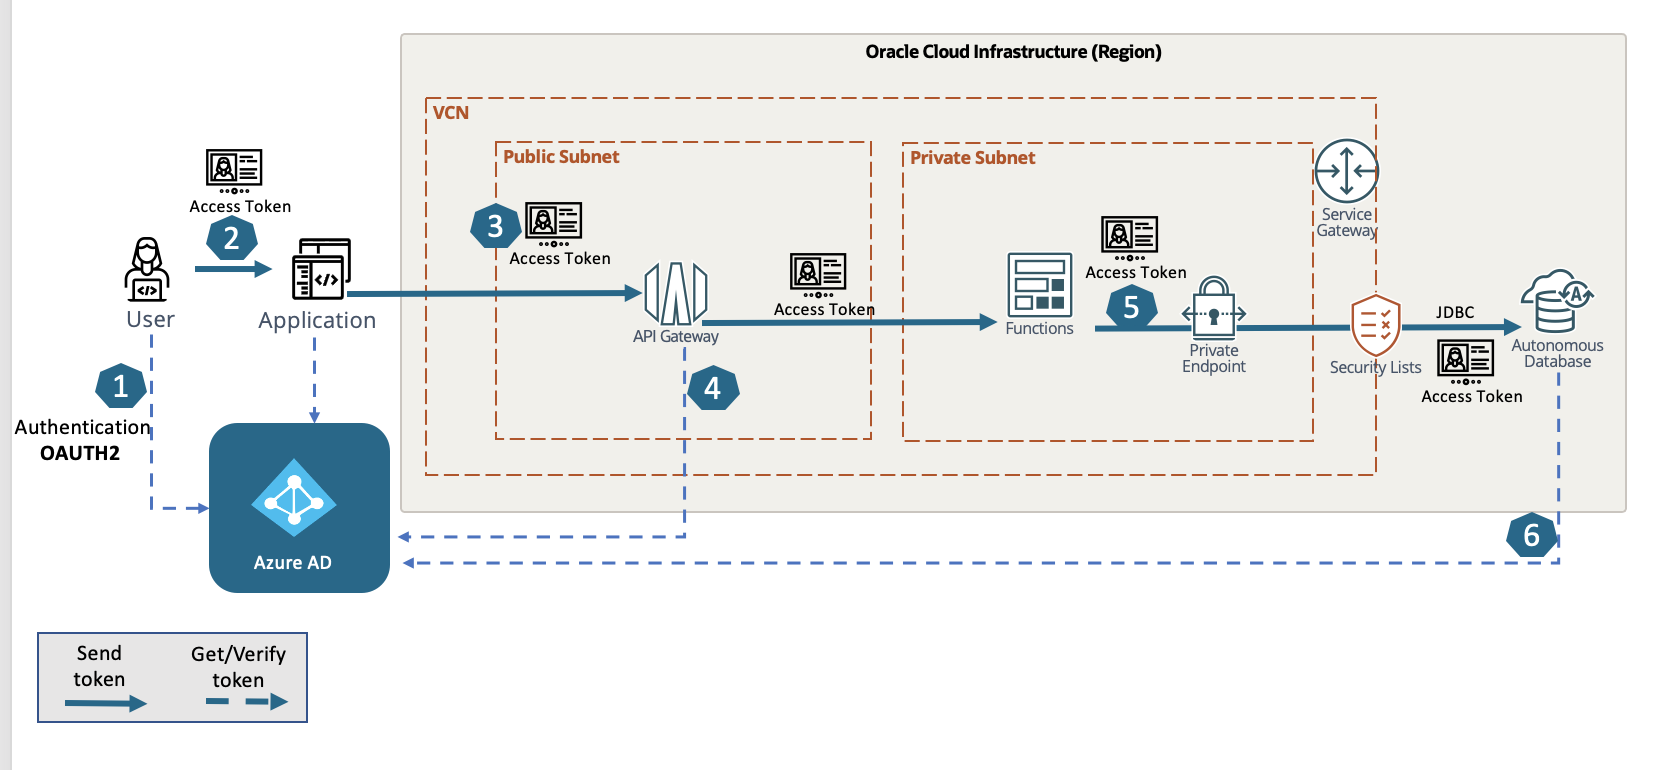
1.) User accesses an application that is integrated with Azure EntraID as a Authorization Server that invokes an OAuth2 flow – preferably the AuthCode Flow for best security practices. This establishes a user session and grants the access_token.
2.) The application receives the access_token and ensures validity – and optionally can authorize the call to proceed to the API service running in OCI.
3.) The application then issues the service call to the API Gateway to process, passing the access_token along with the payload.
4.) Optionally – the API gateway can use an authorizer function to verify that the user is rightfully authenticated and possess the necessary privileges to proceed.
(For this scenario, it is pass through to the function – here is an article explaining that)
5.) Function accepts the access_token and proceeds to use the latest JDBC libraries to issue a sql call to the autonomous database private endpoint using the One-Way TLS connection string.
6.) ADB accepts the access_token, but needs to verify the authenticity of the token before accepting the UserPrincipal and Role claims. Upon validation – the user session is established with the User Schema – and maps the role claims to the Global Roles in the database.
Demonstration Overview
The Database Security product management team has published a step-by-step video walking through the steps to configure Azure EntraID, along with a wealth of useful information that covers the use case that I will be demonstrating in this post – located here. Highly recommend watching.
The following proof-of-concept builds upon the information delivered in the video, and is intended to highlight the use of JDBC and application applicability. I’ll take opportunity to say that the POC was built using only native tooling and services available within the OCI console – with the exception of the Azure EntraID, of course.
In OCI – you’ll need some familiarity with these tools – but have included other blog posts if you find yourself using a new service.
- SQLDeveloperWeb – OCI based SQL client that
- OCI CodeEditor – OCI, web-based IDE used for deploying and editing code – integrates with CloudShell
- OCI Functions – know how to build, deploy a function – in particular with Java
- OCI API Gateway – configuring a simple Route Deployment to call a backend function
- Autonomous Transaction Processing Database (ADB)
Configuring Azure EntraID for the ADB Instance
In the Azure EntraID portal, you will first create an App registrations –
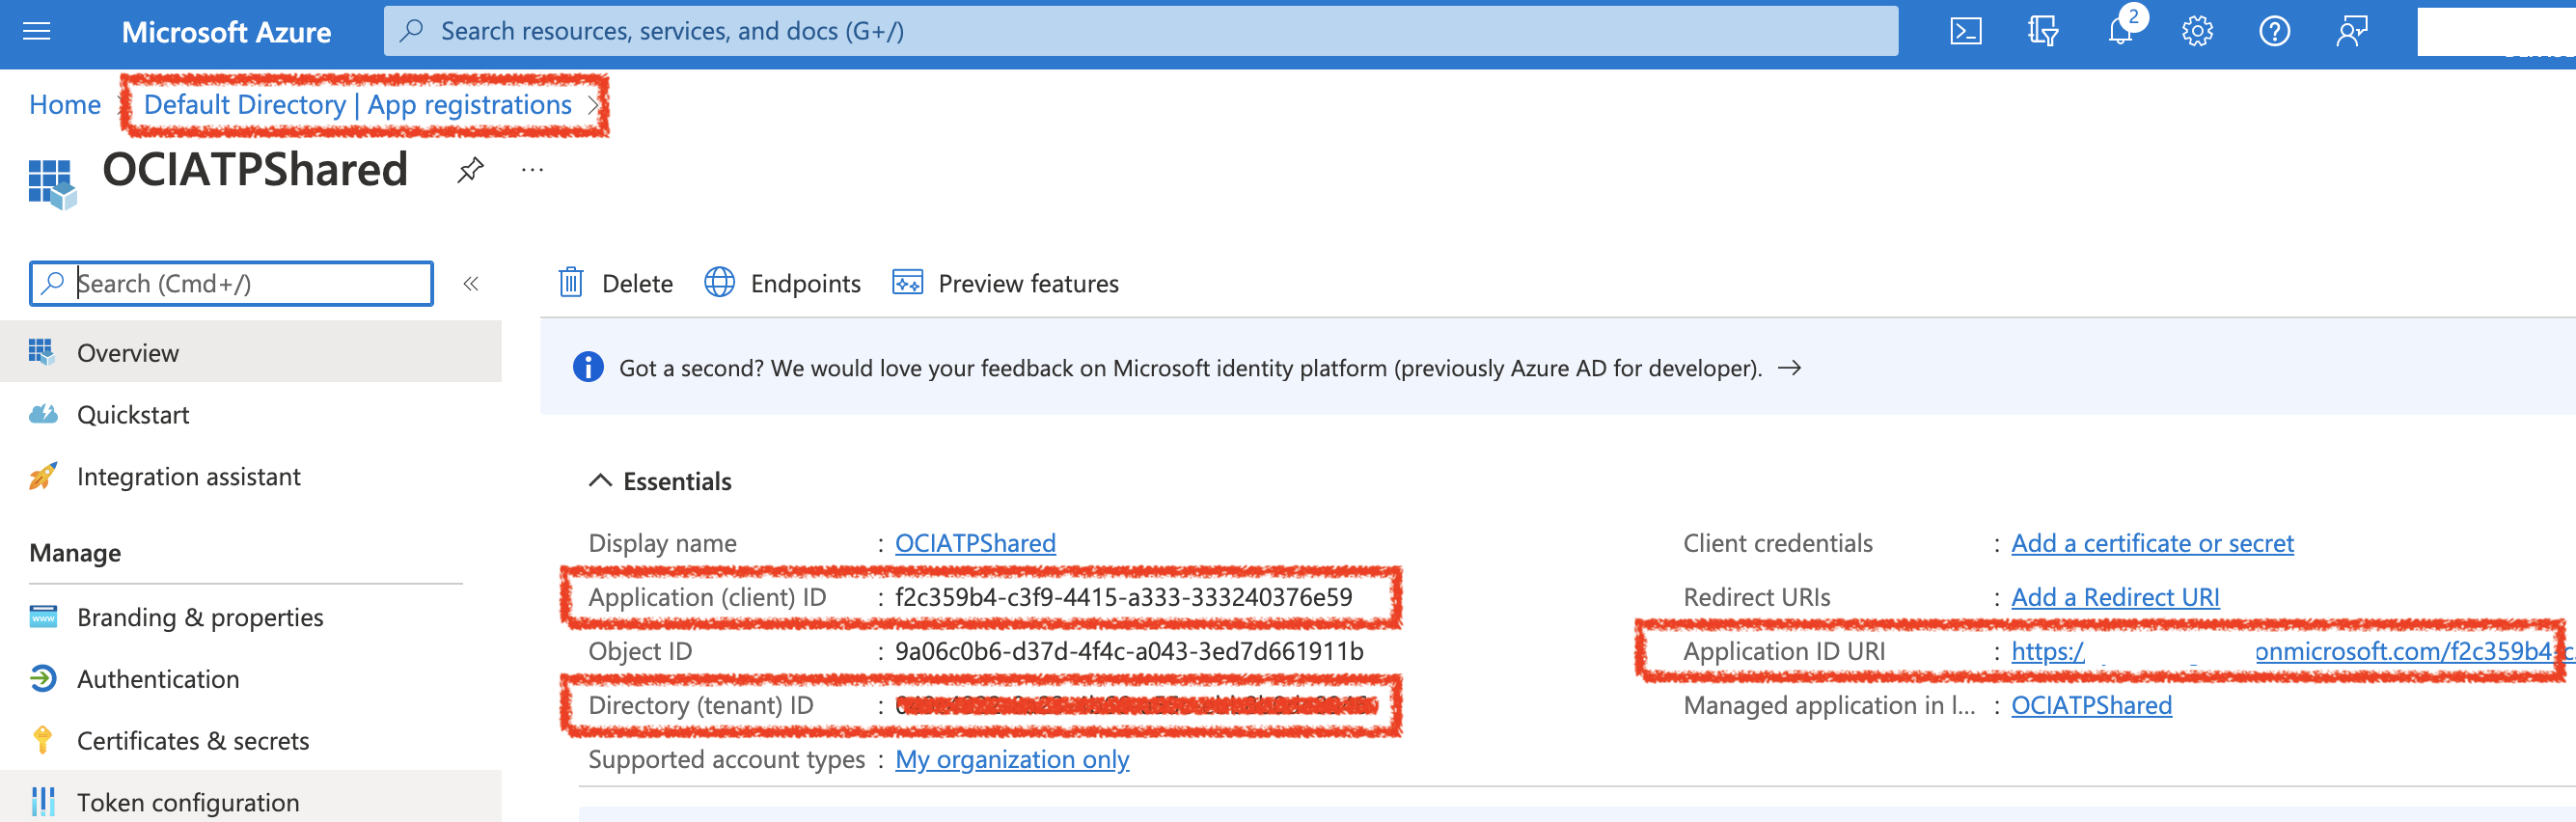
Once the basic App Registration is completed – you will need to specify the App ID URI (seen below) – which will be used later in the Database configuration. When finished, your app registration Overiew page should look as above.
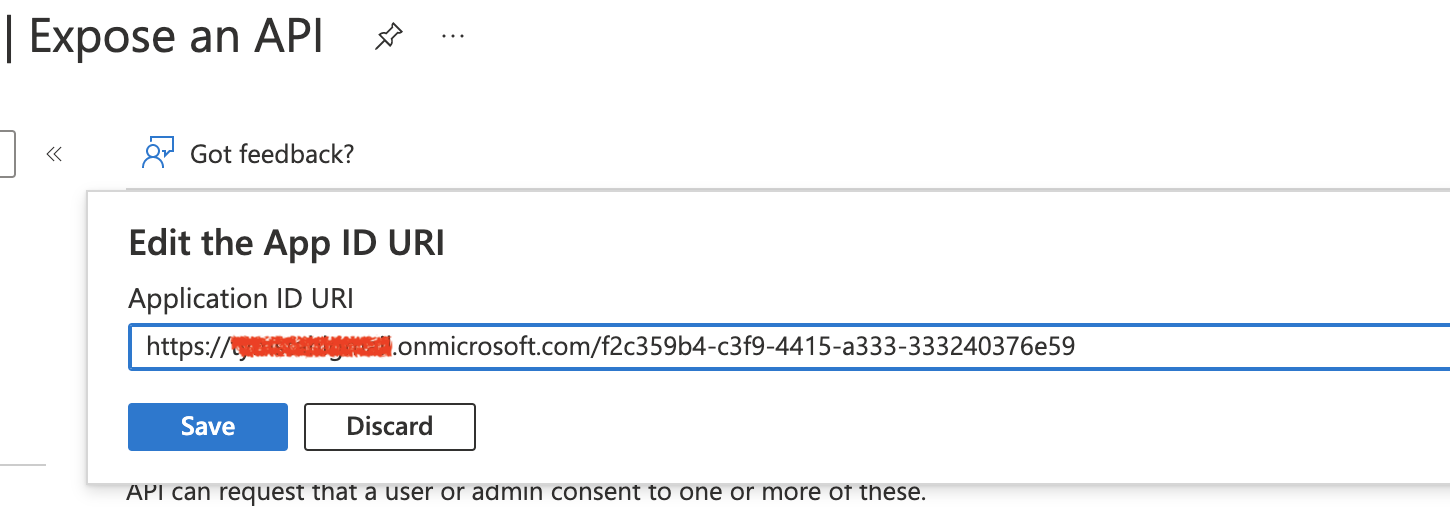
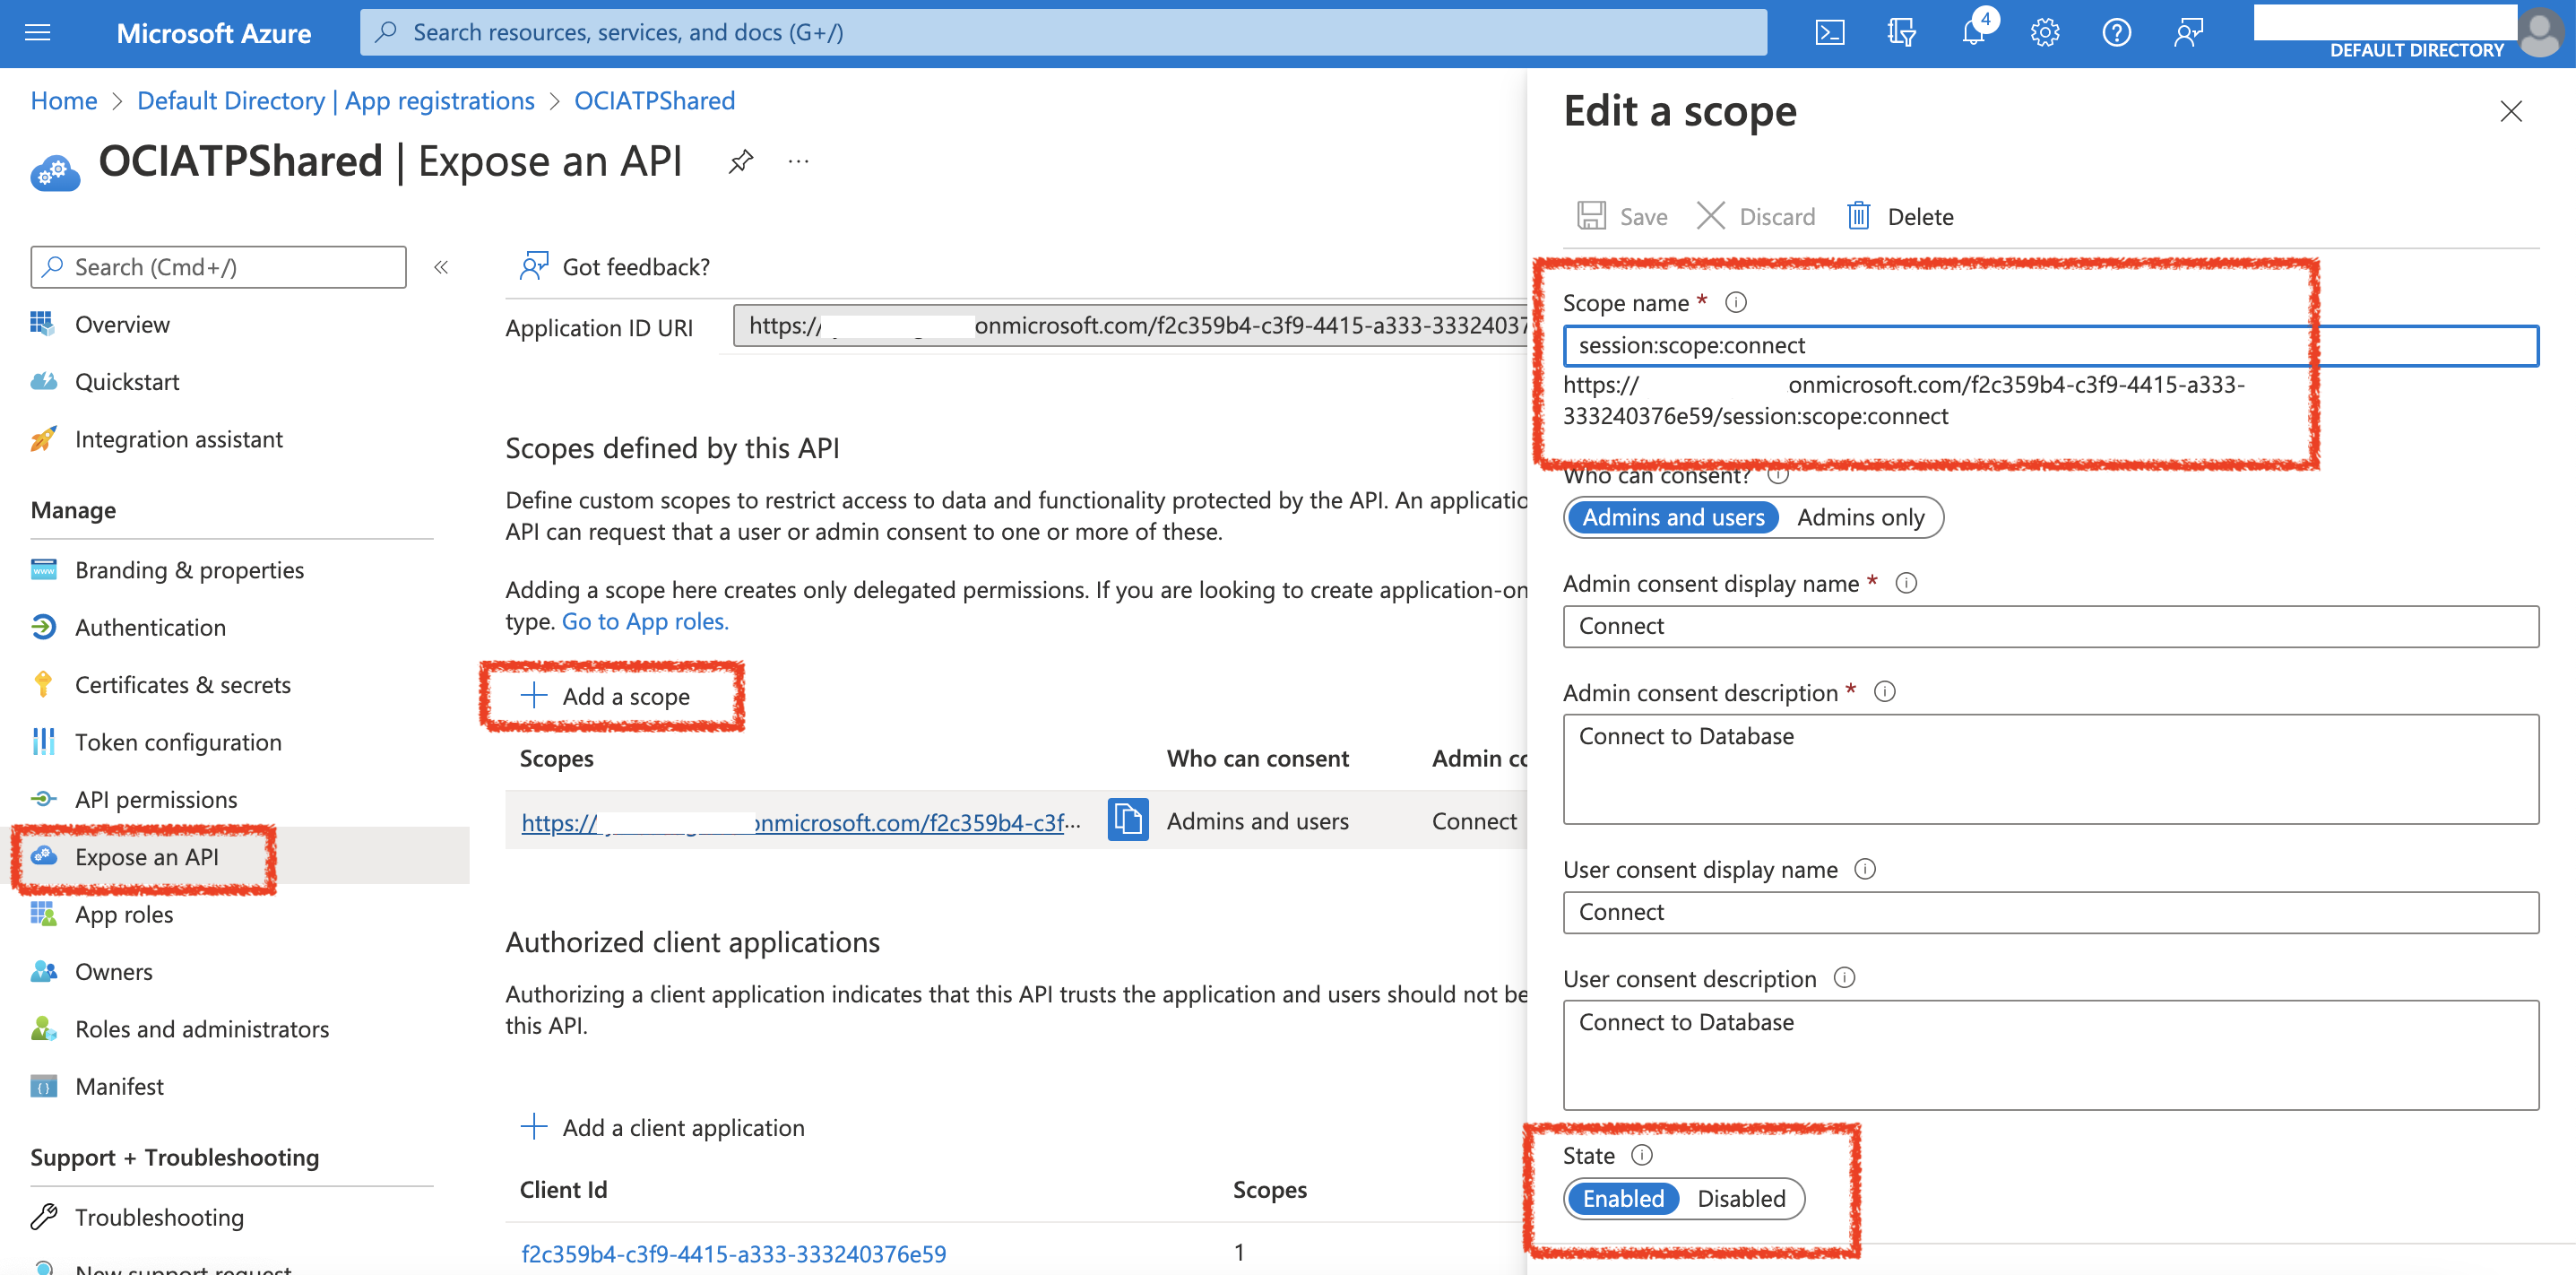
Next, you will need to create the Scope by selecting Expose an API – then supplying the value: session:scope:connect
Ensure that ‘Admins and Users’ toggle is selected and Enabled.
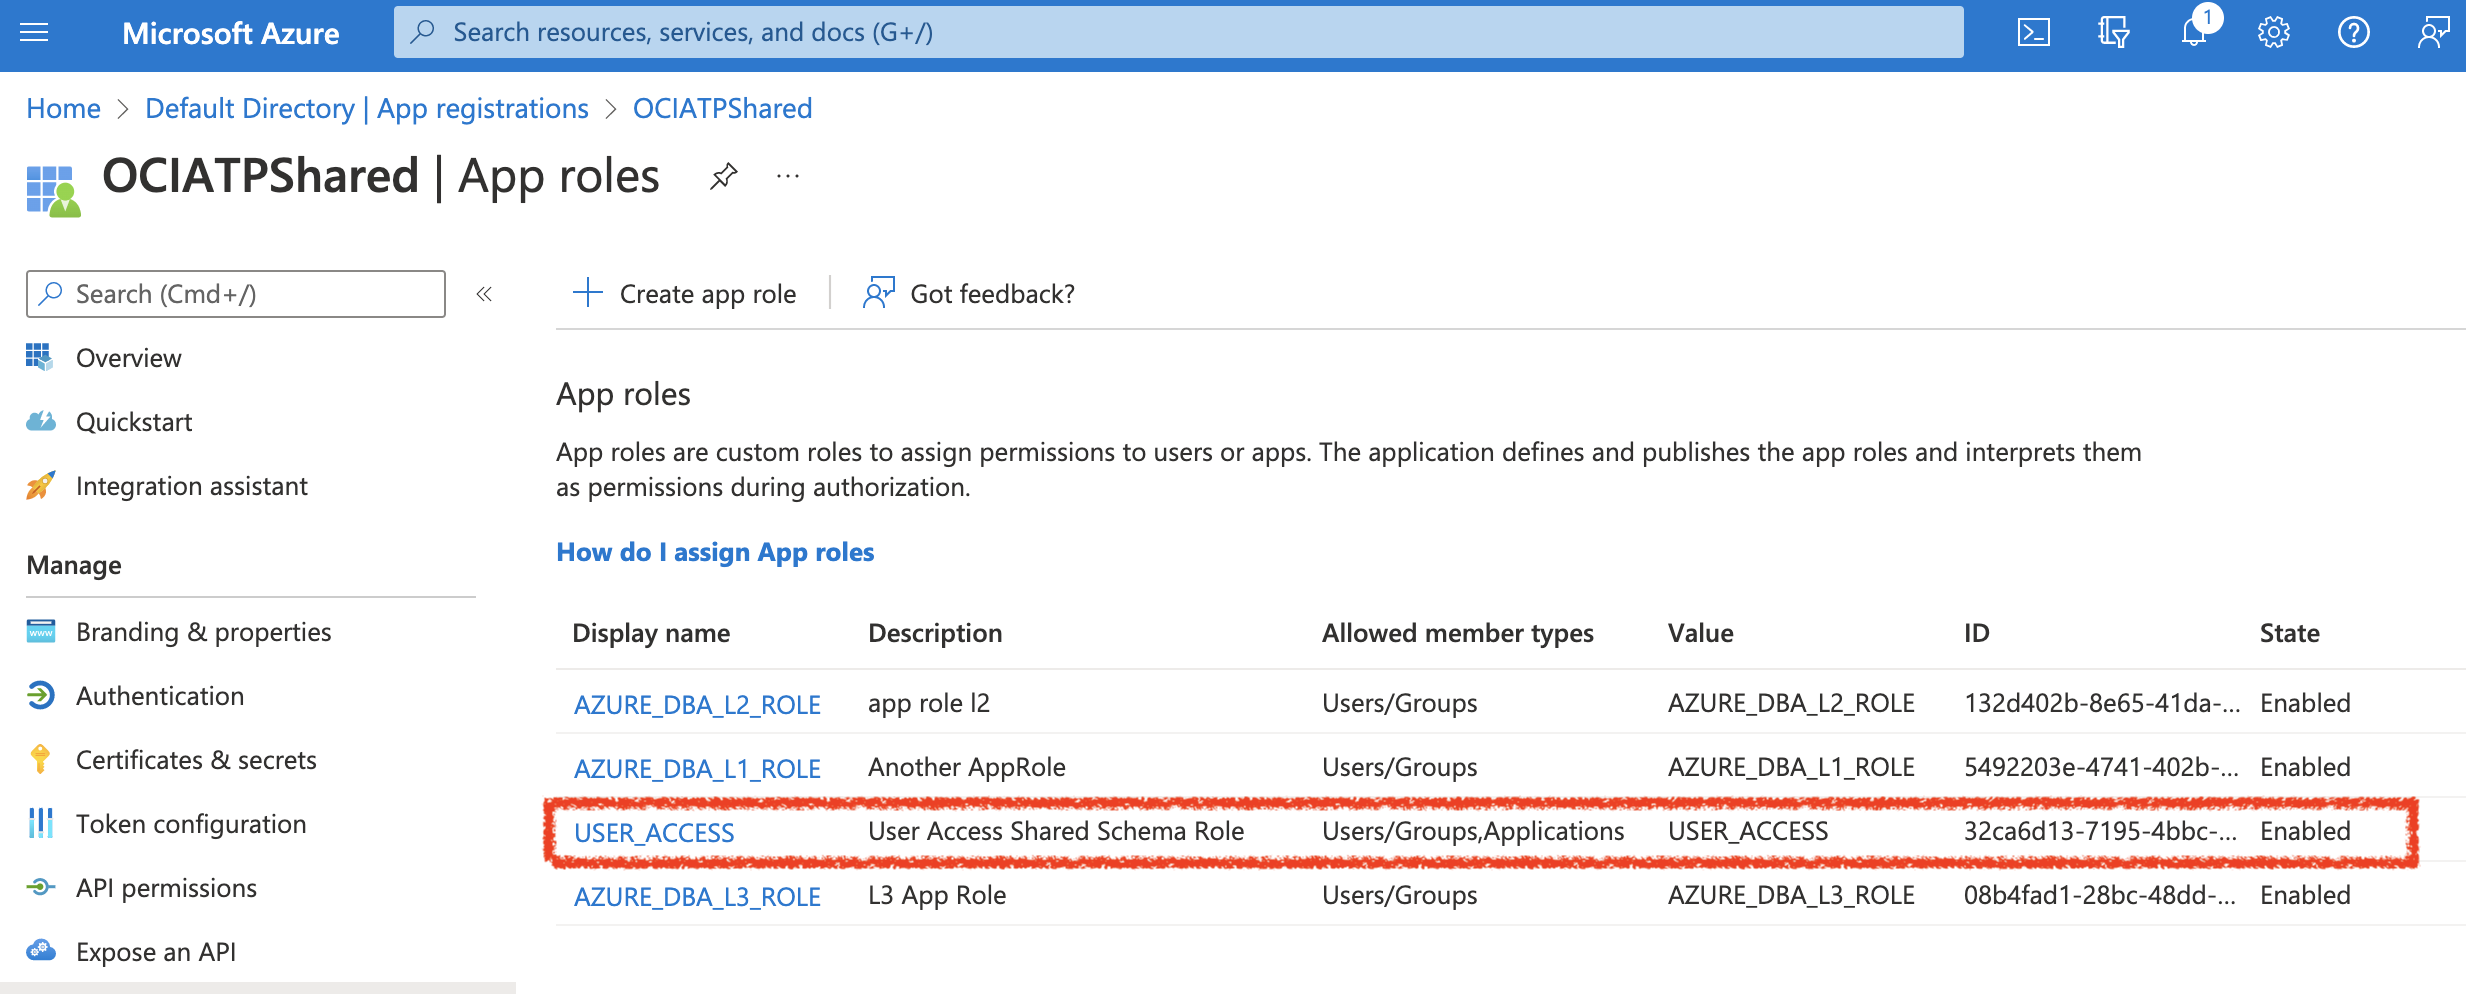
Now, you will create some App Roles. Specifcally, I created the USER_ACCESS role which is what will be used to request the scope that is needed to authorize the database connect.
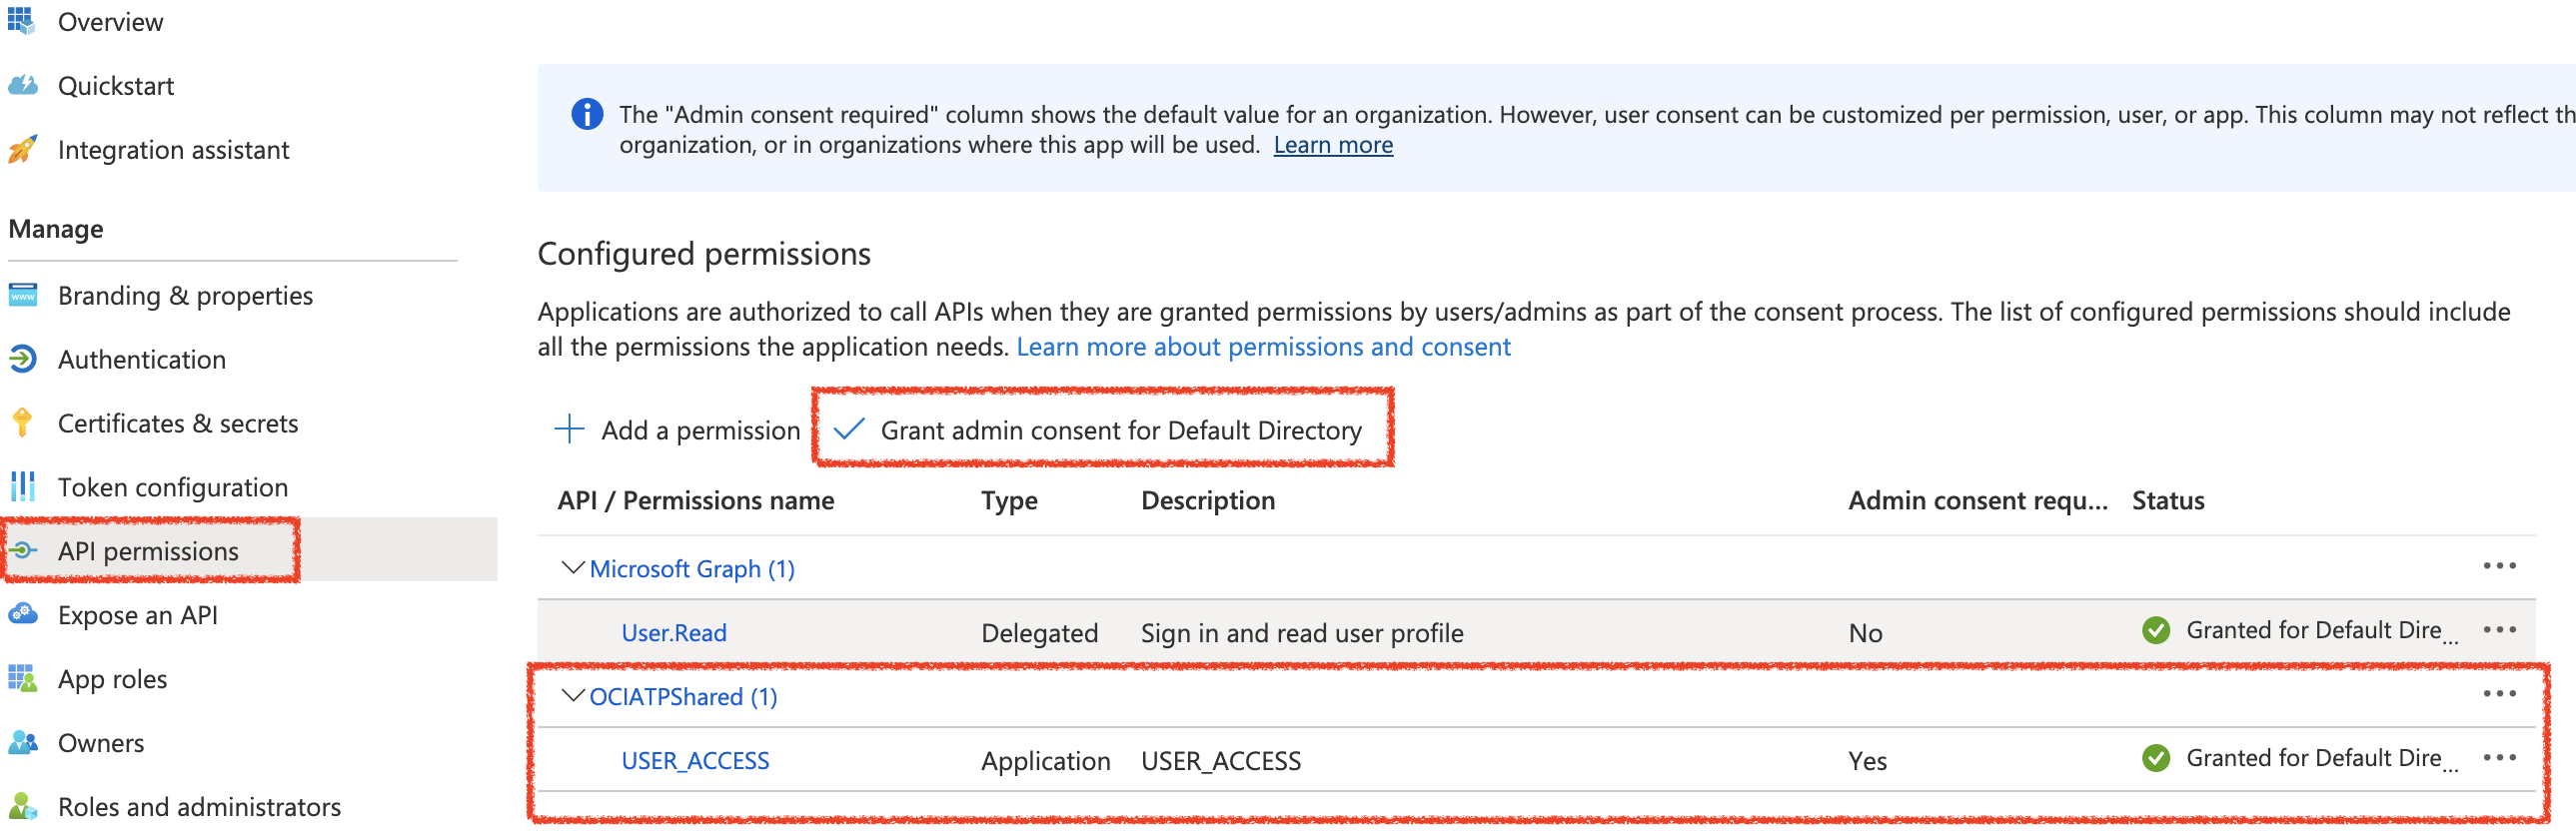
Then, you will create API Permissions for the App Role by selecting:
API Permissions => Add Permission => Select Your Application Name (OCIATPShared) => Next
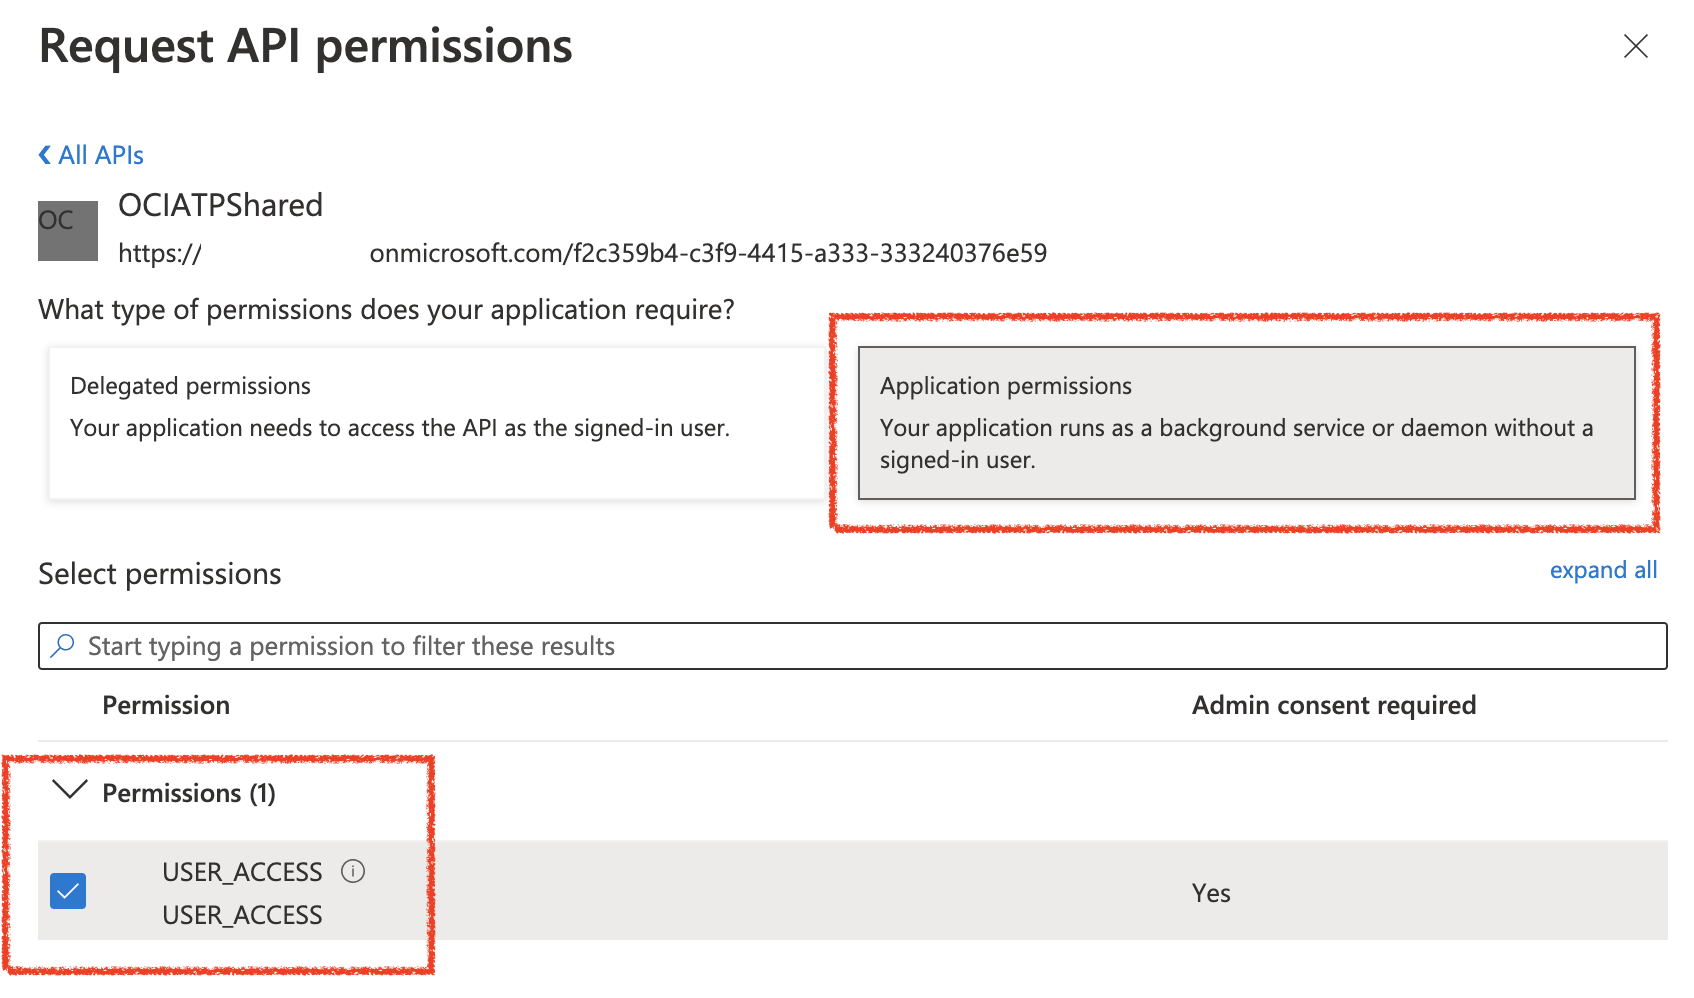
Here, you will select the USER_ACCESS permission – then “Add Permission”. (below image)
Your API Permissions should look like the above image – and simply click “Grant admin consent for Default Directory”
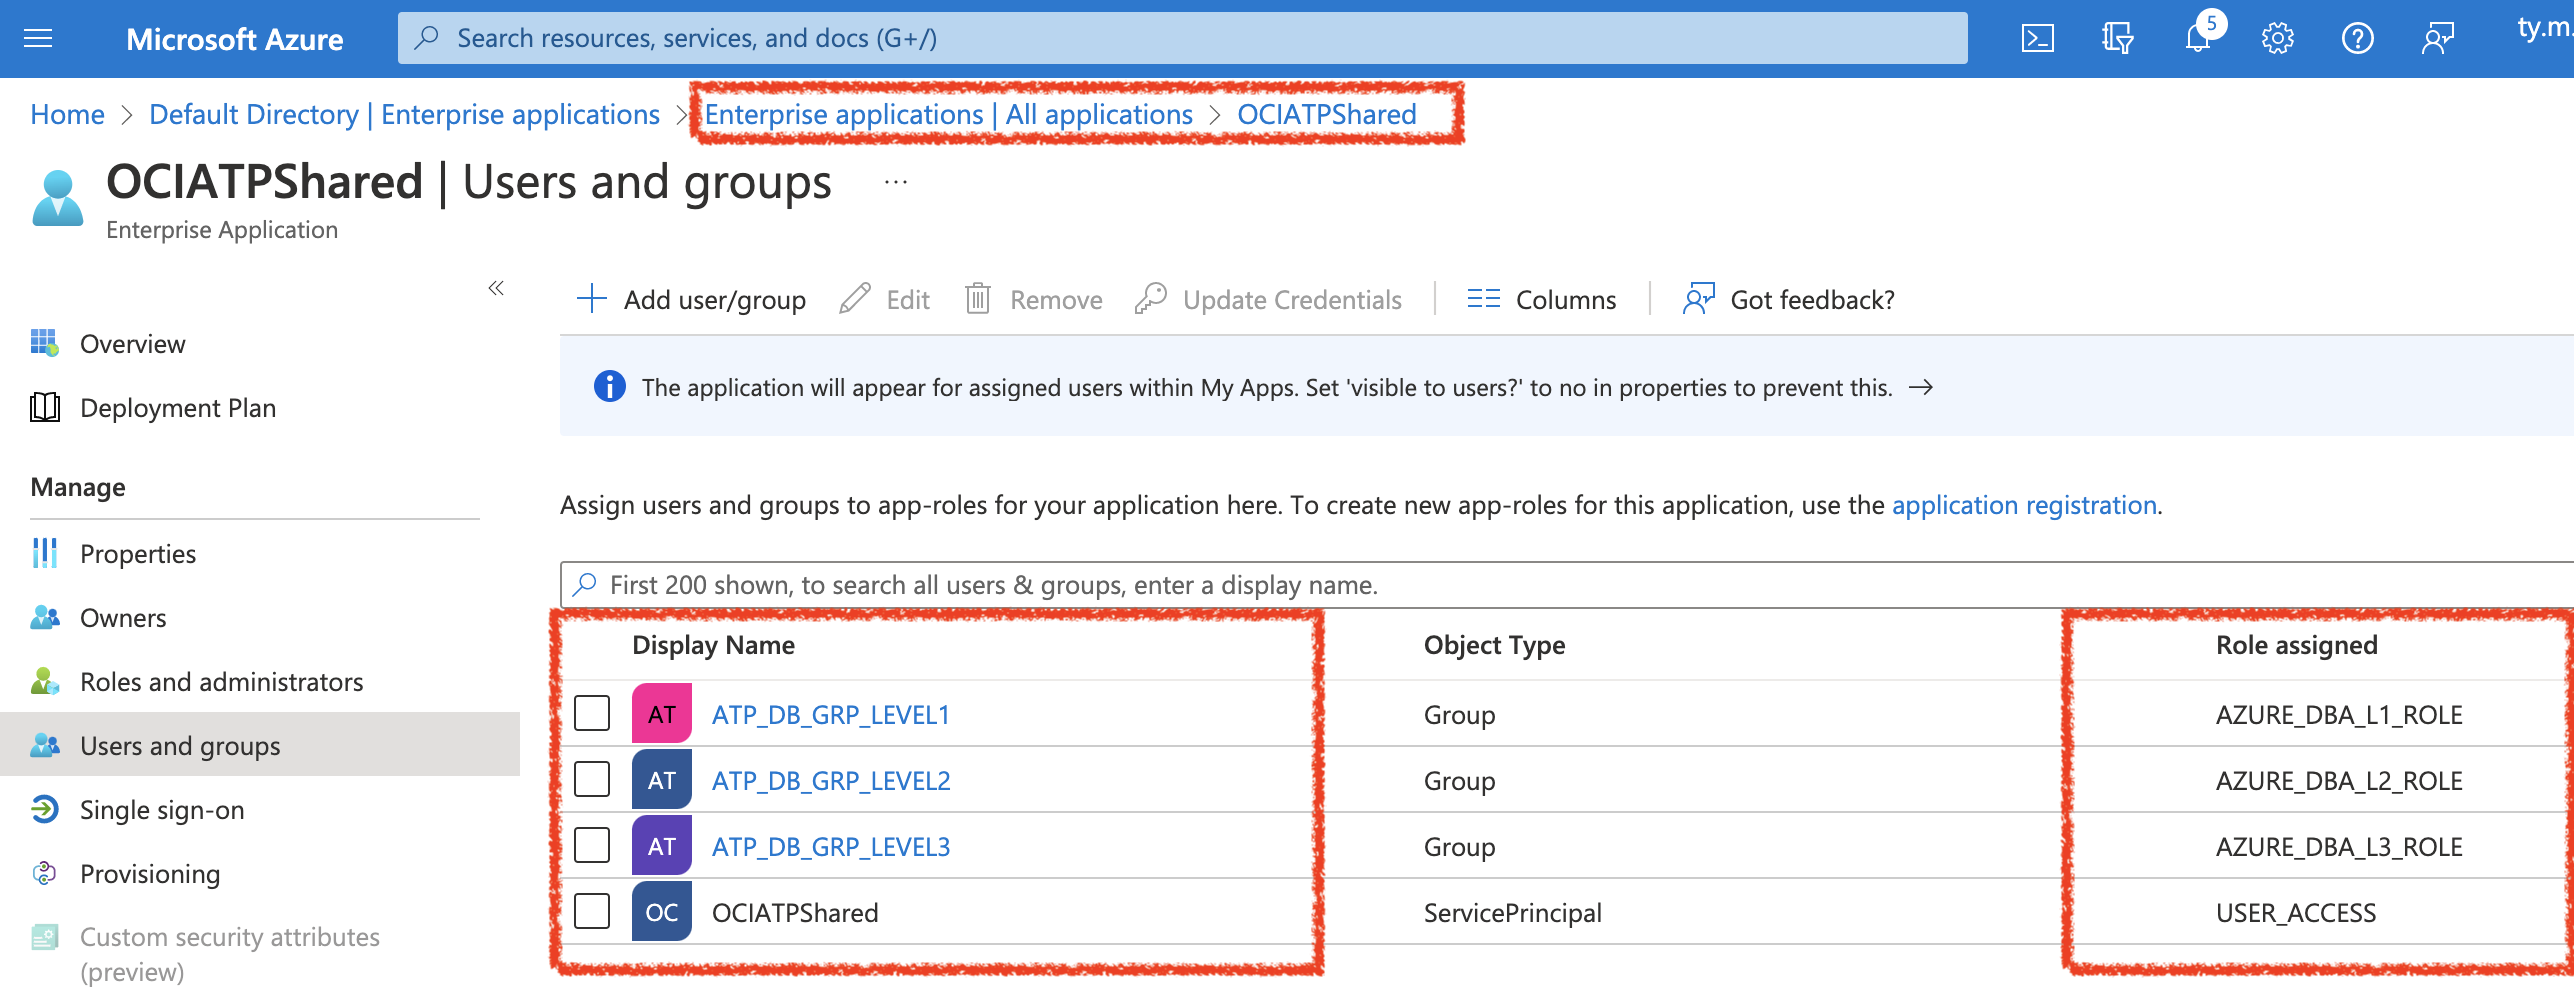
Next, Navigate to Enteprise Applications and then Assign the Groups to their respective AppRoles created in the previous step:
When finished, your Group to Role mapping should look similar to this.
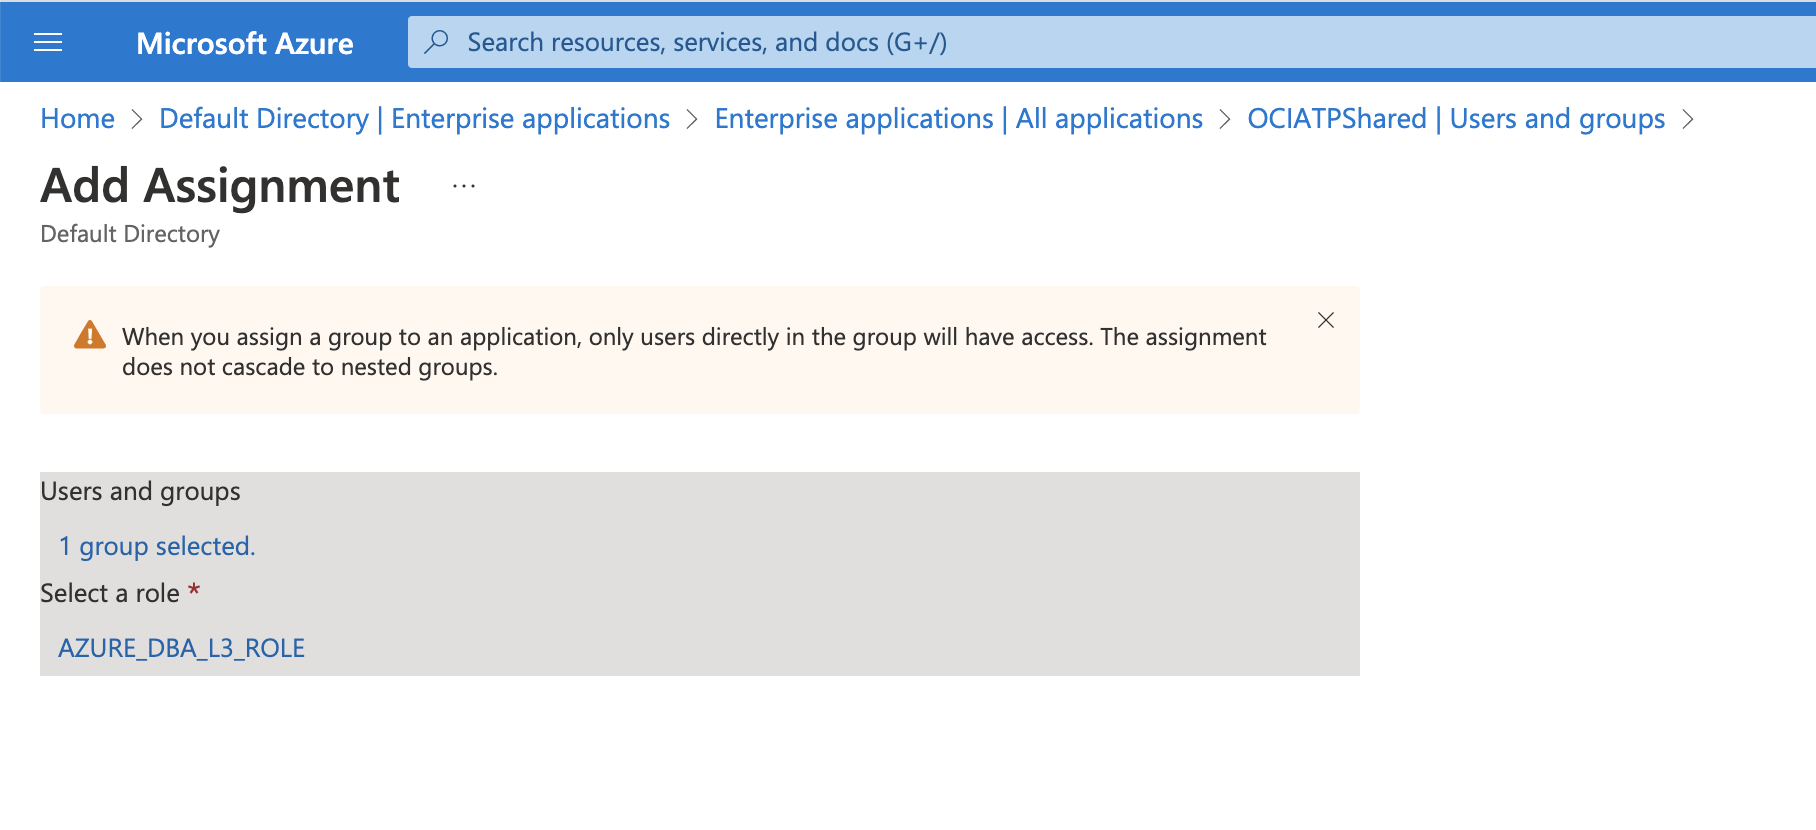
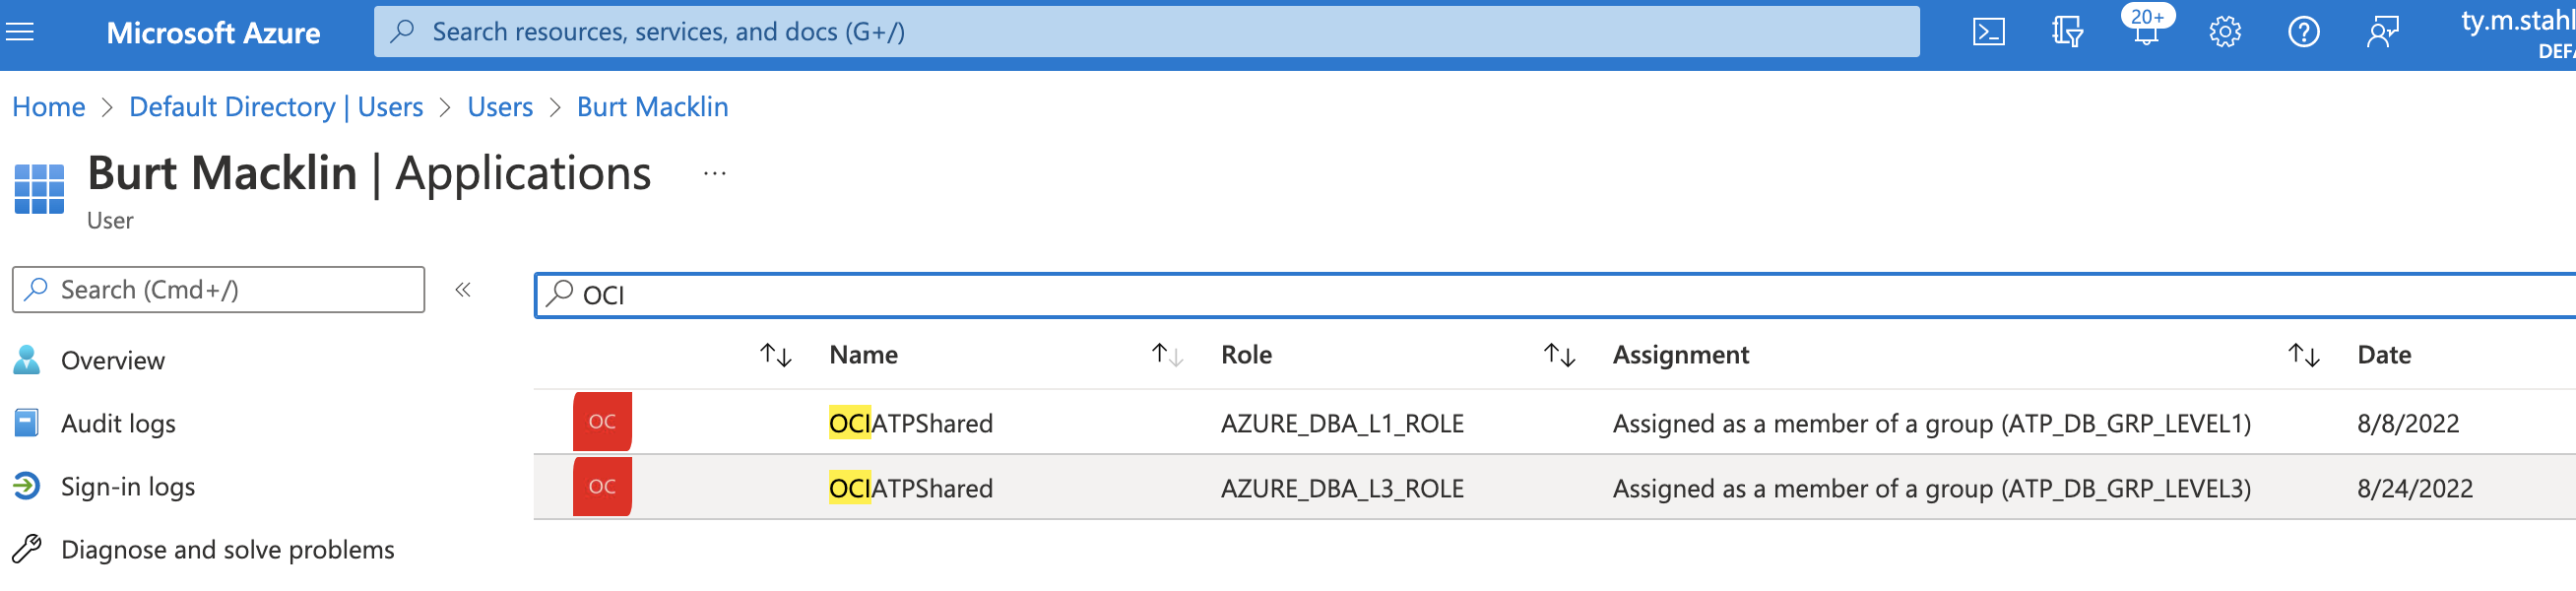
Now, to assign users to these Roles – simply navigate to ‘Users and Groups’ and assign accordingly to the respective groups. The following are 2 distinct accounts that have separate groups. Both can connect, but their roles are unique.

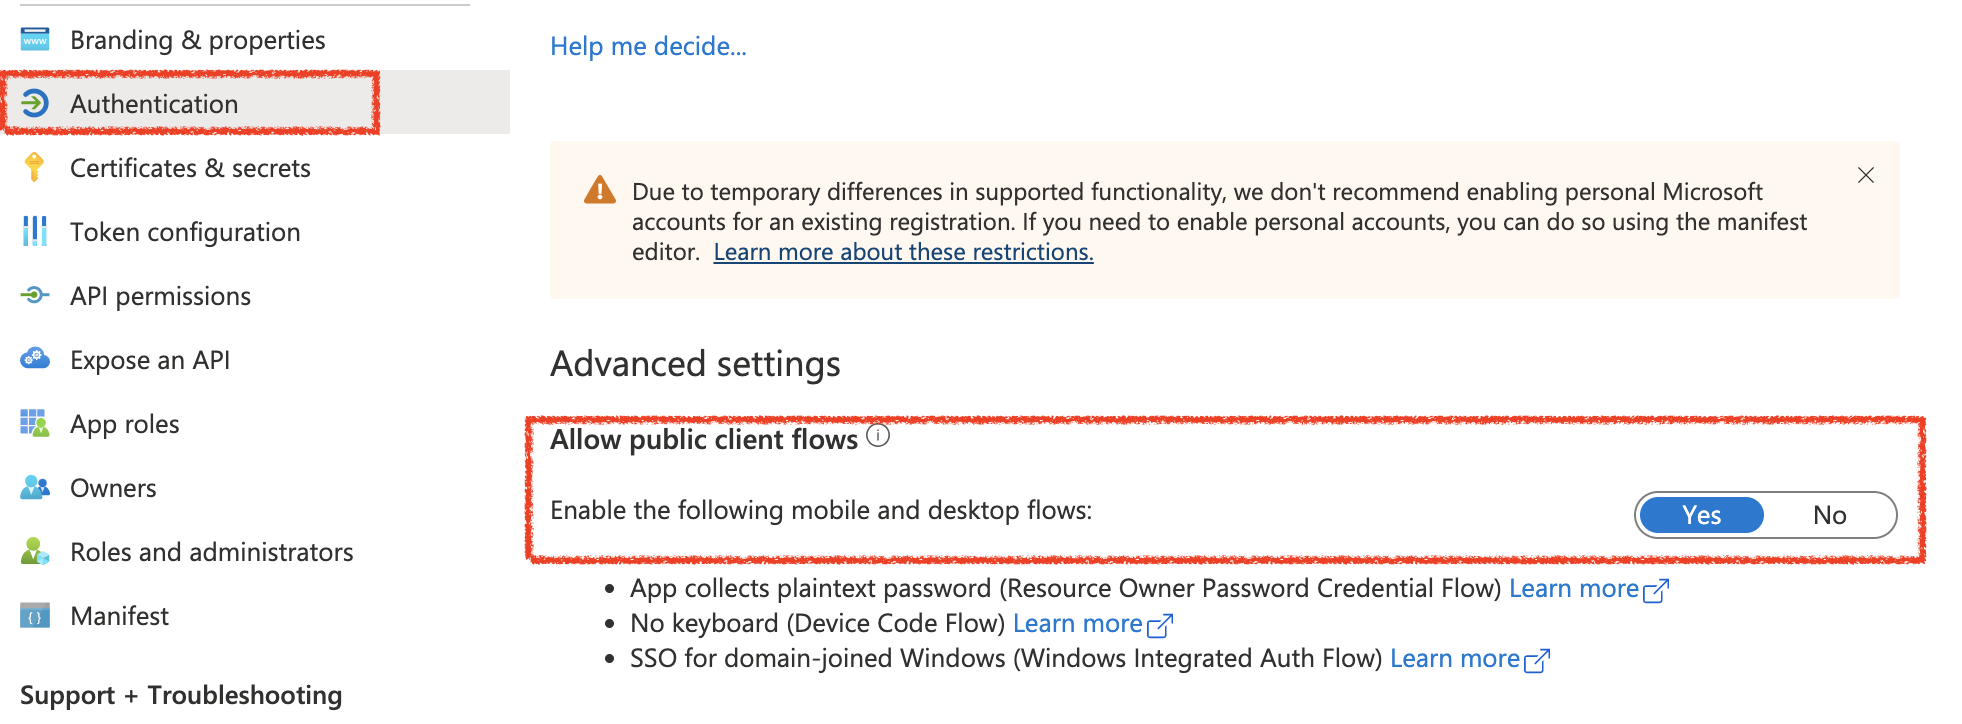
Lastly, this is just for the sake of demonstration purposes – we will need to enable the ‘Allow public client flows’. Since I am using Postman to test the RESTful web service, this will allow us to use the Resource Owner (Password) flow in order to obtain a user access_token. Be advised, as a securtiy best practice – I always recommend the use of the AuthCode flow for any client-side application authentication.
Autonomous Database Configurations
Alright, so we made it through that – and you have all of the variables needed in order to setup the ADB. This is relatively straight forward process to enable the authenticator for Azure.
First, gain access to the SQLDeveloperWeb (Database Actions) as an Administrator – and get to the SQLWorksheet. You’ll replace the variables below with values from your setup:
tenant_id – your Azure EntraID tenancy GUID
application_id – This is the Application ID from AppRegistrations
application_id_uri – This is a combination of your Tenancy URI + AppRegistrationID
Then, execute lines 1-9.

Next, I created a Shared Schema User – Alan explains this best in the video here. Essentially, this means that I do not need to create each of my users independently in the database. They just need a Role in the JWT token that will allow them to connect as the shared schema user – AZ_DBA_LEVEL_1
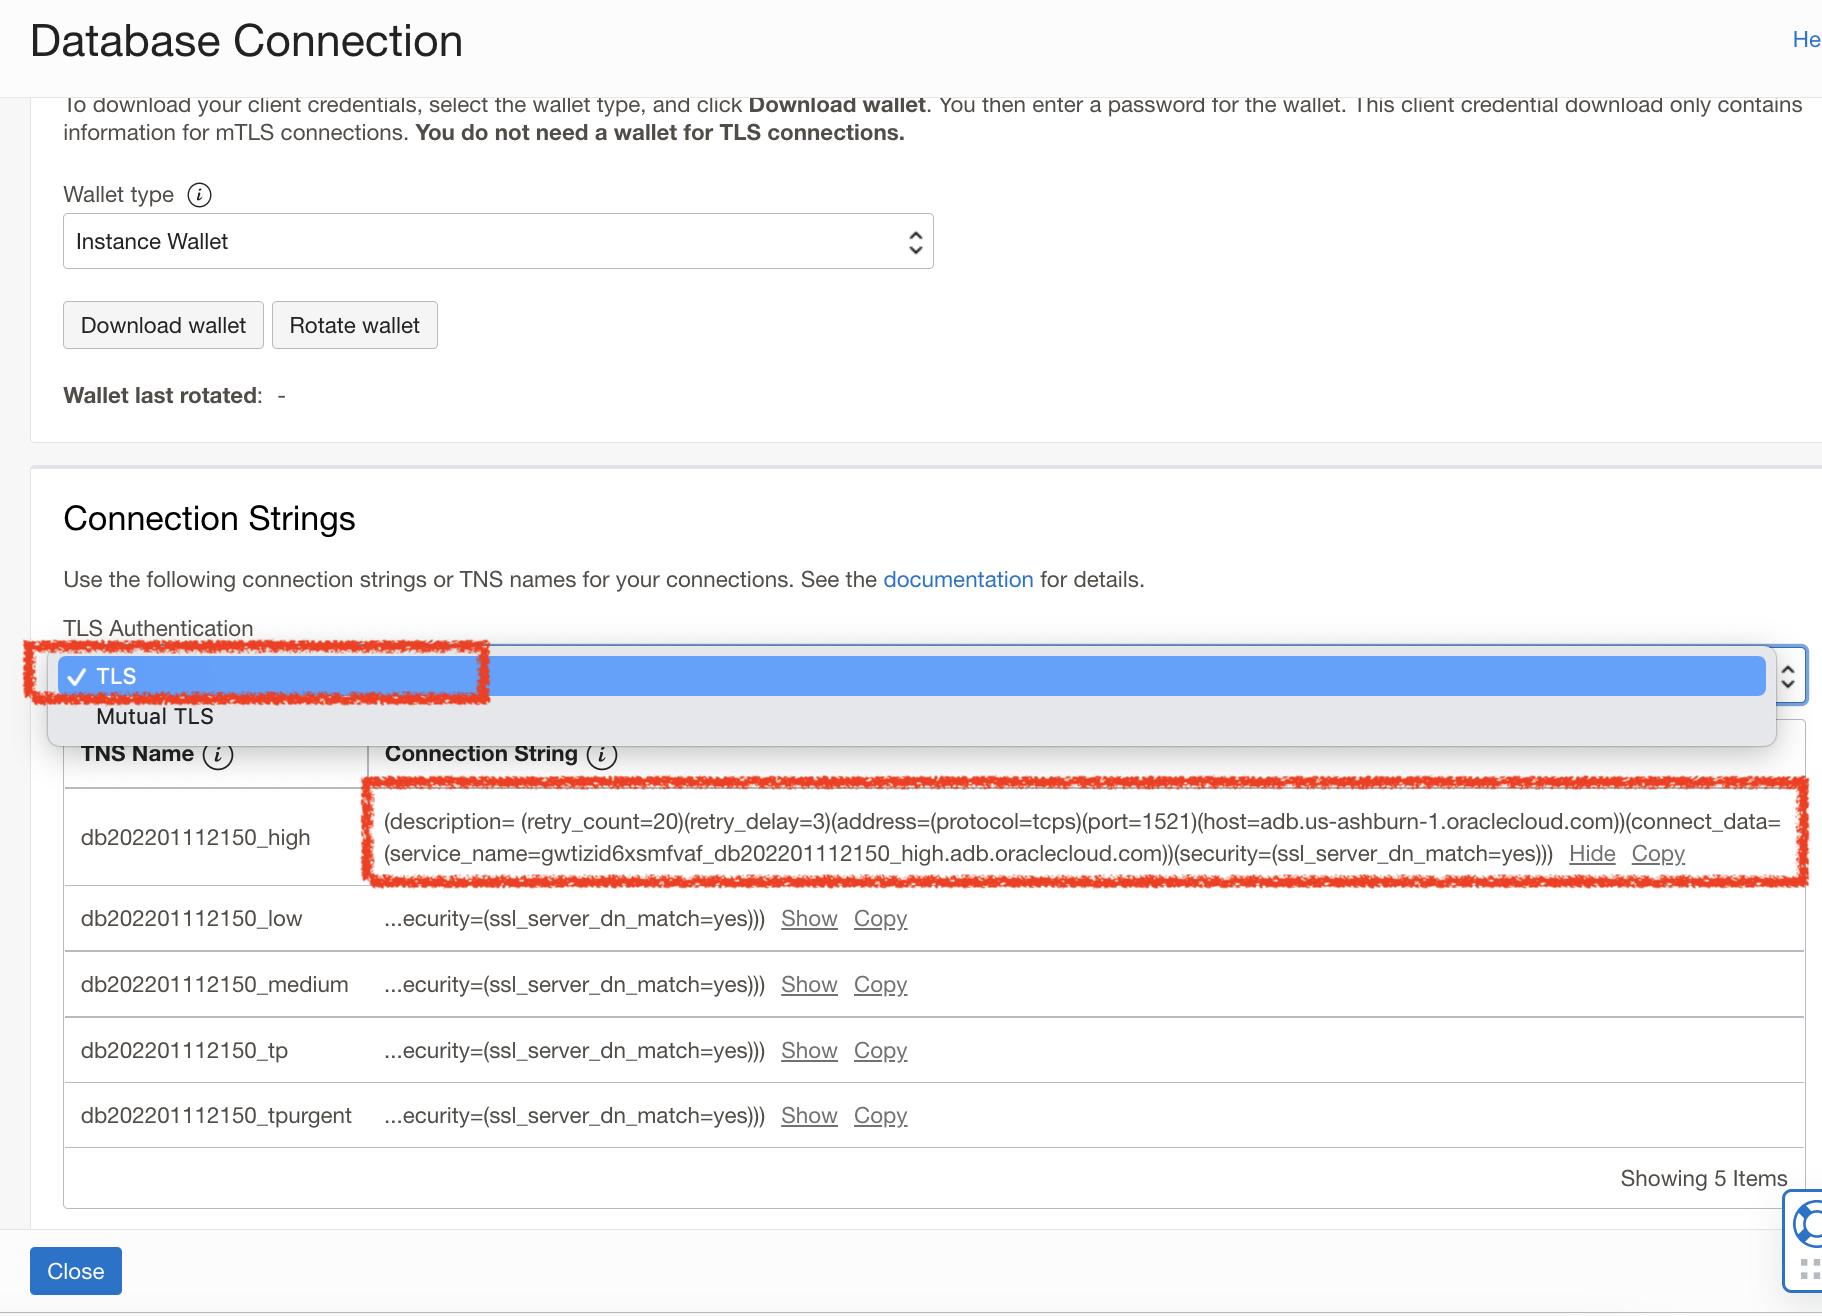
At this point, all of the database configurations are complete – and now it’s time to setup the function and web service. First off, you will need to grab the Connection String from the Autonomous database. Specifically – we will get the non-Mutual TLS connection string – which allows us to connect to the database using 1-way TLS. The following blog explains the wallet-less connection.
If you reference our Demo architecture diagram from the beginning – we can access the database via a Private Endpoint within the Private Subnet of the VCN – so in this case, we can relax the need for mutual TLS authentication of our client.
Code Editor
We will now use a tool that was released to the General Public as I was building this blog/POC – which prompted me to highlight the “OCI Native Tooling”.
To launch Code Editor – simply select the newly minted icon in the top right navigation bar.
![]()
Next, we will deploy our function – the following assumes that you have deployed a function (can be the example) before this, so that you have an active application and container registry setup. If this is not the case, you’ll need to follow through with creating a sample application here.
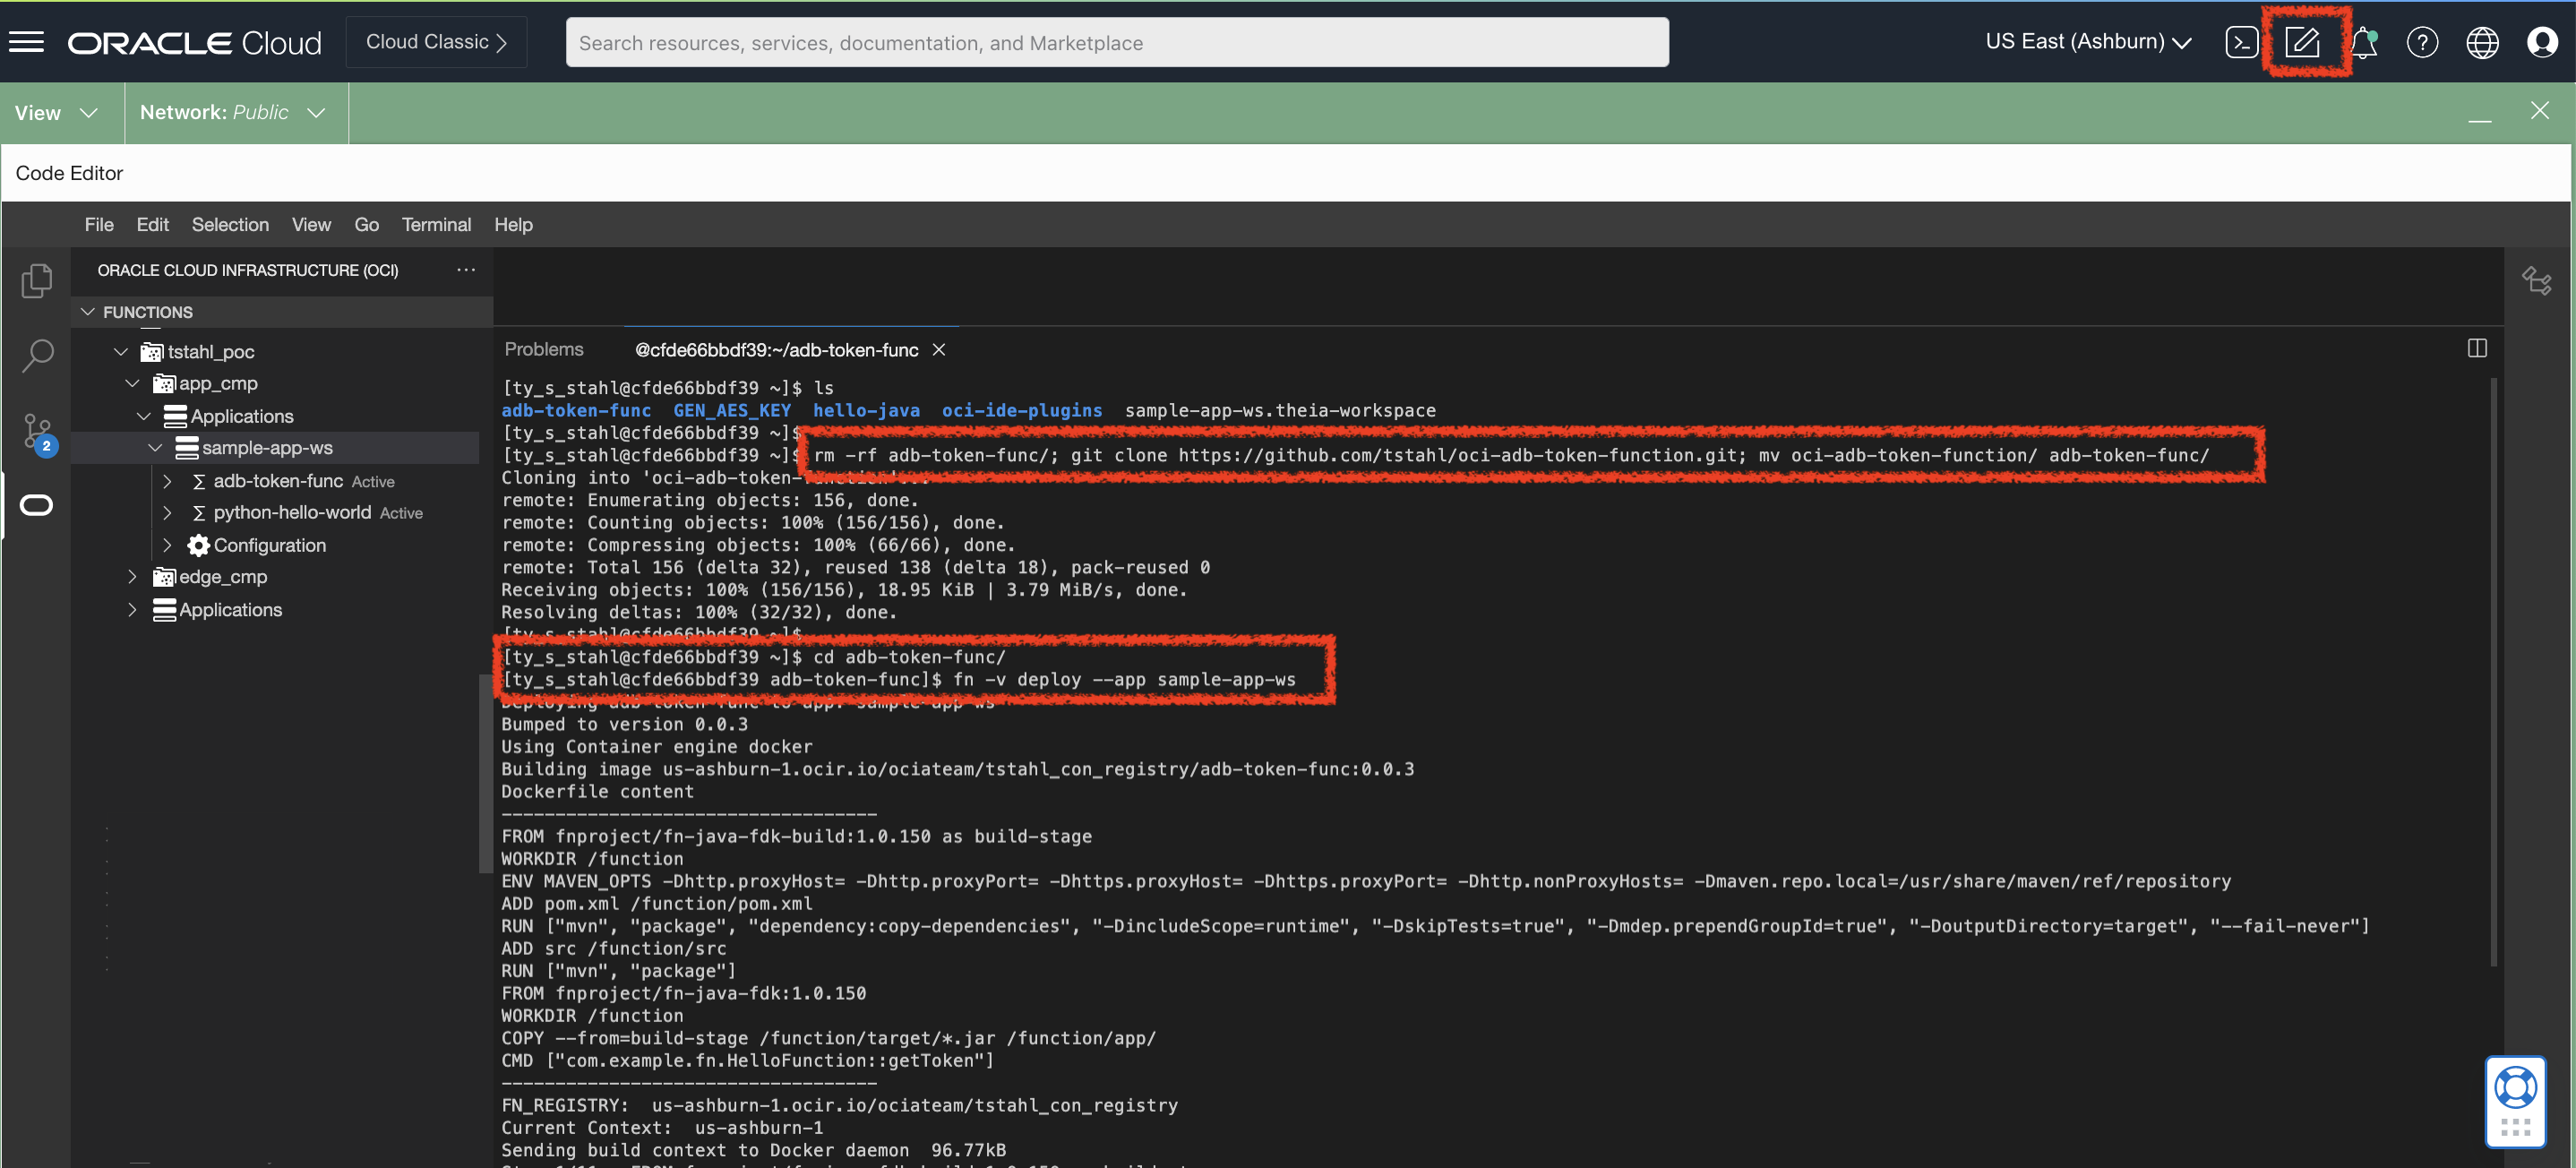
Now that you have deployed an application – we can now deploy the OCI-AD-Token-Function code using code editor. From the Terminal feature within Code Editor – you will need to create a new function with these example snippets.
I used some base example projects from the following public repositories and updated them slightly for demonstrating the Azure Tokens with JDBC – as well as creating a sample function with CodeEditor.
First, we need to ensure that we are using the latest JDBC Libraries that include the ability to generate accept the Access Token and send it to ADB with the JDBC request.
Include the latest JDBC client library in POM.xml

Sample func.yaml needed for the OCI Function
You must substitute in your ADB Connection details for your database Instance which we collected earlier:
String DB_URL=”jdbc:oracle:thin:@<INSERT_CONNECTION_STRING>)”;

Now, to deploy your function ensure that you are in the base location where the func.yaml and pom.xml is stored.
Create an API Gateway
The last configuration component is to create an API Gatway in the Public Subnet. This is to add an additional service layer which allows us to invoke this function from outside of the OCI VCN. For more detailed walkthrough – Here is a blog post showing how to create a function as a backend for an API gateway. Depicted below are the configurations that I created for this demonstration.
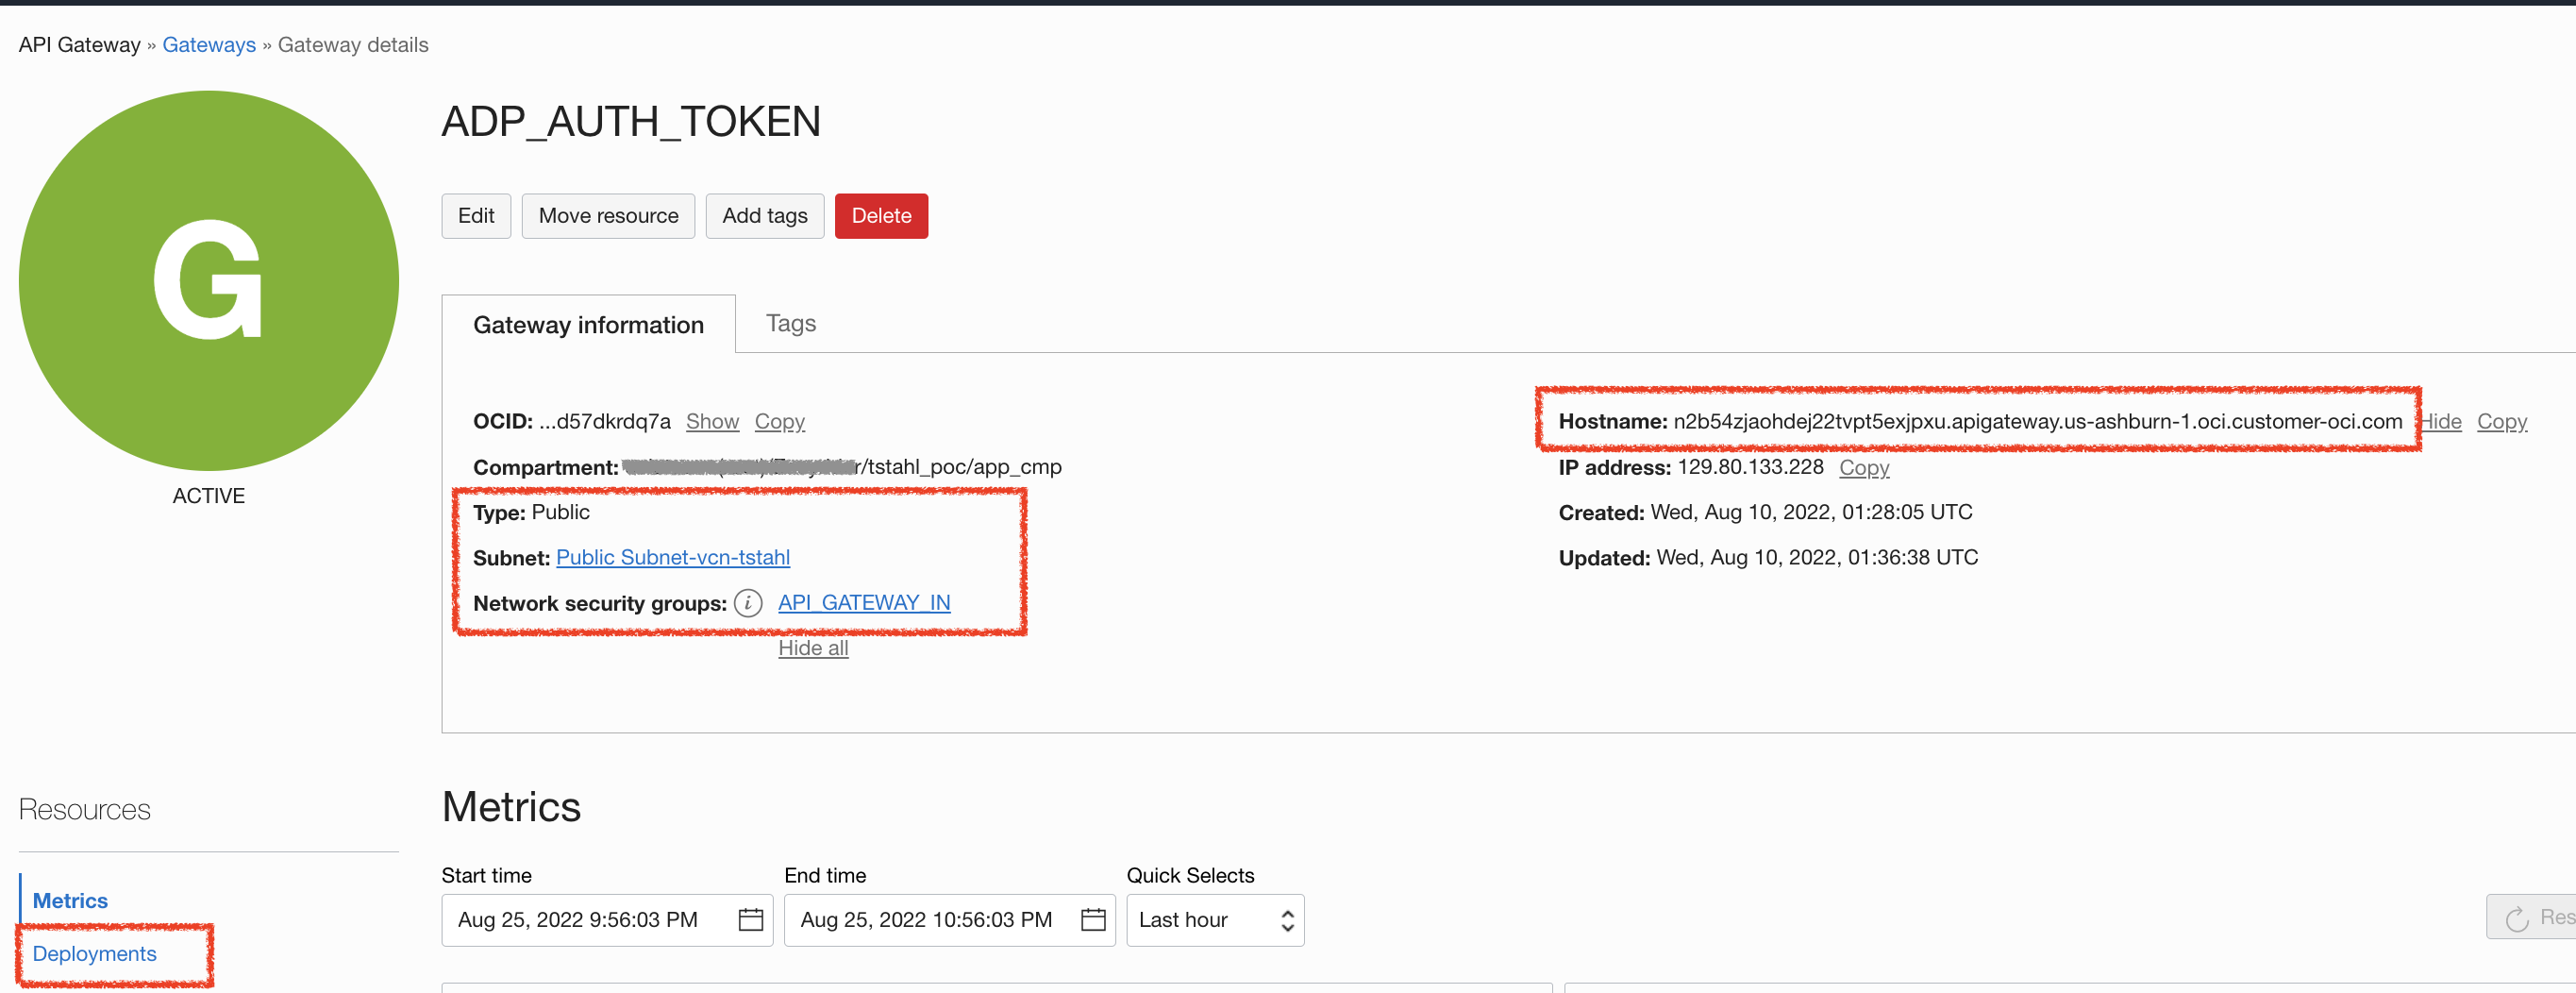
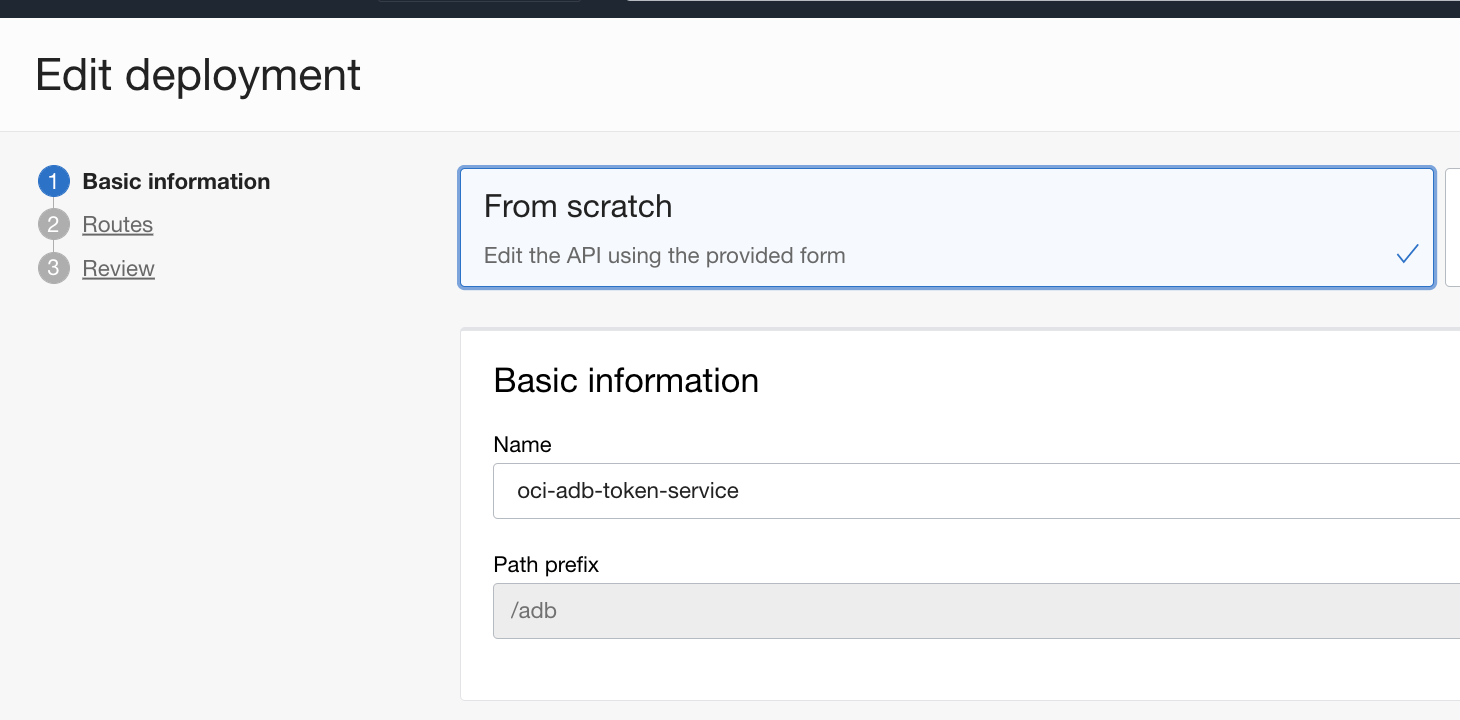
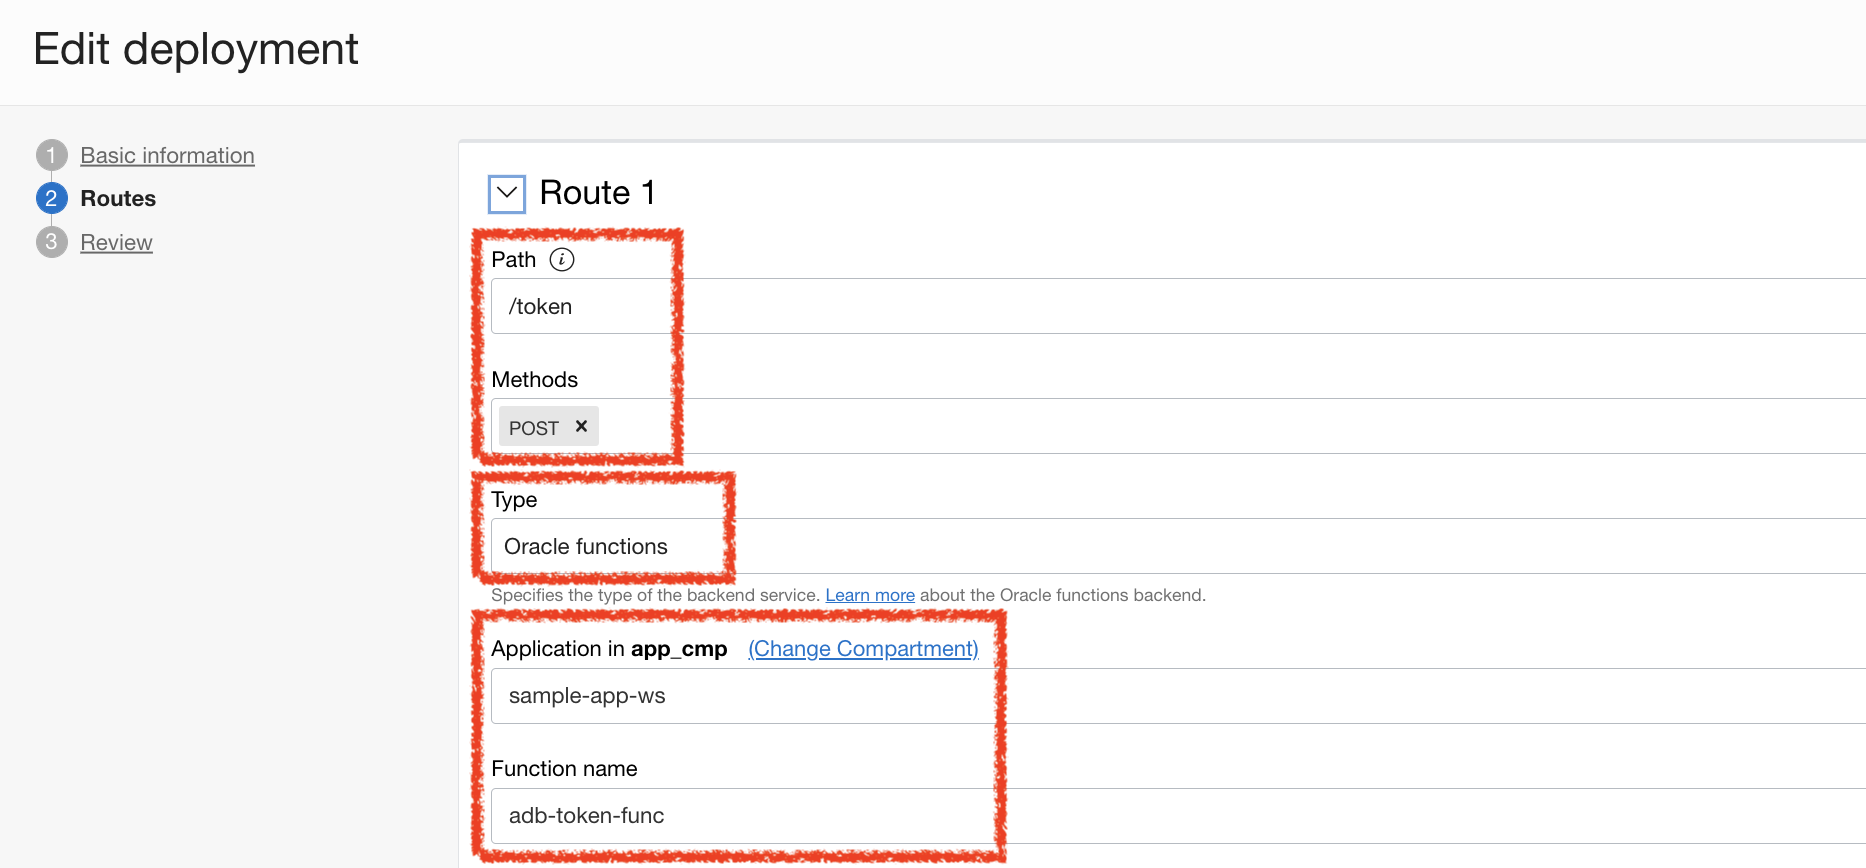
After the Gateway instance is established and running – I created a deployment for my function. Supplying /adb – as the path to reach this service endpoint.
Next, I added a secondary path for service call to invoke. This also involves accepting on POST operations because we will be passing in a JWT payload in the Body.
Lastly – I will select the Application and specific Function that I just deployed earlier.
Now that we deployed this API Gateway, we are ready to test!
Testing
As I mentioned earlier – for simplicity reasons, I am using the OAuth2 Password grant flow in order to get a quick access_token for my user.
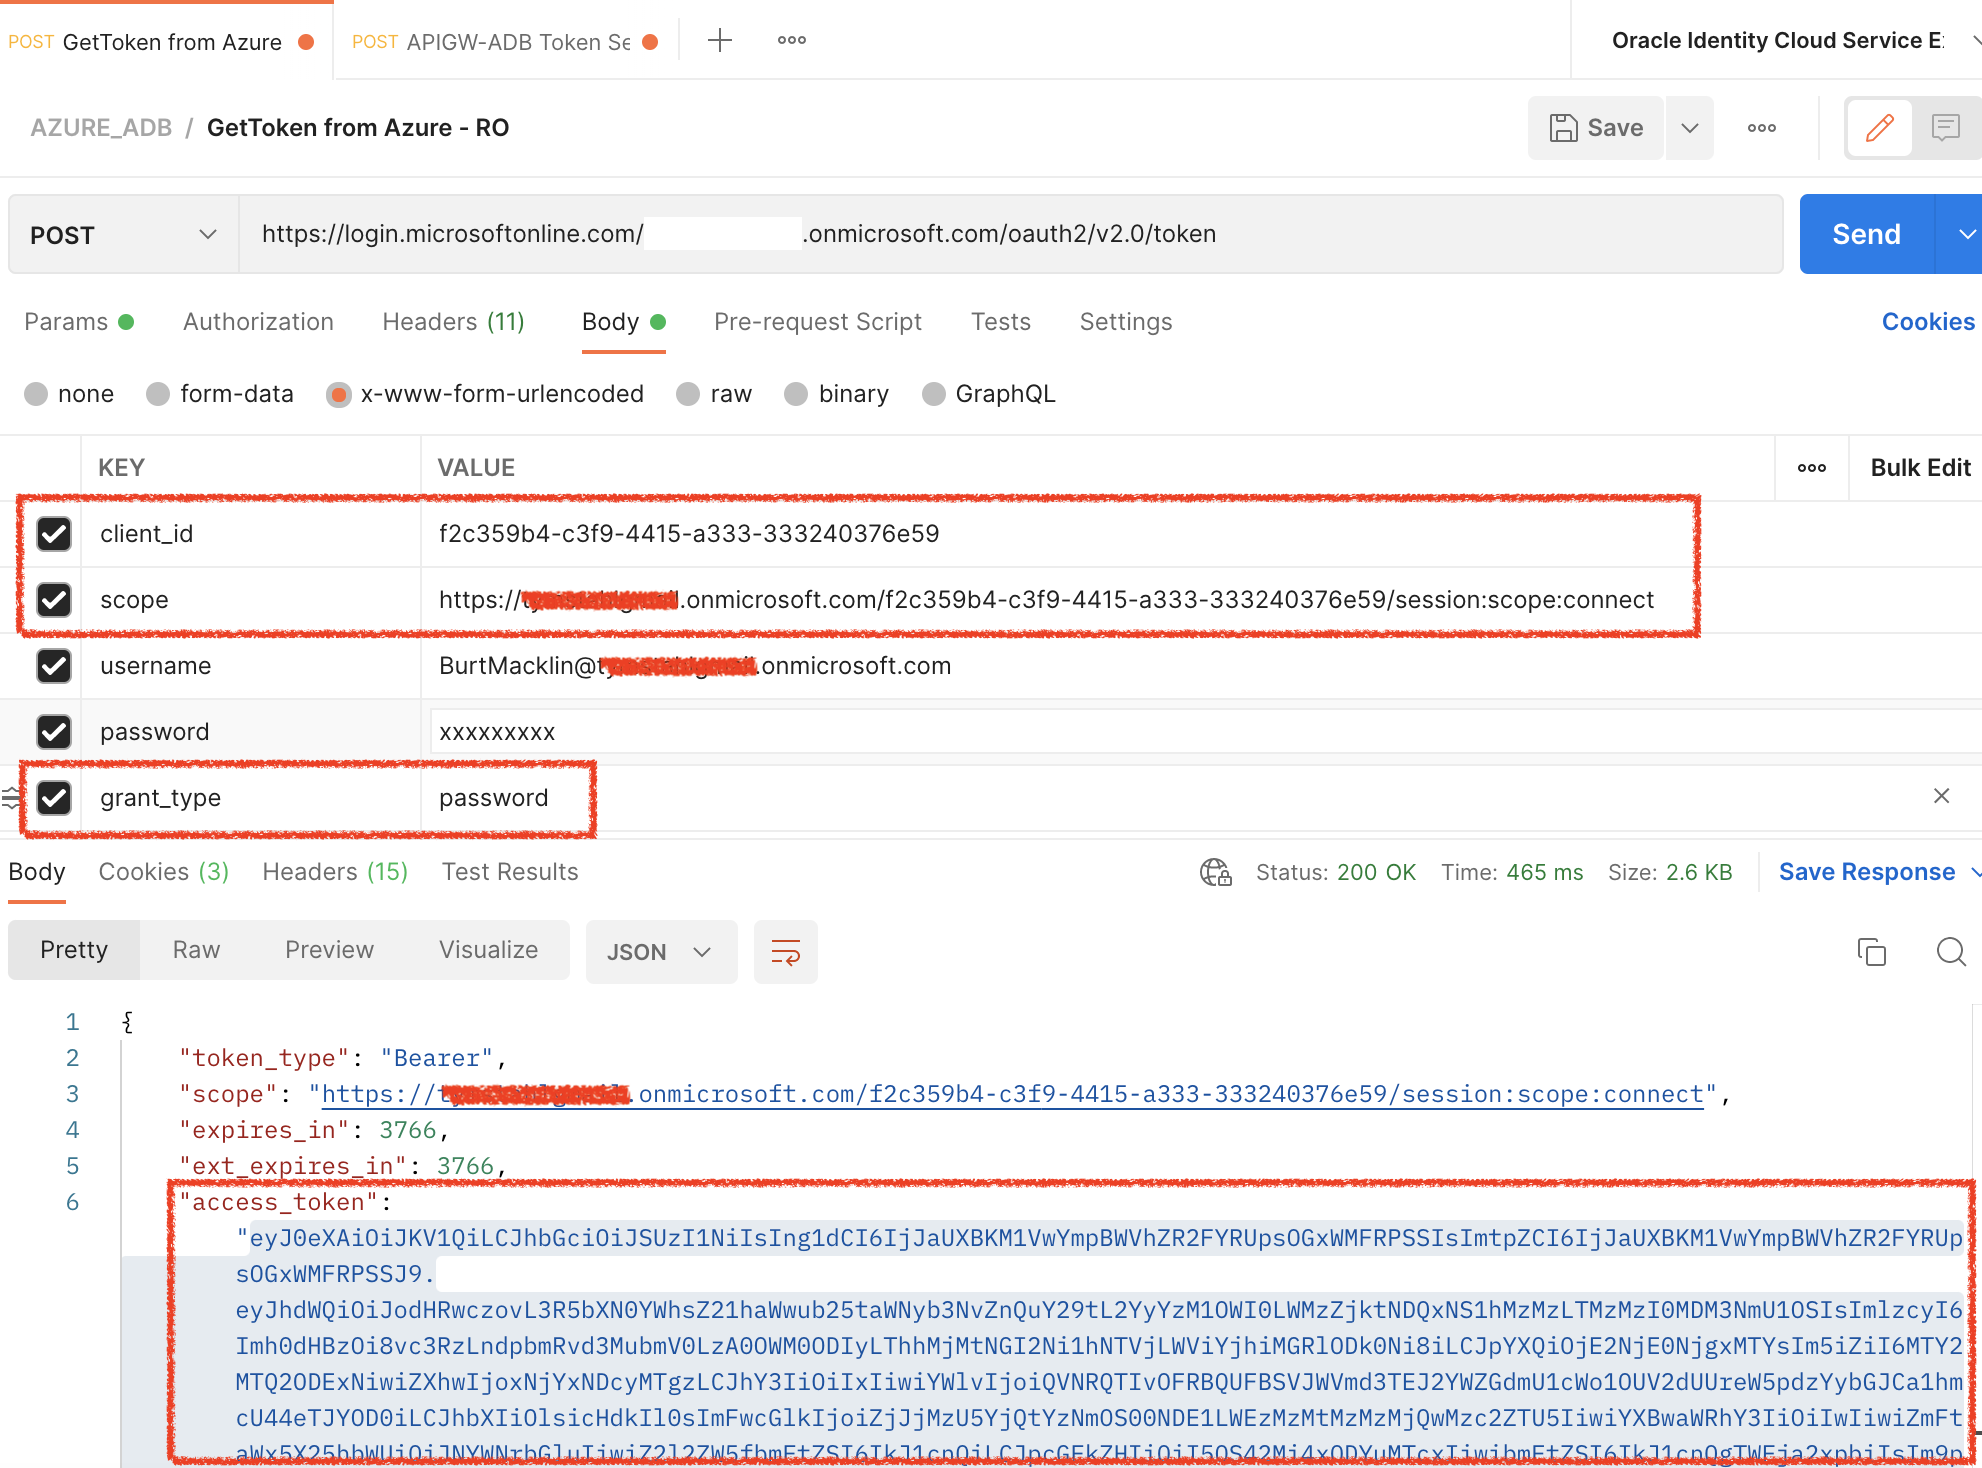
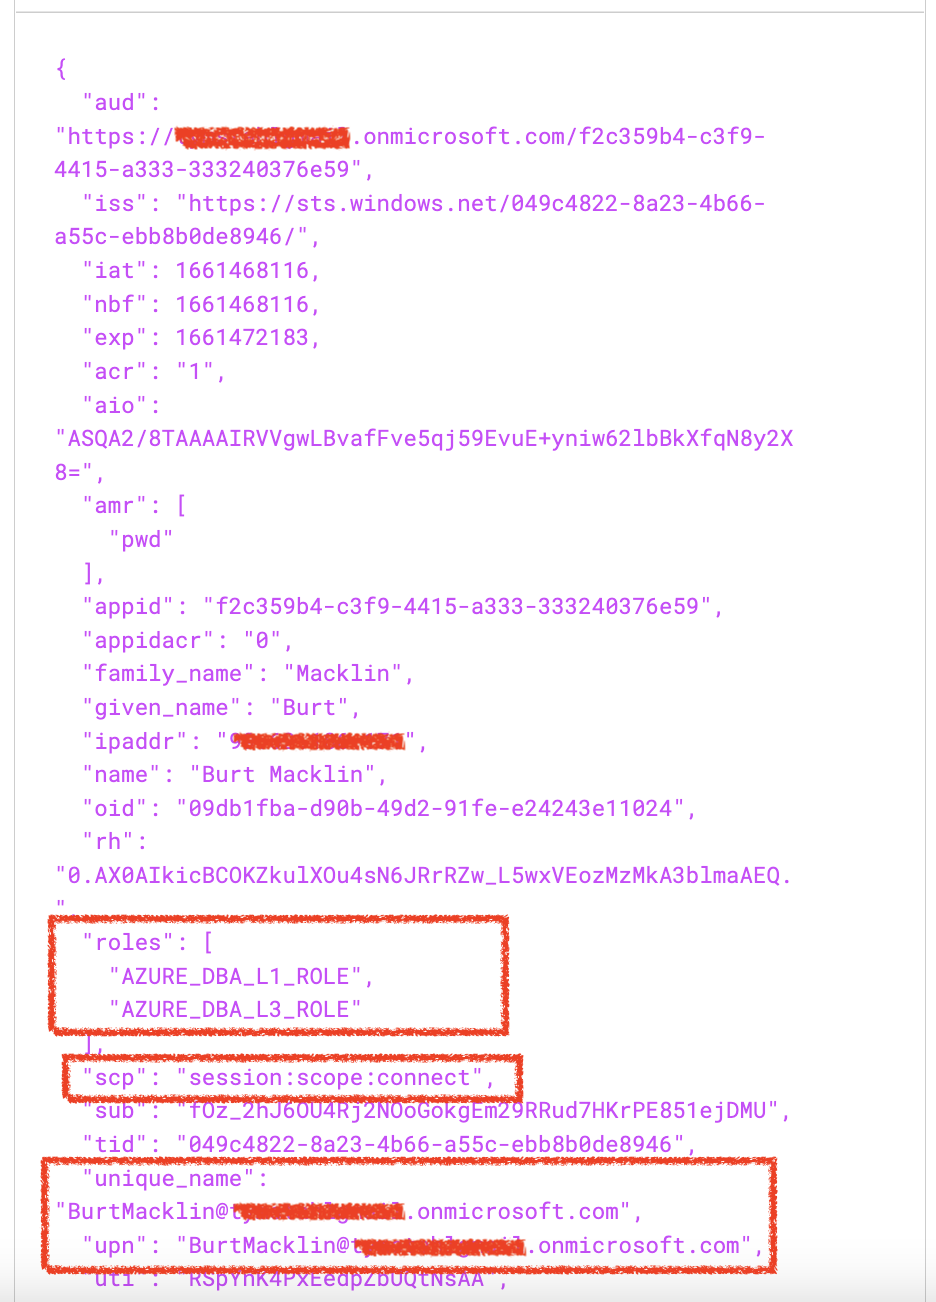
After a successful authentication using Postman acting as an Application/Client – I use jwt.io to inspect the contents of the JWT access_token.
Last but not least, we will add the access_token as the payload for the API Gateway service that we just created – and obtain the response.
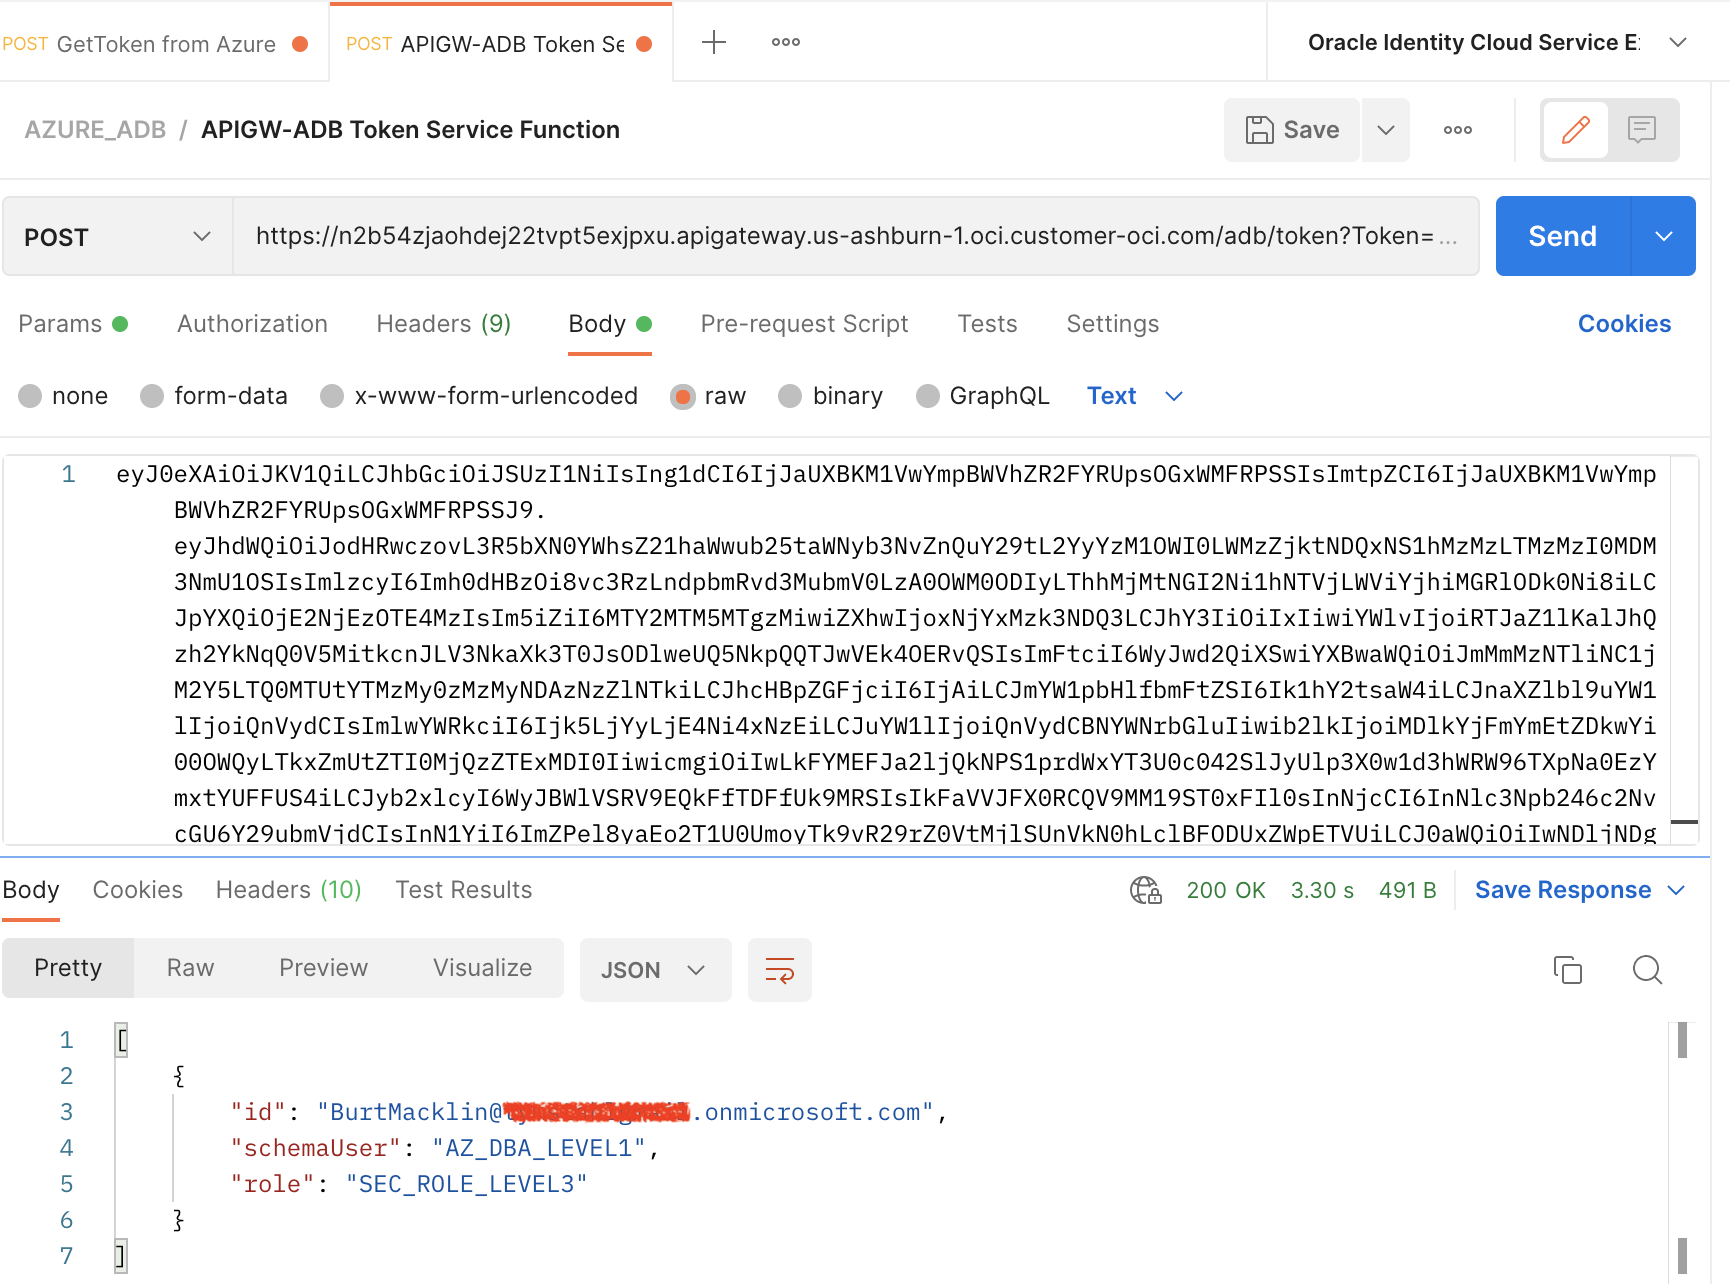
Success! We have a valid JSON response from the database that executed a few simple SQL commands.
id = the original Identity of the user from Azure EntraID
select sys_context('userenv', 'authenticated_identity') from dual)
schemaUser = this is the Shared Schema user we created with simply CONNECT privileges
SELECT USER FROM sys.dual
role = this represents additional Roles that can be passed in the Claims, and then be mapped to Database Roles for more fine-grained authorization rules and policies
select * from session_roles
Conclusion
If you have hung around for the finale of this post – I hope you were able to take away the importance of identity propagation with ADB’s capability to accept OAuth2 tokens from an Identity Provider (Azure EntraID) and OCI IAM. This proof-of-concept is just one of many use cases around application security that we all can capitalize on by leaning into the adoption of multi-cloud services.