In my previous article, I explained how to use Python’s built-in logging library to send logs directly to the OCI logging service. That was a useful and fun exercise which I’ve used for a dozen small projects since that article was published. I was recently asked how to use the OCI identity management service, OCI IAM Identity Domains, to serve as an OpenID Connect (OIDC) provider for a custom application. It’s not a difficult task, but it helps to have a reference to look at.
In this article we’re going to set up an Identity Domain to act as the provider in the OIDC three-legged flow. This will let us offload storage, protection, and processing of our user identities to OCI rather than having to manage sensitive data ourselves. We will be able to authenticate users and read claims about the user’s identity returned in a JSON Web Token (JWT) consumed by our application. Scopes will be defined to access additional information about the users, such as verified email addresses. Implementing OCI Identity Domains as our IdP (Identity Provider) allows access to other features if we decide to use them, such as Adaptive Security, Passwordless Authentication, or Network Perimeters.
To create our application we will be using the popular Python web framework Flask. This will handle routing, session handling, and other minutae of web development so we can focus on the fun parts of the application. We will use the popular authentication library Authlib to perform the hard tasks about OIDC for us, like claim checking and signature verification. Without this library, we would need to implement these features ourselves. Please verify that the licenses for each library work for your project. With the exception of the frameworks and libraries previously mentioned, I will try to make this tutorial as generic as I’m able for those using different languages and libraries.
OCI IAM Identity Domain
Confidential Application Configuration
The OIDC provider endpoint and client will depend on the Identity Domain. Either navigate to an existing domain that will be our identity provider, or create a new domain for the application.
Note: This example utilizes the flask development server. For production you would use URLs to your web server or load balancer.
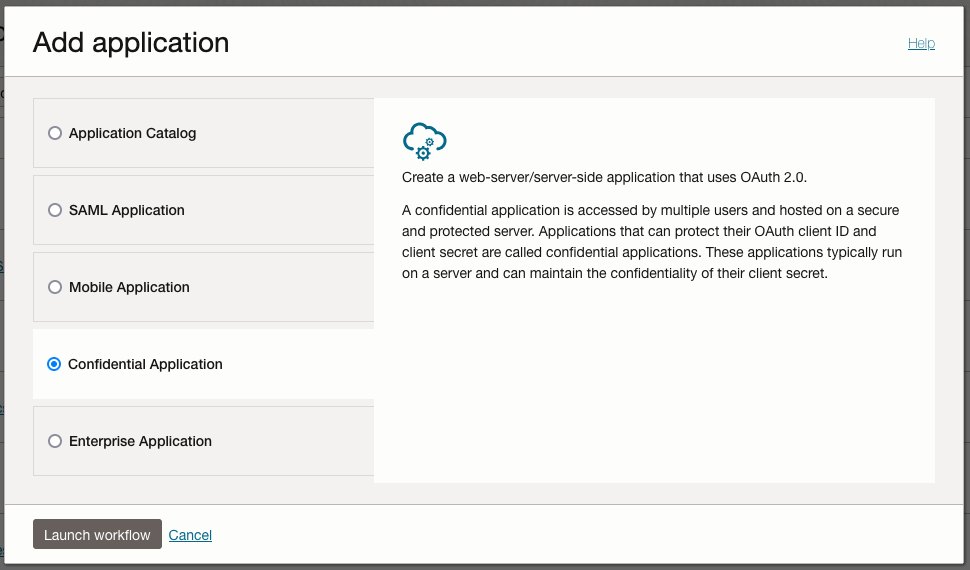
- Open Integrated Applications from the Identity Domain menu and add a new Confidential Application
- Give the applicaiton an appropriate name
- In Configure OAuth, select Configure this application as a resource server now and enter http://localhost:5000 for Primary audience to work with the local Flask development server
- In the Configure OAuth step select Configure this application as a client now to access the OAuth configurations
- Check the Client Credentials and Authorization Code grants
- Check Allow non-HTTPS URLs and enter http://localhost:5000/callback as Redirect URL
- Click Next and Finish then finally Activate to go live with the application


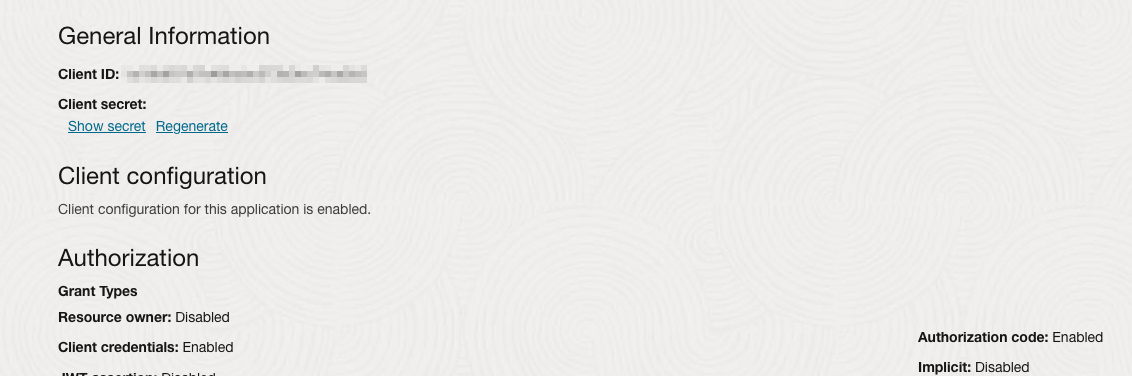
Once we have an active application, we will need three pieces of information:
- The Client ID which can be found in the Integrated Application, in OAuth Configuration under General Information
- The Client Secret which can be accessed directly below the Client ID
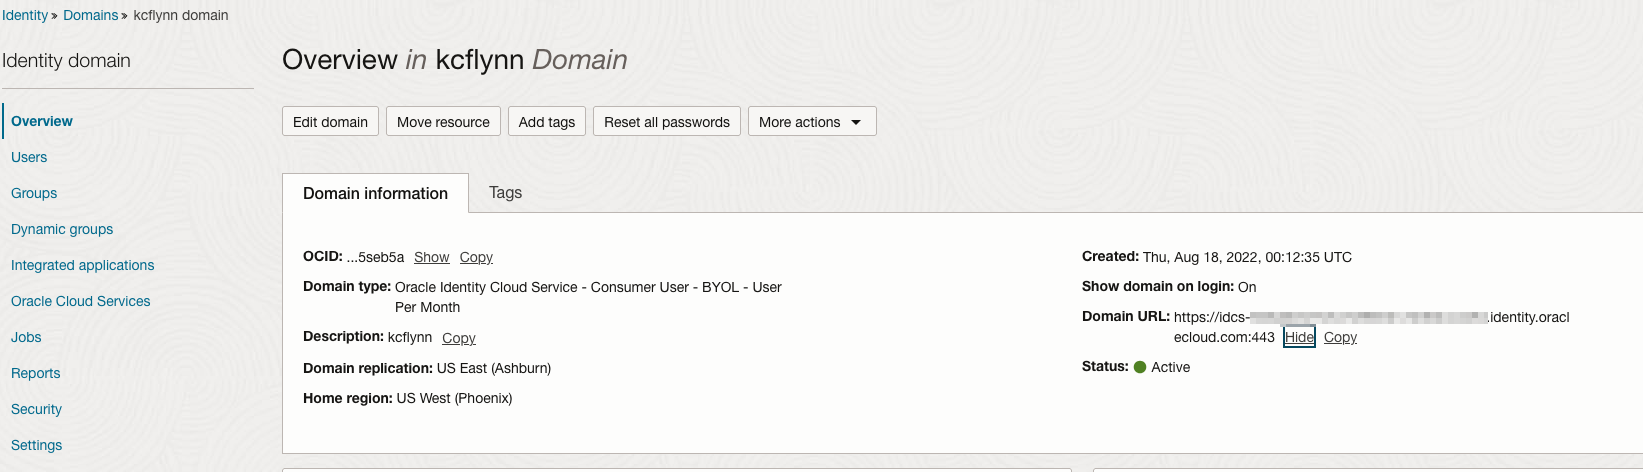
- The Domain URL, which is in the Domain Information on the Overview page for the Domain
Set the Issuer on the Identity Domain
Some applications require that the OpenID Connect Discovery document match the issuer in returned tokens. By default, the URL in the issuer field on JWTs is https://identity.oraclecloud.com/, which does not identify the specific domain issuing tokens. This shouldn’t affect our Flask application, but if you’re using another framework or service it may be required to change the issuer.
The documentation on how to change the OAuth issuer for the domain can be found here.
Ensure the Domain Signing Certificate is Accessible
In Settings > Domain settings, make sure the Configure client access is checked under Access signing certificate.

Python Flask Application
Install Dependencies
Python best practice is to set up an independent virtual environment for projects like these to prevent dependency conflicts. Let’s do that now:
python3 -m venv oidc-app

source oidc-app/bin/activate
We now have a Python environment for our flask app. Now we install dependencies.
pip install Flask authlib
We should be ready to begin coding. Create a file named wsgi.py and open it in your editor of choice.
Create the Flask Application
from flask import Flask, session, redirect, render_template, url_for, request
app = Flask(__name__)
app.config['SESSION_COOKIE_SAMESITE'] = 'Lax' # Needed for cross-domain redirects
We have created our application and assigned it the app variable as well as setting the session SameSite attribute to Lax.
Configure the Authlib Flask Object
We now need to define the authentication parameters for the OAuth 2.0 implementation. This will require the domain endpoint, client ID, and client secret we recorded earlier.
from authlib.integrations.flask_client import OAuth
oauth = OAuth(app)
oauth.register(
    'ocidomain',
    client_id=getenv('1234567'), # Confidential application client ID
    client_secret=getenv('abcdefg'), # Confidential application client secret
    server_metadata_url='https://idcs-xyz.identity.oraclecloud.com/.well-known/openid-configuration',
    client_kwargs={'scope': 'openid'}) # Note the scope is defined here
We now have our OAuth implementation specifically for Flask. Next, we need to define a place to initiate the OAuth flow.
Define OAuth Login Routes
@app.route('/login', methods=['GET'])
def login():
    uri = url_for('callback', _external=True)
    return oauth.ocidomain.authorize_redirect(uri)
We define the /login path to redirect the user to the authorization endpoint. The /callback endpoint is constructed to be passed as an argument for the redirect_uri parameter. The end result is the user being redirected to a URL similar to:
https://idcs-xyz.identity.oraclecloud.com/oauth2/v1/authorize?client_id=1234567&response_type=code&redirect_uri=app.com/callback&scope=openid&nonce=random&state=random
At this URL the user will be challanged for their credentials and redirected to the redirect_uri, which is our callback path:
@app.route('/callback', methods=['GET'])
def callback():
    token = oauth.ocidomain.authorize_access_token()
    session['user'] = token["userinfo"]["sub"]
    return redirect(url_for('home'))
Finally we have our JWT assigned to the token variable. We set the session to the use the sub attribute of the userinfo object as the user. You may want to define the user differently, which you should to fit your use case. We then send the user back to our home URL with their active session.
Now we will set our logout endpoint to revoke the user session on logout.
@app.route('/logout', methods=[HTTPMethod.GET])
def logout():
    url = f'{idm_host}/oauth2/v1/userlogout?id_token_hint={session.get("id_token")}'
    url += f'&post_logout_redirect_uri={app_host}{url_for("home")}'
    session.clear()
    return redirect(url)
Test the Flow
Once we’ve put together all the pieces, we can test the authentication flow.
flask run
In this example, we start at our homepage located at localhost:5000/

Clicking on Sign In takes us to localhost:5000/login which redirects us to a GET request to the following URL:

We are now logged into the application.

To Conclude
When it comes to user identity management, like a board game at NORAD, the only winning move is not to play. Let Oracle Cloud manage user identites for you. Using OCI IAM Identity Domains, you can have an OIDC provider configured quickly and easily.
Want to change the sign in page for your organization? The next step would be to re-brand the sign-in as your own, which can be done with ease in OCI.
Happy building!