Consulting Solutions Architect, Business Intelligence
Background
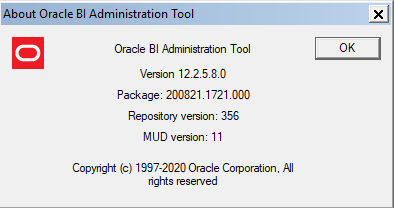
* This blog was last tested on OAC 105.8.0-133 (Version 5.8) + ADW 18c + Oracle Analytics Client Tools 5.8.0 [aka Oracle BI Administration Tool Version 12.2.5.8.0] + Instant Client for Microsoft Windows (x64) – Version 19.8.0.0.0 – Basic Package *
This article walks through the steps to configure the Developer Client Tool for Oracle Analytics Cloud (OAC) in a proxy-enabled network.
The blog demonstrates how to perform the following in a proxy-enabled network:
ORACLE INSTANT CLIENT IS REQUIRED IN ORDER TO CONNECT TO ADW IN A PROXY-ENABLED NETWORK!
Downloaded latest Oracle Instant Client from here.
These steps were validated using “Instant Client for Microsoft Windows (x64)” – Version 19.8.0.0.0 – Basic Package – instantclient-basic-windows.x64-19.8.0.0.0dbru.zip
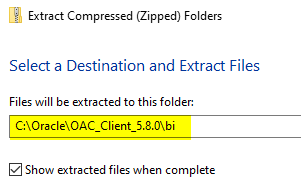
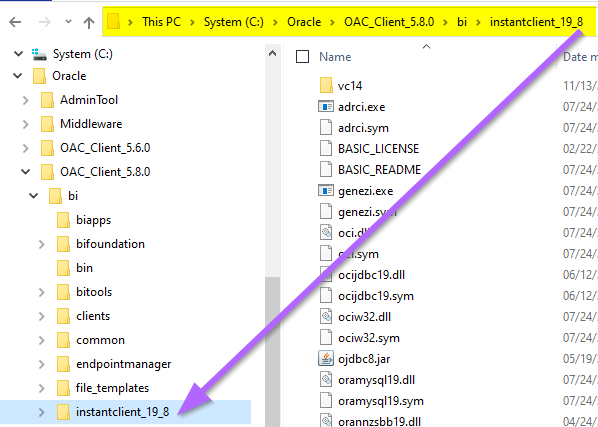
Unzip Instant Client files to: <OracleBIClient>\bi
Confirm the extracted Instant Client files are saved under: <OracleBIClient>\bi\instantclient_19_8
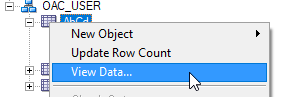
Confirm that View Data and Import Metadata are operational with the BI Admin Tool Offline in the Proxy-enabled Network.
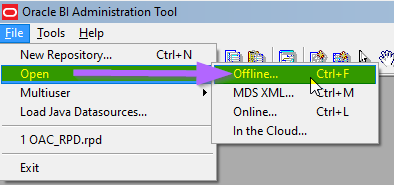
Open Oracle BI Admin Tool in the Cloud in a Proxy-enabled Network
!!! IMPORTANT !!!
Do not upload the RPD to OAC with (https_proxy=www-proxy-xyz.us.company.com)(https_proxy_port=80) in the Connection Pool Data Source Name.
Proxy settings should be manually added each time from the Oracle BI Admin Tool when needing to Import Metadata or View Data in the Proxy-enabled Network. They should then be removed before uploading/replacing the RPD to OAC.
**** Complete all configurations listed in Step 2 (if not already complete) ****
Launch Oracle BI Administrator Tool (found in <OracleBIClient>\bi\bitools\bin\admintool.cmd or desktop shortcut previously created.
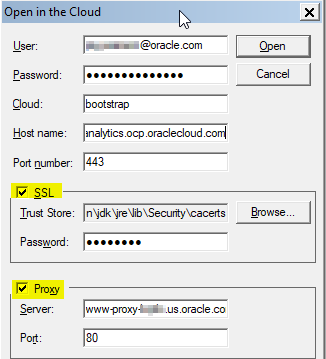
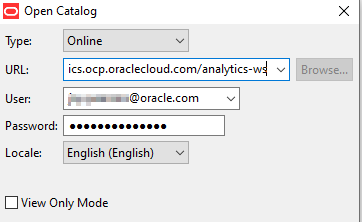
File -> Open -> In the Cloud
* Enter OAC user/password
* Cloud: bootstrap
* Host name: OAC Hostname. i.e. jaysoac-ateam.analytics.ocp.oraclecloud.com
* Port: 443
* Check SSL!
* The default SSL Trust Store Password is: changeit
* Check Proxy!
* Enter Proxy Server Name / or IP Address and Proxy Port
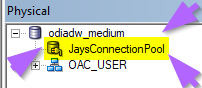
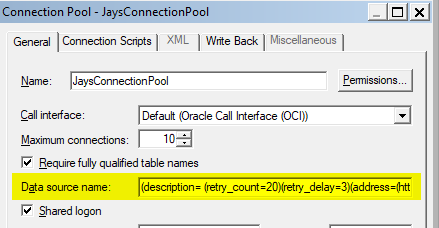
Modify the Connection Pool Data Source Name to include the Proxy Address or Proxy IP and Proxy Port (as outlined in Step 2). Don’t forget to remove before publishing the RPD to the Cloud!
From the Physical Layer -> Modify the Connection Pool -> Data Source Name -> Add Proxy Address or Proxy IP and Proxy Port.
Connect to Catalog Manager online in a Proxy-enabled Network
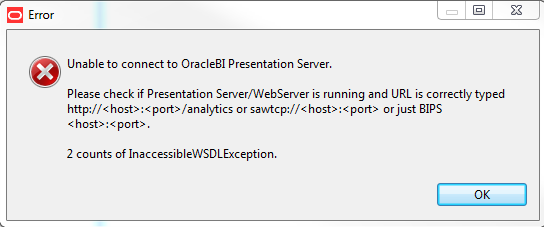
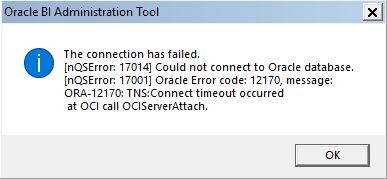
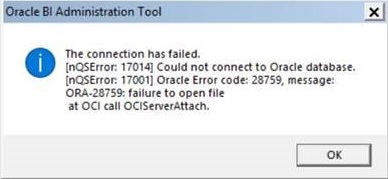
When connecting to Catalog Manager online in a Proxy these errors may be encountered:
Unable to connect to OracleBI Presentation Server.
Please check if Presentation Server/WebServer is running and URL is correctly typed http://<host>:<port> /analytics or sawtcp://<host>:<port> or just BIPS <host>:<port>.
2 counts of InaccessibleWSDLException.”
To resolve this error:
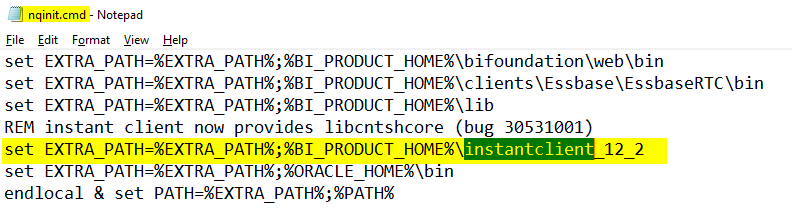
Open: <OracleBIClient>\bi\bifoundation\web\catalogmanager\runcatinternal.cmd in a text editor.
Search on: “set jvmBasicArgs=-Xmx1440M” or set jvmBasicArgs=-Xmx2560M in newer versions.
Update jvmBasicArgs to include Proxy Host and Proxy Port:
set jvmBasicArgs=-Xmx1440M -Dhttps.proxyHost=<host> -Dhttps.proxyPort=<port>
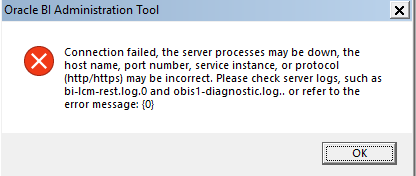
Error: Connection failed, the server processes may be down, the host name, port number, service instance, or protocol (http/https) may be incorrect. Please check server logs, such as bi-lcm-rest.log.0 and obis1-diagnostic.log.. or refer to the error message: {0}
Refer to Oracle Support Doc: Oracle Analytics: How to Connect to the Oracle Analytics Cloud(OAC) RPD using Client Admintool (Doc ID 2432176.1)
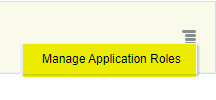
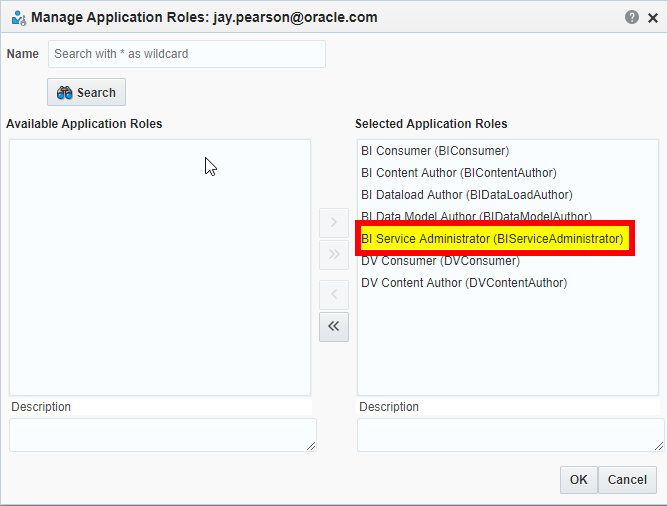
To resolve: DV Console -> Users and Roles -> Manage Application Roles -> add BI Service Administrator (BIServiceAdministrator)
Want to Learn More?
Click here for more A-Team Oracle Analytics (OAC) Blogs.
Summary
This article walked through the steps to configure the Developer Client Tool for Oracle Analytics Cloud (OAC) with ADW in a proxy-enabled network. The blog outlined how to open, connect, and utilize the Oracle BI Admin Tool and Catalog Manager in a proxy-enabled network. Additionally, the blog provides a starting point for identifying and debugging Oracle BI Admin Tool proxy errors.
Authors
Jay Pearson
Consulting Solutions Architect, Business Intelligence