A customer recently asked me for help creating a bunch of fake users for testing purposes. The actual use case involved a complicated migration and transformation of some user data from one system to their OCI IAM identity domain and they wanted to do some heavy duty testing with fake users before doing it for realsies – just to make sure their code was going to work properly.
If you know me you know my answer is always Yes. Not “yes, I can help you do that”, but “Yes. And I can show you how to do it yourself”. And if I can show them then I can show all of you how to do it too!
So let’s say you need… One Million Dollars Users.
Note: I really wanted to use Dr. Evil here but our lawyers, while not humorless, don’t like us doing that sort of thing for copyright reasons.
So enjoy this picture of a crowd that is way fewer than one million people:

Photo by Yvette de Wit via Unsplash
How do you go about creating them? How do you load them into an OCI IAM identity domain? And when you’re done how do you get rid of them? Read on for the answers to these and other questions!
First problem: making fake user data
The first thing we need is a way to make up fake user data. When you create a user you need at least three items: a given name, a surname, and a username. By default OCI IAM also requires an email address (though you can turn this off), but for simplicity we can use the (fake) email address as the username.
But how do we create all of that?
Python’s got your back with an aptly named module called Faker that does all that for you. Install that module and this code will create a single given name, surname, and email address:
from faker import Faker
fake = Faker()
gn = fake.first_name()
sn = fake.last_name()
email = fake.email()
We want a whole bunch of users so just throw a for loop around it and you’re good.
Second problem: loading them into the Identity Domain
OCI IAM allows you to create users in a bunch of ways. Among them:
- From the OCI Console (i.e. by hand)
- Via the OCI CLI
- Via the OCI API
- Via the industry standard SCIM APIs
- Via a CSV in the OCI Console
- Via a CSV using the API
Each of these has its uses. But obviously we don’t want to do this one at a time so 1, 2, and 3 are out. Options 5 and 6 seem like good ones, and it’s totally reasonable to do that; we could write a Python script that generates CSV files and then just load them in.
But I don’t want to do that. I want to use an API because APIs are cool. Plus there are far too few examples just laying around that show you simple it is to use SCIM to do stuff like this. And there are even fewer examples that show you how to take advantage of a feature of SCIM that allows me to batch up multiple “operations” in a single REST call – something the SCIM RFC refers to this as Bulk Operations.
To use the SCIM APIs I am going to need to have my application authenticate to the Identity Domain.
1. I want to be able to run my scripts without having to go into the console to get an Access Token by hand.
2. I want the user records to show that they were created by my Python script, not by me. If I use an OAuth Application to do that then the “createdBy” field will have that info and I can search by that in the future.
So let’s go do it right…
Create an Application in your Identity Domain
The OCI IAM documentation explains how to create an Application, but in summary:
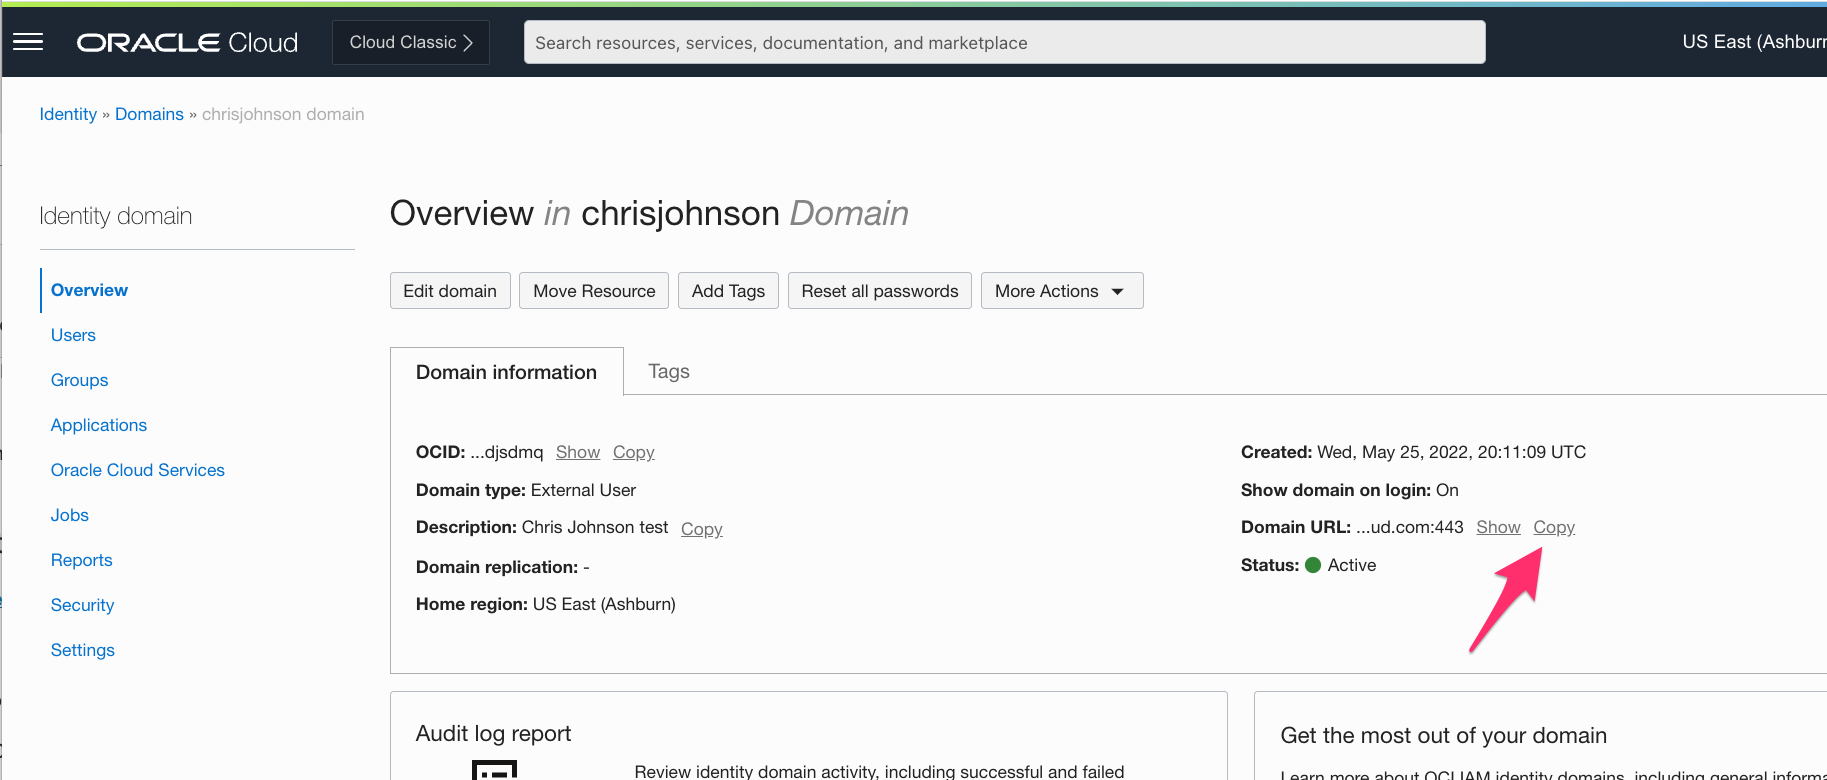
Step 1. Go to the OCI console and navigate to your Identity Domain
You can see your domains at https://cloud.oracle.com/identity/domains
We’re going to need the Identity Domain URL later so let’s get that from the Overview screen now. I’ll show you where we use it in a bit so just copy/paste it into Atom or Notepad or something.
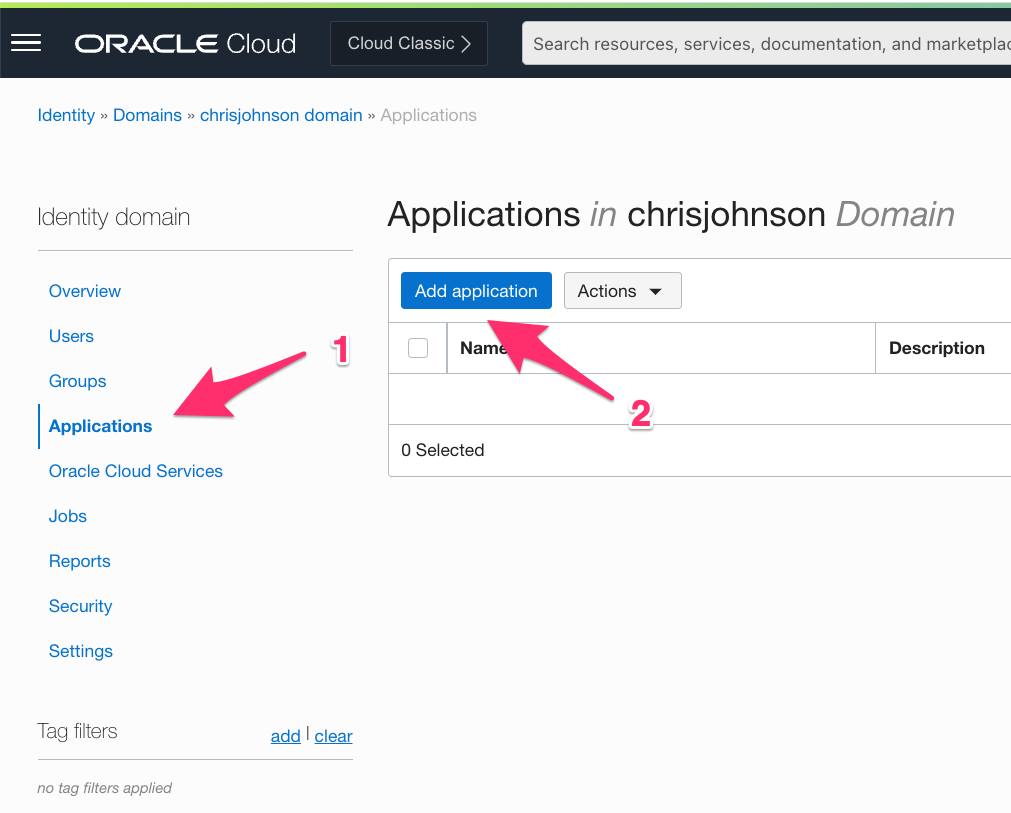
Step 2: Click Applications on the left hand side and then click the Add Application button
Step 3: Select Confidential Application
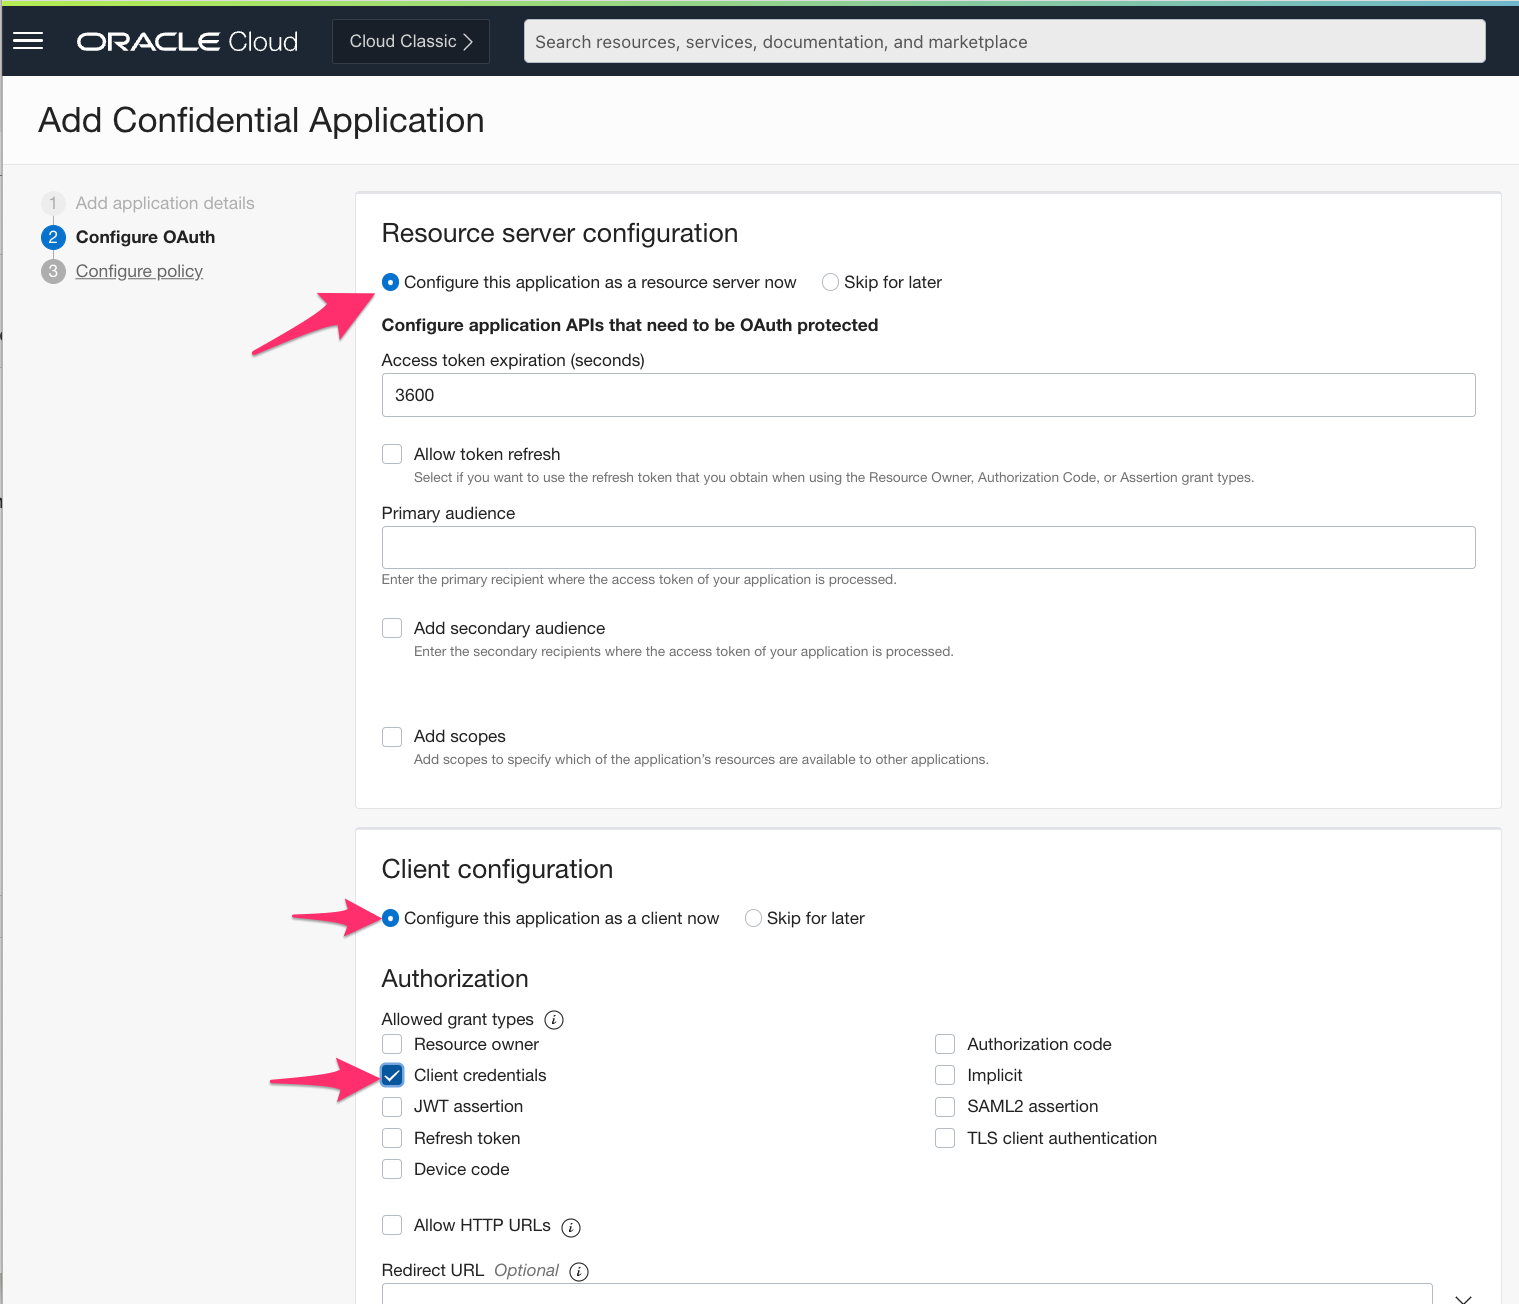
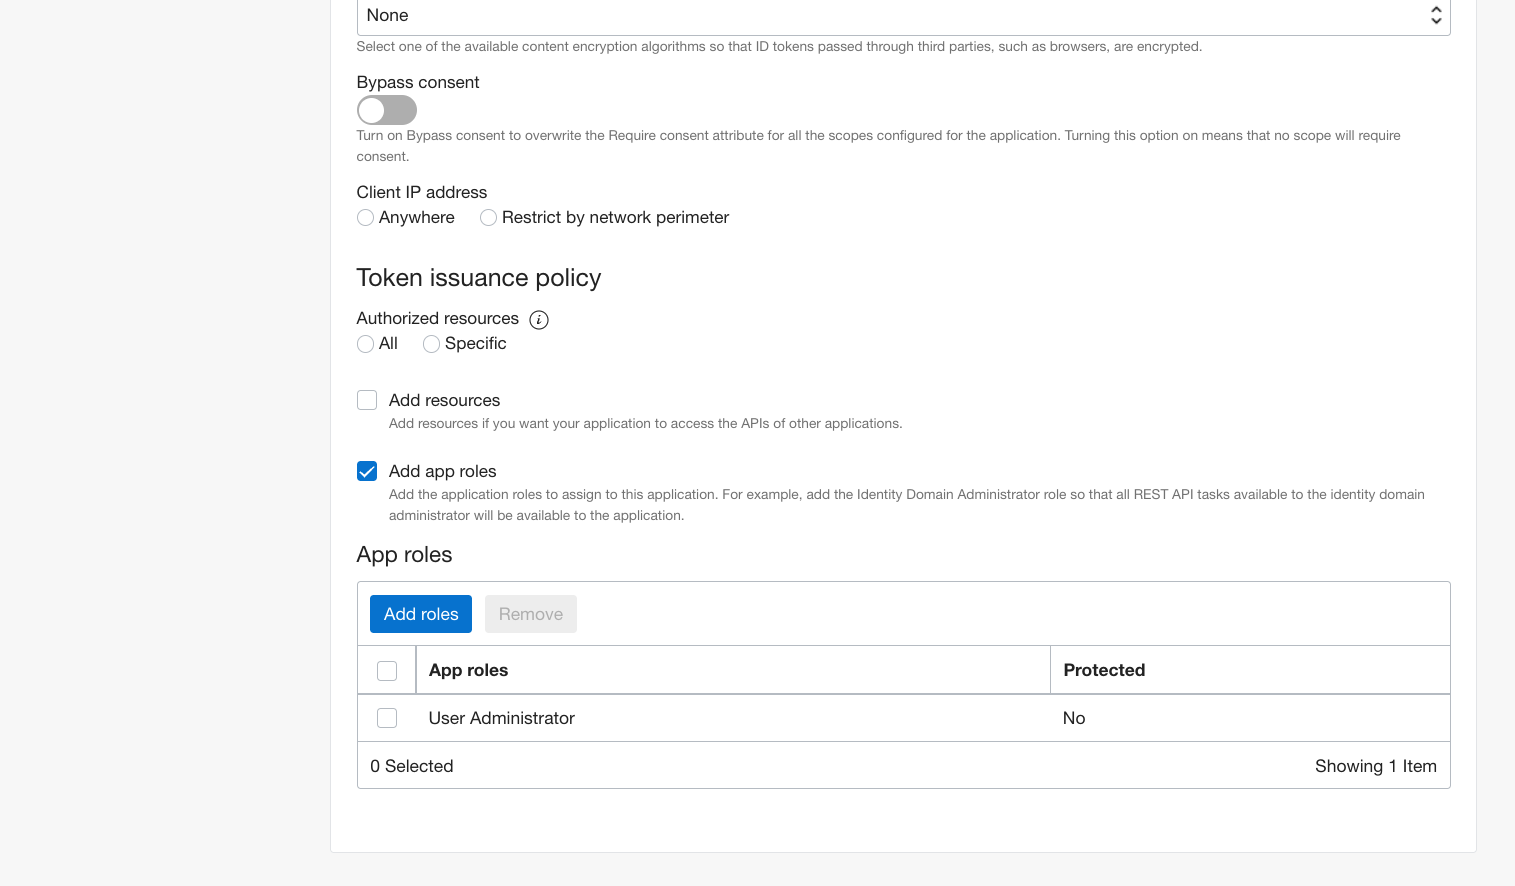
We want to create an OAuth 2.0 application that uses the Client Credentials grant type and has permission to call the IAM APIs in order to actually manage users. So we select “Confidential Application” and then launch the workflow:

Step 4: Configure the application
OCI IAM is under active development at the moment so these screens will probably have changed by the time you see this. But the steps should be pretty much as shown.
Give it a name:

Then Configure OAuth:
Step 5: Next through and Finish
Work your way through the workflow and click Finish on the last screen
Step 6: Activate the Application, then Copy/paste the Client ID and Secret
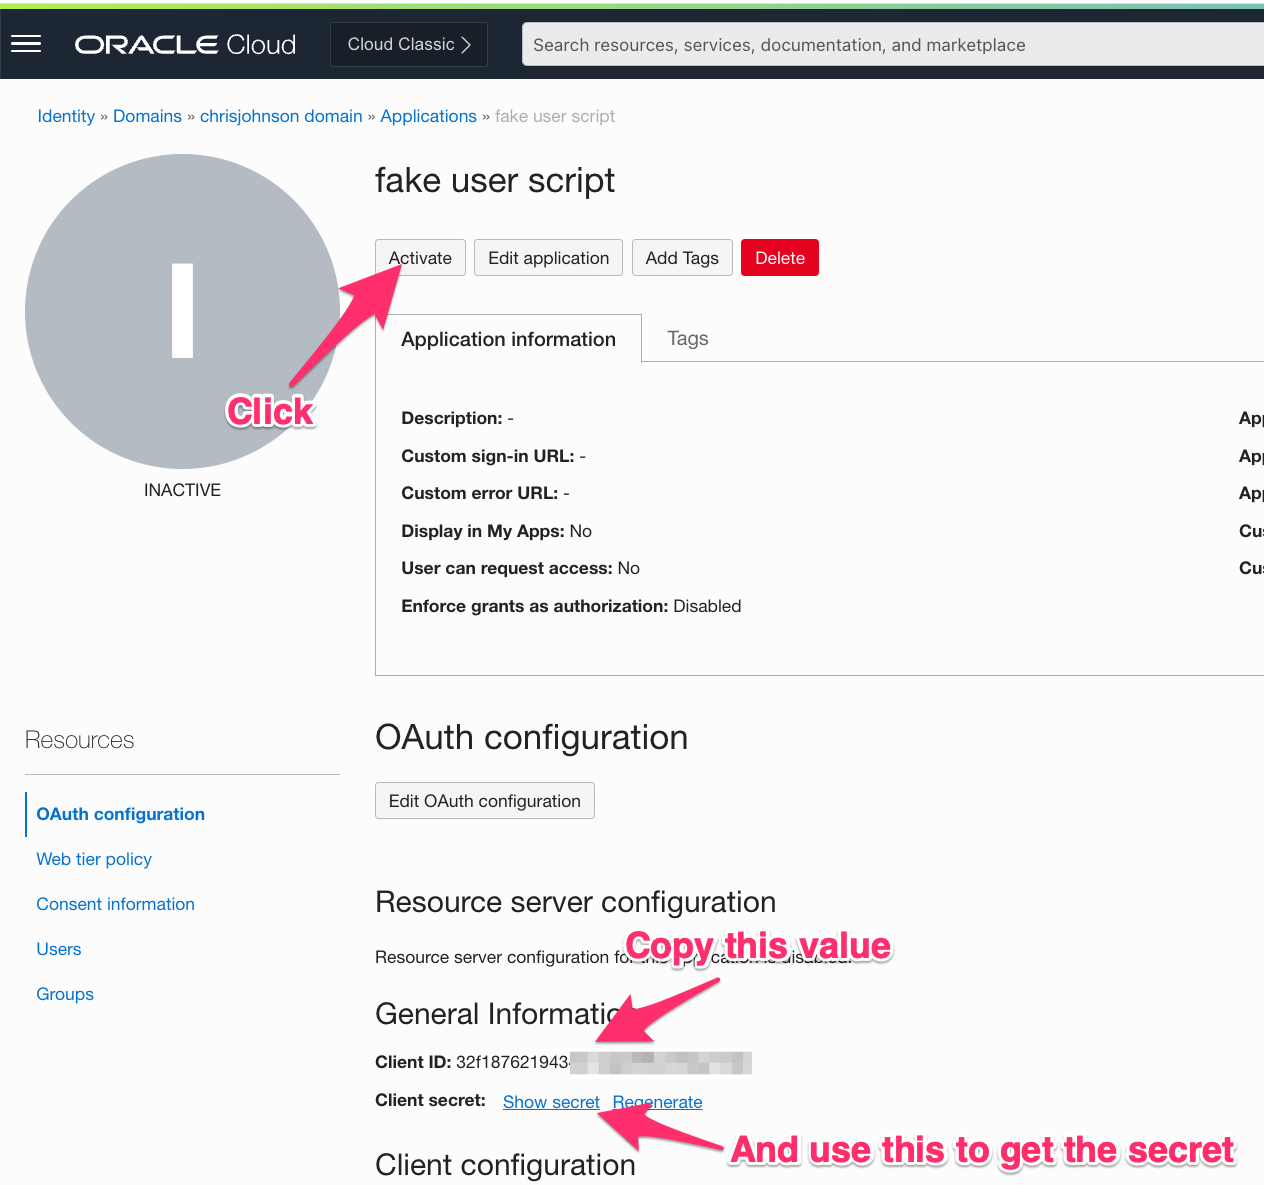
Put the Client ID and secret in the same place you stashed the identity domain URL.
Look at / grab my Python Code
I have published my Python code on Github @ https://github.com/therealcmj/fakingUsers (this link is to a specific commit because I’m going to extend this in the future).
Clone it to your machine (either your laptop or a Compute instance in OCI).
Edit fakeUsers.py (if desired)
The fakeUsers.py script has a definition of a user at around line 45 through 62 (as of this writing). Look for the line that starts with “data” and you can see the Python dict that represents a user. You can easily make changes to that – for example adding additional attributes and their values.
Note: One interesting item in each request is this line:
"urn:ietf:params:scim:schemas:oracle:idcs:extension:user:User:bypassNotification": True
This line tells OCI IAM not to send the user an email no matter what.
The code has a couple of variables at the top:
# this script doesn't check your work
# so make sure that NUMUSERS is divisible by BATCHSIZE please
NUMUSERS=1000
BATCHSIZE=100
NUMUSERS tells the script how many users you want to create. In this case just 1,000. Whereas BATCHSIZE indicates how many users should be created in each Bulk SCIM operation. Feel free to adjust the former as high as you’d like. A BATCHSIZE of 100 is the largest size I’d recommend but feel free to play with it if you want.
Update the configuration file
All of the code to interact with your identity domain is in IAMClient.py which gets its configuration from the IAMClientConfig.json file. You will need to edit that file to replace the URL, client ID, and secret with values from your environment.
A smarter alternative would be to put it in your OS’es secure storage using Python’s keyring package or storing it in an OCI Vault Secret. I have other plans for this code in the future so I’m going to leave this as is for the moment, but you have been warned. 🙂
Setup your environment
If you have used Python before and know what a Virtual Environment is just go ahead and do your thing and skip ahead to the next section.
If you haven’t done this before you’re going to want to do this:
python3 -m venv create venv
. venv/bin/activate
pip install -r requirements.txt
Those steps
(1) create a Virtual Environment where you will install all of the dependencies of the script. This helps protect other scripts on your system from using the wrong versions of libraries
(2) “Activate” the Virtual Environment
(3) installs all the dependencies
The Virtual Environment will live on in the “venv” directory even after you reboot. Which means the next time you come back to run these scripts you can skip steps 1 and 3.
Run it
Once you’ve done the above edits you’ll want to run the script.
In your terminal just type this command and hit return:
./fakeUsers.py
The script will go ahead and create your 1,000 users – 100 at a time (or NUMUSERS – BATCHSIZE at a time if you changed those values).
A few notes for you:
- The code I checked in has logging set to “DEBUG”. This is super chatty and you probably don’t actually need to see all that. Feel free to edit the that starts with “logging.basicConfig” changing DEBUG to INFO.
- The code in IAMClient.py does a “fire and forget” for the bulk calls. It doesn’t care if any or all of the requests actually succeed – it always returns success. If this bothers you feel free to fix it!
- The code sends each Bulk SCIM request synchronously. I create the request, send it, wait for IAM to tell me whether it succeeded or not (which I ignore), and then repeat the process. If you run this from inside OCI near your identity domain there will be nearly zero latency on that call. But if you run it in Boston (where I live) over a VPN to California and then back to Ashburn the latency actually starts to add up. Take this as you will.
Identifying the Fake Users
Up above I said:
2. I want the user records to show that they were created by my Python script. If I use an OAuth Application to do that then the “createdBy” field will have that info and I can search by that in the future.
If you look at a user created by the script you’ll see something like this:
  "idcsCreatedBy": {
     "$ref": "https://idcs-XXXX.identity.oraclecloud.com:443/admin/v1/Apps/1234567890",
     "display": "fakeusers",
     "type": "App",
     "value": "1234567890"
   },
The “value” there is the id of the application which, just like the username of a user, is different from the OAuth Client ID.
To go from an OAuth Client ID to the “id” of the application you need to search …/Apps with the filter
name eq "<the OAuth client ID>"
For example:
/admin/v1/Apps?attributes=name%2Cid&filter=name+eq+%22AAAAAAAAAAAAAAA%22
Cleaning up
This is all well and good but you pay for OCI IAM users on a per user per month basis. So unless you want to keep paying for these test users you probably want to clean them up.
I included cleanUsers.py that does exactly that. And it even goes out of its way to only delete users that were created by the fakeUsers.py script by going from the OAuth Client ID to the application ID and then searching for users created by that OAuth client1
A note about SCIM
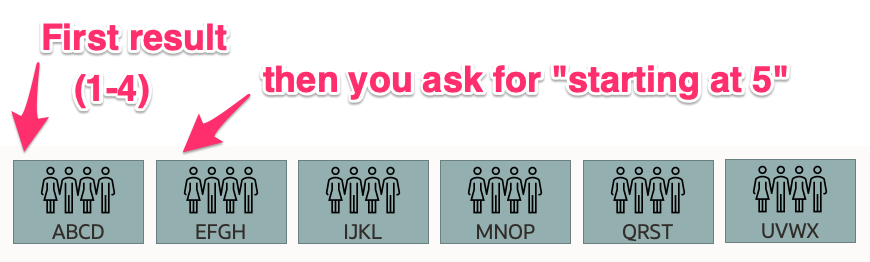
One of the cool things about SCIM is that it allows you to page through search results – you execute the search and you get back a result that says “there are $X matching results; here’s the first $Y of them”. Then you just execute the search again and tell the server to start at $Y +1 to get the next page. See section 3.4.2.4 of the RFC for info on exactly how.
In a picture that looks like this:
One of the terrible things about SCIM is that it explicitly declares (in that very same section) that “pagination is not stateful” and that “clients MUST be prepared to handle inconsistent results.” So if someone were to, oh I dunno, read 4 users, delete them, and then execute the same search and ask for users starting at 5 (i.e. 4 + 1) to get the next “page” then 4 users would get skipped. In our diagram that means that “E, F, G, and H” won’t get deleted!
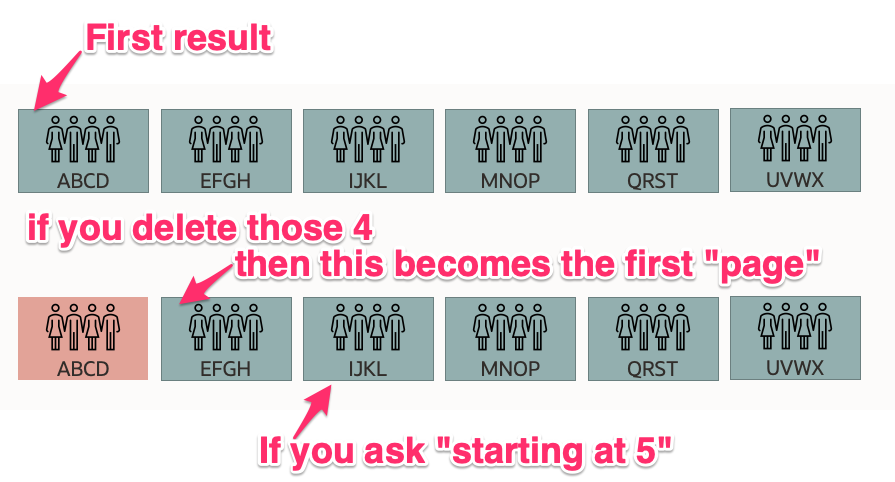
The first time you do this you skip 4 users. The second time you skip 8 (E,F,G,H and M,N,O,P) – the reason for that is left as an exercise for the reader to figure out. But importantly the further down the list you go the more users are going to get skipped each time!
There are a bunch of ways to work around this…
1: get all of the ids first. Then delete them all in a later step. This works great if you have a few hundred or thousand users. But when you have hundred of thousands, or millions the delay between making the list and starting to delete users is annoying.
2: retrieve e.g. 100 users and deleted them. Then just repeat that same process until all of the users were gone. This works fine except that you can only delete 100 users at a time and it can never be parallelized.
3: find a clever way to keep moving forward through the list of users even as users get deleted.
I choose violence.
Oops. I mean cleverness.
To work around that limitation of SCIM I decided to take advantage of the “id” attribute of each user. I search and ask the server to sort by “id” and return me 100 users. Then I simply work my way through that list building the bulk operation to delete each user and remember the last id I see. Then I repeat the process. This insures that each search continues to walk its way through the real set of users even if “earlier” users in the database been deleted.
You might think this is a lot like option 2, and it is. BUT it’s actually a bit more clever than you might think… because it will allow me to do things like spin a thread off to do the deletion while the main thread gets the next 100 users to delete. And since delete is a write operation and write operations are almost always somewhat slower than read operations I can queue up a bunch of deletes to run in batches… perhaps via Python’s ThreadPoolExecutor!
Which I’m going to do in a later code check-in.
Actually running the clean up script
If you aren’t running the deletion right away then you’ll need to remember to activate your virtual environment before running the script.
Like so:
. venv/bin/activate
 ./cleanUsers.py
Wrapping up
In this post I showed you how to do a bunch of useful things:
- Creating an Application in an OCI IAM identity domain
- Use the OAuth libraries to acquire an Access Token automatically from OCI IAM
- Invoke the SCIM APIs from Python
- Create and delete users within a Bulk operation in SCIM
- Search for an application in OCI IAM based on its OAuth client ID
- Search for users that were created by that application
Keep an eye on Github for updates to the script to parallelize it.
But keep an eye here for another couple of things that will make your life even better!