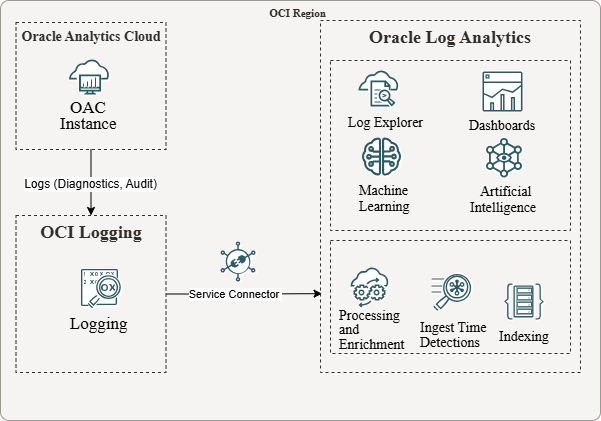
Oracle Log Analytics is a cloud solution in Oracle Cloud Infrastructure (OCI) that lets you index, enrich, aggregate, explore, search, analyze, correlate, visualize, and monitor all log data from your applications and system infrastructure. By ingesting Oracle Analytics Cloud (OAC) logs into Log Analytics, you can analyze the logs to troubleshoot issues and observe the operational tasks. The interactive visualizations provide several possibilities to slice and dice the data. You can save interesting searches and place them as widgets on management dashboards.
In this blog I describe the process for enabling an OAC instance to publish logs to the OCI Logging service and moving the logs to Oracle Log Analytics via an OCI service connector.
For costs associated with using the Logging and Log Analytics services in OCI, refer the O&M pricing link in the reference section below.
Reference Architecture
Pre-Requisites
You need to have enabled Log Analytics in your tenancy, and be a member of an IAM group with the necessary privileges to use the service. For more details refer to documentation here: Enable Access to Log Analytics and Its Resources.
There are two methods for moving OCI service logs to Log Analytics:
- Using the “Add Data” workflow in Log Analytics: In OCI console, navigate to “Observability & Management”->”Log Analytics”->”Administration”->”Overview”. Click on “Add Data”, expand “Monitor OCI resources”, click “Configure log collection for OCI resources”, and follow the instructions.
- Manual configuration. This is what I am using in the following steps.
Create Log Groups
Log groups are logical containers for organizing log data. We need to create groups in Logging and in Log Analytics:
- In OCI Console, navigate to “Observability & Management”->”Logging”->”Log Groups”.
- Select the compartment where you want the log group to reside.
- Click “Create log group”, provide a name and description, and click “Create”.
- Still in OCI console, navigate to “Observability & Management”->”Log Analytics”->”Administration”->”Log Groups”.
- Create a Log Analytics log group in a similar manner.
Enable OAC Logs in Logging Service
By default, OCI service logs are disabled. Follow the steps below to enable OAC logs.
- In OCI Console, navigate to “Observability & Management”->”Logging”->”Log groups”.
- Click on the log group just created.
- On the log group home page, click on the “Logs” tab.
- Click on “Actions”->”Enable service log”.
- On the “Enable resource log” screen:
- Select the compartment where your OAC instance is located.
- For service, select “Analytics Cloud”.
- For “resource”, select your OAC instance.
- Under “Configure log”, click the “Log category” drop-down.
- Select one of the two categories (Audit or Diagnostic Logs).
- Provide a name for the log (for example: my_oac_instance_audit_log or my_oac_instance_diagnostic_log).
- Click on “Advanced options”.
- Under “Log location”, choose a compartment for your log and ensure the correct log group is selected.
- Leave “Log retention” at default (1 month), since we’ll be moving the logs to Log Analytics.
- Click “Enable”.
- Repeat the process for the second log category. You should now have two logs in your log group, one for OAC audit and the other for OAC diagnostic.
Move Logs to Log Analytics using a Service Connector
- In OCI Console, navigate to “Observability & Management”->”Logging”->”Connectors”.
- Click “Create connector”.
- Enter a name and description and choose a compartment where the connector should reside.
- Under “Configure connector”, select “Logging” as the source, and “Log Analytics” as the target.
- Under “Configure source”, select the log group just created, and select one of the two OAC logs you enabled.
- Click “+Another log” and add the second OAC log.
- We’ll skip the optional tasks for the purpose of this blog.
- Under “Configure target”, select the Log Analytics log group created earlier.
- You are asked to create a policy for the connector. If your IAM group has been granted the required privileges, you should be able to create the policy in the indicated compartment.
- The last item on this screen is for enabling the connector logs. We’ll skip it for the purpose of this blog.
- Click “Create”.
After a few minutes, the logs should start flowing through the connector if there is activity in the OAC instance. To verify, navigate to the connector home page, then under “Resources”, click on Metrics and check the various connector metrics.
Oracle Log Analytics provides two out-of-the-box log sources for OAC logs:
- OCI Analytics Cloud (OAC) Audit Logs
- OCI Analytics Cloud (OAC) Diagnostic Logs
When OAC logs are ingested in Log Analytics, each log will be automatically associated with the corresponding log source.
Verify Log Collection is Working
In OCI console, navigate to “Log Analytics”->”Log Explorer” and run the following queries:
- ‘Log Source’ = ‘OCI Analytics Cloud (OAC) Audit Logs’
- ‘Log Source’ = ‘OCI Analytics Cloud (OAC) Diagnostic Logs’
- ‘Log Source’ like ‘%Analytics Cloud%’
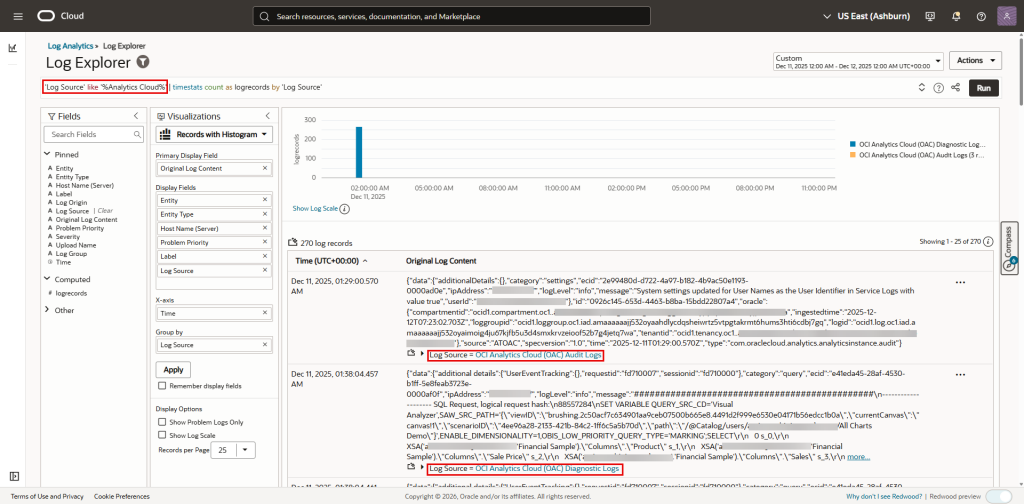
Select the appropriate time interval in the time selector in the upper right-hand of the screen to see the log records that were ingested in Log Analytics in this period. If you’re not familiar with the various features of Log Explorer, review the documentation here: Familiarize Yourself with Log Explorer.
Gain Insights into Your OAC Log Data
Now that your OAC logs are being collected in Log Analytics, you can use the various features of this service to explore your log data, debug issues, create dashboards, create detection rules and set alarms, etc. Check the reference section below for links to documentation of many of the features of Log Analytics.
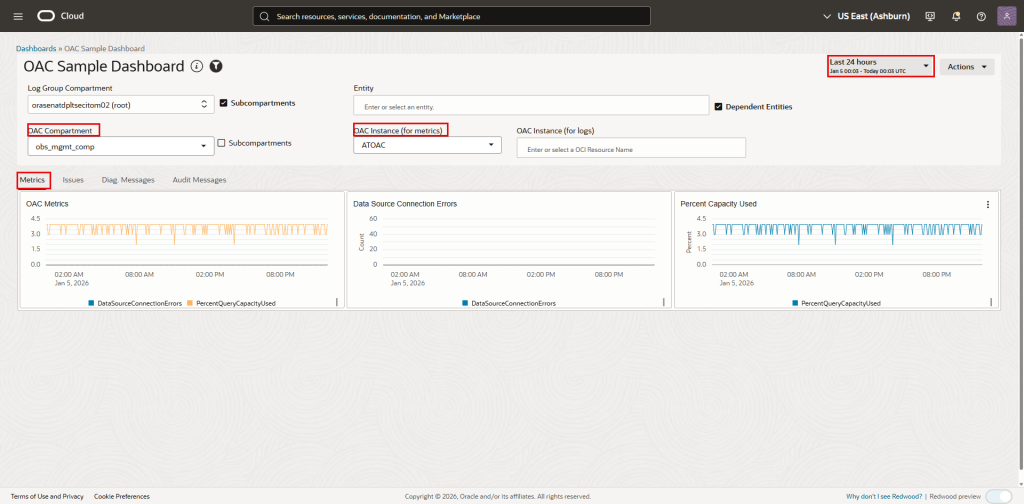
You can save interesting searches you create in Log Explorer as widgets to place on new or existing dashboards. To get you started, download the “OAC Sample Dashboard.json” file from GitHub for a sample dashboard I created for this blog. To import it using the OCI console, navigate to “Observability & Management”->”Management Dashboard”->”Dashboards”. Click “Import dashboards” and specify the JSON file. Specify your compartment for both the dashboard and the saved searches (each widget on the dashboard is a saved search).
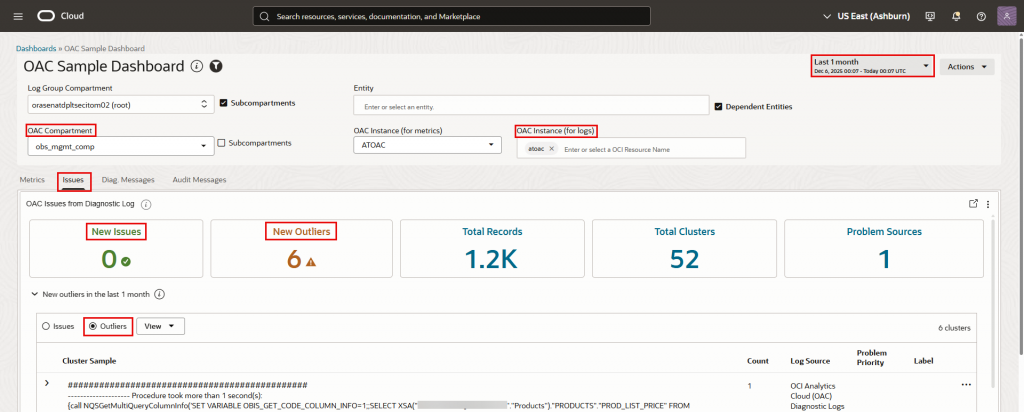
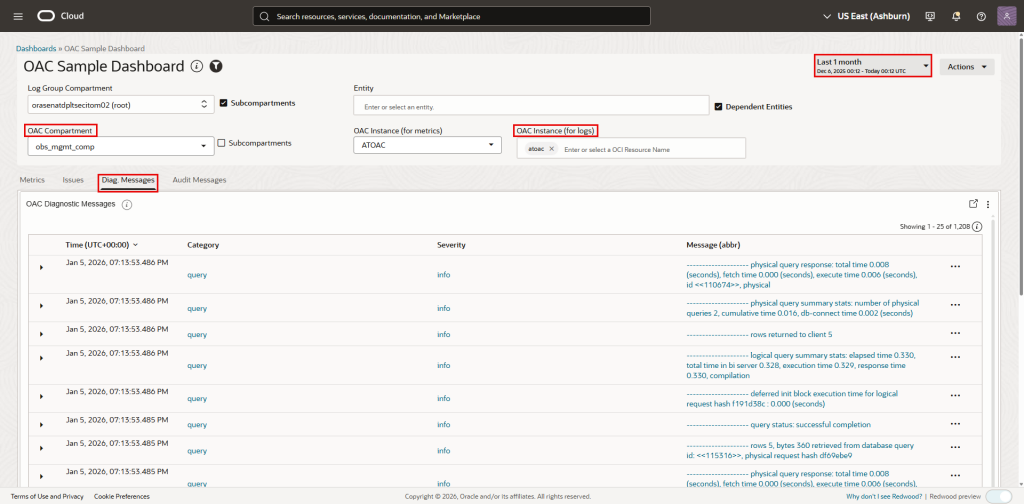
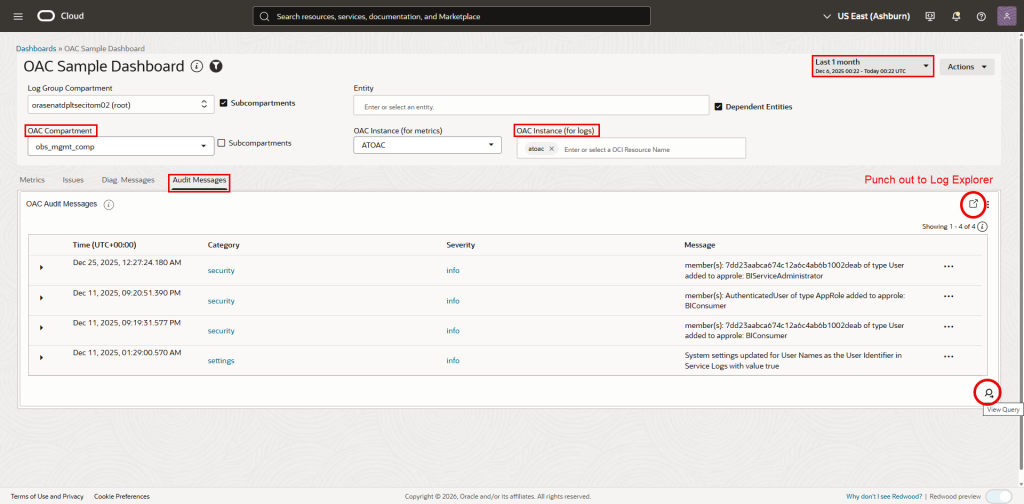
The dashboard has 4 tabs. The first tab, “Metrics”, shows OAC metrics data from the OCI Monitoring service, not logs. The other 3 tabs show log data from Log Analytics. If the metric widgets do not show data, it may be because your OAC instance is in a different compartment than your dashboard. If that’s the case, edit the dashboard, then edit each widget on this tab by clicking the 3-dot menu in the top right corner of the widget. In the right hand side navigation bar, under “Configured widget inputs”, link the “Compartment” parameter with the compartment where your OAC instance is located.
Note the Monitoring service keeps metric data for 3 months only. There’s no restriction on retention period for log data in the Log Analytics service. In Log Analytics, you have control on how long to retain log data. Refer to “Manage Storage” for more information.
Following are screenshots of the OAC Sample dashboard: