Sensitive data, wether if it’s customer information, healthcare records, or financial transactions remains a top priority for securing organizations leveraging Oracle Cloud Infrastructure (OCI). A constant is security threats continuously evolving and changing with new vectors of attacks. With the growing importance of regulatory compliance, it’s essential to enforce strict access controls and robust data protections across your cloud footprint. That’s where Zero Trust Packet Routing (ZPR) steps in. ZPR empowers OCI customers to define clear, easily managed trust boundaries between workloads. By replacing traditional and often complex IP-based security rules with a default-deny approach using intuitive, human-readable policies.
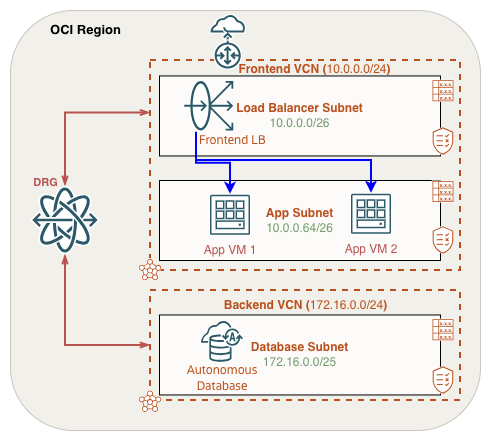
In this post, I’ll guide you step by step through implementing a ZPR policy for inter-VCN ZPR connectivity. So that you can intently protect your organization’s critical workloads on OCI. We’ll use a common three-tier architecture consisting of a Front End (public load balancer), App (web VMs), and Backend Database tier. Reference the following diagram throughout this guide:
Enabling Zero Trust Packet Routing (ZPR)
Before you can implement Zero Trust Packet Routing, the service must be enabled in your tenancy. Details on enablement can be found here, but I want to call out important points with ZPR enablement.
First, ZPR can only be enabled in your tenancy home region and when doing so, a default “security attribute namespace” is created in your root compartment. It’s not required to use this default name space when creating your security attributes.
Enabling ZPR and creating ZPR policies does not impact communication between OCI resources that lack the ZPR security attribute. ZPR policies are enforced only on resources in which the attribute has been applied. It’s important to note that ZPR operates alongside existing Network Security Group (NSG) and Security List (SL) rules. This means that even if a ZPR policy permits access to a specific OCI resource, access will still be denied unless there is a corresponding NSG or SL rule in place.
Building the ZPR Artifacts
After ZPR is enabled in your tenancy, there are three main tasks required before the ZPR service can be applied to OCI resources:
- Creating a Security Attribute Namespace
- Creating Security Attributes
- Creating ZPR Policies
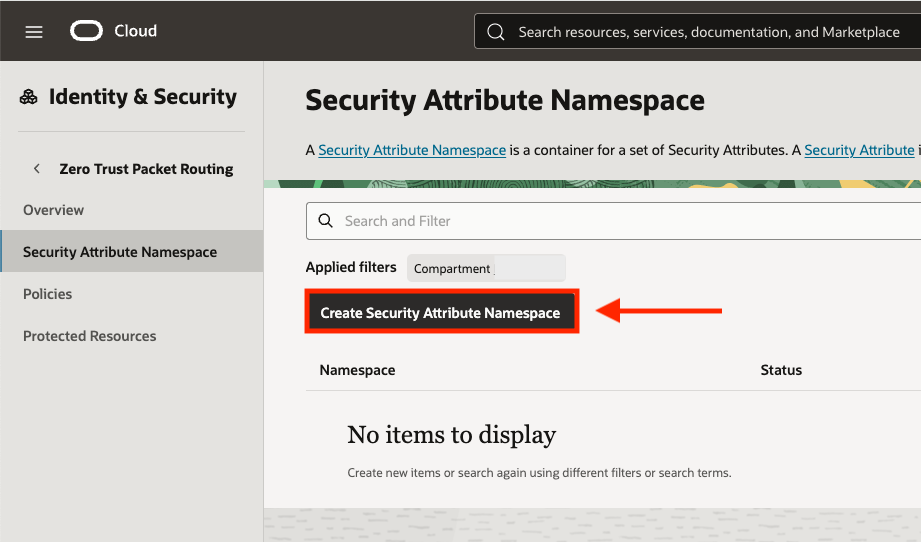
Create a Security Attribute Namespace
We’ll start with creating our security attribute namespace. This can be accessed from the Zero Trust Packet Routing menu within the main Identity & Security menu. To begin, select the Create Security Attribute Namespace button:
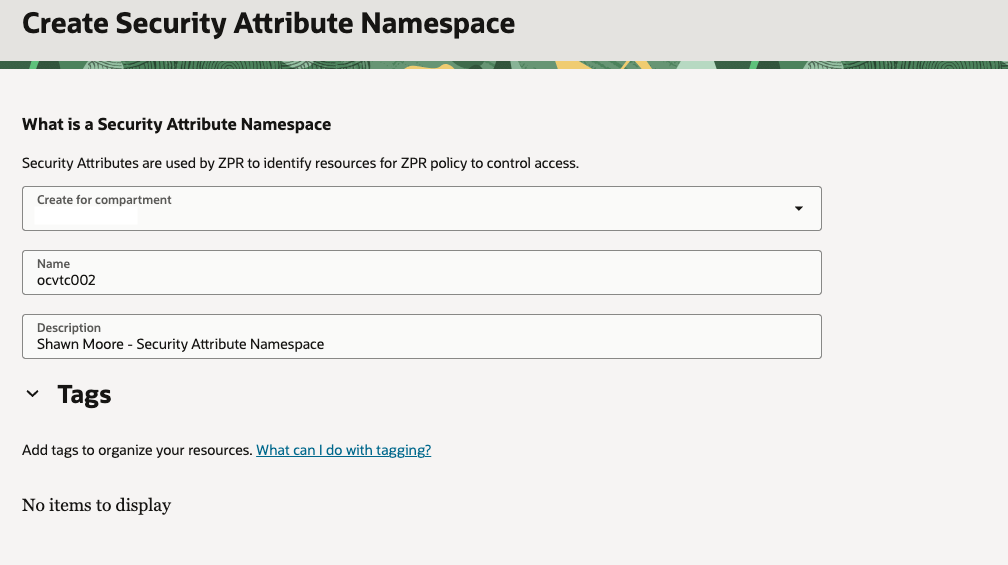
Select the correct compartment, provide a name, and a description (Tags optional) for the security attribute namespace. Once finished, click the Create button on the bottom right of the console:
Create Security Attributes
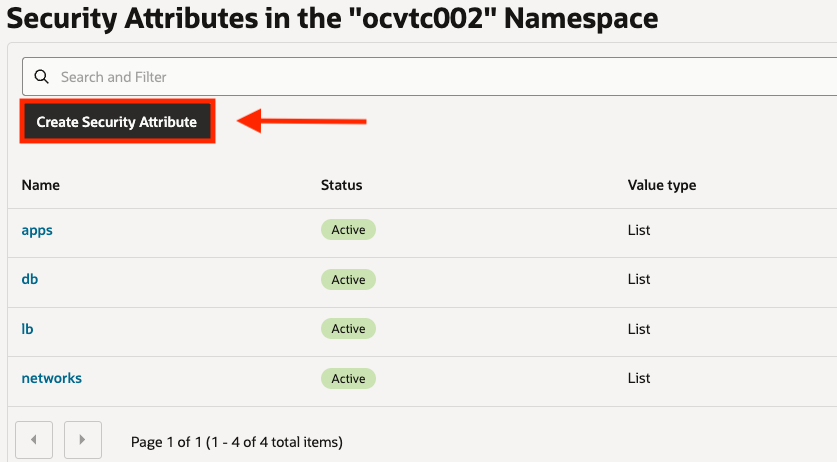
Next, we’ll create security attributes, which functions similar to OCI tags. You apply these attributes to OCI resources, and ZPR policies then reference them to define allowed communication paths.
Attributes can be created as freeform (static) key/value or a list key/value pairs. In this example, we’ll use the list type which allows us to pick from a list of values for each security attribute. I find that this reduces configuration errors and provides clearer governance over which attributes can be applied to OCI resources, allowing for easier policy management.
For our environment, we’ll need to create a security attribute for our Load Balancer, App VMs, Database, & VCNs. I created the following security attributes and associated key/values:
| Attribute Name (Key) | Value(s) | Value Type |
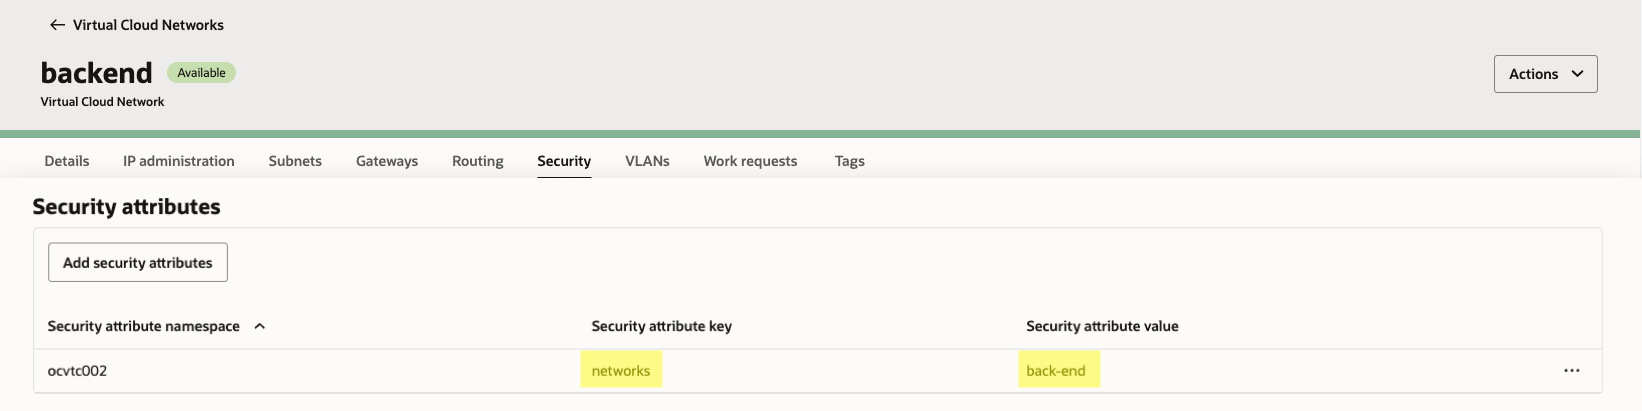
| networks | front-end back-end | List |
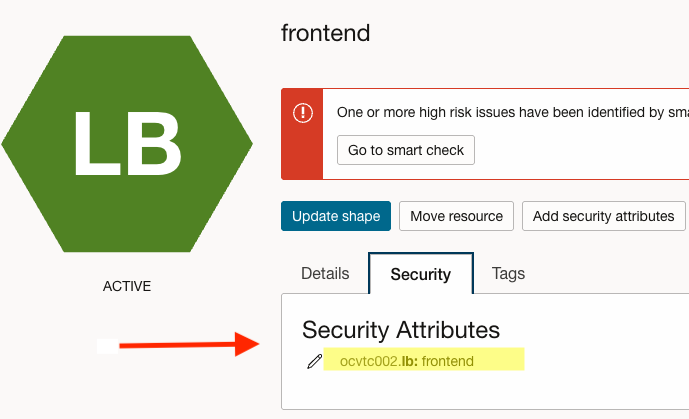
| lb | frontend | List |
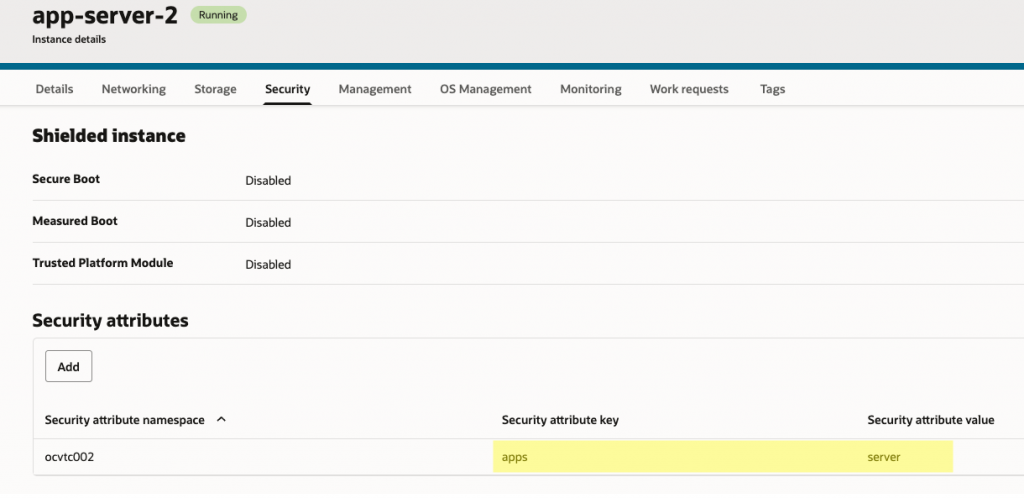
| apps | server | List |
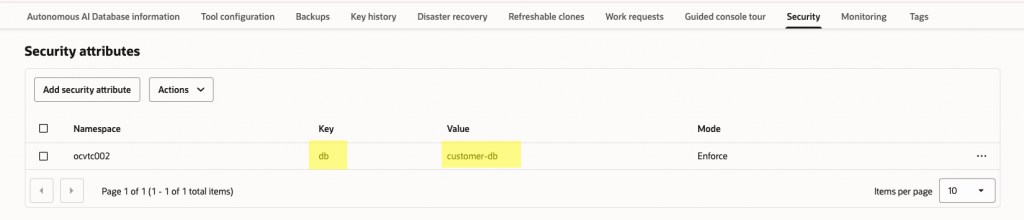
| db | customer-db | List |
Create ZPR Policy
Now that we’ve defined our security attributes, we can build the corresponding ZPR policies. The ZPR policies will be constructed such that external users can only access the front-end load balancer over HTTP port 80. Meanwhile, only the load balancer can communicate with the application servers over port 80. And finally, only the app servers will have the ability to connect to the backend database in a separate VCN over SQL TCP port 1521.
Summarized, we’ll enforce the following traffic flows:
- External users → front-end public load balancer: TCP/80 (HTTP) only
- Load balancer → application servers: TCP/80 only
- Application servers → backend database (separate VCN): TCP/1521 only
All other paths are denied by default.
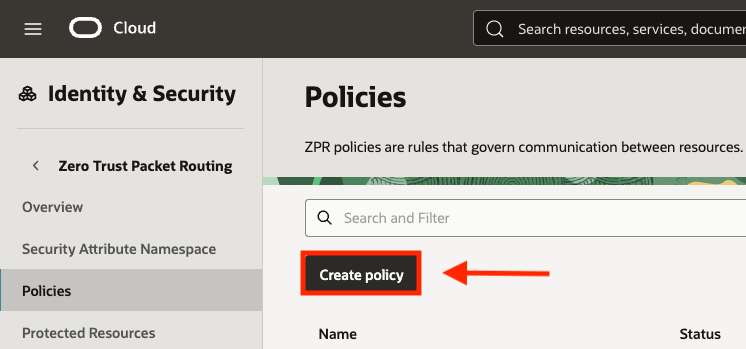
Navigating back to the ZPR main menu, click the Create policy button to begin building our policy:
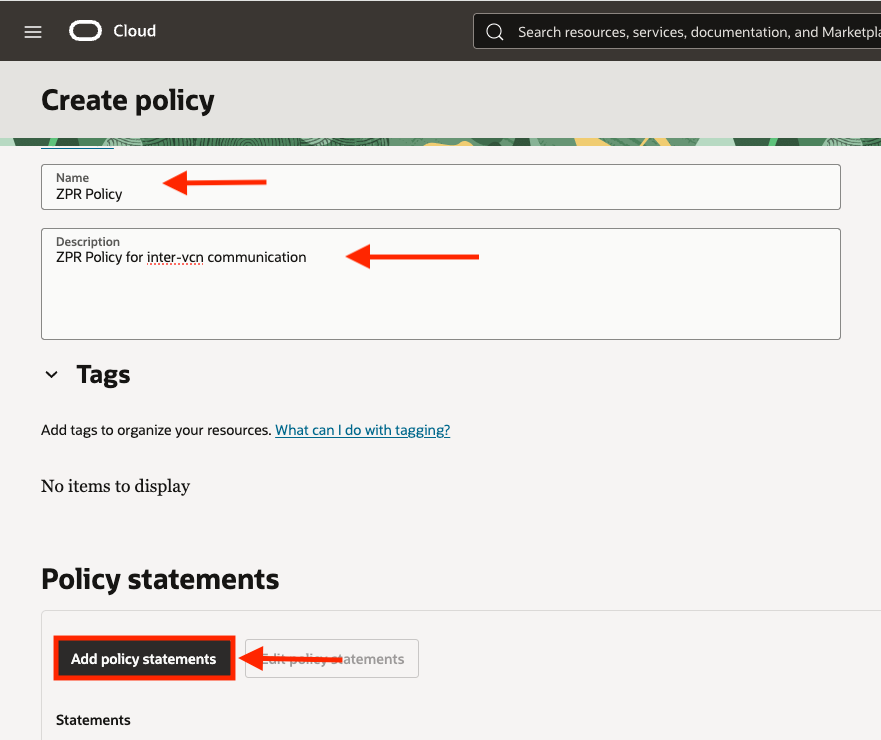
When creating a ZPR policy, a Name and Description is required while any additional tags are optional. Once provided, you can then click Add policy statements to write your policy:
There are three ways to create ZPR policy statements. Either with the simple policy builder, policy template builder, or manually. For my example, I chose to use the manual policy builder option. In the below screenshot you can see the first statement that will allow external clients to connect to my front end public load balancer in the front-end VCN over TCP/80:
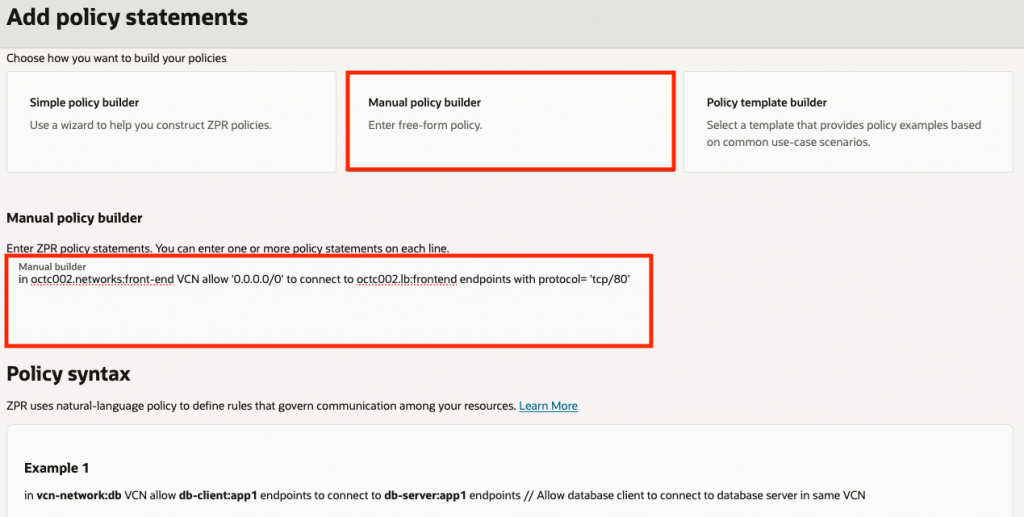
In ocvtc002.networks:front-end VCN allow '0.0.0.0/0' to connect to ocvtc002.lb:frontend endpoints with protocol='tcp/80'I created two additional policy statements that will allow my Load Balancer to connect to the App VM backends over TCP/80.
In ocvtc002.networks:front-end VCN allow ocvtc002.lb:frontend endpoints to connect to ocvtc002.apps:server endpoints with protocol='tcp/80'Along with a policy that allows the App VMs to connect to the database in the backend VCN over TCP/1521:
allow ocvtc002.apps:server endpoints in ocvtc002.networks:front-end VCN to connect to ocvtc002.db:customer-db endpoints with protocol='tcp/1521' in ocvtc002.networks:back-end VCN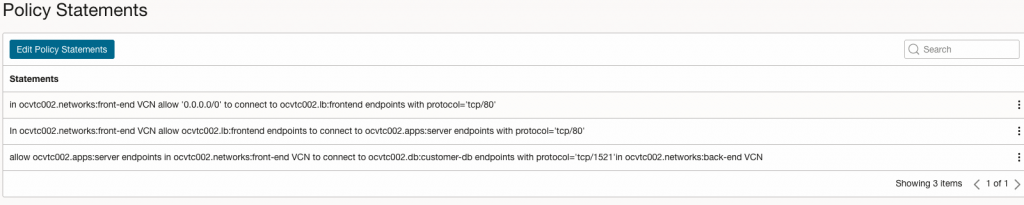
Applying Security Attributes to Resources
The final step is to apply the appropriate security attributes to our resources as needed. Recall that we’ve created attributes for our VCNs, Load Balancer, App Servers, & the Database. Lets apply the attributes to each of these resources now.
Front End VCN (Contains our LB and App Servers):

Back End VCN (Contains our DB, connected to the Front End VCN via a Dynamic Routing Gateway):
Front End Load Balancer:
App Servers:
Database:
Verification
With my ZPR policy created and applied to our resources, I performed the following connectivity verifications:
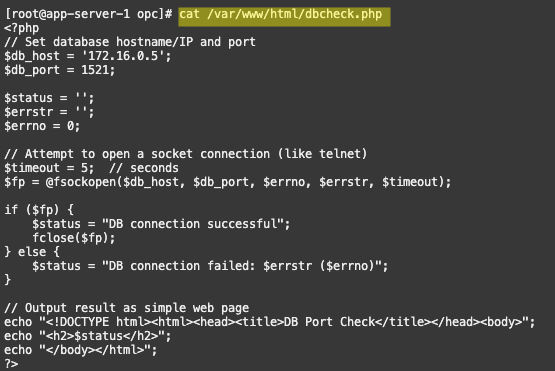
First, I created a simple script with PHP (dbcheck.php) on my Web App VMs running Apache to verify that I could connect to the backend database over SQL (TCP port 1521) with my ZPR security attributes assigned. If connectivity is successful, the script will display the message “DB connection successful“:
Application to database connectivity was confirmed with a telnet and a cURL:

Now to perform my final test. Recall that the Load Balancer allows connectivity over TCP port 80 from external clients and also connects to the App VMs over port TCP/80.
Using a web browser, I successfully connected to the public front end load balancer IP address (HTTP TCP port 80) with the URL path /dbcheck.php. The response from my App VMs displayed the expected “DB connection successful” message in my web browser. Indicating that I was able to connect end-to-end from my browser to the database:

Conclusion
Implementing inter-VCN ZPR policies on OCI is just one powerful example on how to strengthen your organization’s security posture with Zero Trust Packet Routing (ZPR). By following similar steps outlined above, you can confidently define and enforce strict trust boundaries, ensuring that only authorized workloads communicate across your environment. As enterprise cloud architectures become more complex, solutions like ZPR offer a clear path toward scalable, manageable, and robust security. Taking this proactive approach not only helps protect your most critical data, but also positions your organization to meet evolving compliance requirements and respond to tomorrow’s threats with confidence.