Oracle Data Transforms, now with a powerful Python API, makes automation and consistency within your data workflows straightforward, whether you’re building, migrating, maintaining, or scheduling data pipelines. Previously, we shared an introduction and installation guide, including your first connection script to Oracle Data Transforms. Make sure to review that blog before reading this one.
Now, let’s walk through creating a Data Flow, including adding new or imported Data Entities and ultimately scheduling execution.
Creating a dataflow
Importing modules and connection to an Oracle Data Transforms instance
Let’s start by importing the required modules and creating a connection. For authentication, securely pass your password into the workbench constructor—ideally, this should come from a vault or secrets manager rather than hardcoding it.
from datatransforms.workbench import DataTransformsWorkbench,WorkbenchConfig
from datatransforms.dataflow import DataFlow
from datatransforms.dataentity import DataEntity
from datatransforms.dataflow_load_options import OracleInsert,DataFlowIntegrationType
from datatransforms.dataflow import DataFlow,Project,AggregateAttribute

pswd="<your_data_transforms_password>" # ideally retrieved from a vault
connect_params = WorkbenchConfig.get_workbench_config(pswd)
workbench = DataTransformsWorkbench()
workbench.connect_workbench(connect_params)

workbench.get_all_connections()
The last line retrieves all connections, so we can now import or create new Data Entities for these connections.
Creating and importing Data Entities
For this blog, we will use the moviestream dataset available at : https://objectstorage.us-ashburn-1.oraclecloud.com/n/c4u04/b/moviestream_landing/o. Our goal is to generate a monthly report for our Loyal Customer team, showing which customer segments are most loyal and identifying segments that show potential for growth. Specifically, we’ll calculate the number of long-term subscribers in each segment. While the CUSTOMER Data Entity already exists, we need to import CUSTOMER_SEGMENT as a source and create LONG_TERM_SUBSCRIBER_SEGMENT as our output target.
To create a new Data Entity from an existing database table, we need to specify our Connection name as defined in Oracle Data Transforms, the database schema and the name of the table.
# Create a new Data Entity from an existing database table
cust_seg = DataEntity().from_connection("adb23a1","JEROMEFR").entity_name("CUSTOMER_SEGMENT")
workbench.save_data_entity(cust_seg)
We can also create a Data Entity from scratch by adding columns manually. The database table will be created later when we first execute our Data Flow.
# CREATE the target Data Entity
target_table = DataEntity().from_connection("adb23a1","JEROMEFR").entity_name("LONG_TERM_SUBSCRIBER_SEGMENT")
target_table.add_column(name="SEGMENT_ID",position=1,dataType="NUMBER",dataTypeCode="NUMBER",length=38,scale=-0)
target_table.add_column(name="SEGMENT_NAME",position=2,dataType="VARCHAR2",dataTypeCode="VARCHAR2",length=500,scale=0)
target_table.add_column(name="SEGMENT_SHORTNAME",position=3,dataType="VARCHAR2",dataTypeCode="VARCHAR2",length=200,scale=0)
target_table.add_column(name="LONG_TERM_SUBSCRIBERS",position=4,dataType="NUMBER",dataTypeCode="NUMBER",length=38,scale=-0)
workbench.save_data_entity(target_table)
Creating the Data Flow and adding Data Entities
We want to create a new Data Flow in a project named Moviestream. We can also optionally add a folder. In our case, the project and the folder are not yet present in Oracle Data Transforms but the following code will create them.
df = DataFlow("DF_LONG_TERM_SUBSCRIBER_SEGMENT","MOVIESTREAM", "MONTHLY_REPORT")
Next, let’s add both our source Data Entities and our target Data Entity to the Data Flow using the following syntax.
source_table=df.use(connection_name="adb23a1",schema_name="JEROMEFR",data_entity_name="CUSTOMER")
source_table=df.use(connection_name="adb23a1",schema_name="JEROMEFR",data_entity_name="CUSTOMER_SEGMENT")
target_table=df.use(connection_name="adb23a1",schema_name="JEROMEFR",data_entity_name="LONG_TERM_SUBSCRIBER_SEGMENT")
Preparing properties for Aggregate Transforms
As we want to count the number of customers for each segment, we will need to add an Aggregate Transform in our Data Flow. We first need to create a list to define the attributes in the Aggregate component. For each of them, we want to specify the datatype and if it is part of the GROUP BY clause or not.
agg_attr=[]
agg_attr.append(AggregateAttribute("SEGMENT_ID","NUMBER",20,"CUSTOMER_SEGMENT.SEGMENT_ID", is_group_by="YES"))
agg_attr.append(AggregateAttribute("SEGMENT_NAME","VARCHAR2",500,"CUSTOMER_SEGMENT.NAME", is_group_by="YES"))
agg_attr.append(AggregateAttribute("SEGMENT_SHORTNAME","VARCHAR2",200,"CUSTOMER_SEGMENT.SHORT_NAME", is_group_by="YES"))
agg_attr.append(AggregateAttribute("LONG_TERM_SUBSCRIBERS","NUMBER",38,"COUNT(CUSTOMER.CUST_ID)", is_group_by="NO"))
We now need to create a dictionary to map each of these attributes with a column from a source table or an aggregate expression – COUNT(CUSTOMER.CUST_ID) in our case.
agg_map={}
agg_map["COUNT_SUBS.SEGMENT_ID*"]="CUSTOMER_SEGMENT.SEGMENT_ID"
agg_map["COUNT_SUBS.SEGMENT_NAME*"]="CUSTOMER_SEGMENT.NAME"
agg_map["COUNT_SUBS.SEGMENT_SHORTNAME*"]="CUSTOMER_SEGMENT.SHORT_NAME"
agg_map["COUNT_SUBS.LONG_TERM_SUBSCRIBERS"]="COUNT(CUSTOMER.CUST_ID)"
Selecting a loading strategy
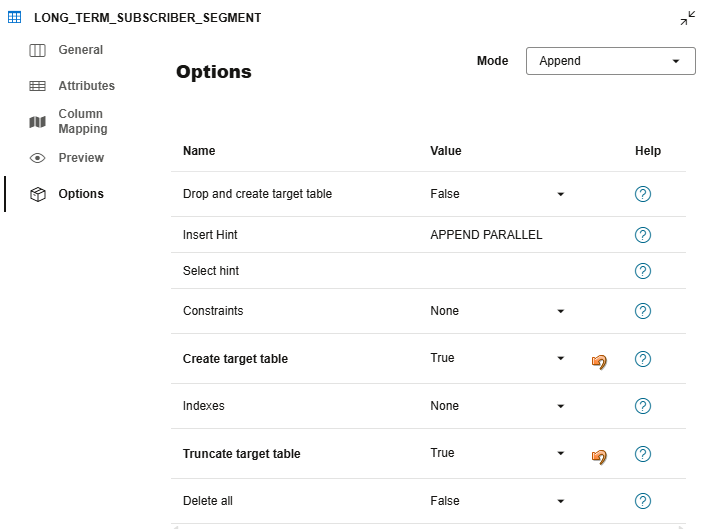
Before adding all the components to the Data Flow, we need to choose a loading strategy. We can append, merge, drop and recreate, create if missing, or truncate the target—here, we’ll create if needed and truncate before each load.
#Define the load table properties. The columns are auto mapped
OracleInsert.CREATE_TARGET_TABLE = True
OracleInsert.TRUNCATE_TARGET_TABLE = True
load_options=DataFlowIntegrationType.append()
load_options.update(OracleInsert.options())
Adding transforms and saving the Data Flow
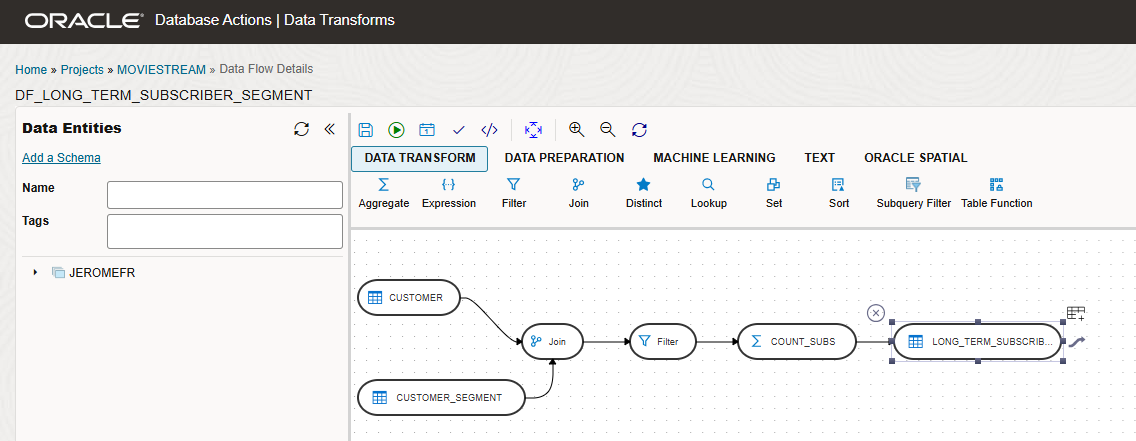
We can now add our Data Entities and our Transforms to our Data Flow. We are first adding our two source Data Entities – the existing one (CUSTOMER) and the newly imported one (CUSTOMER_SEGMENT). We then join them using the SEGMENT_ID in both tables before filtering on customers that have subscribed for 3 years or more. Let’s add our aggregate that we call COUNT_SUBS and pass the list of attributes and the dictionary of mappings. Finally, we can define the target table and pass the loading options we have just defined.
#Define the flow of transforms in the data flow
df.from_source("CUSTOMER","adb23a1.JEROMEFR.CUSTOMER").\
     from_source("CUSTOMER_SEGMENT","adb23a1.JEROMEFR.CUSTOMER_SEGMENT").\
     join("Join","INNER","CUSTOMER.SEGMENT_ID=CUSTOMER_SEGMENT.SEGMENT_ID").\
     filter_by("Filter","CUSTOMER.YRS_CUSTOMER >= 3").\
     aggregate("COUNT_SUBS", "", "",agg_attr,agg_map).\
     load("LONG_TERM_SUBSCRIBER_SEGMENT","adb23a1.JEROMEFR.LONG_TERM_SUBSCRIBER_SEGMENT",load_options)
Finally, execute the create() command to save your Data Flow in the Oracle Data Transforms repository.
df.create()
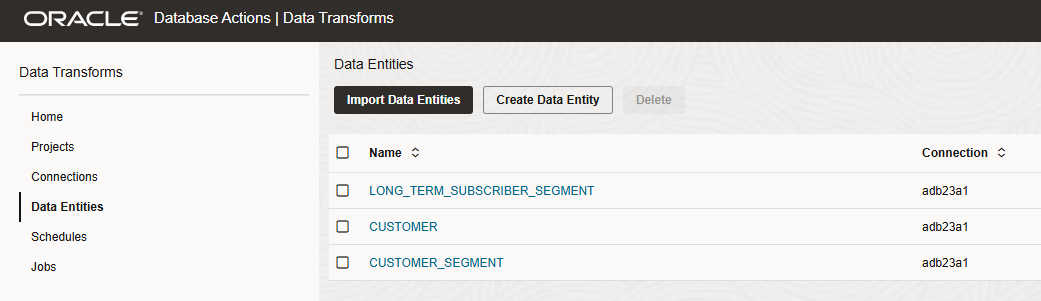
After executing this code, we can verify the results in the Oracle Data Transforms web UI to confirm the two new Data Entities CUSTOMER_SEGMENT and LONG_TERM_SUBSCRIBER_SEGMENT are present.
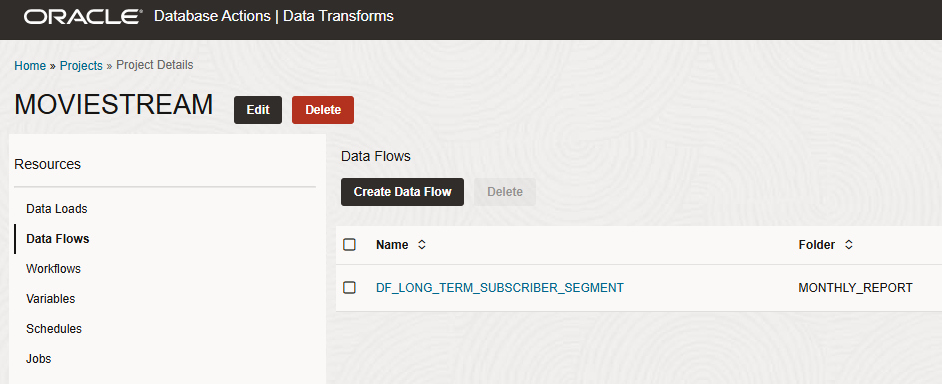
Let’s navigate to the Projects page to discover our new MOVIESTREAM Project with our Data Flow. We can open it to check its content.
With our Data Flow now configured and saved, the next step is to run it and populate the target table.
Scheduling the Data Flow
In order to create a Schedule for our Data Flow, we can create a new python script, import the required modules and start a session.
from datatransforms.schedule import Schedule,SCHEDULE_STATUS_ACTIVE, MonthlyDayOfMonthSchedule
from datatransforms.workbench import DataTransformsWorkbench,WorkbenchConfig

pswd="<your_data_transforms_password>" # ideally retrieved from a vault
connect_params = WorkbenchConfig.get_workbench_config(pswd)
workbench = DataTransformsWorkbench()
workbench.connect_workbench(connect_params)
All we need to do now is to instanciate a Schedule object, reference our Data Flow or Workflow, set the timing and frequency, activate it and save it on the workbench.
Let’s create one that will run immediately so we can already get a first report for our Loyal Customer team.
schedule = Schedule("DF_LONG_TERM_SUBSCRIBER_SEGMENT Immediate")\
    .dataflow(project="MOVIESTREAM",dataflow_name="DF_LONG_TERM_SUBSCRIBER_SEGMENT")\
    .immediate()\
    .schedule_status(SCHEDULE_STATUS_ACTIVE)
workbench.save_schedule(schedule)
We also want to add a second schedule to execute the Data Flow at 6:00 AM on the first day of every month.
schedule = Schedule("DF_LONG_TERM_SUBSCRIBER_SEGMENT Monthly Second to Last Day")\
    .dataflow(project="MOVIESTREAM",dataflow_name="DF_LONG_TERM_SUBSCRIBER_SEGMENT")\
    .monthly("01", "06:00:00")\
    .schedule_status(SCHEDULE_STATUS_ACTIVE)
workbench.save_schedule(schedule)
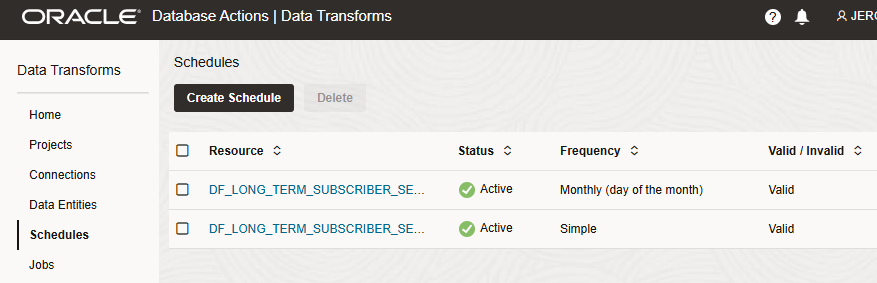
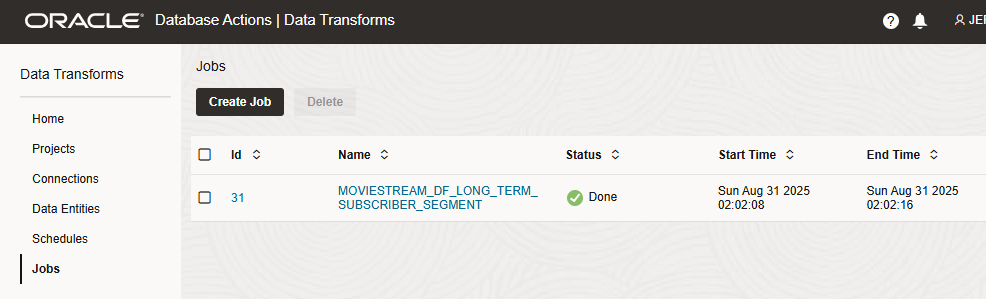
After executing this script, we can review the results in the Oracle Data Transforms web UI. We see two new Schedules and one of them has already run in the Jobs page.
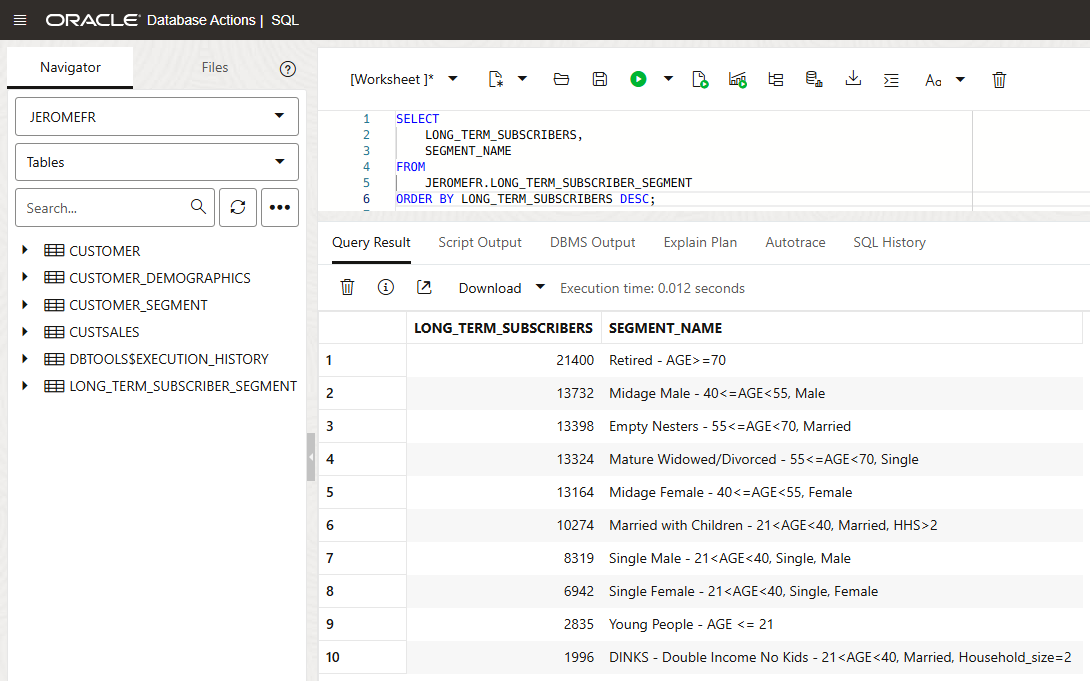
We can also open SQL Developer and check the data in our Autonomous Database. We see that our new LONG_TERM_SUBSCRIBER_SEGMENT table has been created and contains the data requested by the Loyal Customer team.
Conclusion
The Oracle Data Transforms Python API provides an easy way to programmatically create new Data Entities and new Data Flows. It is also possible to schedule them for immediate or later execution.
In future articles we will explore other use cases for the Oracle Data Transforms Python API. Stay tuned!