Welcome back! This marks the Part 2 of the blog post series centered around the topic of Multi-factor Authentication (MFA) for Databases. In the preceding blog post (Part 1), you were provided with a brief overview and a demonstration of MFA for Oracle Databases using OCI IAM RADIUS Proxy.
Now, let’s shift our focus to the practical implementation aspect of this topic. Within this blog post, you will explore the necessary configurations that must be completed within both the OCI Identity Domain and the Oracle Database Server.
Before you begin:
- Make sure you have access to the OCI Identity Domain console with administrative privileges.
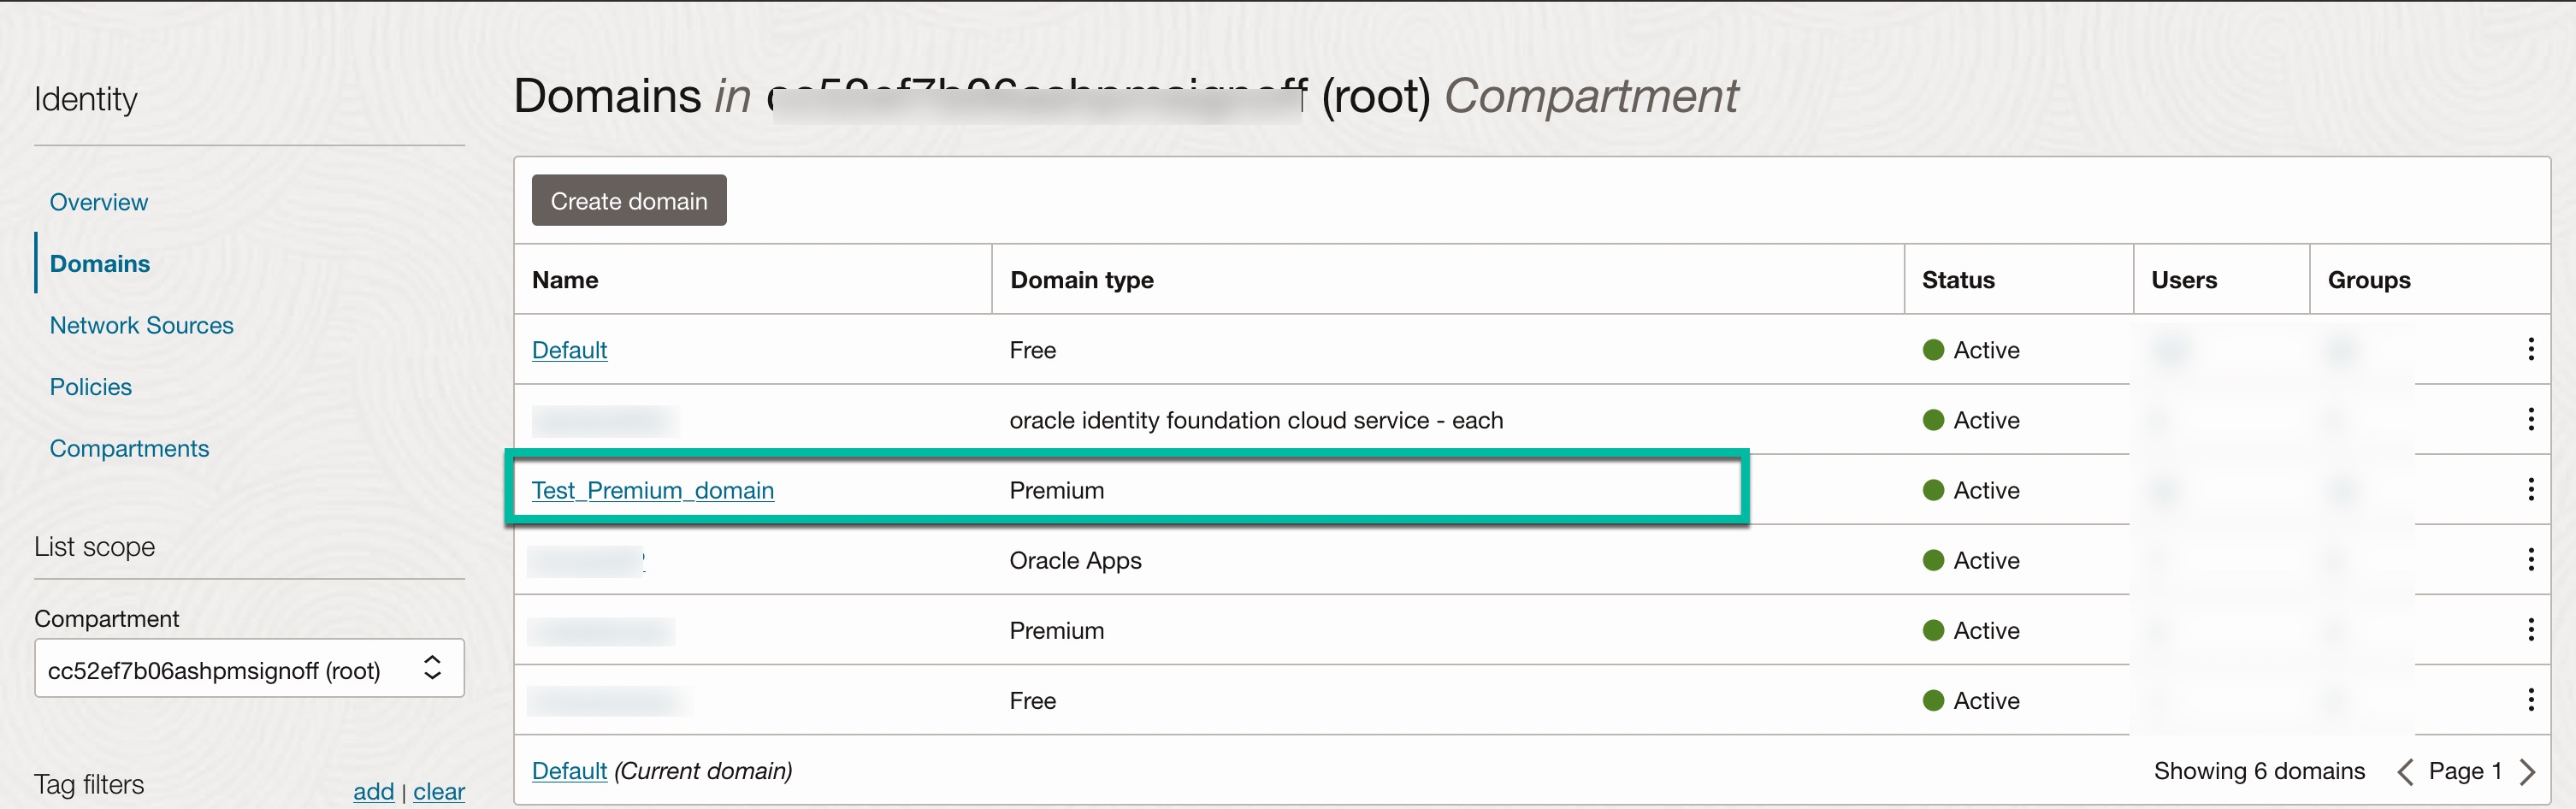
- Please note that Identity Domain type must be either “Oracle Apps Premium” or “Premium” in order to utilize the RADIUS proxy feature.
- Prepare the Postman utility for invoking OCI Identity Domain API calls. (You can download it from https://www.postman.com/)
- Keep your Database’s IP address readily available.
- Since you’ll be deploying the RADIUS proxy, remember that it’s only compatible with a Linux OS, have the IP address handy of the Linux host where you intend to install it, along with the desired port for its operation (default is 1812).
- Note: While it’s technically feasible to run the RADIUS proxy on the same host as the Database server, it’s strongly recommended, especially in production environments, to host it on a separate dedicated machine for best practices. In this blog post, the database and RADIUS proxy are set up on different machines.
- Make sure you have root or sudo access to the Linux host to install the RADIUS proxy.
Summary of Tasks:
OCI Identity Domain:
- Onboard Oracle Database Radius App in OCI Identity Domain
- Create and activate RADIUS proxy and listener definitions using OCI Identity Domain API calls.
- Install the RADIUS Proxy on a Linux host.
- Configure Multi-Factor Authentication (MFA) for the Oracle Database RADIUS App in OCI Identity Domain.
Oracle Database:
- Enable RADIUS Authentication and MFA on the Oracle Database Server.
Onboard Oracle Database RADIUS App within the OCI Identity Domain
- Login to your OCI cloud account or tenancy.
- Select the hamburger menu located at the top left corner, and proceed to “Identity & Security” -> “Identity” -> “Domains“.
- A list of Identity Domains within your tenancy will be displayed.
- Choose the specific Identity Domain you wish to utilize for this integration. Domain type should be either “Oracle Apps Premium” or “Premium”.
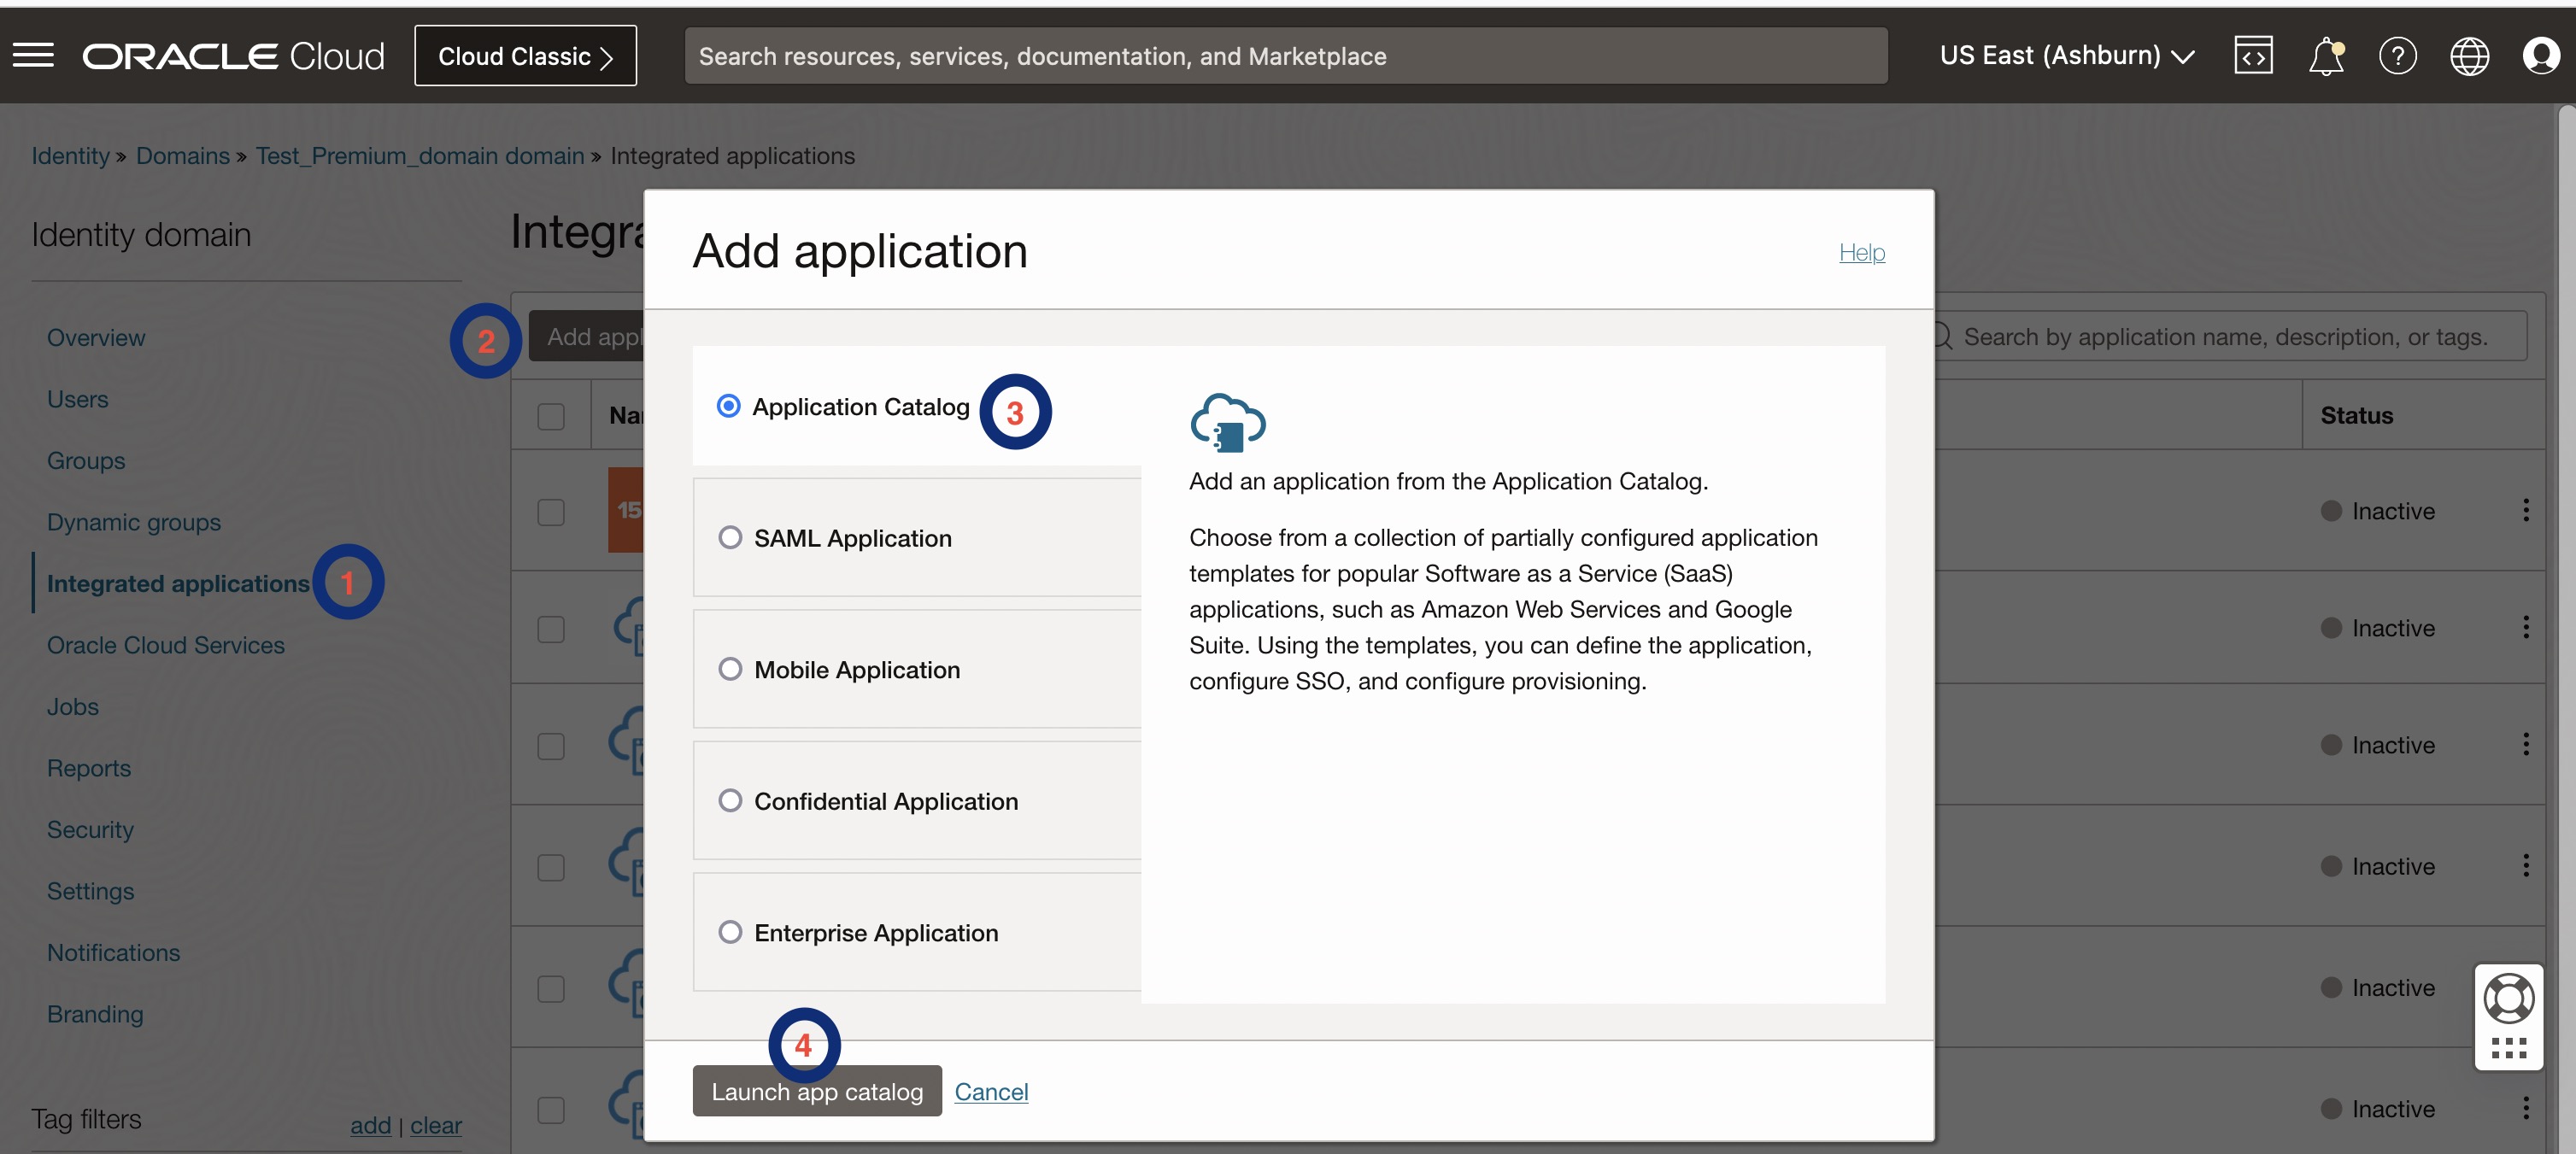
- On the “Identity Domain” page, navigate to “Integrated Applications” -> “Add Application” on the left-hand side. Opt for “App Catalog” from the list of options presented within the “Add Application” window, and then click on “Launch app catalog.”
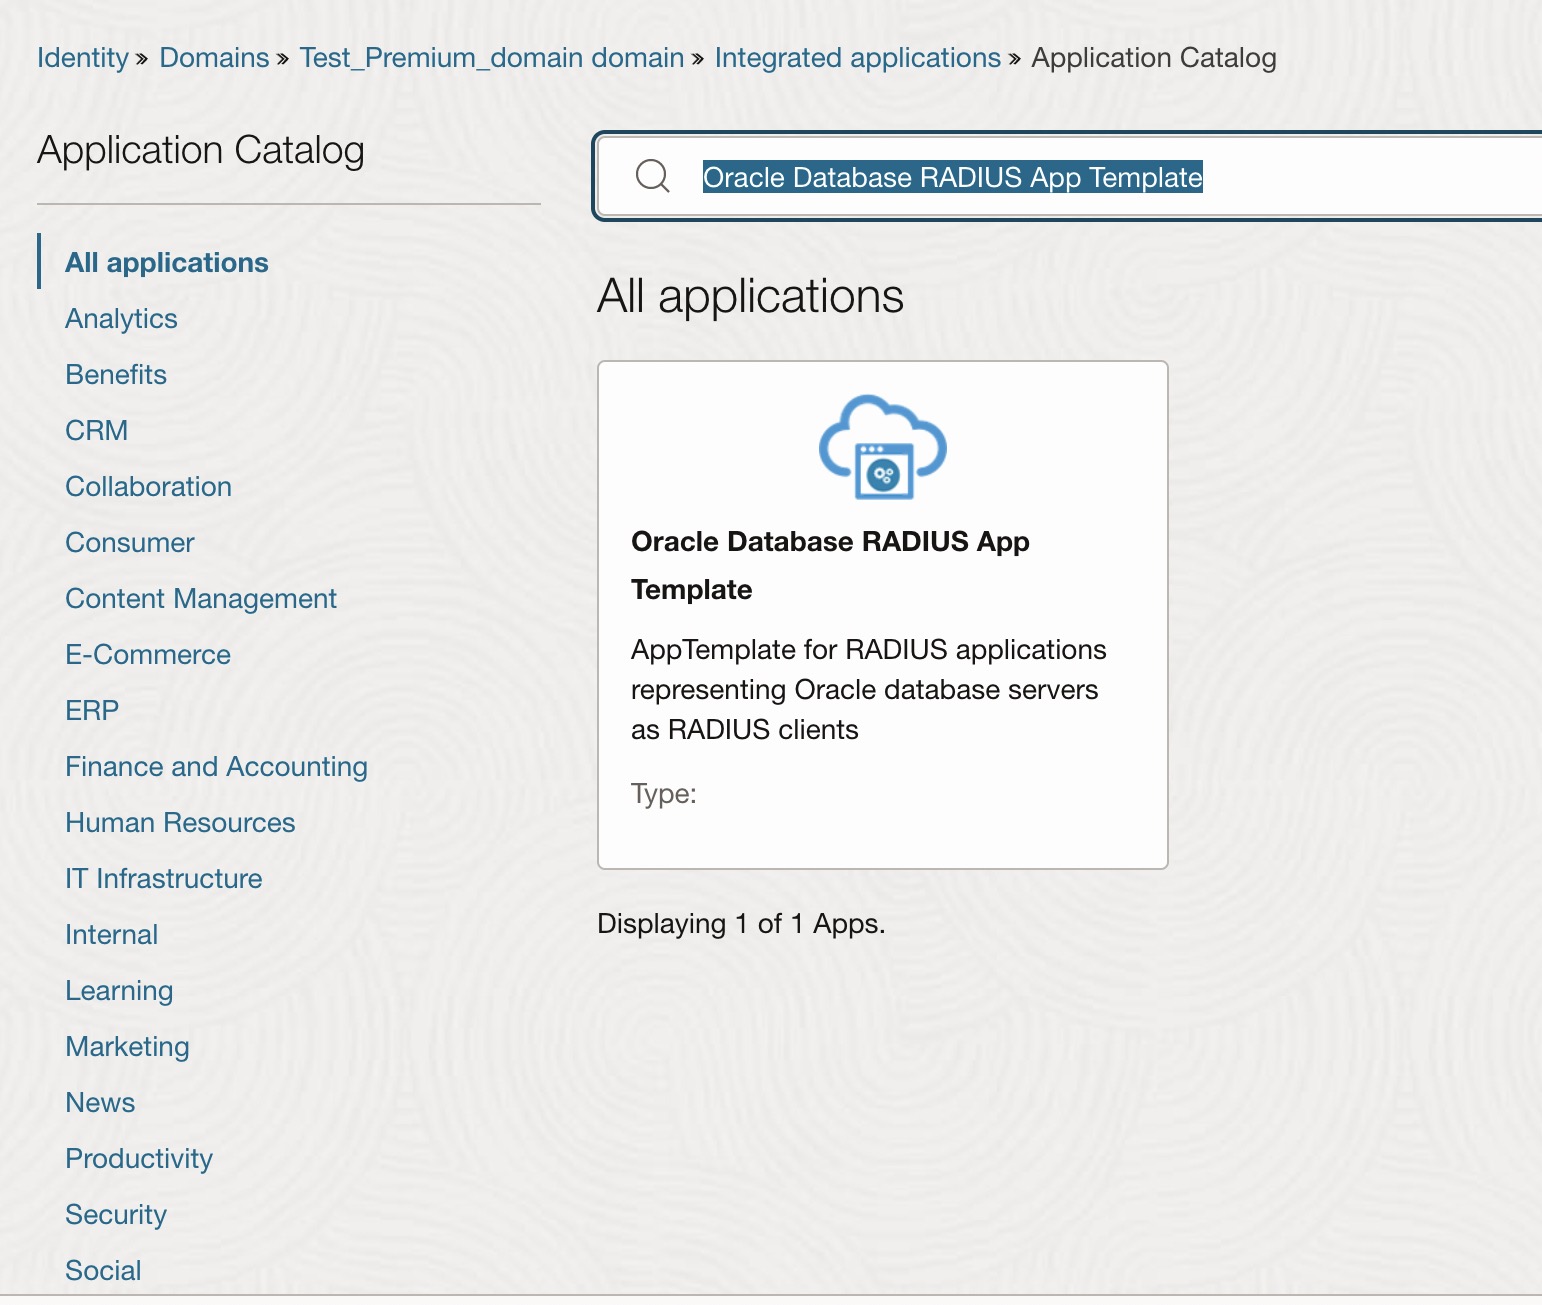
- On Application Catalog page, search for “Oracle Database RADIUS App Template” and select the radius app template as shown below.
- Add the application by providing below details.
- Name: Enter the name for your RADIUS application.
- Description: Optional field.
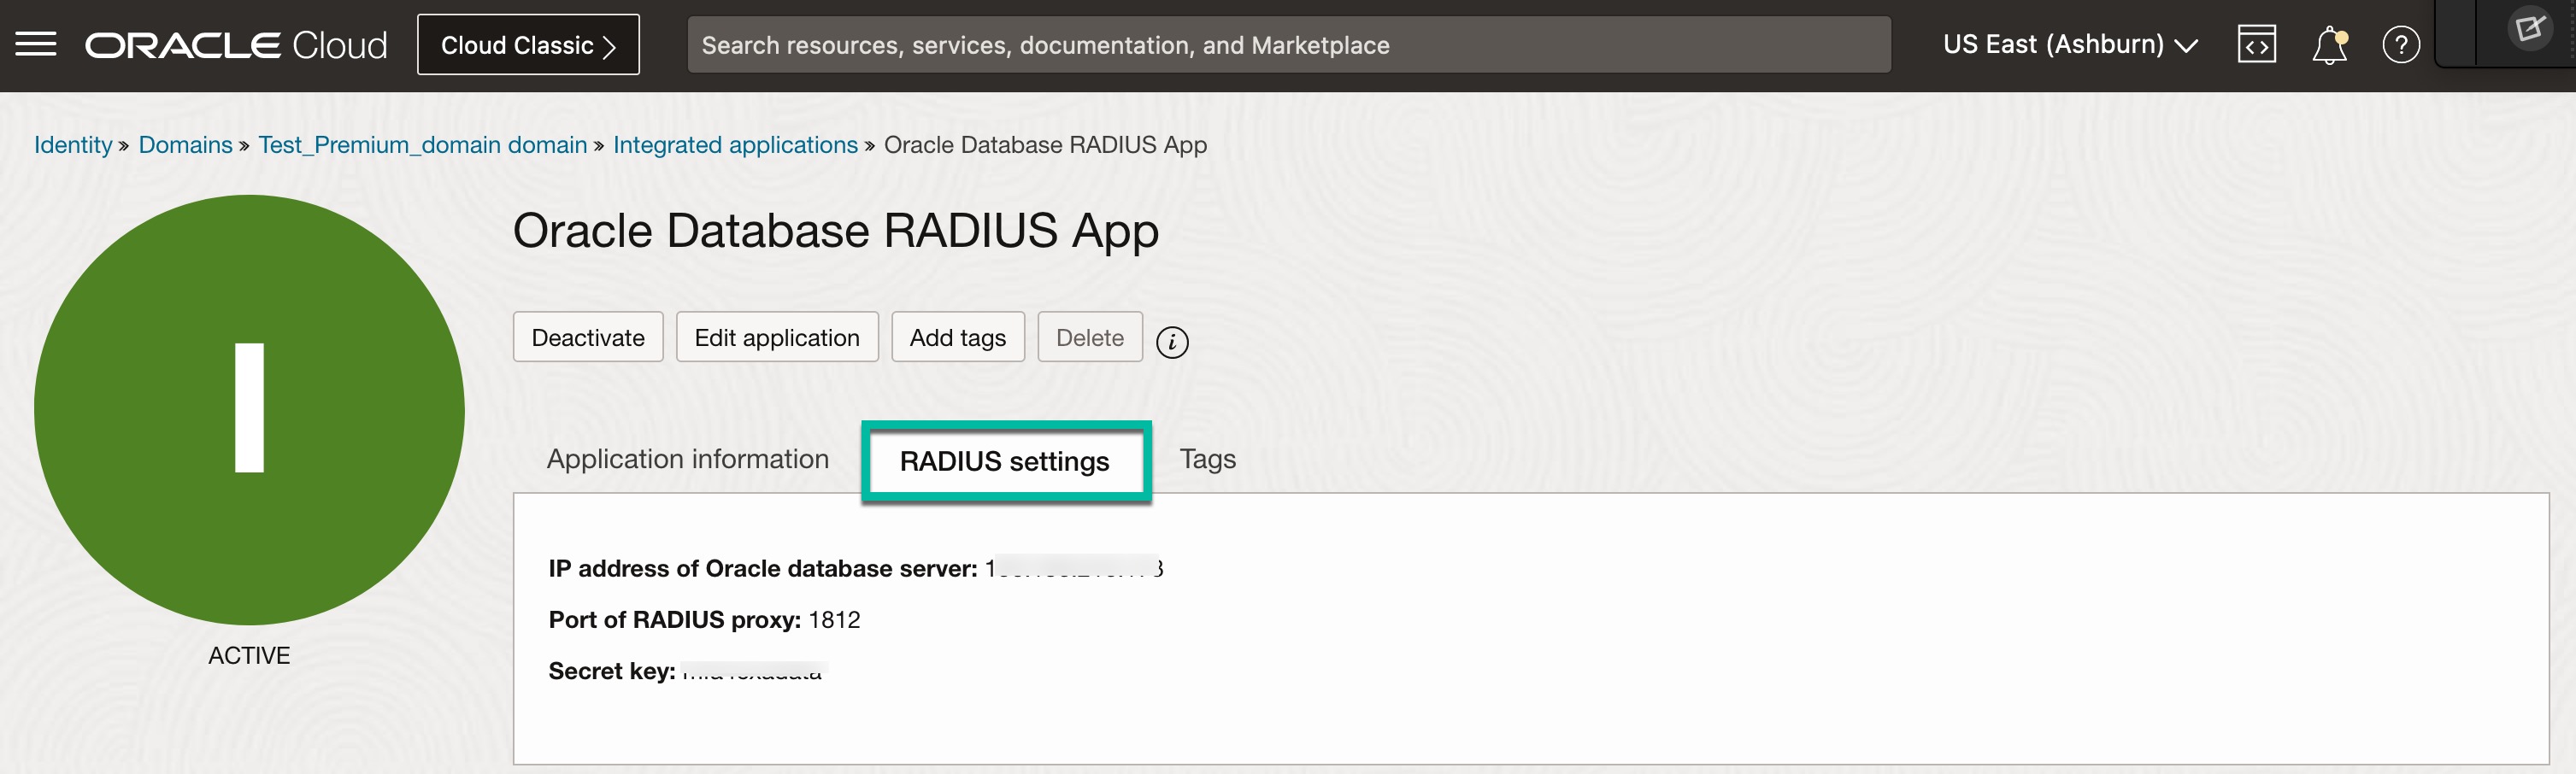
Under “Radius Settings” section, enter below details.
- IP address of Oracle Database Server – This is the IP address where your Oracle Database is running.
- Port of RADIUS proxy – Default is 1812. This is the port on which RADIUS Proxy would be listening for requests from the database. The same port number would be specified in the RADIUS settings of Oracle Database (sqlnet.ora)
- Secret Key – The secret key is used to establish trust mechanism and secure communication between RADIUS Proxy and the Oracle Database server. The same key should be configured in the RADIUS settings of Oracle Database server.
You can leave other fields to default.
Note: If you have observed, nowhere we provided IP address of the Linux host on the app definition. We will cover that later in the process.
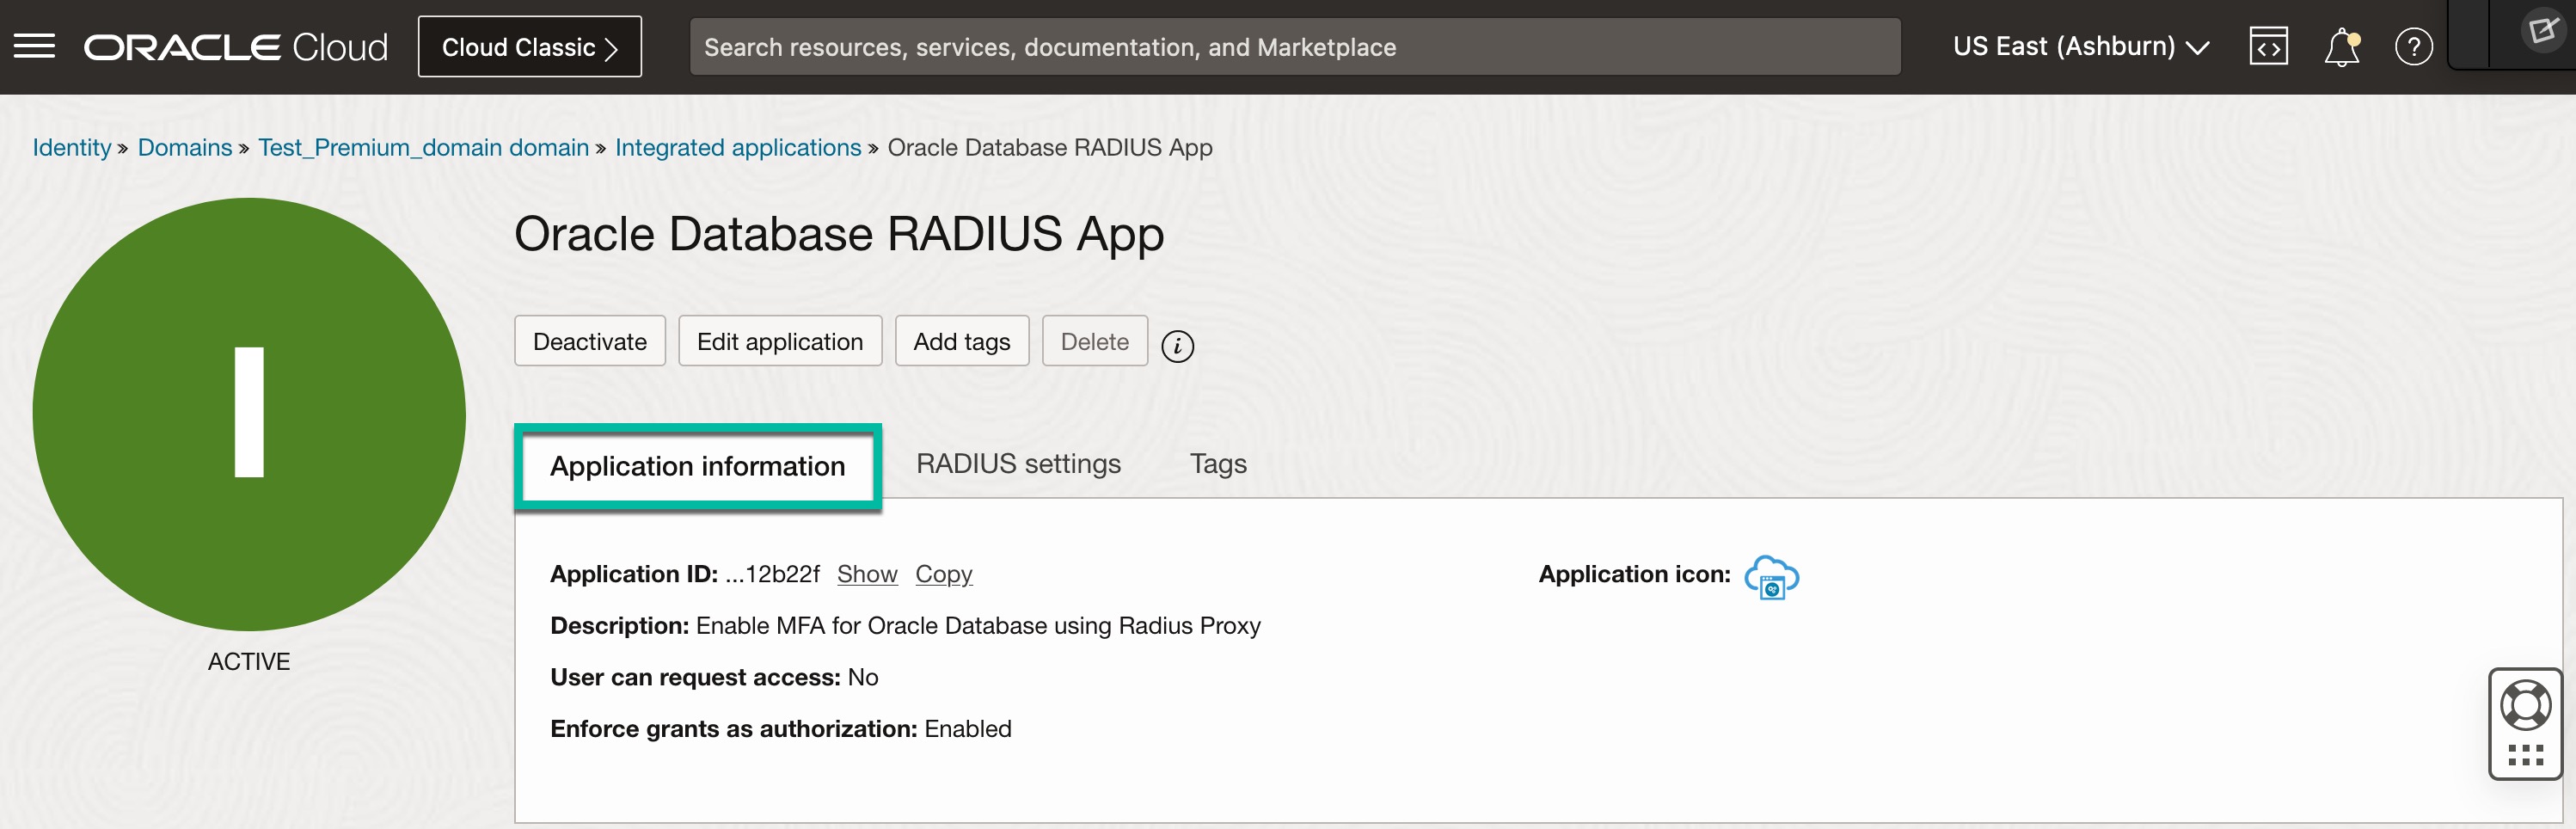
8. Click on “Create Application” and activate the application. It should look like below.
9. As shown below, assign the users who should be allowed to sign into Oracle Database.
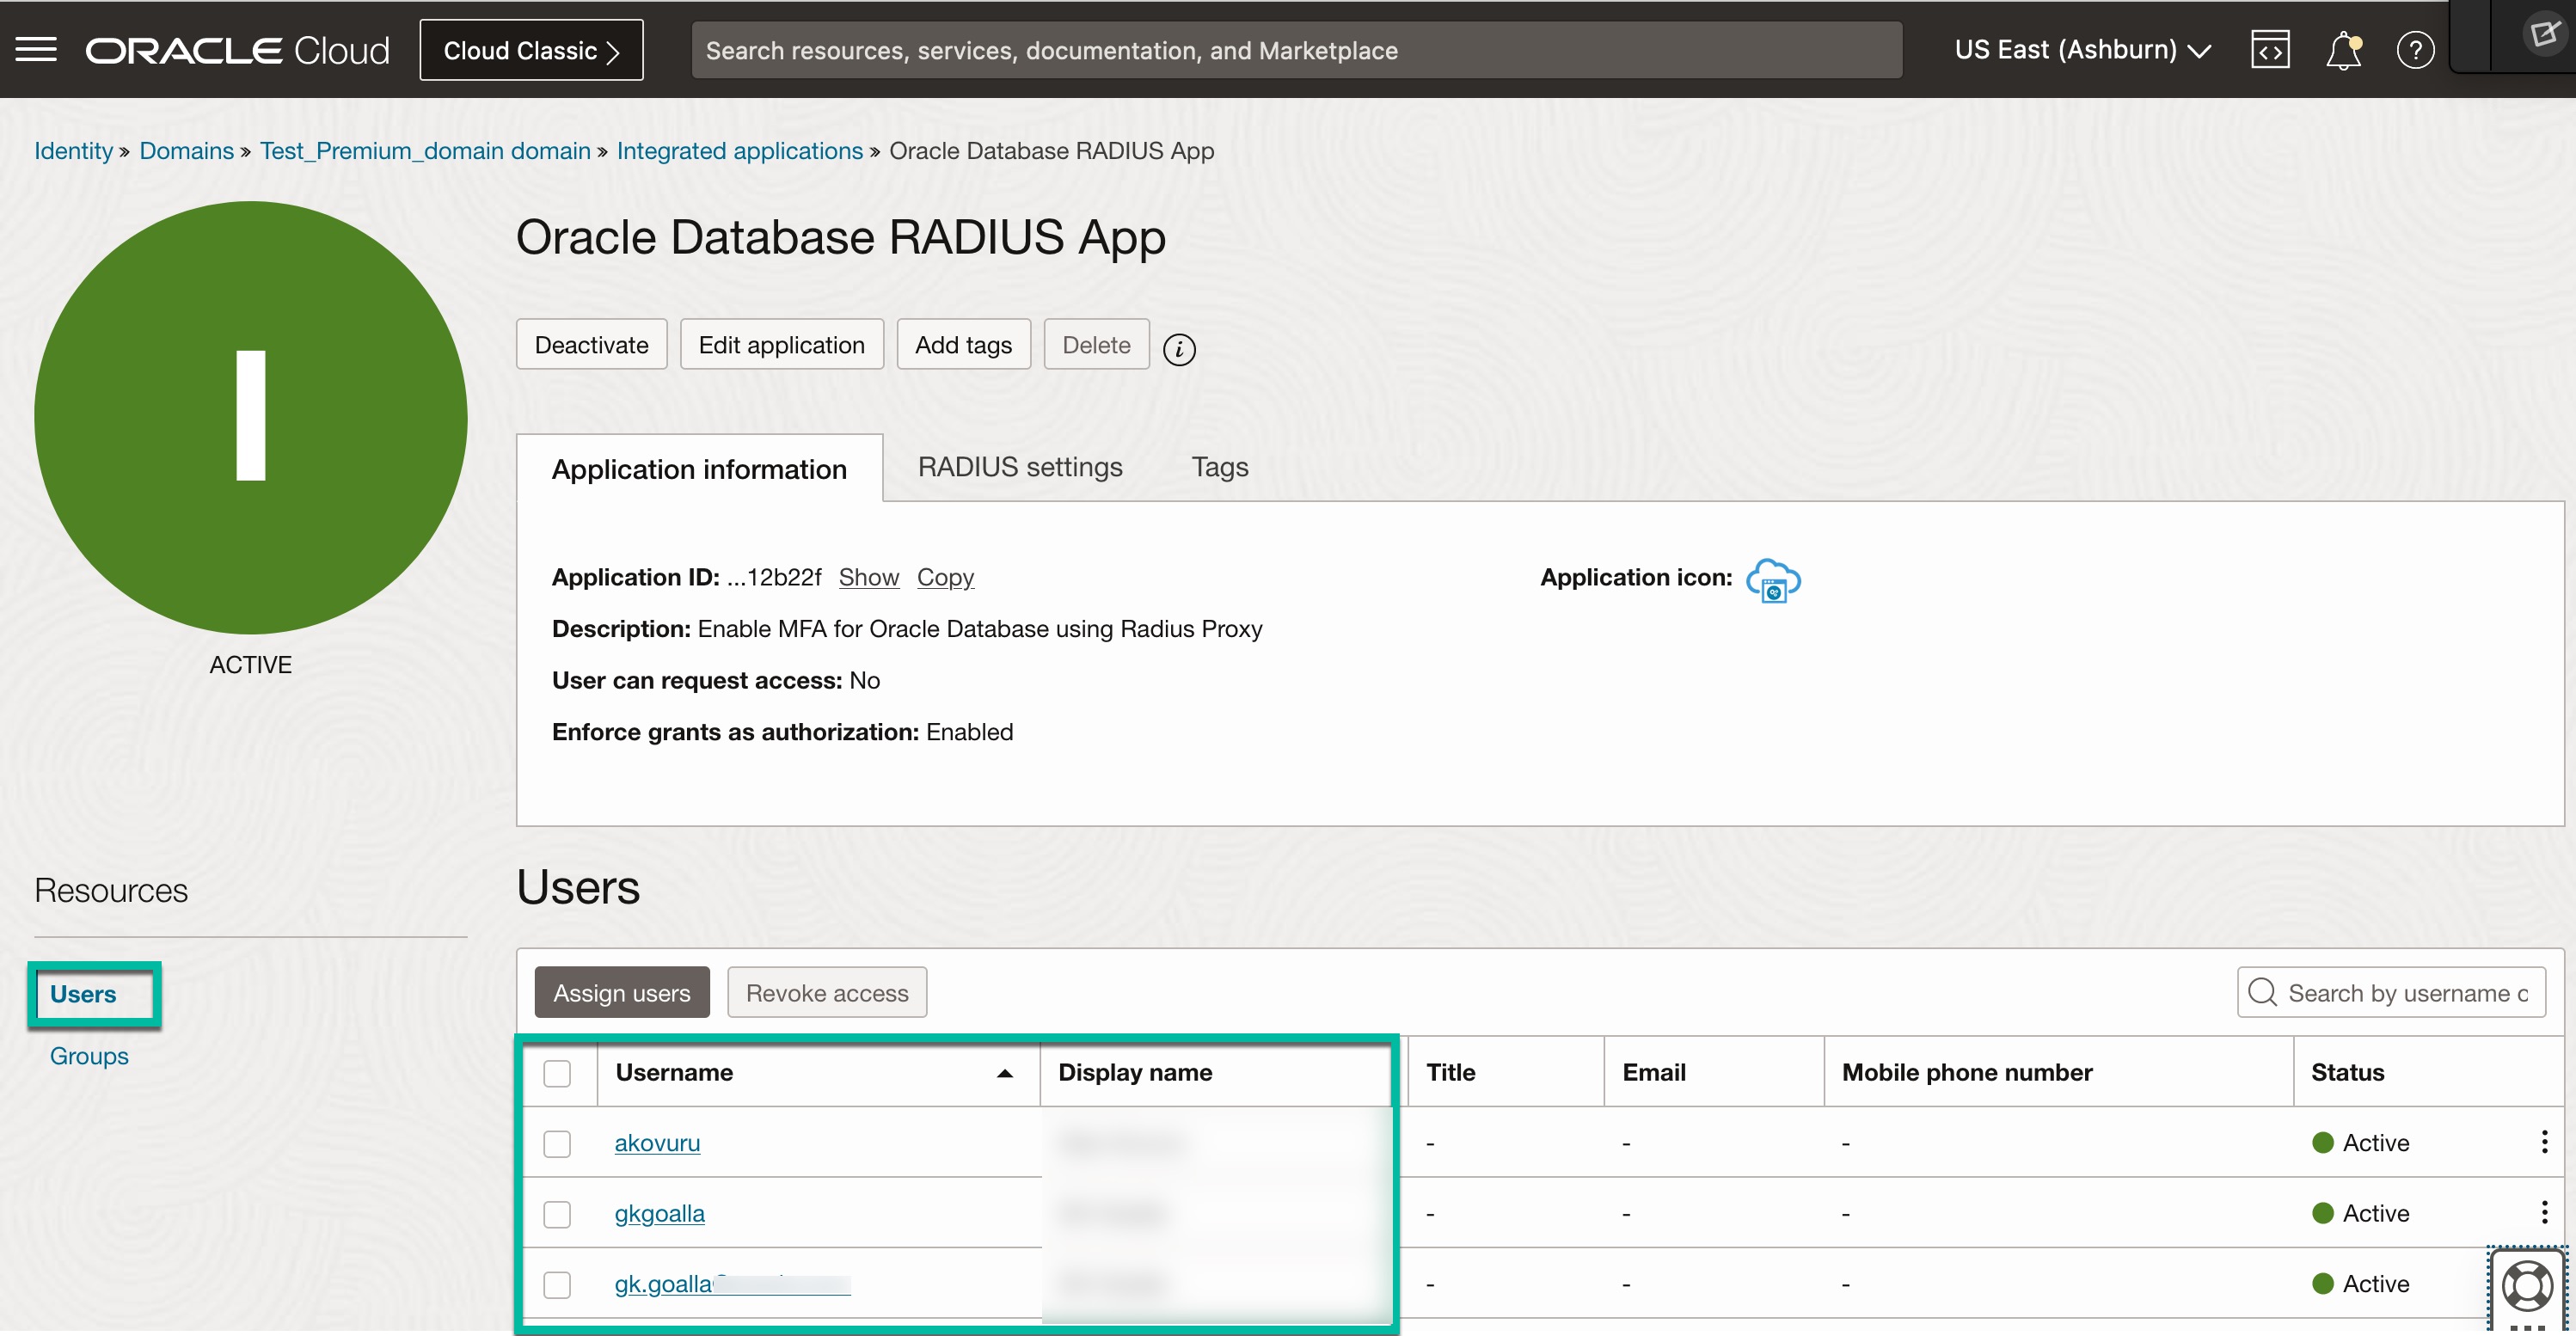
Optional: Instead of assigning individual users, you can assign a group to the app. Click on “Groups” and assign a group or groups.
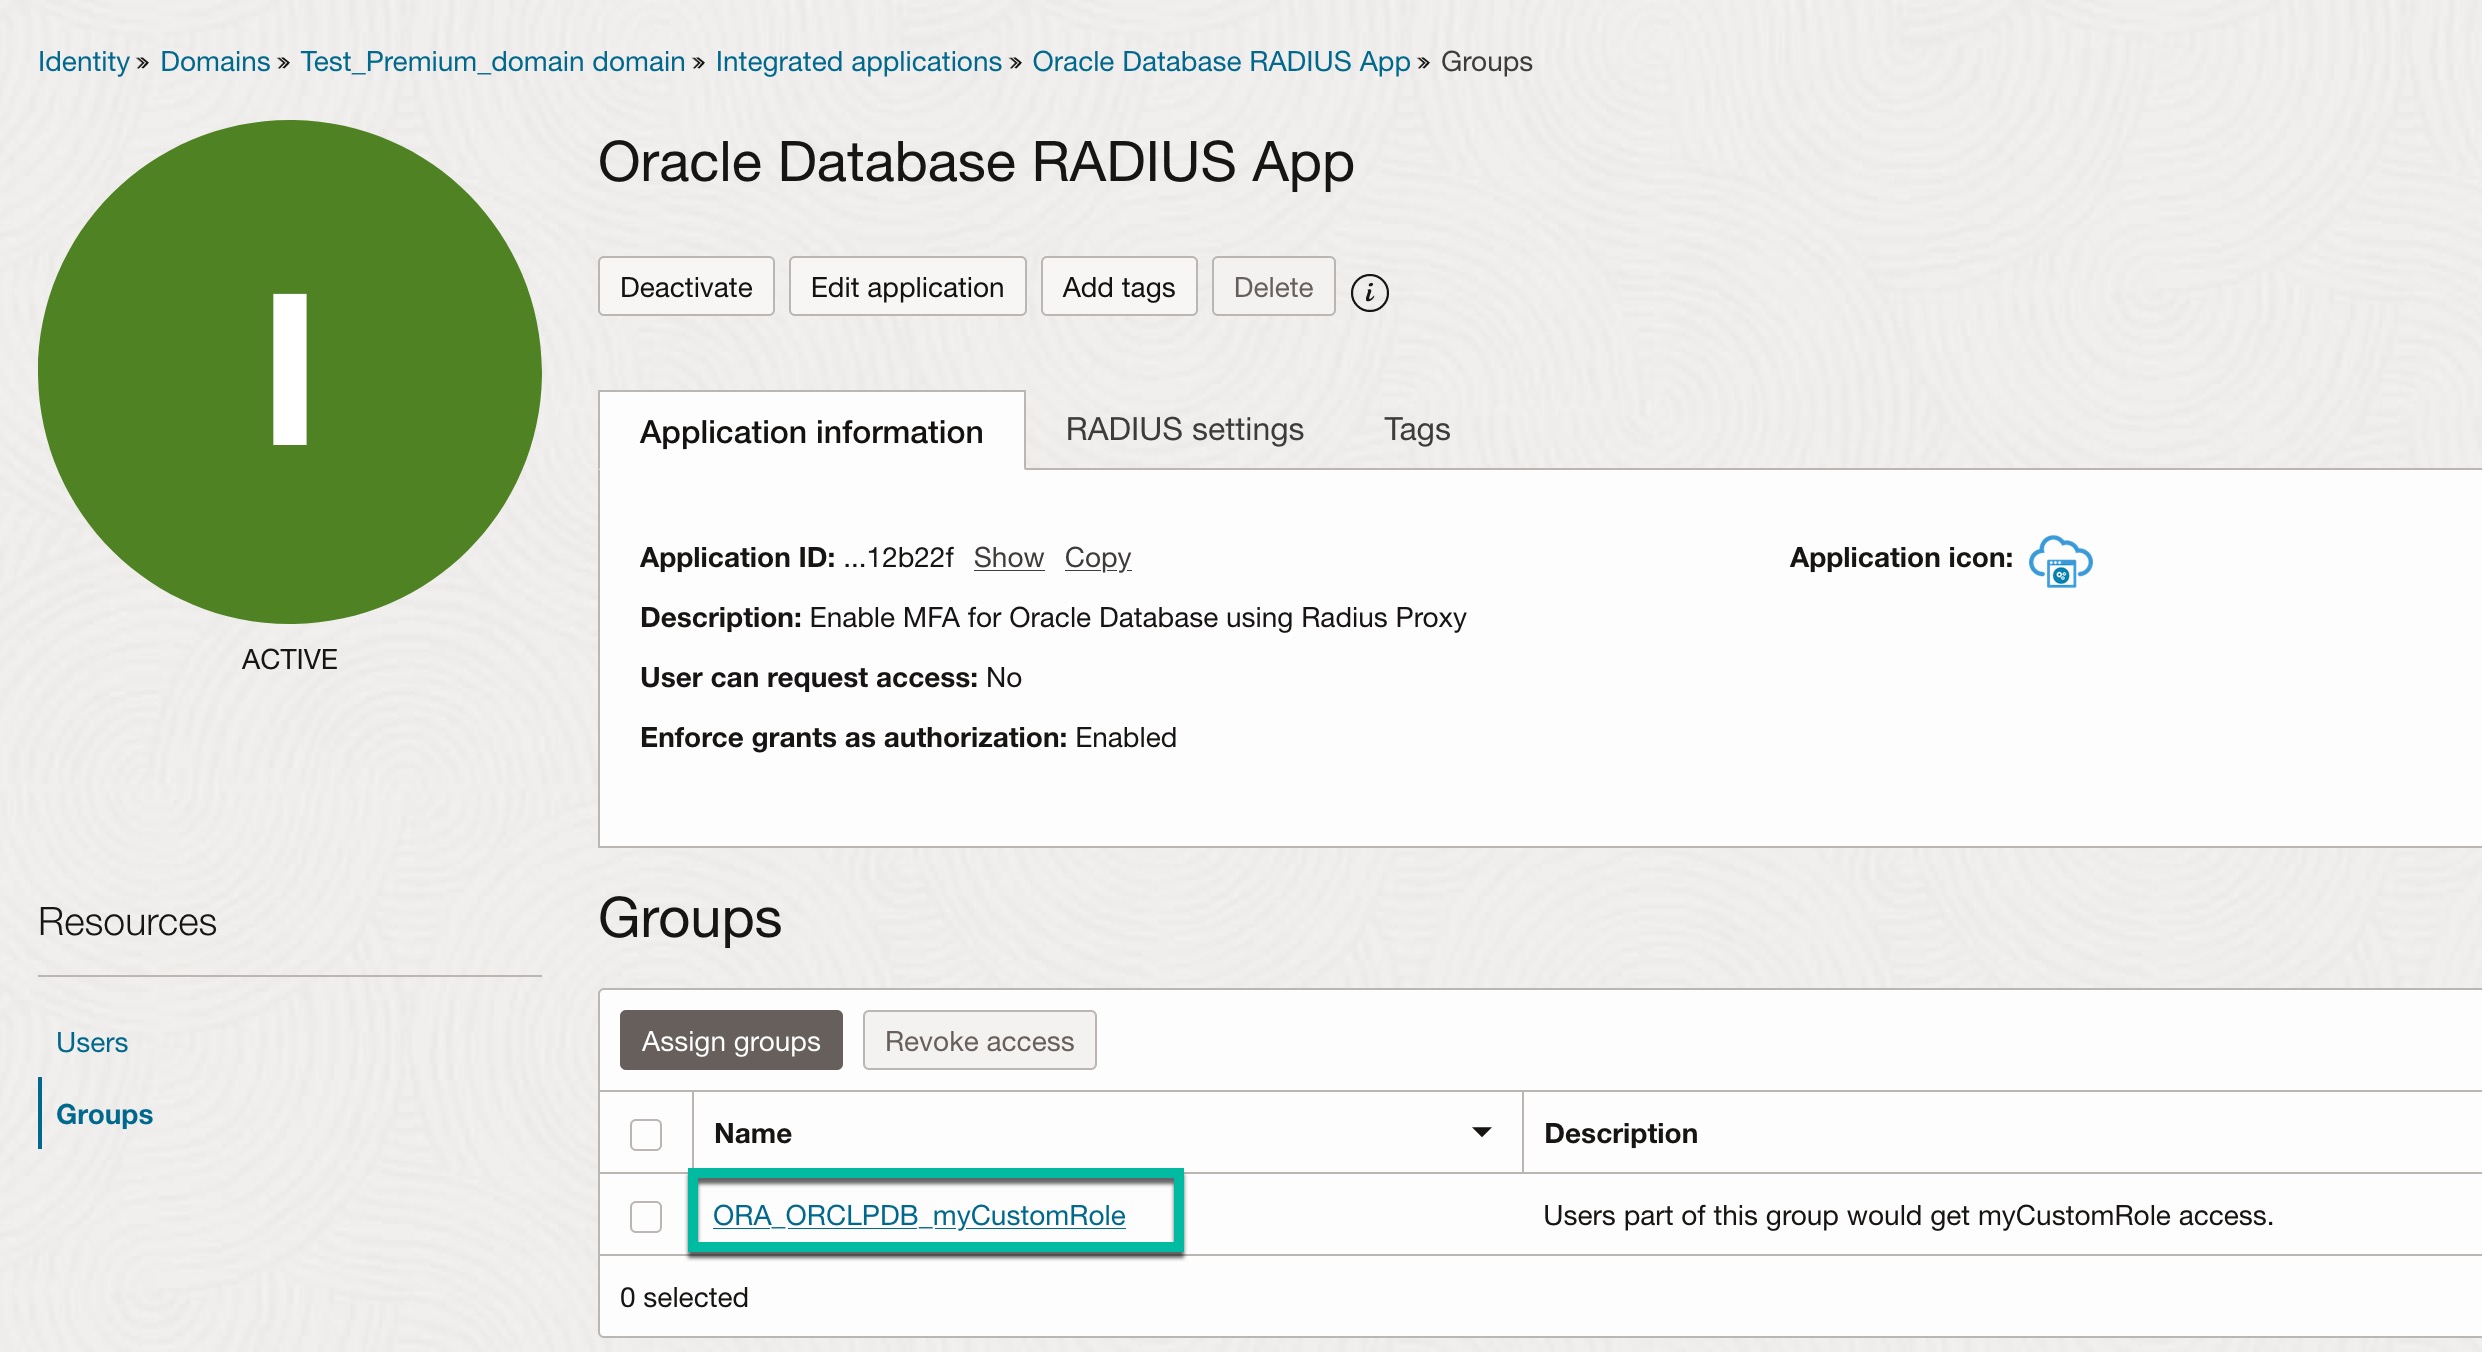
Note: Group name must be in a certain format i.e., ORA_databaseSID_rolename[_[A] | [D]]
- databaseSID – SID of the Oracle Database that is configured in the database init.ora file.
- rolename – Name of the role that you created in database with the flag “IDENTIFIED EXTERNALLY” . Example, myCustomRole.
- sql> create role myCustomRole identified externally;
- sql> grant create session to myCustomRole;
- A – An optional character that indicates the user has admin privileges for this role.
- D – An optional character that indicates this role is to be enabled by default.
For every EXTERNAL role in Oracle database to be identified by OCI Identity domain, create a corresponding group using the format mentioned above. Assign a user to this group in OCI Identity Domain so that the respective database user is associated with the respective database role.
Create Radius Proxy and Radius Proxy Listener Definitions:
Create Confidential Application (OAuth) in Identity Domain:
To invoke Identity Domain REST APIs, you need to have appropriate OAuth Client Credentials. Let’s create a Confidential Application.
- Create a confidential application in Identity Domain and make this application to have below settings.
- Grant type: client credentials
- Grant “Identity Domain Administrator” role.
2. Activate the confidential application and keep client id and client secret handy.
Note: This step is optional if you already have a confidential (OAuth) application that have access to Identity Cloud Service admin APIs.
Import OCI Identity Domain APIs collection in Postman:
If you already have OCI Identity Domain APIs imported in Postman, you can ignore this step. Otherwise, you can grab below JSON files from GitHub URL and import them in Postman.
- REST_API_for_Oracle_Identity_Cloud_Service_postman_collection.json
- example_environment.json
- oracle_identity_cloud_service_postman_globals.json
- Oracle Identity Cloud Service RADIUS Proxy Example Environment with Variables.postman_environment.json
- Oracle Identity Cloud Service RADIUS Proxy.postman_collection.json
Setup your Postman with environment variables such as Identity Domain host name, Client id and Client secret, etc. Now you are good to go to invoke REST APIs.
Inovke OCI Identity Domain APIs to Create RADIUS Proxy & Listener Definition:
1. Fetch App ID for “Oracle Database RADIUS App” (that you created above) using /admin/v1/apps endpoint
- “displayName”: “Oracle Database RADIUS App”
- “id”: “5919e6f45e1942daa5a56b3aa112b22f”
2. Create RADIUS Proxy using below REST endpoint.
Endpoint: {{HOST}}/admin/v1/RadiusProxies/
Method: POST
Body:
{
“displayName”: “Oracle Database RADIUS Proxy”,
“description”: “This is a RADIUS Proxy used for authentication of database users”,
“type”: “proxy”,
“timeout”: 20,
“noOfWorkerThreads”: 10,
“schemas” : [“urn:ietf:params:scim:schemas:oracle:idcs:RadiusProxy”]
}
If it’s successful, from the response, you should see that a new Radius proxy is created. Note down RADIUS proxy id and OAuth client app id for RADIUS proxy.
- RADIUS Proxy ID: a256608a146a4f74a28c30ab5b4609a2
- RADIUS Proxy OAuth Client App ID (Grab it from Resource ->oauthClient section -> value): 9f868a137c384f9594c0d3aeede81706
3. Activate RADIUS Proxy.
Endpoint: {{HOST}}/admin/v1/RadiusProxies/<RADIUS proxy id>
Method: PATCH
Body:
{
“Operations”:[
{
“op”: “replace”,
“path”: “active”,
“value”: true
}
],
“schemas”: [
“urn:ietf:params:scim:api:messages:2.0:PatchOp”
]
}
4. Create RADIUS proxy listener.
Note: You need to provide RADIUS proxy id and the IP address of Linux machine where you would be installing RADIUS proxy.
- RADIUS Proxy ID: a256608a146a4f74a28c30ab5b4609a2
- RADIUS Proxy IP Address: xxx.xxx.117.33
Endpoint: {{HOST}}/admin/v1/RadiusProxyListeners
Method: POST
Body:
{
“description”: “Brief description for this RADIUS Proxy Listener.”,
“displayName”: “RP1_L1”,
“hostName”: “xxx.xxx.117.33“,
“radiusProxySettings”: “{\”key1\”: \”value1\”, \”key2\”: \”value2\”}”,
“radiusProxy”: {
“value” : “a256608a146a4f74a28c30ab5b4609a2“
},
“schemas” : [“urn:ietf:params:scim:schemas:oracle:idcs:RadiusProxyListener”]
}
If it’s successful, from the response, you should see that a new RADIUS proxy is created. Note down listener name and id.
- displayName”: “RP1_L1”
- RADIUS Proxy Listener “id”: “e8b47e282e0b47cb986076aafea24e40”
5. Bind/map the RADIUS proxy with RADIUS App that you created in previous steps. Be ready with ID of RADIUS proxy and RADIUS app before making REST call.
- displayName: “Oracle Database RADIUS Proxy”
- RADIUS Proxy id: a256608a146a4f74a28c30ab5b4609a2
- displayName: “Oracle Database RADIUS App “,
- RADIUS App ID: 5919e6f45e1942daa5a56b3aa112b22f
Endpoint: {{HOST}}/admin/v1/RadiusProxyMappings/
Method: POST
Body:
{
“description”: “RADIUS Proxy mapping for Database server”,
“radiusProxy”: {
“value” : “a256608a146a4f74a28c30ab5b4609a2”
},
“radiusApp”: {
“value”: “5919e6f45e1942daa5a56b3aa112b22f”
},
“schemas” : [“urn:ietf:params:scim:schemas:oracle:idcs:RadiusProxyMapping”]
}
If it’s successful, proceed to the next step.
6. Fetch OAuth client credentials of RADIUS proxy. These credentials are required during RADIUS proxy installation.To fetch them, you need RADIUS Proxy OAuth client App ID that you collected in Step #2 above.
- RADIUS Proxy OAuth Client App ID: 9f868a137c384f9594c0d3aeede81706
Endpoint: {{HOST}}/admin/v1/Apps/{{RPOAuthClientAppId}}?attributes=clientSecret,name
Method: GET
If it’s successful, you should see response like below.
{
“displayName”: ” Oracle Database RADIUS Proxy”,
“basedOnTemplate”: {
“value”: “RadiusProxyAppTemplateId”
},
“id”: “9f868a137c384f9594c0d3aeede81706”,
“isAliasApp”: false,
“name“: “767daa3f39404ba5bdfc34de4d4371eb”,
“clientSecret“: “05b103ff-5fec-43eb-888e-70bd6e7fe508”
}
Note: name and clientSecret refers to RADIUS proxy OAuth client_id and client_secret respectively.
- RADIUS proxy OAuth client_id: 767daa3f39404ba5bdfc34de4d4371eb
- RADIUS proxy OAuth client_secret: 05b103ff-5fec-43eb-888e-70bd6e7fe508
Install RADIUS Proxy:
- Download the RADIUS Proxy installer from Identity Domain console. Navigate to Identity Domain -> Settings – Downloads
- Look for “Identity Cloud Service RADIUS Proxy for Linux”, and then click Download.
- Copy the installer to Linux machine.
- Unzip the installer.
- Run the installer as ‘root’ user or ‘sudo’ user.
- Read the Welcome screen, click Next.
- Read the Information screen, click Next.
- Choose the folder to install RADIUS Proxy (Suggest installing under ‘non-root’ folder)
- On the HTTP screen, select Use HTTP Proxy if you want Radius proxy to connect to Identity Domain through HTTP proxy. If not, leave the checkbox unchecked. Click on Next.
- On the next screen, enter client id and client secret of RADIUS proxy and Identity Domain (IDCS) base URL.
- RADIUS proxy OAuth client_id: 767daa3f39404ba5bdfc34de4d4371eb
- RADIUS proxy OAuth client_secret: 05b103ff-5fec-43eb-888e-70bd6e7fe508
- Identity domain URL: https://idcs-xxxxx.identity.oraclecloud.com:443
- On the RADIUS user & group information screen, enter OS username and group name. RADIUS Proxy daemon will run under the specified username and group.
Note: Don’t run proxy daemon under ‘root’ user. So, choose ‘non-root’ user.
- Click Install
- On the pre-install screen, review all the information entered and click Install.
- When the install is finished, click Done.
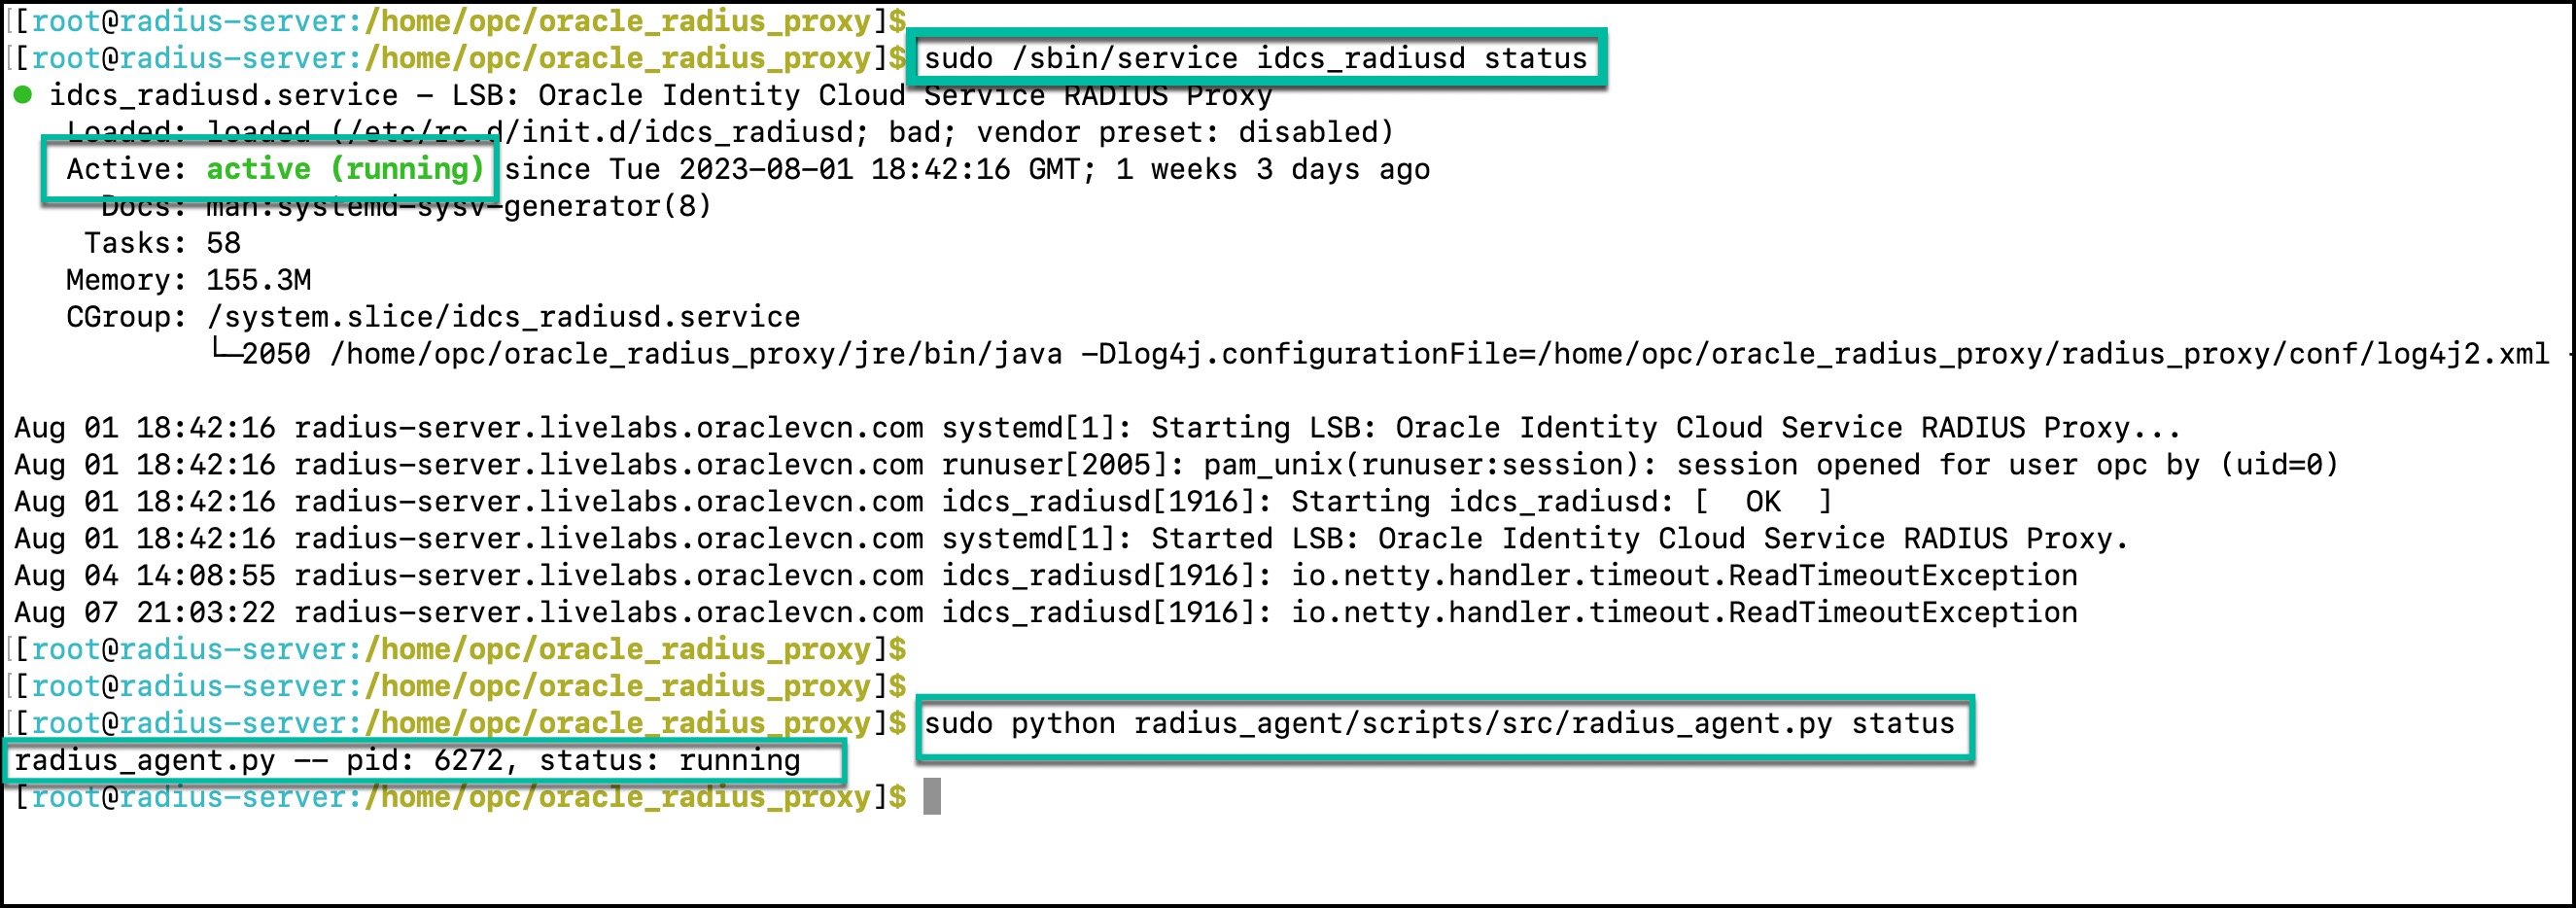
- Make sure RADIUS Agent and RADIUS Proxy are running.
RADIUS proxy base folder: /home/opc/oracle_radius_proxy/
RADIUS proxy folder: /home/opc/oracle_radius_proxy/radius_proxy
RADIUS agent folder: /home/opc/oracle_radius_proxy/radius_agent
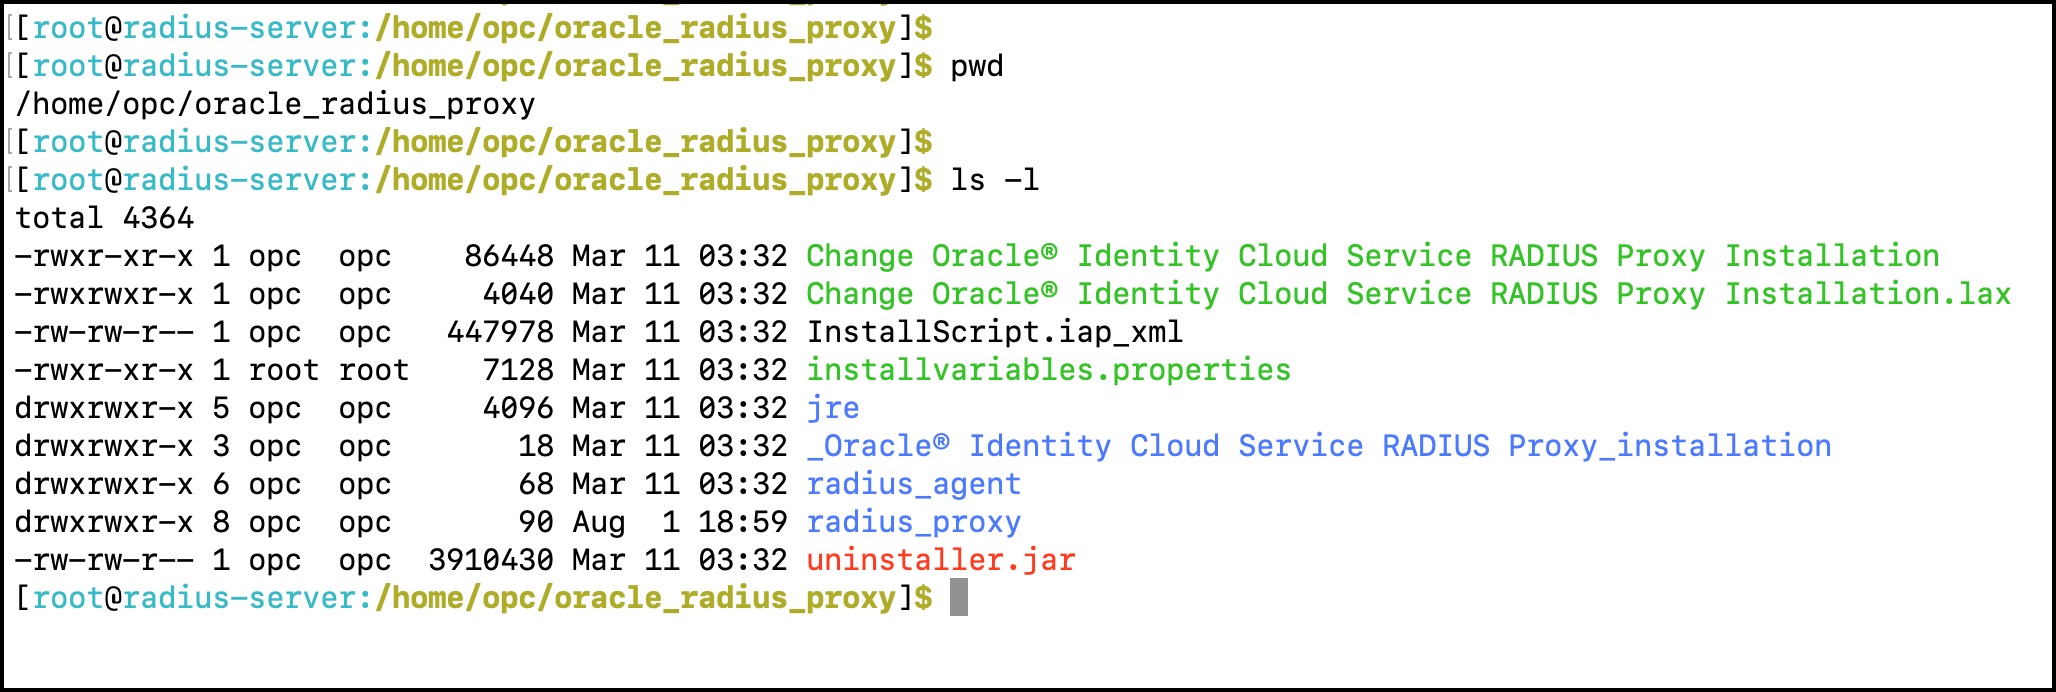
Here are commands to manage (start/stop/restart/staus) RADIUS proxy and RADIUS agent.
- RADIUS proxy: sudo /sbin/service idcs_radiusd {start | stop| restart| status}
- RADIUS agent: sudo python /home/opc/oracle_radius_proxy/radius_agent/scripts/src/radius_agent.py {start | stop| restart| status}
Check connectivity between RADIUS proxy and Identity Domain:
You have two options to test the connectivity between RADIUS proxy and Identity Domain
Important Note: If you are trying either of these options from a machine other than the Oracle Database server, you need to change the IP address accordingly on Oracle Database RADIUS App. This is because RADIUS Proxy only trusts requests that originate from the IP address (Database server) configured in the app definition.
Once connectivity test is successful, you can change it back to Database server IP address on the Oracle Database RADIUS App.
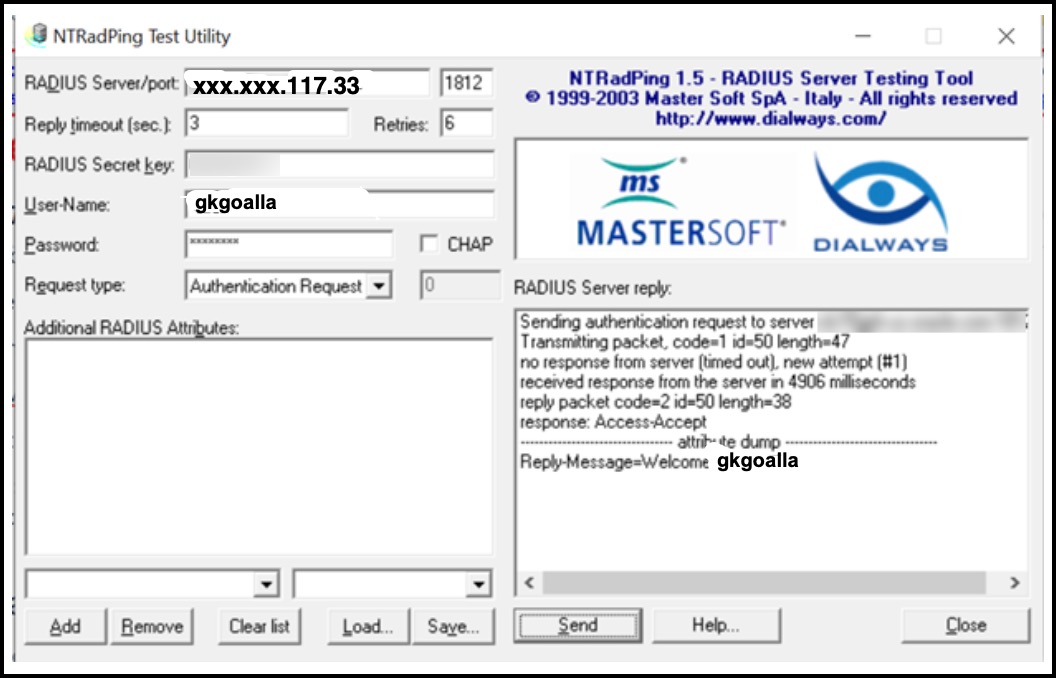
Option 1: Use NTRADping utility (This GUI tool is only available for Windows OS)
- Download the utility from https://ntradping.apponic.com/.
- Start the utility.
- Input below fields.
- Radius server IP = IP address of Linux host where RADIUS proxy is running.
- Port = Grab it from Oracle Database RADIUS App definition (Default is 1812)
- Secret key= Grab it from Oracle Database RADIUS App definition
- Username & Password: Any Identity Domain user who has access to the app.
- Click Send
- If the test is successful, you should see “Welcome <IDCS Username>” under RADIUS Server reply.
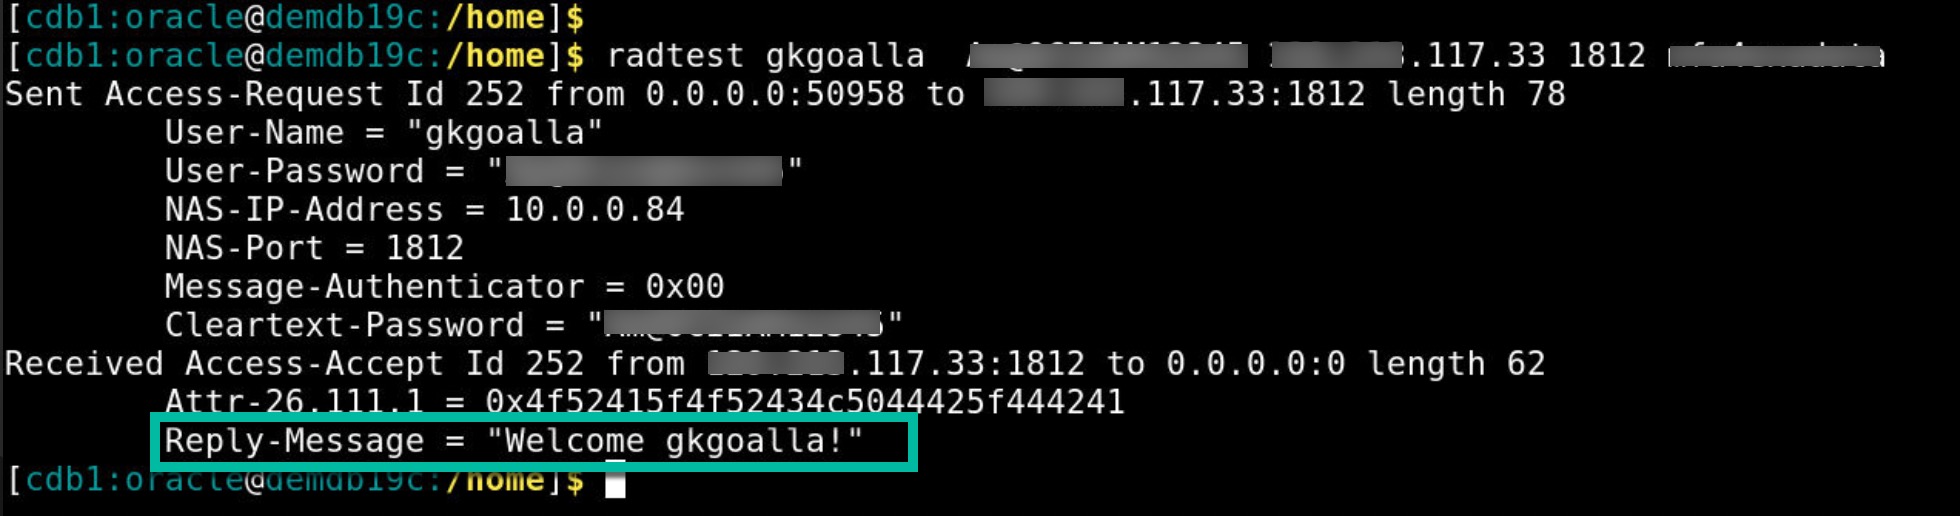
Option 2: Using Free RADIUS utility on Linux Host
- Install free RADIUS utility using the command yum install freeradius freeradius-utils
- When you install free radius, you get “radtest” command line utility.
- Run ‘radtest’ as shown in below example.
Syntax: radtest <IAM_username> < password> <radius_proxy_ip> <port> <secret_key>
Example: radtest gkgoalla ***** xxx.xxx..117.33 1812 ******
If it’s successful – It should say “Welcome gkgoalla!“
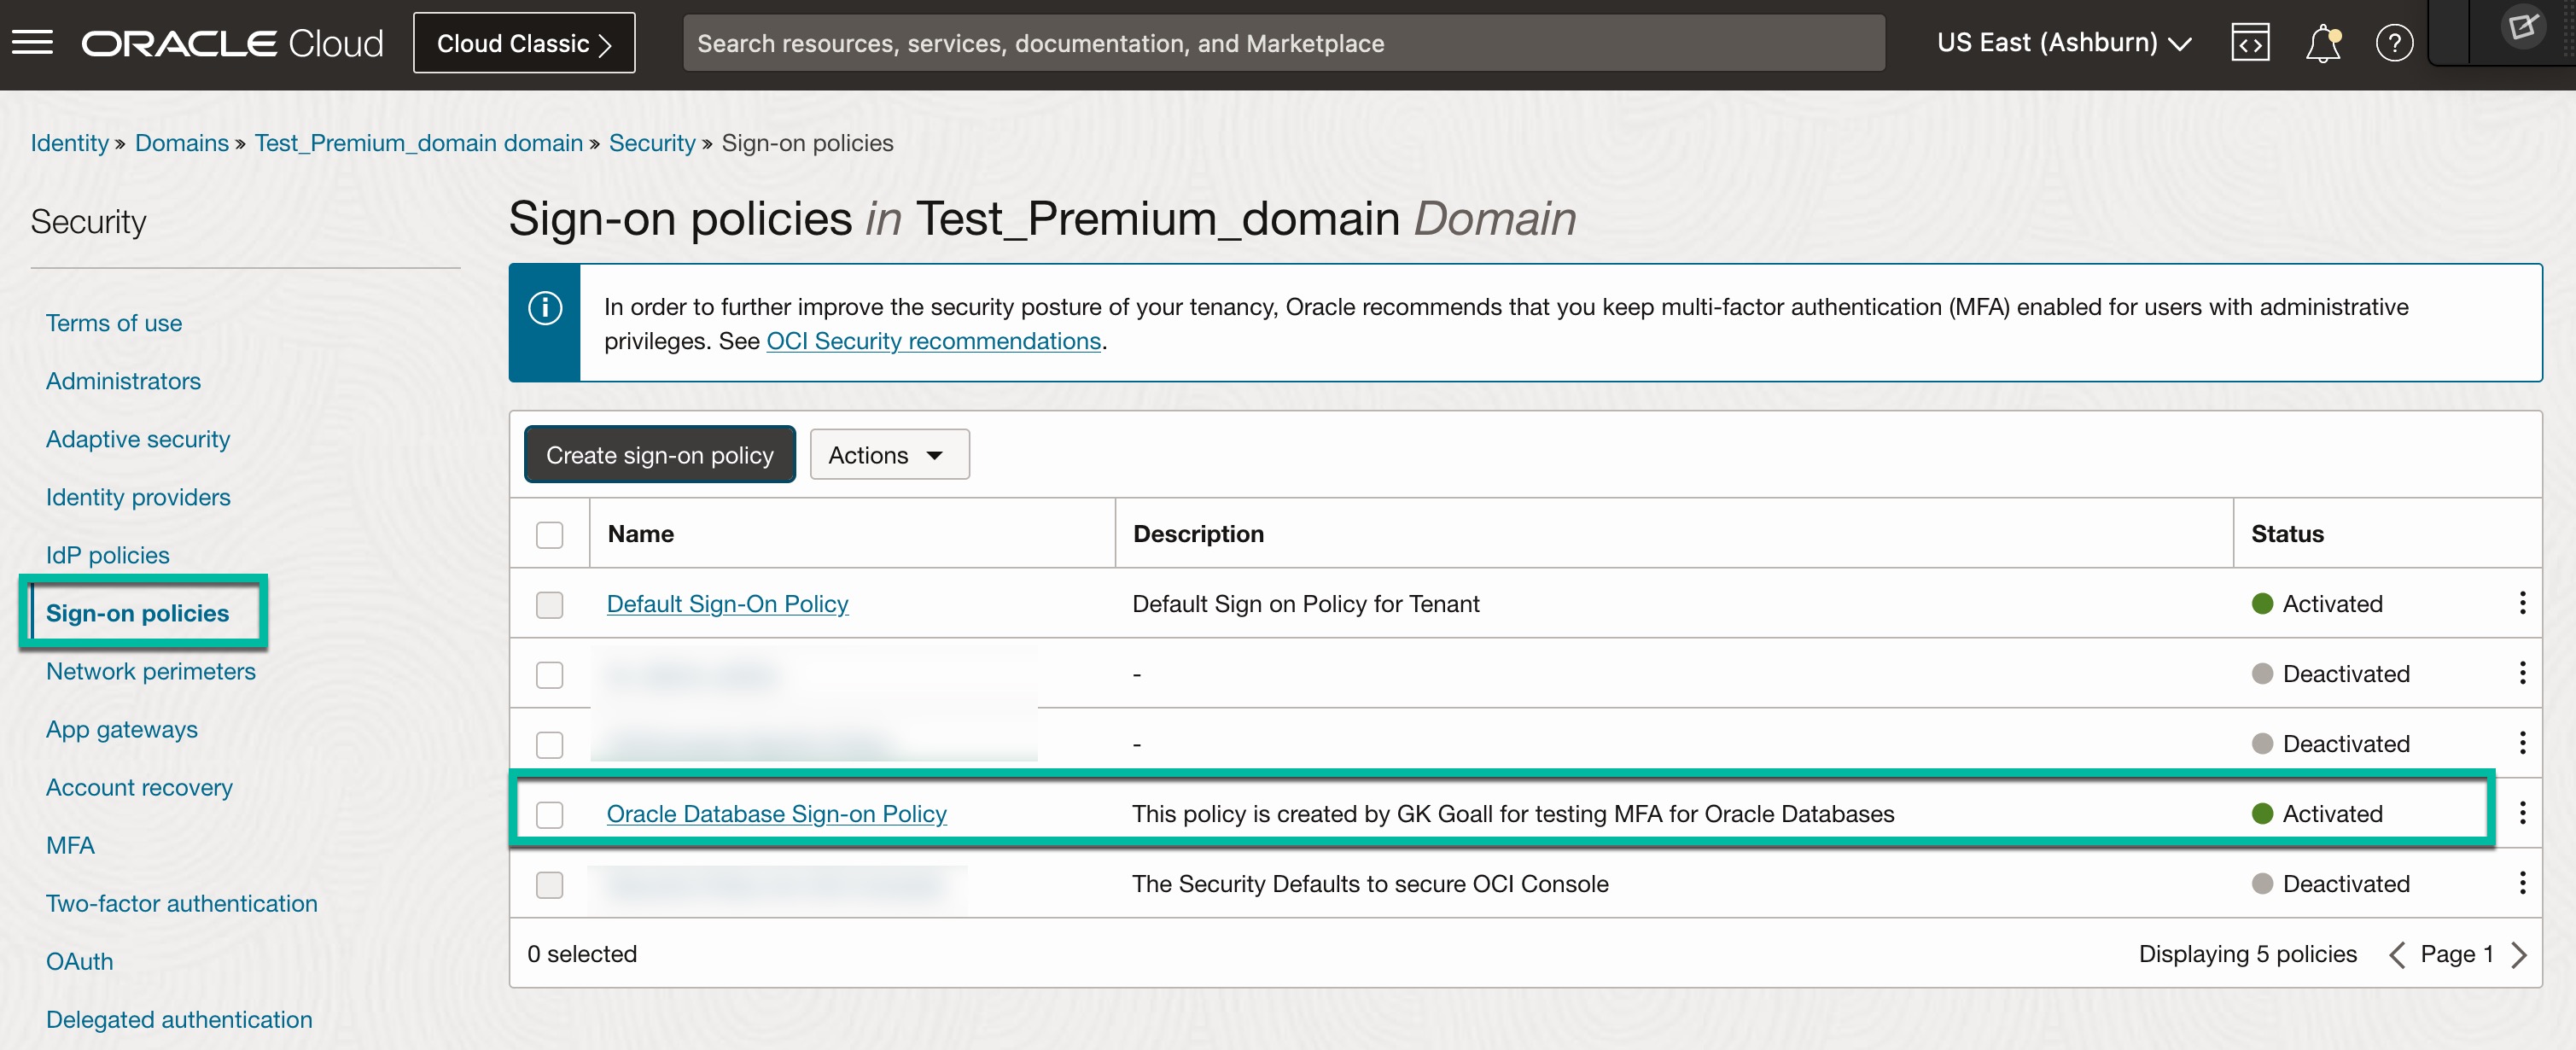
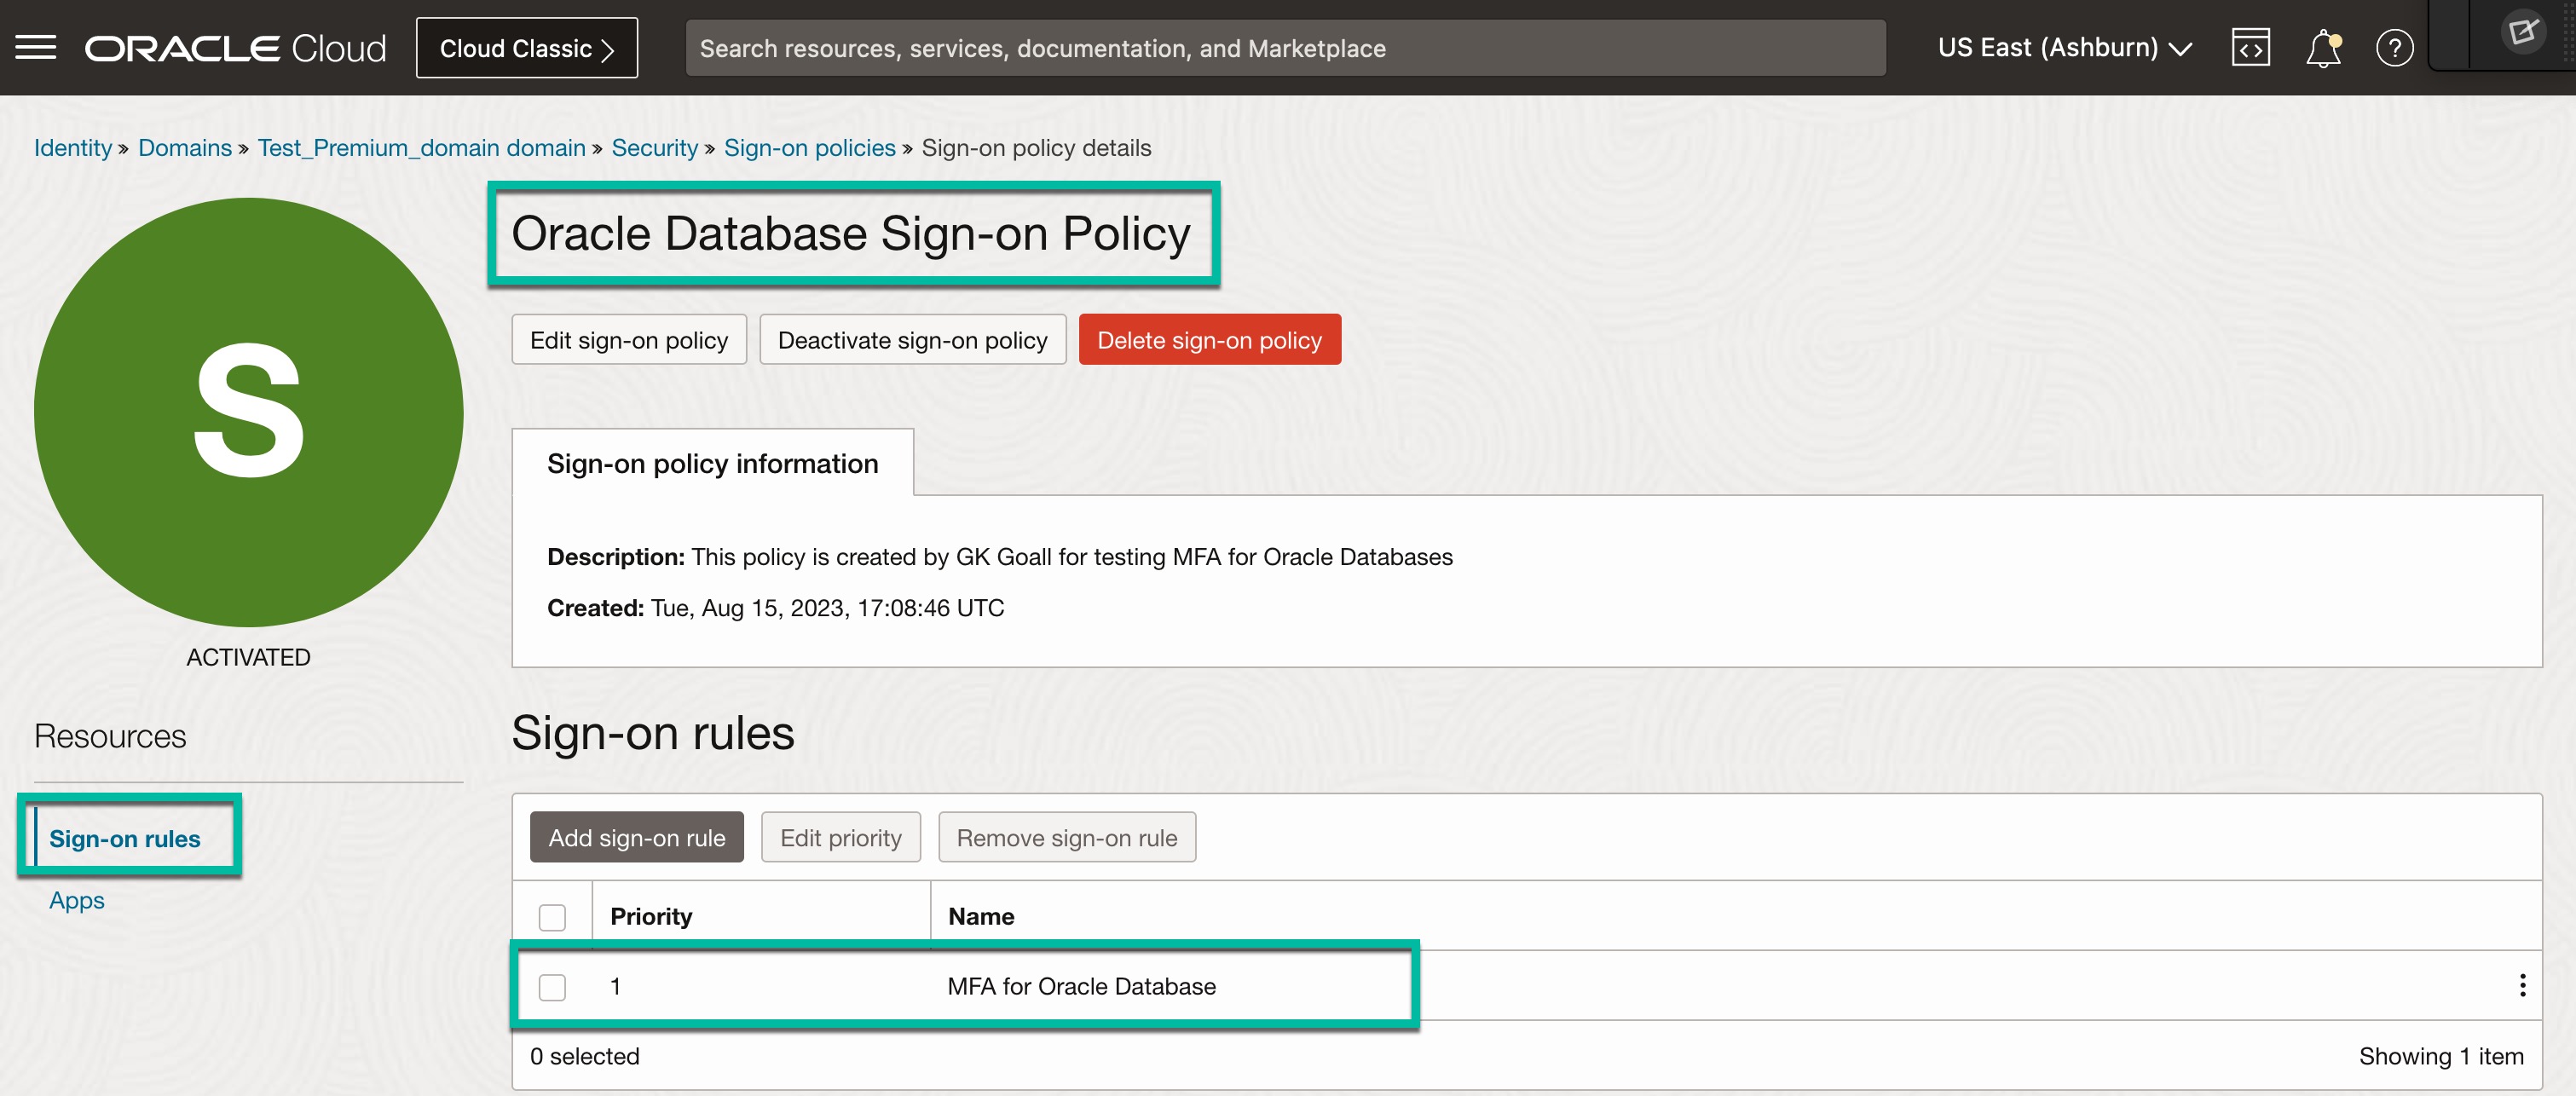
Enable MFA for Oracle RADIUS App in Identity Domain:
- From your Identity Domain, navigate to Security -> Sign-on Policies.
- Create a new sign-on policy.
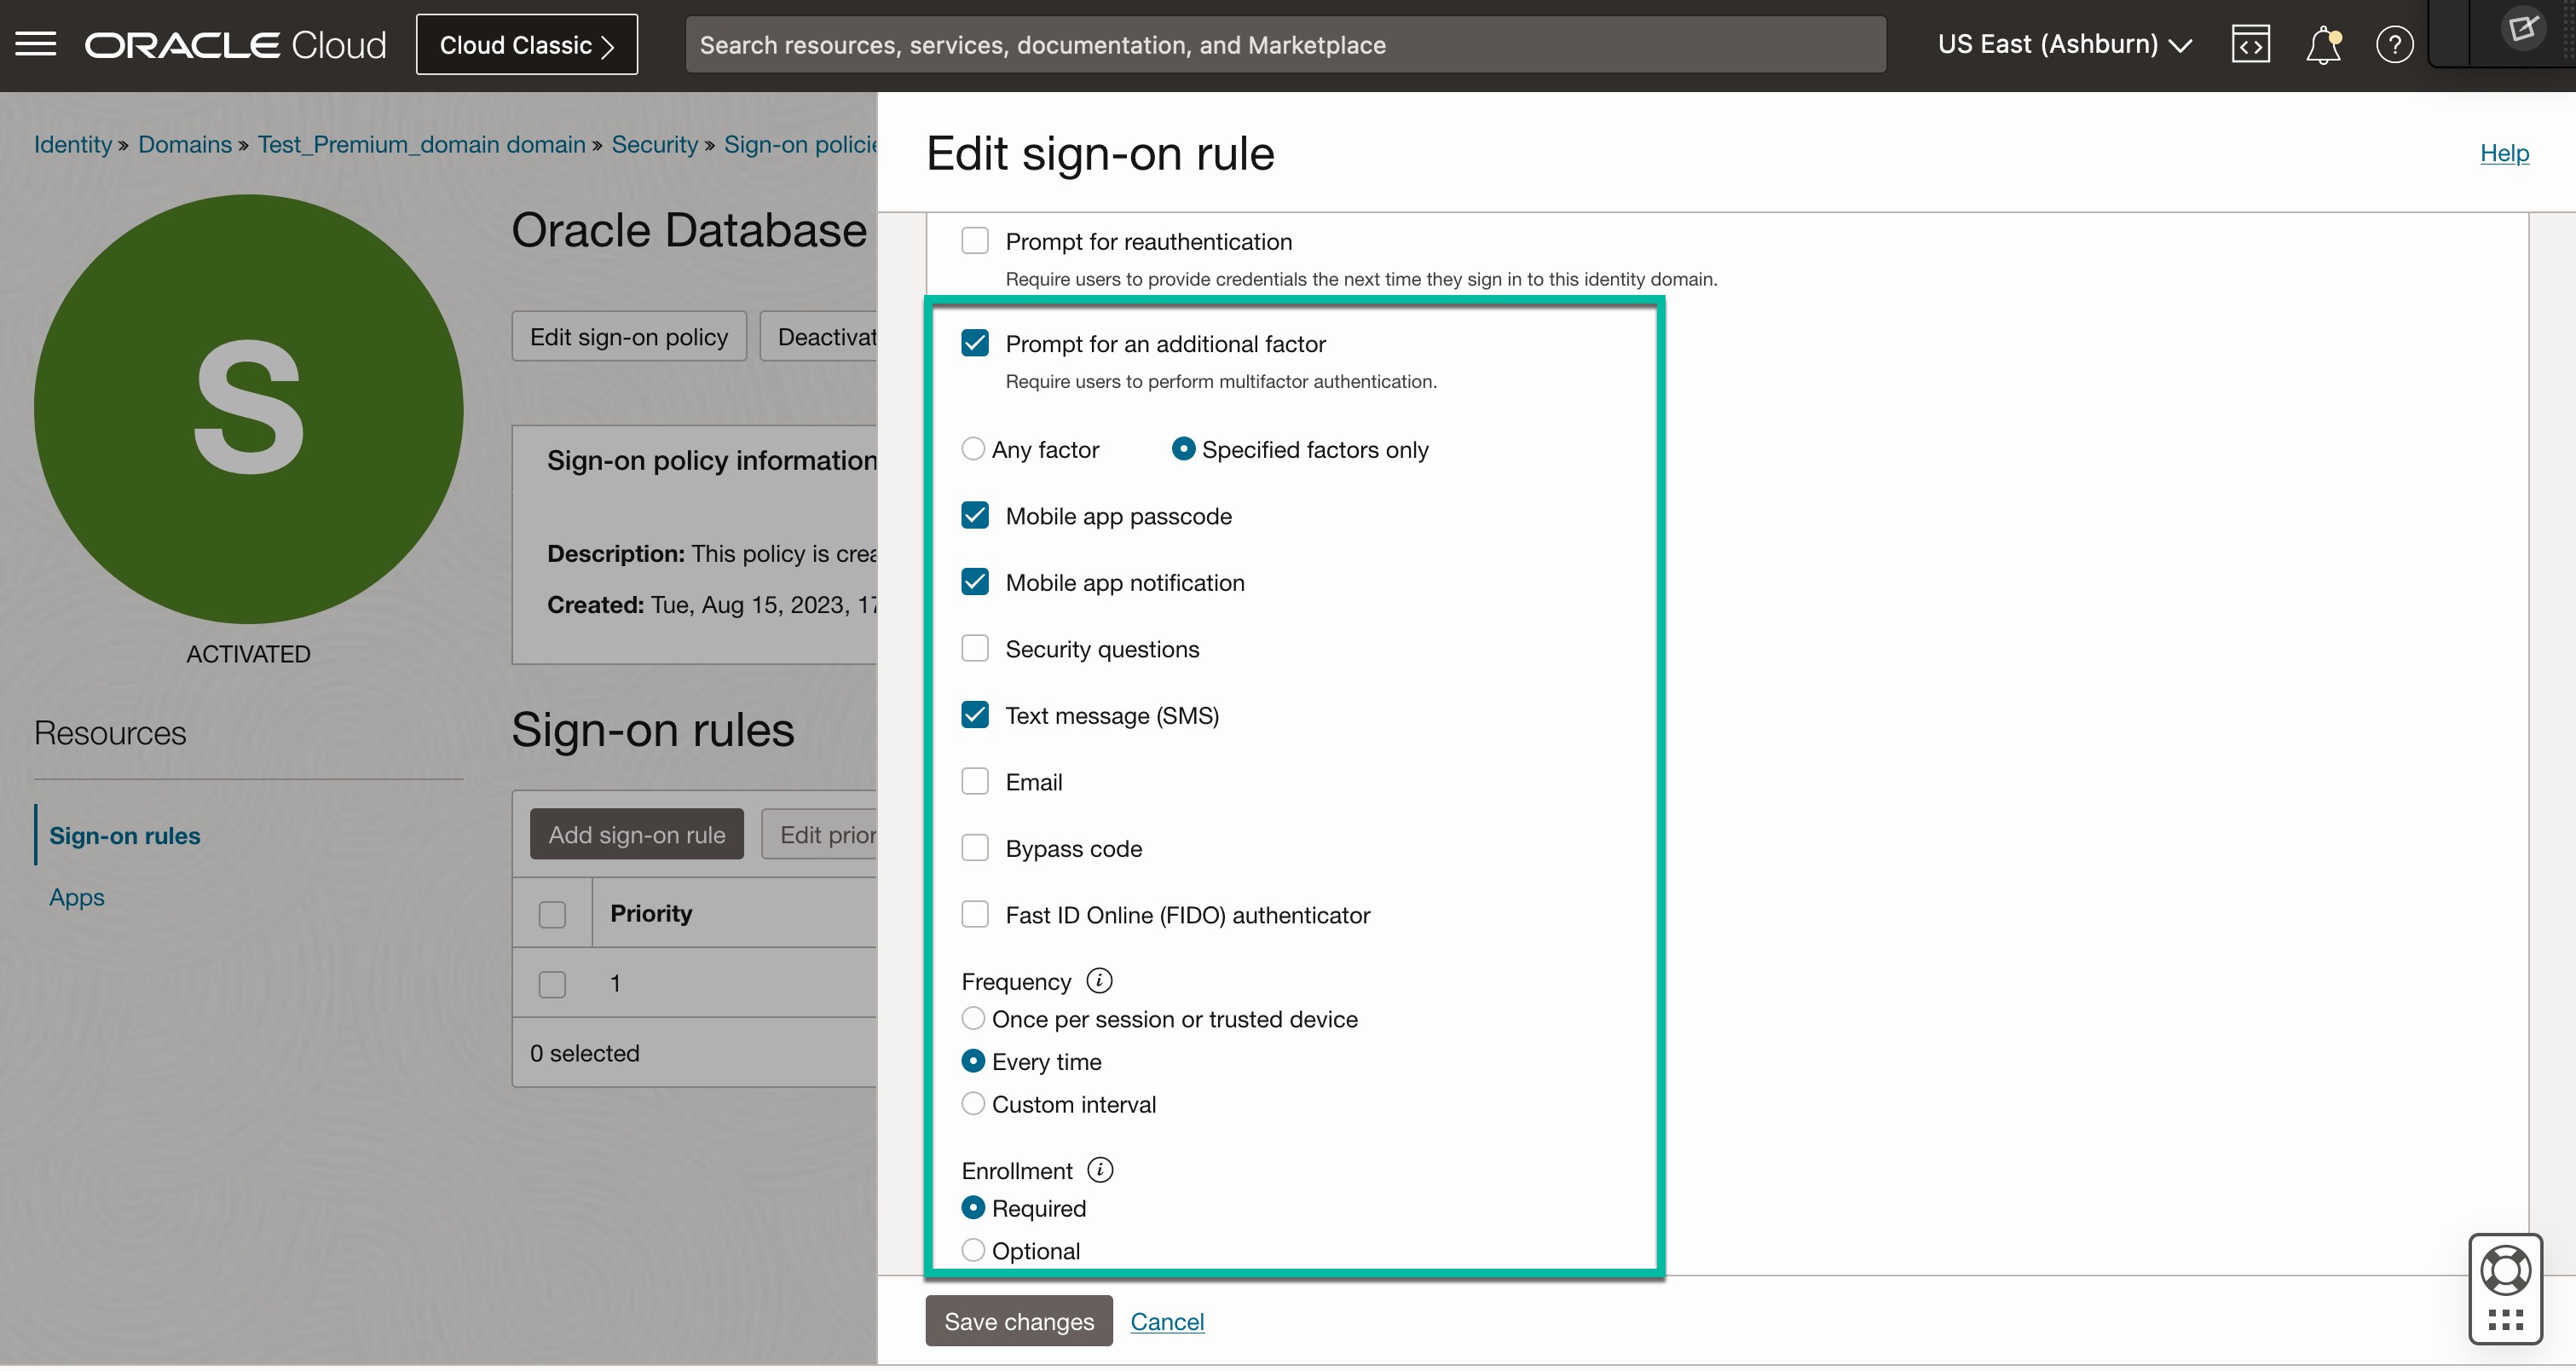
- Add Sign-on Rule (Ex: MFA for Oracle Databases). Under Actions, select “Prompt for additional factor”, select “Specified factors only”. Check below factors:
- Mobile app notification
- Mobile app passcode
- Text Message
- Save the Sign-on Rule.
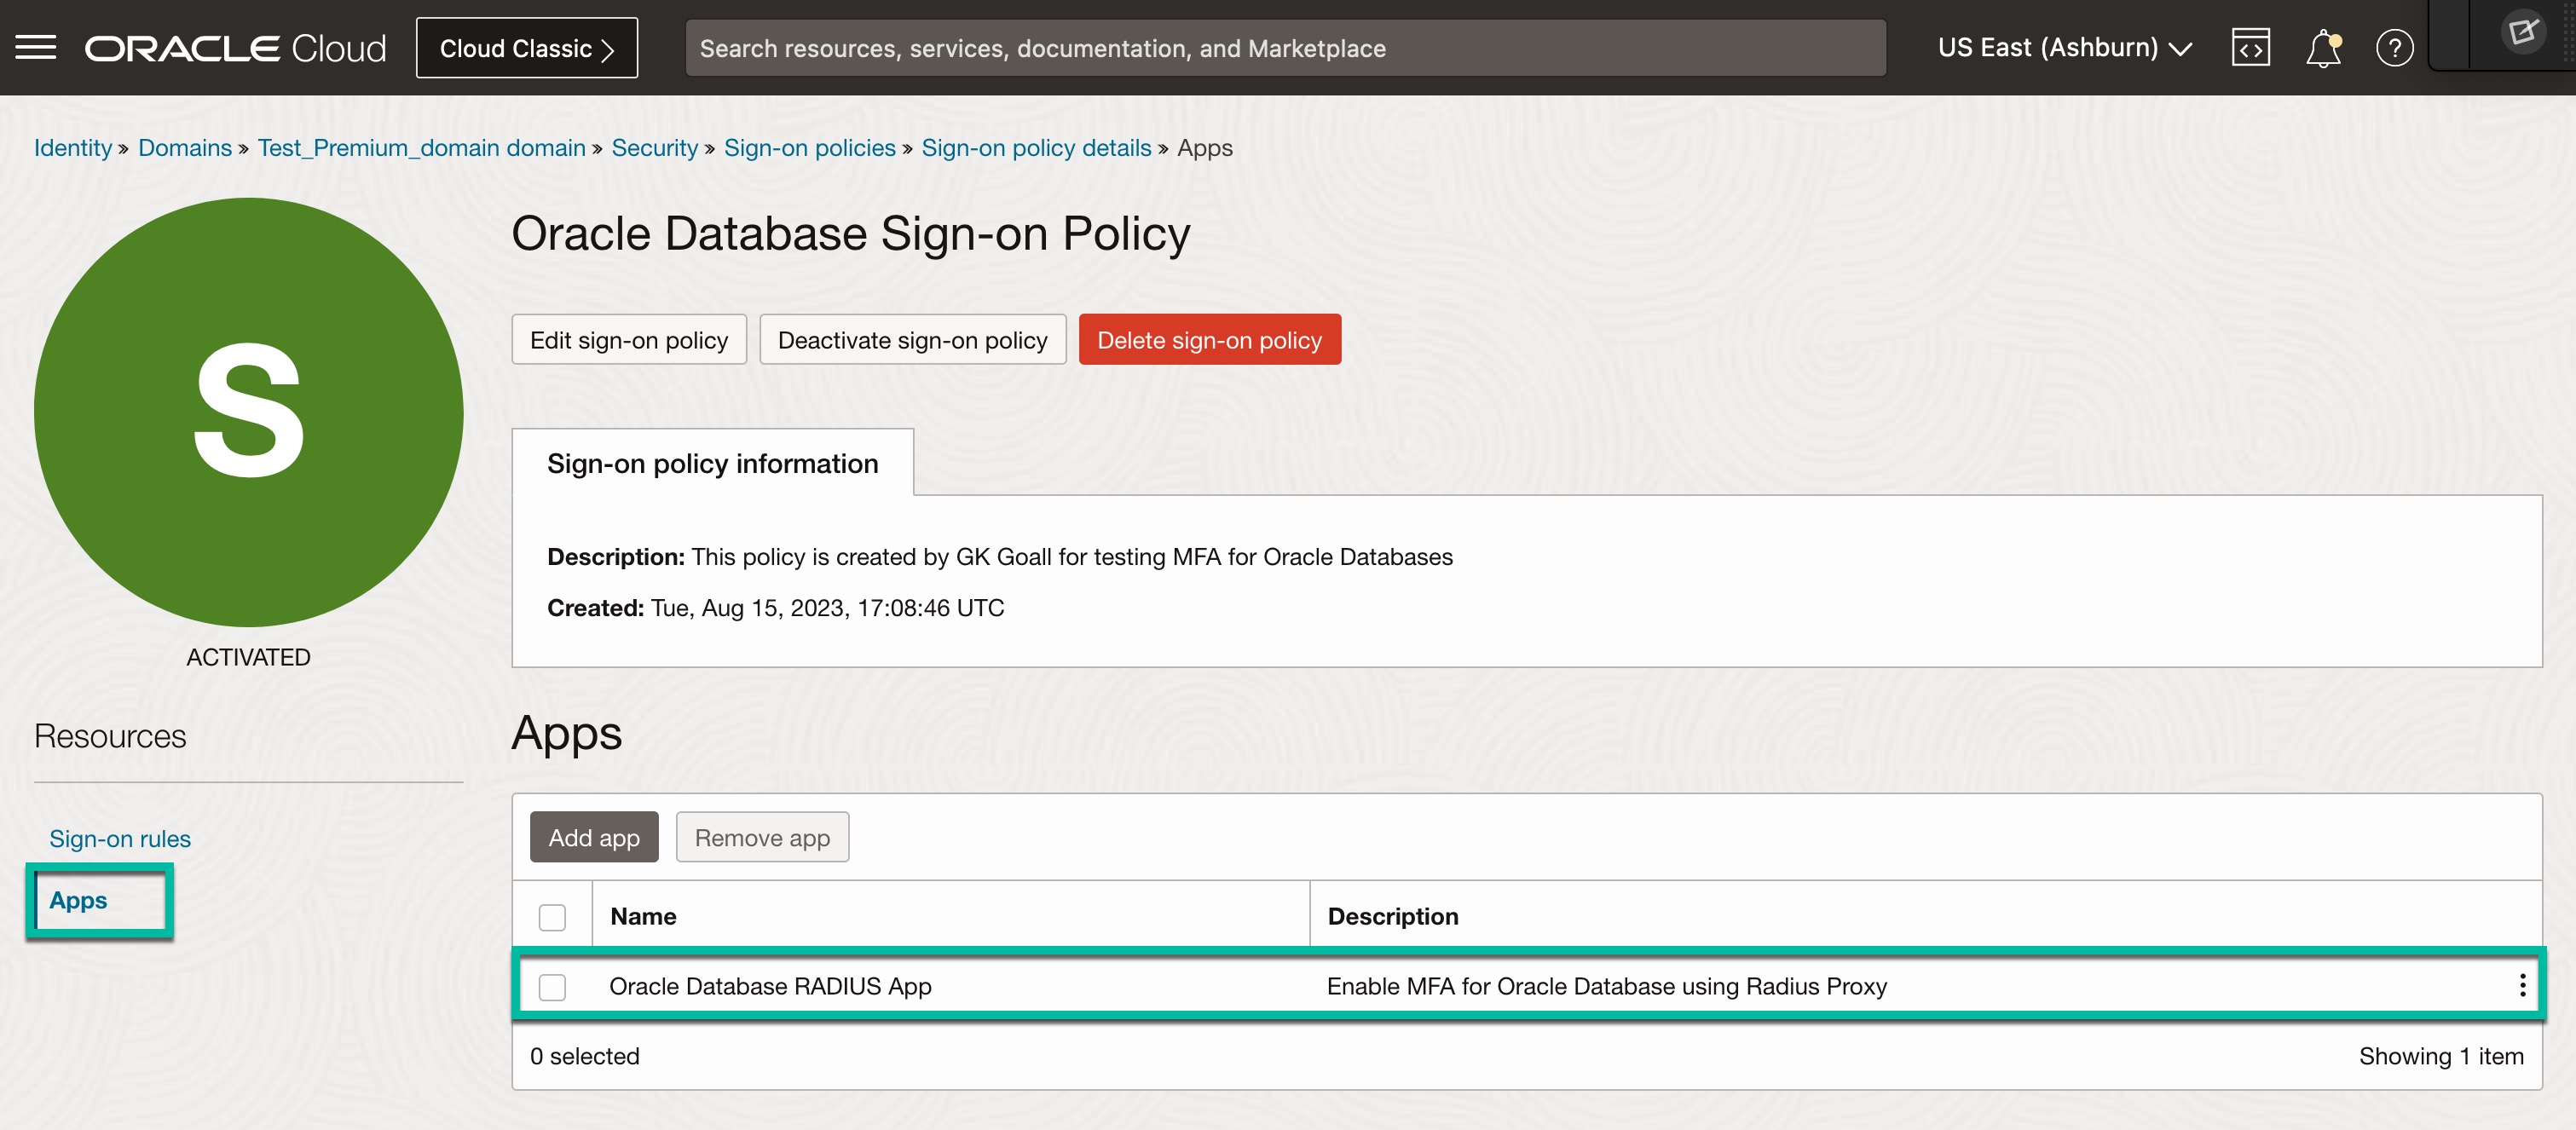
- Add “Oracle Database RADIUS App” to the policy.
- Ensure you are activated Sign-on policy.
It should look like below.
This concludes configurations in OCI Identity Domain.
Enable RADIUS Authentication on Oracle Database Server:
- Log in to Oracle Database server.
- Obtain the secret key from “Oracle Database Radius app” in Identity Domain, create a new file and save it with secret key.
For example:
- File name: radius.key
- Location: /home/oracle/sw/network/security
Note: File location can be anywhere on the database server
- Take a backup and edit sqlnet.ora file on your database server to enable RADIUS authentication with below entries.
# To enable RADIUS authentication for the database
- SQLNET.authentication_services=(RADIUS, BEQ, TCPS)
- SQLNET.radius_authentication=***.***.117.33
- SQLNET.radius_authentication_port=1812
- SQLNET.radius_secret=<Oracle_Home>/network/security/radius.key
# To enable MFA for DB via RADIUS
- SQLNET.RADIUS_CHALLENGE_RESPONSE=on
- SQLNET.RADIUS_AUTHENTICATION_INTERFACE=oracle/net/radius/DefaultRadiusInterface
- SQLNET.RADIUS_CLASSPATH=<Oracle_Home>/network/jlib/netradius8.jar:<Oracle_Home>/network/jlib:<Oracle_Home>/jdk/jre/lib:<Oracle_Home>/lib:<Oracle_Home>/jdk/jre/lib/amd64:<Oracle_Home>/jdk/jre/lib/amd64/server/
# To prevent ORA 12636 – Packet Send Failed error
- DISABLE_OOB=ON
- Connect to Oracle Database as DBA user and update REMOTE_OS_AUTHENT and OS_AUTHENT_PREFIX database parameters and restart the database.
- remote_os_authent: Specifies whether remote clients will be authenticated with the value of the OS_AUTHENT_PREFIX parameter. Set it to false.
- os_authent_prefix: specifies a prefix that Oracle uses to authenticate users attempting to connect to the server. set this parameter to NULL
To see current values of these parameters:
- sql> show parameter REMOTE_OS_AUTHENT;
- sql> show parameter OS_AUTHENT_PREFIX;
5. Update them as shown below:
- sql> alter system set remote_os_authent=false scope=spfile;
- sql> alter system set os_authent_prefix=” scope=spfile;
6. Users that you have assigned to “Oracle Database RADIUS App” in Identity Domain should be created locally in database with the flag “EXTERNALLY”.
Syntax:
- sql> create user <username> identified externally;
- sql> grant connect,resource to <username>;
Example:
- sql> create user gkgoalla identified externally;
- sql> grant connect,resource to gkgoalla
7. Restart the database.
That concludes configurations on Oracle Database Server.
Summary:
In this blog post, you have gained the knowledge of setting up RADIUS authentication and activating MFA for your Oracle Database server. In the next and final blog post of this series, you will explore how to setup user’s environment and see MFA in action for Oracle Database.
References:
Setup Radius Proxy: https://docs.oracle.com/en-us/iaas/Content/Identity/radiusproxy/overview.htm