
Introduction
Oracle Visual Builder is a cloud-based visual development and hosting platform for building and extending responsive web and mobile applications with minimal coding.
Visual Builder can also integrate with Oracle Integration. Visual Builder provides the application user interface, while Oracle Integration connects it to Oracle and third-party systems and orchestrates the underlying business processes.
A custom endpoint lets an organization use a custom domain for its Visual Builder instance. Instead of relying on a system-generated URL, users can connect through a branded, easy-to-remember address such as https://mydomain.com.
The custom hostname routes traffic to the same Visual Builder instance. The original instance URL remains available.
This approach offers several advantages:
- Gives users an easy-to-remember URL
- Aligns Visual Builder with enterprise branding
- Simplifies user communication and documentation
- Supports certificate management using corporate standards
- Supports a consistent approach to accessing Oracle Cloud services
In this blog, we walk through configuring a custom endpoint for Oracle Visual Builder in three deployment models:
- Public endpoint
- Private endpoint
- Hybrid deployment: private VB with public access through an OCI Load Balancer
Each section covers the prerequisites, architecture, implementation steps, and verification.
We also explain how to Create and Update Alternate Endpoints for applications running on the same Visual Builder instance.
Public Endpoint Deployment
With a public endpoint, Visual Builder is accessible over the internet. To configure a custom URL, associate a public hostname with the Visual Builder instance, store its SSL certificate in OCI Vault, and update public DNS.
Prerequisites
Before configuring the custom endpoint, ensure that:
- A public DNS zone is configured for your registered domain.
- You have a valid SSL certificate from a trusted certificate authority (CA).
- You can configure an OCI vault and secret for the custom endpoint.
Architecture
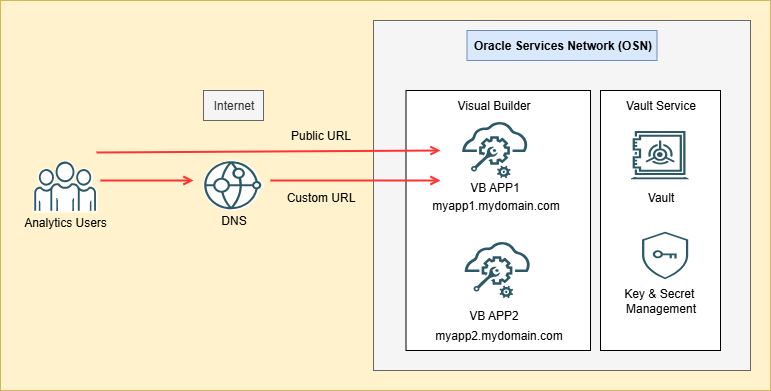
Implementation
Step 1: Configure an OCI Vault and Secret
In the OCI Console, go to Identity & Security > Key Management > Vault and create a vault.
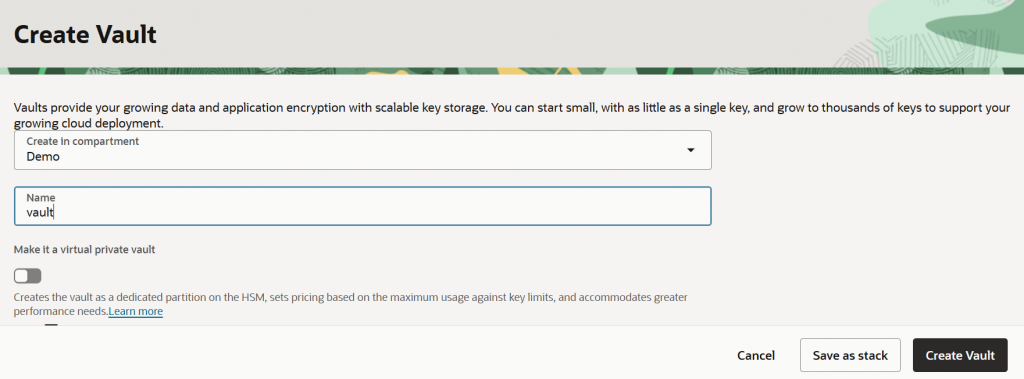
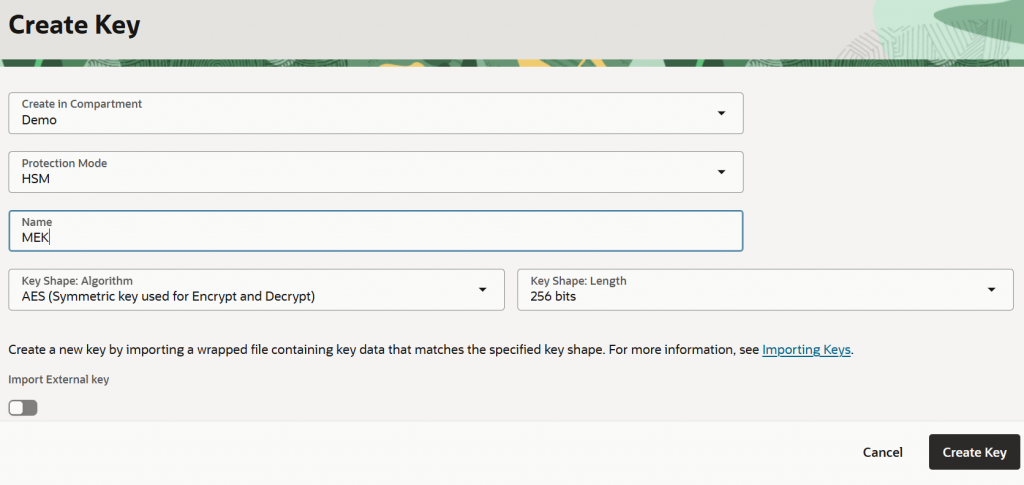
Create a master encryption key in the vault.
On the vault’s Secrets tab, select Create Secret. Choose manual secret generation and provide the certificate bundle.
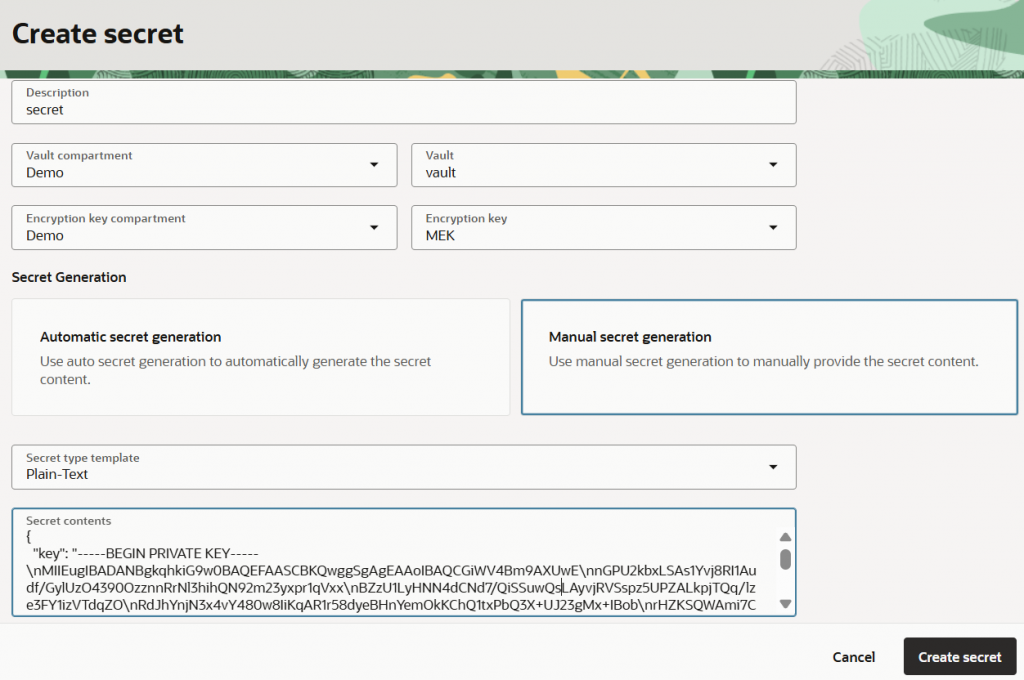
The secret contents must use this JSON format. Include the passphrase only if the private key is encrypted:
{
  "key": "-----BEGIN PRIVATE KEY-----\n…..-----END PRIVATE KEY-----\n",
  "cert": "-----BEGIN CERTIFICATE-----\n….-----END CERTIFICATE-----\n",
 "intermediates": [
    "-----BEGIN CERTIFICATE-----\n….-----END CERTIFICATE-----\n",
    "-----BEGIN CERTIFICATE-----\n….-----END CERTIFICATE-----\n"
   ],
"passphrase": "<private key password if encrypted key is provided>"
}
If you have the certificates and private key as PEM files, this Python example reads them into a JSON payload:
import json
def read_pem(path):
    with open(path, "r") as f:
        return f.read()
data = {
    "key": read_pem("private.pem"),
    "cert": read_pem("certificate.crt"),
    "intermediates": [
        read_pem("intermediate.pem"),
        ],
   }
print(json.dumps(data))
Step 2: Create a Visual Builder Instance
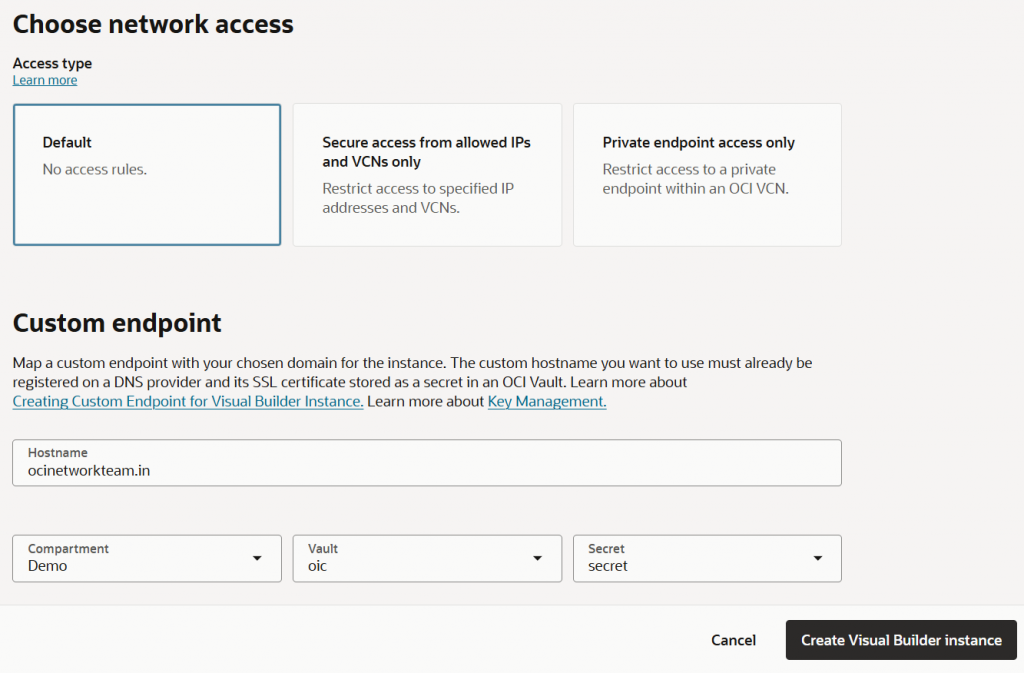
In the OCI Console, go to Developer Services > Visual Builder and select Create Visual Builder Instance.
During instance creation, select:
Access type: Default
Optional: Secure access from allowed IPs and VCNs only
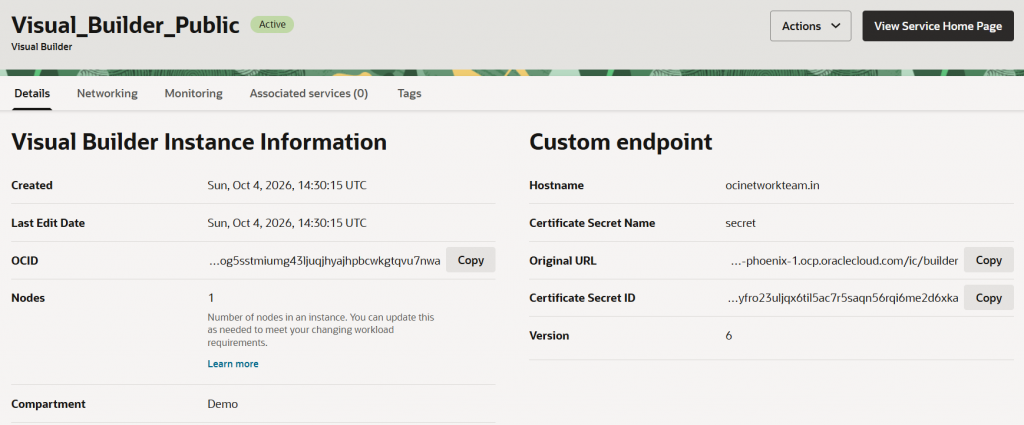
Custom endpoint: Enter the hostname, select the vault and secret, and create the Visual Builder instance.
The Visual Builder instance is now provisioned.
Step 3: Update Public DNS
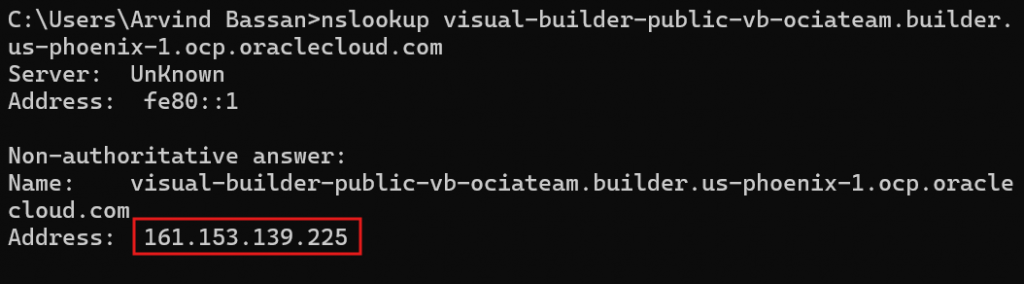
Resolve the original Visual Builder hostname to obtain its public IP address.
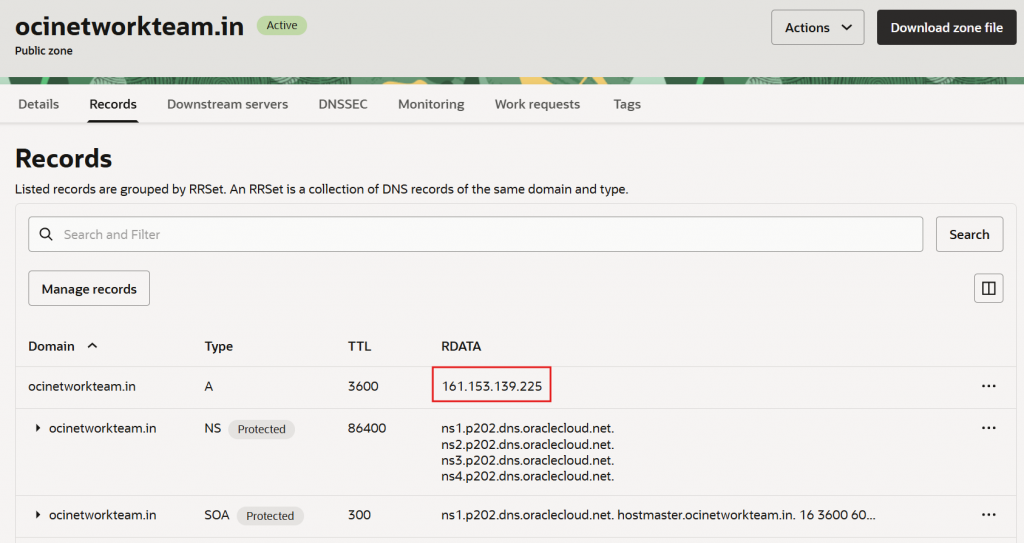
Create or update a public DNS A record so the custom hostname resolves to the Visual Builder public IP address.
Verification
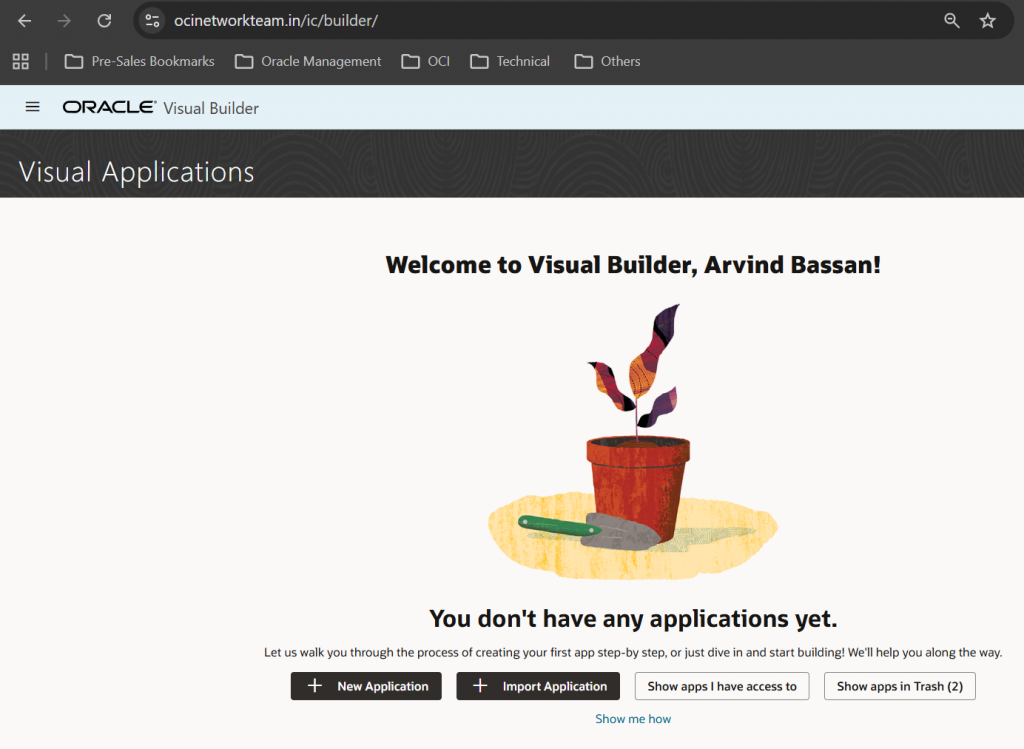
After DNS propagation, access Visual Builder using the custom URL.
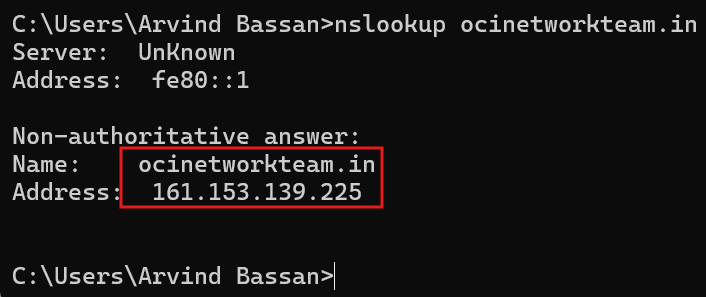
Users can now access the instance through the branded URL. The original URL remains available.
Create and Update Alternate Endpoints
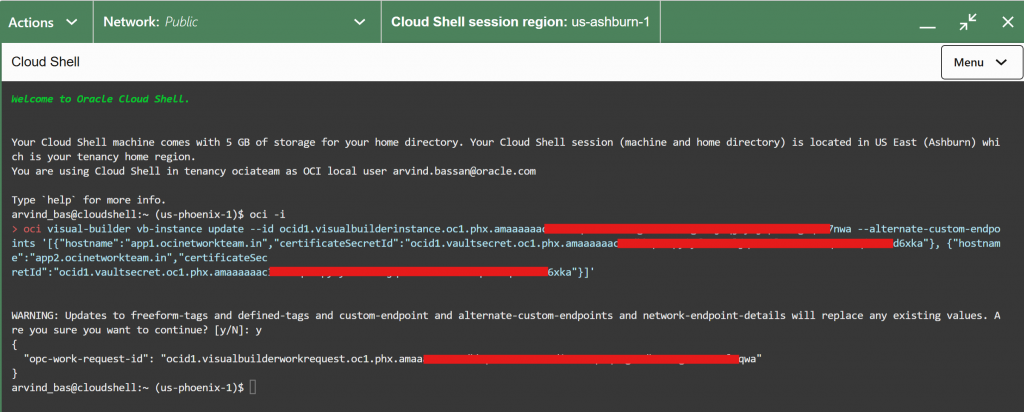
If you run multiple applications on one Visual Builder instance and need additional hostnames (such as app1.mydomain.com and app2.mydomain.com), use OCI Cloud Shell to add or update alternate endpoints.
By default, an instance supports up to three alternate endpoints. Contact VB Dev Ops if you need a higher limit.
First, get the instance OCID:
oci visual-builder vb-instance get --id <OCID>Verify the details, then update the instance with the alternate endpoint listed in the JSON array.
oci visual-builder vb-instance update --id <VB_INSTANCE_OCID> \
  --alternate-custom-endpoints '[{"hostname":"app1.ocinetworkteam.in","certificateSecretId":"<SECRET_1_OCID>"},
  {"hostname":"app2.ocinetworkteam.in","certificateSecretId":"<SECRET_2_OCID>"}]'
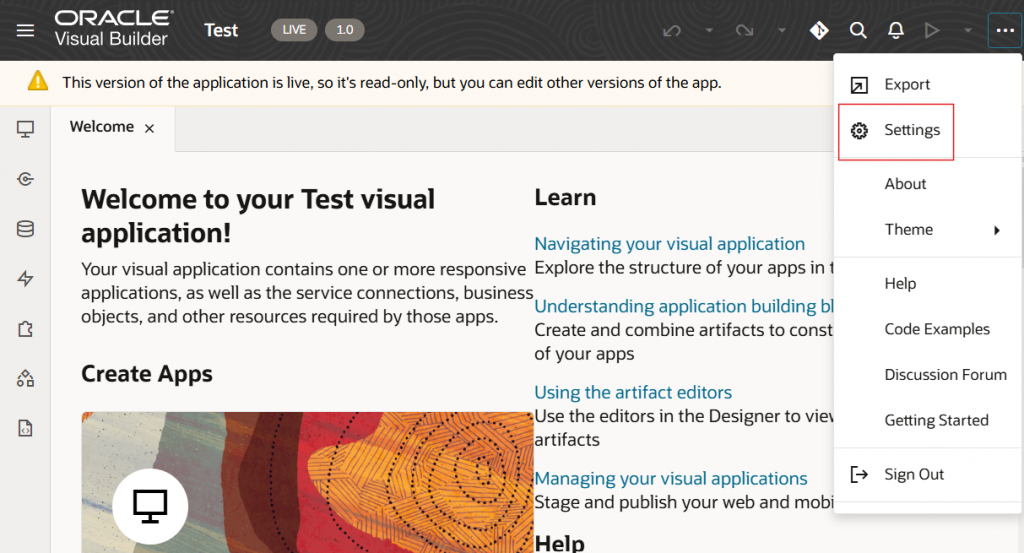
- Open your visual application, select Menu in the upper-right corner, and then select Settings.
- In the Settings editor’s Applications tab, select the custom domain from the Vanity URL list.
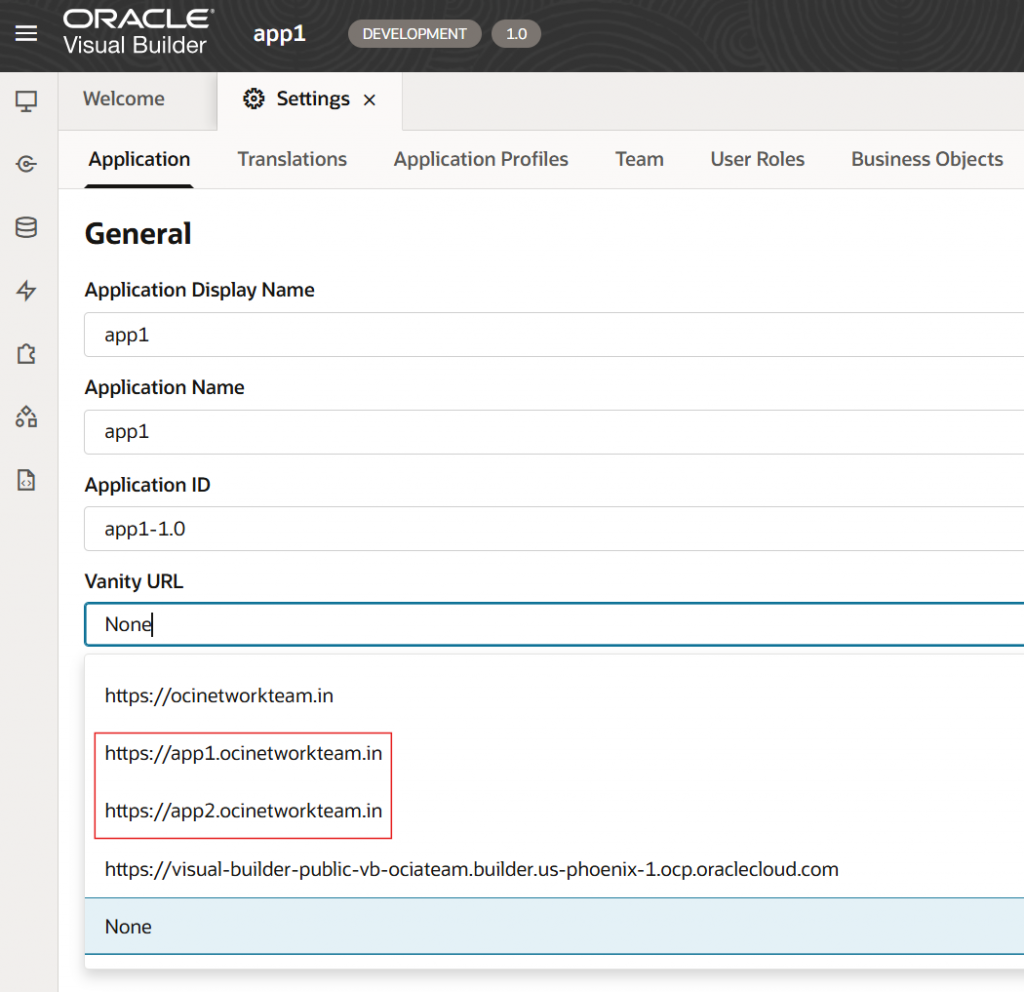
Note: Configure a wildcard SSL certificate or the appropriate single-domain certificates in the vault secrets for the additional endpoints. Include every existing alternate endpoint in each update command; an endpoint omitted from the payload is removed.
Private Endpoint Deployment
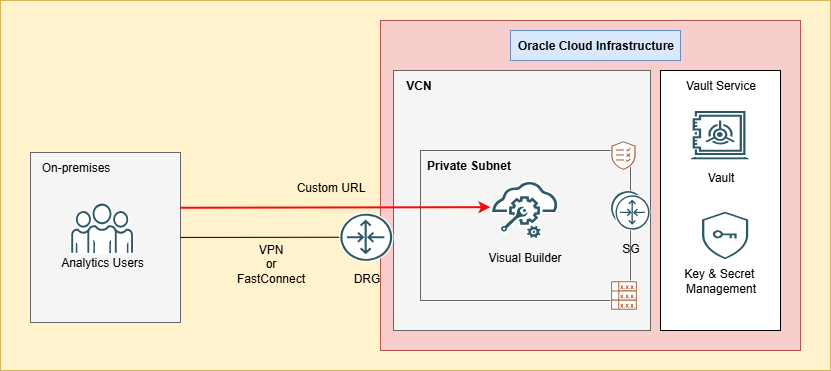
Many organizations use a private endpoint so access to Visual Builder stays within their private network through a VPN or FastConnect.
In this model, the custom URL resolves through a private DNS zone and is accessible only from connected private networks.
Prerequisites
Ensure that the following components are available:
- Virtual cloud network (VCN)
- Private subnet
- Route tables
- Security lists or network security groups (NSGs)
- VPN or FastConnect connectivity (if on-premises access is required)
- Private DNS zone
- Valid SSL certificate (a self-signed certificate may be used in this deployment)
- An OCI vault and secret for the custom endpoint
Architecture
Implementation
Step 1: Configure an OCI Vault and Secret
Follow the vault and secret steps in the public endpoint section.
Step 2: Create a Visual Builder Instance
In the OCI Console, go to Developer Services > Visual Builder and select Create Visual Builder Instance.
During instance creation, select:
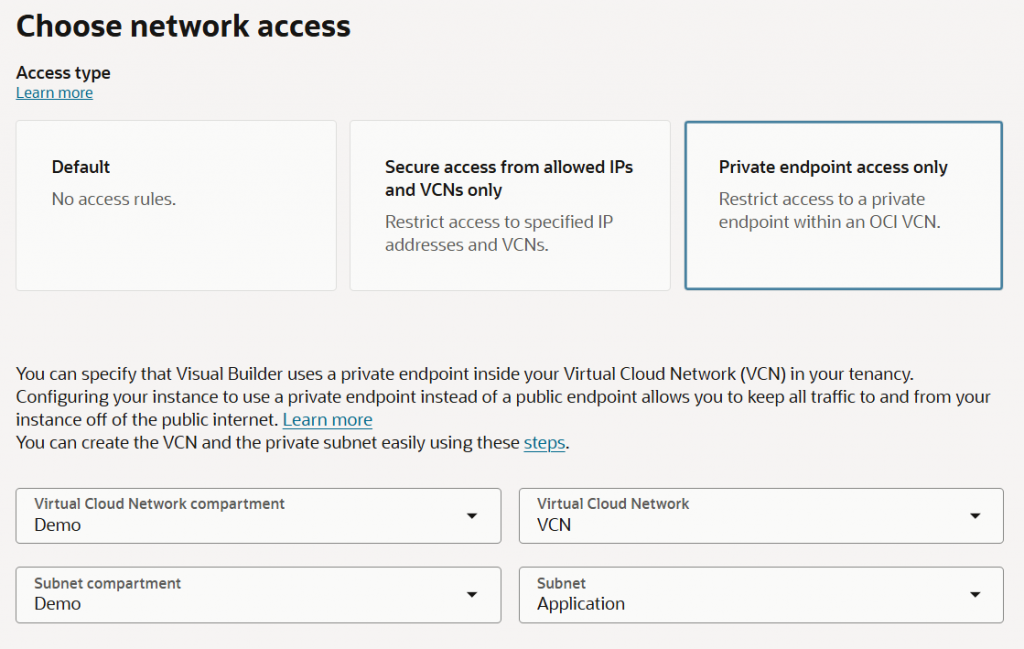
Access type: Private endpoint access only. Select the VCN and subnet for the private endpoint.
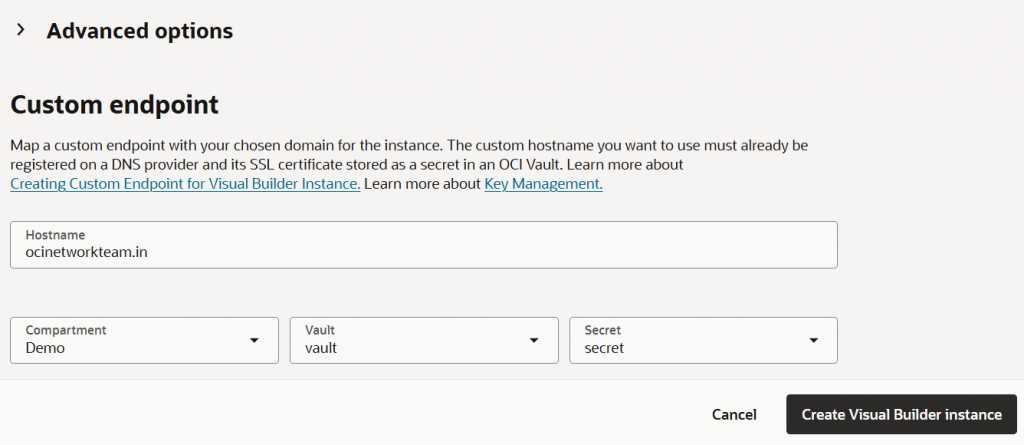
Advanced Options > Custom endpoint: Enter the hostname, select the vault and secret, and create the Visual Builder instance.
Step 3: Update Private DNS
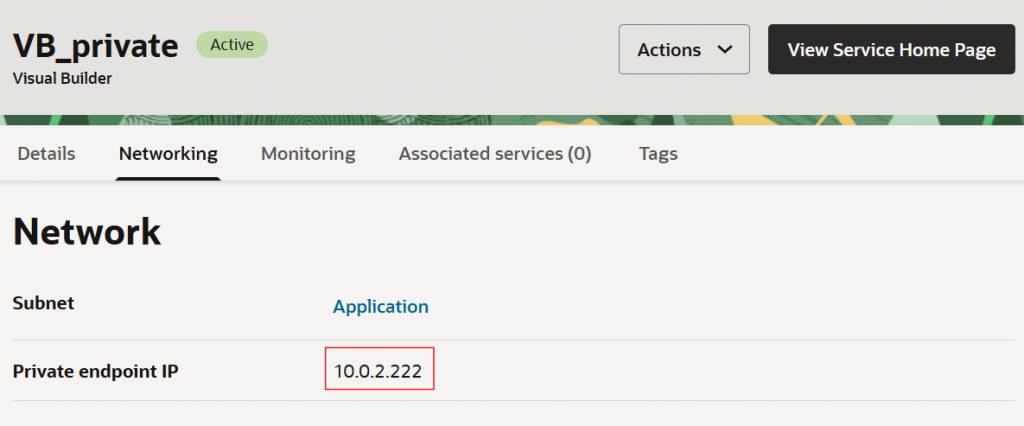
On the Networking tab, note the private IP address assigned to the Visual Builder instance.
Update the private DNS A record so the custom hostname resolves to the private endpoint.
Verification
Verify that users connected through VPN or FastConnect can access Visual Builder through the custom URL.
The hostname should resolve to the private endpoint without exposing the instance to the public internet.
Hybrid Deployment
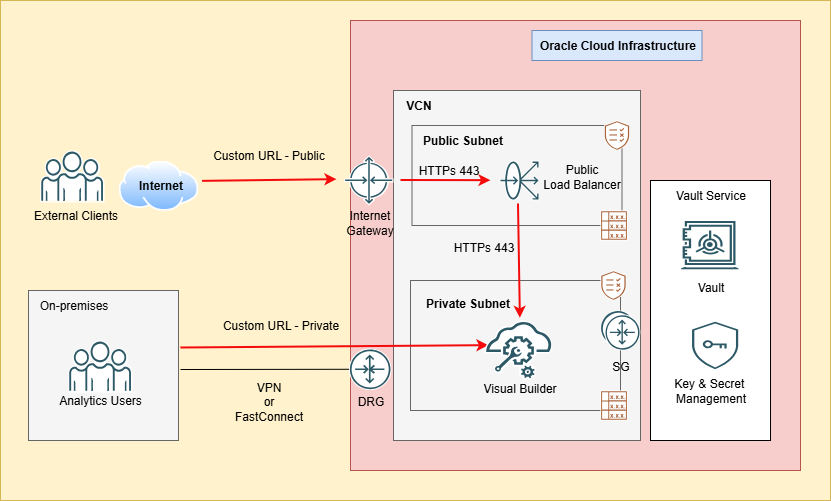
Some organizations need both private and public access.
In this scenario:
- Visual Builder is deployed with a private endpoint.
- Internal users access the private endpoint through VPN or FastConnect.
- External users access the same Visual Builder instance through a public custom URL.
An OCI Load Balancer provides a public entry point while the Visual Builder instance remains private.
Architecture
Implementation
Step 1: Create a Public OCI Load Balancer
To give external users access to a private Visual Builder instance, provision a public OCI Load Balancer in a public subnet. Configure point-to-point SSL, with SSL enabled on both the listener and the backend set.
Configure the load balancer as follows:
- Type: Public load balancer
- Subnet: Public subnet
- Listener protocol: HTTPs
- Listener port: 443
- Backend protocol: HTTPs
- Backend port: 443
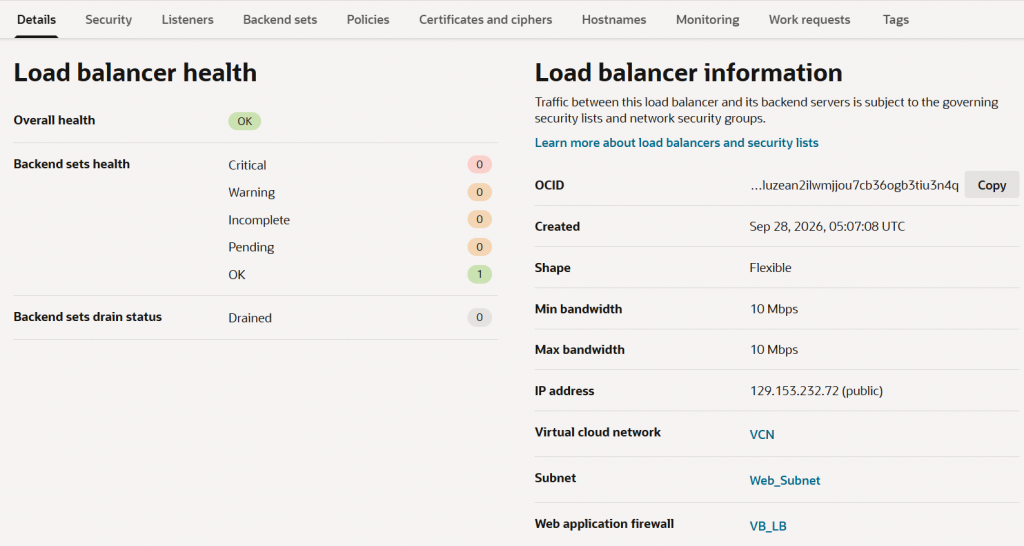
With point-to-point SSL, the client’s SSL connection terminates at the load balancer. The load balancer then establishes a new SSL connection to the Visual Builder backend.
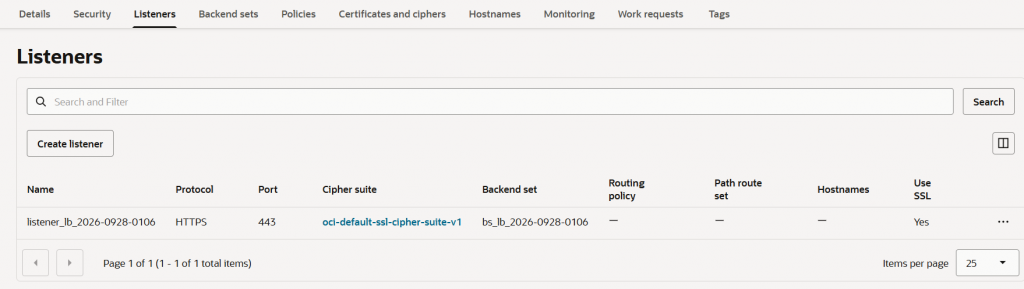
Step 2: Configure the Backend
Add the Oracle Visual Builder private endpoint IP address as the backend on port 443, with SSL enabled at the backend set.
Confirm that the backend health status is Healthy before proceeding.
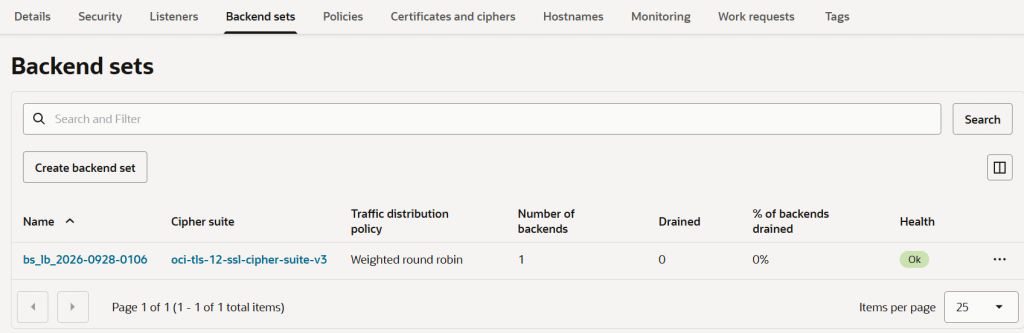
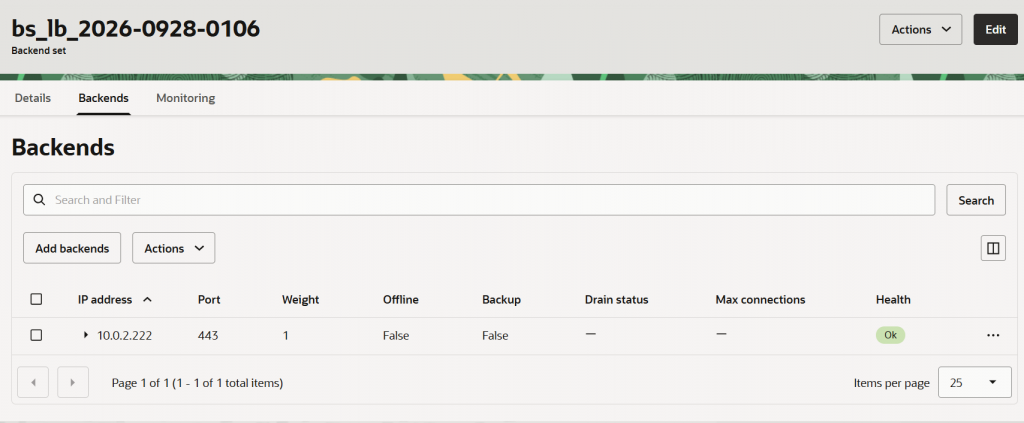
Note: Ensure that the security lists or NSGs for the load balancer and private subnet permit the required TCP traffic on port 443. Check that the backend health check reports the Visual Builder private endpoint as Healthy.
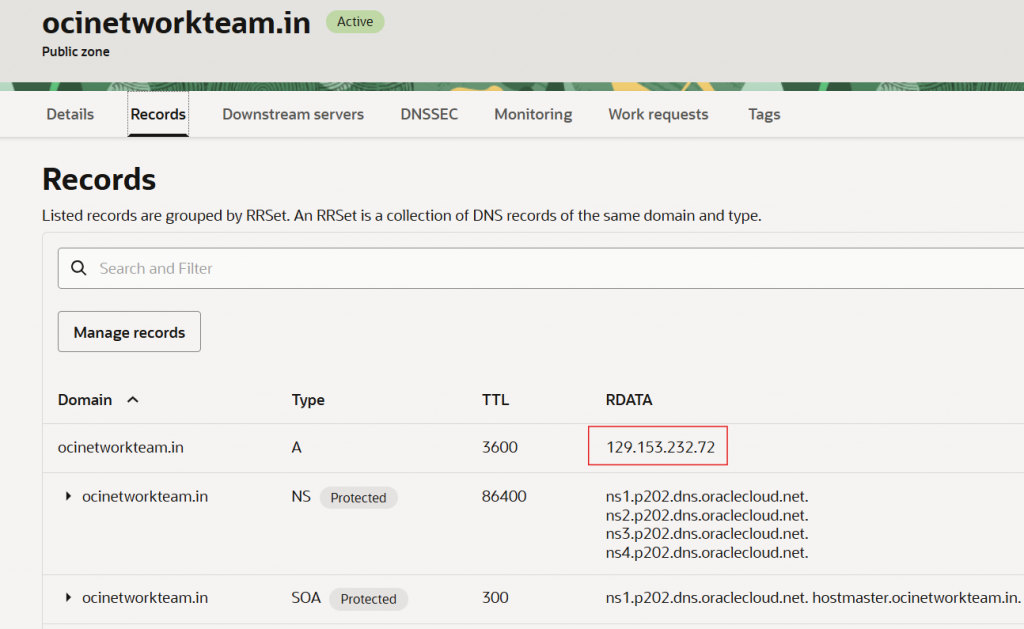
Step 3: Update Public DNS
Update the public DNS A record so the custom hostname resolves to the public IP address of the OCI Load Balancer.
External users can then reach the load balancer, which forwards traffic to the private Visual Builder instance.
Verification
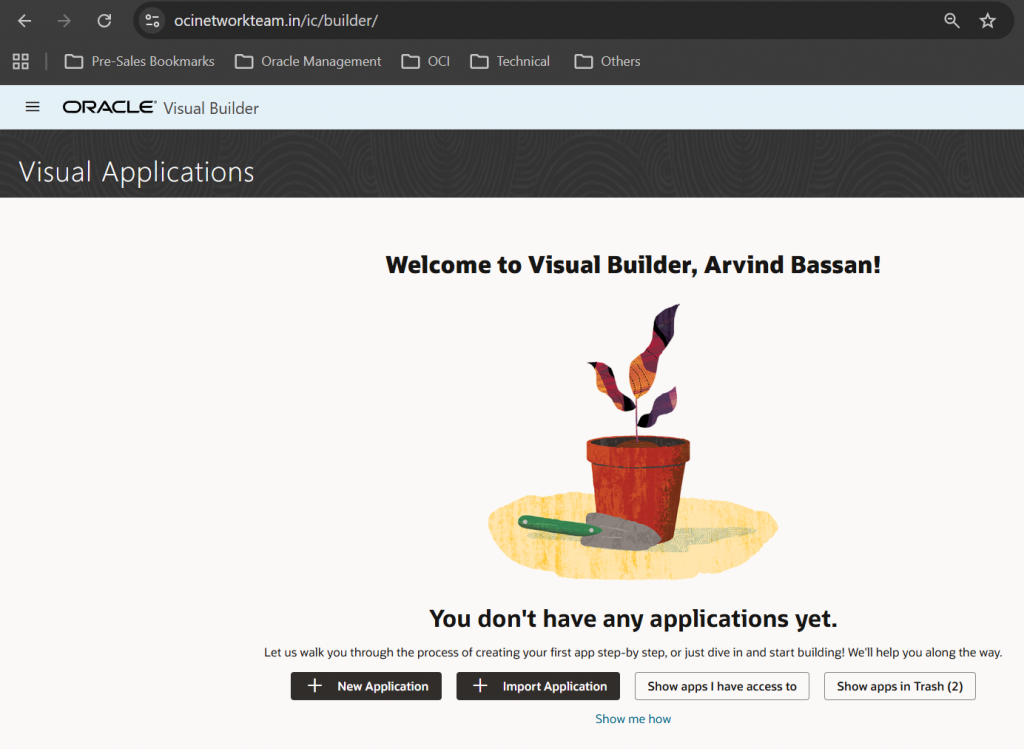
Validate both access paths:
- Internal users access Visual Builder through the private custom URL over VPN or FastConnect
- External users access the same Visual Builder instance through the public custom URL and OCI Load Balancer.
- This setup provides public access while the Visual Builder endpoint remains private.
This setup provides public access while the Visual Builder endpoint remains private.
Note:
You can also integrate the OCI Load Balancer with OCI Web Application Firewall (WAF) for an additional layer of security.
OCI WAF inspects web traffic to help protect web applications from threats such as OWASP Top 10 exploits, application-layer DDoS attacks, and malicious bots before they reach your backend servers.
It provides layer 7 security, centralized policy management, and integration with OCI load balancers to support application availability and compliance requirements.
Conclusion
A custom endpoint gives Visual Builder users a familiar, branded URL while supporting your organization’s DNS and certificate management practices.
The right configuration depends on how users need to reach the instance:
- Public endpoint for direct internet access with public DNS and a trusted certificate.
- Private endpoint when access must stay within connected private networks.
- Hybrid deployment when External users access the instance through the public OCI Load Balancer, while internal users can simultaneously access it directly from the private network or through VPN or FastConnect.
Choosing the right architecture depends on your organization’s networking, security, and access requirements. By following the implementation steps in this guide, administrators can provide Oracle Visual Builder users with a consistent, secure, and branded access experience across public, private, and hybrid deployments.