Background
Oracle Data Transforms is a low-code, data integration tool that enables users to design and execute data integration flows through an intuitive graphical interface. It allows you to create:
- Data Loads: Simplify the process of loading data into Autonomous Database.
- Data Flows: Define how data is moved and transformed between different systems.
- Workflows: Orchestrate the sequence in which data flows are executed.
Oracle Data Transforms integrates seamlessly with Oracle Autonomous Database. Its repository is automatically created during provisioning, storing all user-developed or configured objects. It supports various data source types. See the list of supported connectors.
Oracle Data Transforms can be accessed or provisioned from:
- Autonomous Database Data Studio page: Accessed as a Data Studio component within the Database Actions interface.
- Oracle Cloud Marketplace: Provisioned as a pre-configured VM (supports only Autonomous Database as targets)
Functionally, both versions are the same. The only difference is that the Marketplace version supports only Autonomous Database as a data integration target.
This post outlines the networking and database configuration required to enable secure, private communication between Oracle Data Transforms and Autonomous Database over private endpoints.
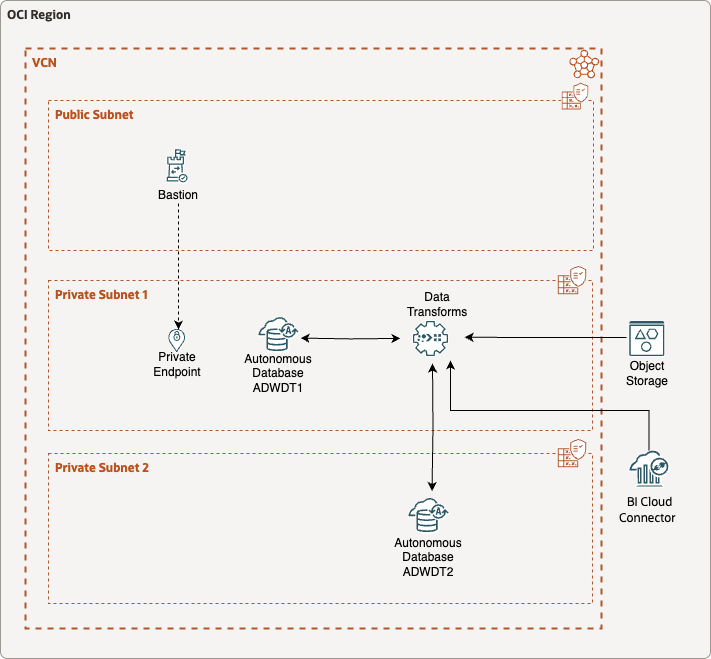
Architecture Overview
NOTE: This is neither a reference architecture nor a required one; it is simply the network configuration used to test Data Transforms connectivity between private endpoints.
The environment used for this blog consists of two Autonomous Database instances provisioned with private endpoints, deployed in a new VCN and subnets using only the default initial configuration. An OCI Bastion service is provisioned with a private endpoint in one of the subnets.
The connectivity between Oracle Data Transforms and BI Cloud Connector (BICC), Object Storage, and Autonomous Database is supported by the network configuration described in this blog post.
Configuration
Creating Private Subnets
- Create a VCN
- Configure private subnets
- Ensure that routing is configured to both the NAT Gateway and the Service Gateway.
The private endpoint prerequisites and configuration steps are detailed in this document.
Provisioning Autonomous Database with Private Endpoints and TLS Authentication
Provision or configure two Autonomous Databases with Private Endpoints (in private subnets).
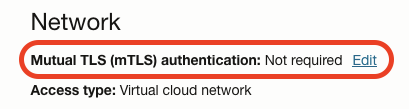
Set Mutual TLS Authentication to “not required”. An Access Control List can be implemented in the Network Security Group allowing specific IP addresses or CIDRs to access the Autonomous Database instance.
Accessing Data Transforms with Private Endpoints via OCI Bastion
As the Autonomous Database instances have private endpoints, the database itself, Database Actions and Data Transforms are not accessible from the Internet. Therefore, the OCI Bastion service is required to access them via SSH Port Forwarding:
- Provision an OCI Bastion service with a private endpoint in one of the private subnets
- Create an SSH Port Forwarding session to the Autonomous Database Endpoint on port 443.
These steps are detailed below:
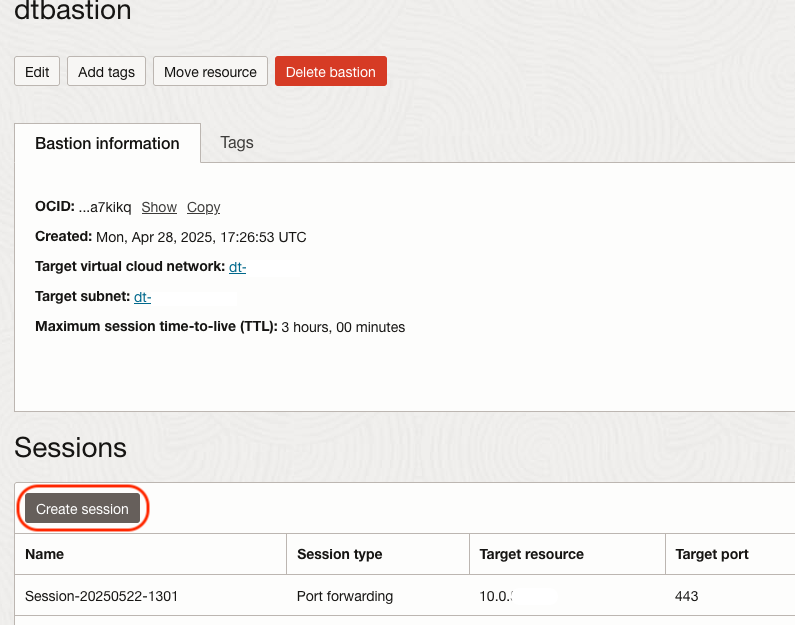
Provisioning OCI Bastion Service
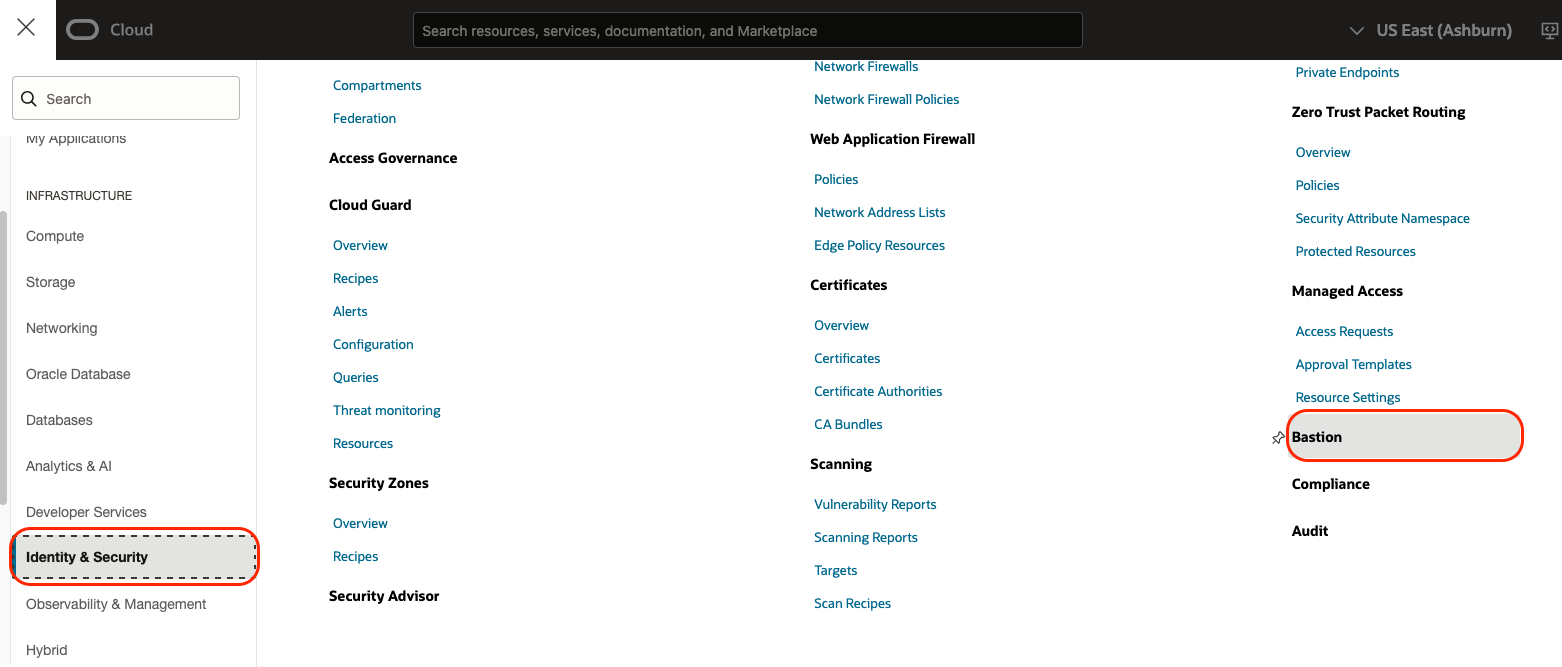
In the OCI Console main menu, click Identity & Security menu item and then Bastion.
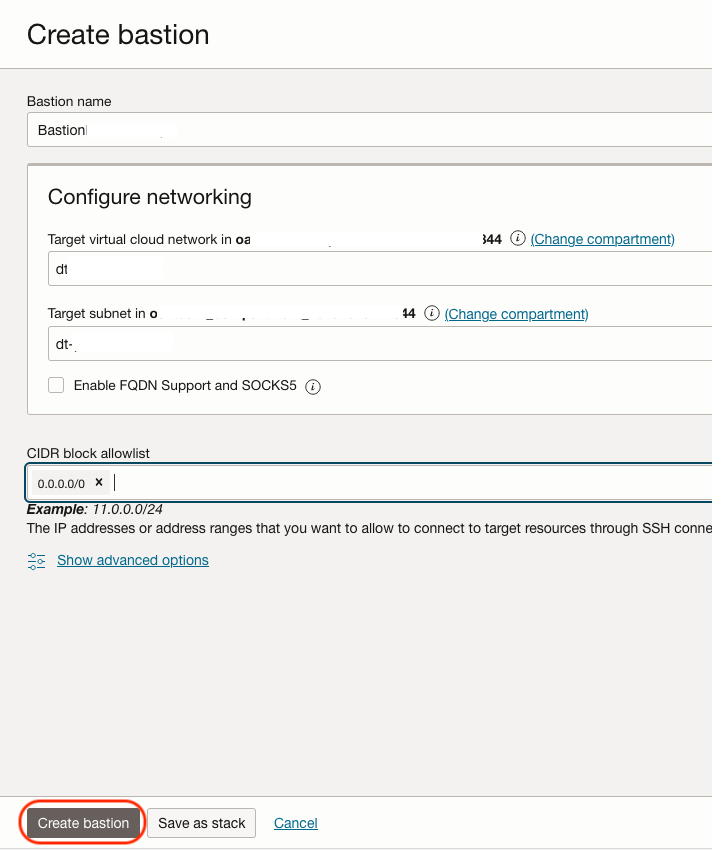
Then click the Create Bastion button. Name the Bastion and select the VCN and private subnet where its endpoint should be provisioned—a private subnet in this case. Add one or more address ranges in CIDR notation that you want to allow to connect to sessions managed by this bastion. Click Create Bastion.
Creating SSH Port Forwarding Session
Click the Bastion Service just created and click Create Session.
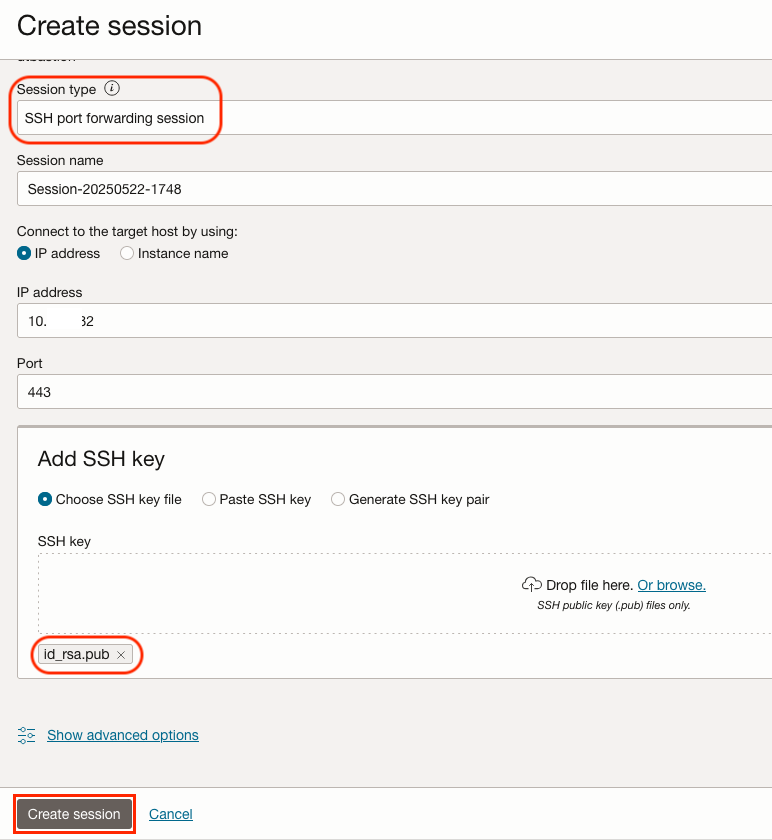
Select SSH Port Forwarding Session for Session Type. Enter the Autonomous Database Private Endpoint IP address you want to access via the Bastion host, the target port (443, for HTTPS) and your SSH public key. Click Create Session.
NOTE: For security purposes, a Bastion session lasts for up to 3 hours. Once it expires, a new one can be created.
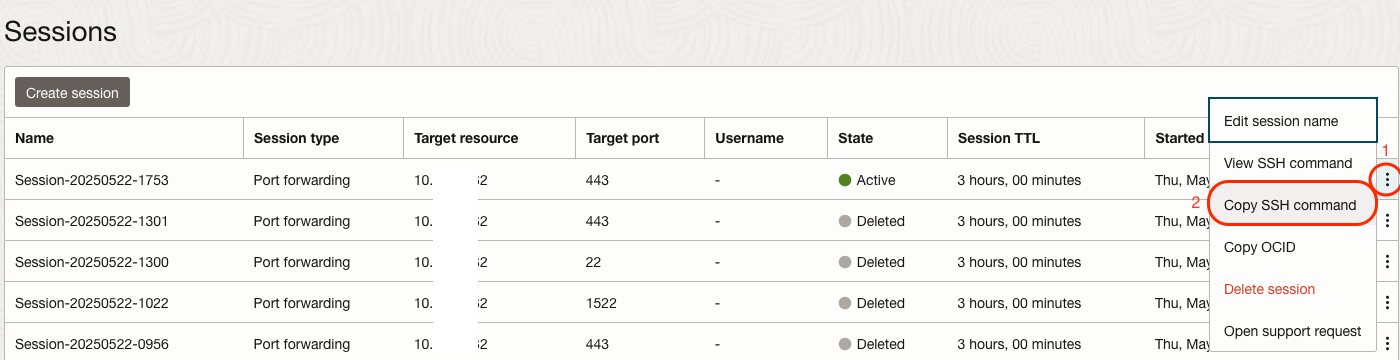
Once the session is provisioned, click on the menu at the end of the row (three dots) and then click Copy SSH command menu item.
Open a terminal window. Paste the SSH command in the command prompt. Example:
ssh -i <privateKey> -N -L <localPort>:10.*.*.*:443 -p 22 ocid1.bastionsession.oc1.iad.aaaaaaaaabbbbbbbbbbccccccccdddddddeeeeeefff@somehost.bastion.west-region-9.oci.oraclecloud.com
The IP address and port contained in the command are the target IP and port provided during the instance creation. Replace <privateKey> with thel path to your SSH private key and <localPort> with the local port you want to forward to the ADB’s remote https port. Example:
ssh -i ~/.ssh/id_rsa -N -L 443:10.*.*.*:443 -p 22 ocid1.bastionsession.oc1.iad.aaaaaaaaabbbbbbbbbbccccccccdddddddeeeeeefff@somehost.bastion.west-region-9.oci.oraclecloud.com
NOTE: On some platforms such as macOS, forwarding ports below 1024 results in an error:
bind [::1]:443: Permission denied
channel_setup_fwd_listener_tcpip: cannot listen to port: 443
If that is the case, add the -g switch to the ssh command:
ssh -i ~/.ssh/id_rsa -g -N -L 443:10.*.*.*:443 -p 22 ocid1.bastionsession.oc1.iad.aaaaaaaaabbbbbbbbbbccccccccdddddddeeeeeefff@somehost.bastion.west-region-9.oci.oraclecloud.com
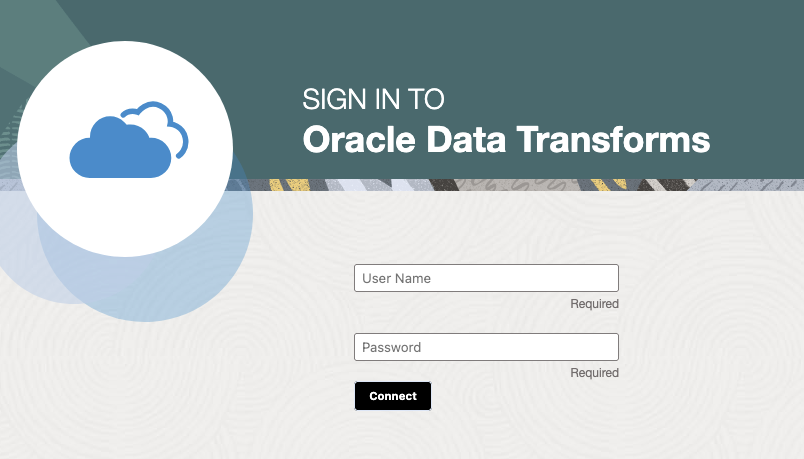
Once the SSH Forwarding Session is established, access Database Actions at https://localhost/ords/sql-developer. And for a direct Data Transforms access: https://localhost/odi
Enable Private Endpoint Access in Autonomous Database
When you use a private endpoint with your Autonomous Database instance, you can provide enhanced security by setting the ROUTE_OUTBOUND_CONNECTIONS database property to the value PRIVATE_ENDPOINT. This specifies that all outgoing connections follow the egress rules of the VCN associated with the Autonomous Database instance’s private endpoint.
As the ADMIN user, run the following statement in both Autonomous Database instances using using SQL Developer via the Database Actions interface at https://localhost/ords/sql-developer.
ALTER DATABASE PROPERTY SET ROUTE_OUTBOUND_CONNECTIONS = 'PRIVATE_ENDPOINT';
For more information, see Enhanced Security for Outbound Connections with Private Endpoints
Network Security Group
- Configure Network Security Groups rules for the Autonomous Databases:
- Ingress stateful rule to allow the OCI Bastion Service to connect via SSH port forwarding on port 443 (Data Transforms).
- Egress stateful rule to allow outbound traffic from the Autonomous Database via its endpoint, due to the database route outbound connection setting done previously.
Associate this Network Security Group to your Autonomous Database instance. Additional ingress rules with specific CIDRs or CIDR ranges can be added as needed. While either Network Security Groups or Security Lists may be used, NSGs provide more granular control.

Database User
Create a database user with DWROLE and DATA_TRANSFORM_USER roles in one of the Autonomous Databases. This is the user that should log into Data Transforms.
Data Transforms Connections
Autonomous Database
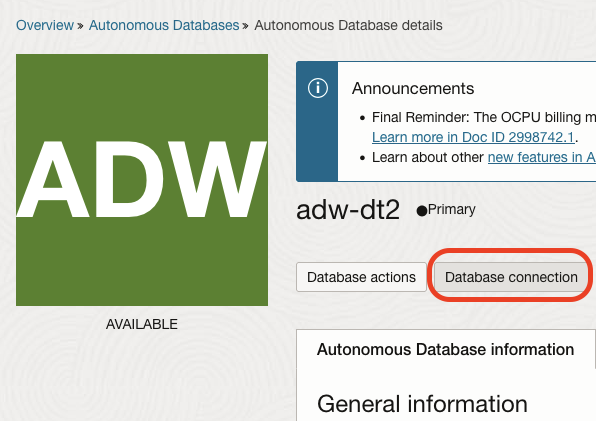
In the Database console page, click the Database Connection button to view the connection details.
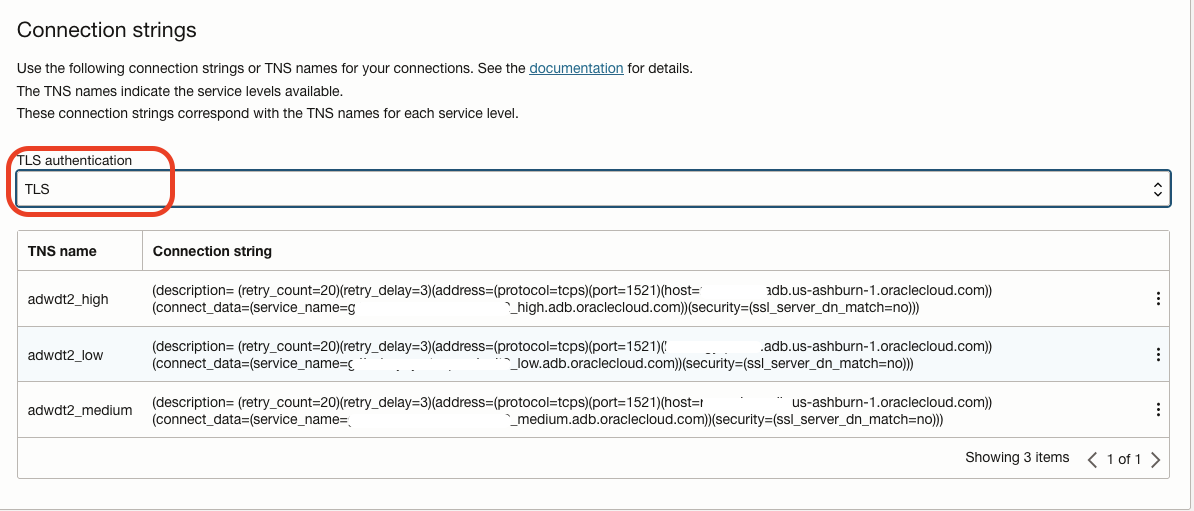
Set the TLS Authentication to TLS and copy the TNS connection description for the desired service level (low, medium, or high). For this test, the low service may be used.
With the SSH Port Forwarding Session established, access Data Transforms from your local machine at https://localhost/odi. The port forwarding maps your local port 443 to the Autonomous Database‘s port 443. Log with the user created previously with the DATA_TRANSFORM_USER role.
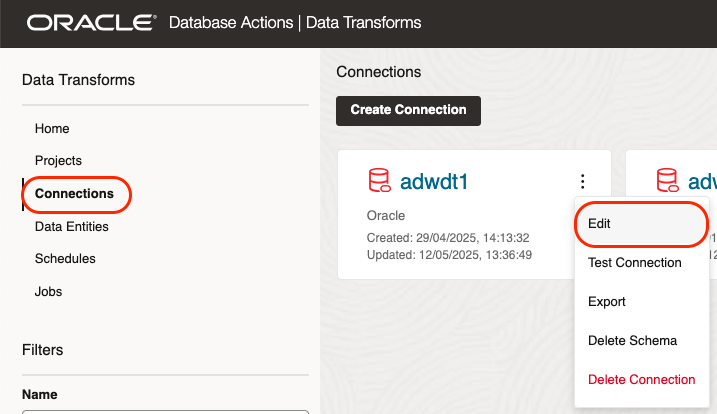
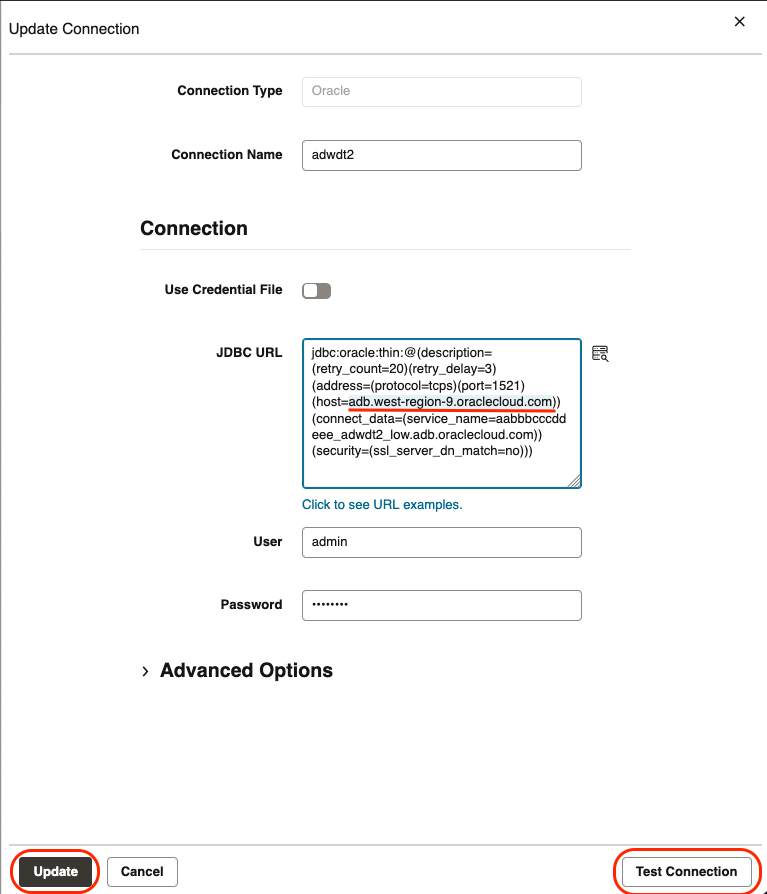
Once loged into Data Transforms, click Connections, click on the three dots menu on your pre-configured local database connections, then Edit.
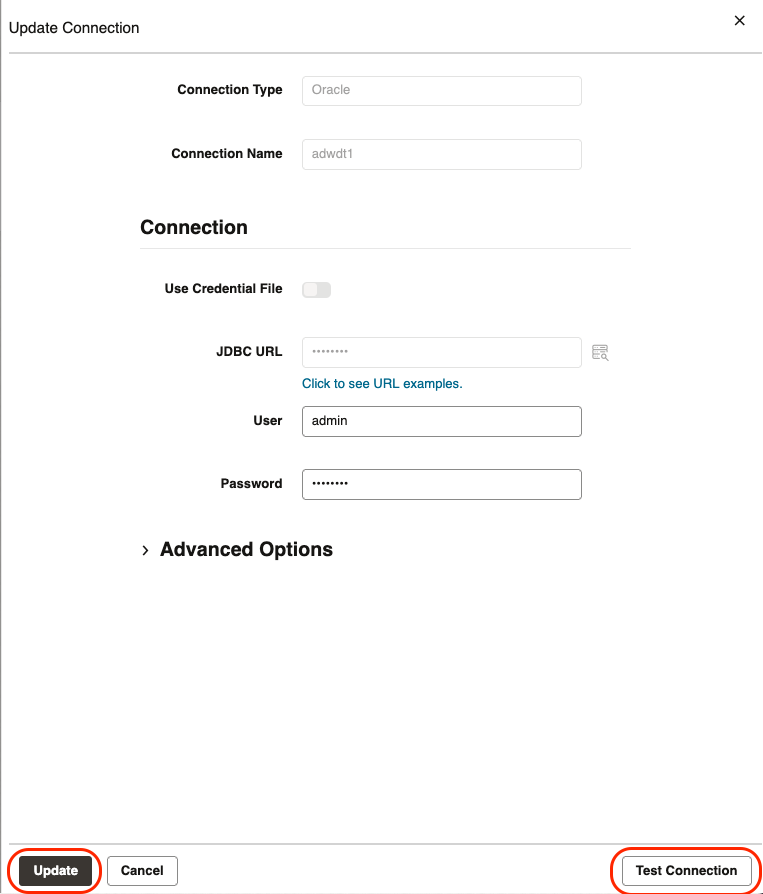
Provide the database credentials for the local Autonomous Database associated to this Data Transform instance and test the connection. If successful, click Update.
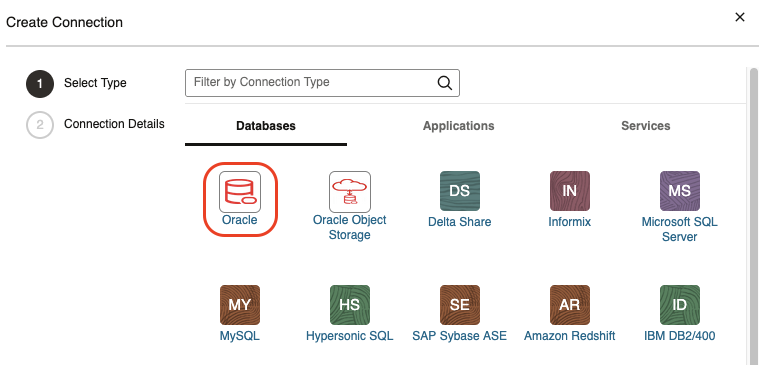
Click Create Connection and select Oracle connector to configure a DB connection to the other Autonomous Database with a Private Endpoint. Refer to Work with Connections.
Paste the TNS description copied previously into the JDBC URL field. Note that the TNS description must start after jdbc:oracle:thin:@
NOTE: Remove the hostname prefix in the host parameter of the TNS description. The hostname must start with adb.
Example, change from
abcdef.adb.west-region-9.oraclecloud.com
to
adb.west-region-9.oraclecloud.com
Click Test Connection and if successful, click Create.
Object Storage
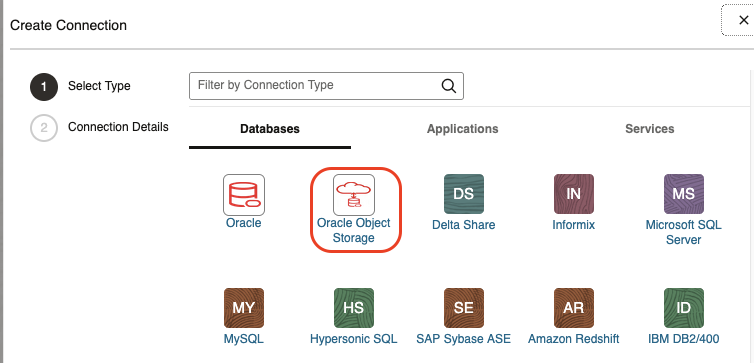
The connection to Object Storage is configured the same way as for public subnets and requires a route to a Service Gateway. Click Create Connection and then choose the Oracle Object Storage connector.
Refer to Create an Oracle Object Storage Connection.
BI Cloud Connector – BICC
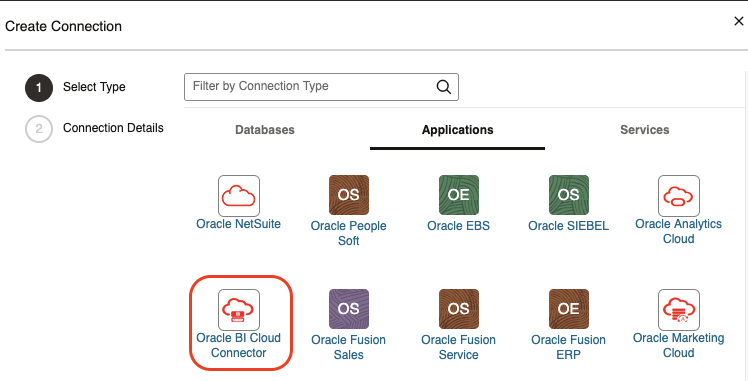
The connection to BICC is configured the same way as for public subnets: Fusion Apps and Object Storage credentials. It requires a route to a Service Gateway. Click Create Connection and then choose the Oracle Object Storage connector.
Refer to Create an Oracle Business Intelligence Cloud Connector Connection
Data Flows
Create test data flows to and from the Autonomous Database—or another source/target—associated with your Data Transforms. The high level steps are:
- Import Data Entities from the source database, the second instance not associated with this Data Transforms instance.
- Create a Project
- Create Data Load or a Data Flow. A Data Load is a direct one-to-one load whereas Data Flow may involve data transformation. The target table can be created when defining the Data Flow or Data Load.
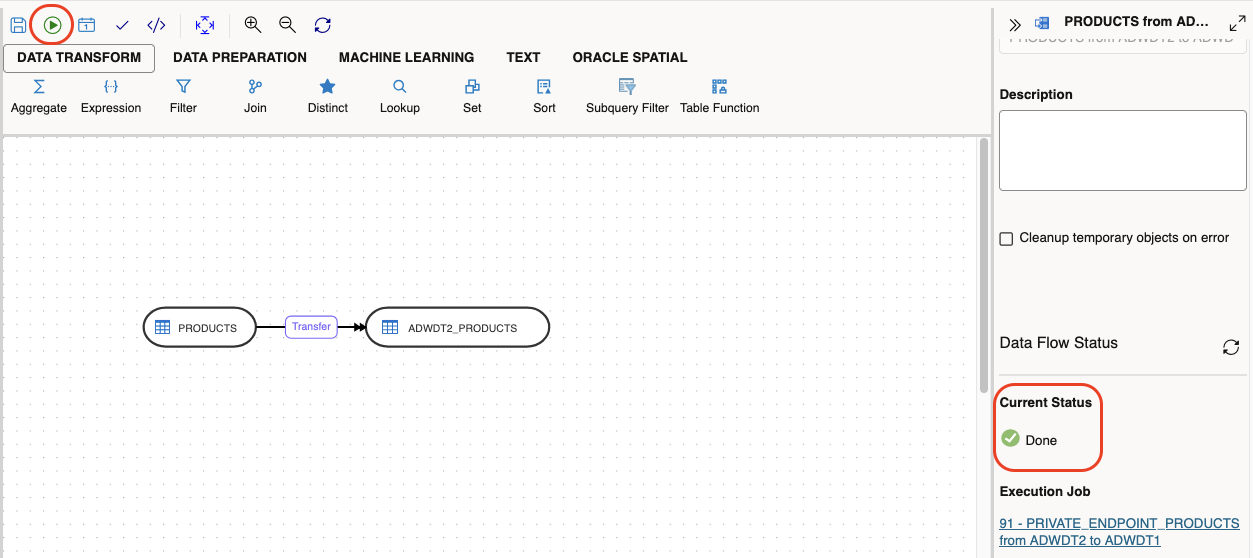
To test the end to end connectivity between Private Endpoints, a simple direct Data Flow with no transformation between source and target is enough for this test. In this case, the remote sample table, SH.PRODUCTS, was mapped as a data store. The Data Flow reads from it and loads into a local table.
Define the data flow from the remote source to the local target. Excute the Data Flow and check the job status. If show Done as below, the job completed succesfully via Private Endpoints and you can check the table at the target database.
Similar tests can be executed with BICC and Object Storage data sources.
References
Oracle Data Transforms – Get Started
Enable Access to Private Data Sources from Autonomous Database
Summary
Oracle Data Transforms supports secure, private data integration within OCI by using Autonomous Database private endpoints. To enable private connectivity, configure TLS authentication, Network Security Group rules, and set the ROUTE_OUTBOUND_CONNECTIONS property to PRIVATE_ENDPOINT. When defining JDBC connections, be sure to modify the TNS description by removing the host prefix, so it begins with adb. This setup allows Data Transforms to connect to other Autonomous Databases and OCI services over private IPs, supporting high-performance, secure data pipelines that remain entirely within your cloud network.