Updated as of May 2025
As the adoption of Custom Security Zones has increased since this blog was originally published – we wanted to refresh with some best practices. Since then, the OCI Landing zone has included support for creating and configuring Security Zones.
With the recent exciting release of Custom Security Zones(CSZ) in OCI – we, as security architects and engineers, are left asking question – “this is great news – now what?” However, before we can answer that question – it’s best that we answer the question “why is this important”? If you have been working with OCI security tools over the past year or so, chances are you have explored Security Zones and may even have evaluated them for use in your tenancy.
Let’s first reminisce about the initial release of Security Zones – which was Maximum Security Zones(MSZ). This feature provides an OCI security administrator with the ability to enforce cloud security best practices to your most sensitive and protected assets. MSZ accomplished this by preventing your administrators and developers from creating an accidental (or intentional) security hole in a particular compartment or zone.
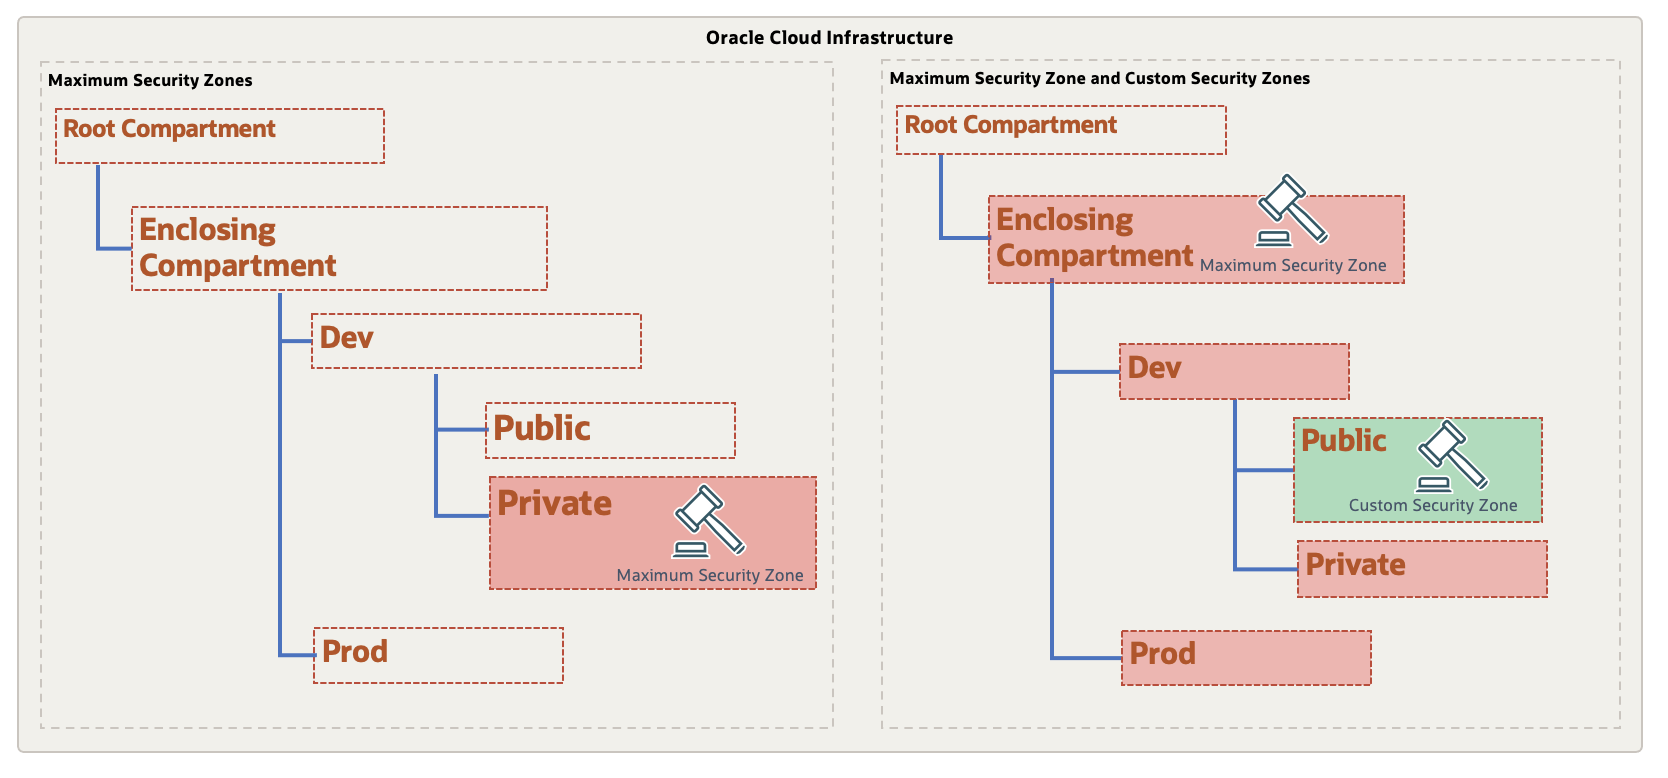
In the image below – depicted (on the left) – is the attachment of a MSZ which creates a security zone around the Private compartment. This private compartment would be the place you would want to enforce your most restrictive access within OCI. In many cases – the MSZ policy could not be applied due to a policy enforcement rules that was simply not feasible for your application architecture to function. For example, let’s just pretend – you truly needed a public bucket.
Fast forward to the release of CSZ, we now can capitalize on the stringent nature of the MSZ while blending CSZs to allow for full coverage within your tenancy – without having to compromise on usability or security.
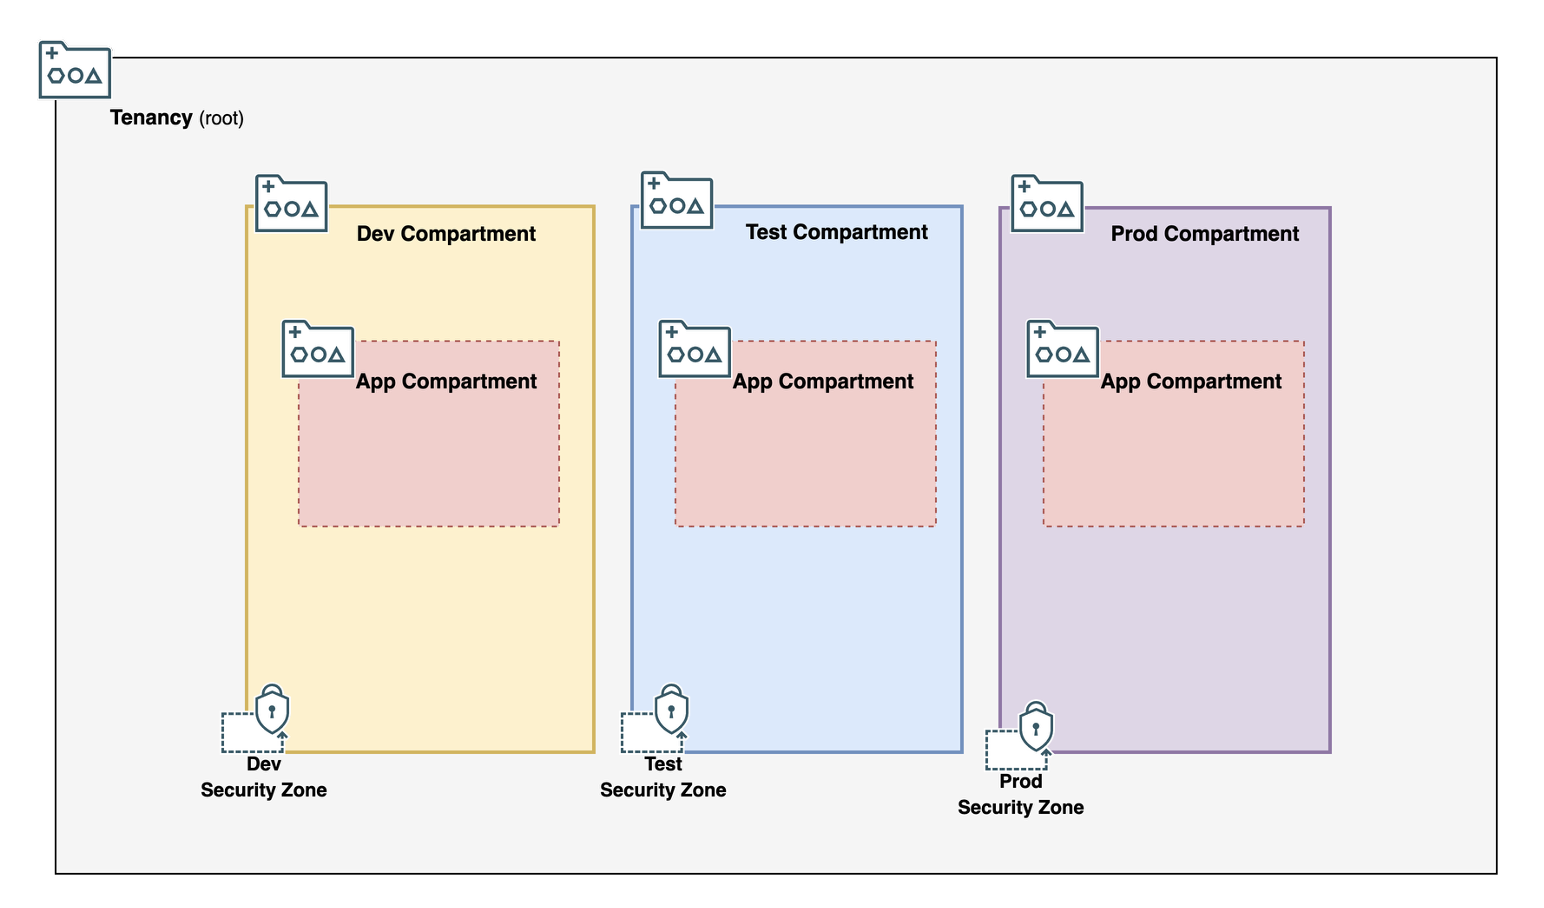
Let’s consider the following use case. If I have a new tenancy that I wanted to start by employing the least-privileged principle, then I could apply the MSZ on the Enclosing compartment underneath the the Enclosing compartment. The MSZ on the Enclosing Compartment would take effect on all sub-compartments that are beneath of it. This would arguably mirror similar behavior to the OCI IAM Policy and Governance framework and it’s deny-by-default approach to access.
As we all know – there is a very likely scenario that all of the MSZ policies simply cannot be applied to all sub-compartments due to the application/data requirements or business processes. Here is where CSZ shines. We now can create a more relaxed security zone recipe that is composed of a customized set of policies that will effectively be an exception – such as the allowance of Public Buckets. Then, we can create a security zone for that specific compartment to attach the recipe without affecting any other compartments security posture. By design, a SZ recipe that is attached to a sub-compartment will supersede a security zone created at a higher level.
The use of both MSZ and CSZ together is illustrated in Tenancy-B in the above diagram – where, the MSZ policies are shaded in red to depict the top-down enforcement from the Enclosing compartment where the SZ was created. The CSZ that was created in the Public compartment is enforcing a reduced set of policies for that specific security zone.
To demonstrate, we are going to perform the following steps:
- Create an Enclosing Compartment as a sub-compartment to Root
- Use the Oracle Managed Maximum Security recipe – and apply all restrictions, then create a security zone in the Enclosing compartment
- Create a custom recipe based from the Oracle Managed Maximum Security allowing the creation of Buckets with Oracle Managed Keys, and then attach it to the Security Zone in the PUBLIC compartment
- Attempt to create Buckets in both the Public and Private
Note: This scenario assumes you have a OCI Vault created with a master encryption key to be used for assignment to buckets
First, let’s create the Security Zone at the Enclosing Compartment level using the Oracle Managed Recipe (maximum security zone)
OCI Console => Identity & Security => Security Zones
Select – Create Security Zone.
This will prompt you for the Name, description and Recipe to apply:
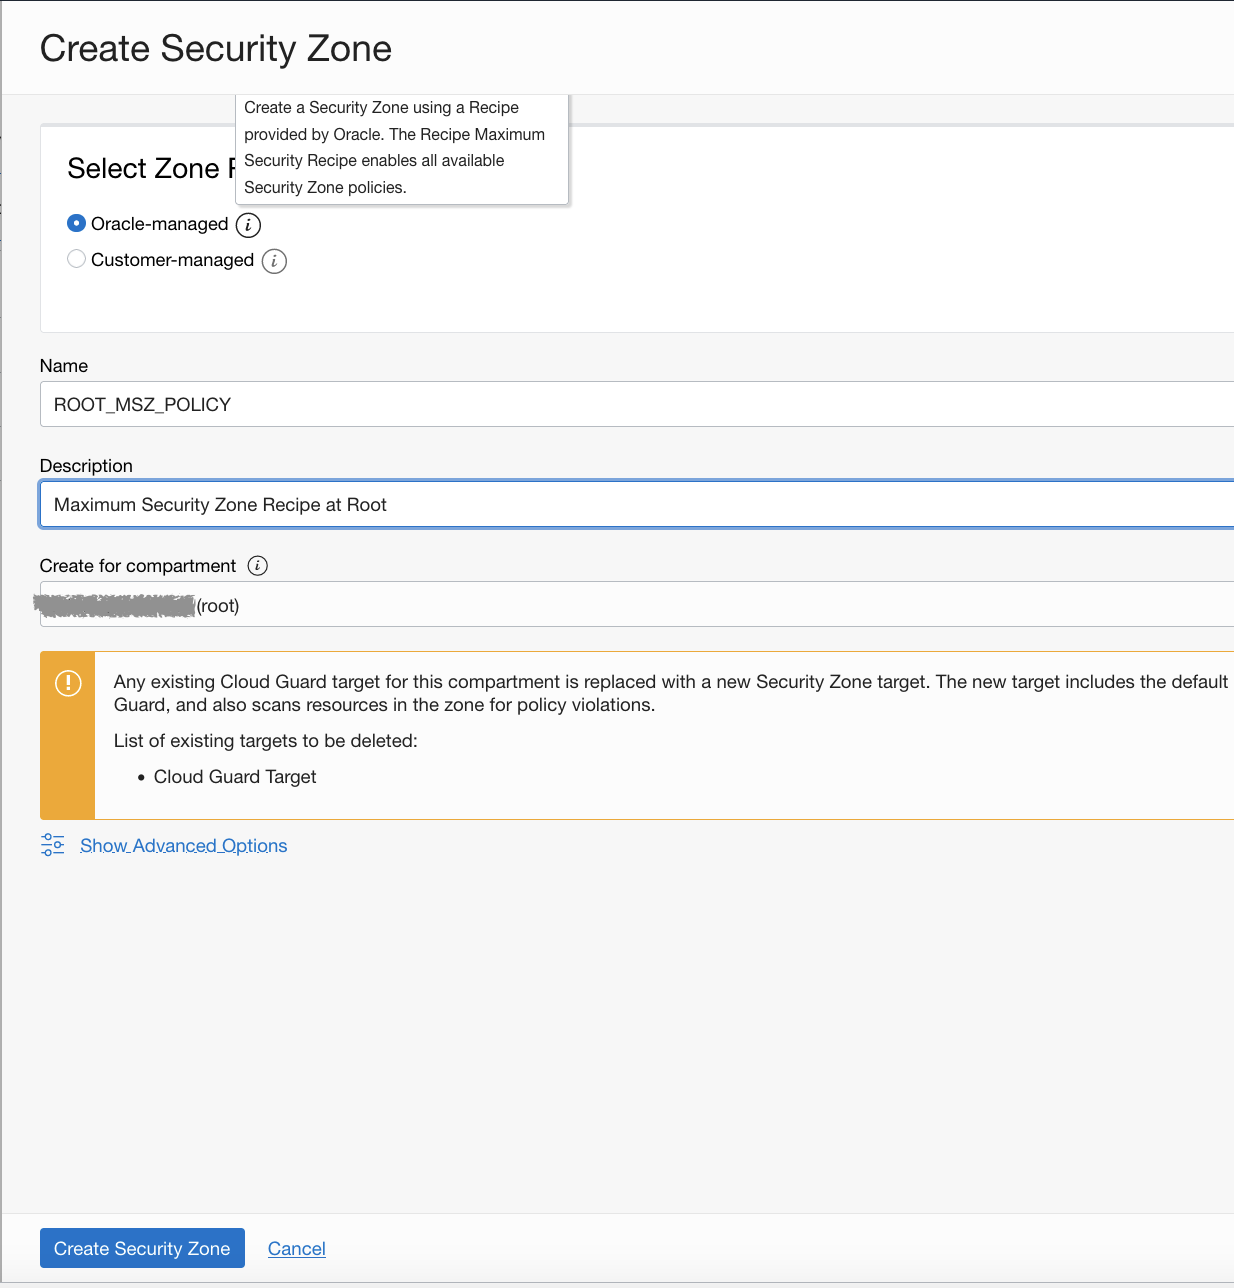
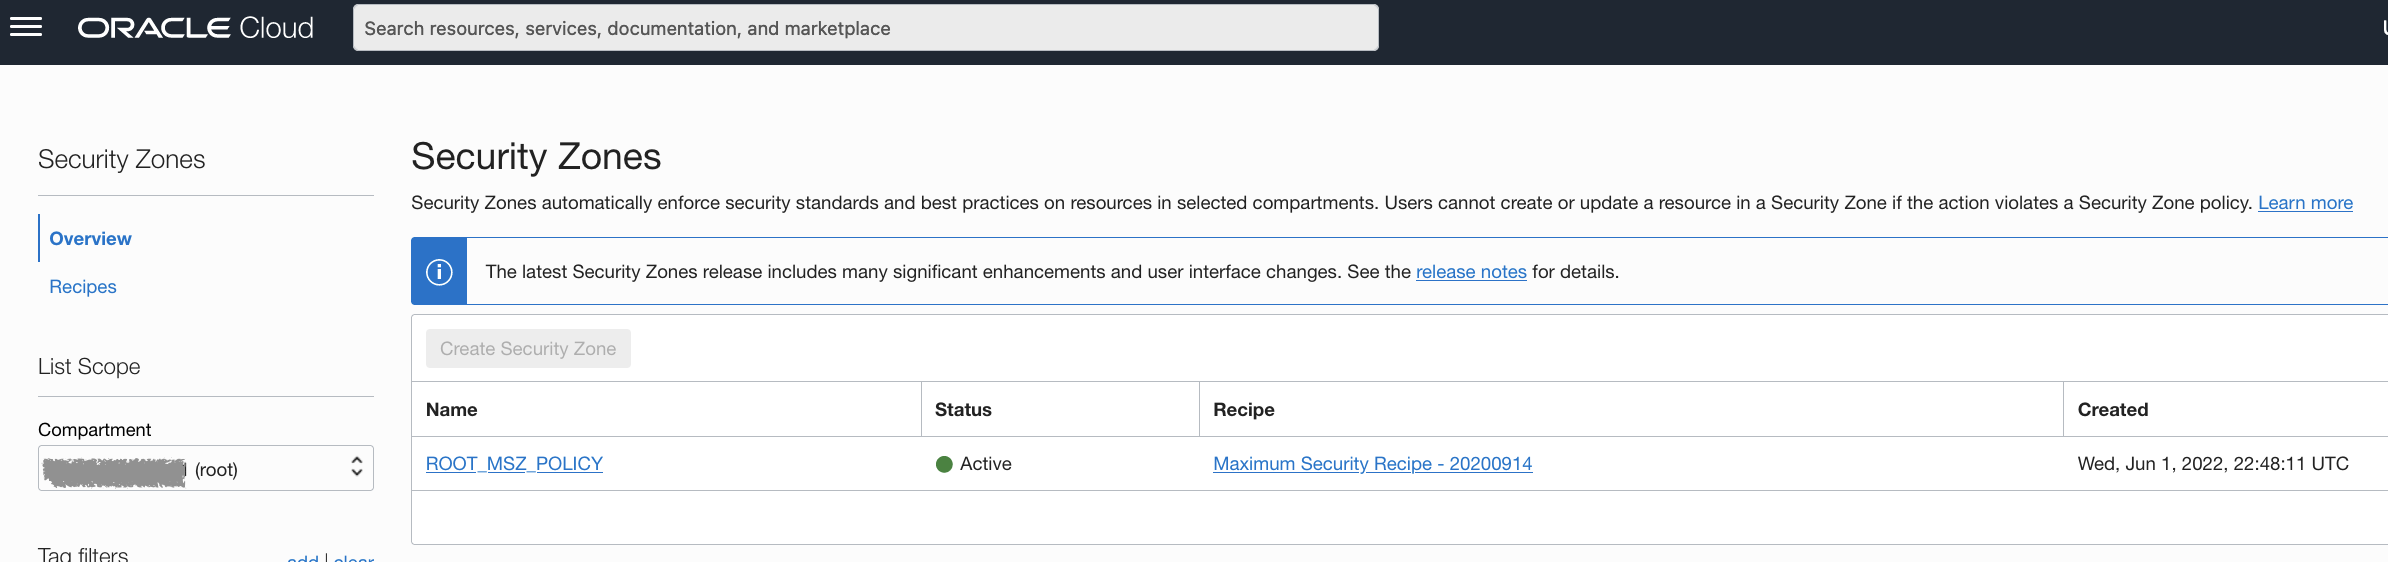
Now, you should see the MSZ created in the Enclosing compartment
Next, we will create the PublicZone Recipe.
Navigate to:
OCI Console => Identity & Security => Security Zones => Recipes
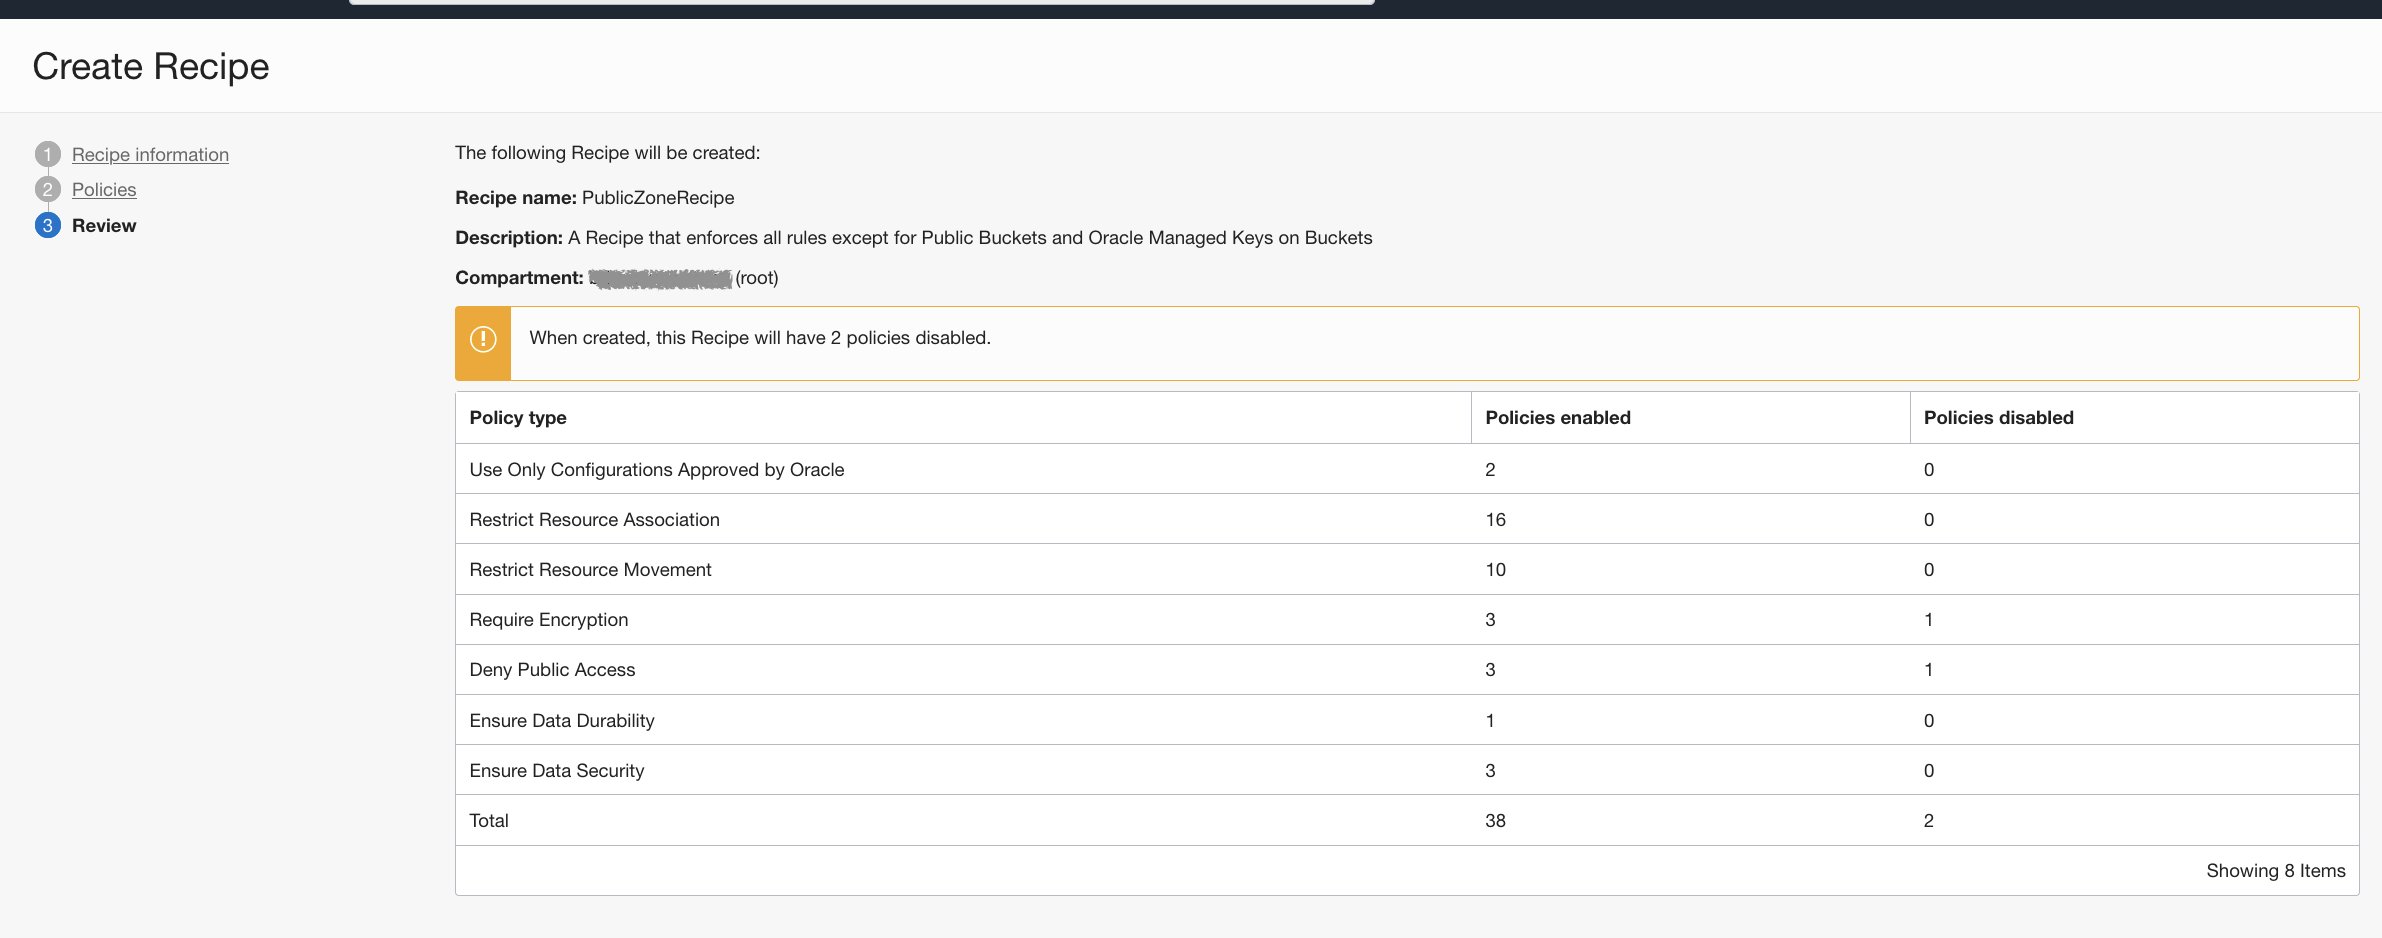
Select Create Recipe, and provide Name, Description and the Destination Compartment.
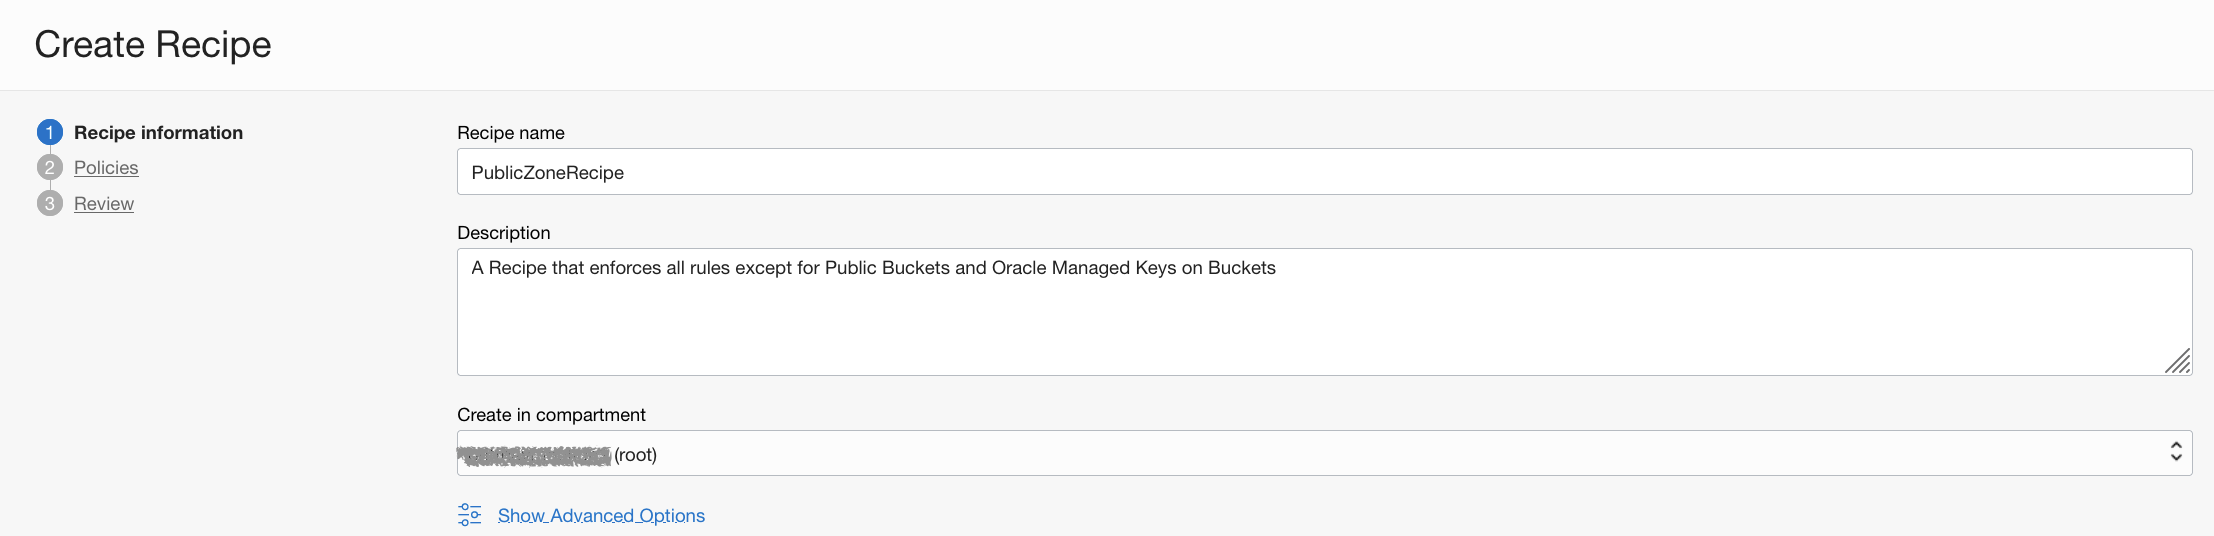
Next, we remove 2 of the policies around Public Buckets and requiring a key from the OCI Vault.

Lastly, it will take you to the Review Recipe where you will see that there are 2 policies that are disabled. Hence, these two disabled policies could be referred to as pseudo-allow rules.
Once the Public Zone recipe is created, we will create another Security Zone. Except this time, we will attach it to a specific sub-compartment – Public.
Navigate to:
OCI Console => Identity & Security => Security Zones
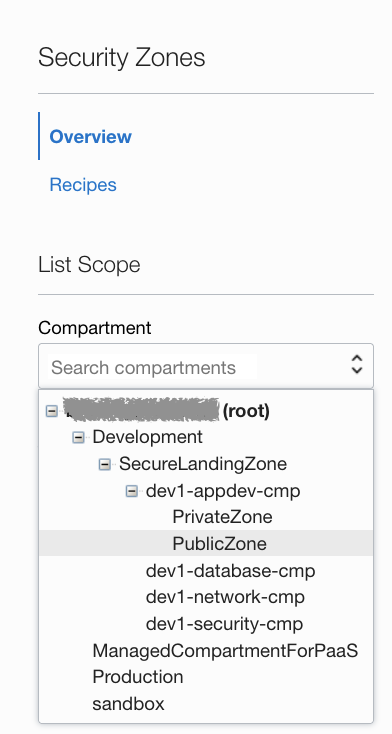
Then, we will change compartment to PublicZone – and select Create Security Zone.
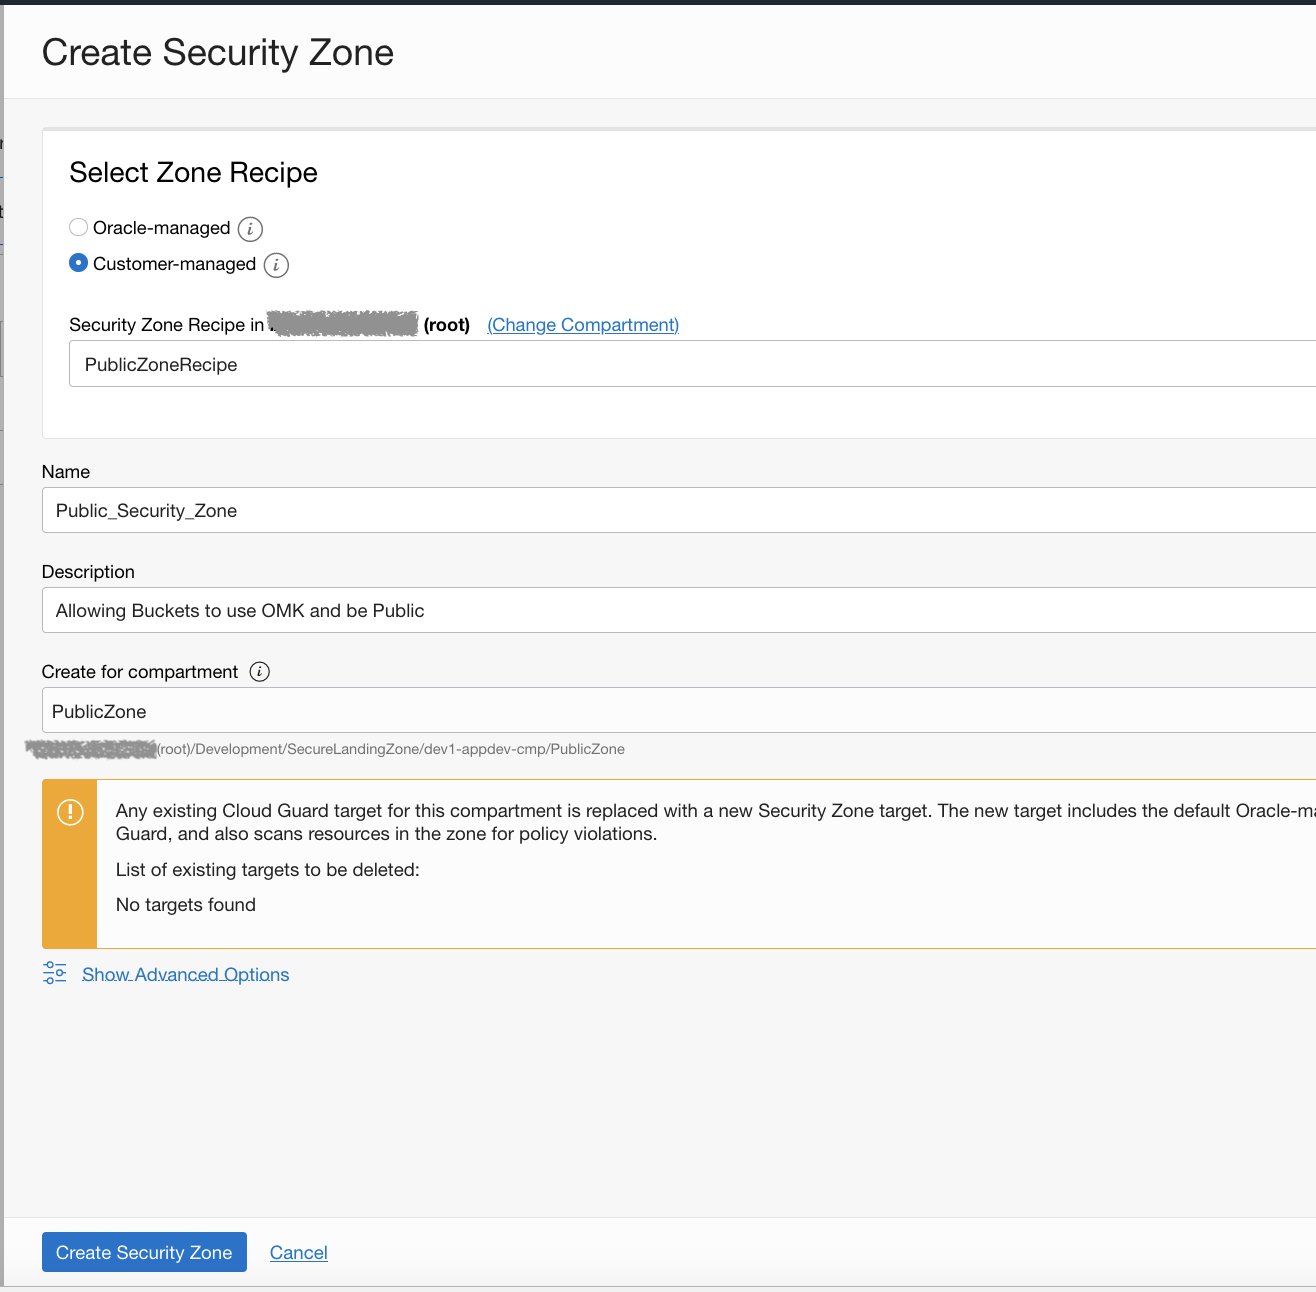
This time, we will select “Customer-managed” – which will give us an option to select our PublicZoneRecipe that we created earlier in the Enclosing compartment.
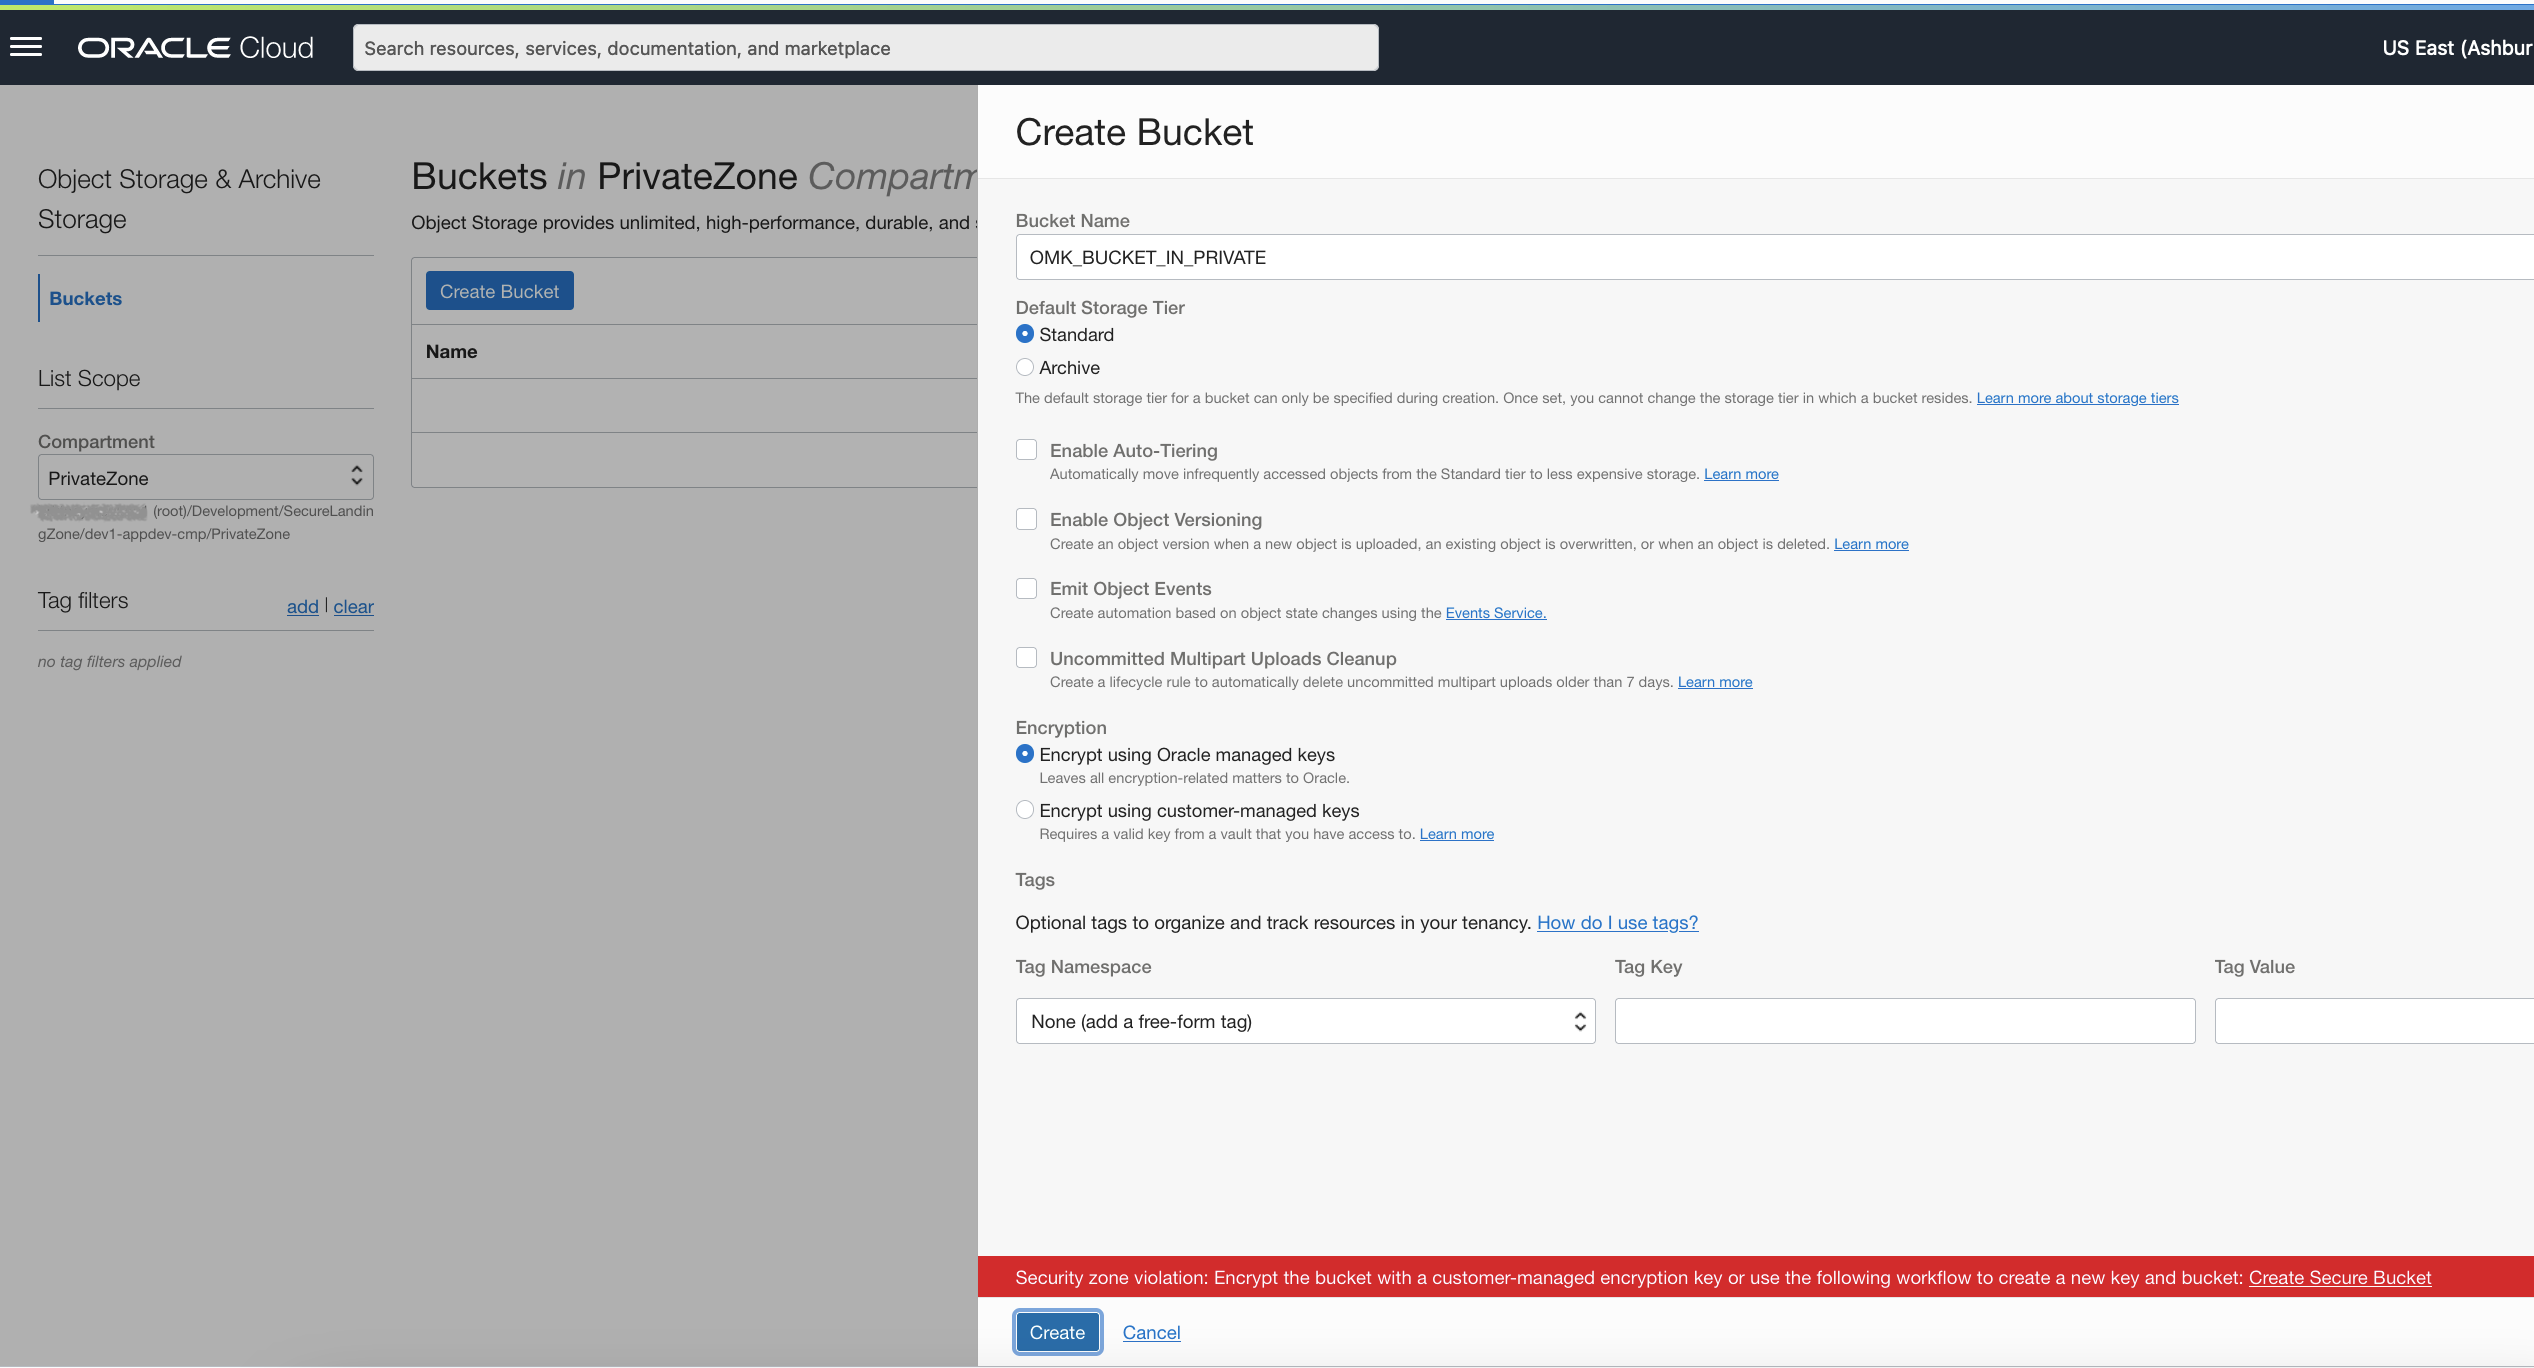
Now that we have created our Public security zone – it’s time to test this out. Let’s navigate to Storage and create a bucket in the Private compartment.
We will simply give it a generic name and ensure that Oracle Managed Keys are selected when we attempt to create. As we expected, this will not be allowed due to the MSZ policy enforcement that is in place – requiring the use of Vault encryption keys.
Now, let’s change compartments to the Public – and attempt the same creation of a bucket as before using Oracle Managed Keys.
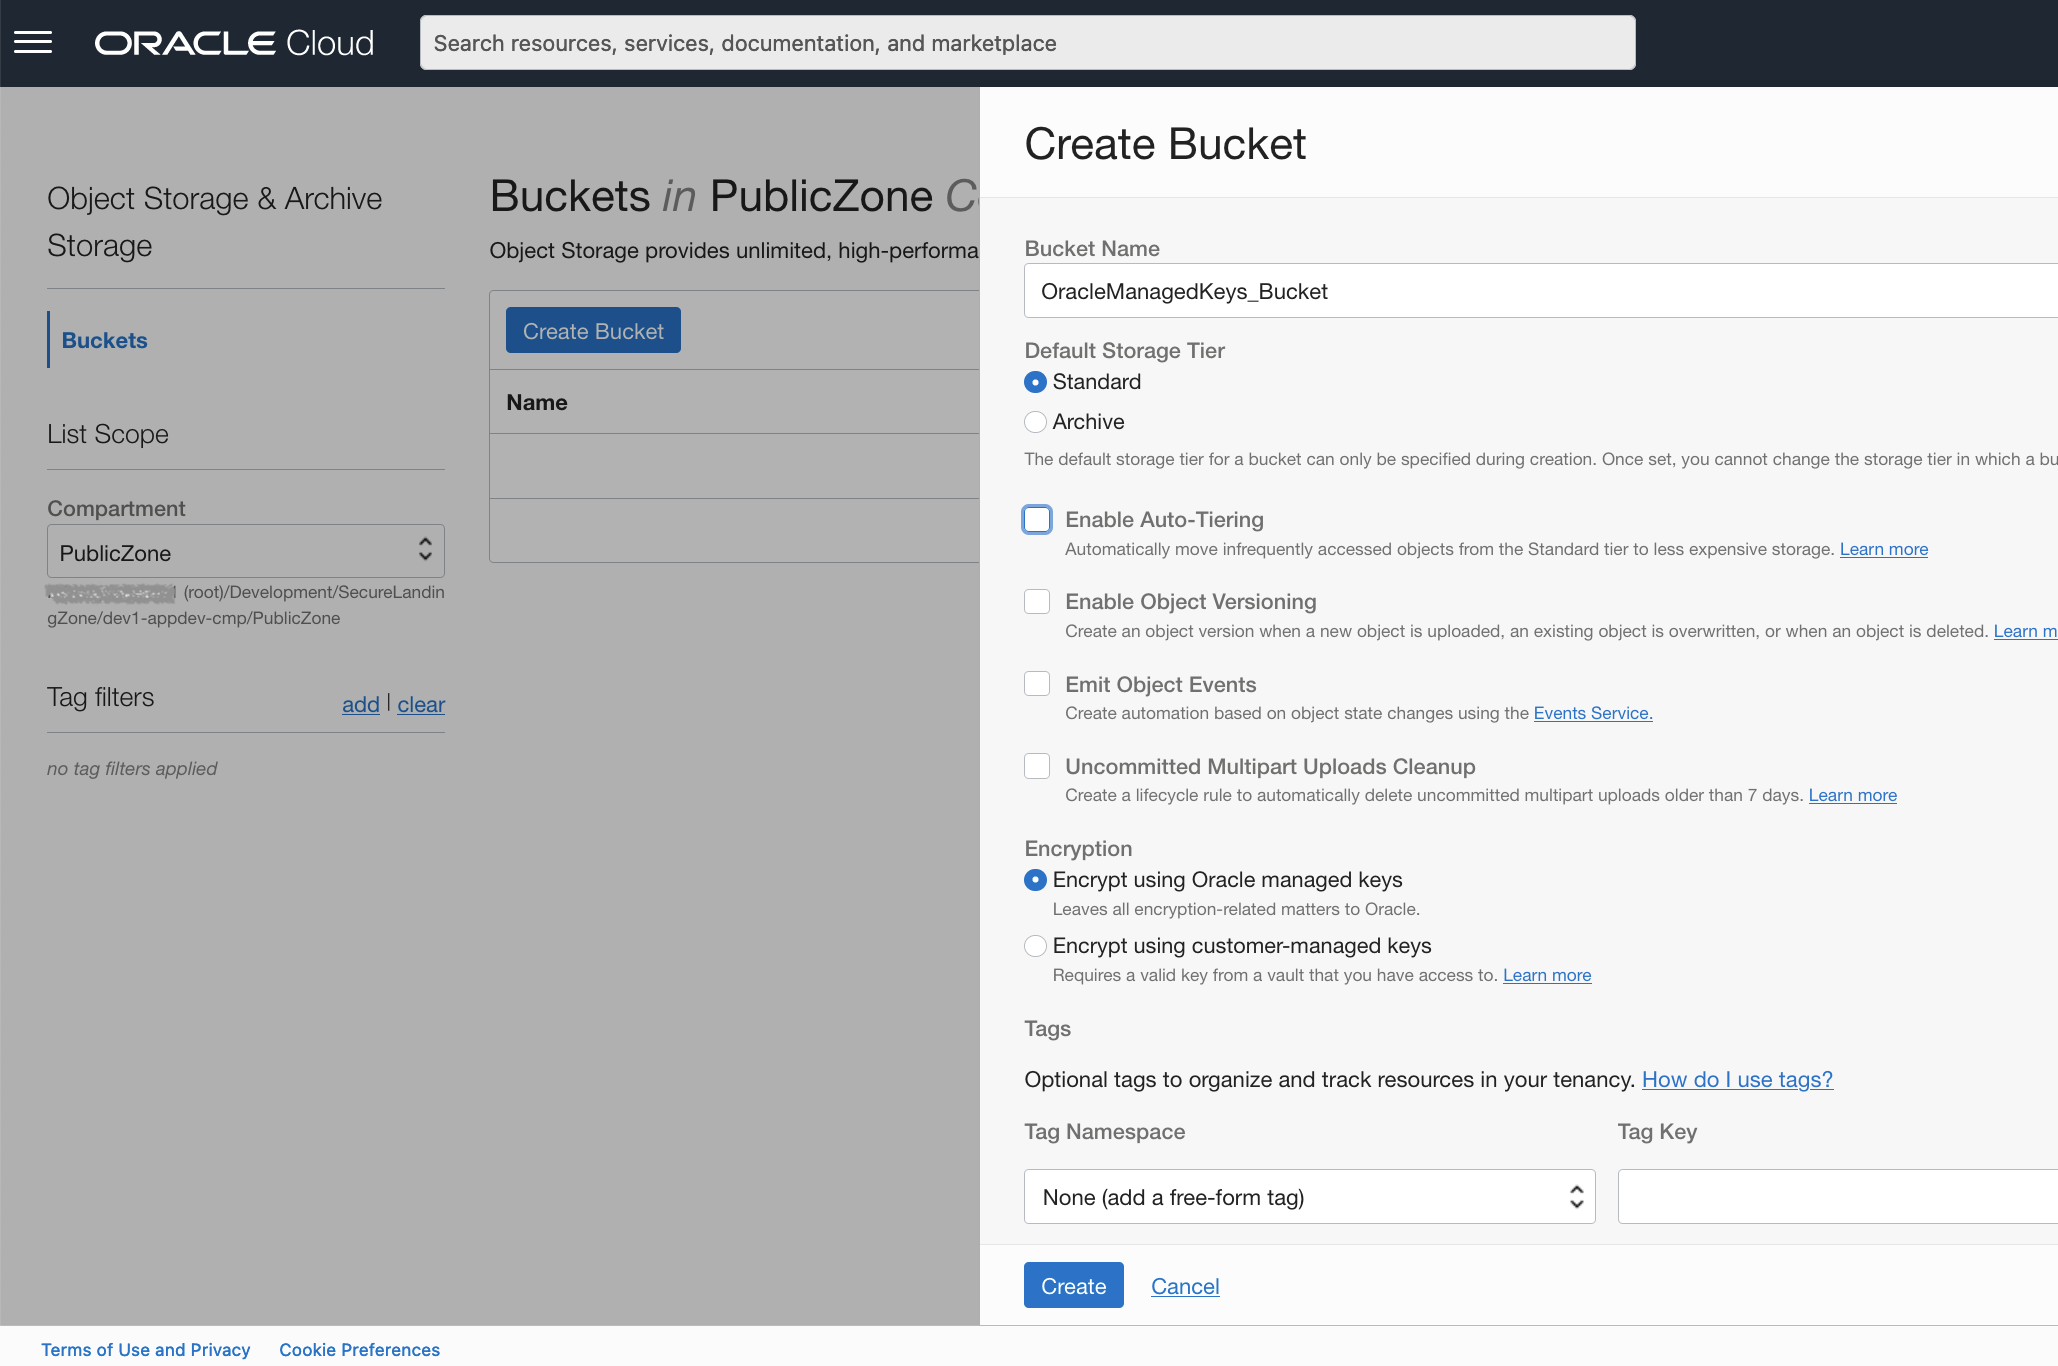
As you may have guessed, this was successful – as the PublicZoneRecipe and Security Zone has explicitly allowed this behavior to occur in this compartment.

Ok, what next?
Now that we have our tenancy using Custom Security Zones and Maximum Security Zones together – you may be asking, “what are the other best practices to prevent our users from having the ability to circumvent these powerful guardrails?”. For this, I am going to refer to the tried-and-true reference architecture that several of my colleagues have developed and are constantly evolving – the OCI Secure Landing Zone.
In the OCI CIS Landing Zone, you will see that a well-defined separation of duty(SoD) compartment structure aligns to the OCI security benchmarks publish by the CIS foundation. Security Zones should be maintained by your most trusted personnel, which generally falls into your Security and Compliance department. Specifically, you will create IAM Policies that will only allow users that belong to the Security Admins group to have access to create, update or delete Security Zones. The security zone IAM policies are part of the cloud-guard-family – and are located here for reference.
Best Practices and Recommendations for Designing Custom Security Zones
Security zones are intended to segment and isolate resources across compartments, so creating a Security Zone policy at the root compartment is not recommended. Instead, the root compartment for Security Zones should contain only recipes used by sub-compartments. It also allows them to prevent changes to them based on strategically placed IAM policies described above.
Design Approach 1: Security Zones Based on Environment Type
As an example best practice – let’s take the scenario where Security Zones can be aligned to OCI Compartments that separate environments like Dev, Test, and Prod. These Zones allow organizations to organize and control resource access by environment type’s sensitivity – and there are several security zone recipes that prevent movement of resources to other security zones. This ensures that resources are secured adequately in production environments, and that developers have flexibility in lower environments to perform their duties.
This recommend approach creates an enclosing compartment for the environment types – which is how the CIS Landing Zone allows for. Then, you can attach a Security Zone to the environment type compartments with the recipe for that environment. Finally, the Security Zone controls will be applied to the compartments created under the environment’s enclosing compartment.
Design Approach 2: Single Security Zone as Guardrails
Security Zones can be used as guardrails to ensure that resources in a tenancy are used in accordance with security and compliance policies set forth by their cloud security organization. The Security Zone recipe should be bare bones as it is applied across all compartments in this pattern. An example of a bare-bone rule would be preventing the creation of Public Object Storage buckets.
To set this up, create an enclosing compartment in the root compartment and assign the guardrail Security Zone to the Enclosing Compartment. Then, all subsequent sub-compartments and resources will be managed in this sub-compartment, thus ensuring all compartments and resources in the tenancy have the same security rules enforcement.

Summary
We covered a quick recap of the evolution of the Security Zones, and saw how both the MSZ and CSZ can co-exist to provide a deny-by-default architecture pattern. Additionally, we looked into the management and administration best practices from an identity and access management perspective within your enterprise to maintain and implement security zones.