Since the launch of Fusion Data Intelligence, initially OAX and then renamed FAW and finally FDI, the Oracle Product and Engineering teams for FDI CX, ERP, HCM and SCM have made consistent and relentless effort to curate factory data models covering hundreds of subject areas and star schemas, and the same teams are continously enriching the existing data models and adding new subjects areas to deliver on the FDI product roadmap.
The existing data models, including tables, relationship diagram, subject areas, data lineage, prebuilt analytics are thoroughly documented in the Reference section of the FDI main documentation library.
In today multicloud topologies, customers needs to be able to consume the FDI curate data models and share them with other downstream systems or data lakes. This feature is now supported with FDI Autonomous Database.
As Alexey writes in his blog, “Data Sharing in Autonomous Database provides both an open way of sharing data with any recipient, Oracle or non-Oracle, and an optimized Oracle-to-Oracle. Oracle Autonomous Database offers unmatched data sharing capabilities that address all the requirements of modern data sharing architectures for anyone”
Data Sharing in Autonomous Database can be achieved with the Data Share tool in Data Studio or using the PL/SQL APIs. This article will focus on the PL/SQL APIs to set up, create, populate, publish and consume ADB Data Shares.
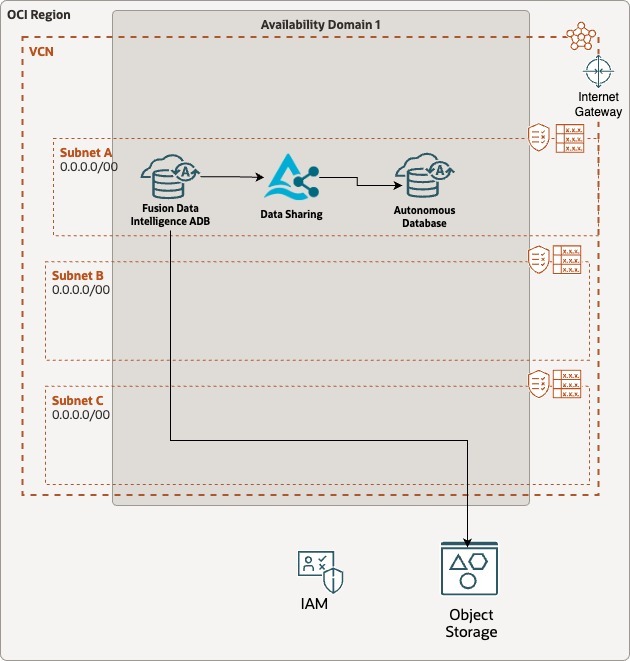
The diagram below details the architecture we will be detailing in the following sections :
Figure 1: Fusion Data Intelligence- Sharing Data with ADB – Data Share Architecture
The corresponding logical flow is comprised of the below steps:
Setting up Data Sharing
Set up Share Provider User
Enable Data Transforms on FDI ADB
Identify a FDI factory table to use for Data Sharing and set up frequent refreshes
Creating and Publishing the Versioned Data Share
Create a Data Share
Add the synonym from the FDI factory table to the data share
Publish the Data Share
Creating and Authorizing the Data Share recipient
Create Data Share Recipient
Grant Access to the Data Share
Consuming the Data Share
Set up Share Consumer User
Discover Data Shares and Consume Available Data Shares
Insert new data in Fusion, reload the FDI corresponding table and review changes in share
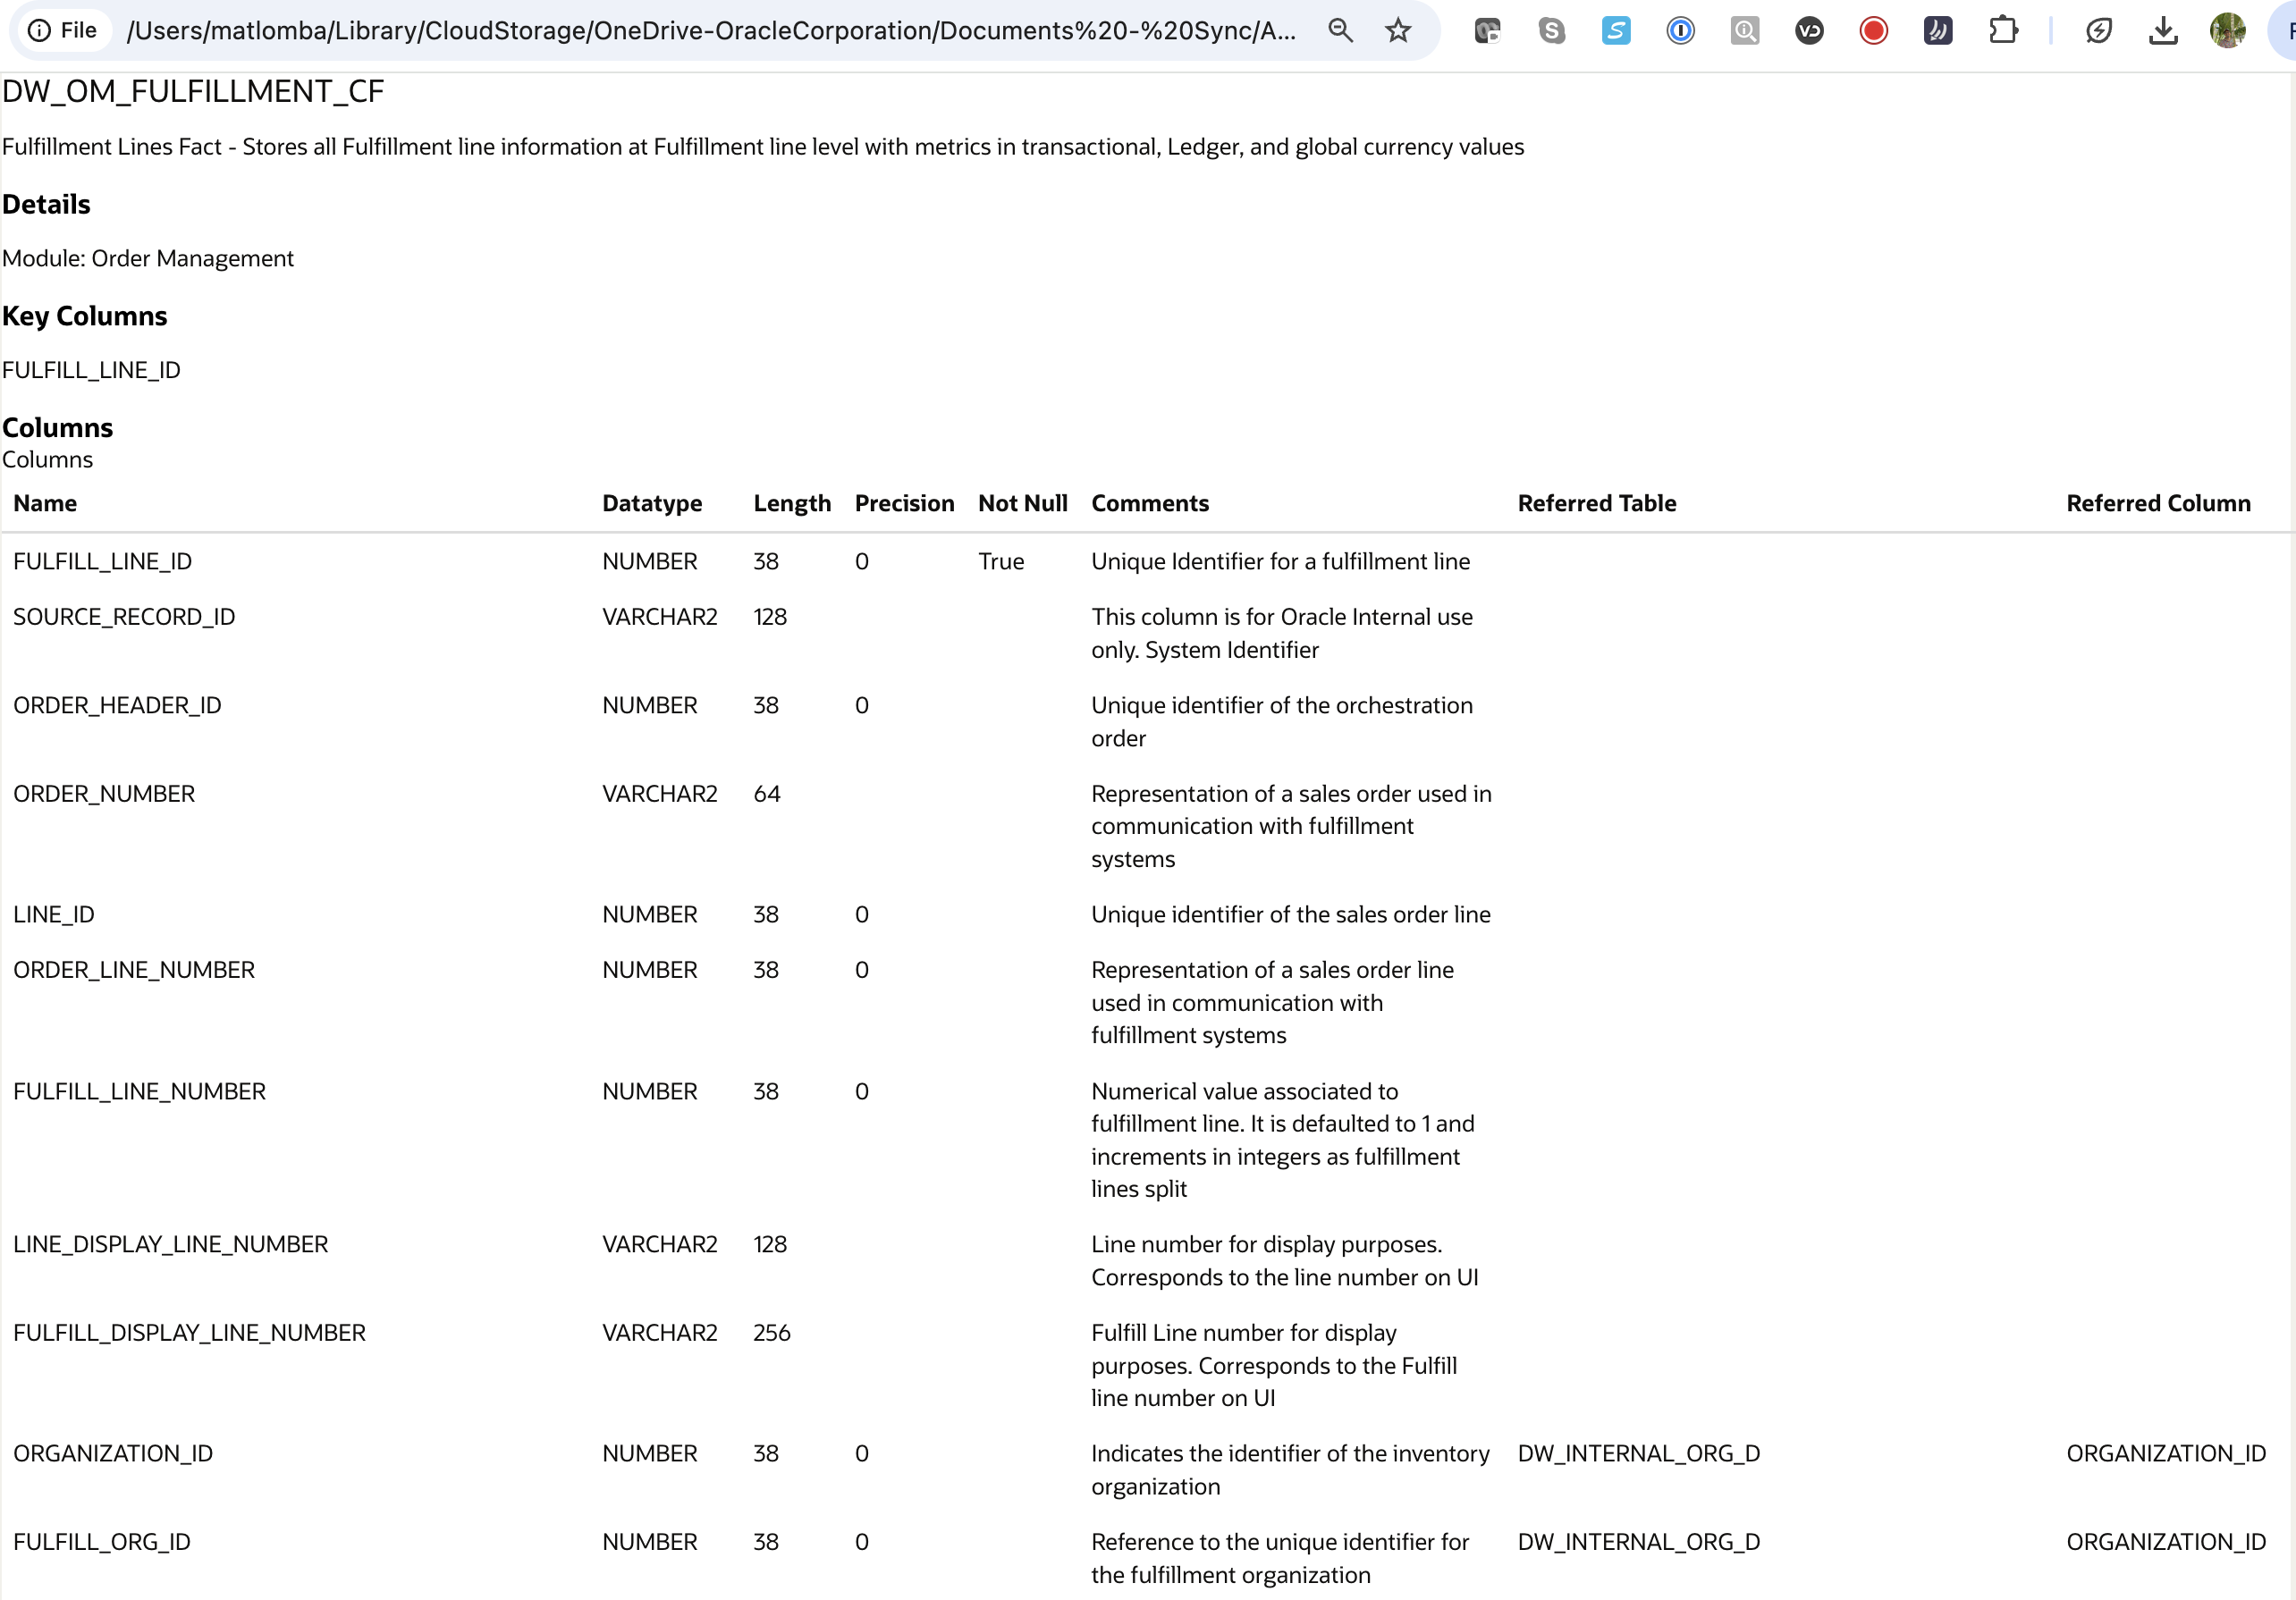
This current article covers all the aspects of setting up, creating, authorizing and consuming an Oracle Autonomois Database share of the FDI Factory table DW_OM_FULFILLMENT_CF, that is the Fulfillment Lines Fact – Stores all Fulfillment line information at Fulfillment line level with metrics in transactional, Ledger, and global currency values.
Figure 2: Fusion Data Intelligence – Factory Table for Data Share DW_OM_FULFILLMENT_CF
Have access to the OCI Console in your region of choice
Have a compartment created with FDI already provisionned.
Have configured SQL access to the FDI Autonomous Database with SQL Developer using OAX_USER
Have ADMIN access to the FDI Autonomous Database
Setting Up Data Sharing
In this section, we will create the necessary objects and grants in the Autonomous Database so we can succesfully implement Data Sharing in the subsequent sections
Set up Share Provider User
With ADMIN User
The first we will do here is setting the Share Provider user and granting it the appropriate roles using the below SQL queries
Click to toggle and display the queries
/** with ADMIN */
-- USER SQL
CREATE USER "ATEAM_SHARE_PROVIDER" IDENTIFIED BY "DataShare4FDI"
DEFAULT TABLESPACE "DATA"
TEMPORARY TABLESPACE "TEMP";

-- QUOTAS
ALTER USER "ATEAM_SHARE_PROVIDER" QUOTA UNLIMITED ON "DATA";

-- ROLES
GRANT "CONNECT" TO "ATEAM_SHARE_PROVIDER" ;
GRANT "RESOURCE" TO "ATEAM_SHARE_PROVIDER" ;
GRANT "ODI_DEVELOPER" TO "ATEAM_SHARE_PROVIDER" ;
GRANT "DWROLE" TO "ATEAM_SHARE_PROVIDER" ;
GRANT "ODIADMIN" TO "ATEAM_SHARE_PROVIDER" ;
GRANT "DATA_TRANSFORM_USER" TO "ATEAM_SHARE_PROVIDER" ;
Then we will enable REST and Data Sharing for the Share Provider user with the below SQL Queries
/* with ATEAM_SHARE_PROVIDER */
-- get Share provider share id
SELECT dbms_share.get_sharing_id
FROM dual;
Set share provider user identify information
Click to toggle and display the queries
/* with ATEAM_SHARE_PROVIDER */

-- set share provider user identify information
BEGIN
dbms_share.set_published_identity(SYS.JSON_OBJECT_T(JSON_OBJECT(
    -- A name that will be visible to recipients.
    -- Give enough information to be identifiable
    'name' VALUE 'FDI_LIVE_SHARE_PROVIDER_'
    || SYS_CONTEXT('USERENV', 'CON_NAME') || '/' || USER,
    'description' VALUE 'FDI Live Share Provider',
    'contact' VALUE 'matthieu.lombard@oracle.com')));
END;
/
Get the share provider user identify information and review the information is correct
Click to toggle and display the queries
/* with ATEAM_SHARE_PROVIDER */

-- get share provider user identify information
SELECT *
FROM JSON_TABLE(
dbms_share.get_published_identity, '$'
COLUMNS (name, description, contact));
With OAX_USER
OAX_USER is owning the access to the factory FDI database objects. This is acccess is done via synonyms. Here, we need to grant access to the FDI factory table DW_OM_FULFILLMENT_CF to our Share provider user, with the below queries:
Click to toggle and display the queries
--grant read to FDI Factory table to ATEAM_SHARE_PROVIDER
GRANT SELECT ON OAX_USER.DW_OM_FULFILLMENT_CF TO ATEAM_SHARE_PROVIDER WITH GRANT OPTION;-- run with oax_user
GRANT SELECT ON OAX$DW.DW_OM_FULFILLMENT_CF TO ATEAM_SHARE_PROVIDER WITH GRANT OPTION;-- run with oax_user
Review with the Share provider user that it can select data from the factory table
Click to toggle and display the queries
/*with ATEAM_SHARE_PROVIDER*/

--factory table
select * from OAX_USER.DW_OM_FULFILLMENT_CF;
Enable Data Transforms on FDI ADB
As described in the ADB Documentation, Autonomous Database include a series of built in tools that can be enabled or disabled once the Autonomous Database is provisioned.The one of interest here is Data Transforms as it needs to be enabled.
To enable Data Transforms in your FDI ADB,
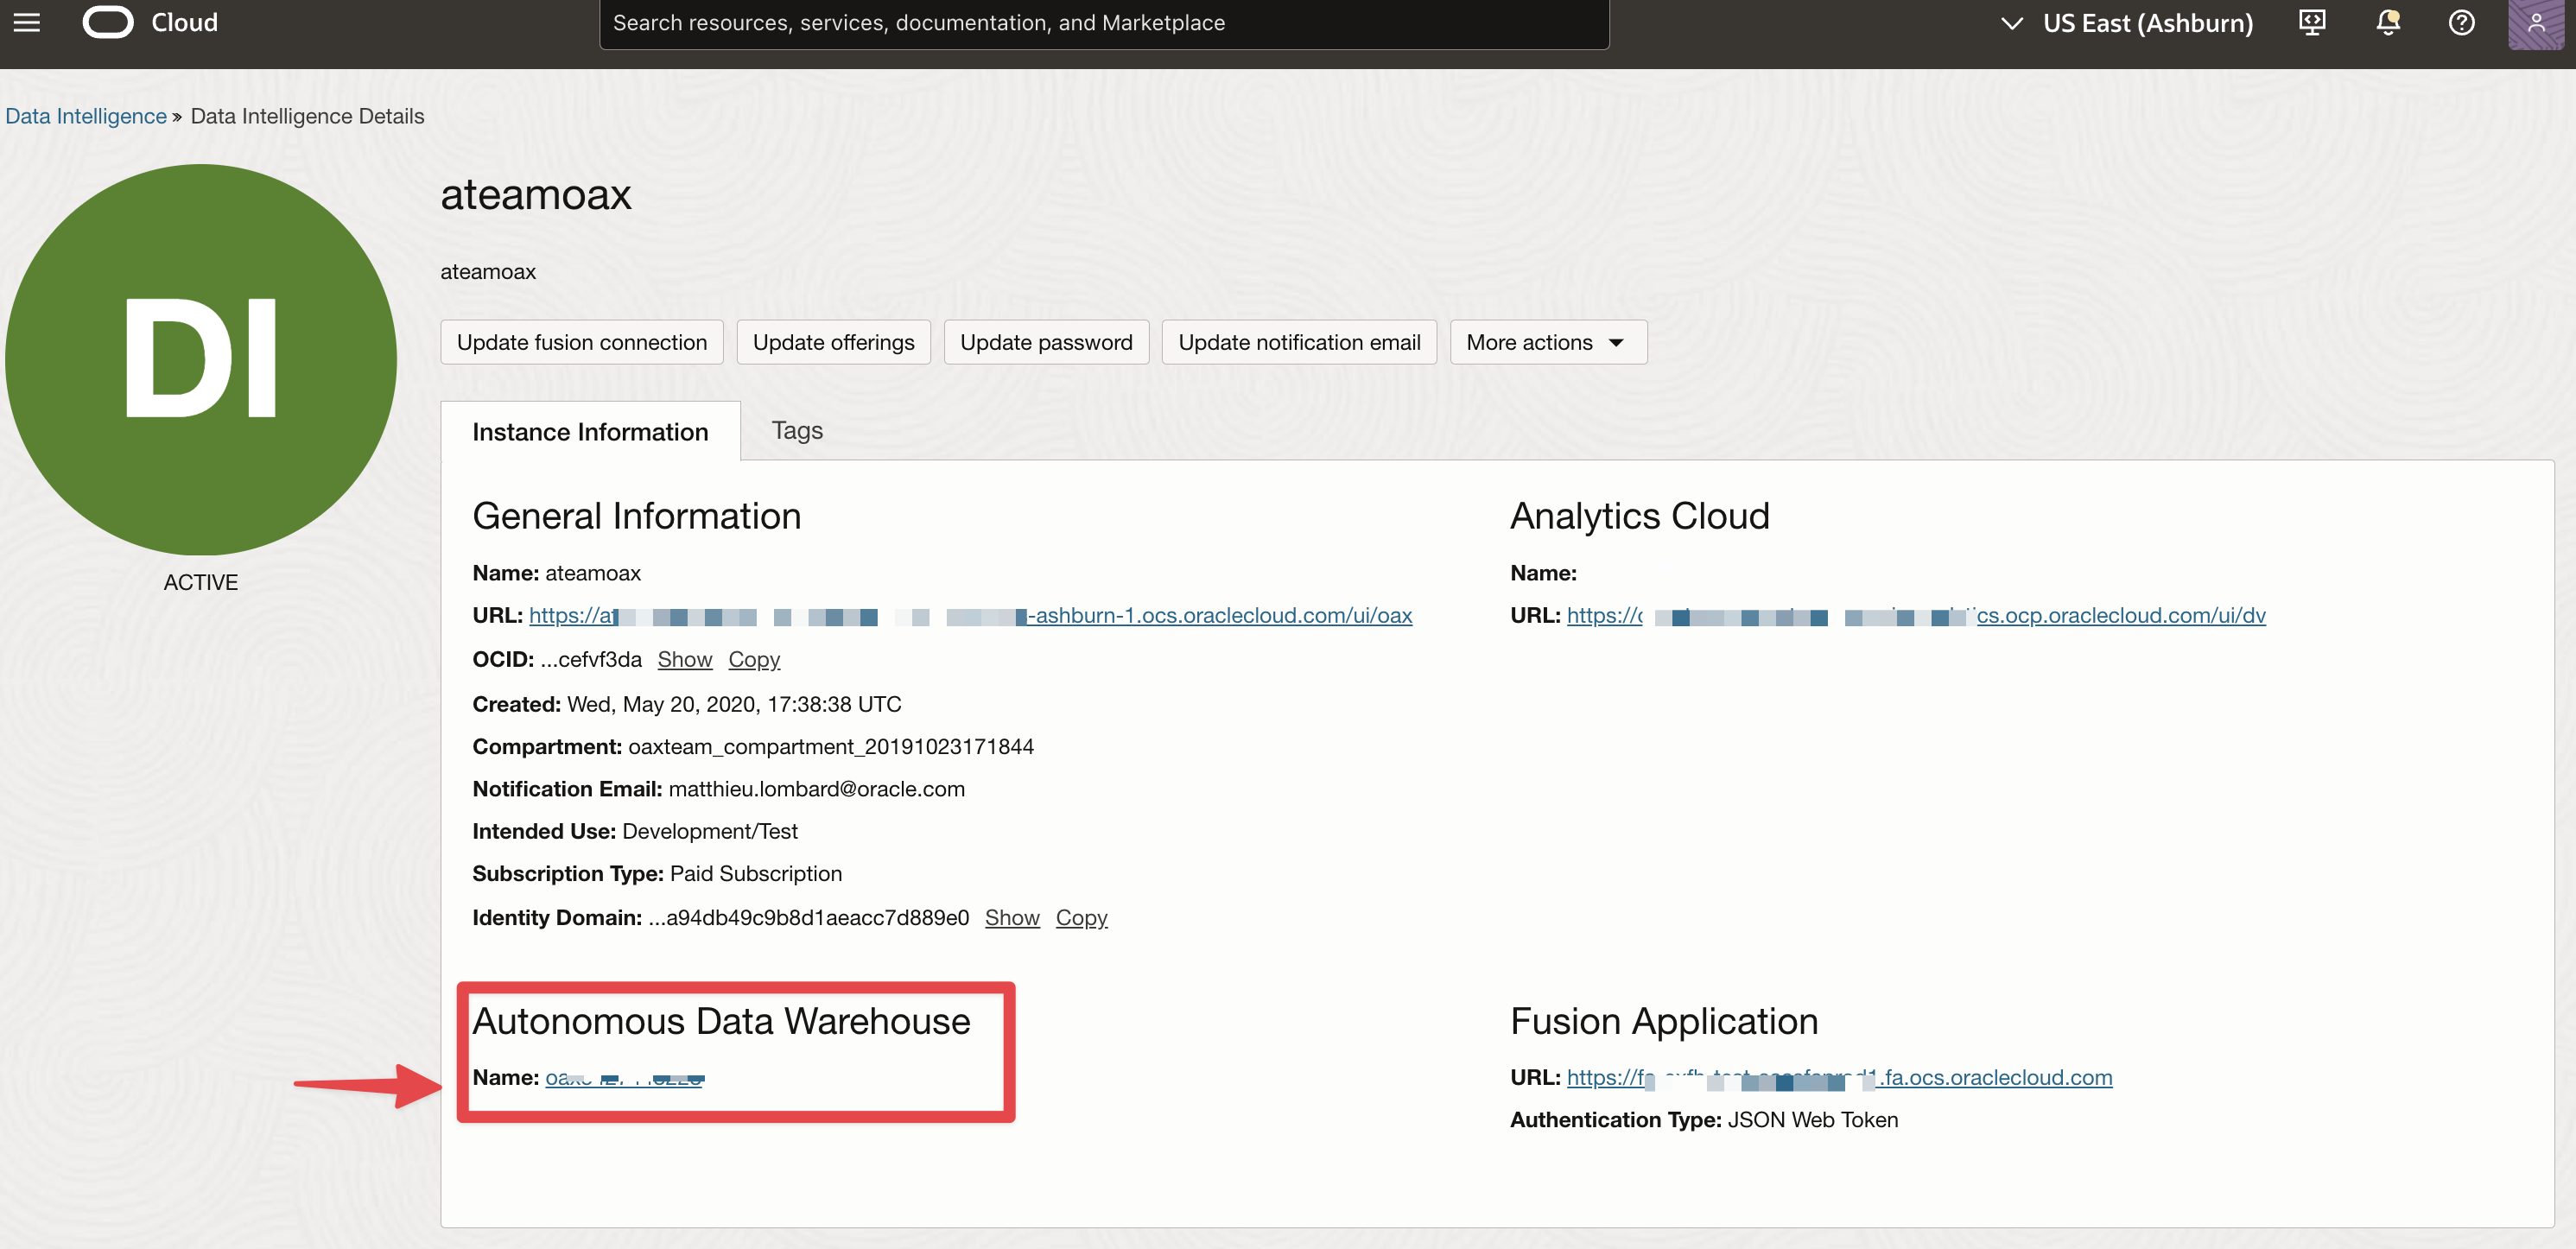
Navigate to your FDI Instance and click on your Autonomous Database Name
Figure 3: FDI – Access ADB
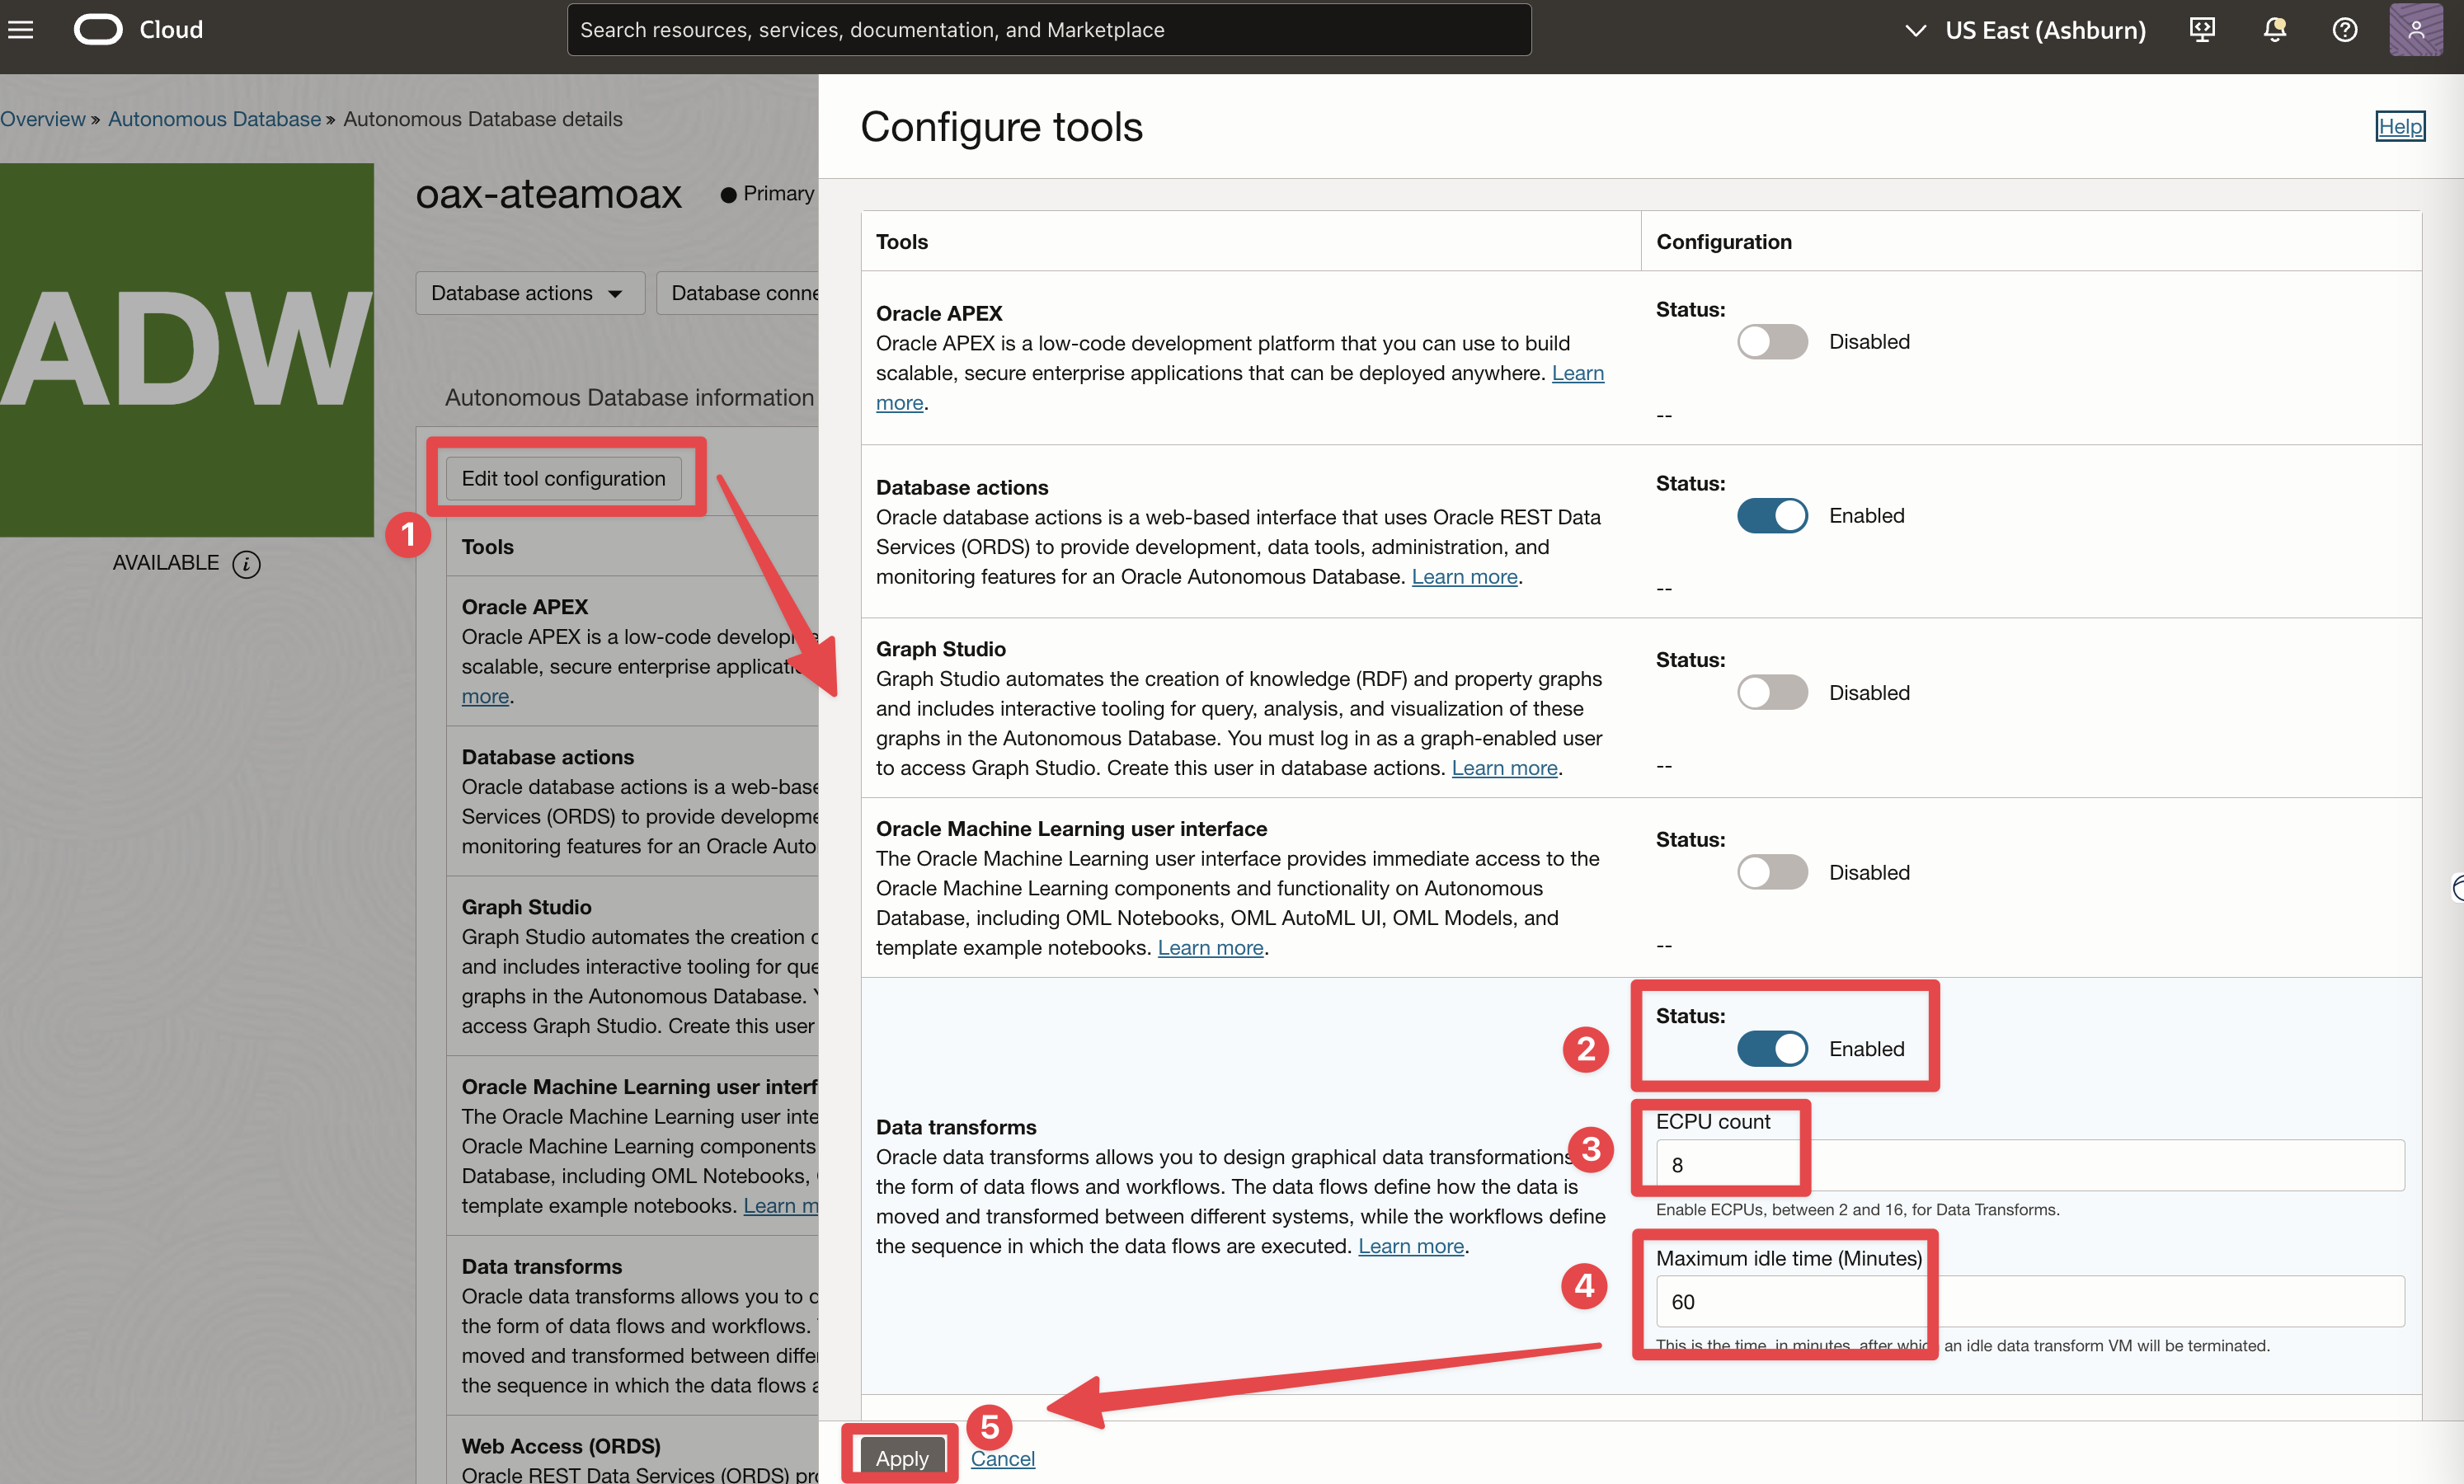
Click on Tool Configuration
Figure 4: FDI – Access ADB tools configuration
Enable Data Transform, set ECPU count to 8 and idle time to 60 minutes and click Apply
Figure 5: FDI – Enable Data Transforms
Review and confirm Data Transforms is enabled
Figure 6: FDI – Oracle Data Transforms enabled
Identify a FDI factory table to use for Data Sharing and set up frequent refreshes
If you are running Data Transforms on Compute instance, the following sections apply
Identify a FDI factory table to use for Data Sharing
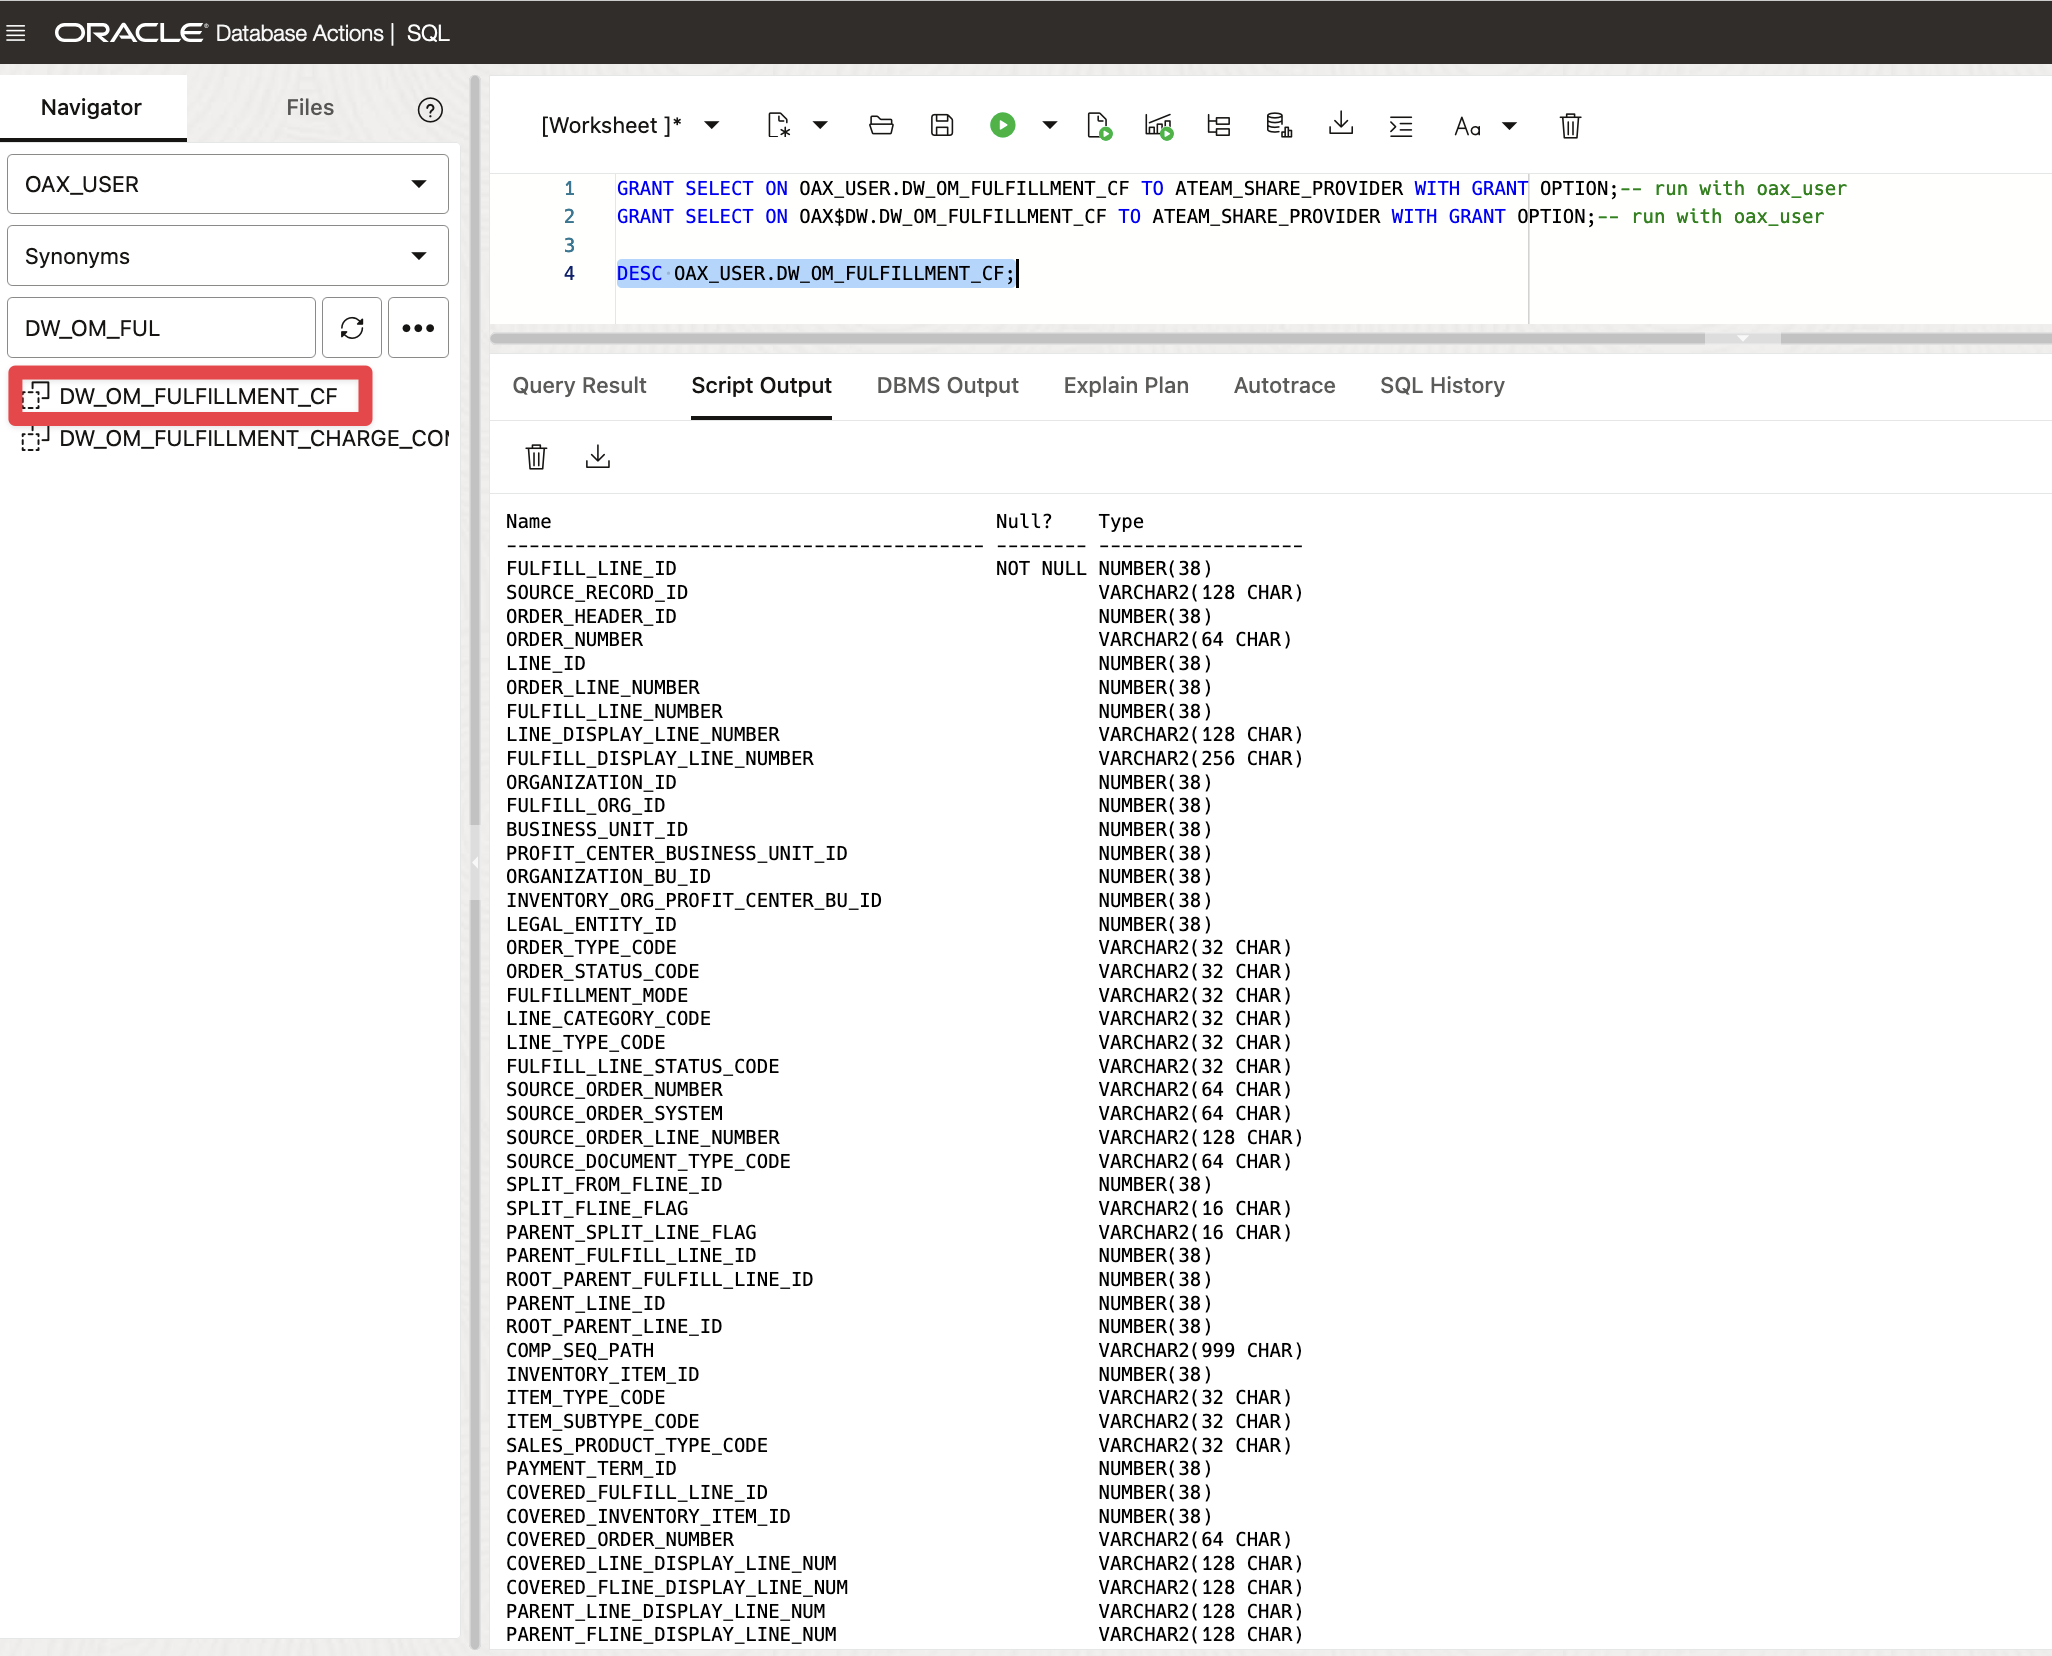
We have work on another project with Eloi to correlate weather data and events like hurricane, tornados and flood from various weather provider APIs with the actual shipments in Fusion SaaS application that are extracted and loading into FDI to gain insight on the impact shipments and provide recommendations on next steps for these shipments (rerouting, changing mean of transportation…). During this project, we were focusing on the Order Management Fullfillment Fact table DW_OM_FULFILLMENT_CF.
We can review the columns available for this factory table by run the DESC query against the synonym, as shown in below picture:
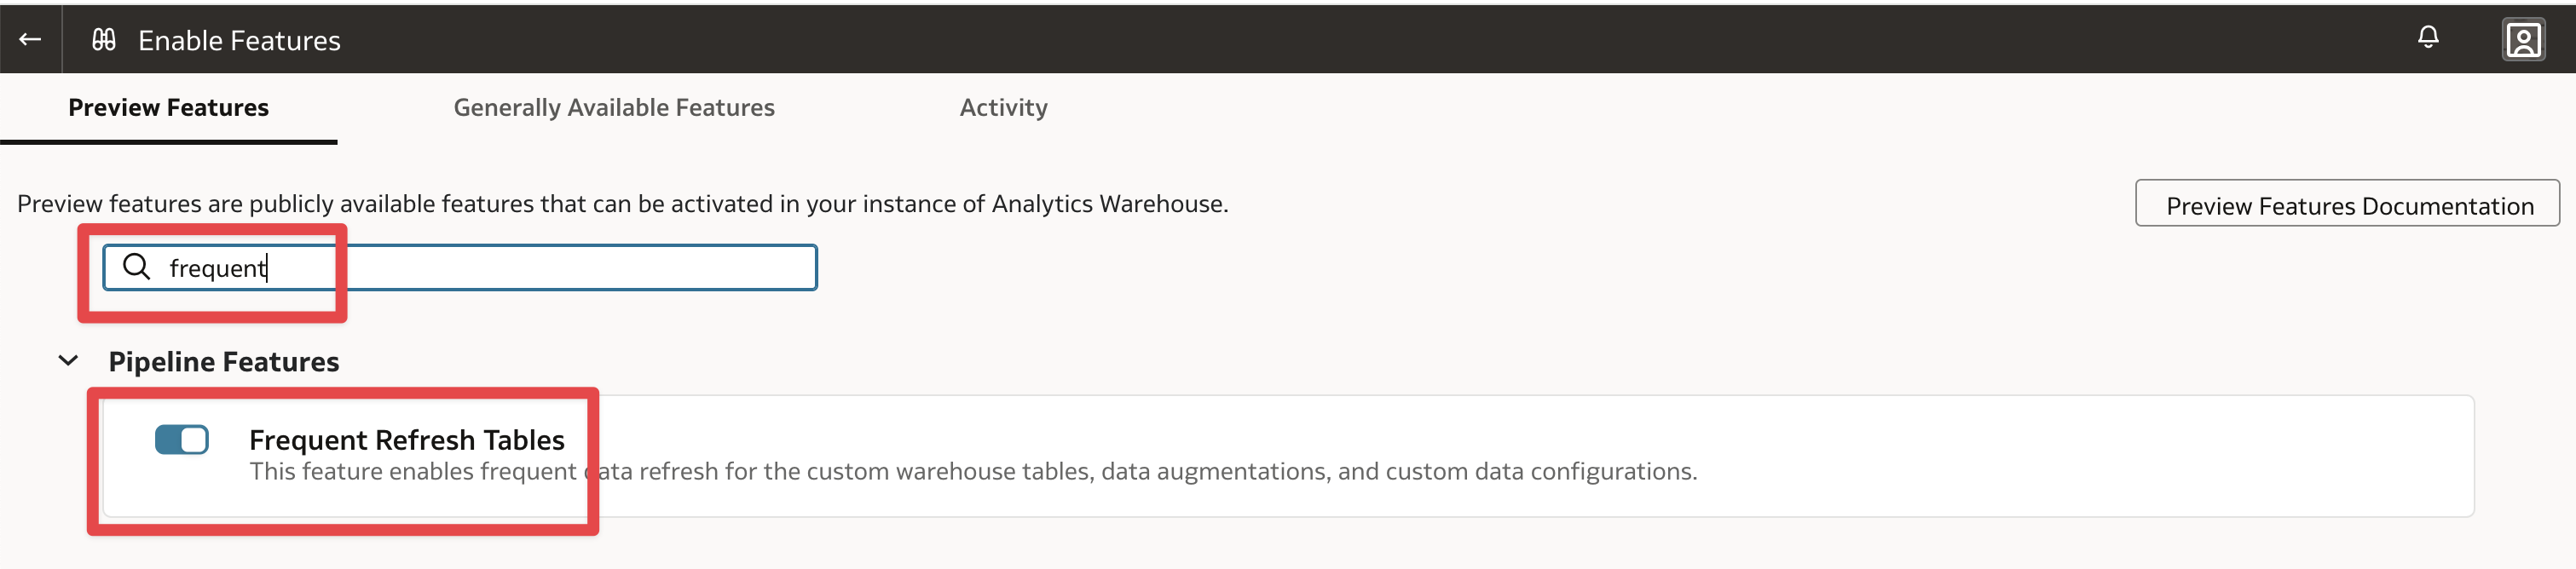
Now we have identified our factory table, we will enable fequent refreshes every four hours so the data authored in Fusion SaaS for this object will flow into the FDI warehouse and the updates can be made available with data share to downstream consumers.
First, in the FDI Administration Console, click on Enable Features tile. Then search for Frequent to filter out the features. Then slide the ticker so the Frequent Refresh Tables are enabled
Figure 8: FDI – Enable Frequent Refresh Tables
Go back to the Admin Console and click on Data Configuration. Select Fusion Data Source and click Pipeline Settings tile:
Figure 9: FDI – Fusion Pipeline Settings
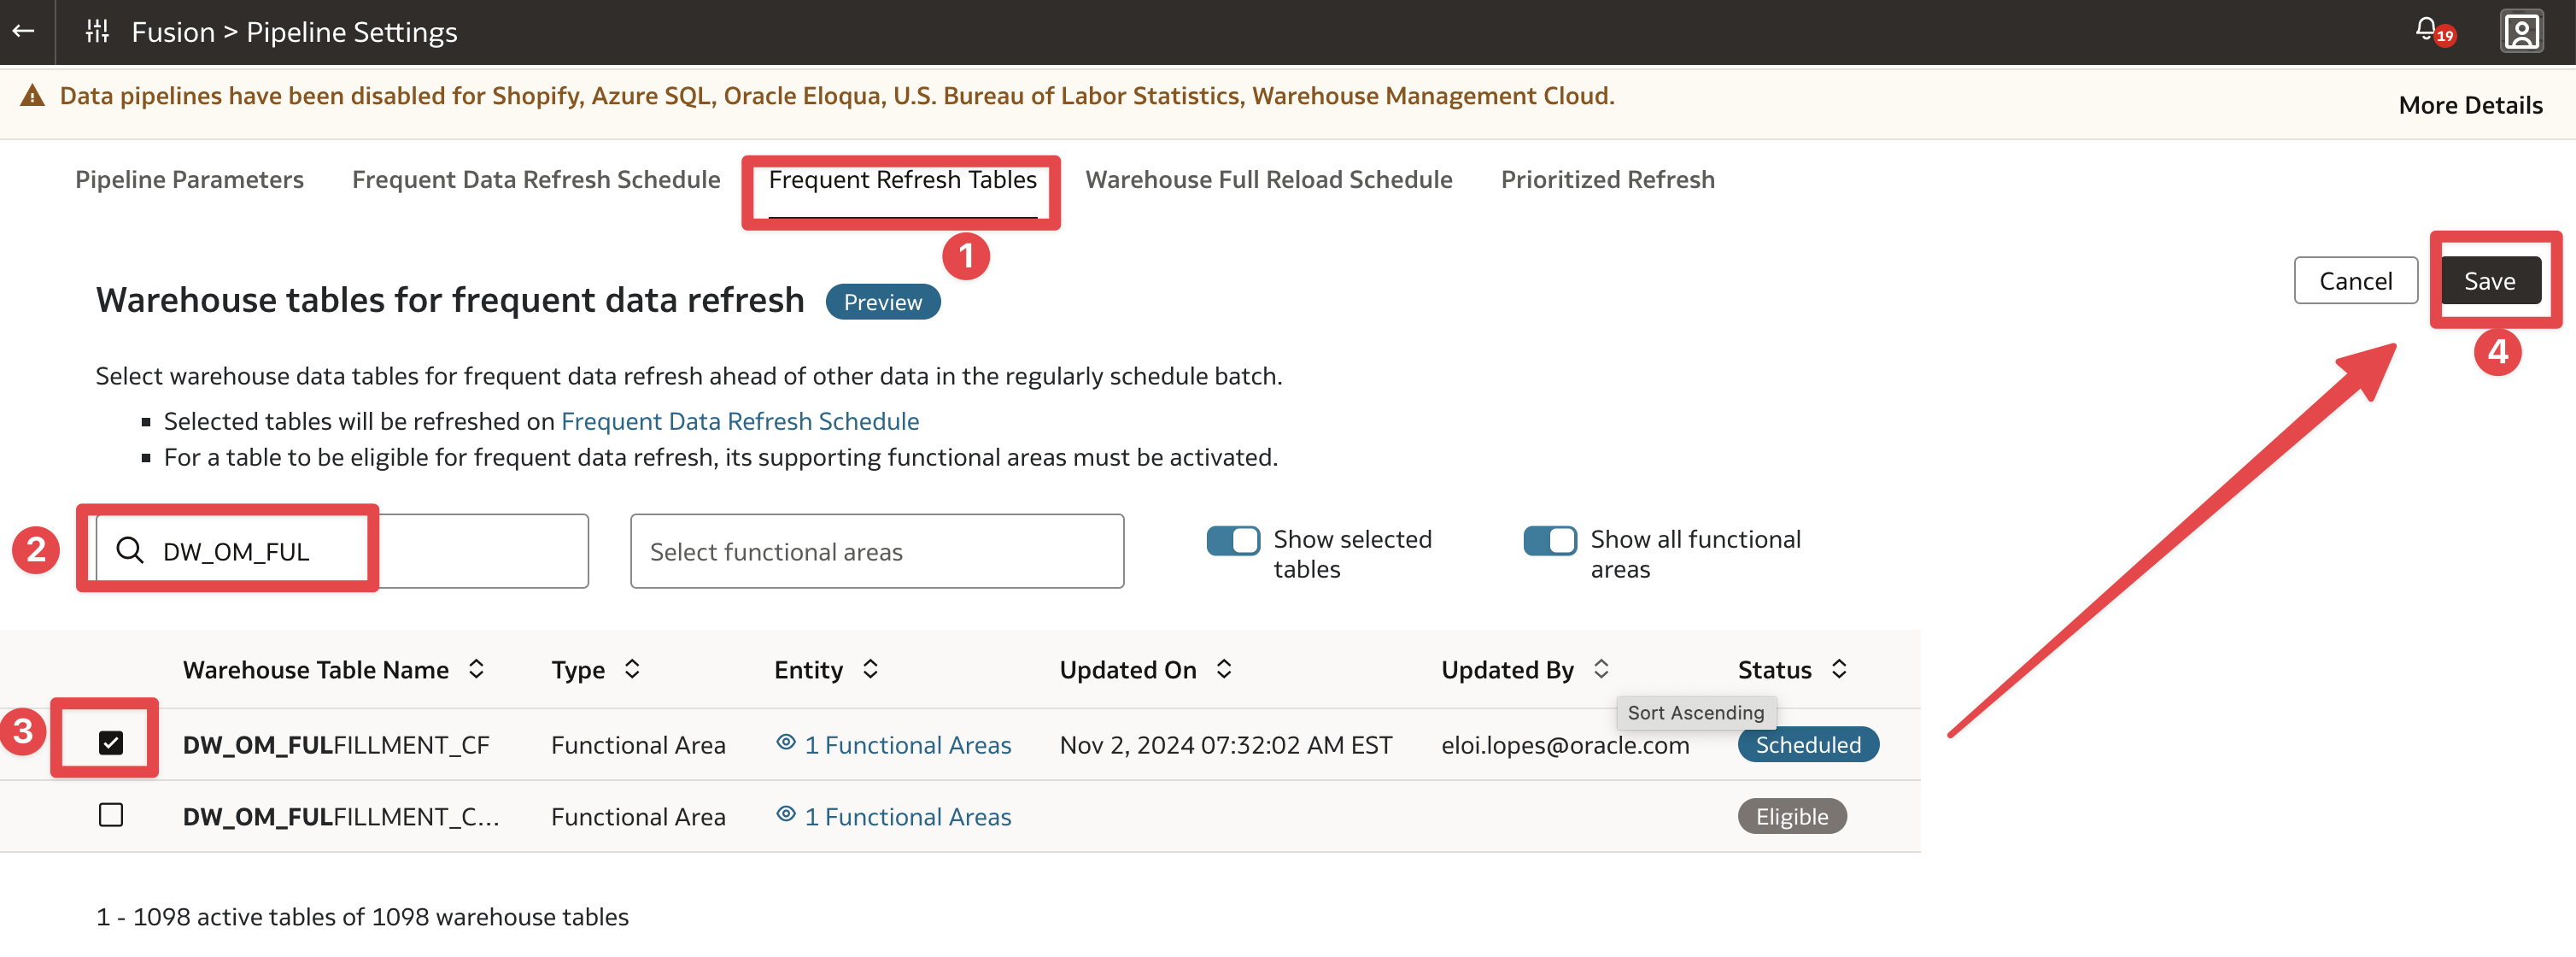
Click on Frequent Refresh Tables Tab. Filter the tables with DW_OM_FUL. Select the DW_OM_FULFILLMENT_CF table and save
Figure 10: FDI – Select Frequent Refresh Table
Click on Frequent Data Refresh Schedule Tab. Set the frequency to 4 hours, the start time at 3:00 pm GMT as an example, slide the ticket to Perform frequent refresh for warehouse tables and save. After Savng, the next screen with ask you to authorize the action.
Figure 11: FDI – Set frequent refresh schedule
Summary Video
The following video summarizes the steps from this section.
Figure 12: FDI – Setting up ADB Data share
Creating and Publishing the Data Share
Now that the building block for Data Share are available, we can now create the Data Share, populate the Data Share and publish it.
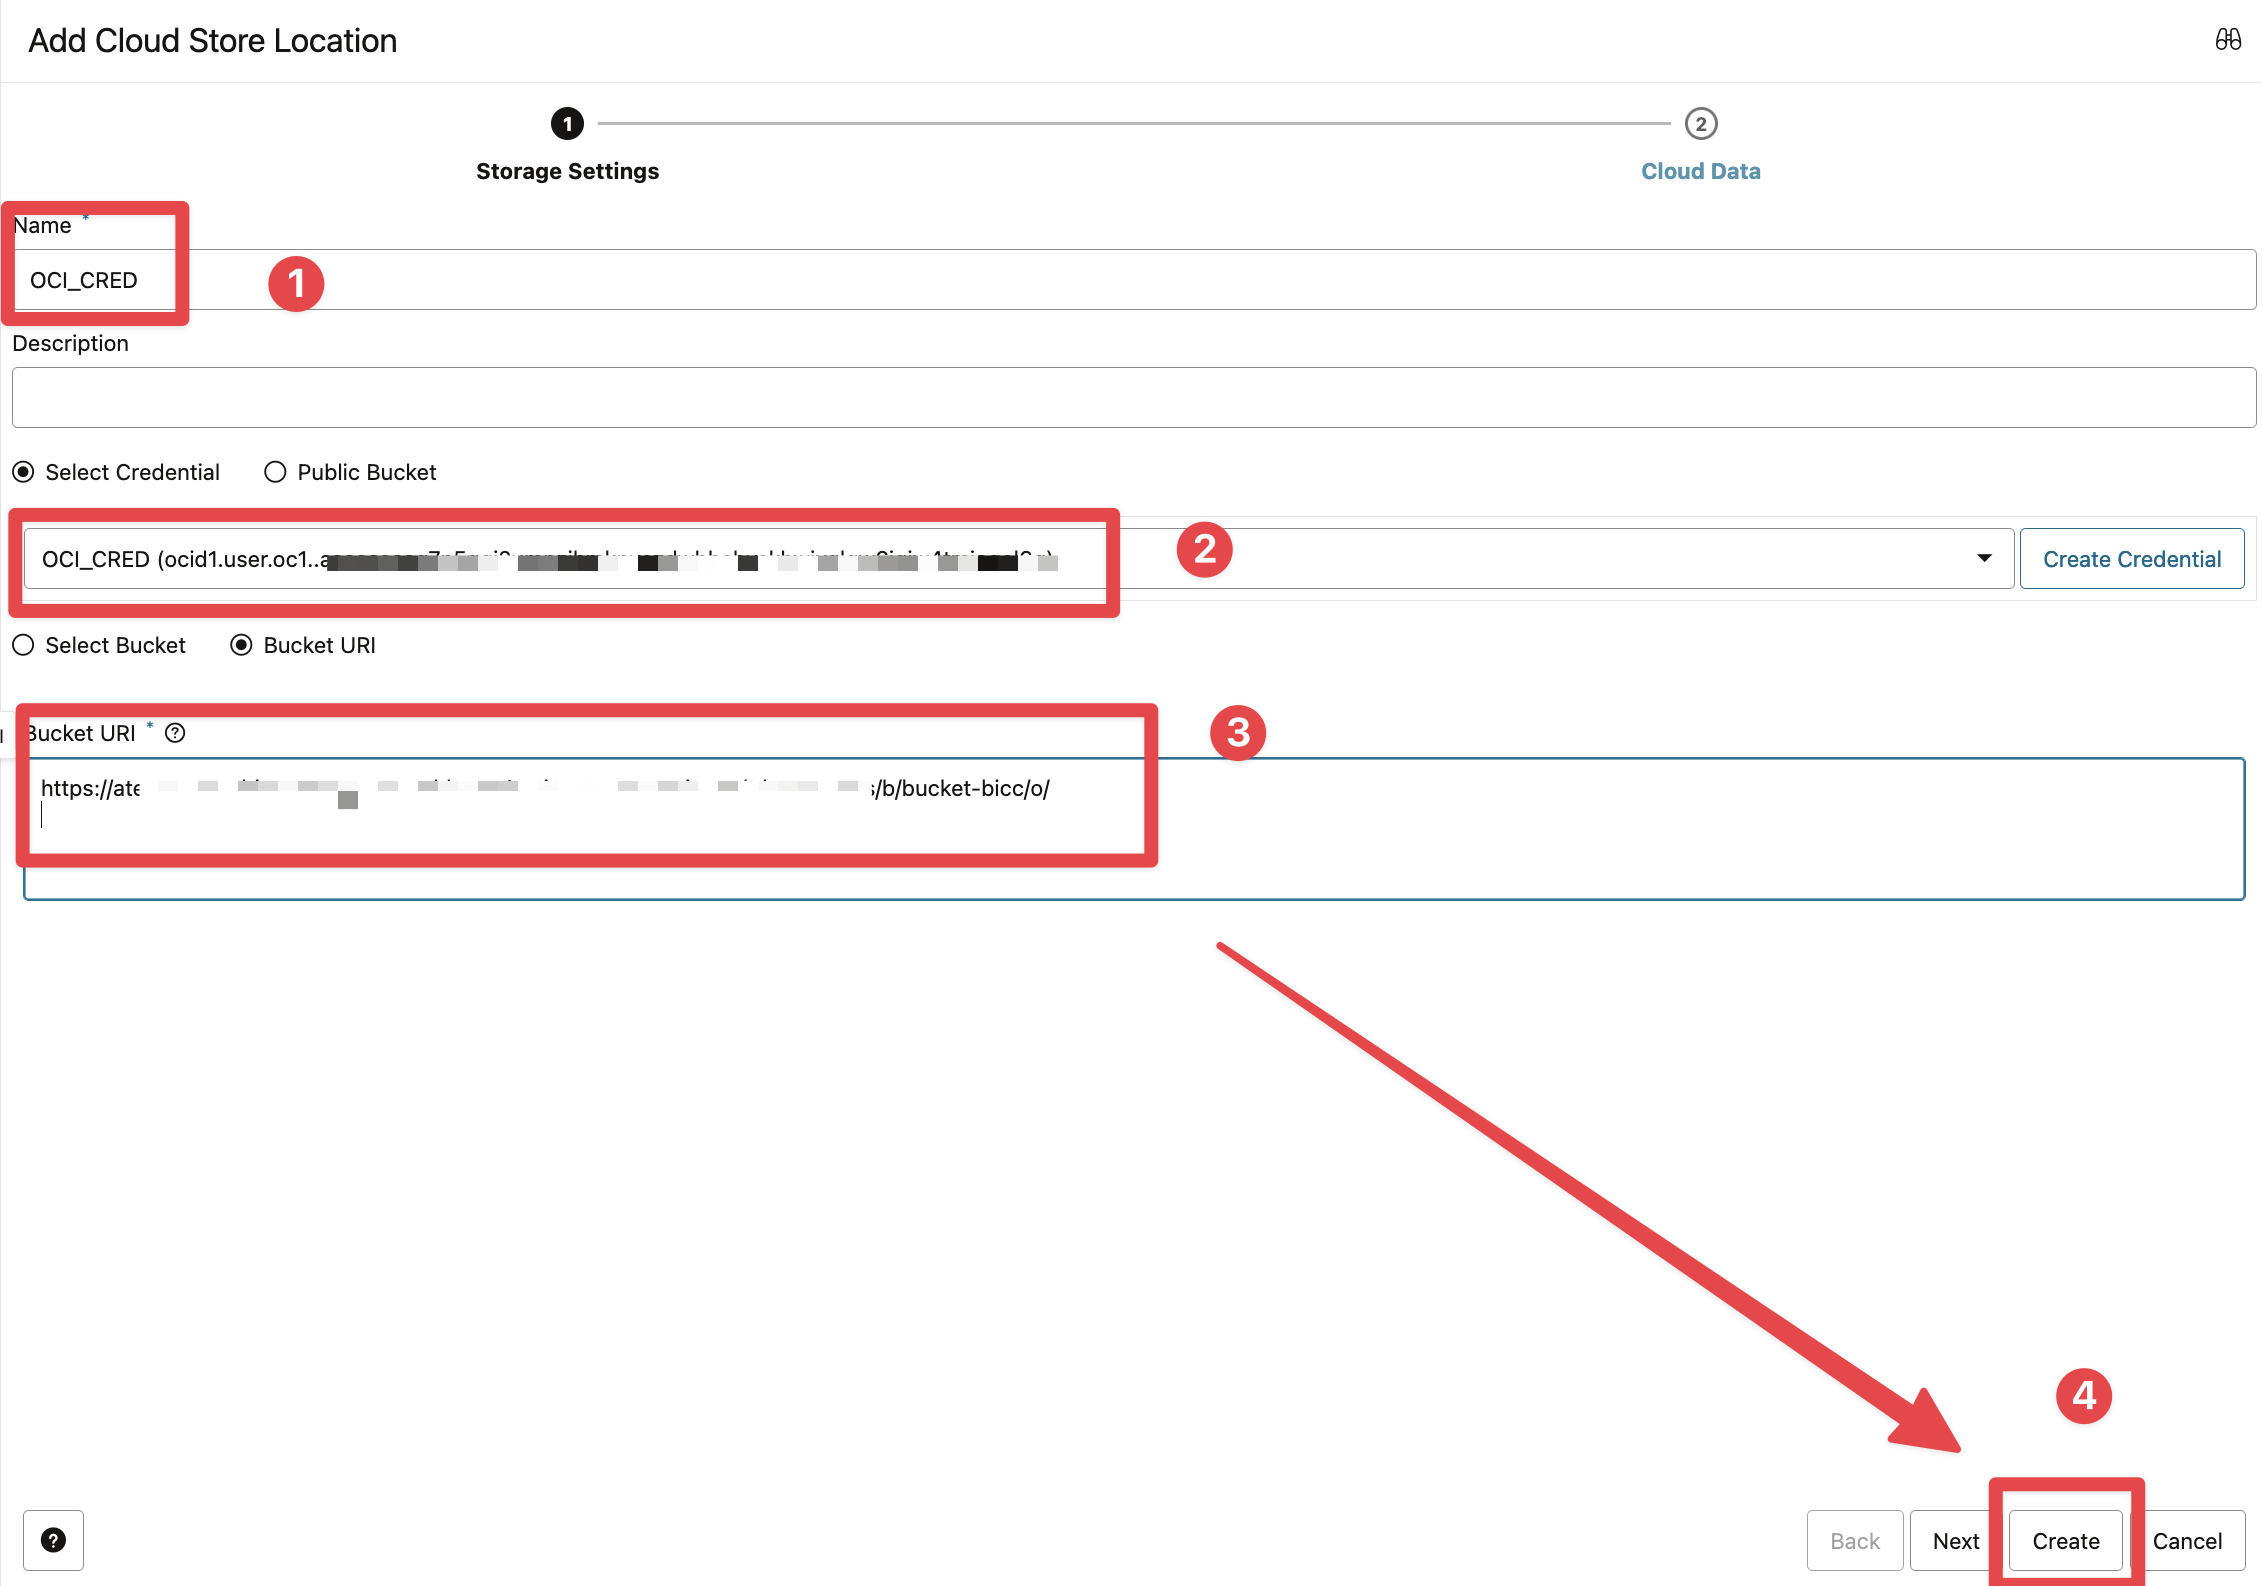
Creating a Storage Link
To create a versioned data share using PL/SQL APIs, we need a Storage link to exist in Data Load, as described in this documentation page. The storage link need to be created with the Share Provider user.
The following steps describe the flow to create the Storage Link:
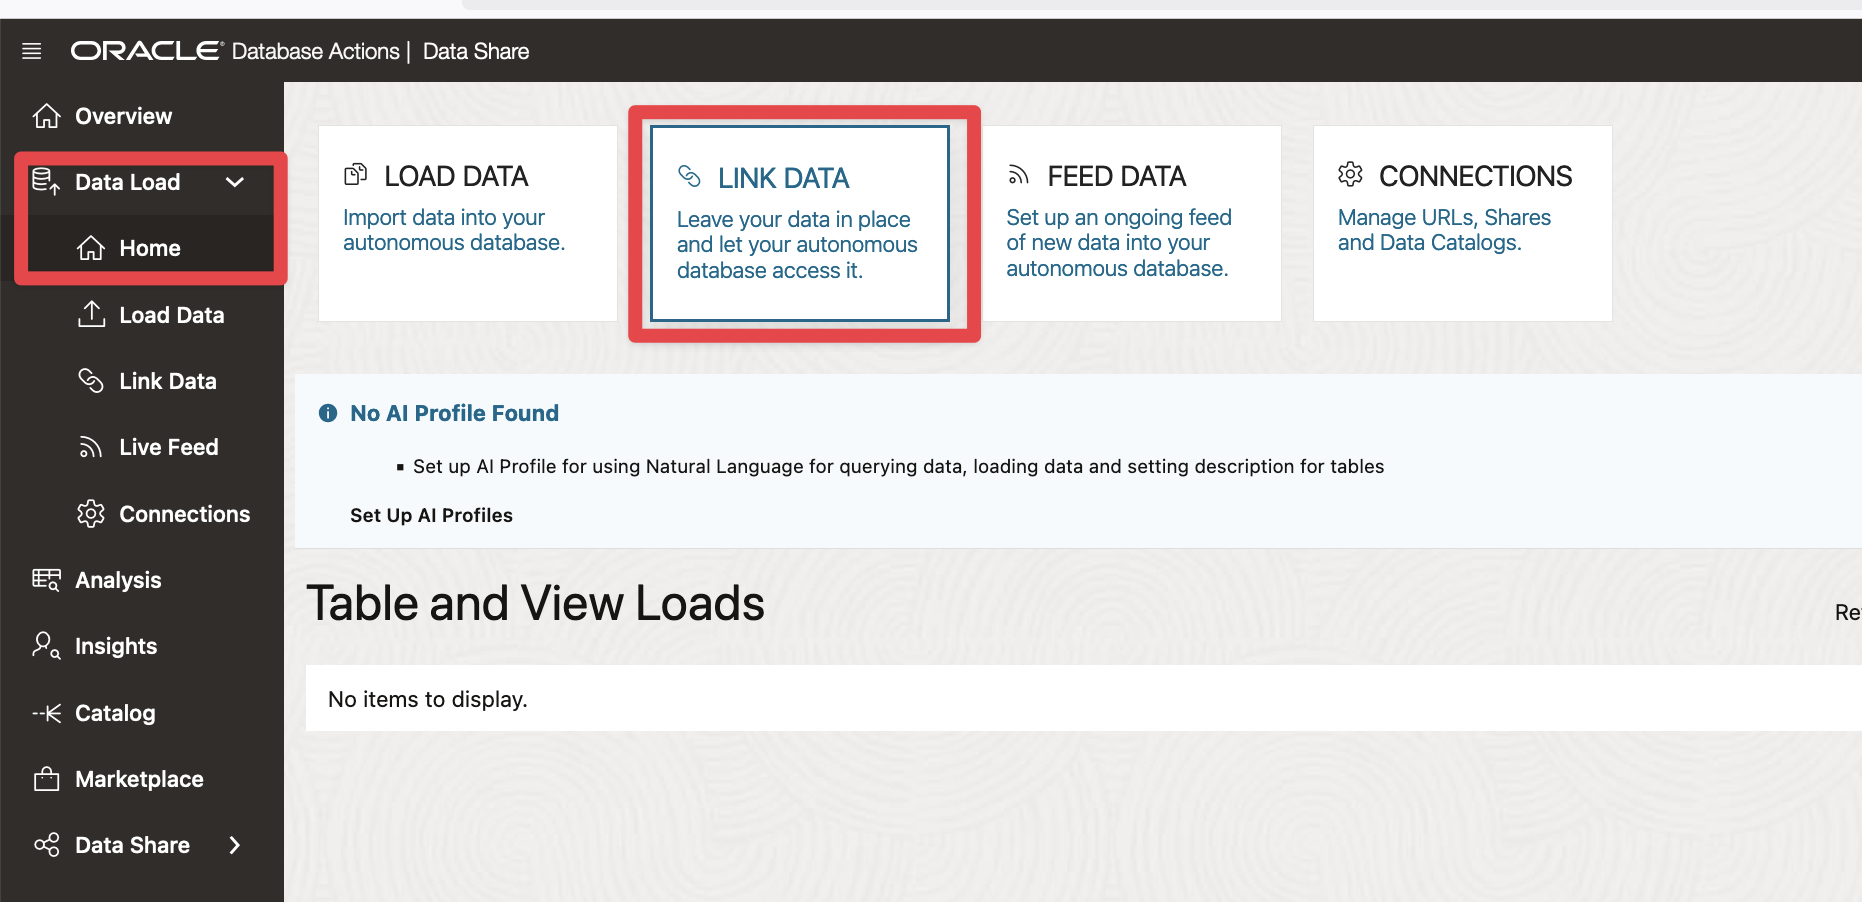
Sign in the database action with Share Provider user and go to Data Studio > Data Load. Then click Home > Link Data
Figure 13: Data Share – Link Data
Click on Cloud Store and click Create Cloud Store Location.
Figure 14: Data Share – Create Cloud Store Location
Sign in the database action with Share Provider user and go to Data Studio > Data Load.
Figure 15: Data Share – Enter Cloud Store Location details and Create
Sign in the database action with Share Provider user and go to Data Studio > Data Load.
Figure 16: Data Share – Review Cloud Store Location
Create a Data Share
Now that a cloud store location is available, we can use the PL/SQL APIs to create the Data Share. The following query does just that :
Click to toggle and display the queries
/** with Share provider */
--create the share
BEGIN
DBMS_SHARE.CREATE_SHARE(
    share_name=>'fusion_data_intelligence_scm',
    share_type=>'VERSIONED',
    storage_link_name=>'OCI_CRED'
    );
END;
/
In case you need to drop the share, use the below query
Click to toggle and display the queries
/** with Share provider */
--drop the share if need be
BEGIN
    DBMS_SHARE.DROP_SHARE('fusion_data_intelligence_scm');
END;
/
Add the synonym from the FDI factory table to the Data Share
We will now create a synonym to point to the factory table
Click to toggle and display the queries
/** with Share provider */

-- create syn to point to FDI Factory Table
CREATE OR REPLACE EDITIONABLE SYNONYM ATEAM_SHARE_PROVIDER.SYN_DW_OM_FULFILLMENT_CF FOR OAX_USER.DW_OM_FULFILLMENT_CF;
Then we will add the synonym to the Data Share Below is a sample PL/SQL Block to call this procedure, as we will be calling it from Data Transf
Click to toggle and display the queries
/** with Share provider */
-- add to share
BEGIN
DBMS_SHARE.ADD_TO_SHARE(
    share_name=>'fusion_data_intelligence_scm',
    owner=> 'ATEAM_SHARE_PROVIDER',
    table_name=> 'SYN_DW_OM_FULFILLMENT_CF');
END;
/
Below is a sample PL/SQL Block to call this procedure, as we will be calling it from Data Transf
Then we will update the share properties to allow flashback queries
Click to toggle and display the queries
/** with Share provider */
--update share properties to allow flashback queries and pubish
BEGIN
  dbms_share.update_share_table_property(
    'fusion_data_intelligence_scm',
    'SYN_DW_OM_FULFILLMENT_CF',
    'FLASHBACK', 'NO', 'ATEAM_SHARE_PROVIDER');
END;
/
Publish the Data Share
The final step is to publish the data share
Click to toggle and display the queries
/** with Share provider */

BEGIN
dbms_share.publish_share_wait('fusion_data_intelligence_scm');
END;
/
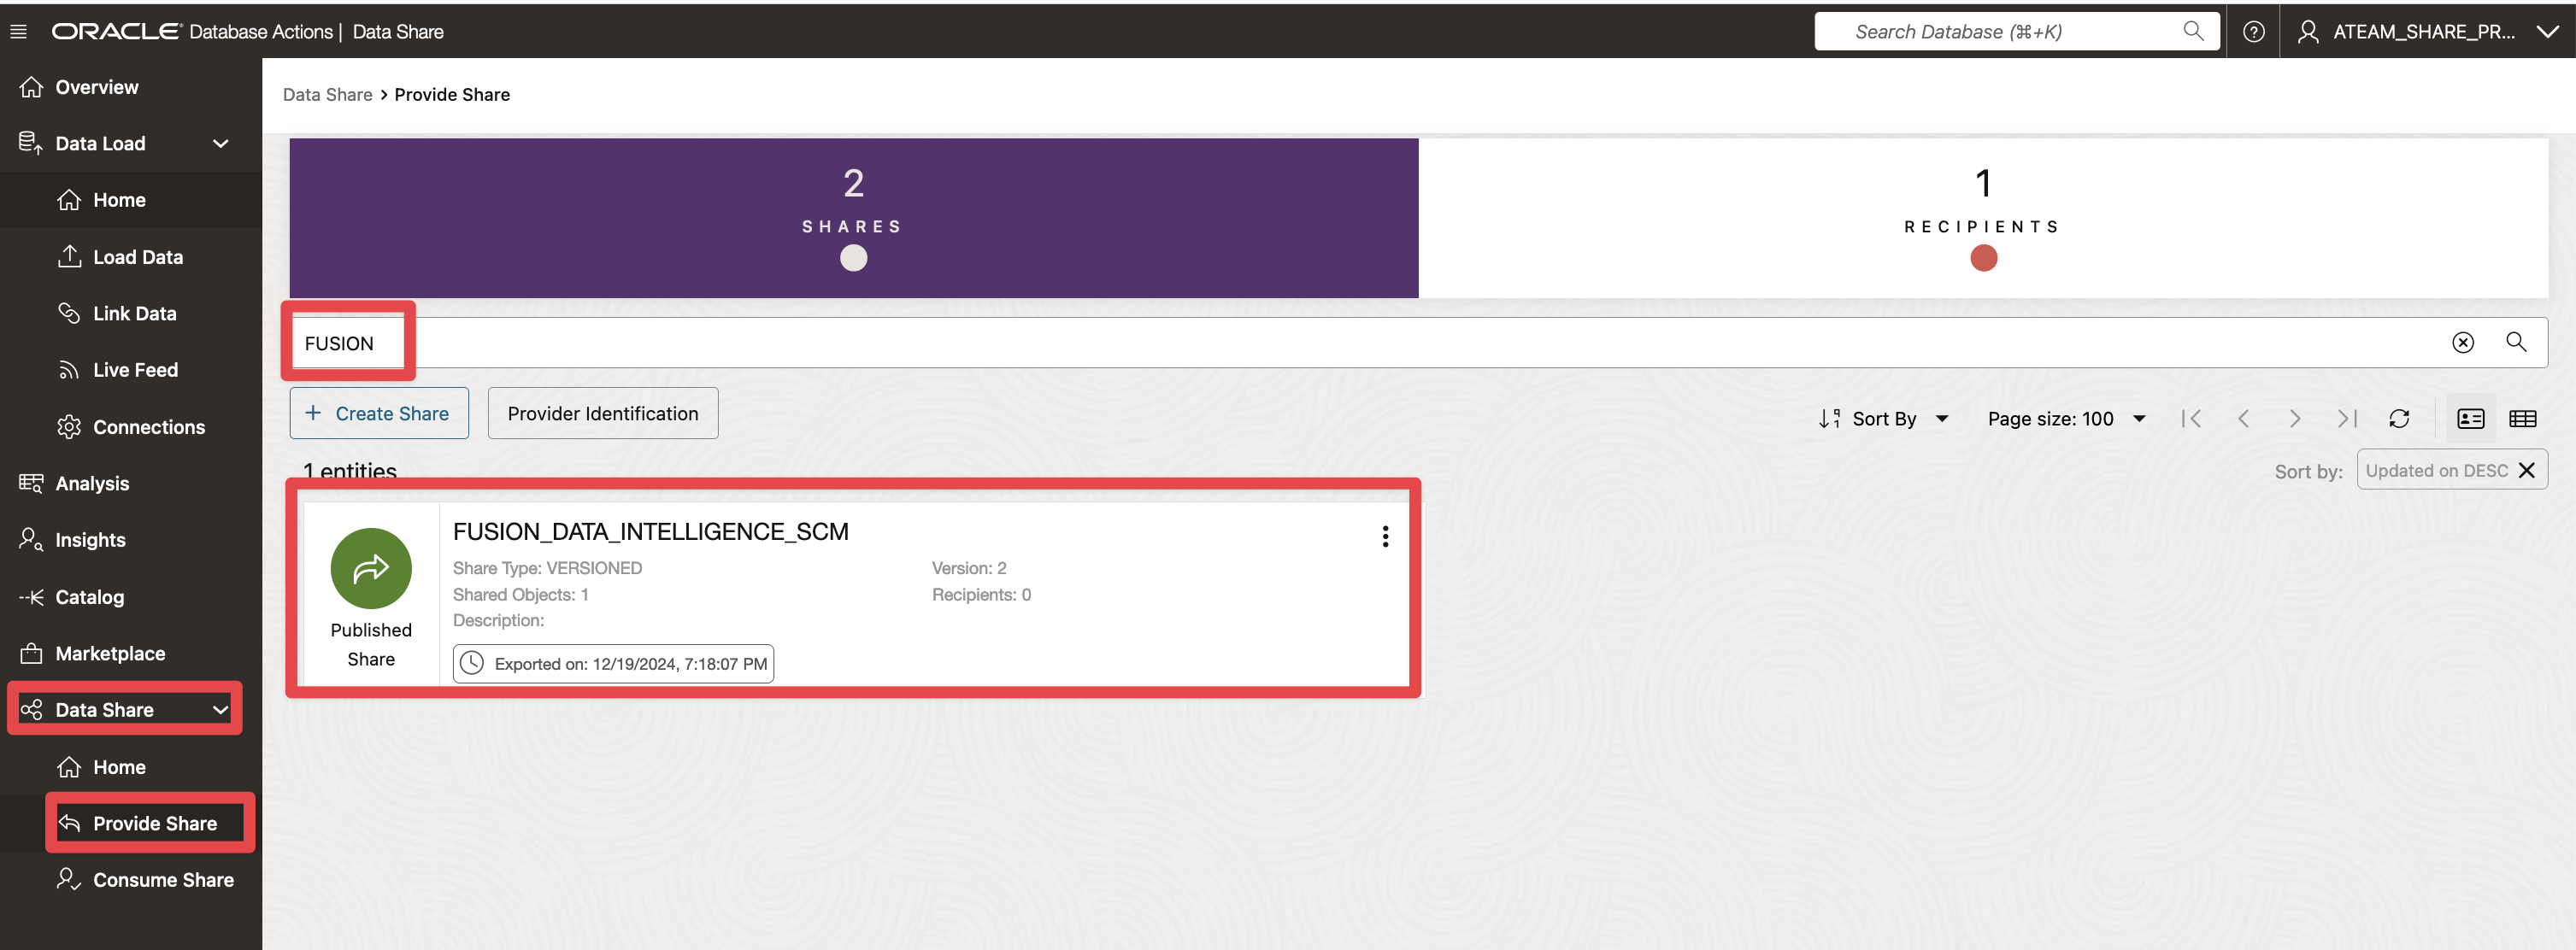
Once published, the share is available in the Data Share UI. In the database action with Share Provider user, go to Data Studio > Data Share. Click on Provide Share and filter on the share name.
Figure 16: Data Share – Review Published Share
We can also review the status of the share with the below query:
Click to toggle and display the queries
/** with Share provider */

SELECT SHARE_NAME, SHARE_VERSION, STATUS
FROM user_share_versions v
WHERE v.share_name = 'fusion_data_intelligence_scm'
ORDER BY share_version desc;
Summary Video
The following video summarizes the steps from this section:
Figure 17: Data Share – Summary video – Create and Publish Share
Creating and Authorizing the Data Share recipient
Create Data Share Recipient
To create the Data Share Recipient, use the following PL/SQL Code
To grant access to the Data Share Recipient, use the following PL/SQL Code
Click to toggle and display the queries
-- Grant the Recipient Access Privileges to the Data Share
BEGIN
    DBMS_SHARE.GRANT_TO_RECIPIENT(
        share_name=>'fusion_data_intelligence_scm',
        recipient_name=> 'ATEAM',
        AUTO_COMMIT=>true);
END;
/
Consuming the Data Share
Set up Share Consumer User
To set up the Data Share Consumer User, use the following PL/SQL Code
Click to toggle and display the queries
-- create consumer user

CREATE USER ATEAM_SHARE_CONSUMER IDENTIFIED BY DataShare4FDI;

-- Grant the new user the required roles.

GRANT CONNECT TO ATEAM_SHARE_CONSUMER;
GRANT DWROLE TO ATEAM_SHARE_CONSUMER;
GRANT RESOURCE TO ATEAM_SHARE_CONSUMER;
GRANT UNLIMITED TABLESPACE TO ATEAM_SHARE_CONSUMER;


-- QUOTAS
ALTER USER "ATEAM_SHARE_CONSUMER" QUOTA UNLIMITED ON "DATA";

-- ROLES
GRANT "CONNECT" TO "ATEAM_SHARE_CONSUMER" ;
GRANT "RESOURCE" TO "ATEAM_SHARE_CONSUMER" ;
GRANT "ODI_DEVELOPER" TO "ATEAM_SHARE_CONSUMER" ;
GRANT "DWROLE" TO "ATEAM_SHARE_CONSUMER" ;
GRANT "ODIADMIN" TO "ATEAM_SHARE_CONSUMER" ;
GRANT "DATA_TRANSFORM_USER" TO "ATEAM_SHARE_CONSUMER" ;

BEGIN
ORDS_ADMIN.ENABLE_SCHEMA
    (p_enabled => TRUE,
     p_schema => 'ATEAM_SHARE_CONSUMER',
     p_url_mapping_type => 'BASE_PATH',
     p_url_mapping_pattern => 'ateam_share_consumer',
     p_auto_rest_auth=> TRUE );
END;
/
Discover Data Shares and Consume Available Data Shares
This section is covered in the subsequebnt summary video
Insert new data in Fusion, reload the FDI corresponding table and review changes in Data Share
This section is covered in the subsequebnt summary video
Summary Video
The following video walks through the last two main sections above, that is creating and authorizing a Data Share Recipient and consuming a Data Share:
Figure 18: FDI – Data Share Recipient and consuming a Data Share for a Factory Table
Want to Learn More?
Click here to sign up to the RSS feed to receive notifications for when new A-team blogs are published.
Summary
This article covered all the aspects of setting up Autonomous Data Share for a Fusion Data Intelligence Factory table, that is:
Setting up Data Sharing
Set up Share Provider User
Enable Data Transforms on FDI ADB
Identify a FDI factory table to use for Data Sharing and set up frequent refreshes
Creating and Publishing the Versioned Data Share
Create a Data Share
Add the synonym from the FDI factory table to the data share
Publish the Data Share
Creating and Authorizing the Data Share recipient
Create Data Share Recipient
Grant Access to the Data Share
Consuming the Data Share
Set up Share Consumer User
Discover Data Shares and Consume Available Data Shares
Insert new data in Fusion, reload the FDI corresponding table and review changes in share
Bookmark this post to stay up-to-date on changes made to this blog as our products evolve.
Authors
Elói Lopes
Cloud Solution Architect
Elói is a Cloud Solution Architect for Data Integration and Analytics. He has experience in developing ELT / ETL projects and delivering analytics solutions to multiple customers across different industries.
The Oracle A-Team is a central, outbound, highly technical team of enterprise architects, solution specialists, and software engineers.
Matthieu Lombard
Consulting Solution Architect
The Oracle A-Team is a central, outbound, highly technical team of enterprise architects, solution specialists, and software engineers.
The Oracle A-Team works with external customers and Oracle partners around the globe to provide guidance on implementation best practices, architecture design reviews, troubleshooting, and how to use Oracle products to solve customer business challenges.
I focus on data integration, data warehousing, Big Data, cloud services, and analytics (BI) products. My role included acting as the subject-matter expert on Oracle Data Integration and Analytics products and cloud services such as Oracle Data Integrator (ODI), and Oracle Analytics Cloud (OAC, OA For Fusion Apps, OAX).