
When you deploy an OCI Cache or Redis cluster you should always do it on what OCI calls a Private subnet. The cluster then is guaranteed to never be given a public IP address and can never, ever be reached directly from the internet. This is in keeping with Redis’ own recommendations:
Redis is designed to be accessed by trusted clients inside trusted environments. This means that usually it is not a good idea to expose the Redis instance directly to the internet or, in general, to an environment where untrusted clients can directly access the Redis TCP port or UNIX socket.
Source: https://redis.io/docs/latest/operate/oss_and_stack/management/security/
As in many other areas this is trading off security vs convenience – at least for your developers and operations folks. Putting the cluster on a private subnet means you need to have a VPN or some other means to reach that private subnet in order to explore the cache or otherwise manage it. The OCI Bastion Service “provides restricted and time-limited access to target resources that don’t have public endpoints” – meaning your admins can use whatever clients they prefer directly on their laptops and conect to the OCI Cache or Redis server running on OCI. And they can do that over an authenticated channel wiithout opening it up to the internet.
Think of the Bastion service as a way to securely connect from your laptop to anything inside your OCI virtual cloud network without needing to deploy a VPN and without the overhead of needing to create and secure your own bastion hosts.
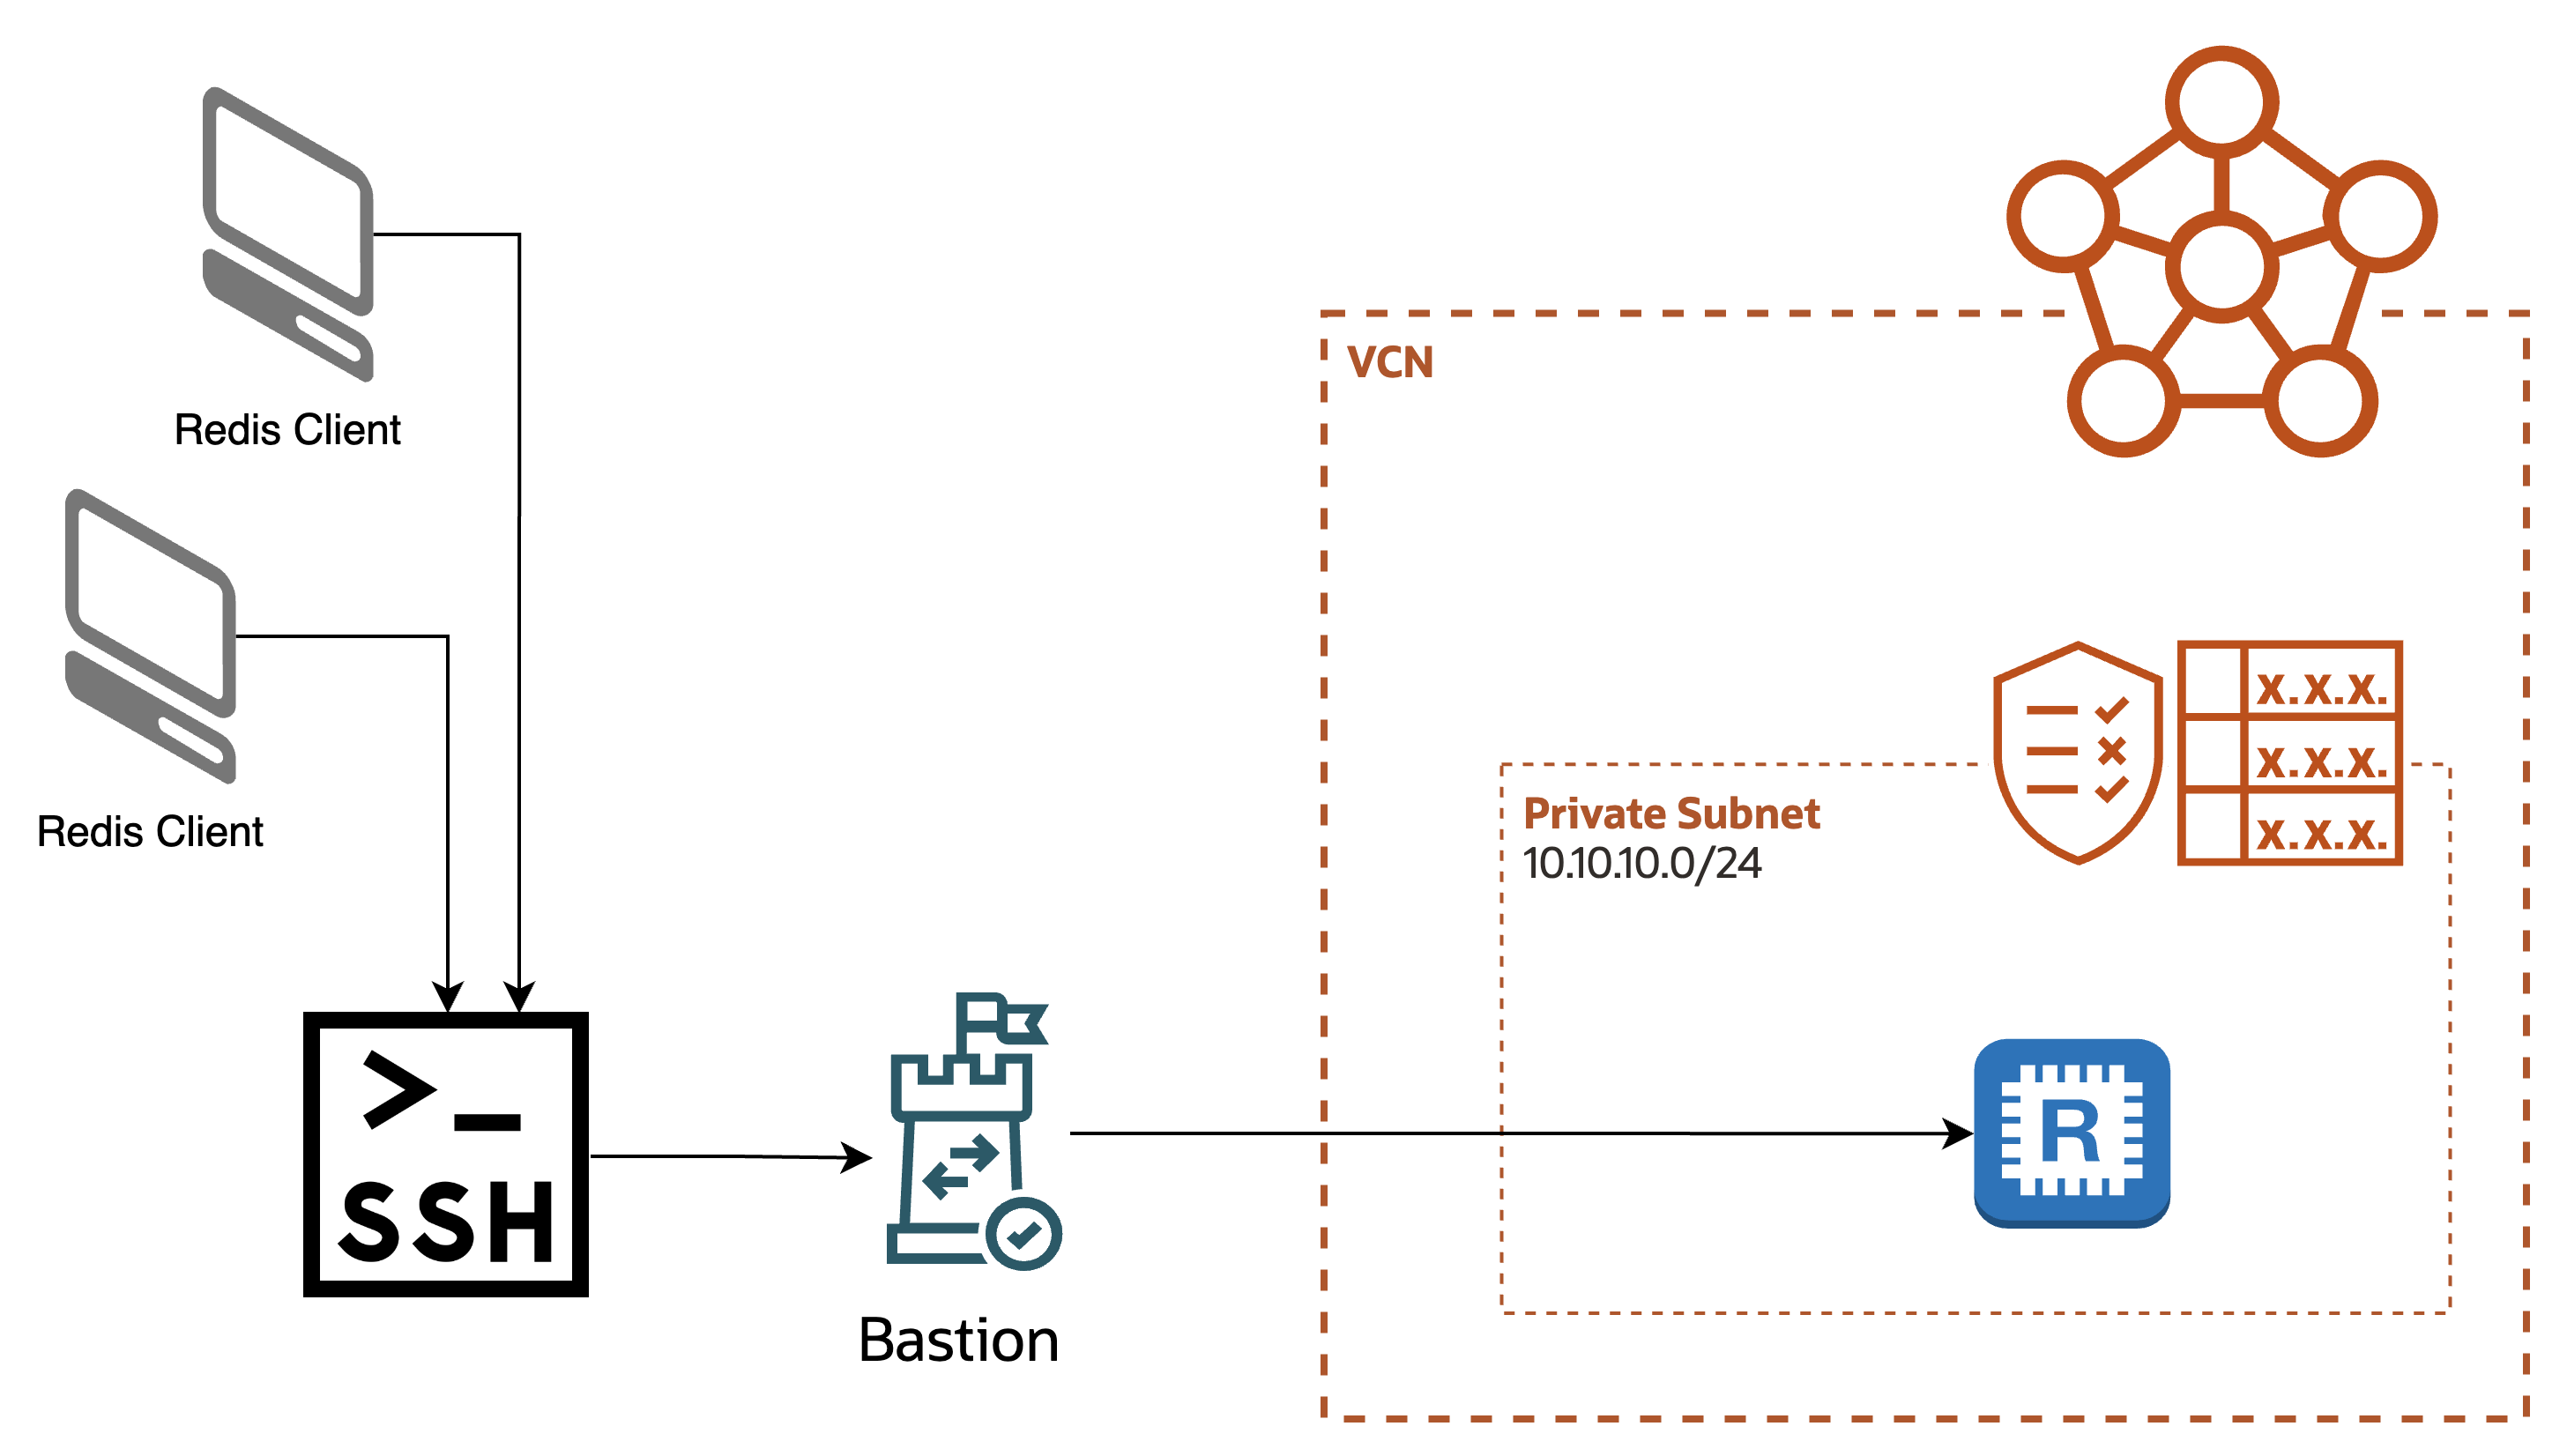
In diagram form that means something like this:
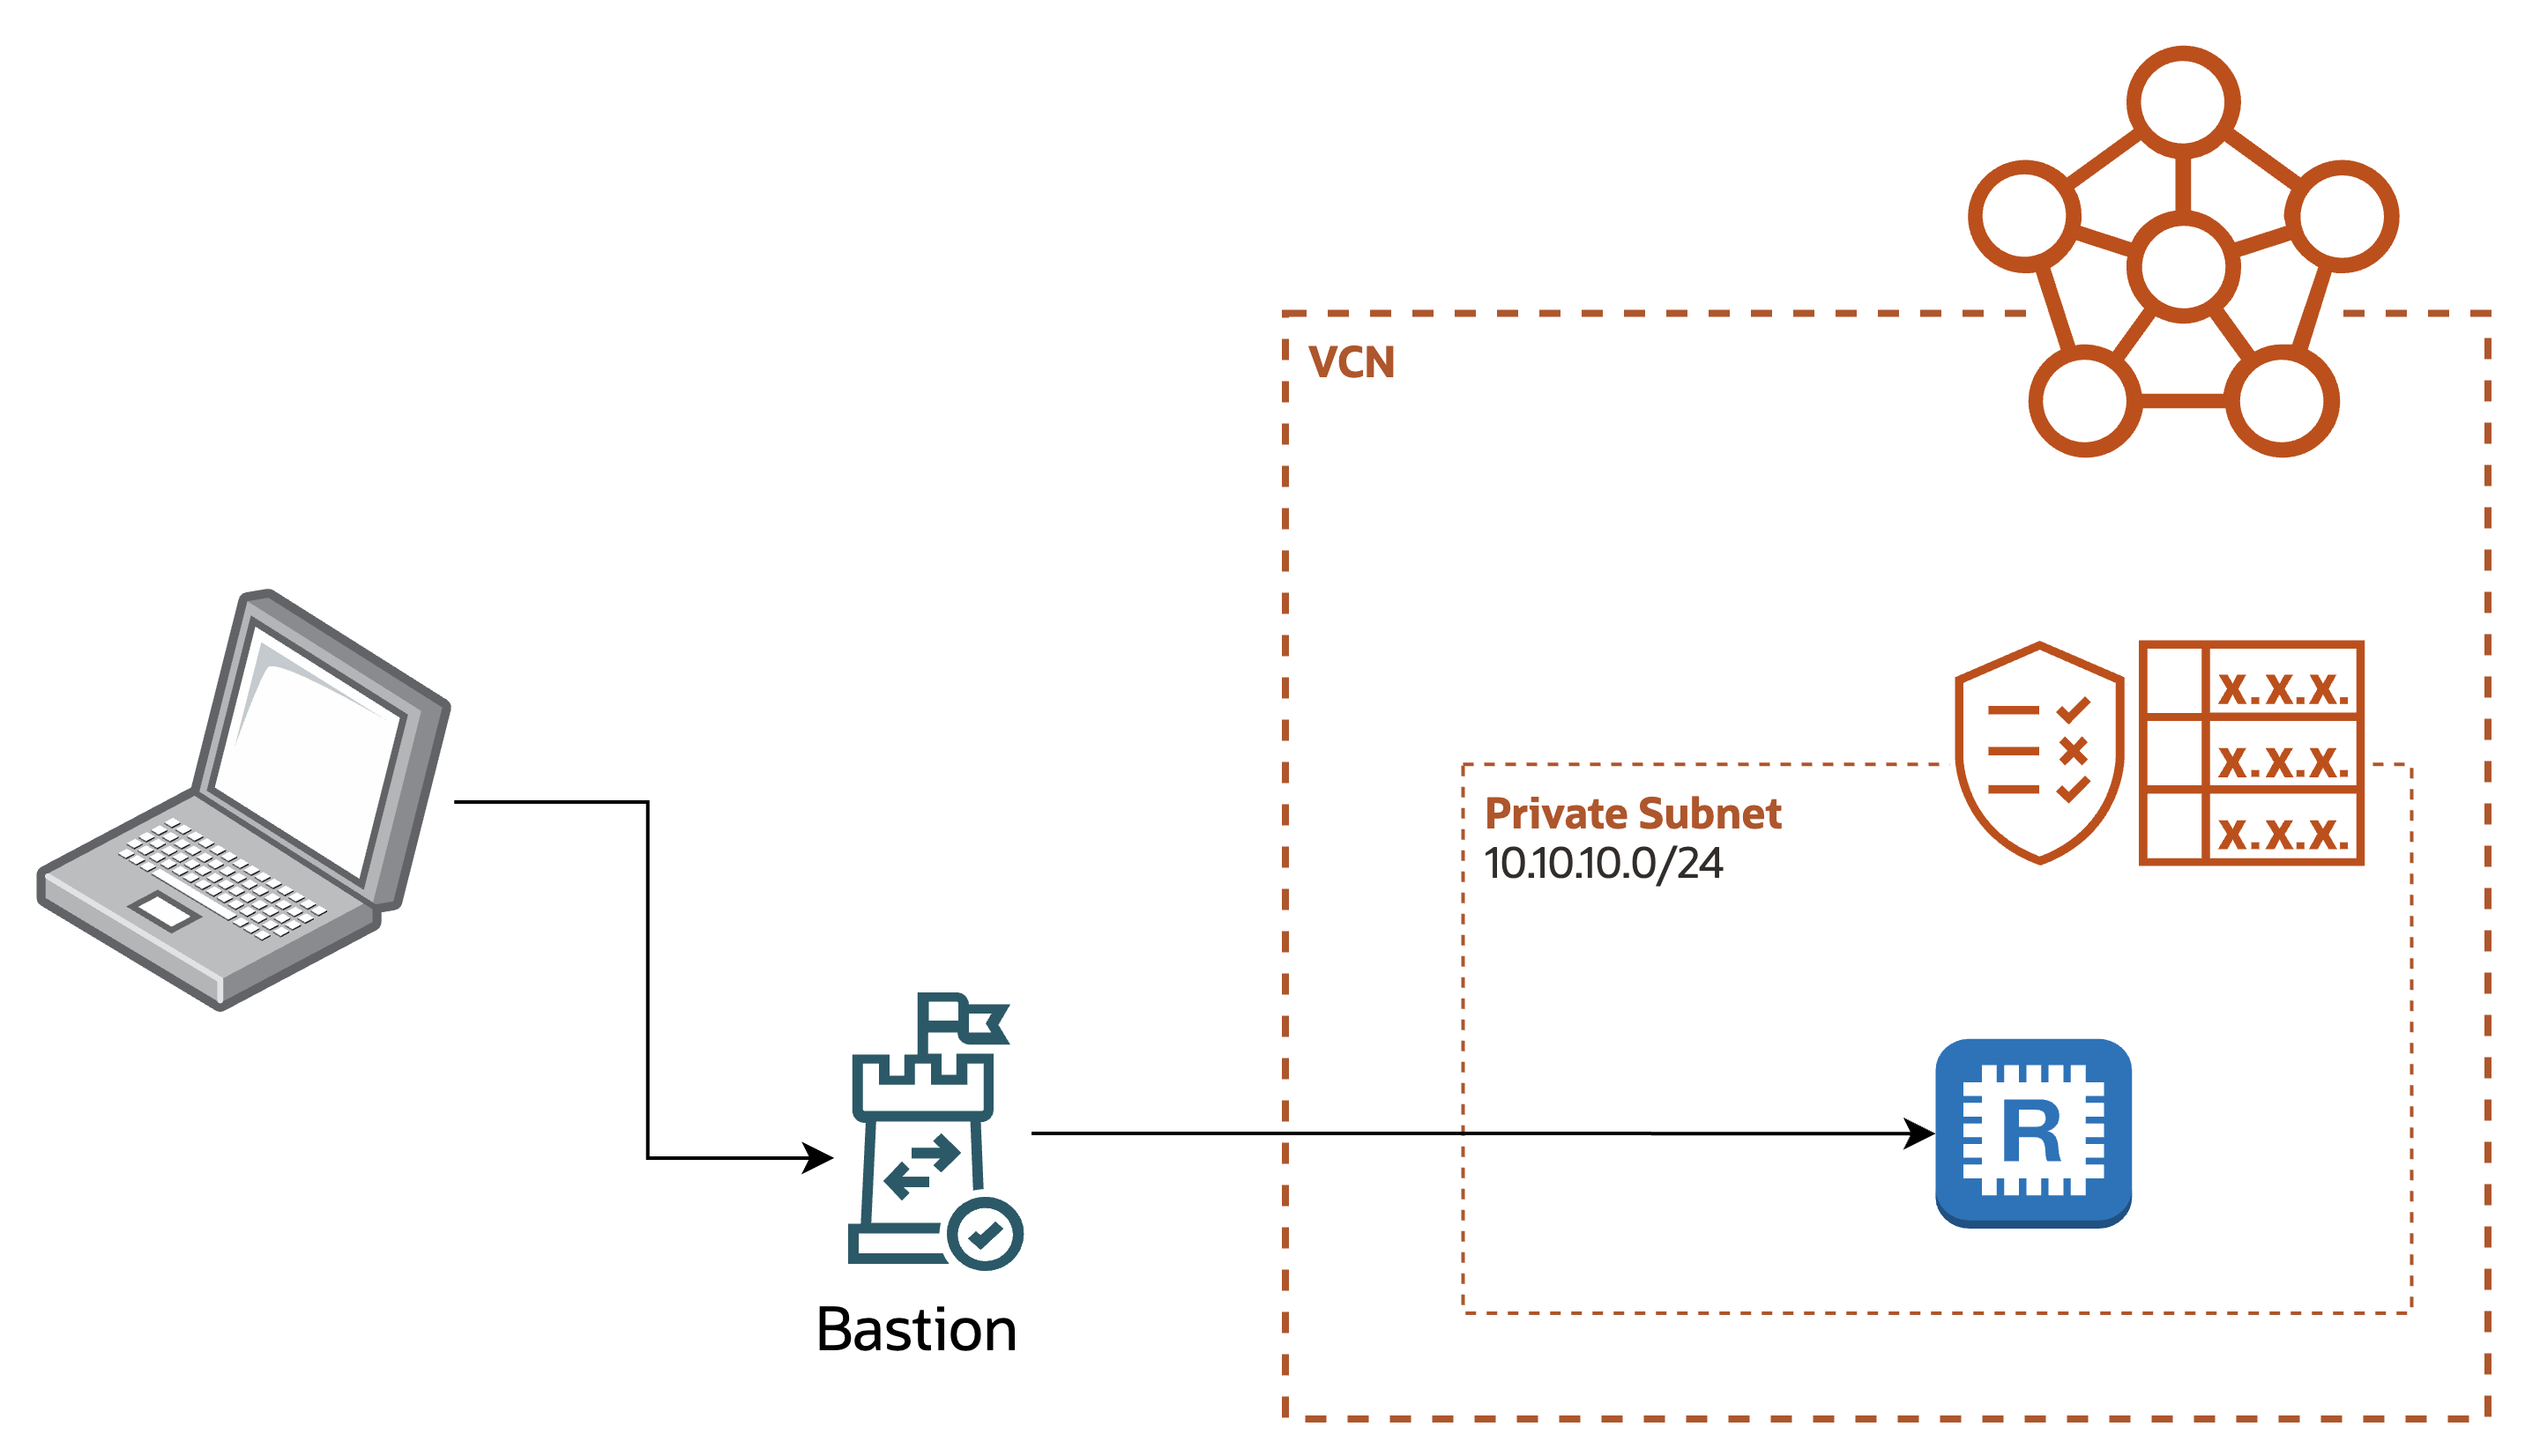
A site to site VPN should be used for long-lived and mostly server to server communication
A bastion should be used for short duration “a human needs to” use cases.
It’s best to not try to use a VPN when you need a bastion or a bastion when you need a VPN.
At a high level all you need to do is:
- Start with your VCN, Subnet, and the Redis cluster
- If you already have this you’re set
- Create your Bastion instance
- remember: we’re going to use the OCI Bastion service rather than our own bastion host
- Create a bastion Session
- Configure your local client to connect to the Redis cluser via the bastion session
Steps in detail
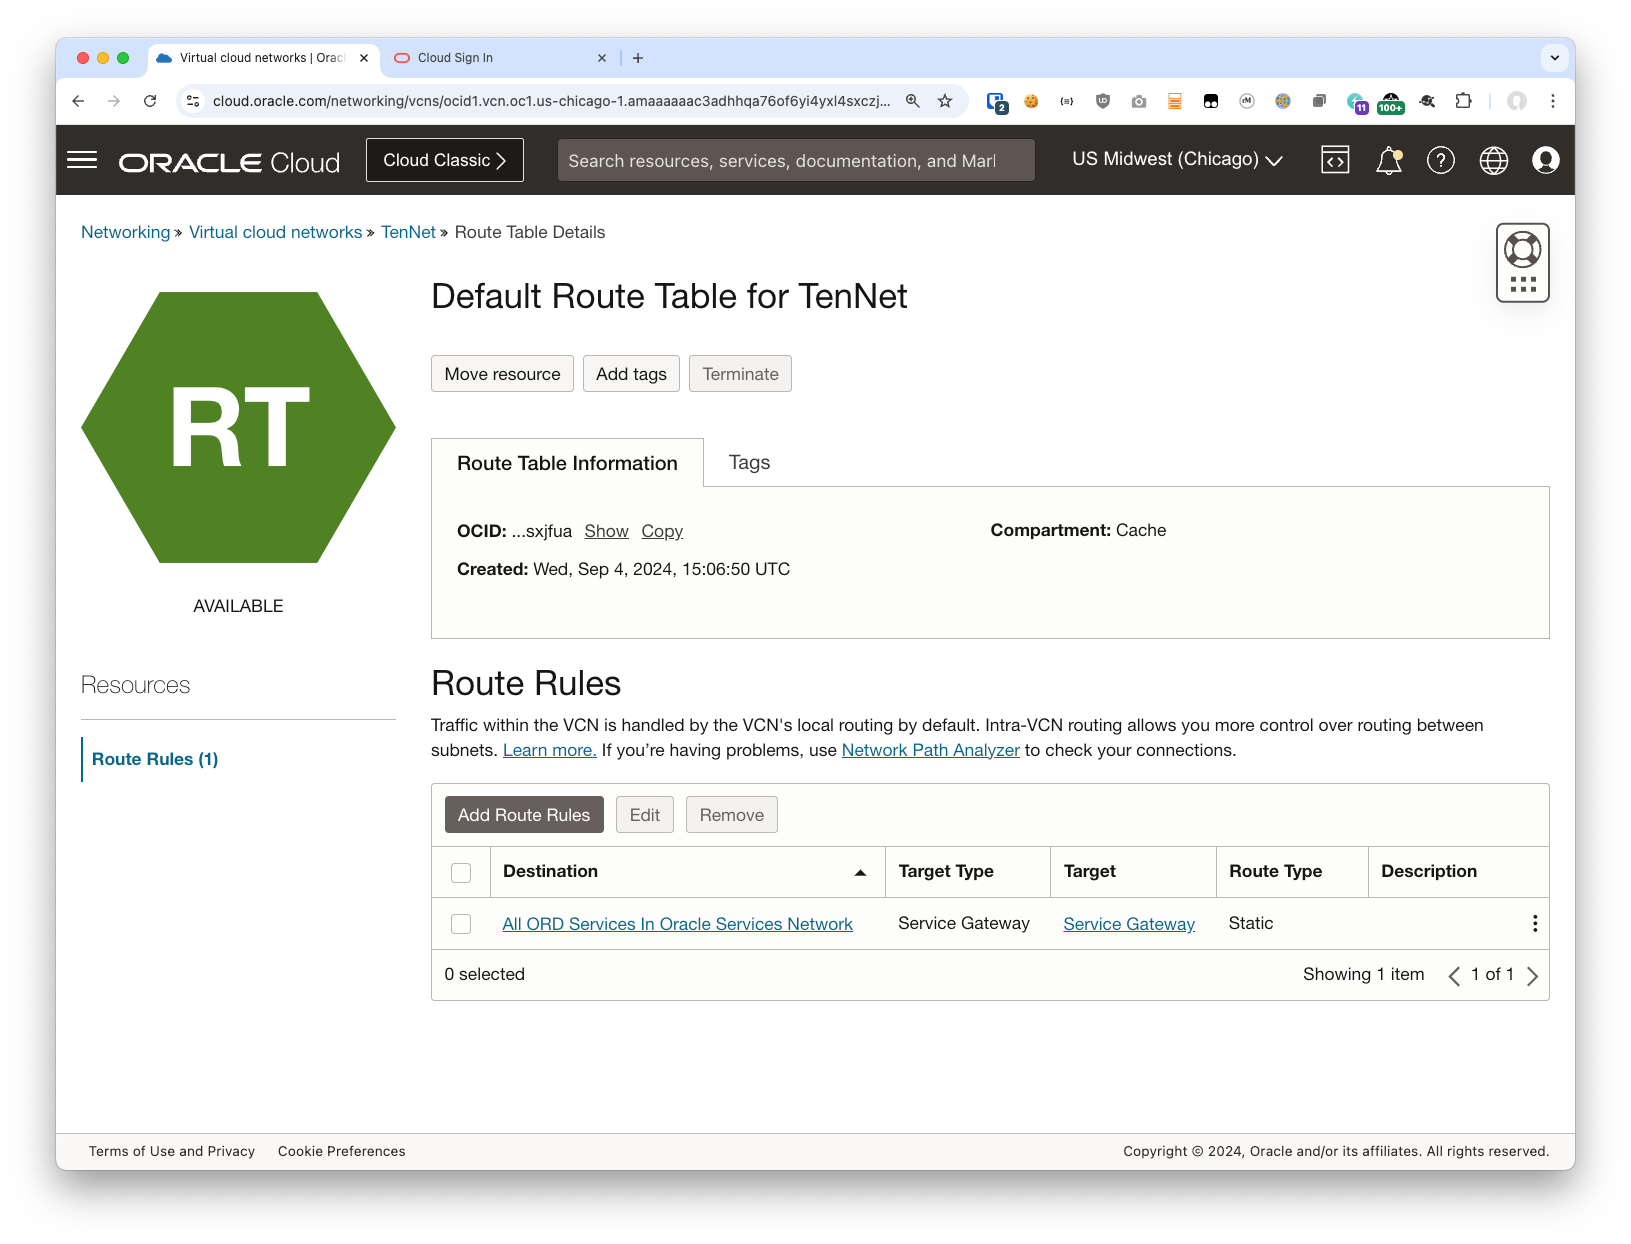
I am starting with a Compartment, a VCN with a single private subnet, and the OCI Cache service. An important note is that the Route Table for the subnet the Cache is connected to does NOT have internet access at all. It only has a Service Gateway:
Create your Bastion
One big difference between running your own bastion hosts and using the OCI Bastion service is that in the former you tend to wind up giving the bastion host wide access to your network. With the Bastion service you can be much more fine grained and create one Bastion instance per VCN or subnet. Or you can go even more fine grained than that: you could create a Bastion per group of users, or you could create a Bastion for the data tier, or even a Bastion just for the Cache servers!
In my case I have a Cache cluster in my “TenTenTen” subnet. And I’m going to create a Bastion in the same subnet to model a fairly typical deployment.
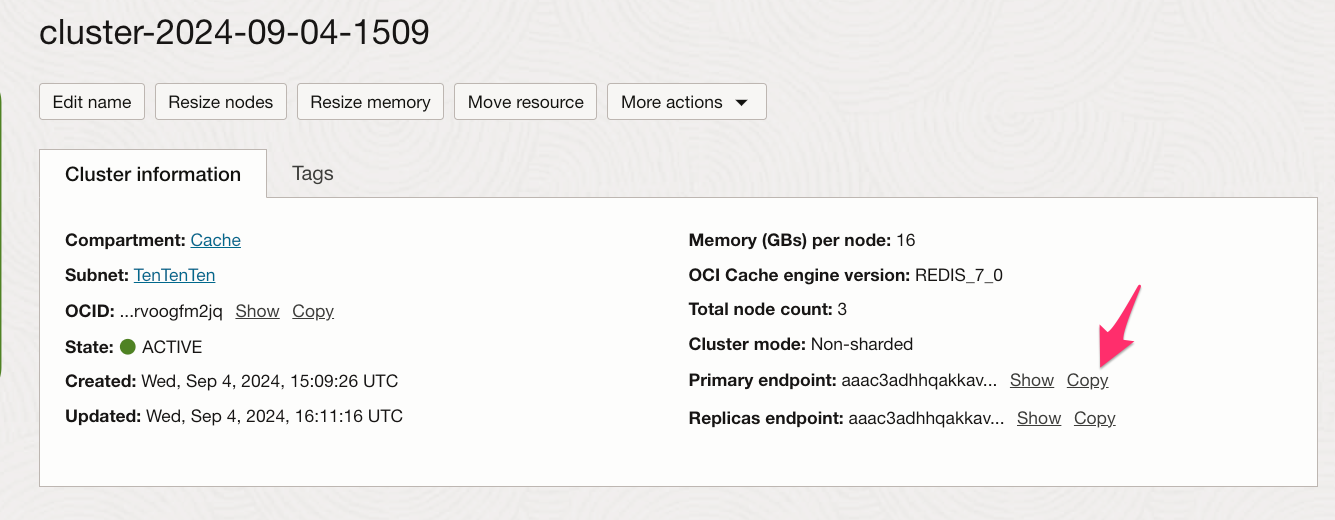
Here is my Cache Cluster:
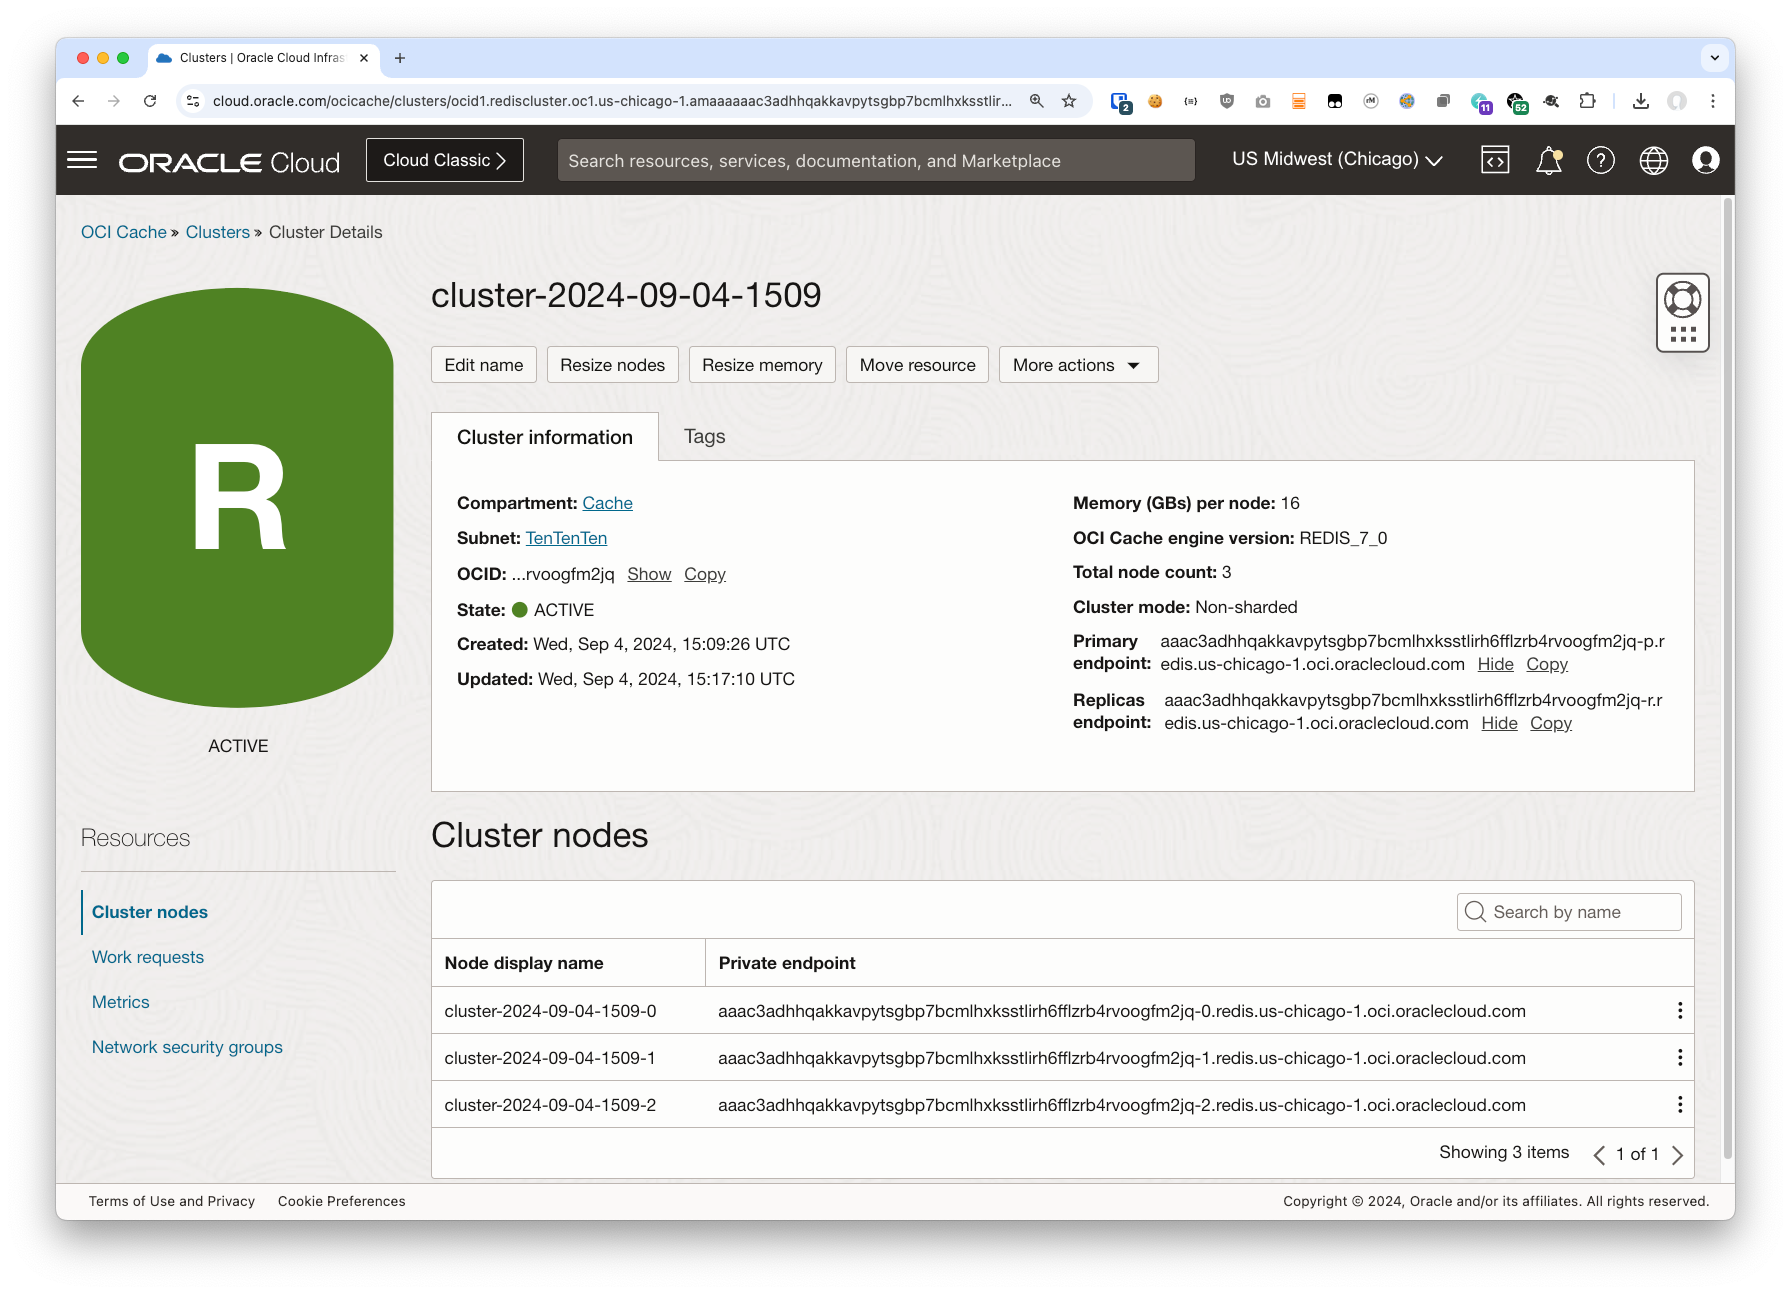
We will need these values later on.
To create the Bastion on the same network here’s what to do:
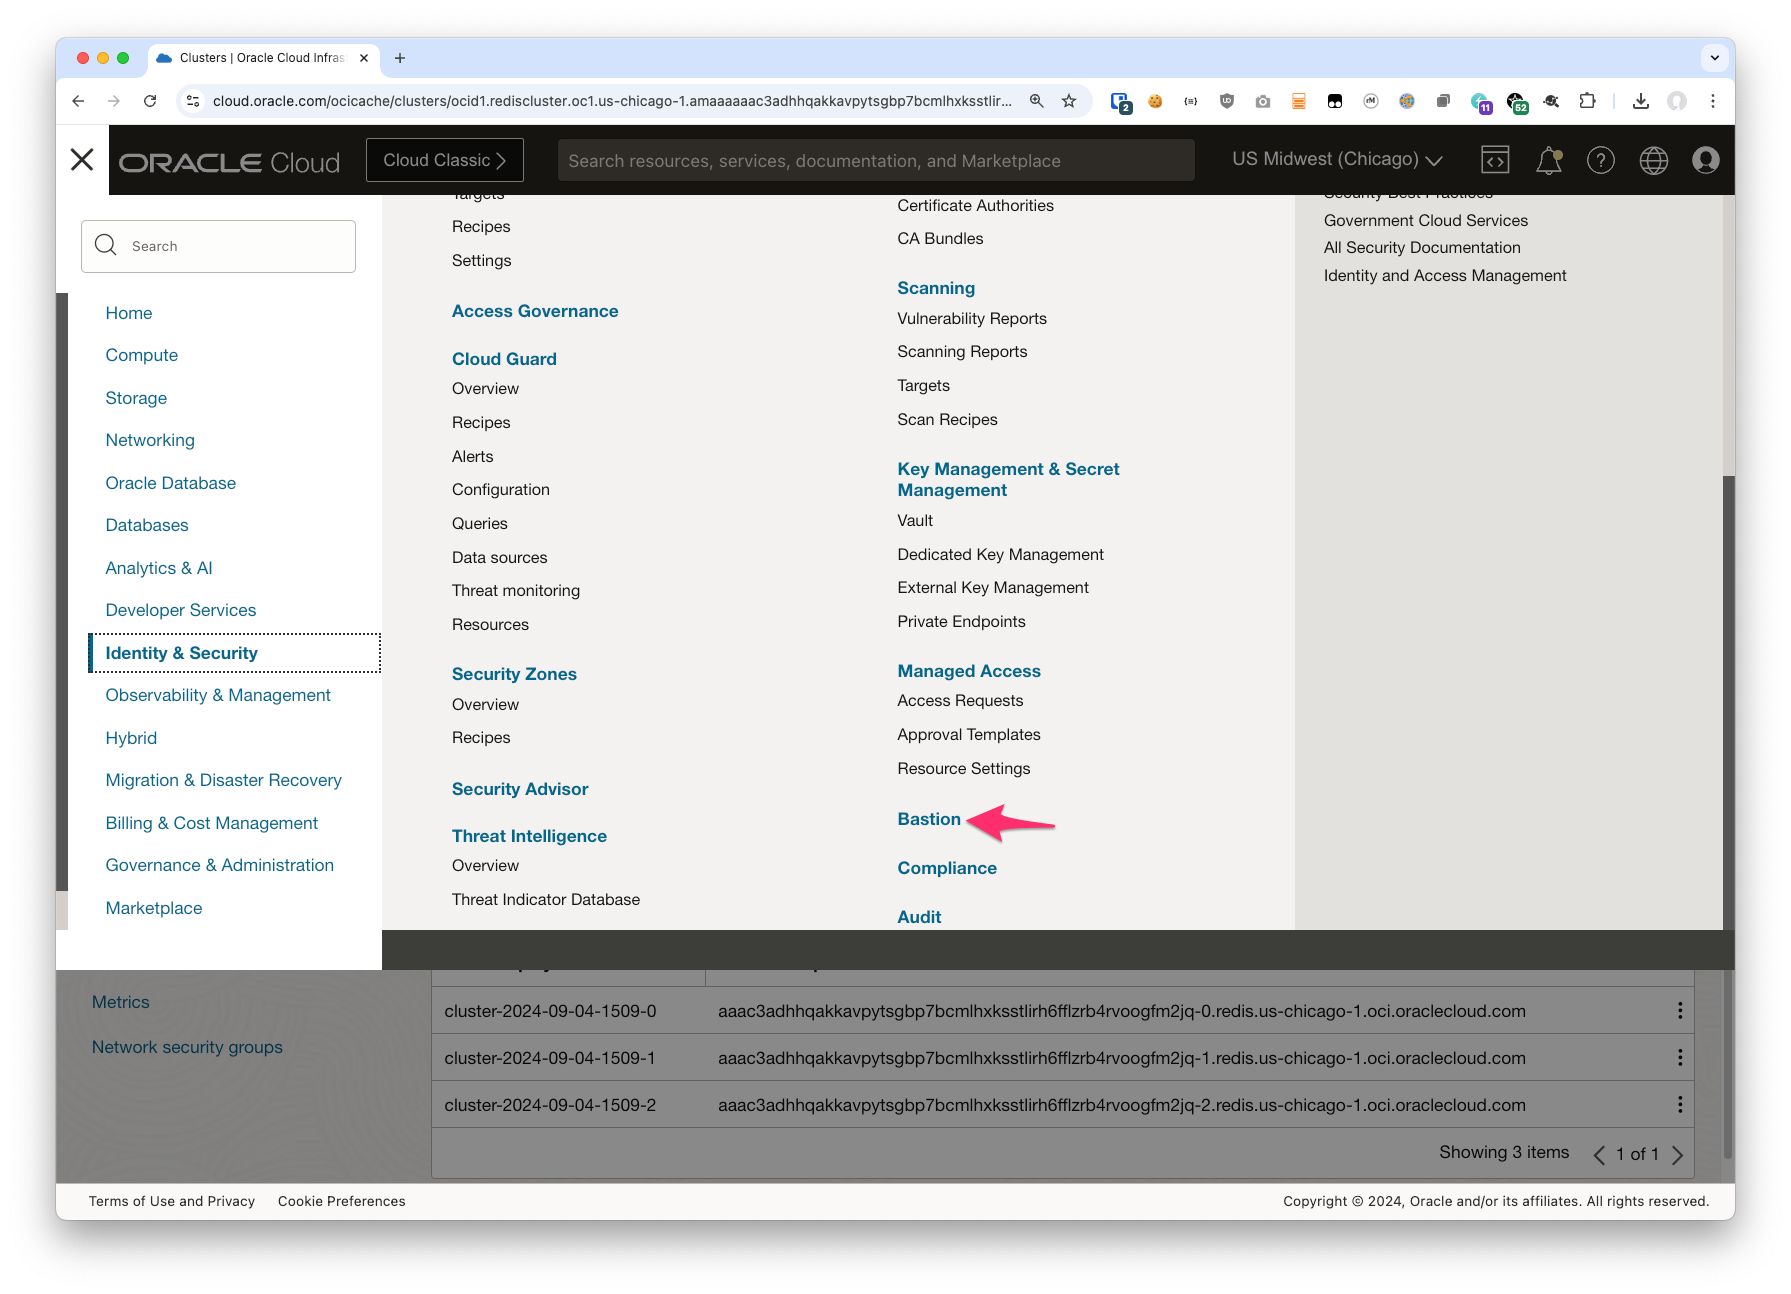
1. Click on the hamburger menu, then Identity and Security, and then select Bastion from the list
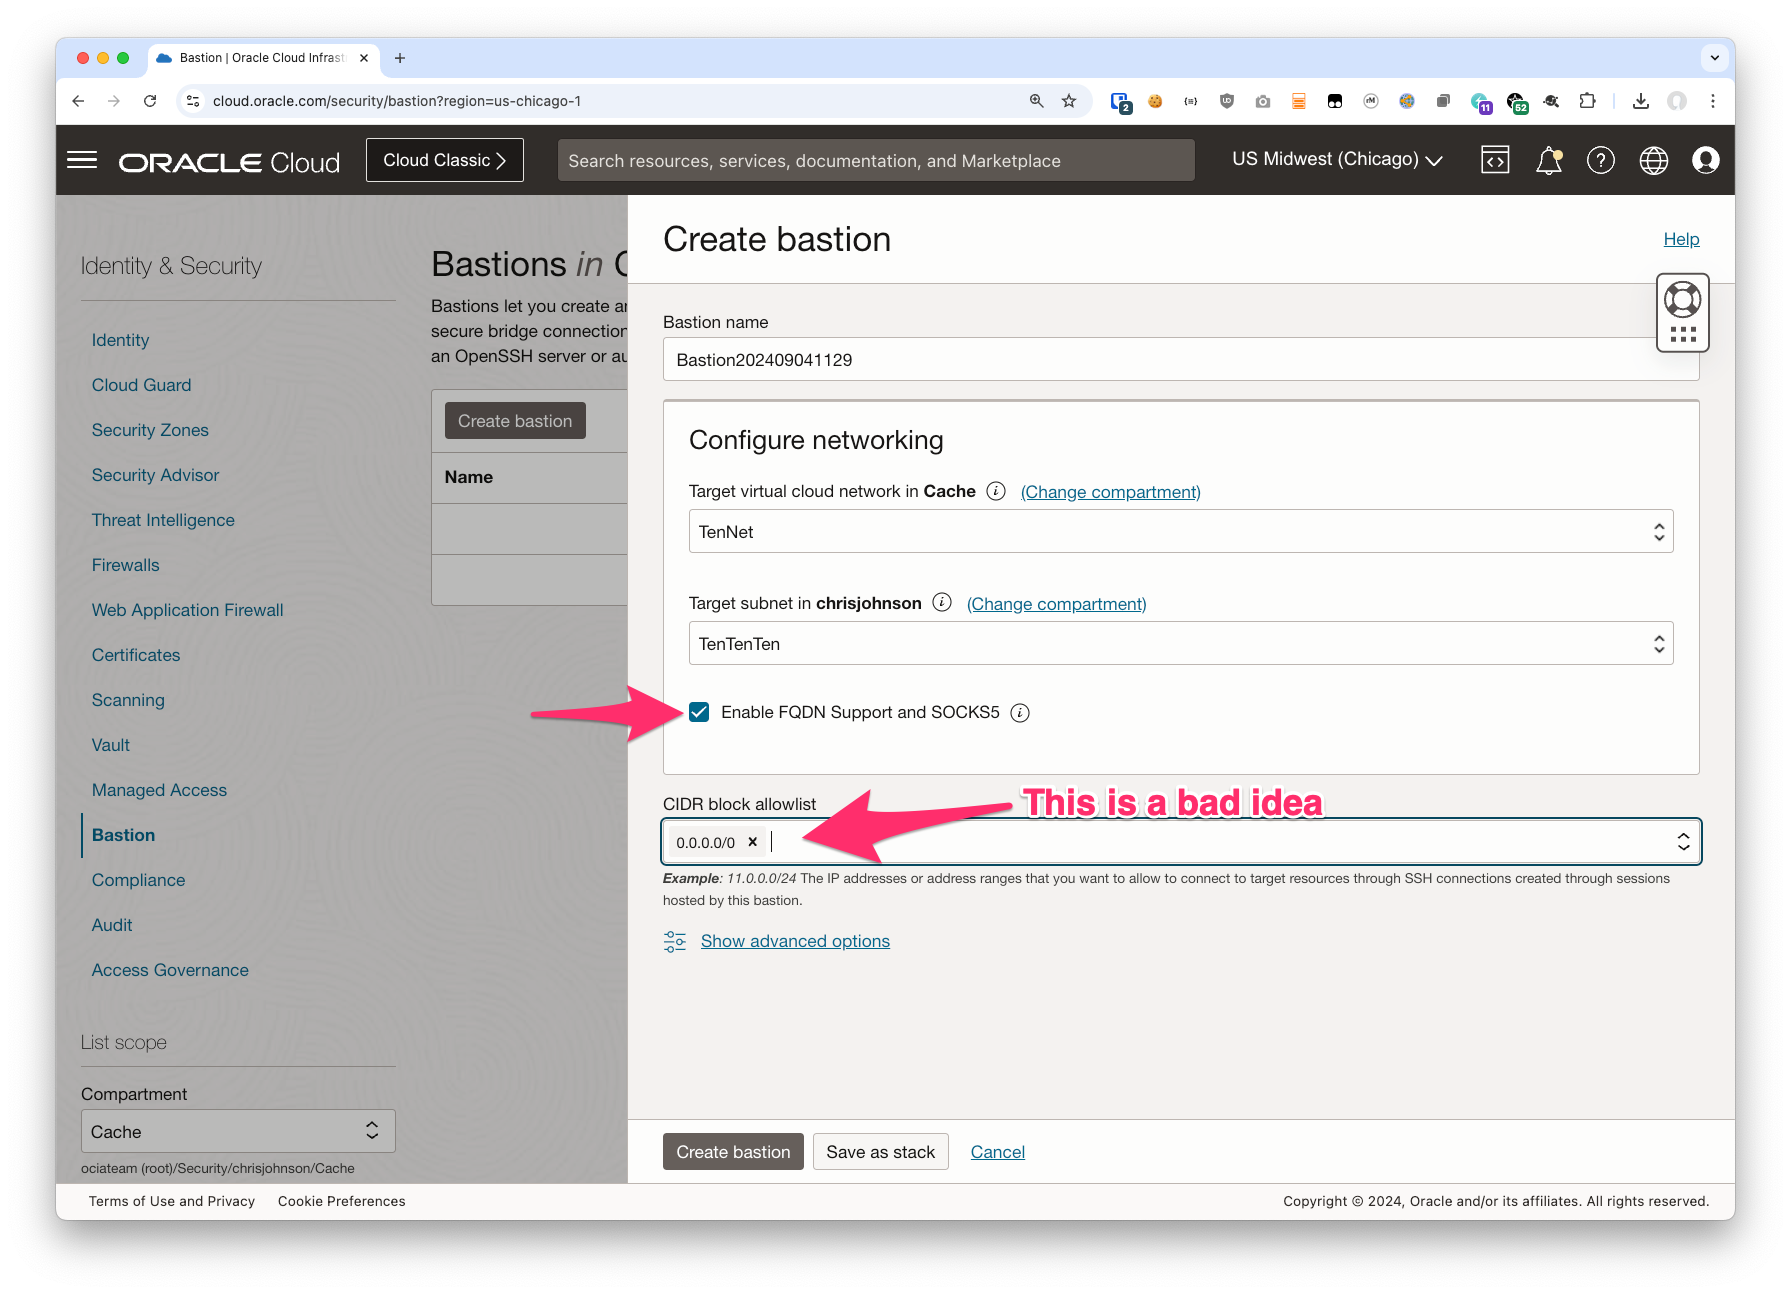
2. Create your Bastion
- You need to choose the VCN and Subnet
- Be sure to choose “Enable FQDN Support and SOCKS5”
By checking this box you allow the bastion clients to use hostnames instead of IP addresses on the subnet. We’ll discuss this more later but for now just be sure to check this box.
Also note: if you do not check this box during Bastion creation you cannot enable it later. So do be sure to check it now! - In “CIDR block allowlist” you can specify a smaller list of IP address blocks allowed to use the Bastion instance.
In my case I’m putting 0.0.0.0/0 in but this is a terrible, horrible, no good, very bad idea*!
You should specify a smaller CIDR block including only the IP addresses of the users you expect to actually use the Bastion service. You can change this later so as long as you don’t leave it at 0.0.0/0 in the long term this might be OK. But I don’t recommend it!
After you click on “create” OCI will begin creating the Bastion instance for you. Once that’s complete you can open it up and see something like this:
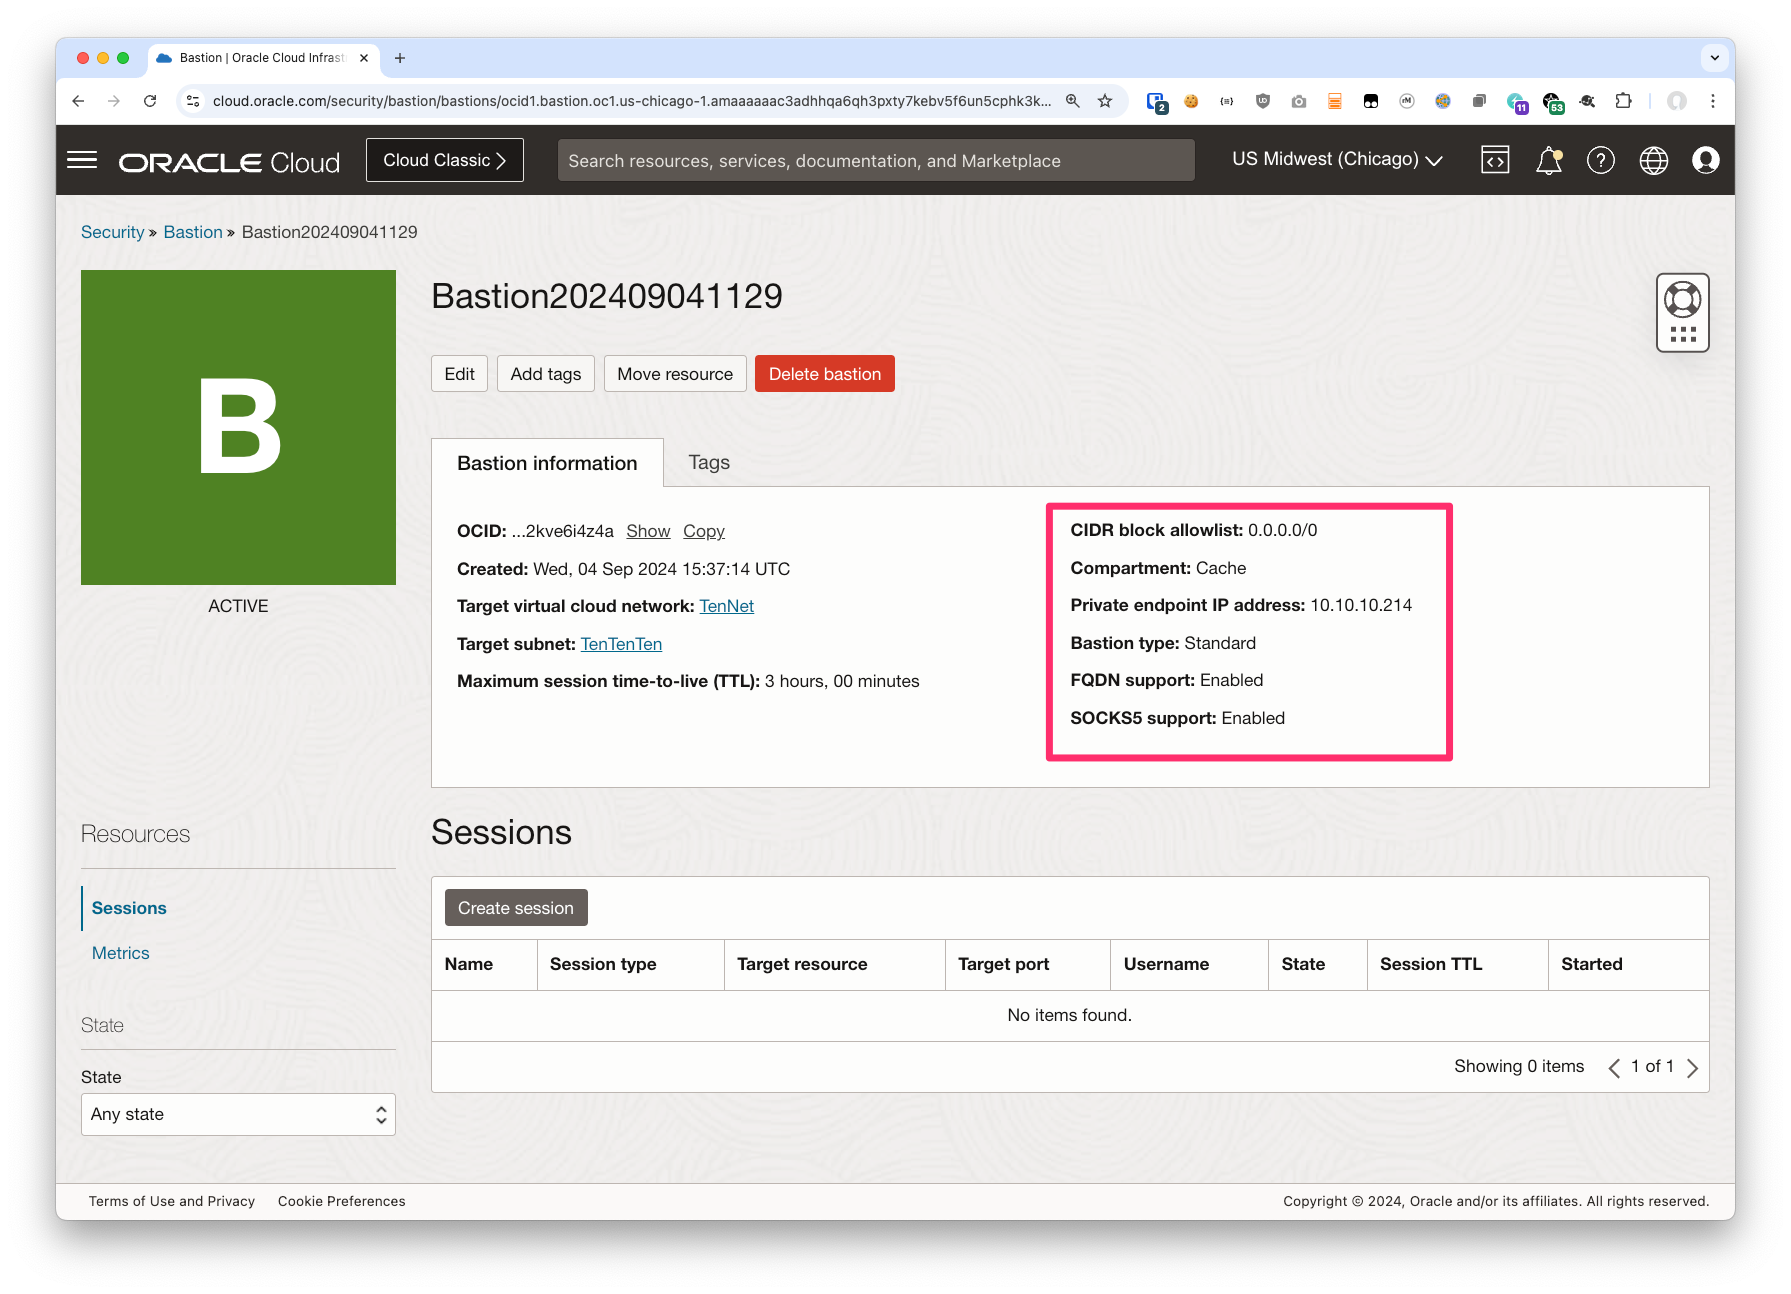
Note specifically the fields I highlighed in the screen shot. Please check to make sure the values you see match up with what I show:
| Field | My value | Your value |
|---|---|---|
| CIDR block allowlist | 0.0.0.0/0 | Probably shouldn’t be 0.0.0.0/0 |
| Private endpoint IP address | 10.10.10.214 |
An IP address in your subnet Please note this value – we’ll want it later |
| Bastion type | Standard | Standard |
| FQDN support | Enabled | Enabled |
| SOCKS5 support | Enabled | Enabled |
Create your Bastion Session
This is where things get fun – we are going to create a session and specify the destination as the TCP port that the Cache cluster is listening on.
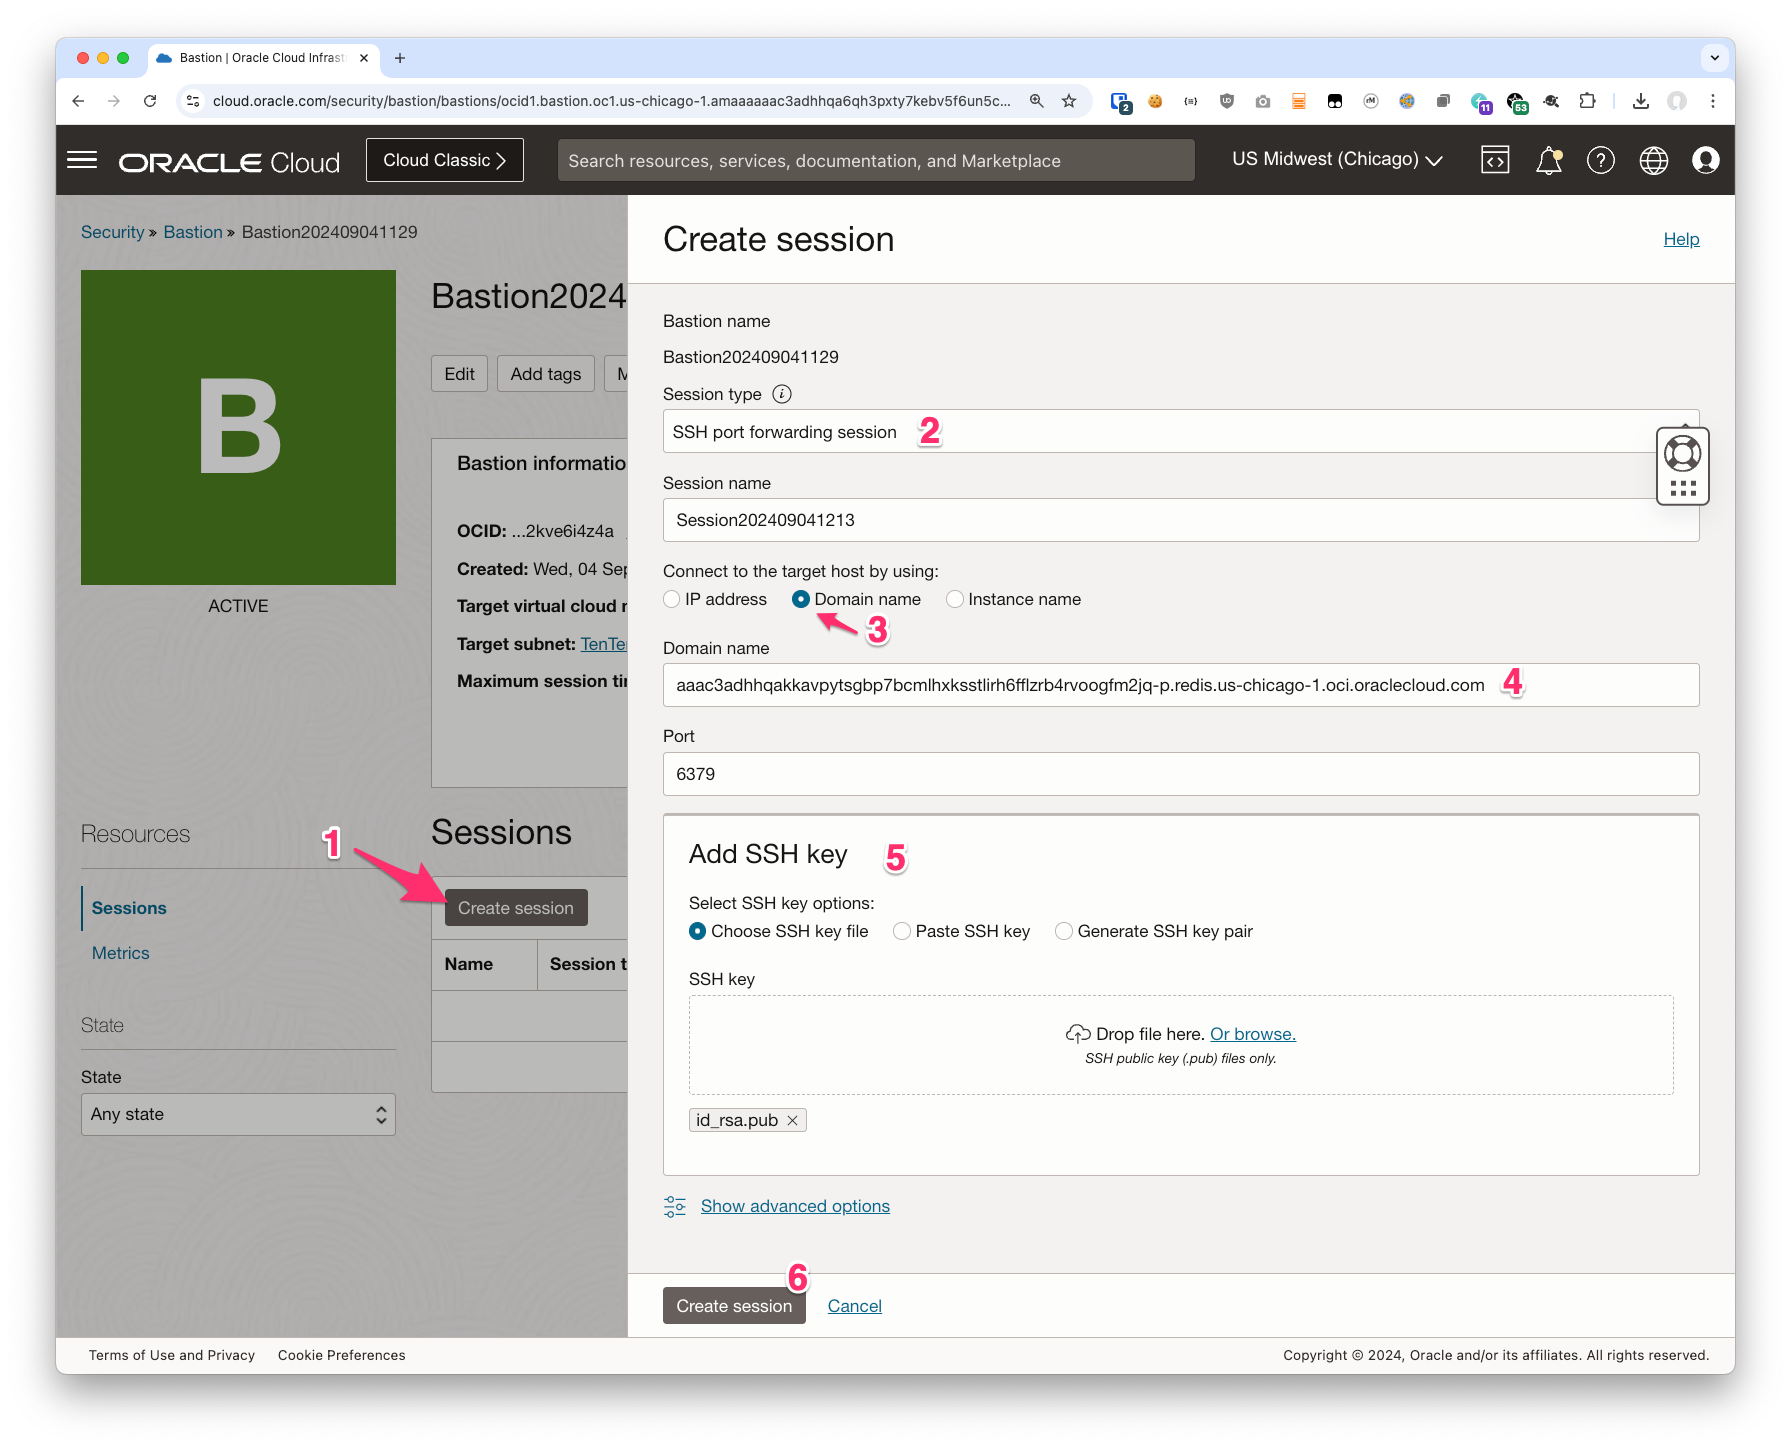
- Click the Create Bastion Session button
- Choose “SSH port forwarding session”
- Choose “Domain name”
this is why we chose to enable FQDN support.
If you do not see a place to select “Domain name” you will need to recreate the Bastion. Please back up to step 2 and try again. - Under “Domain name” enter the fuilly qualified domain name from your Redis cluster’s Primary endpoint
You can copy this easily by clicking on the word Copy next to it in the Cluster details dialog
- Enter the port number 6379
Port 6379 is the default port for the OCI Caching service and/or Redis. This port is also listed in the OCI documentation for your future reference should you need it. If you have deployed your own Redis cluster and changed the port you can specify that here instead. - Add or copy in an SSH key
From a security perspective it is generally recommended to crete a key locally and then upload the public key to OCI. But you can also have the UI create one for you if you prefer.
The result should look something like this:
Connect to Your Bastion Session
Once the session has been created you need to connect your laptop to it.
- click on the 3 dots next to the session
- and then click View SSH command
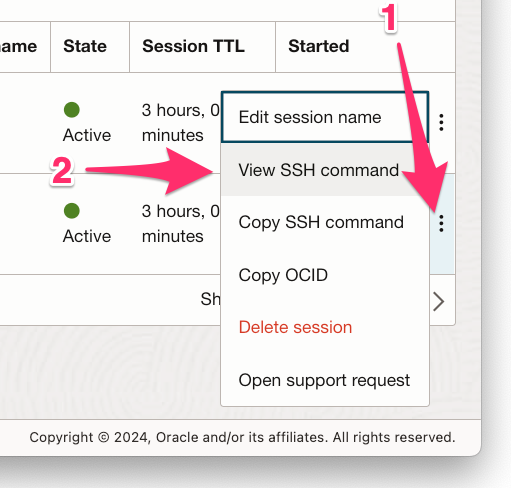
The result will be something like this:
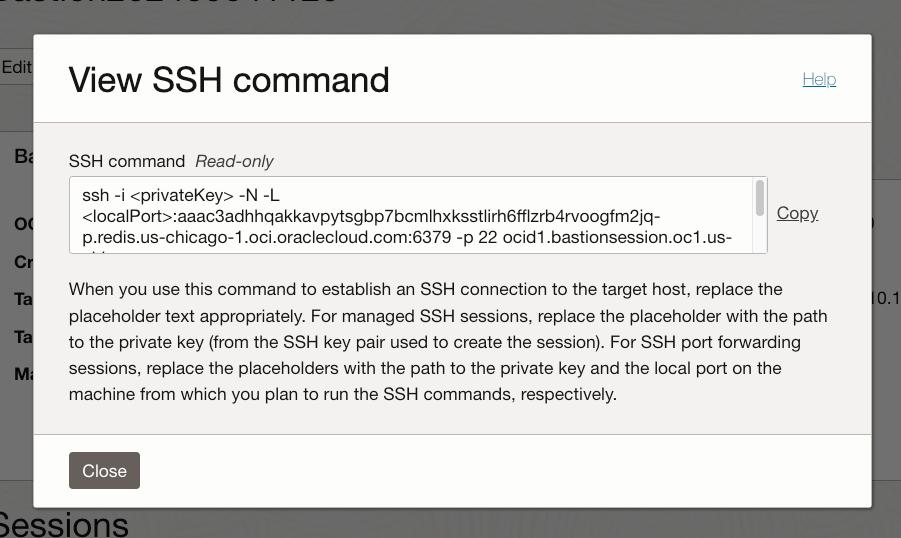
That’s now super readable but if you copy it out you’ll see something like this:
ssh -i <privateKey> -N -L <localPort>:aaac3adhhqakkavpytsgbp7bcmlhxksstlirh6fflzrb4rvoogfm2jq-p.redis.us-chicago-1.oci.oraclecloud.com:6379 -p 22 ocid1.bastionsession.oc1.us-chicago-1.amaaaaaac3adhhqahogjh4bljbxbyz5mkktsabzl6wo423guu3y4di3ipruq@host.bastion.us-chicago-1.oci.oraclecloud.com
What is going to happen when you run the command (after editting it slightly) is this:
- the ssh client will connect to the Bastion service instance
- the ssh client will authenticate to the Bastion service instance
- the ssh client will begin to listen on a local port (i.e. on 127.0.0.1)
When you connect you a Redis client application to that port:
- the ssh client will ask the Bastion service to open a new TCP connection to the redis cluster
- any data sent from the redis client to the ssh client on your laptop will be sent over the SSH tunnel to the redis cluster
- any data sent from the redis cluster will be sent over the SSH tunnel to the ssh client and and then from there to the redis client
Or to put it more simply: one end of the socket will be connected to the other side completely transparently to the client
So let’s edit the command.
We started with this:
ssh -i <privateKey> -N -L <localPort>:aaac3adhhqakkavpytsgbp7bcmlhxksstlirh6fflzrb4rvoogfm2jq-p.redis.us-chicago-1.oci.oraclecloud.com:6379 -p 22 ocid1.bastionsession.oc1.us-chicago-1.amaaaaaac3adhhqahogjh4bljbxbyz5mkktsabzl6wo423guu3y4di3ipruq@host.bastion.us-chicago-1.oci.oraclecloud.com
We need to make 2 changes:
- Update the “<privateKey>” to point to your private key
If you created and downloaded a key from the console update that to point to the file. e.g. “-i ~/Downloads/key.txt”
If you uploaded the public half of your default key you can simply remove the -i argument - Update “<localPort>”
If you only want to connect to one redis cluster you can just use the default port “6379”
if you are going to connect to multiple clusters you’ll need a different port for each
For me, my resulting command line is
ssh -i ~/Downloads/key.txt -N -L 6379:aaac3adhhqakkavpytsgbp7bcmlhxksstlirh6fflzrb4rvoogfm2jq-p.redis.us-chicago-1.oci.oraclecloud.com:6379 -p 22 ocid1.bastionsession.oc1.us-chicago-1.amaaaaaac3adhhqahogjh4bljbxbyz5mkktsabzl6wo423guu3y4di3ipruq@host.bastion.us-chicago-1.oci.oraclecloud.com
Connect Your Redis Client
You are sort of on your own here. There are all sorts of Redis clients you could use so pick your poison. I’ve tested with a few and noted them here. If you have problems with one do feel free to let me know and I’ll see if I can figure it out and update the post.
A few important notes for you:
- OCI Cache Service only supports TLS. Make sure your client does too.
- If your client doesn’t support and can’t then you can connect with support and they may be able to help
- Be sure to specify the Database number.
If you don’t know what this is it’s probably 0
Example: “redis-cli”
Oracle Linux 8 as well as RedHat, CentOS and similar operating systems include version 5 of Redis in the redis and redis-tools packages. That version of Redis is not only quite old, but it also does not include support for TLS. To make that version of the client work with the OCI Cache service you would need to use stunnel or similar tools… and that is far beyond the scope of this blog post. If you absolutely need to use the redis-cli on such an Operating System please check in with support for assistance.
Oracle Linux 9 included Redis version 7 which does include TLS support by default.
Homebrew on macOS (as of this writing) installs Redis client version 6 with TLS support enabled.
Running redis-cli without any options will not give you an error but no commands will work. And you will be disconnected as soon as you send one.
For example:
$ redis-cli
127.0.0.1:6379> ping
Error: Server closed the connection
not connected> exit
In order to use the redis-cli you need to add the –tls command line argument:
$ redis-cli --tls
127.0.0.1:6379> ping
PONG
127.0.0.1:6379> exit
Example: “iredis”
IRedis calls itself “A Terminal Client for Redis with AutoCompletion and Syntax Highligting”. It’s pretty groovy and I find it nicer to use than redis-cli.
To enable TLS with iredis you simply add an extra S to the URL (rediss:// instead of redis://). We’re connecting to localhost, port 6379, and database 0 so that would make the URL “rediss://127.0.0.1:6379/0″.
Like so:
$ iredis --url rediss://127.0.0.1:6379/0
iredis  1.15.0 (Python 3.12.5)
redis-server  7.0.15
Home:   https://iredis.xbin.io/
Issues: https://github.com/laixintao/iredis/issues
127.0.0.1:6379> ping
"PONG"
127.0.0.1:6379> exit
Goodbye!
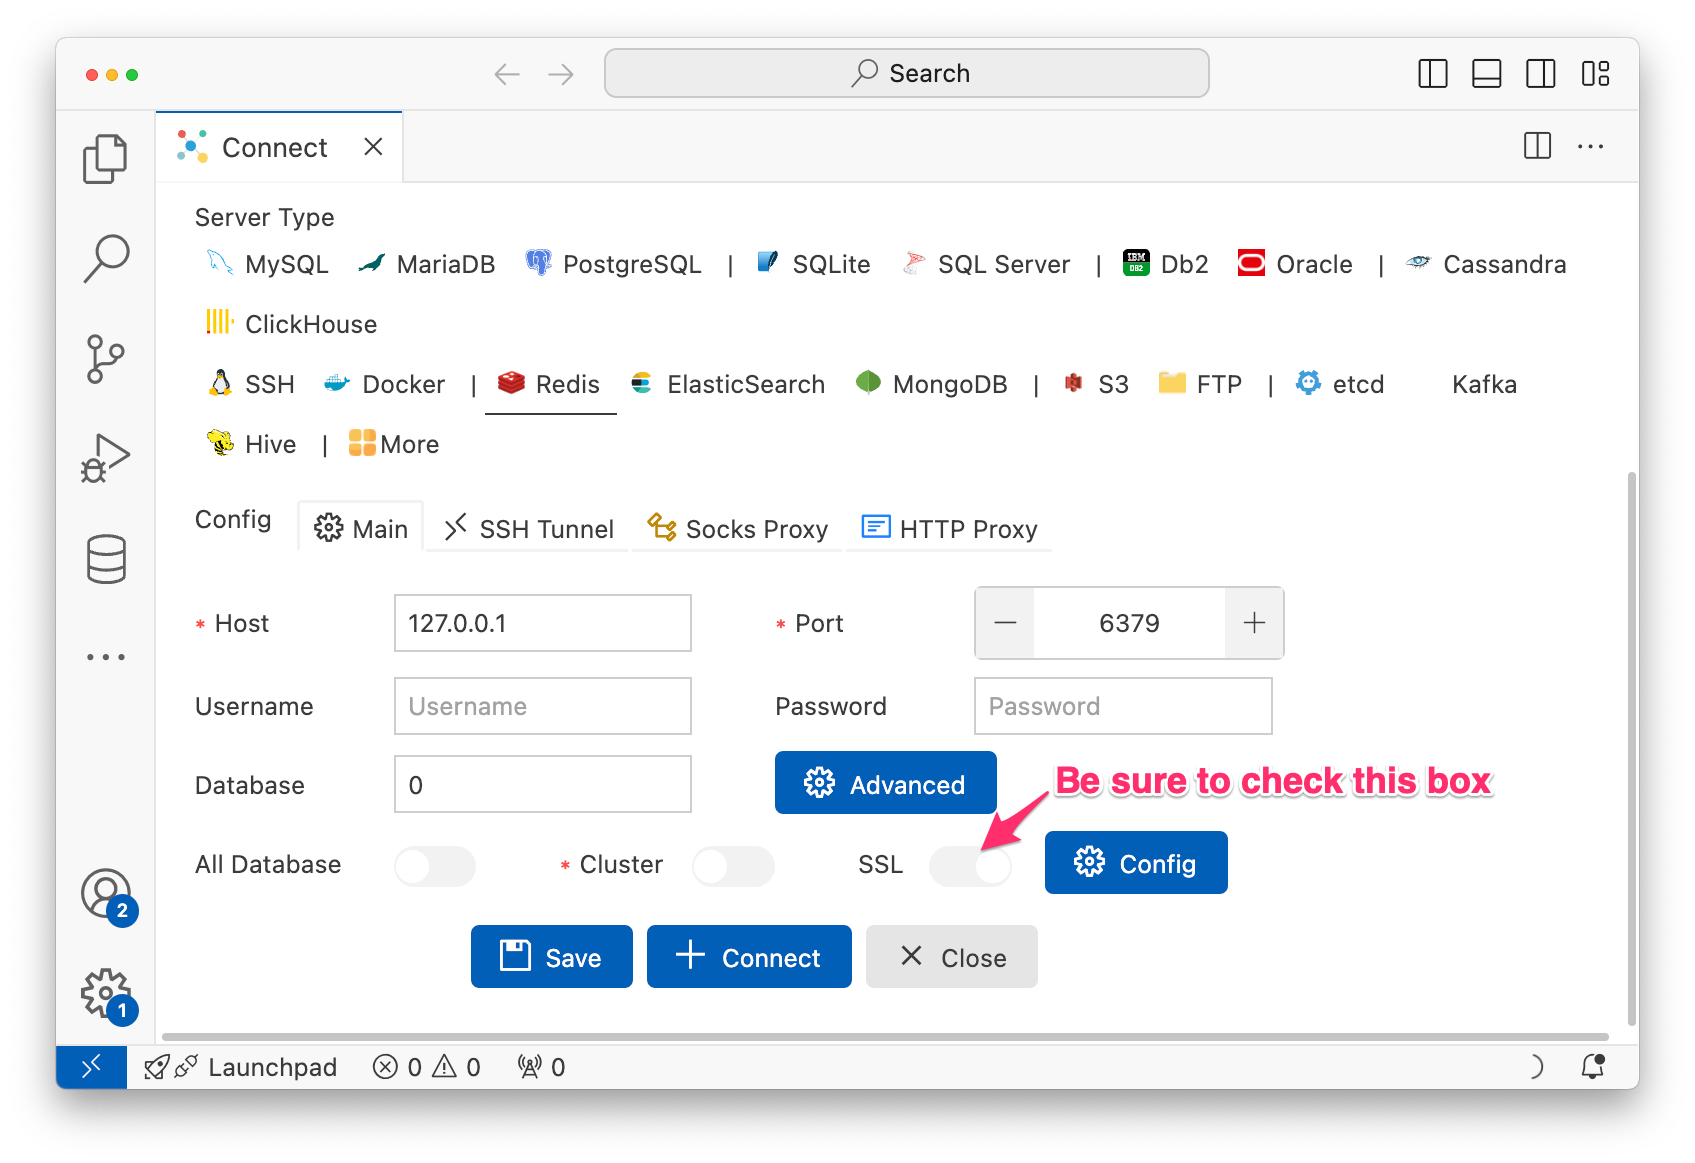
GUIs and other tools
Basically anything that supports TLS should work fine.
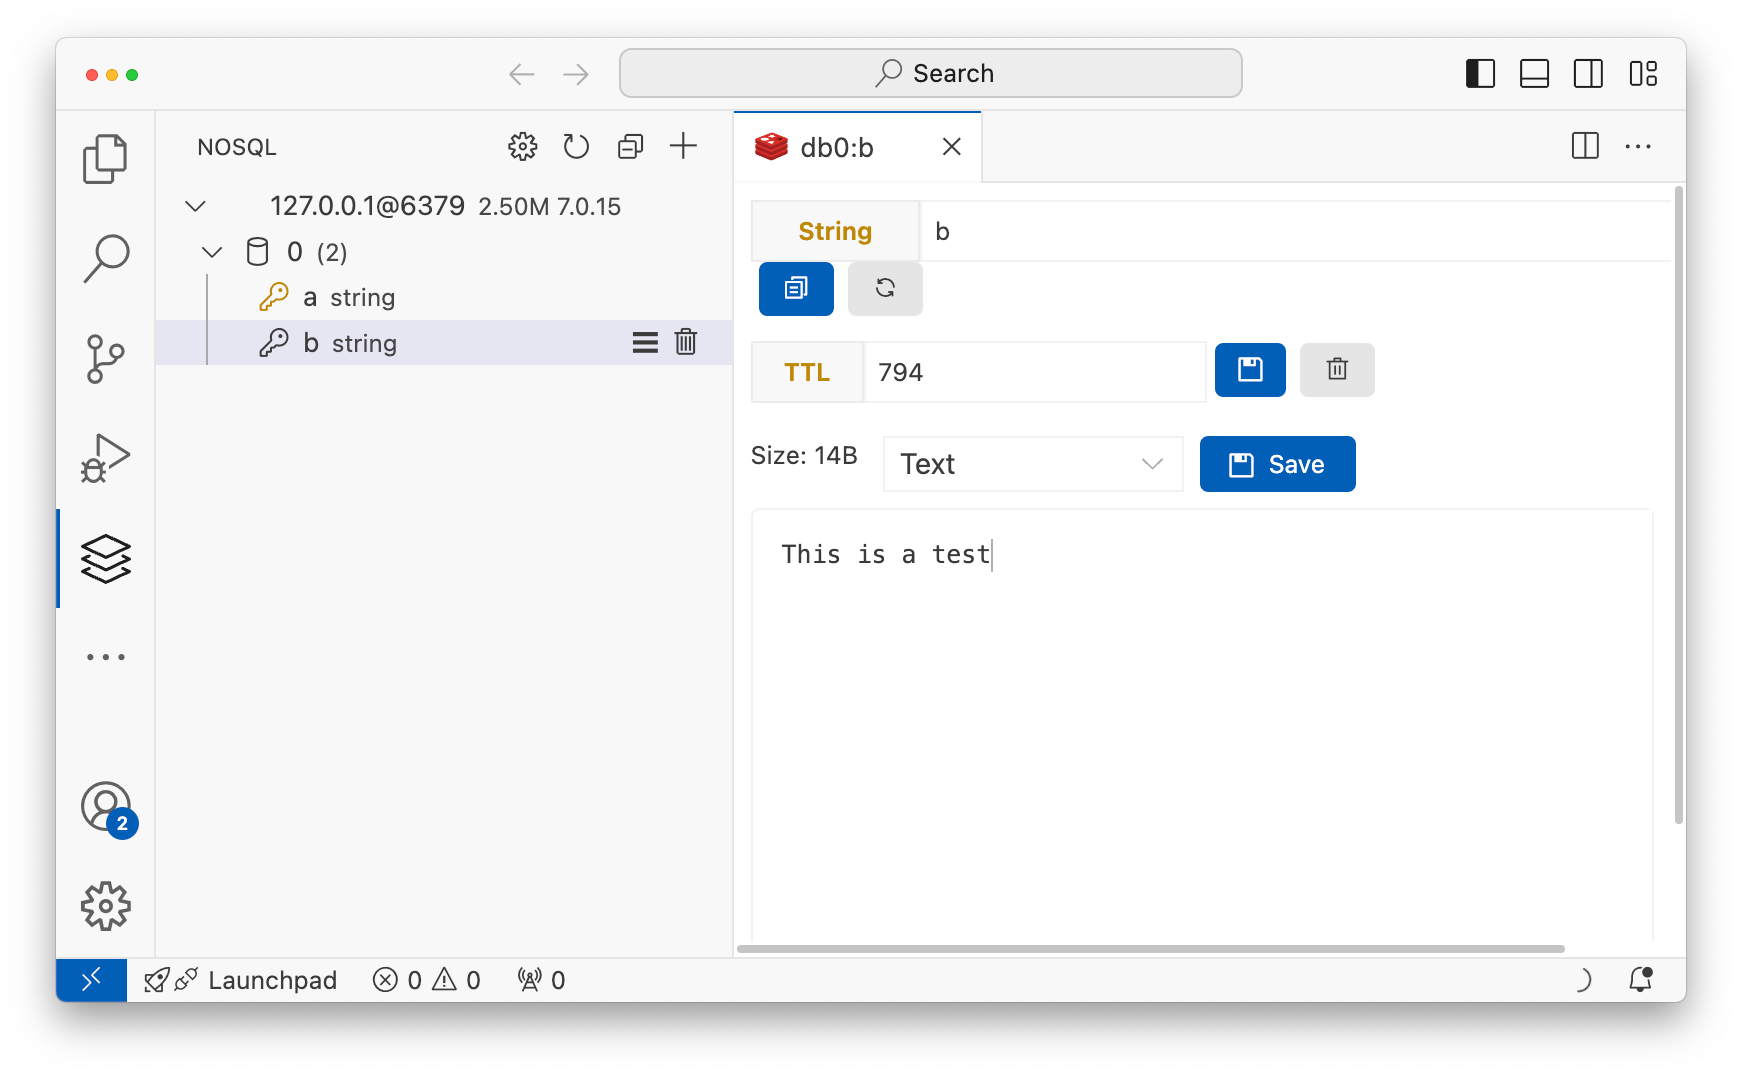
For example here’s me connecting to my cluster with VSCode and databse-client since that was one of the first hits in Google.
Troubleshooting
Add -v to SSH command line
Adding the “-v” argument will make OpenSSH print more information as it connects and negotiates with the Bastion service.
You should see something like
debug1: could not add identity to agent: /Users/cmj/.ssh/id_rsa (-27)
Authenticated to host.bastion.us-chicago-1.oci.oraclecloud.com ([131.186.8.189]:22) using "publickey".
debug1: Local connections to LOCALHOST:6379 forwarded to remote address aaac3adhhqakkavpytsgbp7bcmlhxksstlirh6fflzrb4rvoogfm2jq-p.redis.us-chicago-1.oci.oraclecloud.com:6379
debug1: Local forwarding listening on ::1 port 6379.
debug1: channel 0: new port-listener [port listener] (inactive timeout: 0)
debug1: Local forwarding listening on 127.0.0.1 port 6379.
debug1: channel 1: new port-listener [port listener] (inactive timeout: 0)
debug1: setting up multiplex master socket
debug1: channel 2: new mux listener [/Users/cmj/.ssh/sockets/e949c750428c77d2d835ebff5e633b99c0290194] (inactive timeout: 0)
debug1: Entering interactive session.
debug1: pledge: id
The key thing to look for are:
- “Authenticated to host…” saying that it was able to authenticate to the Bastion service
- “Local connections to LOCALHOST:6379 forwarded to…” which shows that the tunnel from the 6379 on your laptop is connected over to the Redis cluster
Use Netstat to see the listener
It’s all well and good that the SSH daemon says that it’s listening. But there’s no harm in verifying that.
Run “netstat -ant | grep 6379” to see it listening. You should see something like:
$ netstat -ant | grep 6379
tcp4       0      0  127.0.0.1.6379         *.*                    LISTEN
tcp6       0      0  ::1.6379               *.*                    LISTEN
Verify TCP connection
If you have “nc” installed you can use it to make a TCP connection
$ nc -v localhost 6379
Connection to localhost port 6379 [tcp/*] succeeded!
If you see succeeded that means the connection was establshed all the way through to the Redis cluster.
This command will seem to hang until you send garbage on it. Pound on your keyboard (including hitting enter) until it disconnects:
$ nc -v localhost 6379
Connection to localhost port 6379 [tcp/*] succeeded!


sdfjgh
asfjhg
Verify TLS handshake
OCI Cache service only supports TLS connections. This means that you have a Redis connection inside a TLS pipe inside an SSH pipe. You can use “openssl” to test that the SSH pipe is working and that Redis is operating correctly.
Run the command
openssl s_client -connect localhost:6379 -servername XXXXX.oci.oraclecloud.com
replacing the XXXXXX with the Redis cluster primary hostname from above.
For example:
$ openssl s_client -connect localhost:6379 -servername aaac3adhhqakkavpytsgbp7bcmlhxksstlirh6fflzrb4rvoogfm2jq-p.redis.us-chicago-1.oci.oraclecloud.com
Connecting to ::1
CONNECTED(00000005)
depth=2 C=US, O=DigiCert Inc, OU=www.digicert.com, CN=DigiCert Global Root G2
verify return:1
depth=1 C=US, O=DigiCert Inc, CN=DigiCert Global G2 TLS RSA SHA256 2020 CA1
verify return:1
depth=0 C=US, ST=California, L=Redwood City, O=Oracle Corporation, CN=*.redis.us-chicago-1.oci.oraclecloud.com
verify return:1
---
Certificate chain
 0 s:C=US, ST=California, L=Redwood City, O=Oracle Corporation, CN=*.redis.us-chicago-1.oci.oraclecloud.com
   i:C=US, O=DigiCert Inc, CN=DigiCert Global G2 TLS RSA SHA256 2020 CA1
   a:PKEY: rsaEncryption, 2048 (bit); sigalg: RSA-SHA256
   v:NotBefore: Jan 30 00:00:00 2024 GMT; NotAfter: Jan 30 23:59:59 2025 GMT
 1 s:C=US, O=DigiCert Inc, CN=DigiCert Global G2 TLS RSA SHA256 2020 CA1
   i:C=US, O=DigiCert Inc, OU=www.digicert.com, CN=DigiCert Global Root G2
   a:PKEY: rsaEncryption, 2048 (bit); sigalg: RSA-SHA256
   v:NotBefore: Mar 30 00:00:00 2021 GMT; NotAfter: Mar 29 23:59:59 2031 GMT
---
Server certificate
...
And then the server’s certfificate.
If you see all this then the connection is complete and you should be able to send Redis commands over it.
Redis PING
In the commands above I showed using the “ping” command. When you send a PING the server responds with PONG. If you get that working then your client is able to communicate with the server. If you get an error after that you know that the problem is not related to communication!
Wrapping Things Up
In this post I showed you how to use the OCI Bastion service to connect to an OCI Cache or Redis cluster inside your private subnet. The only extra things I want to be sure to mention, but didn’t find a good place to put them are about the session time limits…
Bastion sessions are time limited. The rules are pretty simple:
- a session may not exceed 3 hours
- the default session time is the same as the maximum allowed time
- users may configure a shorter time than that limit when they create the session
- the service automatically terminates and cleans up sessions after the configured time
- when the session ends the SSH tunnel will close and the ssh process will exit
- a session cannot be extended
- once the session ends it’s over. And you’ll need to create a new one
This is generally not a big deal. Bastion sessions are intended for humans (i.e. ugly bags of mostly water) needing to do something on an exception basis. You shouldn’t be doing all that much administrative work directly and interactively and so you shouldn’t need to be hanging around your compute instance, database, or redis cluster for hours or days on end. So that’s the use case the Bastion service addresses.
That said, if you wanted to you could use the OCI CLI or a slightly clever script to make starting the session easier. And I have one or two of those up my sleeve too.
* yes, that’s a literary reference you uncultured philistine