Oracle Logging Analytics enables you to set up continuous REST API based log collection from endpoint URLs that respond with log messages. The REST API log source must be configured with an API which responds with the log messages generated within the time frame specified in the request.
This is the recommended method when you want to automate the continuous log collection from environments, platforms, or applications like OCI services, Fusion Apps, ERP applications, or any other applications emitting logs through an API. There are macros available which can be used in the source definition to specify a log time to start your log collection from, provide an offset to iterate and collect data over page results of a log endpoint, and collect logs over a collection window or a time frame.
In this blog, we collect the audit history log records from an Oracle Fusion Application instance, using the REST API documented here: Get an audit report. The instructions are based on the OCI Logging Analytics documentation in this section: Set Up REST API Log Collection.
Pre-requisites
We assume you have already enabled Logging Analytics in your tenancy, and you belong to an IAM group that has been granted the necessary privileges to use the service, as described in the documentation here: Enable Access to Logging Analytics and Its Resources.
Complete the following pre-requisites:
- Identify or create a compartment to hold the log group we will use.
- Create a log group in this compartment to hold the log data:
- In OCI console, navigate to “Observability & Management”->”Logging Analytics”->”Administration”->”Log Groups”. Click “Create Log Group”.
- Name: provide a suitable name, e.g., “my_erp_log_group”.
- Gather the following items:
- Your Fusion Application Instance URL, e.g.,: https://fa-xxxx-saasfademo1.xx-xx.oraclepdemos.com
- Based on this URL, the REST API to use is:
https://fa-xxxx-saasfademo1.xx-xx.oraclepdemos.com/fscmRestApi/fndAuditRESTService/audittrail/getaudithistory - Your login credential to the FA instance. In our case we are using basic authentication with username and password.
- Sample request payload to use when configuring the endpoint. You can use the “Example Request Payload” from the documentation link Get an audit report.
- Sample response body to use when creating a parser. You can use the “Example of Response Body” from the documentation link Get an audit report. We will not copy the example here due to the size of the text. However, please ensure the text is valid json. At the time of writing this blog, the example had a missing comma in 2 places at the following entry:
“userInternalName”: “HCM_USER2”
which should be:
“userInternalName”: “HCM_USER2”,
Overall Flow for Collecting Logs Using REST API Based Source
Following are the high-level tasks for collecting log information through the REST API based source:
- Task 1: Install the Management Agent on a host that has http or https access to your endpoint server. See Set Up Continuous Log Collection From Your Hosts.
- Task 2: Configure authorization for the connection between the Management Agent and the REST API source. See Management Agent Source Credentials.
- Task 3: Create the entity in Oracle Logging Analytics to represent your log-emitting host. See Create an Entity to Represent Your Log-Emitting Resource.
- Task 4: Create a suitable parser to process the log entries provided as a response from the API. See Create a Parser.
- Update 27-Mar-2025: There’s now an out-of-box parser you should be able to use instead: “Fusion Apps: Audit History Log Format“.
- Task 5: Create a REST API Source by defining the REST API endpoints. See Create REST API Source.
- Update 27-Mar-2025: There’s now an out-of-box source you should be able to use instead: “Fusion Apps: HCM People Audit Logs“.
- Task 6: Associate the entity with the source. See Configure New Source-Entity Association.
Task Details
Task 1: Install the Management Agent on a host that has http or https access to your endpoint server
You need to use or provision a host that has https access to your endpoint server. For simplicity, place the host in the compartment identified in the pre-requisites section. If the host is a compute instance, you can enable the management agent from the “Cloud Agent” tab of the compute instance home. If not, or if the compute instance uses an OS image that doesn’t support the management agent plugin in the “Cloud Agent” tab, you can install the management agent manually following the documentation here: Install Management Agents.
In either case, you need to deploy the Logging Analytics plugin on the management agent:
- In OCI console, navigate to “Observability & Management”->”Agent”.
- Ensure the correct compartment is selected under “Scope” in the left hand-side navigation bar.
- Click on the agent you enabled or installed on the host.
- On the agent home page, click “Deploy plug-ins”.
- Check the “Logging Analytics” checkbox and click “Update”.
You can test your access from this host to the REST API endpoint on the command line using curl as follows:
- Place the “Example Request Payload” from the documentation link Get an audit report in a text file such as “/tmp/demo_request_payload.json”:
{
    "fromDate": "2017-01-01",
    "toDate": "2017-01-27",
    "product": "hcmCore",
    "businessObjectType": "oracle.apps.hcm.people.core.uiModel.view.ManagePersonVO",
    "includeChildObjects":"true"
}
-
Run the following command:
curl -i --user "<username>:<password>" -H "Content-Type: application/json" -X POST --data @/tmp/demo_request_payload.json https://fa-xxxx-saasfademo1.xx-xx.oraclepdemos.com/fscmRestApi/fndAuditRESTService/audittrail/getaudithistory
Task 2: Configure authorization for the connection between the Management Agent and the REST API source
To authorize a connection between the Management Agent and the REST API source, configure the API credential in the agent’s credential store:
- Login to your host as a user with the appropriate sudo privileges, e.g., opc.
- Create an input file such as “/tmp/agent_apicreds.json”:
{
  "source":"lacollector.la_rest_api",
  "name":"RestAPICreds",
  "type":"HTTPSBasicAuthCreds",
  "description":"SaaS API Credentials",
  "properties":[
  {"name":"HTTPSUserName","value":"<username>"},
  {"name":"HTTPSPassword","value":"<password>"}]
}
- Add the credential to the agent credential store. Use one of the following methods:
If you enabled the management agent using the “Cloud Agent” tab on the compute instance homepage:
cat /tmp/agent_apicreds.json | sudo -u oracle-cloud-agent /var/lib/oracle-cloud-agent/plugins/oci-managementagent/polaris/agent_inst/bin/credential_mgmt.sh -o upsertCredentials -s logan
or, if you installed the management agent manually:
cat /tmp/agent_apicreds.json | sudo -u mgmt_agent /opt/oracle/mgmt_agent/agent_inst/bin/credential_mgmt.sh -o upsertCredentials -s logan
In either case, the command output should look like:
Effect Credential Source
———- —————— ————————————————-
ADDED RestAPICreds lacollector.la_rest_api
Type: HTTPSBasicAuthCreds [HTTPSUserName, HTTPSPassword]
Description: SaaS API Credentials
1 credential(s) added to the logan service.
Task 3: Create the entity in Oracle Logging Analytics to represent your log-emitting host
When you deploy the management agent on a Linux host and enable the Logging Analytics plugin, two entities are created automatically in Logging Analytics: one for the agent itself, and the other for the host where the agent is installed. We will be associating the host entity to our log source in task 6.
Task 4: Create a suitable parser to process the log entries provided as a response from the API
(Update 27-Mar-2025: There’s now an out-of-box parser you should be able to use instead: “Fusion Apps: Audit History Log Format“).
Reference documentation: Create a Parser.
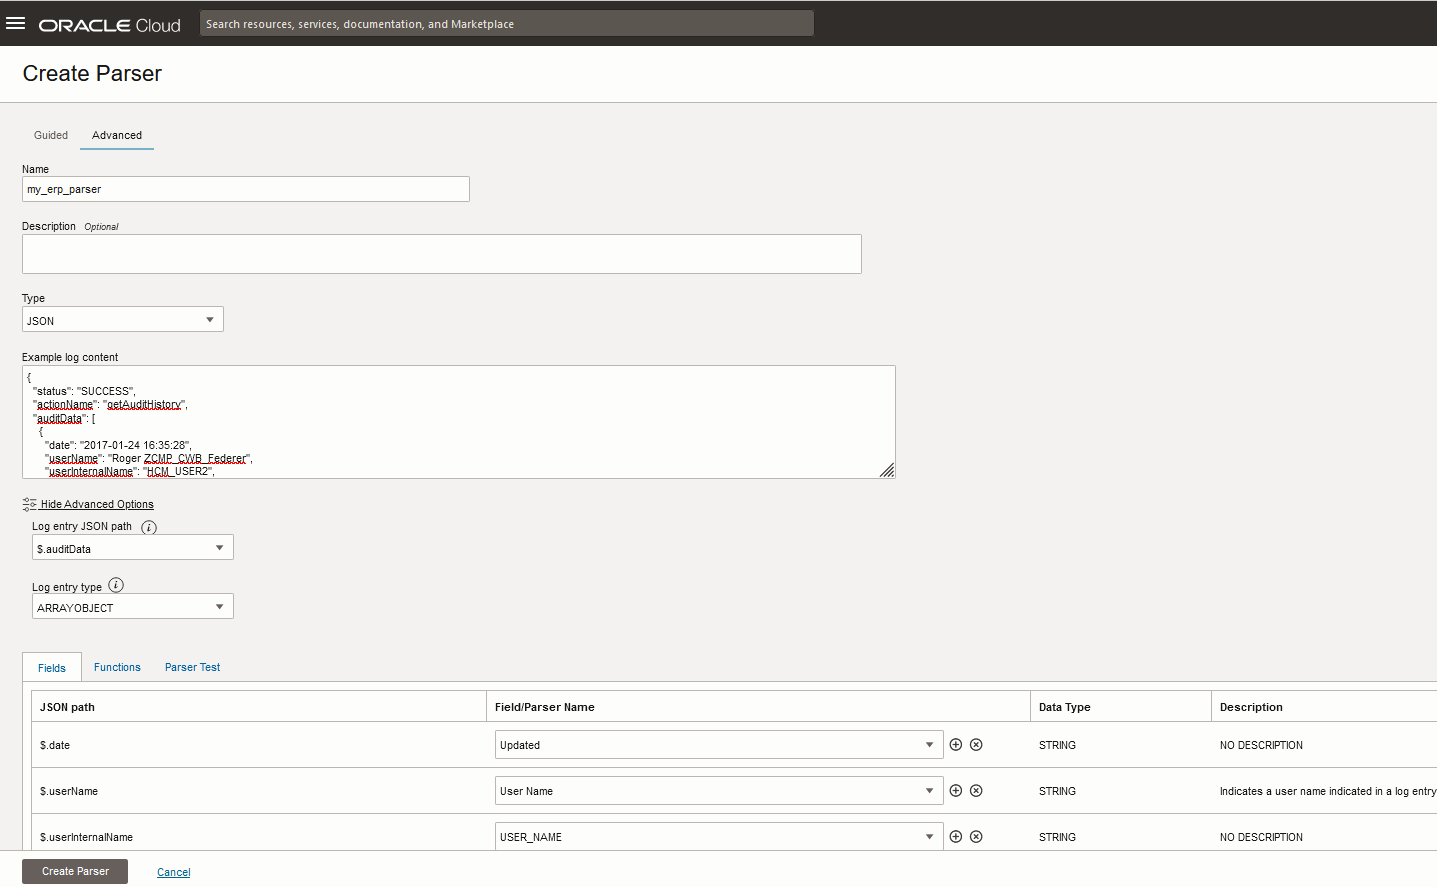
- In OCI console, navigate to “Observability & Management”->”Logging Analytics”->”Administration”->”Parsers”. Click “Create Parser”->”JSON”.
- Name: provide a suitable name, e.g., “my_erp_parser”.
- Example Log Content: Paste the sample response body gathered in the pre-requisites section. If you get an error when you tab out of the field, ensure you have added the 2 missing commas as described in the that section.
- Expand the “Advanced Options” link, and choose “$.auditData” as the “Log entry JSON path”. For this blog, we will parse the fields in this section of the log record only.
- In the “Fields” tab of the parser, the “JSON Path” will be populated with fields read from the “Example log content”. We need to map these entries to parser fields. The drop-down list for each field will be populated with default “Oracle-defined” fields. You can choose one of these default fields if appropriate or create your own. The fields you create will be available for re-use in your tenancy as “User-created” fields, under “Logging Analytics”->”Administration”->”Fields”.
- For this blog, we will map the fields under “$.auditData” up to “description”. We will not map the fields under “attributeDetails”.
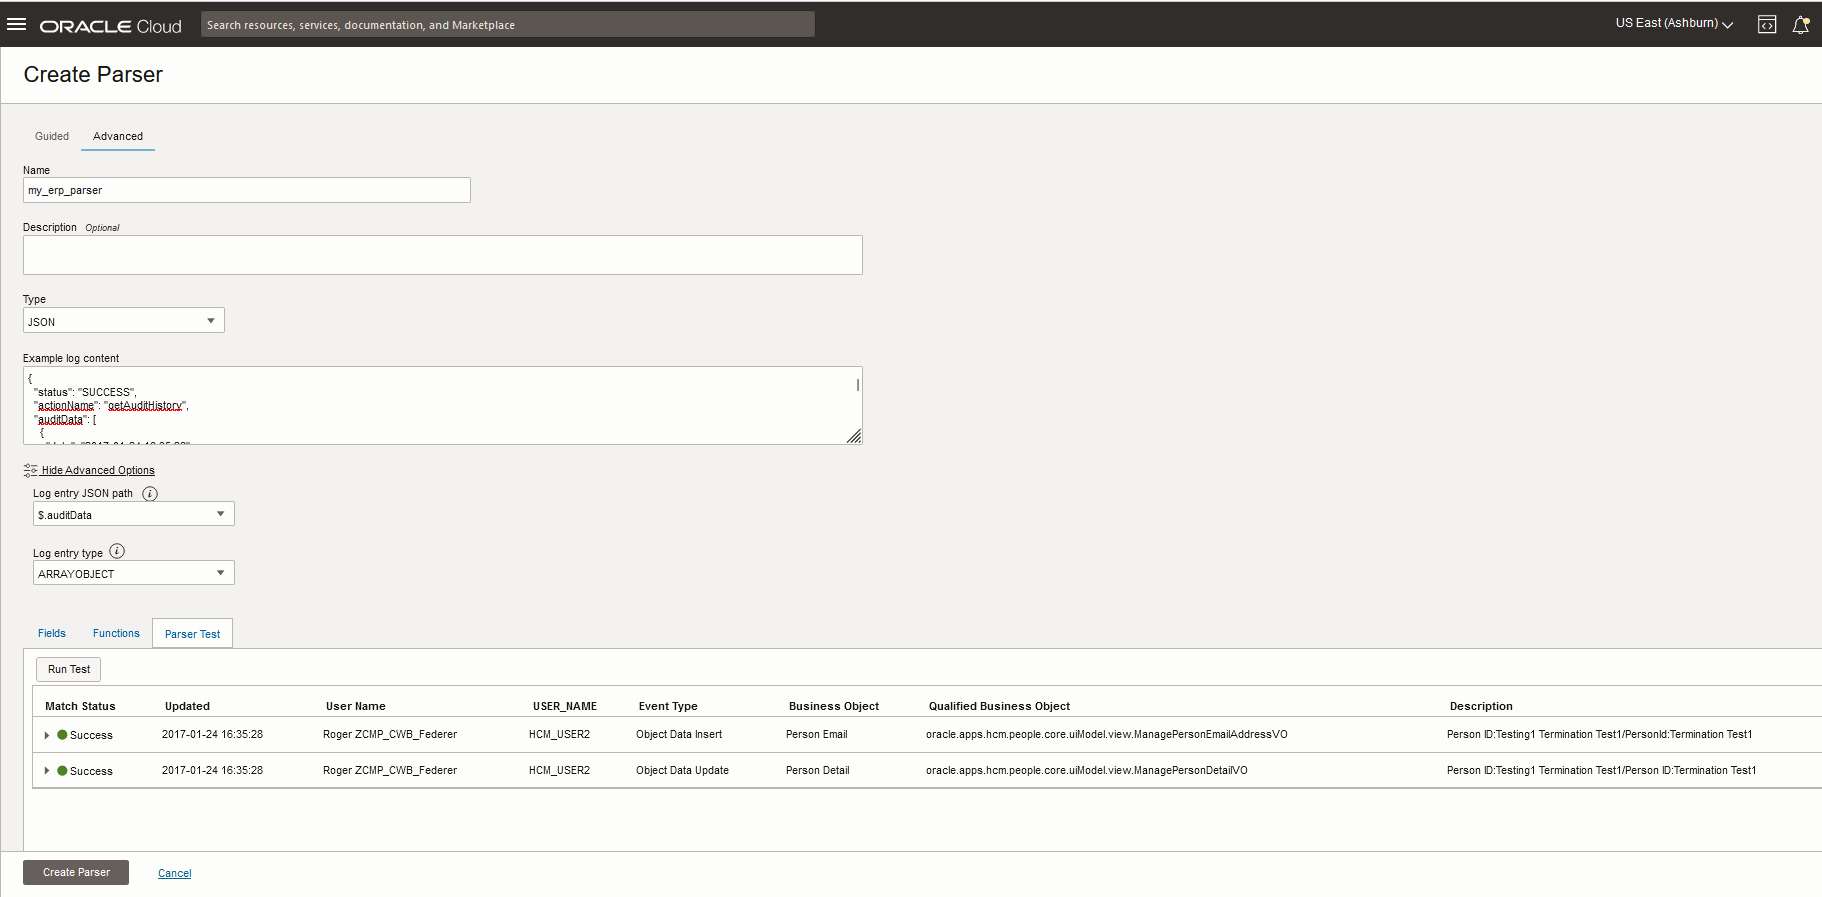
Click the “Test Parser” tab, then “Run Test”:
Task 5: Create a REST API Source by defining the REST API endpoints
(Update 27-Mar-2025: There’s now an out-of-box source you should be able to use instead: “Fusion Apps: HCM People Audit Logs“)
Reference documentation: Create REST API Source.
First, for testing purposes, we will use a payload with fixed “fromDate” and “toDate”. Once we verify it’s working, we’ll update those parameters to use dynamic values, and the Log URL to use a dynamic time window.
- In OCI console, navigate to “Observability & Management”->”Logging Analytics”->”Administration”->”Sources”. Click “Create Source”.
- Name: “my_erp_log_source”.
- Source Type: “REST API”.
- Entity Types: “Host (Linux)”.
- Parser: Specific Parser(s): “my_erp_parser”.
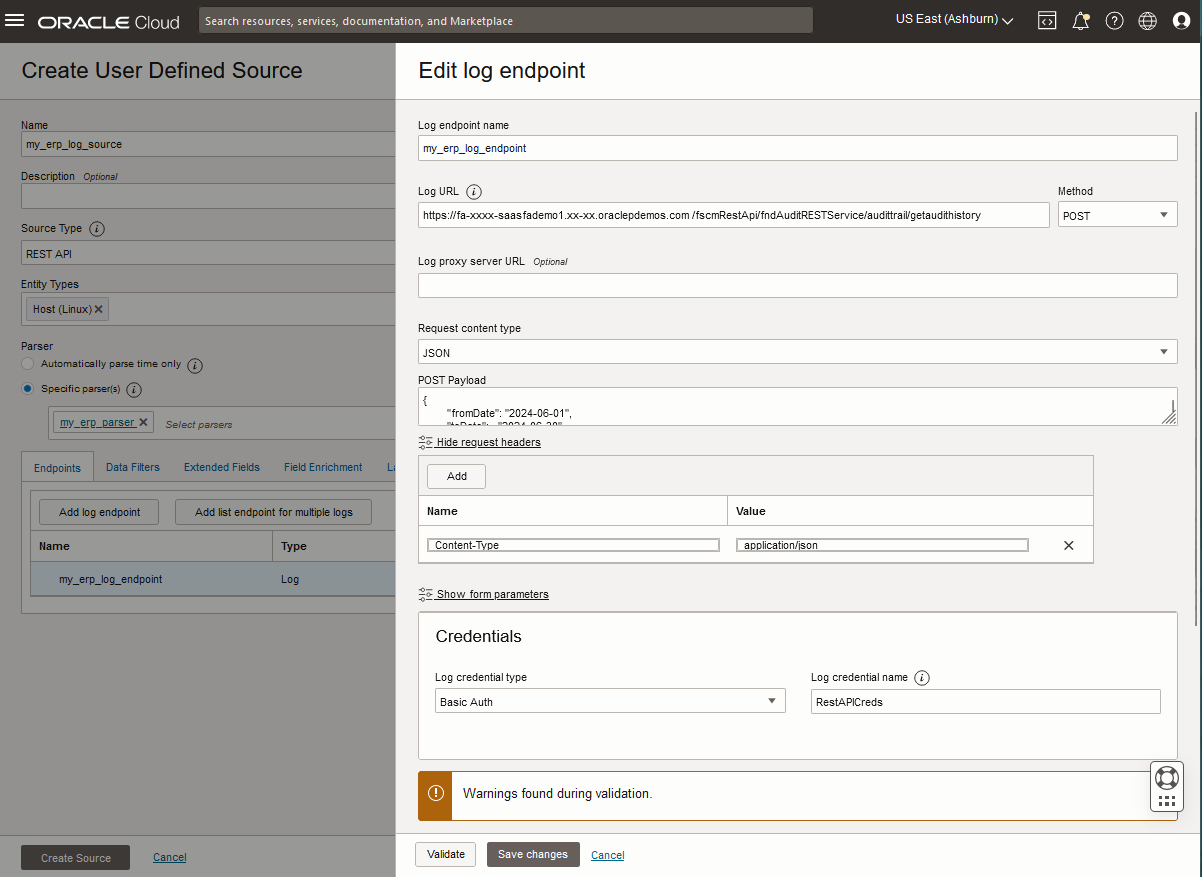
- Under the “Endpoints” tab, click “Add log endpoint”.
- Log endpoint name: ” my_erp_log_endpoint”.
- Log URL: “https://fa-xxxx-saasfademo1.xx-xx.oraclepdemos.com/fscmRestApi/fndAuditRESTService/audittrail/getaudithistory“.
- Method: POST.
- Request content type: JSON
- Post Payload: Sample payload from the pre-requisite above, e.g.:
{
    "fromDate": "2017-01-01",
    "toDate": "2017-01-27",
    "product": "hcmCore",
    "businessObjectType": "oracle.apps.hcm.people.core.uiModel.view.ManagePersonVO",
    "includeChildObjects":"true"
}
- Click “Show request headers” and add:
Name: Content-Type
Value: application/json
- Under “Credentials”:
- Log credentials type: “Basic Auth”.
- Log Credential name: “RestAPICreds” (Created in Task 2).
- Click “Validate”. Ignore the warning about “Missing time macro in source endpoint” since we are testing with fixed “fromDate” and “toDate” parameters. Once verified, we’ll update those parameters and the Log URL. If you get an error and not a warning, review your steps and fix any issues before proceeding.
- Click “Add log endpoint” then click “Create Source”.
Task 6: Associate the entity with the source
Reference documentation: Configure New Source-Entity Association.
- Click on the newly created log source “my_erp_log_source”.
- Click on “Unassociated Entities” in the left hand-side navigation bar.
- Select the host entity created in task 3 and click “Add association”.
- Select your log group compartment and the log group you created in the pre-requisites section.
- Click Submit. This starts the log collection.
- After 5 to 10 minutes, click on “View in Log Explorer”.
- You should see the log entries collected by the agent through the REST API endpoint.
- If you don’t see any data, navigate back to the log source home page, and click on “Agent Collection Warnings” in the left hand-side navigation bar. Fix any issues as required.
- When you see data as expected, navigate to the log source home page and click “Edit”.
- Click the 3 dots at the right of the log endpoint “my_erp_log_endpoint” and click “Edit”.
- Update the Log URL as follows:
https://fa-xxxx-saasfademo1.xx-xx.oraclepdemos.com/fscmRestApi/fndAuditRESTService/audittrail/getaudithistory?timewindow={TIME_WINDOW(1h)} - Update the “fromDate” and “toDate” in the Post Payload as follows:
“fromDate”: “{START_TIME:yyyy-MM-dd HH:mm:ss}“,
“toDate”: “{CURR_TIME:yyyy-MM-dd HH:mm:ss}“, - Click “Validate”, and “Save changes” for the endpoint, then “Save changes” for the log source.
Resources and References
- Logging Analytics Landing Page on oracle.com: Logging Analytics
- Logging Analytics Documentation Home page: Logging Analytics