
Mailinator is a service that provides “disposable” email addresses – it accepts mail for any addressee and provides a web interface and APIs to read them. Most people I know use it for things like “sign up for our email list to get a discount” but the creators market it as being intended for testing. And it’s good for that. But you probably don’t want to expose even a preproduction site and its “welcome to” or password reset emails to everyone on the big bad internet. So let me show you how to deploy your own workalike called Inbucket on OCI instead!
First things first let’s draw a quick diagram to show what we will be building:
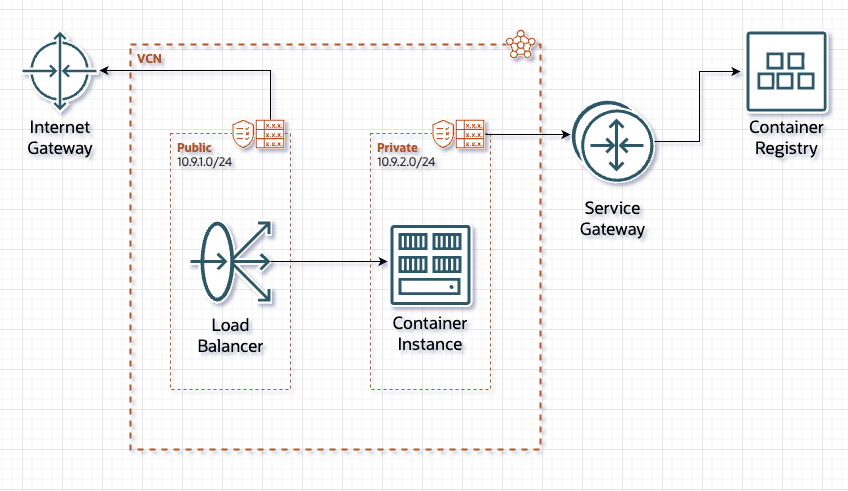
The key items here are that there are:
- An Internet Gateway
- A Service Gateway
- Two subnets
- one “public” accessible from the internet via an Internet Gateway
- one “Private” with access only to the Oracle Service Network. And that only so that it can retrieve the container image from the OCI Container Registry
- A Container Instance to run Inbucket’s mail and web server
- A Load Balancer to expose the Container to the internet
You’ll note that I put the mail server on a private subnet with very limited access to anything else. This is to ensure that if there’s a bug or security problem in Inbucket then attackers are stuck in a sandbox – unable to touch anything of value elsewhere in our tenancy or out on the wider internet. We could do this with Security Lists or Network Security Groups, but using a separate private subnet provides that extra layer of assurance that makes everyone just a little bit more comfortable. Is this slightly “old school”? Yes. Could I do the same with security lists and groups or even the new hotness known as Zero Trust Packet Routing? Also yes. But more on that some other time. For now I’m doing this with the simple basics.
Not mentioned, but also of note, is that you will need to provide a domain name since you can’t really readily receive email at an IP address. Again I’ll call out namecheap.com* as a cheap place to get those but get yours wherever. Obviously you can use whoever you like but you will need to be able to set A and MX records.
* no referral link or anything – I’m just a satisfied customer
The steps…. broadly
Because this isn’t a full tutorial I won’t be providing Shake ‘n’ Bake level of step by step instructions. But fear not – everything is straightforward enough that you should be able to work it out on your own. And if not i’m here to answer questions!
Don’t Re-invent the Wheel
Originally I was thinking about writing my own mail server + web UI. But it turns out that someone else already did that hard part…
From Inbucket‘s site:
Need to test your webapps outbound emails with Mailinator but stuck behind a firewall? Want to keep the new application you are developing secret until it’s time to release it? Need to validate that emails go out as part of your integration test suite? Want to send a link to a coworker demonstrating an email without giving them your gmail password? Need to load test your application without melting your corporate Exchange server? Want to use production data in your test environment without the risk of test messages leaking to an end user? Need to preview emails in multiple desktop email clients? Use Inbucket.
And they even provide a container image on Docker Hub, making this even easier.
Pull the Image
Because of my choice to put the container instance on a private subnet (see above) I can’t just use the published docker image from Docker Hub directly – the Container Instance won’t be able to download it at startup. So I need to put a copy of it somewhere reachable from the Container Instance. The OCI Container Registry (abbreviated as OCIR) is a great option. There are a few ways to get the image onto OCIR but the easiest is simply to pull the image – either to your local machine or to your Cloud Shell. And then push it to OCIR.
To do that just run the command:
docker pull inbucket/inbucket
This will pull the latest version of the image which, as of this writing is v3.0.4, built for ARM 64. Which is perfect for our needs!
Create Your Repository
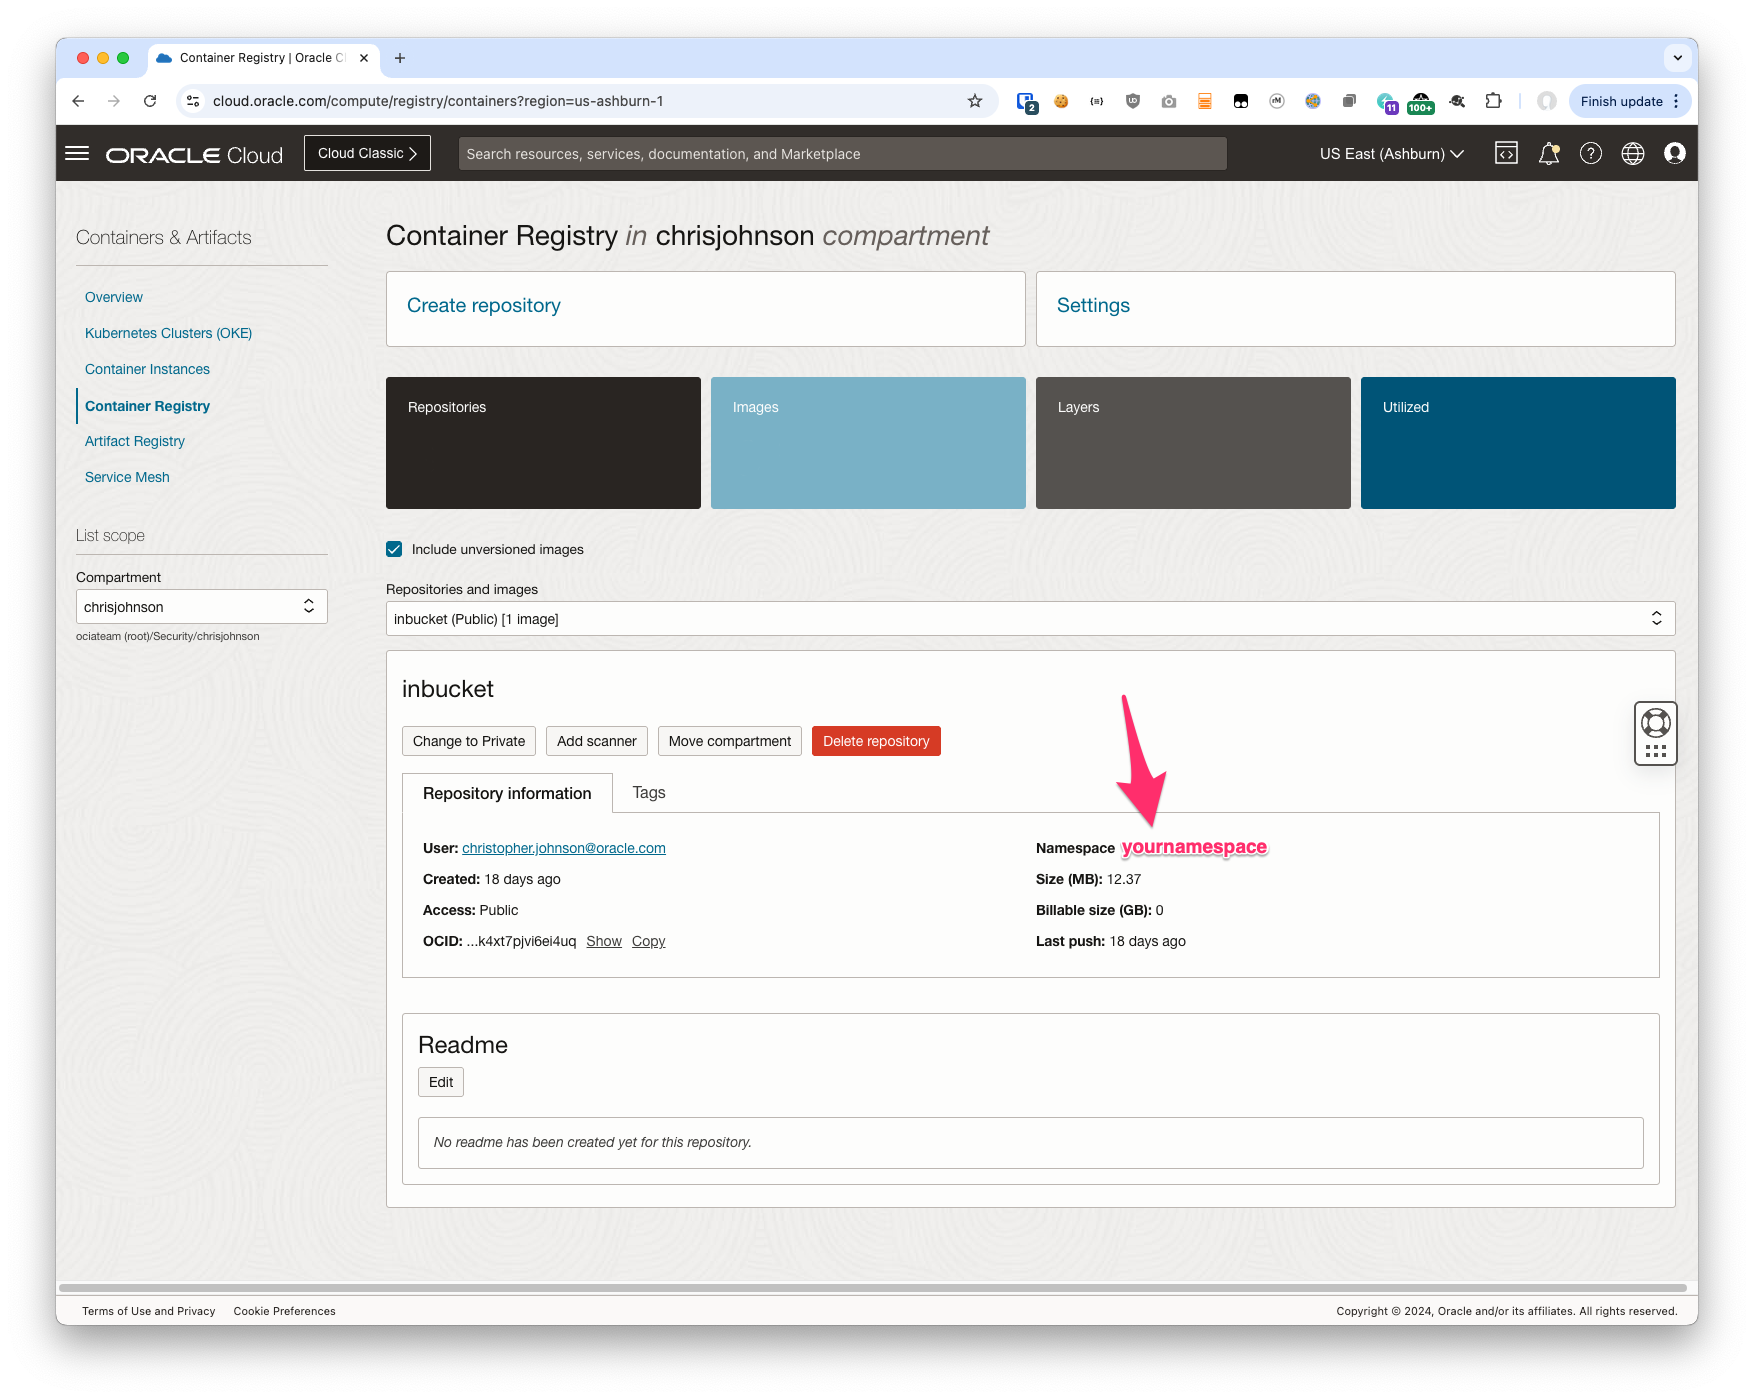
As I mentioned above, need a container registry. The steps there are about as easy as you can imagine…
Navigate to Developer Services -> Containers & Artifacts -> Container Registry and then to the compartment you want to use. Click the Create button and give your repository a name. And that’s it!
We’re going to need the namespace later so after you create the Registry take copy that value or at least note it down.
Oracle Cloud Infrastructure Registry (also known as Container Registry) is an Oracle-managed registry that enables you to simplify your development to production workflow. Container Registry makes it easy for you as a developer to store, share, and manage container images (such as Docker images). And the highly available and scalable architecture of Oracle Cloud Infrastructure ensures you can reliably deploy your applications. So you don’t have to worry about operational issues, or scaling the underlying infrastructure.
If you create a Public Repository anyone on the internet can pull the images from there. If you’re just copying an image from Docker Hub you might think this is fine. And from a security perspective it generally is fine. Or at least fine-ish. However there is always the danger of attackers repeatedly pulling your image and driving your bandwidth costs up or causing you to hit rate limits intended to protect you. And there’s also the risk of you making changes to the images and not thinking about the implications of having those changes publicly visible.
For these reasons we generally recommends leveraging the ability to configure the repository as Private. For instructions on using Container Instances with private Repositories please refer to the official documentation.
Label & Push the Image
Use the usual Docker commands to tag the image and push it.
docker image tag docker.io/inbucket/inbucket:latest iad.ocir.io/XXXXX/inbucket
docker image push iad.ocir.io/XXXXX/inbucket
Replacing XXXXX with the “namespace” from above. And podman (or rancher) in place of Docker if you use them instead, and haven’t aliased docker to them like I do.
Create Your VCN, Subnets, Gateways, Route Table, etc
I will leave this to you other than to suggest that you use a new VCN and subnet to protect your workloads from attackers. VCNs + subnets are a no cost (AKA free) thing in OCI. And creating an additional VCN + a couple of subnet keeps this traffic completely segregated from any existing workloads. Plus if/when you want to cleanup you can just delete the entire subnet, or (if you do what we do here) the entire compartment with the network, container registry, and Container Instance.
The “Create VCN Wizard” process makes this super easy as you’ll get a VCN with 2 subnets, the necessary gateway/s, route tables, security lists and groups, and everything else already set to go.
After you create your network you’ll need to setup security lists or groups to allow traffic from the Load Balancer to the Container Instance. Of note the inbucket Container Image listens on these ports by default:
| Port | Use |
|---|---|
| HTTP | 9000 |
| SMTP | 2500 |
| POP | 1100 |
Since we’re going to use a Load Balancer to map them to the “regular” ports later there is really no need to change these or even to customize the image unless you want to do so. So I’m only noting this here so you have it handy while creating your Security Groups or Lists.
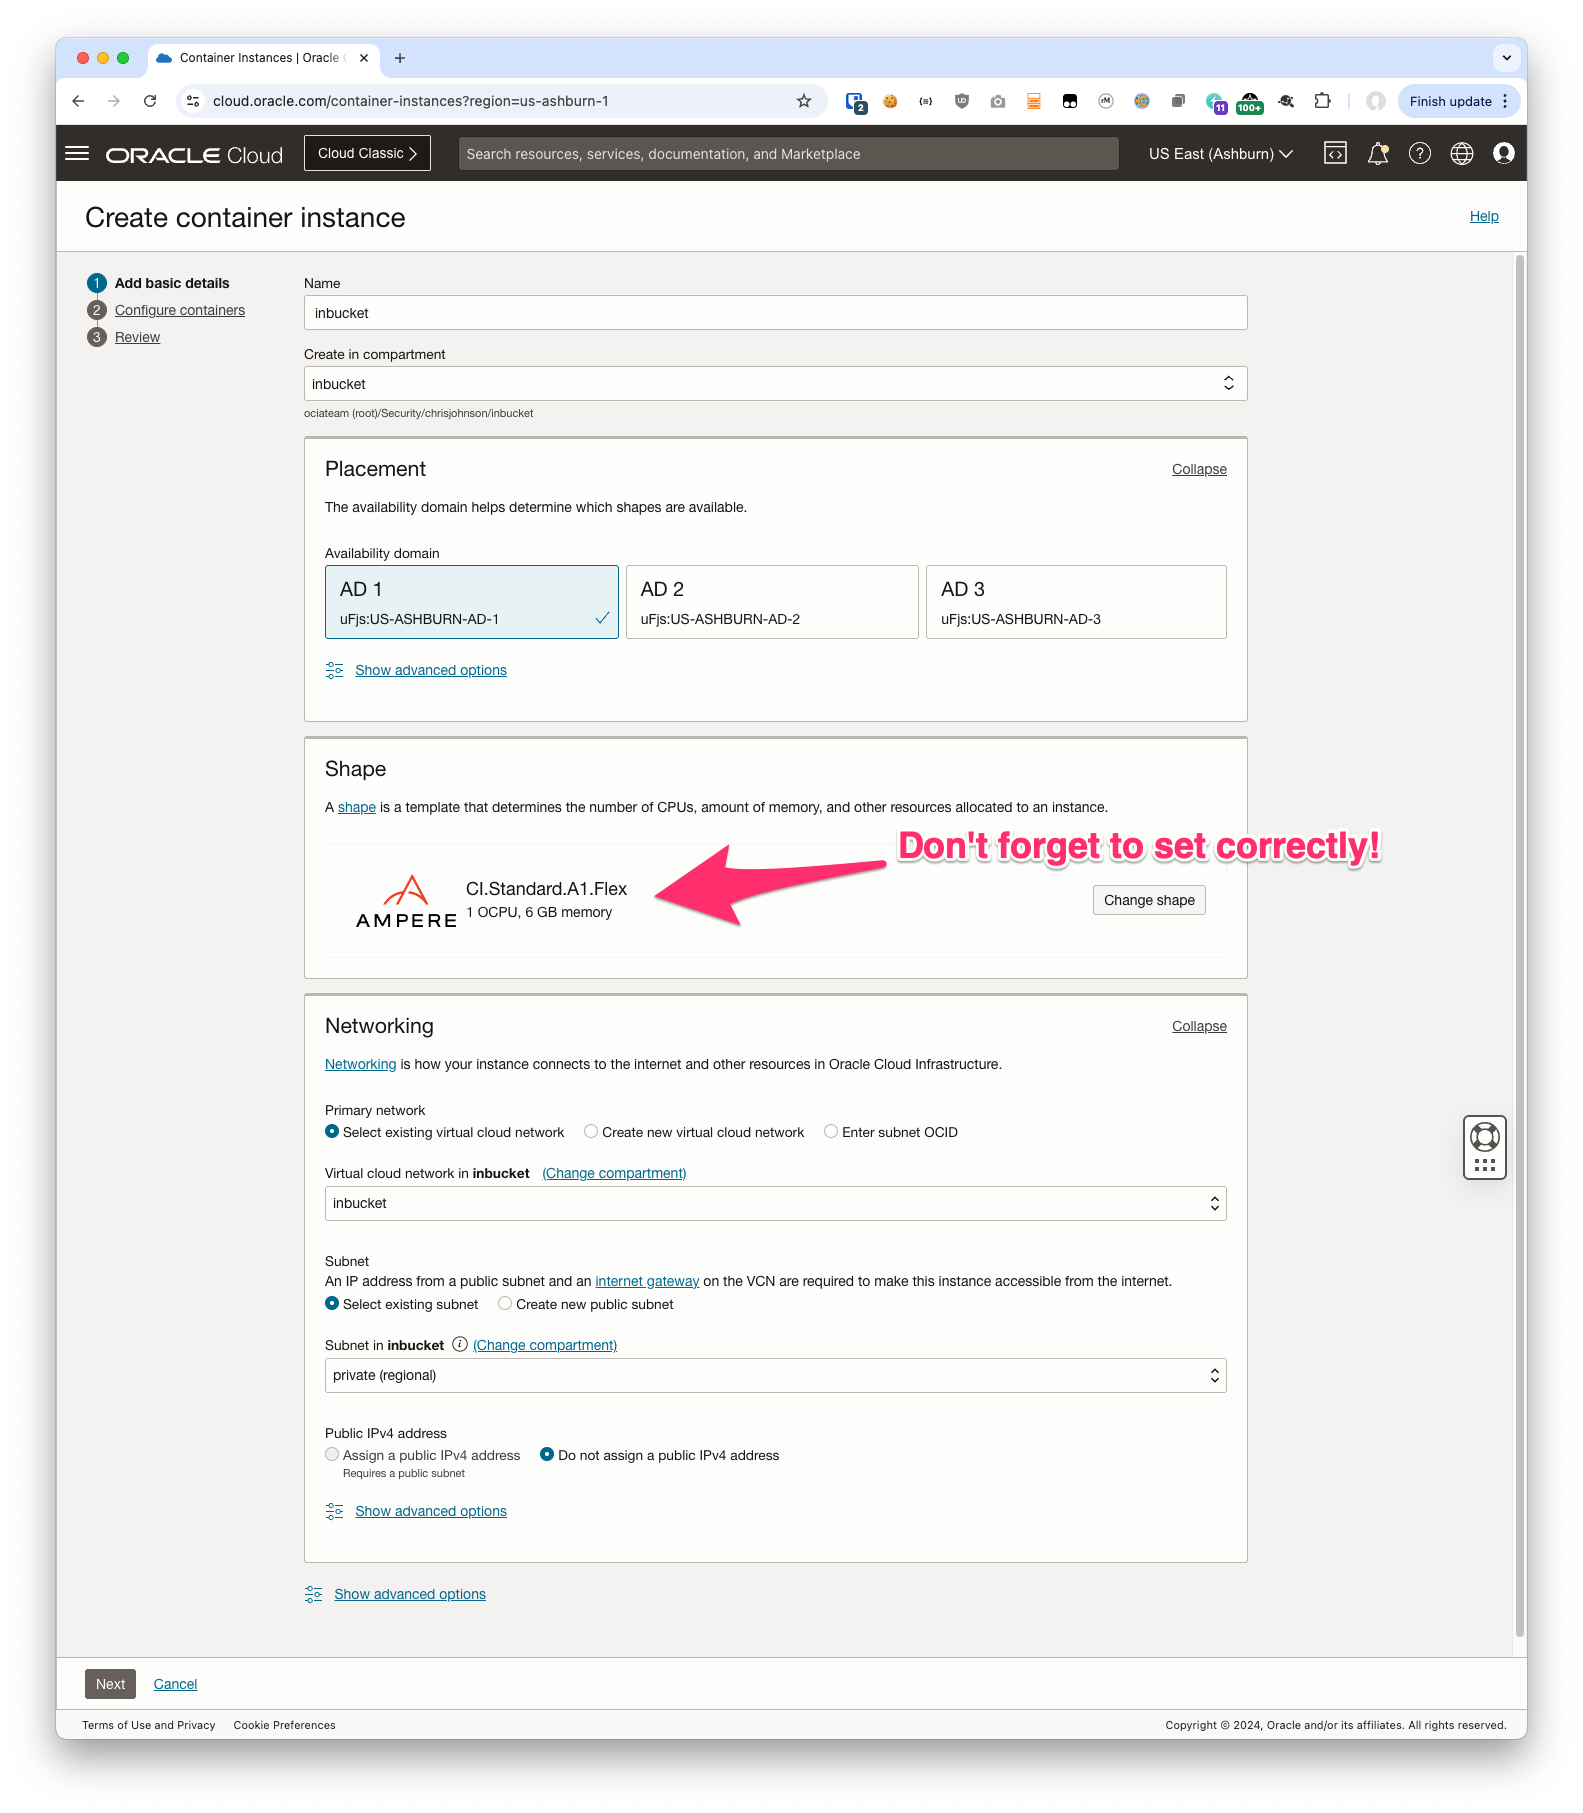
Create Your Container Instance
Navigate to Developer Services -> Container Instance and create a new instance.
Don’t forget to change the shape on the first step – the Container Image above is for ARM 64, not x86-64. If you choose the wrong shape the Container Instance will report a failure starting the container.
Then select the image from your registry
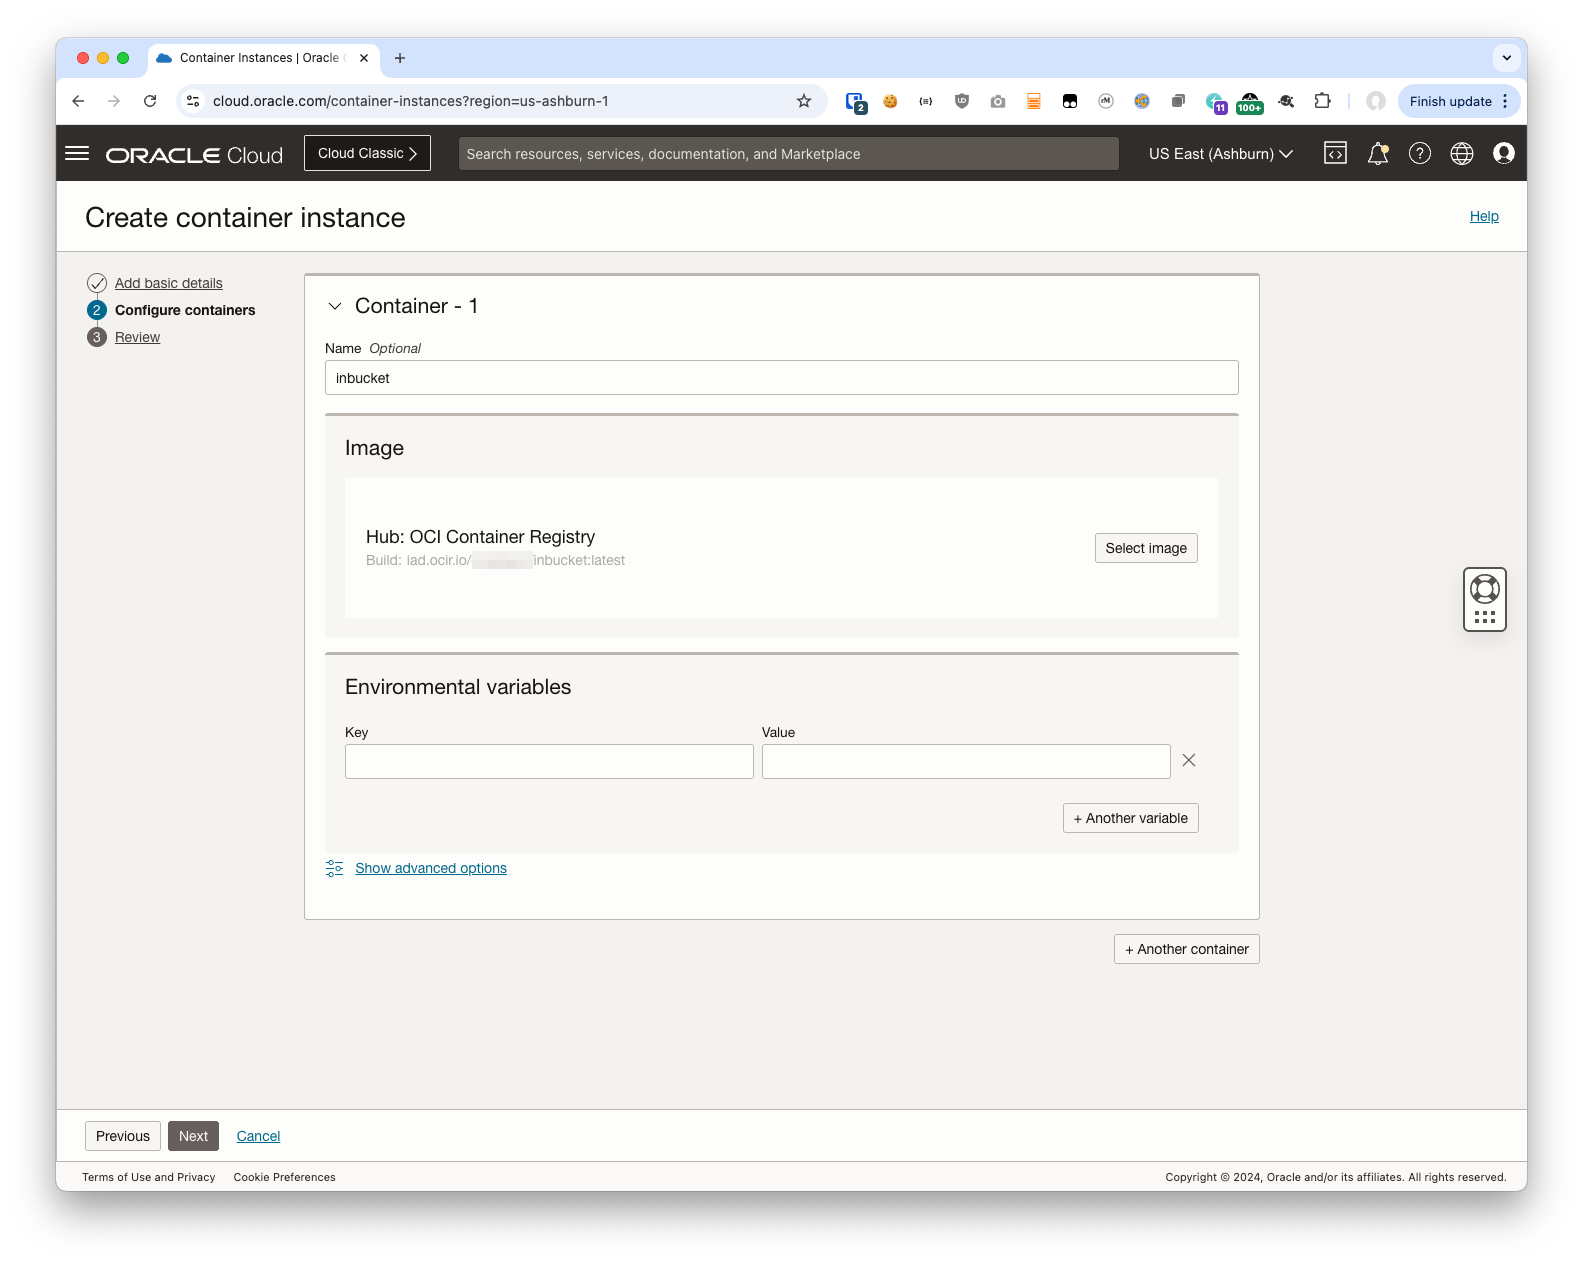
And finally click the Create button and wait for your instance to be ready.
Check Your Work
Before you go further it might be a good idea to test your container instance. I tend to goof up my network settings the first (few) times so I always create a compute instance on the same subnet and test connectivity from there. Then work my way out to the public subnet and then the wider internet. I leave this step to you, but basically just check that the expected TCP ports on the inbucket container are reachable from the private subnet first. And then that something in the public subnet can reach them too. This helps avoid banging your head against the wall later if the Load Balancer complains that it can’t reach them.
Create Your Load Balancer
If you did everything above correctly your Container Instance is running with one container – inbucket. Since the Container Instance is on the private subnet it will not be reachable from the internet until we setup a reverse proxy of some sort.
To expose the SMTP and HTTP ports to the internet you’ll need either a Network Load Balancer or a conventional load balancer. Which you use is up to you, but I chose a traditional load balancer so I can have just one and use TLS/SSL for my web browser and plain TCP for SMTP.
In diagram form that’s:
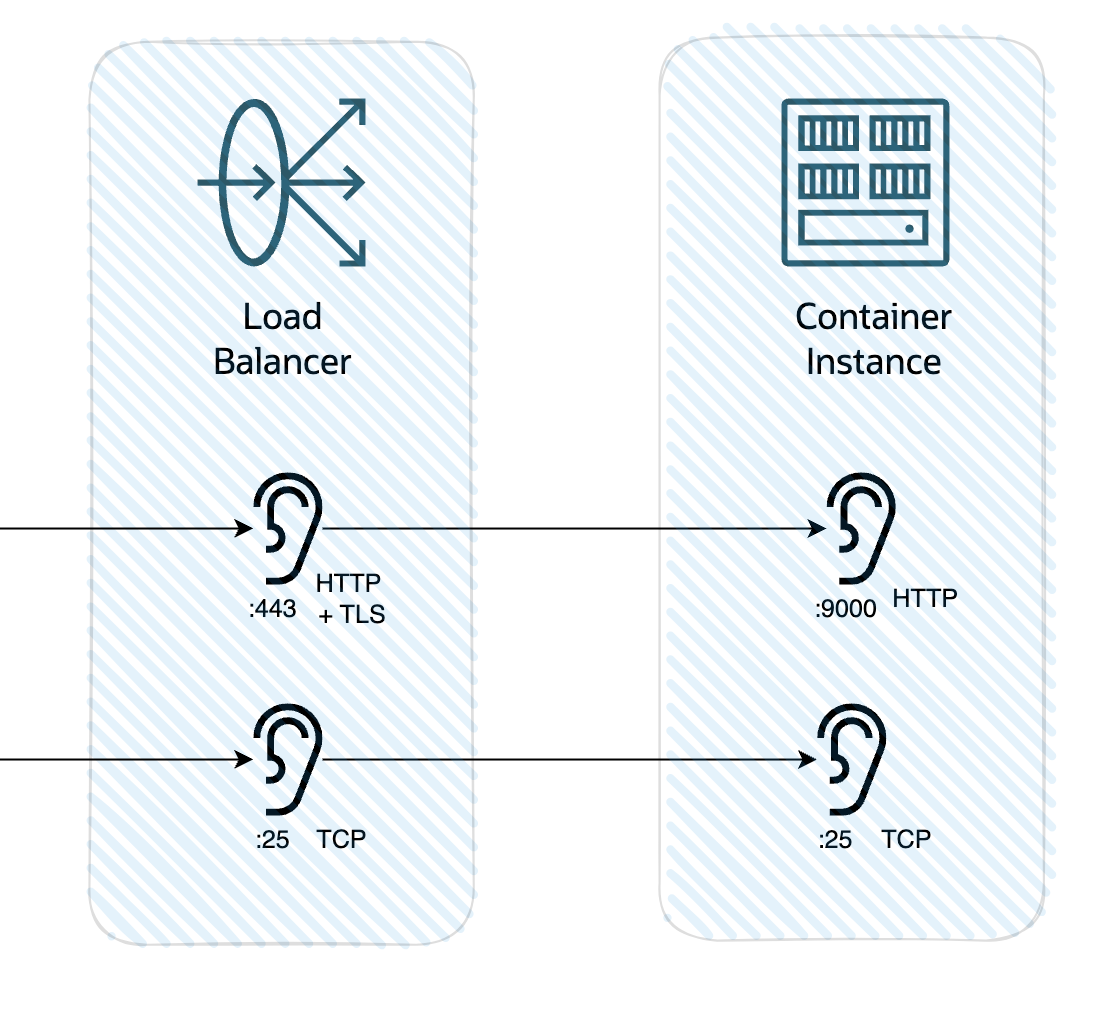
In my config I am:
- terminating SSL on port 443 in the load balancer
- using a certificate I acquired from Lets Encrypt with my certbot plug-in
- following my own best practice of only passing expected traffic through the load balancer (i.e. filtering “in” the traffic I expect)
- using a WAF policy to provide some additional protection against bad actors
- passing that (now just HTTP) traffic to port 9000 on the Container Instance
- using a TCP listenre on port 25 passing that traffic directly to port 2500 on the Container Instance
- sizing the load balancer down to 10 MB min and max bandwidth – if only to keep attackers from being able to drive up my costs
Basically just the normal bare minimum security practices.
Again I’m not showing you all of my work, but the above should cover the broad strokes for you.
What I didn’t do, and would do if I was going to leave this running long term, is to separate SMTP and HTTPS into two hostnames. Using:
- a Network Load Balancer to route port 25 in the public subnet to the Container Instance
- an API Gateway or App Gateway to force users to authenticate via an Identity Domain
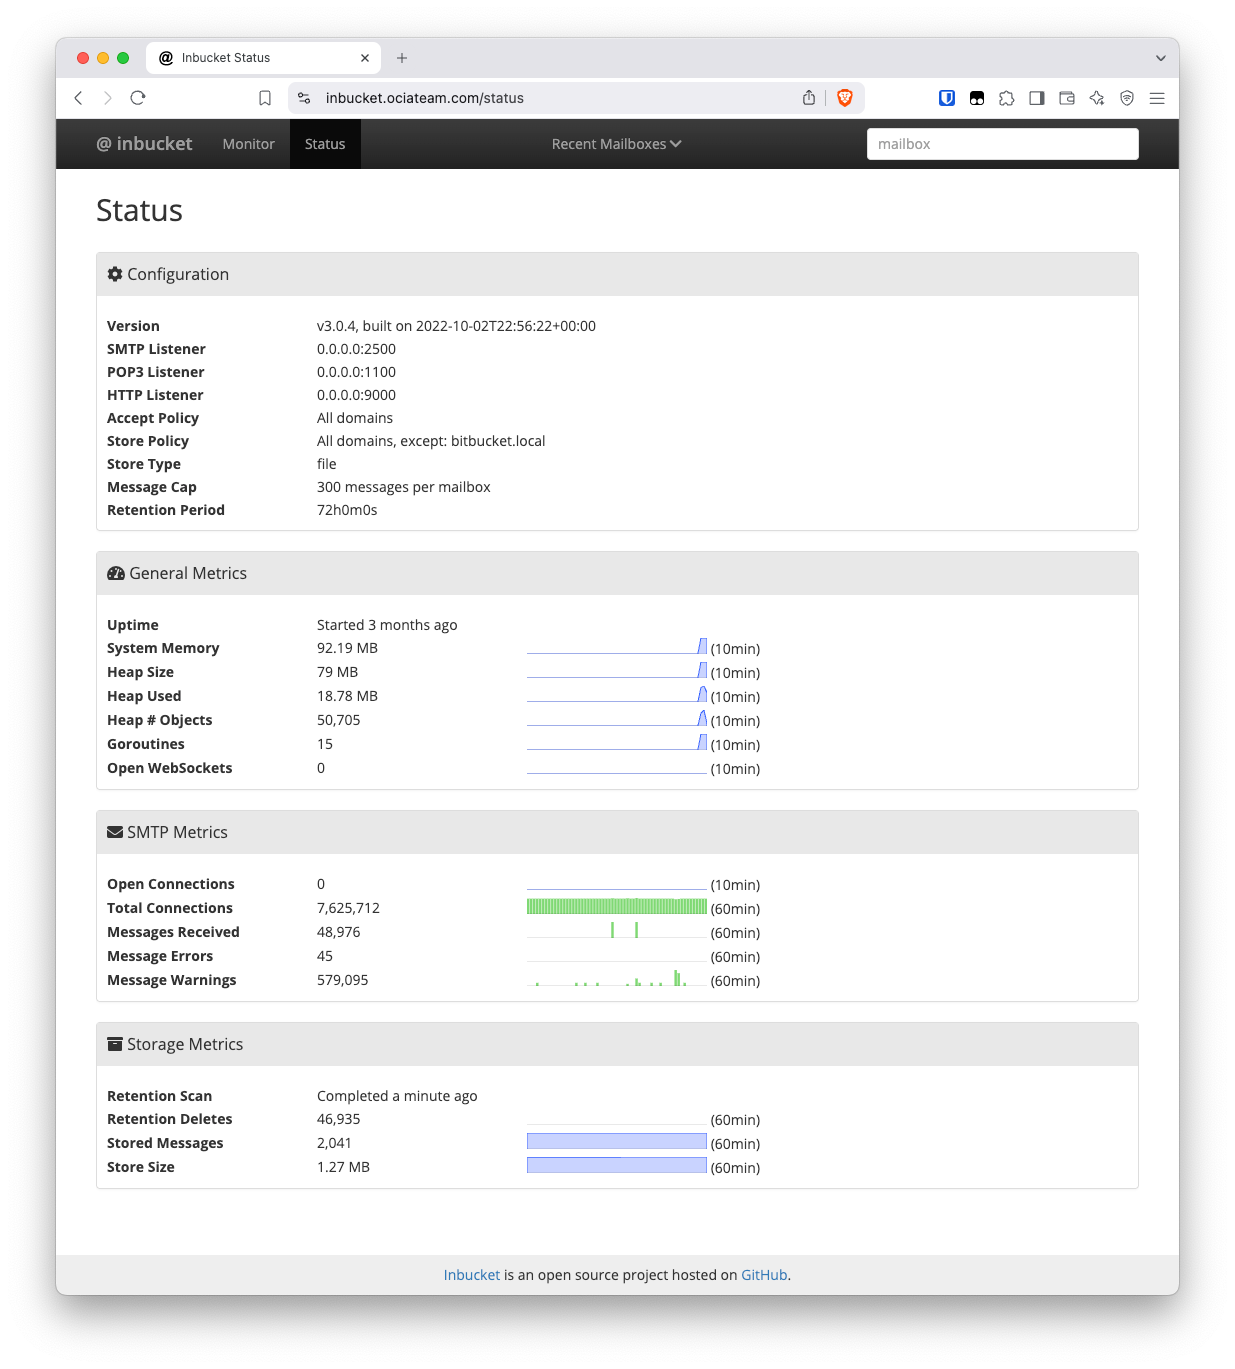
I didn’t really expect my installation to be hammered by attackers but boy was I wrong. Not 10 mins after I spun everything up I got my first attack. And out of morbid curiosity I left it running for a while and it’s been under more or less constant probing by bad guys:
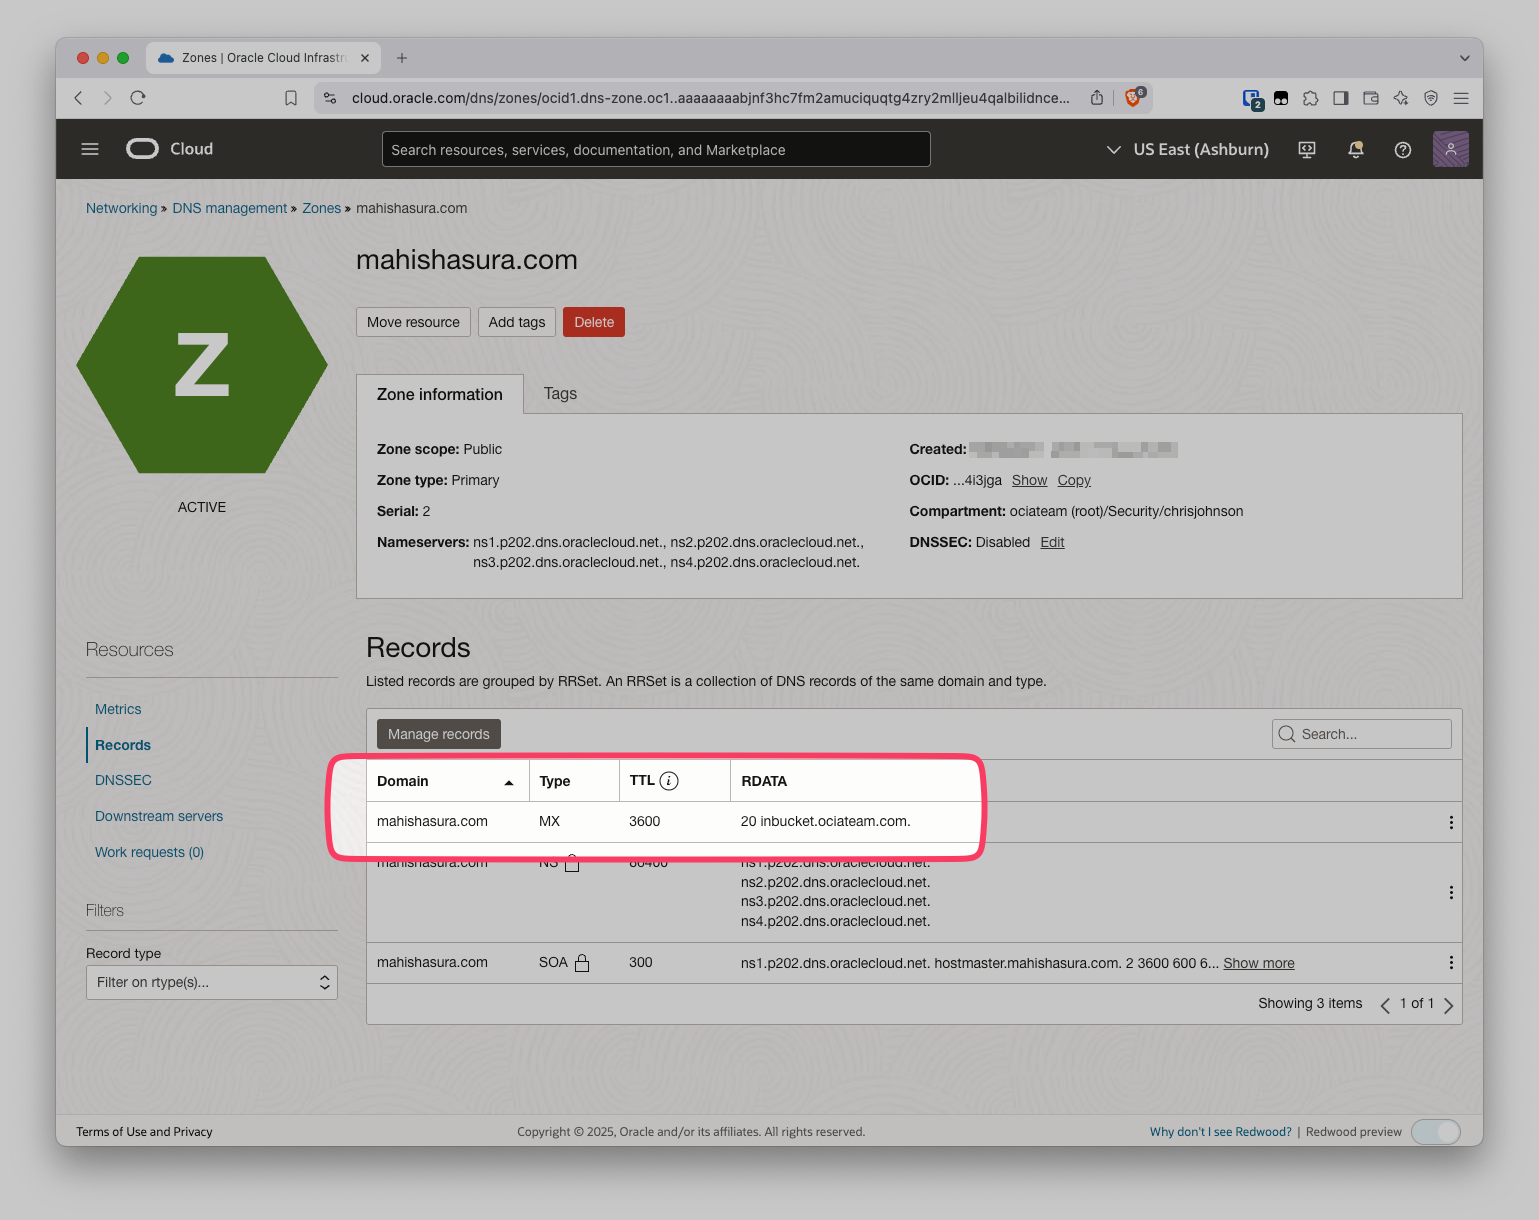
Setup an MX record in DNS
Because of the way SMTP works we need to update DNS and create an MX record pointing to our fresh SMTP server. This is definitely outside the scope of this doc, but in OCI DNS that would look something like this:
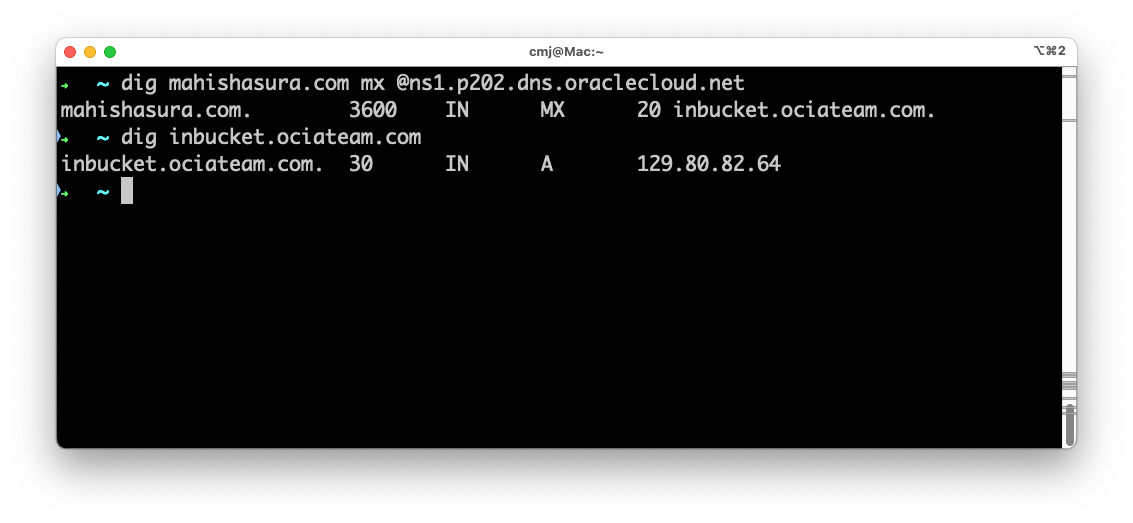
Don’t forget to check your work by using dig or nslookup to check the MX record and the A record:
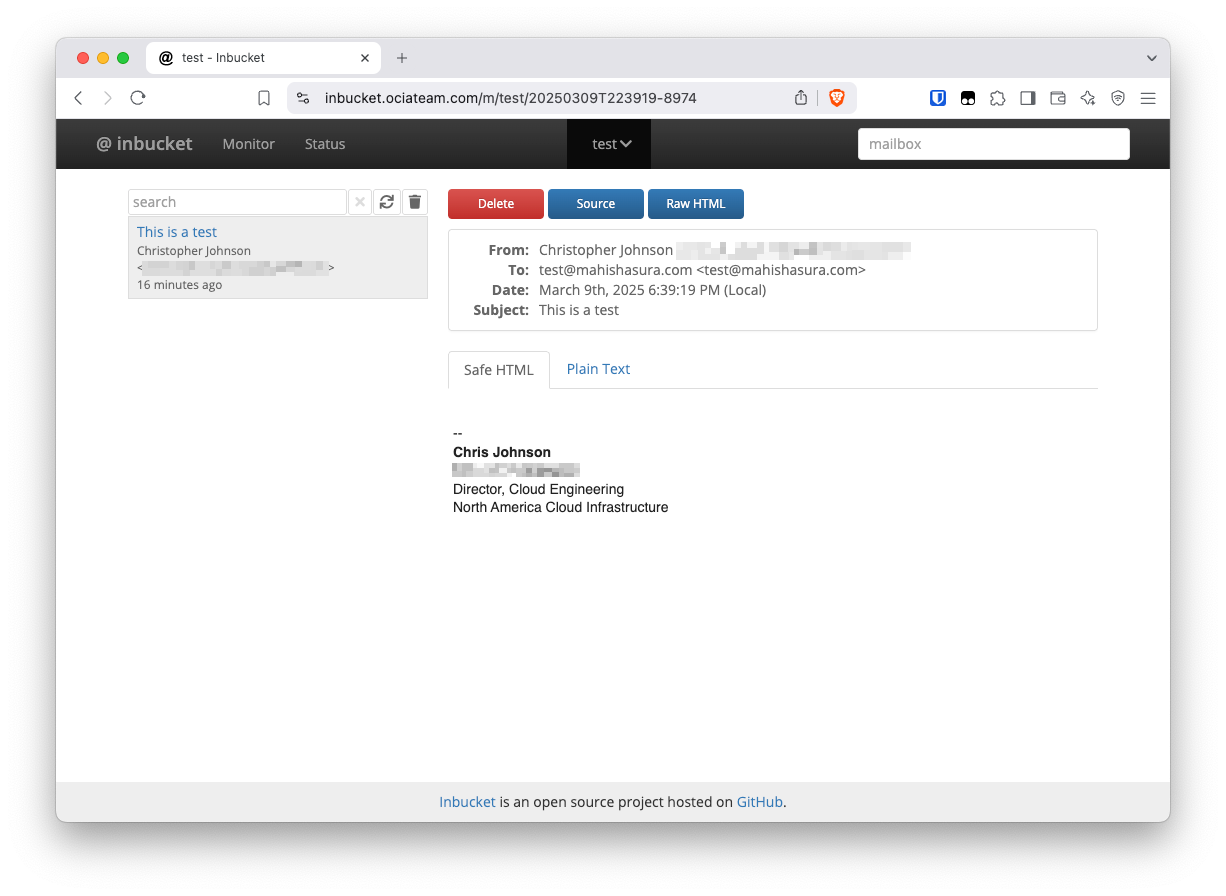
Finally, test your new mail server!
Send an email from your existing email client to your new mail server. Inbucket doesn’t care what’s before the @ sign so go wild!
Think this is neat? Let me know!