For your Enterprise Manager reporting needs, Oracle Analytics Server (OAS) allows you to create and run pixel perfect reports against Enterprise Manager 24ai repository database. By using a standalone OAS for your reporting needs, you can manage and maintain your reporting application independent of Enterprise Manager installation, upgrade, and patch cycles.
For your dashboard needs, in addition to Enterprise Manager dashboards, you can create dashboards using Grafana, an open-source technology used for metric analytics and visualization. In the Enterprise Manager App for Grafana, you can extract Enterprise Manager repository metric data and display it graphically for fast, intuitive access to performance and metric information.
This blog guides you through installing Oracle Analytics Server 2024 for use with Enterprise Manager 24ai. We also cover installing Grafana Server 11.5.1 and deploying the Enterprise Manager App for Grafana version 5.0.
The OAS instructions are based on the following technical brief:
Installing and Configuring Oracle Analytics Server 24 (7.6) for use with Oracle Enterprise Manager 24ai Release 1 (24.1).
The document is comprehensive in that it covers various use cases and scenarios. This blog is not a replacement for the document. We provide a subset of the instructions for a setup where:
- OEM is using the default repository based authentication.
- OEM version is 24ai, and there’s no requirement to migrate custom reports or schedules from an earlier version.
A typical use for this blog is when you have provisioned an OEM 24ai instance from OCI marketplace and want to augment it with an OAS instance in your tenancy. Note OAS requires a database to store its own schemas. This can be a separate database, or you can use the OEM repository database. In this blog we use a separate database.
To simplify the setup, we will provision an Oracle database 19c marketplace image, and install OAS on the same instance. In this case OAS and its repository database are collocated. This may be adequate for a pre-prod or a simple installation. In general, for a production environment, you should consider installing OAS on a separate host from its database. The instructions in this blog should still apply.
We’ll also install a Grafana server on the OAS host, and deploy the OEM app for Grafana. The instructions are based on the Oracle Enterprise Manager App for Grafana User’s Guide.
Licensing
Oracle Analytics Server for use with Oracle Enterprise Manager:
- Licensing for the database instance is covered under Oracle Enterprise Manager Restricted-use License, as long as it used solely for OAS. However, OCI charges for resources used by the compute instance will apply.
- Enterprise Manager includes restricted use of OAS for use with Enterprise Manager functions and interfaces only. This restricted OAS license allows reporting only against the Enterprise Manager repository and against data dictionary (including AWR and AWR Warehousing data) of target databases. In order to report against other data sources, it is necessary to have the OAS license.
- Some Enterprise Manager management packs include OAS reports that use a different data source. The license to use these reports is provided as part of the license for the relevant management pack. The following document provides information on the Enterprise Manager management packs and the corresponding licensed reports: Oracle Business Intelligence Publisher/Oracle Analytics Server Licensing with Oracle Enterprise Manager Cloud Control 13c.
Grafana Server for use with Oracle Enterprise Manager:
- A license to Oracle Enterprise Manager is a prerequisite to license and use Oracle Enterprise Manager App for Grafana.
- A license to Grafana Server is a prerequisite to license and use Oracle Enterprise Manager App for Grafana.
- You do NOT receive a license to use Grafana under your agreement with Oracle. All Grafana service, products, and/or software, must be separately licensed and obtained from Grafana Labs.
- For more details, please refer to the Oracle Enterprise Manager App for Grafana Licensing Information User Manual.
Provision an Oracle Database 19c from OCI Marketplace
In the OCI console, navigate to Marketplace and search for “Oracle Database”. Click on the “Oracle Database – Single Instance) tile. On the next page, before provisioning the image, review the “Usage Instructions” tab, especially item “4. Passwords” under heading “USAGE NOTES”.
When you’re ready to provision the database image, select the default version from the drop-down list on the top right of the page. Specify your compartment, agree to the terms and conditions and click “Launch Instance”. Following are fields you should change from default values:
- Instance Name: oas-grf (or another name of your choice).
- Shape: We chose VM.Standard.E5.Flex with 2 OCPU and 24 GB of memory. You can choose a different shape per your requirement.
- In the “Primary VNIC Information” section, choose your VCN and subnet, then click on “Show advanced options”. For hostname, enter “oas-grf” or the instance name you chose.
- Add your SSH keys.
- Leave other fields at default and click “Create”.
Once the instance is provisioned, log in using an SSH client (e.g., PuTTY) as user opc.
Add the OMS hostname to /etc/hosts file:
Your OMS instance is known in your VCN DNS resolver by its fully qualified hostname. For our purpose, we need to add an entry in the OAS instance “/etc/hosts” file with a reference to the short hostname “oms1”:
<Private IP of your OMS host> oms1
Install required OS package(s):
The OAS installer will check for required OS packages. On the database marketplace image, “gcc-c++-4.8.2” is not installed by default, so we’ll install it now:
sudo yum install gcc-c++
Set up firewall rules:
sudo firewall-cmd –list-ports
<this should be initially empty>
sudo firewall-cmd –add-port 9500/tcp # To be removed after configuring domain for SSL
sudo firewall-cmd –add-port 9501/tcp # BI WebLogic domain console port
sudo firewall-cmd –add-port 9503/tcp # OAS port
sudo firewall-cmd –add-port 1521/tcp # Database listener port. Needed for discovering and monitoring the database with EM.
sudo firewall-cmd –add-port 3872/tcp # EM Agent listener port. Needed for discovering and monitoring the database with EM.
sudo firewall-cmd –add-port=3000/tcp # Grafana server listener port
sudo firewall-cmd –runtime-to-permanent
Download Oracle Software
1) Download software from Oracle Delivery Cloud:
Login to Oracle Software Delivery Cloud with your Oracle Support credentials.
Search for “Oracle Analytics Server” (Download Package):
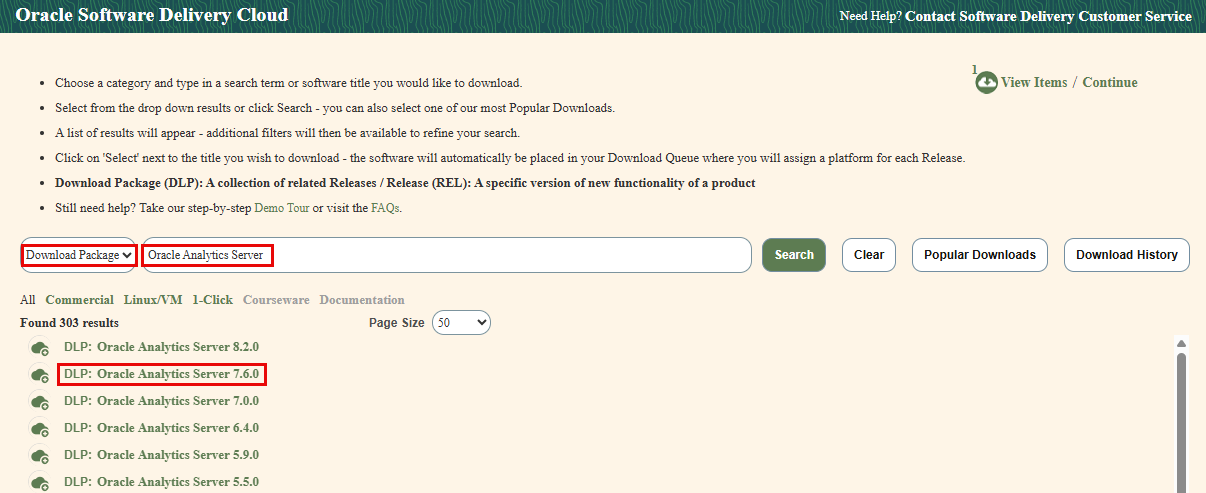
Click on “DLP: Oracle Analytics Server 7.6.0” to add it to the download list.
Search for “Oracle JDK 1.8.0” (Release):
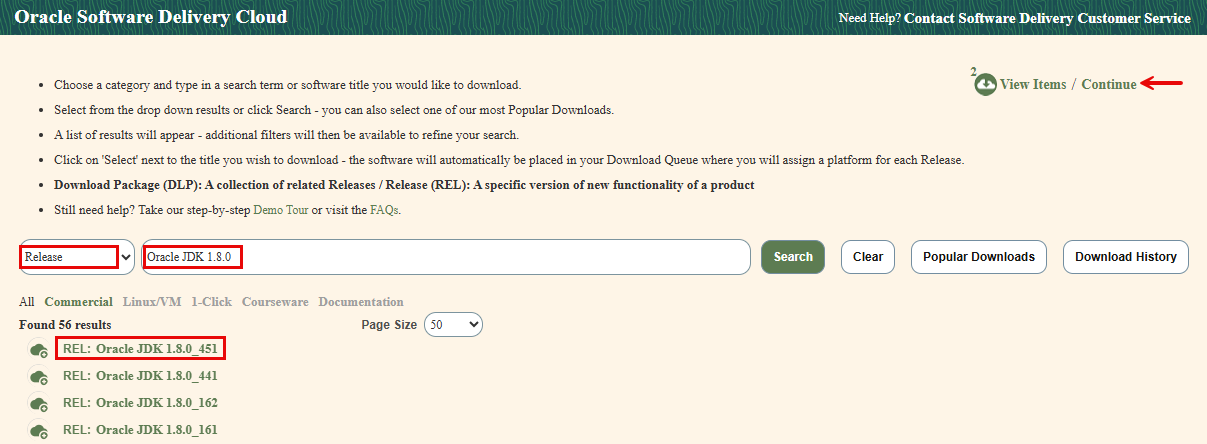
Click on “REL: Oracle JDK 1.8.0_451” to add it to the download list.
Click Continue.
Select “Linux x86-64” for the platform and click “Continue”.
On the next screen, accept the license agreement and click “Continue”.
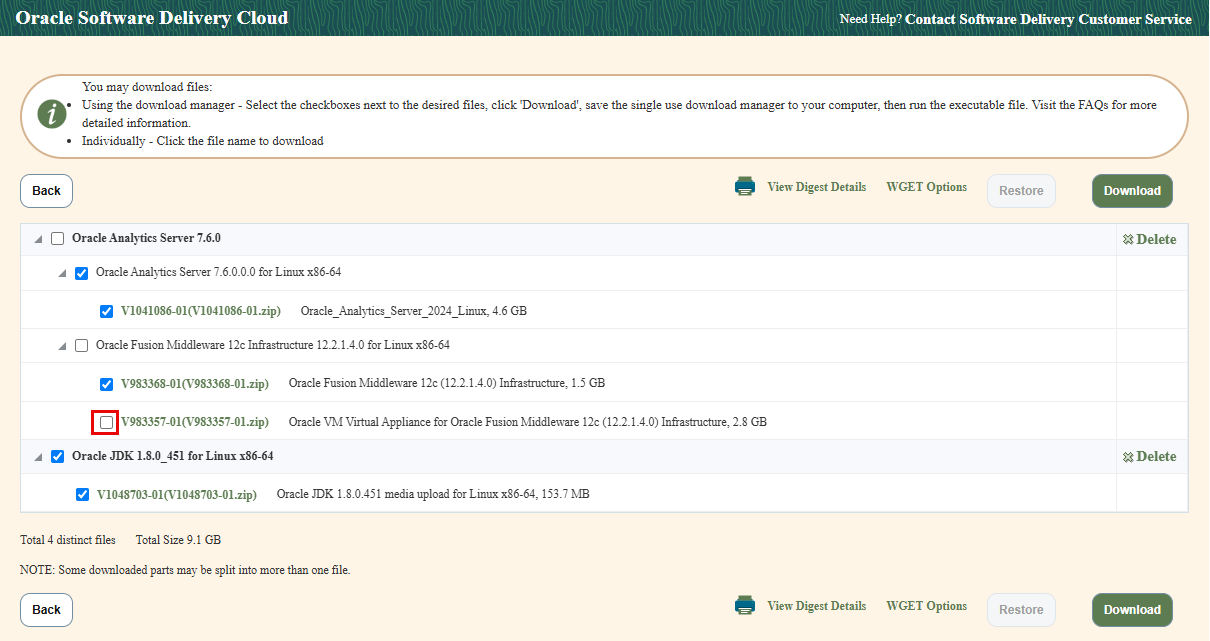
Uncheck file “Oracle VM Virtual Appliance for Oracle Fusion Middleware 12c (12.2.1.4.0) Infrastructure”.
Download the other 3 files manually by clicking on each file name, or use download manager as described on the page:
- V1041086-01(V1041086-01.zip) Oracle_Analytics_Server_2024_Linux
- V983368-01(V983368-01.zip) Oracle Fusion Middleware 12c (12.2.1.4.0) Infrastructure
- V1048703-01(V1048703-01.zip) Oracle JDK 1.8.0.451 media upload for Linux x86-64
Place the files in a directory such as /tmp/oas.
2) Download patches from My Oracle Support
Create a directory to download patches. e.g.: /tmp/oas/patches
Loging to Oracle Support. Download the following patches and place in the patches directory:
Latest OPatch:
OPATCH 13.9.4.2.19 FOR EM 13.5 AND FMW/WLS 12.2.1.4.0, 14.1.1.0.0, 14.1.2.0.0 (Patch)
- p28186730_1394219_Generic.zip
Latest quarterly CPU patches for FMW 12.2.14 (as of the writing of this page):
Critical Patch Update (CPU) Patch Advisor for Oracle Fusion Middleware – Updated for April 2025 (Doc ID 2806740.2)
Click on “FMW Infrastructure / WebLogic Server” link in the left hand-side navigation bar.
Under WebLogic Server, click on “12.2.1.4”
Download the WebLogic Server Stack Patch Bundle (SPB) in step 3 option 1:
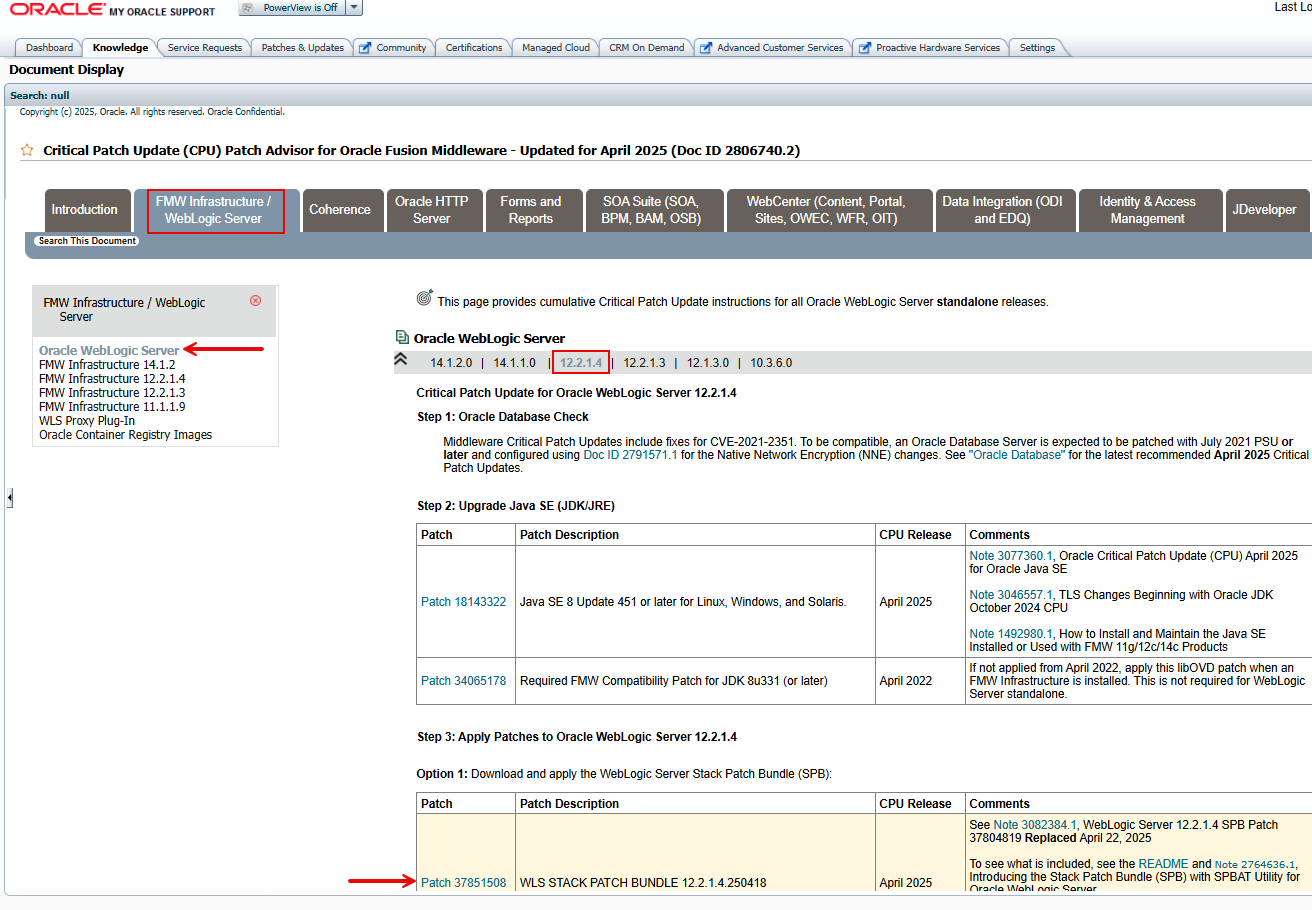
Patch 37851508 WLS STACK PATCH BUNDLE 12.2.1.4.250418
- p37851508_122140_Generic.zip
Click FMW Infrastructure 12.2.1.4 in the left hand-side navigation bar.
Download the following patches and place in /tmp/oas/patches/fmw:

Patch 37836334 ADF BUNDLE PATCH 12.2.1.4.250416
- p37836334_122140_Generic.zip
Patch 34809489 Fix for CVE-2021-42575 (July 2023)
- p34809489_122140_Generic.zip
Patch 36946553 FMW CONTROL BUNDLE PATCH 12.2.1.4.240814
- p36946553_122140_Generic.zip
Patch 37684007 OWSM BUNDLE PATCH 12.2.1.4.250309 (Latest Recommended)
- p37684007_122140_Generic.zip
Patch 37284722 WEBCENTER CORE BP 12.2.1.4.241114 (Latest Recommended)
- p37284722_122140_Generic.zip
Patch 36316422 OPSS BUNDLE PATCH 12.2.1.4.240220 (Latest Recommended)
- p36316422_122140_Generic.zip
When done, upload all files to the newly provisioned database instance oas-grf, and place in a temporary directory (e.g., /tmp/oas). If the files are owned by user opc, change ownership to oracle as follows:
sudo chown -R oracle:oinstall /tmp/oas
Create an OAS Environment File
For convenience, create a simple environment file you can use to set your environment for OAS as needed:
Login to the newly provisioned host oas-grf as user opc
sudo su – oracle
vi setEnvOAS
export ORACLE_BASE=/u01/app
export MW_HOME=$ORACLE_BASE/oasmw
export ORACLE_HOME=$MW_HOME
export JAVA_HOME=$ORACLE_BASE/jdk
export BI_DOMAIN_HOME=$MW_HOME/user_projects/domains/bi
export PATH=$JAVA_HOME/bin:$MW_HOME/oracle_common/common/bin:$BI_DOMAIN_HOME/bin:$PATH
echo “OAS environment set”
You can then set your environment to OAS as follows:
source setEnvOAS
or simply:
. setEnvOAS
Install and Configure OAS
As user oracle, set your environment for OAS and create OAS middleware directory:
cd
. setEnvOAS
mkdir ~/stage; mkdir $ORACLE_BASE/oasmw
Install Java JDK:
cd ~/stage; unzip /tmp/oas/V1048703-01.zip
cd $ORACLE_BASE; tar xvzpf ~/stage/jdk-8u451-linux-x64.tar.gz; mv jdk1.8.0_451 jdk
Next, we’ll install and configure FMW Infrastructure and OAS using a GUI installer. Login to the OAS host using an X-Window enabled terminal.
Install Fusion Middleware Infrastructure:
cd ~/stage; rm -rf *; unzip /tmp/oas/V983368-01.zip; java -jar ~/stage/fmw_12.2.1.4.0_infrastructure.jar
- Skip Auto Updates.
- When prompted for the Oracle Home, provide the following path:
- Oracle Home=/u01/app/oasmw
- Leave everything else at default values.
- Continue to Installation Summary and Click Finish.
The installation takes a few minutes to complete.
Install OAS 2024:
cd ~/stage; rm -rf *; unzip /tmp/oas/V1041086-01.zip; java -jar ~/stage/Oracle_Analytics_Server_2024_Linux.jar
- When prompted for the Oracle Home, provide the following path:
- Skip Auto Updates.
- Installation Location:
- Oracle Home=/u01/app/oasmw
- Ensure all prerequisite checks pass on the next screen.
- Continue to Installation Summary and Click Finish.
When completed, create a backup of MW Home.
Create a backup of MW Home:
cd $ORACLE_BASE; tar -cvzpf ~/oasmw-backup-pre-patch.tar.gz oasmw/
Update OPatch:
Check current OPatch version:
$ORACLE_HOME/OPatch/opatch version
OPatch Version: 13.9.4.2.1
cd ~/stage; rm -rf *; unzip /tmp/oas/patches/p28186730_1394219_Generic.zip
cd 6880880; java -jar ./opatch_generic.jar -silent oracle_home=$ORACLE_HOME
$ORACLE_HOME/OPatch/opatch version
OPatch Version: 13.9.4.2.19
Apply WebLogic Patch:
Patch 37851508 WLS STACK PATCH BUNDLE 12.2.1.4.250418
cd ~/stage; rm -rf *; unzip /tmp/oas/patches/p37851508_122140_Generic.zip
cd WLS_SPB_12.2.1.4.250418/tools/spbat/generic/SPBAT
./spbat.sh -phase precheck -oracle_home $ORACLE_HOME
…
PRECHECK SUMMARY:
No Of FAILURES: 0
No Of WARNINGS: 0
./spbat.sh -phase apply -oracle_home $ORACLE_HOME
…
SPBAT apply phase has completed successfully
Time Taken to run apply phase: 00 hours 07 min 43 secs
Perform the post install actions as documented in the SPB README.txt
$ORACLE_HOME/OPatch/opatch lspatches
…
37851551;WLS STACK PATCH BUNDLE 12.2.1.4.250418 (Patch 37851508)
..
Apply FMW Patches:
Note: when applying these patches, you get the following question:
Please shutdown Oracle instances running out of this ORACLE_HOME on the local system.
(Oracle Home = ‘/u01/app/oasmw’)
Is the local system ready for patching? [y|n]
Reply “y”. We haven’t configured the domain yet, so there’s nothing running out of the oracle home.
1) Patch 37836334 ADF BUNDLE PATCH 12.2.1.4.250416
cd ~/stage; rm -rf *; unzip /tmp/oas/patches/fmw/p37836334_122140_Generic.zip
cd 37836334; $ORACLE_HOME/OPatch/opatch apply
…
OPatch succeeded.
2) Patch 34809489 Fix for CVE-2021-42575 (July 2023)
cd ~/stage; rm -rf *; unzip /tmp/oas/patches/fmw/p34809489_122140_Generic.zip
cd 34809489; $ORACLE_HOME/OPatch/opatch apply
…
OPatch succeeded.
3) Patch 36946553 FMW CONTROL BUNDLE PATCH 12.2.1.4.240814
cd ~/stage; rm -rf *; unzip /tmp/oas/patches/fmw/p36946553_122140_Generic.zip
cd 36946553; $ORACLE_HOME/OPatch/opatch apply
…
OPatch succeeded.
4) Patch 37684007 OWSM BUNDLE PATCH 12.2.1.4.250309 (Latest Recommended)
cd ~/stage; rm -rf *; unzip /tmp/oas/patches/fmw/p37684007_122140_Generic.zip
cd 37684007; $ORACLE_HOME/OPatch/opatch apply
…
OPatch succeeded.
5) Patch 37284722 WEBCENTER CORE BP 12.2.1.4.241114 (Latest Recommended)
cd ~/stage; rm -rf *; unzip /tmp/oas/patches/fmw/p37284722_122140_Generic.zip
cd 37284722; $ORACLE_HOME/OPatch/opatch apply
…
OPatch succeeded.
6) Patch 36316422 OPSS BUNDLE PATCH 12.2.1.4.240220 (Latest Recommended)
cd ~/stage; rm -rf *; unzip /tmp/oas/patches/fmw/p36316422_122140_Generic.zip
cd 36316422; $ORACLE_HOME/OPatch/opatch apply
…
OPatch succeeded.
We’re now done with the patching phase:
cd ~/stage; rm -rf *;
Create a New Backup of the MW Home:
cd $ORACLE_BASE; tar -cvzpf ~/oasmw-backup-post-patch.tar.gz oasmw/
You can now remove the previous backup to save space or move both backups to a different file system or external mount point.
Configure Oracle Analytics Server:
cd
. setEnv OAS
$MW_HOME/bi/bin/config.sh
- On the “components” screen, uncheck “Oracle Analytics Server”. Leave “Oracle Analytics Publisher” checked.
- click Next.
- On the next screen, ensure all “Prerequisite Checks” pass. Click Next.
- On the “Define Domain” screen, set the values as follows:
- Domain Directory: /u01/app/oasmw/user_projects/domains
- Domain Name: bi
- Domain Home: /u01/app/oasmw/user_projects/domains/bi
- Choose a password for user weblogic: ***
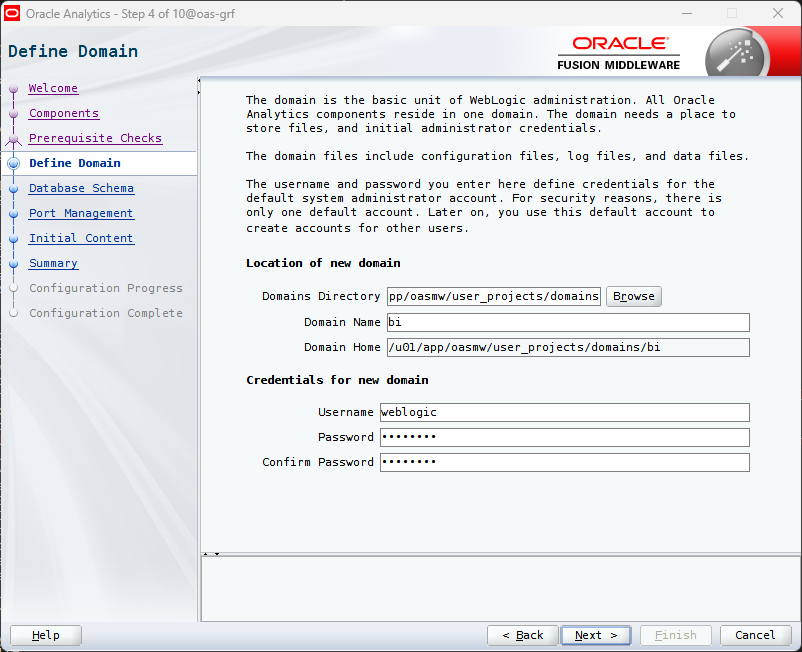
Click Next
On the “Database Schema” screen, choose “Create new schemas”
- Schema prefix: oas
- Schema password: (password must be at least 8 character long, have a mix of upper case, lower case, and special characters).
- Database Type: Oracle Database
- Username: SYS
- Password: (SYS password in the database marketplace image. Refer to “Usage Instructions” on the image home page in OCI console).
- Simple connect string: oas-grf:1521:orclpdb
- You can test on the command line using SQL Plus as follows: sqlplus sys@oas-grf:1521/orclpdb as sysdba
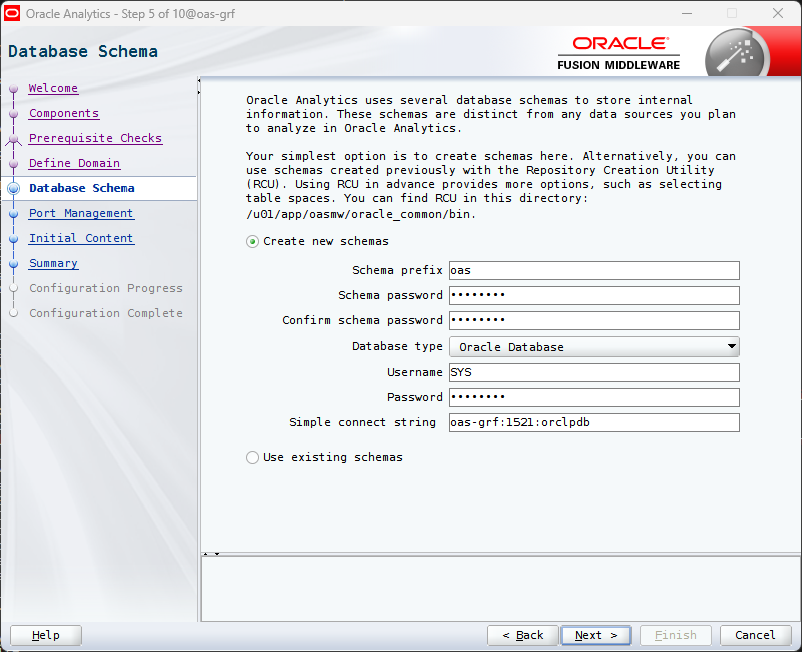
Click Next.
Keep the default selections on the remaining screens and click “Configure”.
When this step is complete, click Next, then “Finish”.
You can now access the console from a browser. For convenience, you may want to add an entry to your local hosts file (“C:\Windows\System32\drivers\etc\hosts” on Windows) as follows:
<Public IP address of the OAS VM> oas-grf
Access the domain as follows:
http://oas-grf:9500/console
(Otherwise specify the IP address of your OAS instance)
Note it’s not https at this point. Login as user weblogic and the password you chose for this user.
- Click “Lock & Edit” in the “Change Center” (Top Left).
- Click “Servers” in the “Domain Structure” menu in the left hand-side toolbar (expand “Environment”).
- Click “AdminServer”.
- Check the “SSL Listen Port Enabled” (Keep the “Listen Port Enabled” checkbox checked).
- Click Save.
- Click “Servers”.
- Click “bi_server1”.
- Check the “SSL Listen Port Enabled” (Keep the “Listen Port Enabled” checkbox checked).
- Click Save.
- Click “Activate Changes” in the “Change Center”.
- Click “Servers”.
- Under “Summary of Servers” in the main area of the screen, click the “Control” tab.
- Check the “AdminServer’ and “bi_server1” checkboxes and click the “Restart SSL” button.
Now click “Logout” and access the domain on the SSL port:
https://oas-grf:9501/console
Accept the browser warning and continue to the site.
You can now disable access to the http port 9500 on the OS command line. As user opc:
sudo firewall-cmd –remove-port 9500/tcp
sudo firewall-cmd –runtime-to-permanent
The port is now closed on the Linux firewall and cannot be accessed remotely. You can also disable it using the WebLogic domain console if needed.
Configure OAS for EM Repository-Based Security
1) Create required DBMS roles and grant to required EM administrators.
Create the required roles, and minimal role grants, on the Enterprise Manager repository database:
Login to the EM repository database host, as user opc:
The OAS server will access the EM repository database on port 1521, so we need to open the port on the Linux firewall:
sudo firewall-cmd –add-port=1521/tcp
sudo firewall-cmd –runtime-to-permanent
Now switch to user oracle:
sudo su – oracle
[oracle@oms1 ~]$ . oraenv
ORACLE_SID = [emrep] ? <Enter>
sqlplus / as sysdba
alter session set container=EMPDB
REM Create base roles
create role XMLP_ADMIN;
create role XMLP_DEVELOPER;
create role XMLP_SCHEDULER;
REM Create Role Hiearchy
grant XMLP_DEVELOPER to XMLP_ADMIN;
grant XMLP_SCHEDULER to XMLP_ADMIN;
grant MGMT_USER to XMLP_ADMIN;
grant XMLP_SCHEDULER to XMLP_DEVELOPER;
grant MGMT_USER to XMLP_DEVELOPER;
REM Sysman gets super admin
grant XMLP_ADMIN to sysman;
Preparation for upload of Oracle Provided Reports
REM Create base EMBIP roles
create role EMBIPADMINISTRATOR;
create role EMBIPAUTHOR;
create role EMBIPSCHEDULER;
create role EMBIPVIEWER;
REM Create Role Mapping
grant XMLP_ADMIN to EMBIPADMINISTRATOR;
grant XMLP_DEVELOPER to EMBIPAUTHOR;
grant XMLP_SCHEDULER to EMBIPSCHEDULER;
grant MGMT_USER to EMBIPVIEWER;
REM Ensure SYSMAN is an OAS Super Administrator
grant EMBIPADMINISTRATOR to SYSMAN;
exit;
Following is an example of granting other Enterprise Manager administrators OAS permissions beyond basic report viewing:
sqlplus / as sysdba
alter session set container=EMPDB
grant EMBIPAUTHOR to OEM_ADMIN1;
grant EMBIPSCHEDULER to OEM_ADMIN2;
exit;
2) Configure OAS for the Database Security Model
Step 1 – Login to OAS
https://oas-grf:9503/xmlpserver
username/password: weblogic/***
Step 2 – Click on the Administration link
In the top right of the OAS user interface, just to the right of the Open link, single click on the user icon. In the drop-down menu that is shown, click Administration.
Step 3 – Security Configuration (located under Security Center)
After the administration link is pressed, the administration screen is shown. Underneath the “Security Center” heading, click “Security Configuration”.
Step 4 – Enable the local super user
Due to the complexities associated with these steps, and the possibility of accidentally locking yourself out of OAS, it is highly recommended to temporarily enable the local SuperUser. This special account is not designed to be utilized for running or scheduling reports, but only to administer OAS. Proceed with these steps to enable this special account:
Click the check-box next to Enable Local Superuser.
Enter a username and password, for example:
- User: SuperUser (or another username of your choice)
- Password: <Choose a password>
Step 5 – Configuring the OAS Database Security Model (Informational only)
We will use the following values in the next step:
- Security Model: Oracle Database
- Connection String: jdbc:oracle:thin:@//oms1:1521/empdb
- Administrator Username: sysman
- Administrator Password: <sysman password>
- Database Driver Class: oracle.jdbc.driver.OracleDriver
Step 6 – Setting the OAS Security Model to “Oracle Database”
Skip the “Authentication” section: Make sure that ‘Use Single Sign-On’ and ‘Use LDAP’ are not checked.
Scroll down to the Authorization section and fill in the appropriate fields.
In the Security Model field, select “Oracle Database” from the drop-down list.
Fill in the appropriate connect descriptor for the Enterprise Manager repository database:
- Connection String: jdbc:oracle:thin:@//oms1:1521/empdb
- Administrator Username: sysman
- Administrator Password: <sysman password>
- Database Driver Class: Leave blank (it defaults to Database Driver Class).
- Click Apply.
Confirmation:
Settings saved successfully. Any changes will not take effect until the application is restarted.
Sign out from OAS (we’ll restart the server after the next task).
Login this time to the OAS WebLogic domain with user weblogic:
https://oas-grf:9501/console
username/password: weblogic/***
- Click on “Servers” under “Environment” in the “Home Page” section (or expand “Environment” in the left hand-side navigation bar).
- In the “Summary of Servers” section, click on the “Control” tab.
- Click on the “bi_server1” checkbox and click “Shutdown”->”Force Shutdown now”.
- Confirm, after a few seconds, refresh until the status shows “shutdown”.
- Click on the “AdminServer” checkbox and click “Shutdown”->”Force Shutdown now”.
- Confirm, you will be presented with the “Server Shutdown” page.
Restart the server on the command line (refer to “Manage Server Start and Stop” below).
Login to OAS again, this time as user SYSMAN:
https://oas-grf:9503/xmlpserver
username/password: sysman/<sysman password>
You should get the OAS home page. if you encounter issues, check the following logs for troubleshooting:
$BI_DOMAIN_HOME/servers/bi_server1/logs/bipublisher/bipublisher.log
$BI_DOMAIN_HOME/servers/bi_server1/logs/bi_server1.log
$BI_DOMAIN_HOME/servers/bi_server1/logs/bi_server1.out?????
Configure Required OAS Data Sources
Create the EM repository data source:
Step 1 – On the OMS host
Set the password for the MGMT_USER which will be used by OAS to connect to the OEM Repository database:
[oracle@oms1 ~]$ $OMS_HOME/bin/emctl config oms -change_view_user_pwd
Enter Repository User’s Password : <SYSMAN Password>
Enter MGMT_VIEW User’s Password : ***
Successfully changed MGMT_VIEW User’s password.
Restart OMS:
$OMS_HOME/bin/emctl stop oms -all
$OMS_HOME/bin/emctl start oms
Step 2 – OAS data source configuration steps
Login to OAS as SYSMAN
https://oas:9503/xmlpserver
Username/Password: sysman/***
In the top right of the OAS user interface, just to the right of the “Open” link, single-click on the user icon. In the drop-down menu that is shown, click Administration.
Under “Data Sources” click “JDBC”.
You can remove the existing “Oracle BI EE” data source.
Click “Add Data Source”.
Fill in the required details
- Data Source Name: EMREPOS
- Driver Type: Oracle 12c
- Database Class: oracle.jdbc.OracleDriver
- Connection String: jdbc:oracle:thin:@//oms1:1521/empdb
- Use System User: Do Not Check
- Username: MGMT_VIEW
- Password: ***
- Pre Process Function: sysman.gc$bip.bip_set_em_user_context(:xdo_user_name)
- Post Process Function: Leave Blank.
- Client Certificate: Leave Blank.
- Use Proxy Authentication: Leave Blank.
Click “Test Connection”. You should get:
Confirmation
Connection established successfully.
(If not, fix the issue per the error and retry).
Scroll down the page to the “Security” section:
- Leave the “Allow Guest Access” checkbox unchecked.
- From the “Available Roles” list, select “EMBIPVIEWER” and “MGMT_USER”
- Move the two items to the “Allowed Roles” list.
Click “Apply” on the top right of the page.
Add a Data Source for the Sample Reports:
You are currently on “JDBC” tab on “Data Sources” page. Click on the “File” tab then click “Add Data Source”:
- Data Source Name: Samples Data Files
- Full Path of Top-level Directory: /u01/app/oasmw/user_projects/domains/bi/bidata/components/bipublisher/repository/DemoFiles
Click “Apply” on the top right of the page.
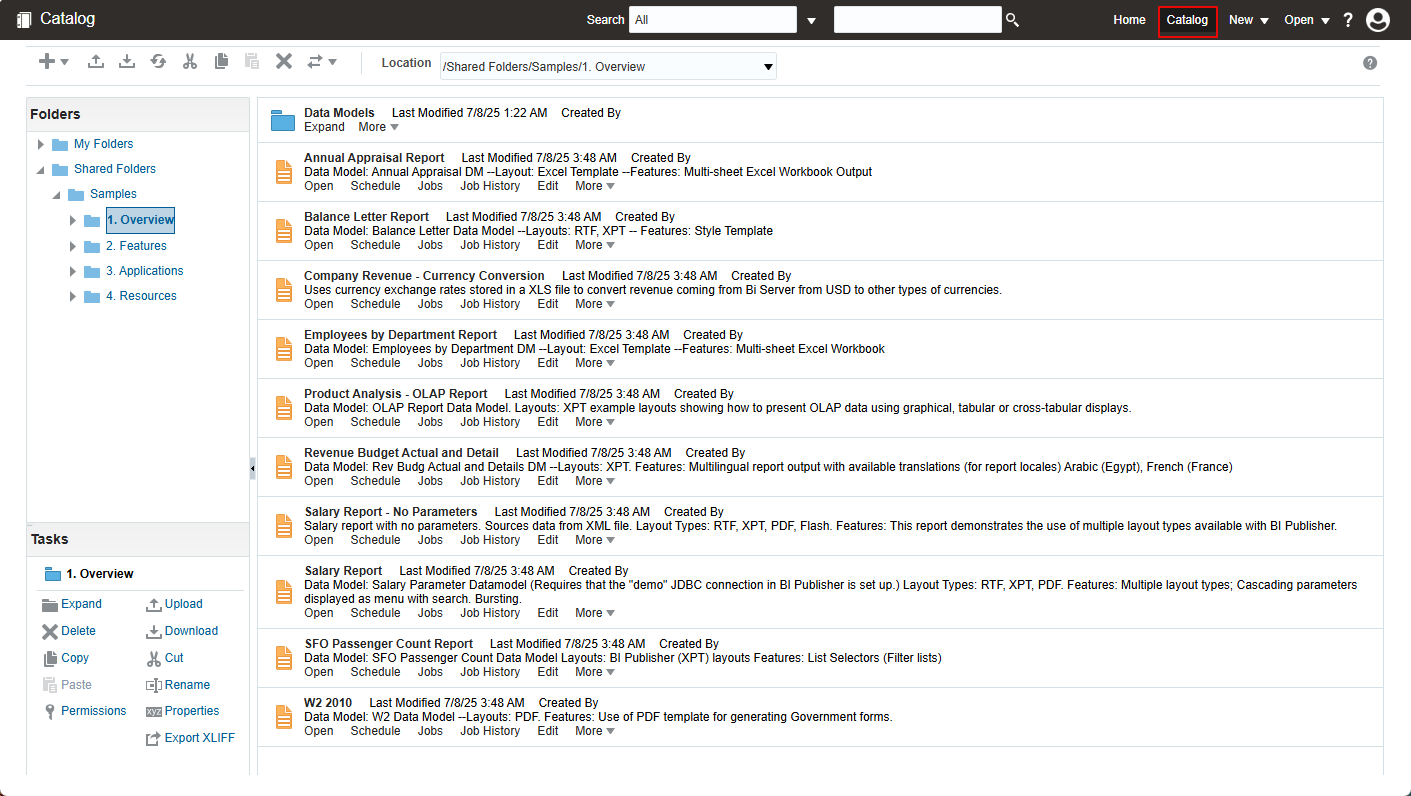
The demo reports based on sample data files are now available in OAS:
- Click “Catalog” on the top right.
- In the “Folders” navigation bar, navigate to “Shared Folders”->”Samples”, and run some of the sample reports:
Upload Enterprise Manager Default Reports to OAS
Download Oracle Provided Out-of-box Reports from the OMS Host
In this task you will download the default reports from the OEM 24ai OMS host to your local workstation, then upload them to OAS using the GUI console.
The base framework reports are bundled in this file:
$OMS_HOME/sysman/jlib/’Enterprise Manager Cloud Control.xdrz’
The Plugins deployed on your OEM may have also deployed their own reports. For each plugin, the reports are bundled in a file with the same name (‘Enterprise Manager Cloud Control.xdrz’). To list those reports:
[oracle@oms1 ~]$ cd $OMS_HOME/plugins/
[oracle@oms1 plugins]$ ls -1 oracle.sysman.*.plugin_24*/metadata/bipublisherreport/emreports/*.xdrz
‘oracle.sysman.cfw.oms.plugin_24.1.1.0.0/metadata/bipublisherreport/emreports/Enterprise Manager Cloud Control.xdrz’
‘oracle.sysman.db.oms.plugin_24.1.1.0.0/metadata/bipublisherreport/emreports/Enterprise Manager Cloud Control.xdrz’
‘oracle.sysman.emas.oms.plugin_24.1.1.0.0/metadata/bipublisherreport/emreports/Enterprise Manager Cloud Control.xdrz’
‘oracle.sysman.xa.oms.plugin_24.1.1.0.0/metadata/bipublisherreport/emreports/Enterprise Manager Cloud Control.xdrz’
(your list may vary depending on how many plugins you have deployed).
To ease the process, create the following directory structure on the OMS host, in the “/tmp” directory:
cd /tmp; mkdir reports; cd reports
Make a subdirectory for the base framework reports, and one for each of the plugin reports (use the plugin abbreviation from the list above, after ‘oracle.sysman.’ on each line)
mkdir base cfw db emas xa
Copy the base EM framework reports bundle, which is located at $OMS_HOME/sysman/jlib/’Enterprise Manager Cloud Control.xdrz’:
cp $OMS_HOME/sysman/jlib/*.xdrz /tmp/reports/base
Copy the plugin reports. Note the list below depends on which plugins you have deployed on your installation of OEM:
cd $OMS_HOME/plugins/
cp oracle.sysman.cfw.oms.plugin_24*/metadata/bipublisherreport/emreports/*.xdrz /tmp/reports/cfw
cp oracle.sysman.db.oms.plugin_24*/metadata/bipublisherreport/emreports/*.xdrz /tmp/reports/db
cp oracle.sysman.emas.oms.plugin_24*/metadata/bipublisherreport/emreports/*.xdrz /tmp/reports/emas
cp oracle.sysman.xa.oms.plugin_24*/metadata/bipublisherreport/emreports/*.xdrz /tmp/reports/xa
When done, each folder will contain exactly one file, with the same name “Enterprise Manager Cloud Control.xdrz”.
[oracle@oms1 plugins]$ cd /tmp; ls -R /tmp/reports
/tmp/reports:
base cfw db emas xa
/tmp/reports/base:
‘Enterprise Manager Cloud Control.xdrz’
/tmp/reports/cfw:
‘Enterprise Manager Cloud Control.xdrz’
/tmp/reports/db:
‘Enterprise Manager Cloud Control.xdrz’
/tmp/reports/emas:
‘Enterprise Manager Cloud Control.xdrz’
/tmp/reports/xa:
‘Enterprise Manager Cloud Control.xdrz’
Change permission for ease of downloading by user opc:
[oracle@oms1 tmp]$ chmod 644 reports/*/*.xdrz
zip -r reports.zip reports
Download the reports.zip file to your local laptop or workstation and extract the content.
Upload Oracle Provided Out-of-box Reports to the Standalone OAS
Login to OAS console as a user with OAS Administrator privileges (SYSMAN):
https://oas-grf:9503/xmlpserver
Username/Password: sysman/***
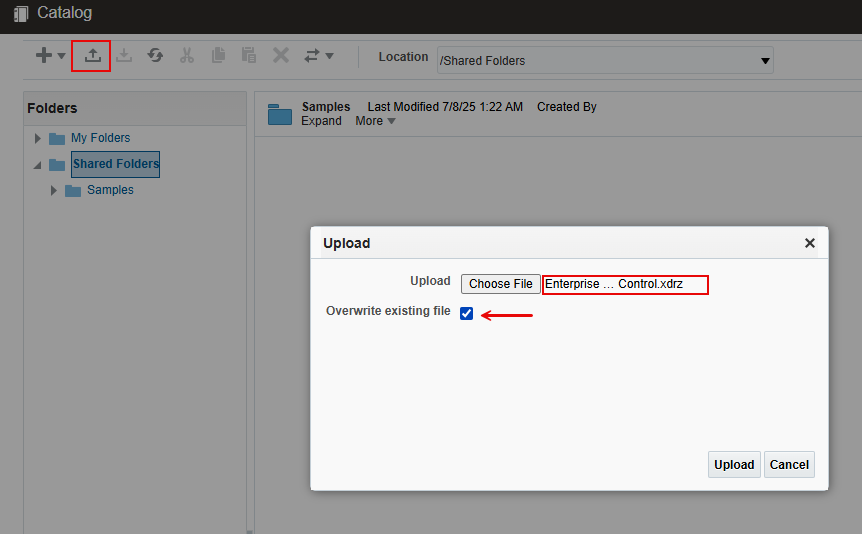
- Click on “Catalog”.
- Click on “Shared Folders” in the left hand-side navigation bar.
- Make sure “Shared Folders” is highlighted.
- Click on the “Upload Resource” icon just above the navigation bar.
- Click “Choose File” and select the reports file to upload. Start with the base framework (under reports/base).
- Check “Overwrite Existing file” and click “Upload”.
- Repeat steps 3 – 6 for the other plugins. Ensure you check “Overwrite Existing file” each time.
- When done, click the “Refresh” icon. You should see the uploaded reports.

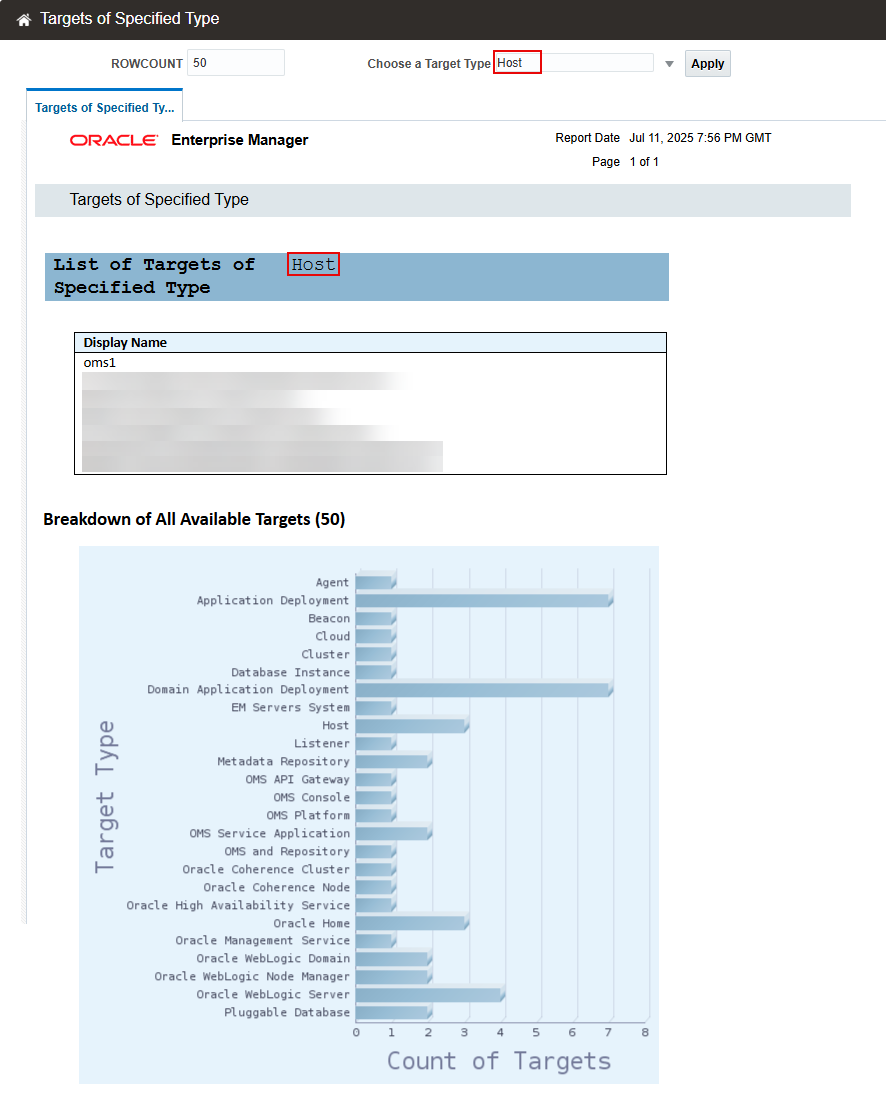
Expand the “EM Sample Reports” folder, then open the “Targets of Specified Type”:
This completes setting up OAS for use with OEM 24ai.
Monitoring Oracle Analytics Server with OEM
To monitor OAS with OEM, you need to install the OEM agent on the OAS host, then discover OAS repository database and OAS WebLogic domain (recommended in this order). We will not cover this task in the blog as it is a general OEM activity, not specifically related to OAS reports.
Note that to discover the OAS (BI) WebLogic domain over “t3s” protocol, you need to add the domain certificate to the OEM agent trust store. For details, check the OEM documentation here:
- Enterprise Manager Cloud Control 24.1 – Middleware Management Guide
Install Grafana Server version 11.5.1 and Deploy OEM App for Grafana version 5.0
Grafana is an open source technology used for metric analytics & visualization. The Oracle Enterprise Manager app for Grafana allows you to integrate Enterprise Manager’s metric data (collected from multiple managed targets and stored in the Enterprise Manager repository) with any other data sources you may have access to.
When deployed, the Oracle Enterprise Manager app for Grafana lets Enterprise Manager become a data source for Grafana. The Enterprise Manager Oracle Management Service (OMS) is in direct communication with the Grafana server, transferring target metric and configuration data stored in the Oracle Management Repository (OMR).
Step 1: Setup OMS Host for OEM App for Grafana
Execute the following emctl commands:
emctl set property -name oracle.sysman.db.restfulapi.grafana.enable -value true -sysman_pwd <sysman password>
emctl set property -name oracle.sysman.db.restfulapi.grafana.executesql.repository.query.enable -value true -sysman_pwd <sysman password>
emctl set property -name oracle.sysman.db.restfulapi.grafana.executesql.target.query.enable -value true -sysman_pwd <sysman password>
Create or use a monitoring user in OEM:
This user will be used in the Grafana data source to connect to OEM. You can use an existing user with a minimal set of privileges for monitoring or create a new user for this purpose. For example:
On the “Create Administrator” screen
Under General:
Username: grafana
Password: ***
Under “Roles”
Select “EM_ALL_VIEWER” from “Available Roles”
Click “Add” to the right on the same row
Click “Create”
Step 2: Install Grafana Server on your OAS host
Although the current version of Grafana server is 12.x, we’ll install version 11.5.1 since the OEM App for Grafana documentation states that it is certified with this version.
Login to your OAS host as user opc:
sudo yum install -y https://dl.grafana.com/enterprise/release/grafana-enterprise-11.5.1-1.x86_64.rpm
Start the server with systemd:
To start the service and verify that the service has started:
sudo systemctl daemon-reload
sudo systemctl start grafana-server
Configure the Grafana server to start at boot:
sudo systemctl enable grafana-server
Access the Grafana server homepage and change the default password:
http://oas-grf:3000/
Username/Password: admin/admin (default)
change password: ***
Step 3: Set up Grafana HTTPS for secure web traffic
The following instructions are based on the Grafana documentation here: Set up Grafana HTTPS for secure web traffic.
While still logged in to the OAS host as user opc:
sudo openssl genrsa -out /etc/grafana/grafana.key 2048
sudo openssl req -new -key /etc/grafana/grafana.key -out /etc/grafana/grafana.csr
You are about to be asked to enter information that will be incorporated into your certificate request.
There are quite a few fields but you can leave some blank. For some fields there will be a default value, If you enter ‘.’, the field will be left blank.
—–
Country Name (2 letter code) [XX]:.
State or Province Name (full name) []:.
Locality Name (eg, city) [Default City]:.
Organization Name (eg, company) [Default Company Ltd]:.
Organizational Unit Name (eg, section) []:.
Common Name (eg, your name or your server’s hostname) []: Grafana (or another name of your choice)
Email Address []:.
Please enter the following ‘extra’ attributes to be sent with your certificate request
A challenge password []:.
An optional company name []:.
sudo openssl x509 -req -days 3650 -in /etc/grafana/grafana.csr -signkey /etc/grafana/grafana.key -out /etc/grafana/grafana.crt
sudo chown grafana:grafana /etc/grafana/grafana.crt
sudo chown grafana:grafana /etc/grafana/grafana.key
sudo chmod 400 /etc/grafana/grafana.key /etc/grafana/grafana.crt
You need to make updates to the Grafana initialization file and restart the Grafana server for these changes to take effect. We’ll do both in the next step after we deploy the OEM app for Grafana.
Step 4: Download and Deploy the OEM App for Grafana to your OAS Host
Access the Grafana download page on oracle.com: Oracle Enterprise Manager App for Grafana.
Download “oracle-emcc-app-5.0.0 , certified with Grafana Version 11.5.1”
Assuming you placed the file in “/tmp”, deploy the app as follows:
sudo /usr/sbin/grafana-cli –pluginUrl /tmp/oracle-emcc-app-5.0.0.zip plugins install oracle-emcc-app
To allow Loading the OEM app which is unsigned. Uncomment the line below and specify the OEM app for Grafana:
sudo vi /etc/grafana/grafana.ini
uncomment the “allow_loading_unsigned_plugins” and update it as follows:
allow_loading_unsigned_plugins = oracle-emcc-app,oracle-emcc-datasource
Also, uncomment and update the following lines in the same file for the SSL configuration to take effect:
[server]
protocol = https
domain = oas-grf
cert_file = /etc/grafana/grafana.crt
cert_key = /etc/grafana/grafana.key
Restart Grafana Server:
sudo systemctl restart grafana-server
Step 5: Add an Enterprise Manager Data Source and View Pre-Defined Dashboards
Access the Grafana server at:
https://oas:3000/
Username/Password: admin/***
From the Grafana home page, Navigate to “Administration” -> “Plugins and data”.
Click on “Plugins”. A list of available Grafana plugins displays.
Click on “Oracle Enterprise Manager App”.
Click “Enable” on the top right corner of the page.
From the left hand-side navigation bar, Navigate to “Connections” -> “Data Sources”.
Click Add data source. A list of data source types is displayed.
Click “Enterprise manager data source” (under “Others”), and enter:
https://oms1:7799 (do not add “/em” at the end of the URL).
Under “Basic Authnetication” enter:
Username: grafana
Password: <password you chose for this user in OEM>
Click “Save and Test”.
You should get “Connection Successful”. If not, review the previous steps to identify and correct the issue.
View Predefined Dashboards:
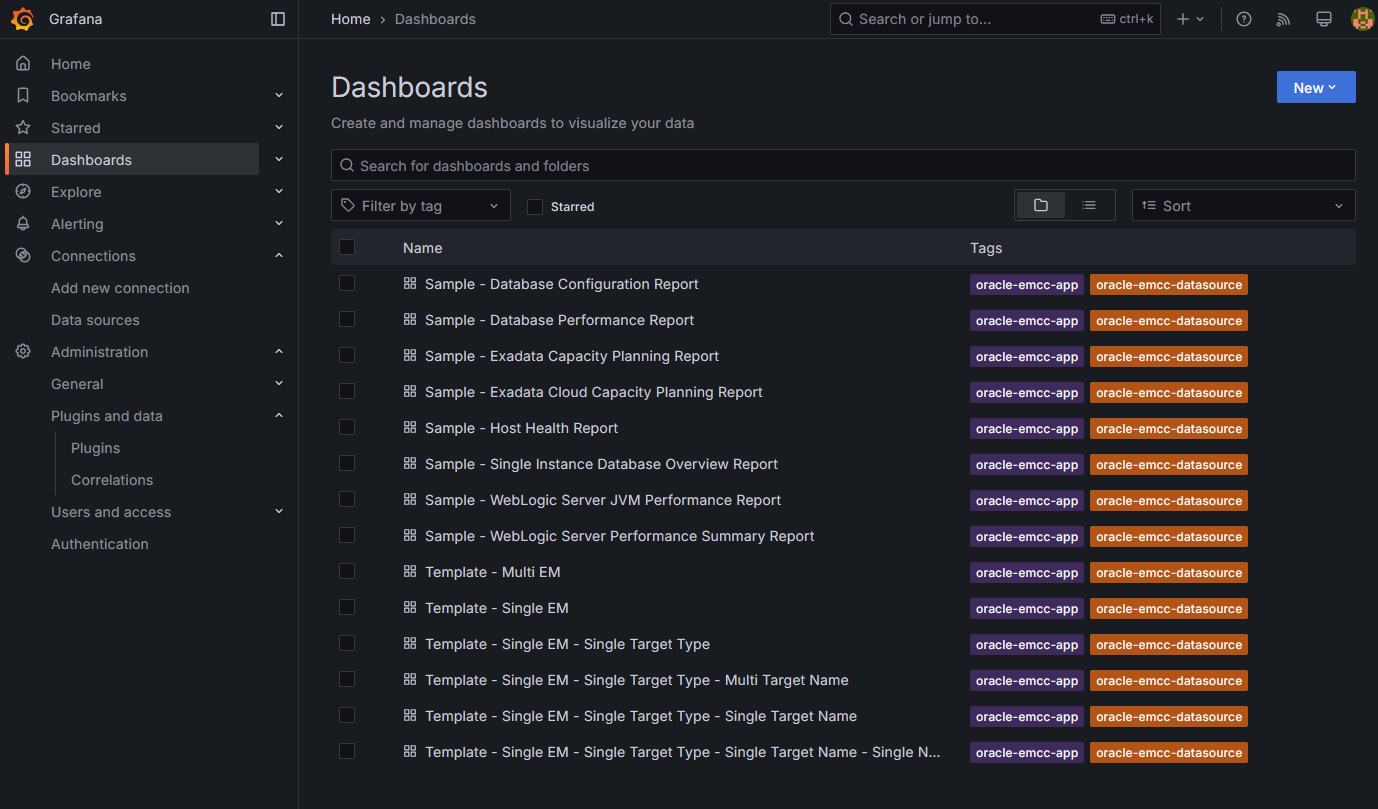
From the left hand-side tool bar, click “Dashboards” to see a list of the sample dashboards provided with the app:
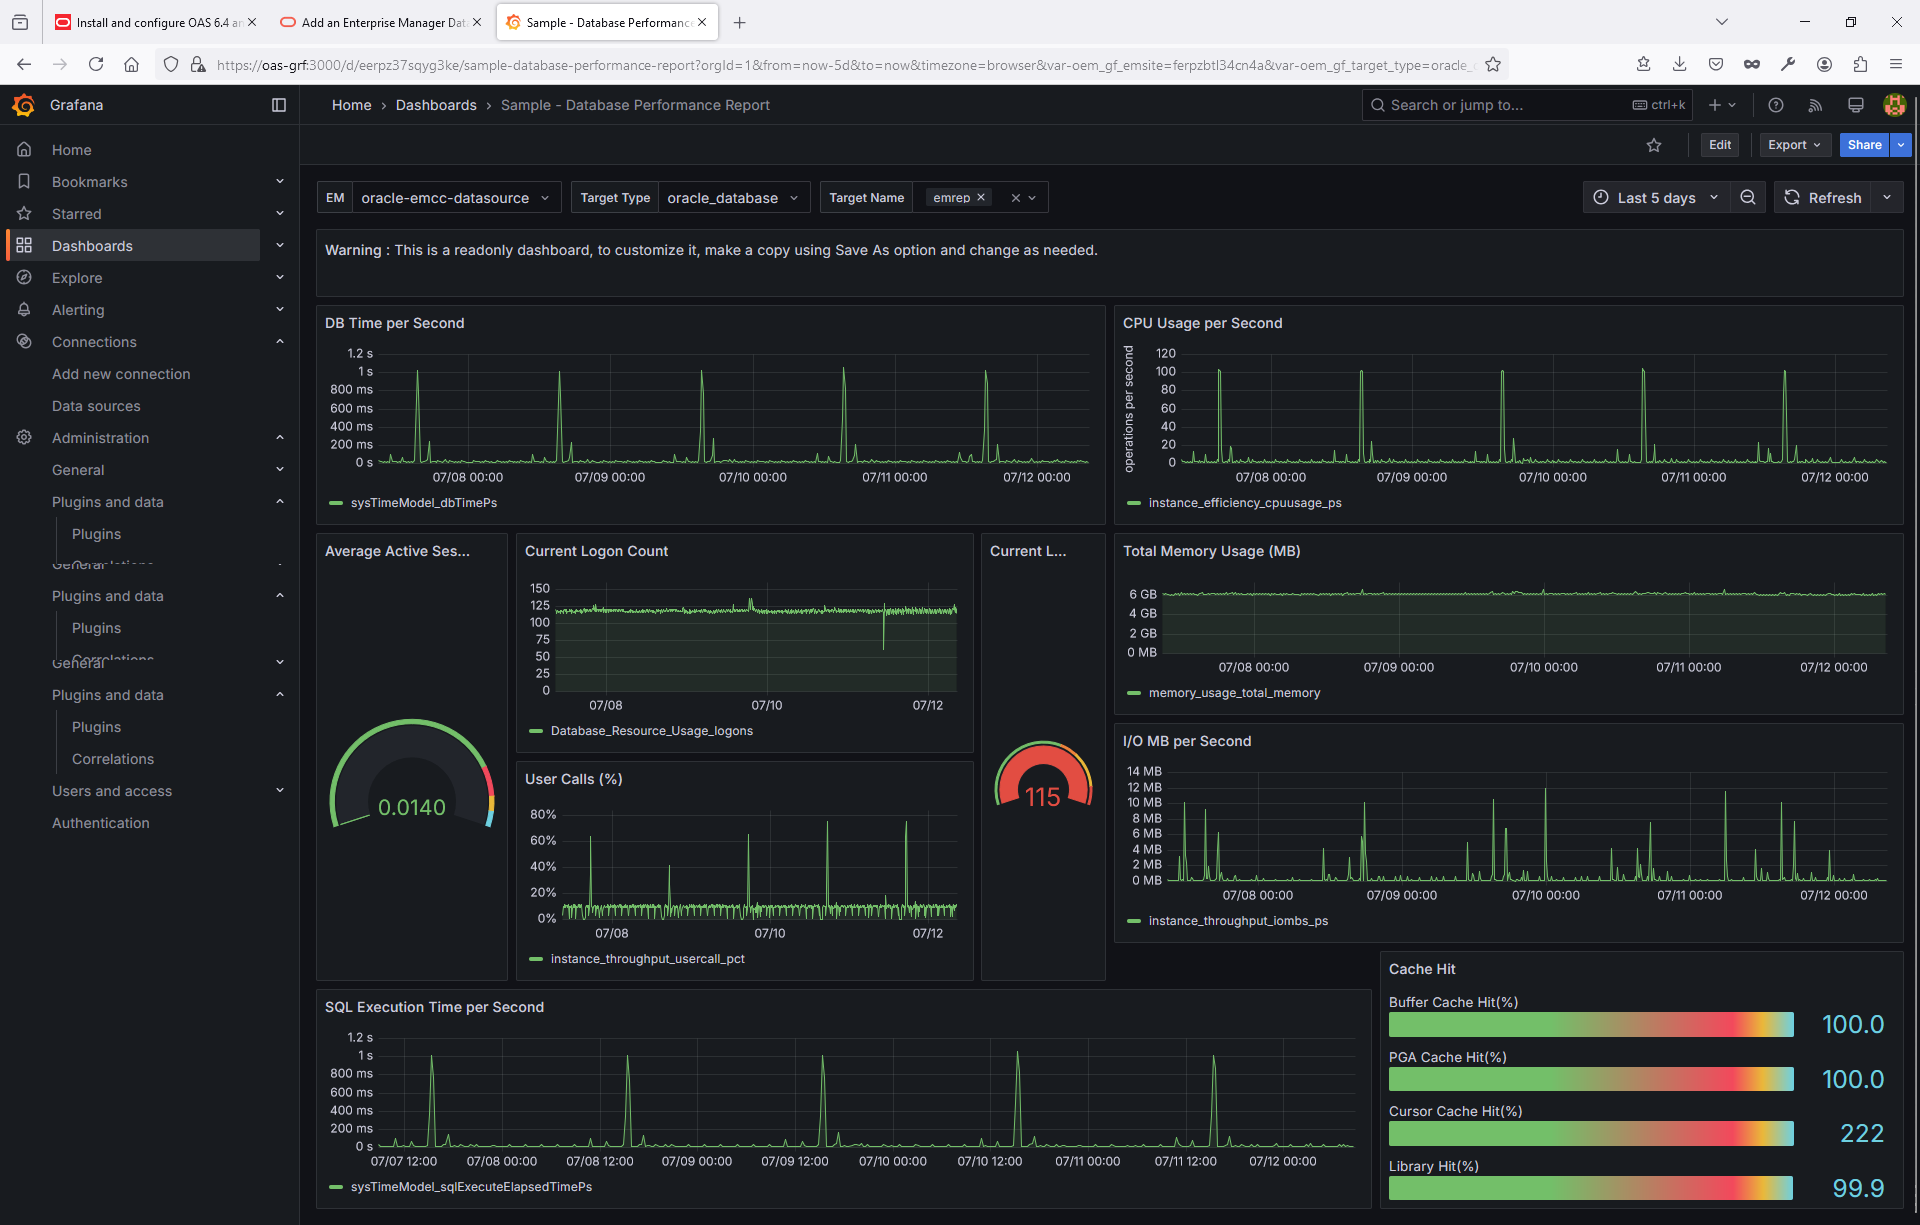
Click on one or more dashboard and verify they’re displaying data from your OEM. Here’s a screenshot of the database performance dashboard:
Also, the list of sample dashboards above includes 2 Exadata Capacity Planning dashboards (that were introduced earlier in version 4 of the app). For screenshots and more details about these dashboards, check this blog:
Oracle Exadata Capacity Planning dashboards in Oracle Enterprise Manager App for Grafana 4.0
For more details about the EM app for Grafana, please refer to the app user’s guide in the reference section below. Check the following blog as well:
Alerting and advanced dashboarding in Oracle Enterprise Manager App for Grafana 4.0
This completes setting up the Grafana Server and deploying the OEM App for Grafana.
Manage Server Start and Stop
OAS
To start or stop the OAS server, use the following commands as user oracle:
. setEnvOAS
$BI_DOMAIN_HOME/bitools/bin/start.sh
$BI_DOMAIN_HOME/bitools/bin/stop.sh
The commands produce a lot of output to the terminal screen. If that’s undesirable, one way to suppress the output is as follows:
$BI_DOMAIN_HOME/bitools/bin/start.sh >/dev/null
$BI_DOMAIN_HOME/bitools/bin/stop.sh >/dev/null
Note it takes a few minutes for the OAS server to start, and about a minute to stop. You can wrap the commands in two simple shell scripts and echo the time before and after:
vi start_oas.sh:
echo “Starting OAS. This should take 2 to 3 minutes …”
date ‘+%d-%b-%Y %I:%M %p %Z’
/u01/app/oasmw/user_projects/domains/bi/bitools/bin/start.sh >/dev/null
echo “OAS started.”
date ‘+%d-%b-%Y %I:%M %p %Z’
vi stop_oas.sh:
echo “Stopping OAS. This should take about a minute …”
date ‘+%d-%b-%Y %I:%M %p %Z’
/u01/app/oasmw/user_projects/domains/bi/bitools/bin/stop.sh >/dev/null
echo “OAS stopped.”
date ‘+%d-%b-%Y %I:%M %p %Z’
Grafana
The Grafana server is automatically started when the VM is started. To start or stop it manually, use the following commands as user opc:
sudo systemctl start grafana-server
sudo systemctl stop grafana-server
Reference
- Installing and Configuring Oracle Analytics Server 24 (7.6) for use with Oracle Enterprise Manager 24ai Release 1 (24.1)
- Installing and Configuring the Oracle Fusion Middleware Infrastructure
- Critical Patch Update (CPU) Patch Advisor for Oracle Fusion Middleware – Updated for April 2025 (Doc ID 2806740.2)
- Installing and Configuring Oracle Analytics Server
- Oracle Enterprise Manager App for Grafana User’s Guide
- Grafana OSS