Introduction
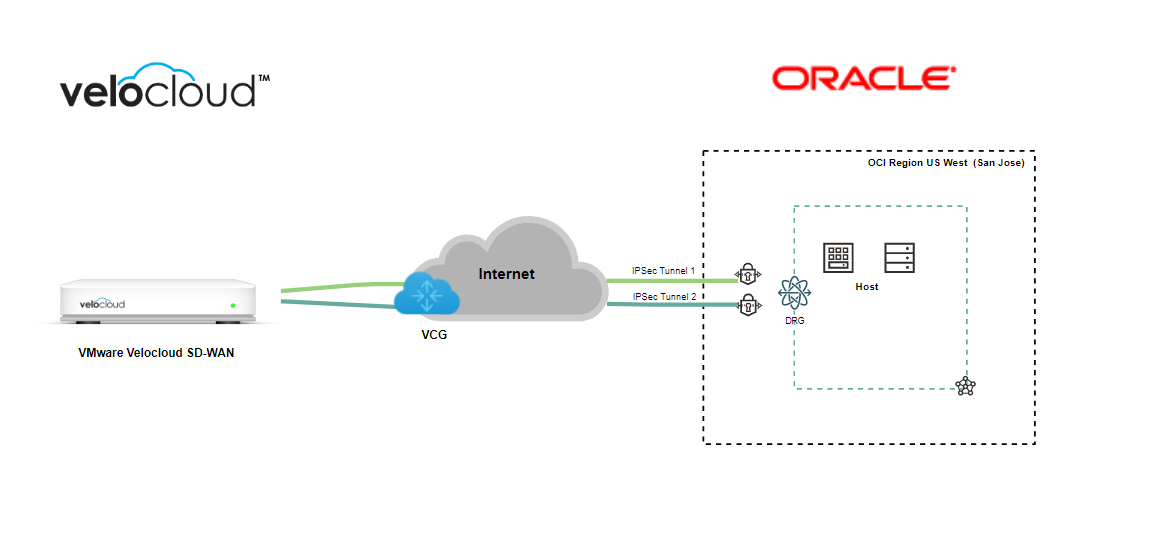
The IPsec VPN is one of the encrypted connection solutions from the business’s on-prem network to the OCI cloud. Nowadays, many customers use SD-WAN as their enterprise WAN solution. In this blog, I will demonstrate how you can connect OCI and VMware Velocloud SD-WAN via IPsec VPN and Velocloud Gateway.
Topology Architecture Diagram
Prerequisites
1. Knowledge of the OCI networking concept. (Reference: OCI Networking Concept)
2. knowledge of VMware Velocloud SD-WAN concept. (Reference: VMware Velocloud )
3. Create VCN with DRG attached, ready for configuring site-to-site VPN on OCI.
(Reference: Network-managingVCNs and Network-managingDRGs )
Agenda
1. Velocloud: Configure a “Non SD-WAN Destination via Edge.”
2. OCI: Configure a Site-to-Site VPN connection to Velocloud.
3. OCI: Edit Tunnels Phase One and Shared Secret Key.
4. Velocloud: Edit and match the Tunnels with OCI public IP addresses, Phase one, and PreSharedKey.
5. Velocloud: Enable the Cloud VPN at the Profile level and associate the created “Non SD-WAN Destination via Edge” VPN.
6. Confirm the connection from both sides!
7.Conclusion.
Let’s get started it!
Step 1: Configure a Non SD-WAN Destination via Edge.
Login to the Velocloud orchestrator.
From the navigation panel on the left side, click on Configure > Network Services.
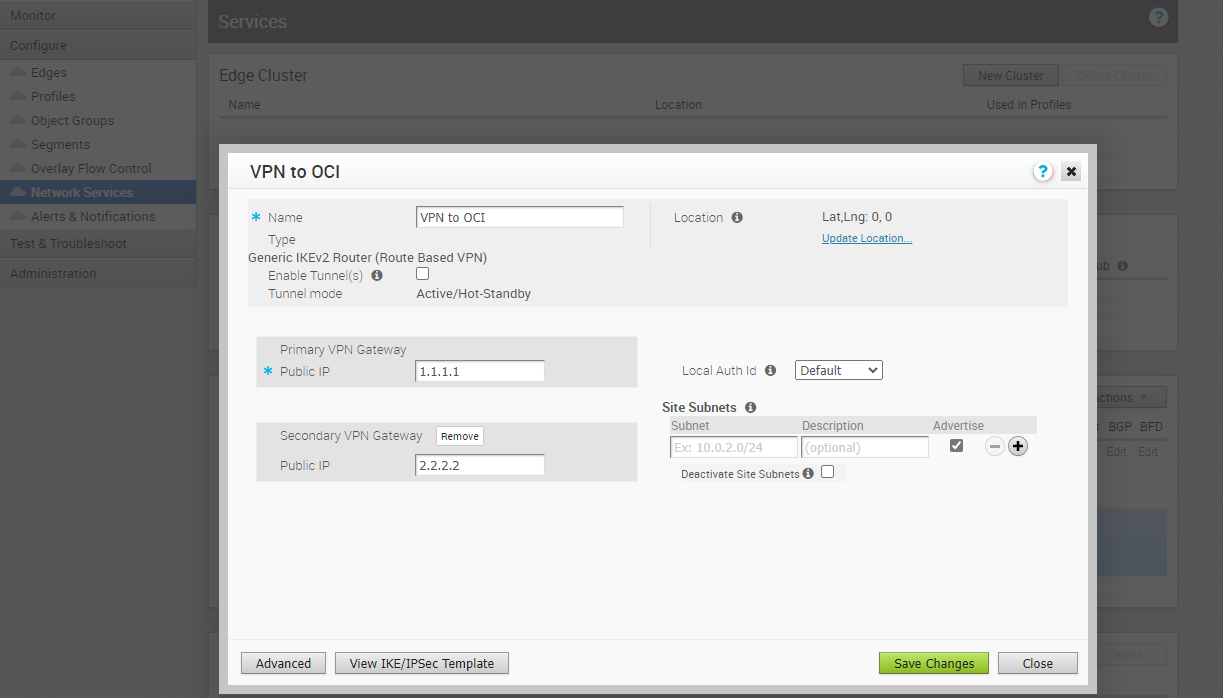
From the Services screen, find the Non SD-WAN Destination via Gateway service and click the New button to create a new connection to OCI.
Please check the screenshot below.
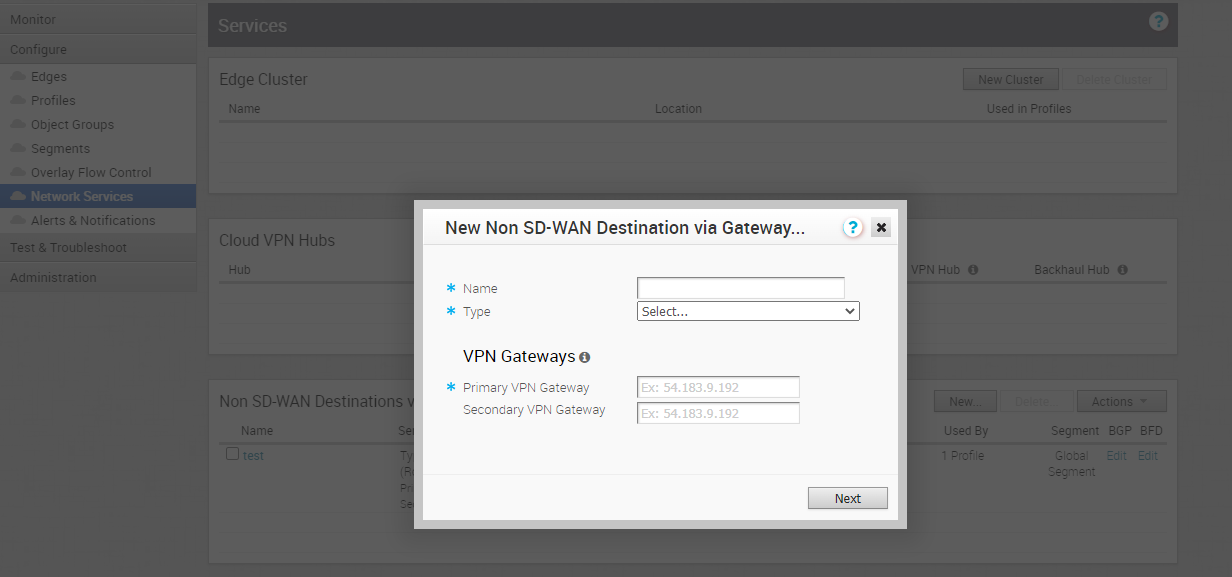
As you see below, we need a name, type, and OCI public IP address (Tunnel IPs) to configure this connection.
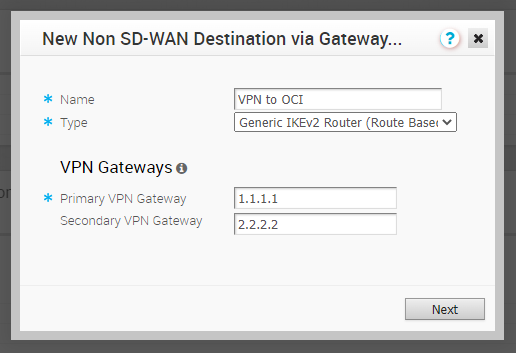
Note: We don’t have OCI headend IPs available yet, so I assigned the random IPs (Dummy IPs) to have the Velocloud gateway public IP address after creating this connection.
Note: For the service Type, you can select either Generic IKEv2 Router (Route Based VPN) or Generic IKEv1 Router (Route Based VPN) as the IPSec tunnel type.
Click on “Next” and continue to configure the IPSec connection.
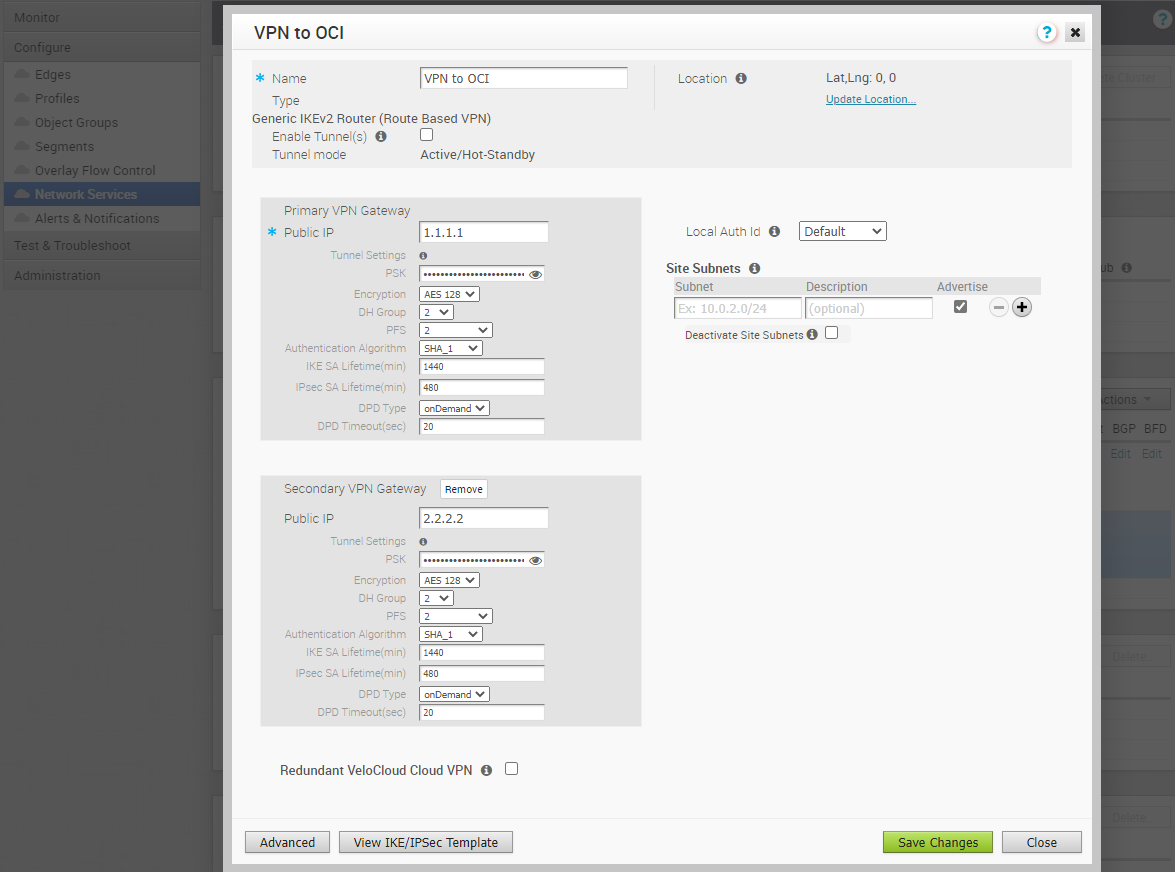
Now, your route-base Non SD-WAN Destination VPN has been created, and you need to note the SD-WAN Gateway public IP address by clicking on the View IKE/IPSec Template button, Check the screenshot below, please.
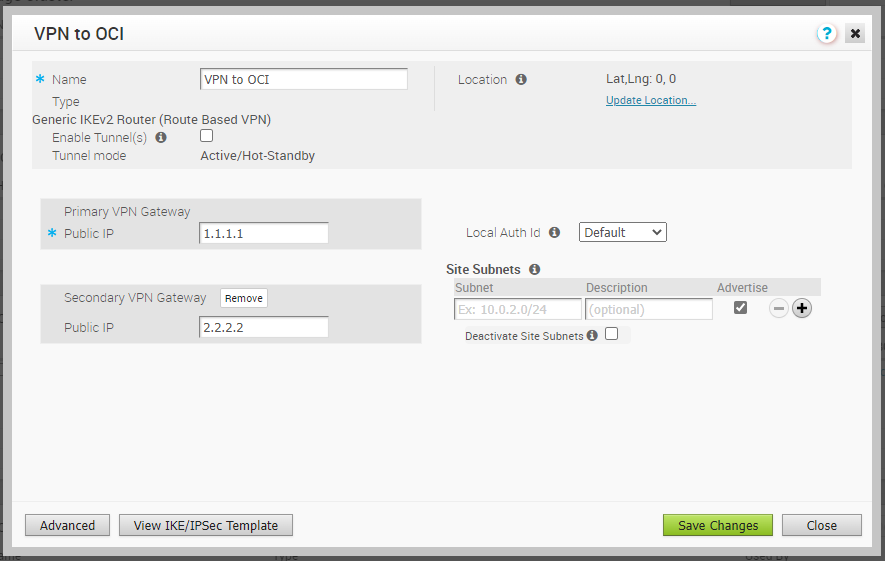
Now, you have Tunnel Interface Outside IP address for SD-WAN Gateway that is 64.186.25.73
We need this IP to create a CPE on the OCI side.
Step 2: Configure a Site-to-Site VPN connection to Velocloud.
Login to the OCI dashboard and choose your desired region (I chose US West – San Jose region)
Navigate to Networking from the left menu.
From the “Customer Connectivity” list, click on Site-to-Site VPN.
Click on “Start VPN Wizard.”
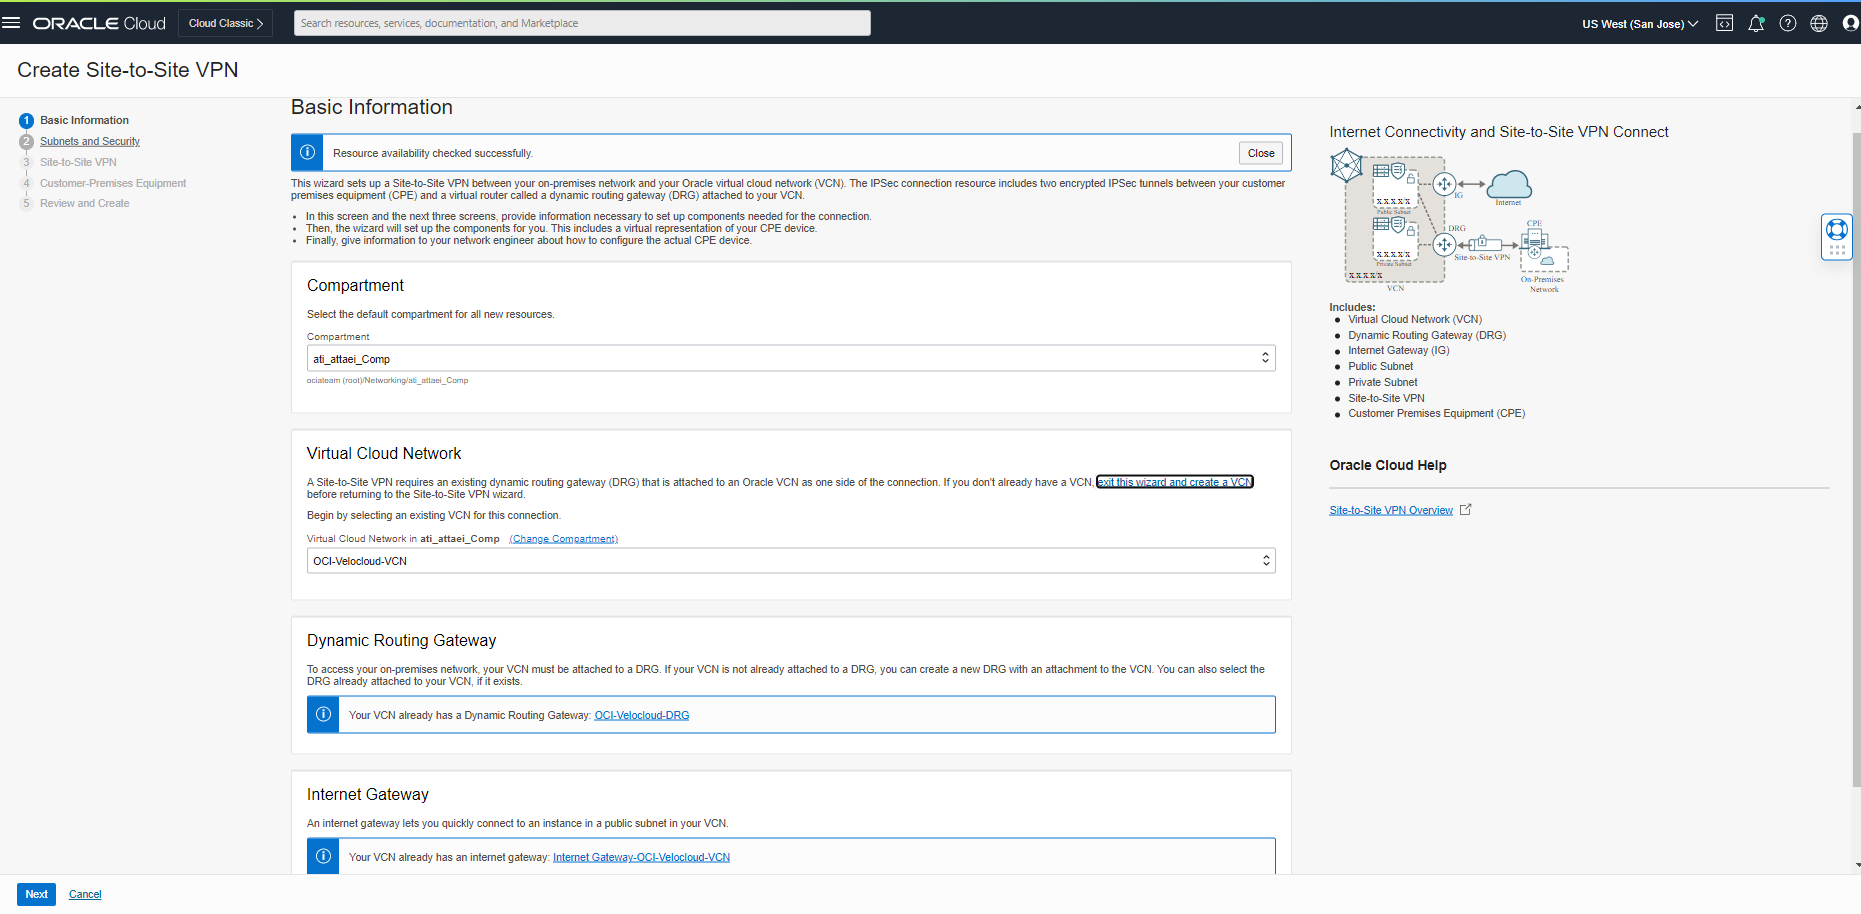
Select your proper compartment, VCN, DRG, and IGW from the Basic Information tab on the first page and click “Next.”
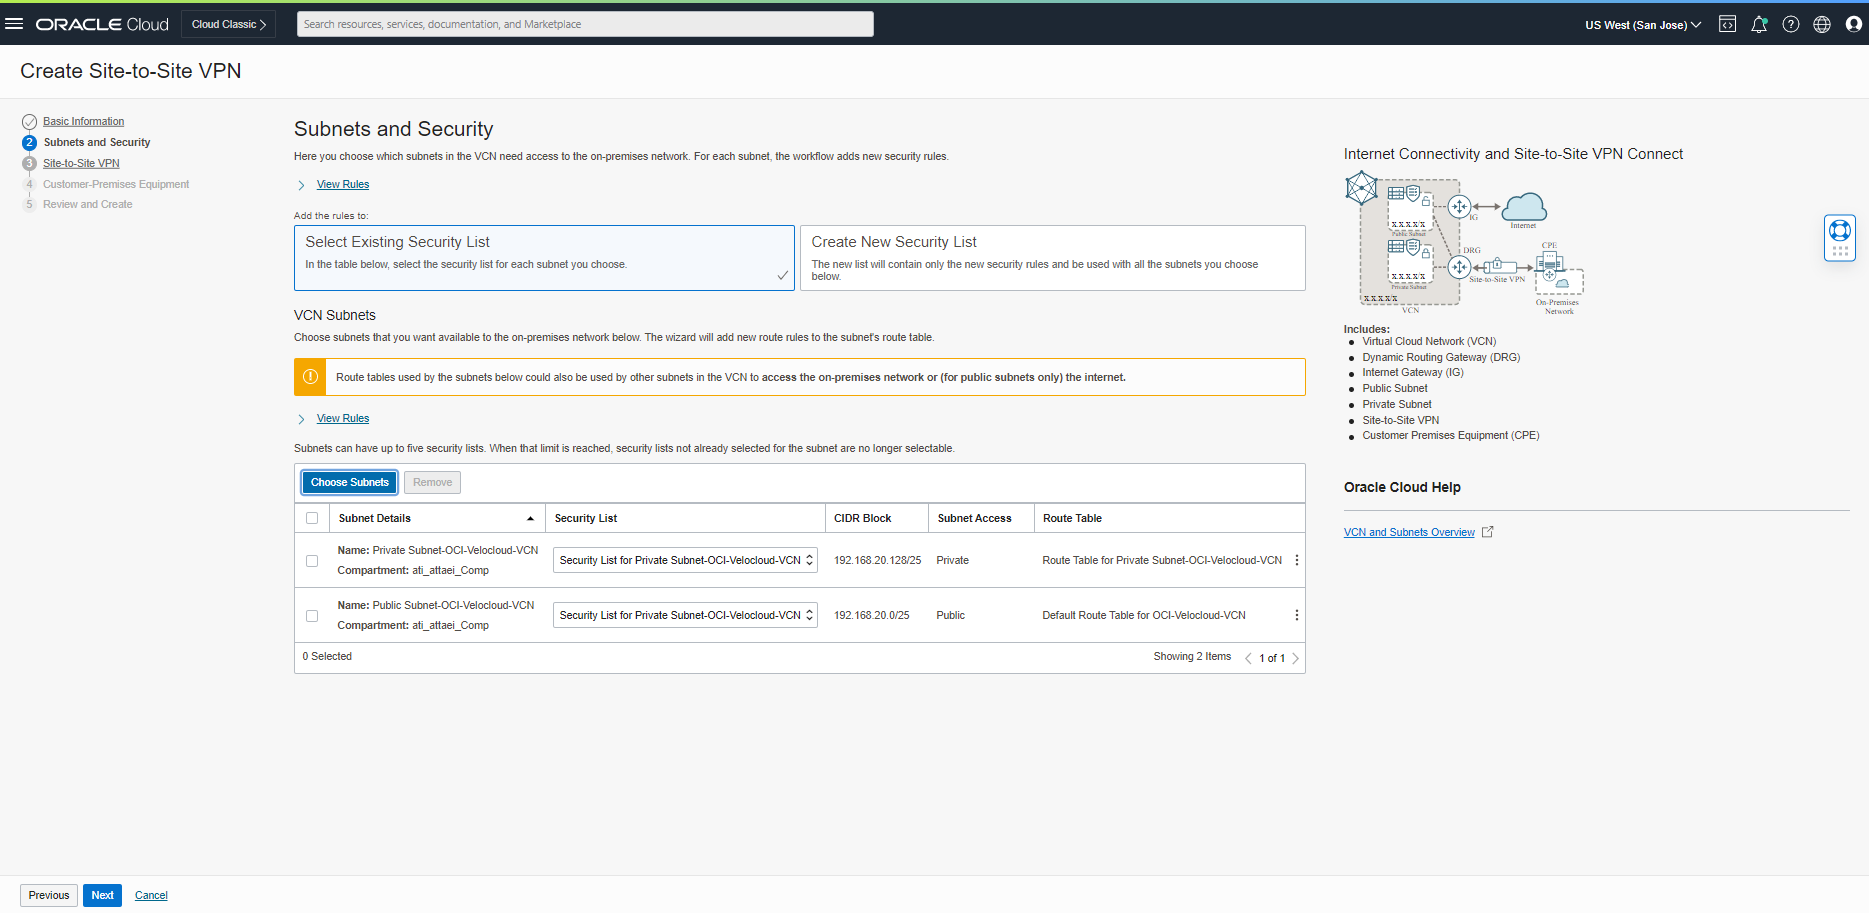
In the Subnet and Security tab, Select the existing Security list or create a new one and the proper Subnet and click on “Next.”
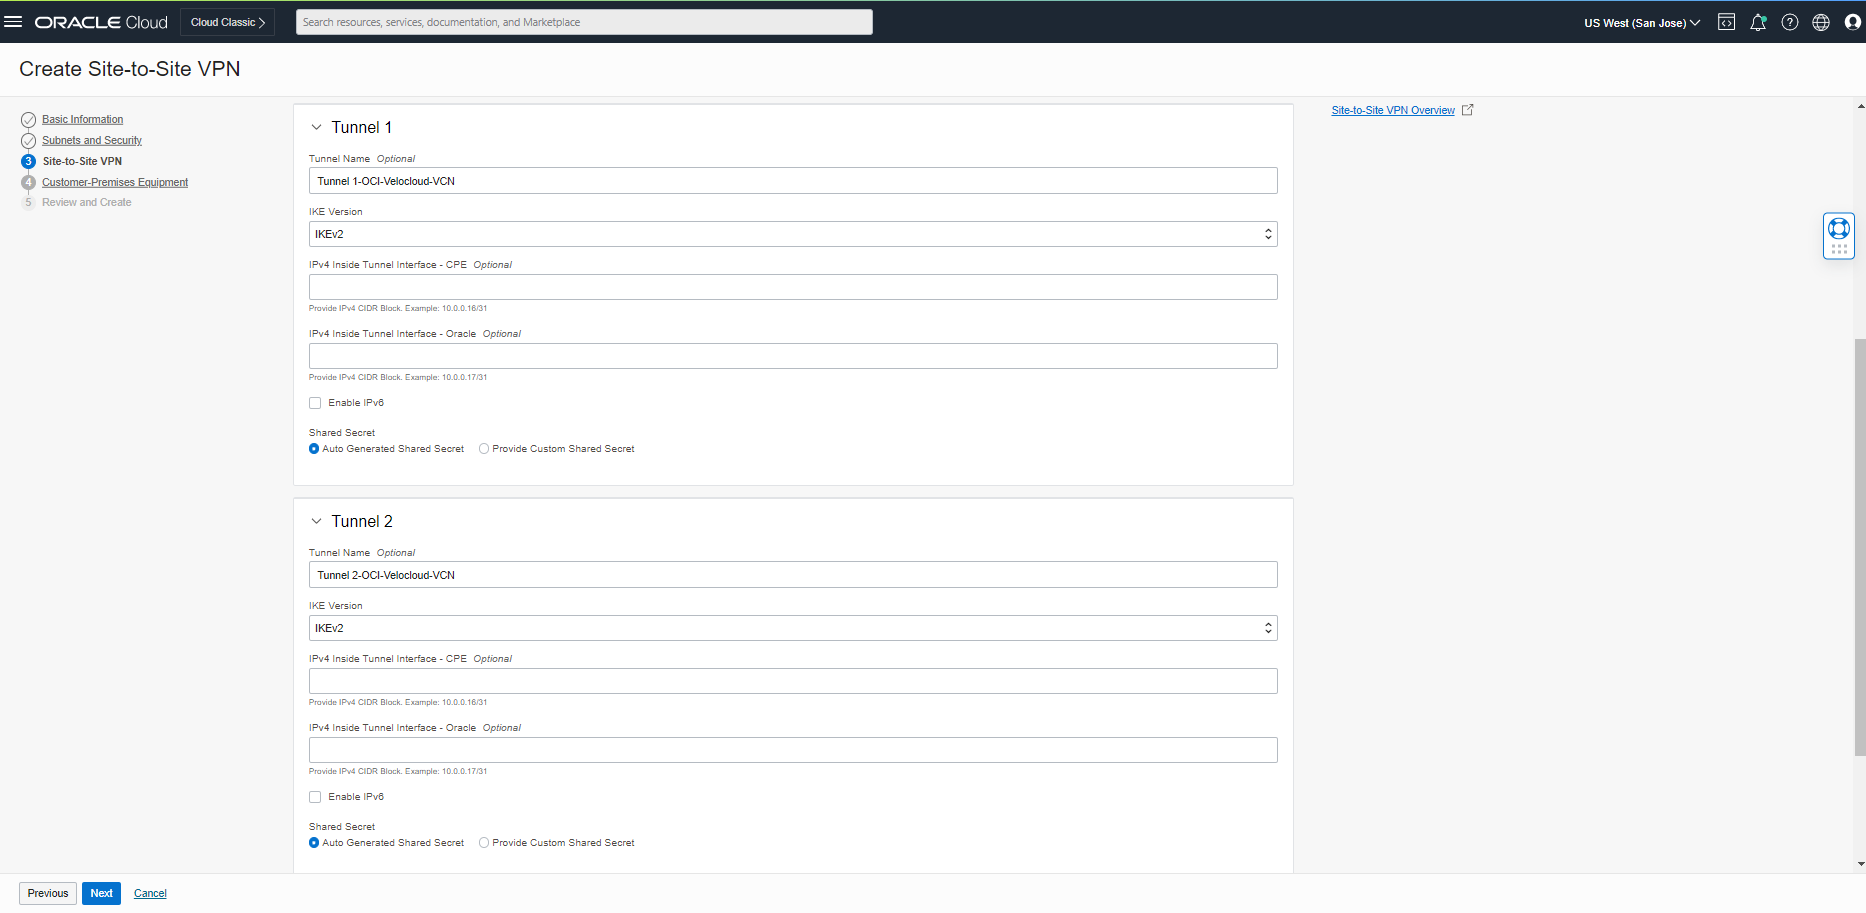
In the site-to-Site tab, fill in the name of the VPN (VPN-OCI-Velocloud-VCN), Select Static Routing as a routing type, and fill in the route to your on-premises network.
Note: I considered the IP CIDR of 10.0.0.0/8 for your on-prem. You can have up to 10 static routes to your on-premises network.
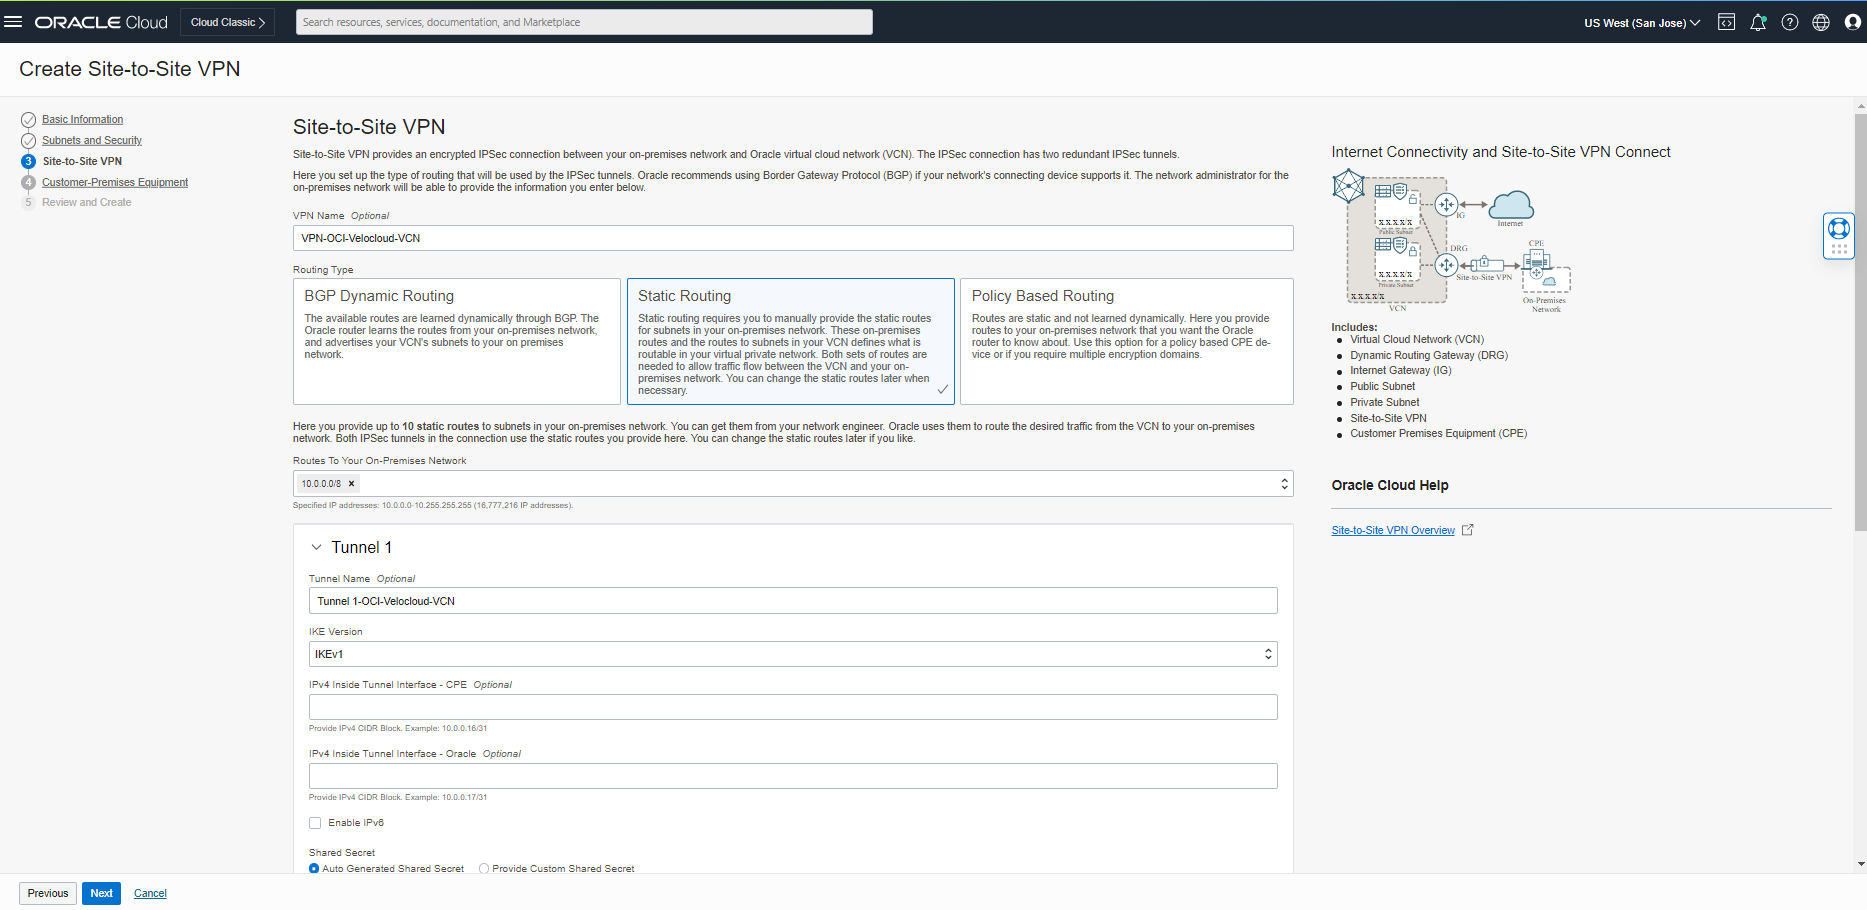
For the tunnel configuration part, I changed Tunnel 1 and 2, IKE Version, to IKEv2 and clicked “Next.”
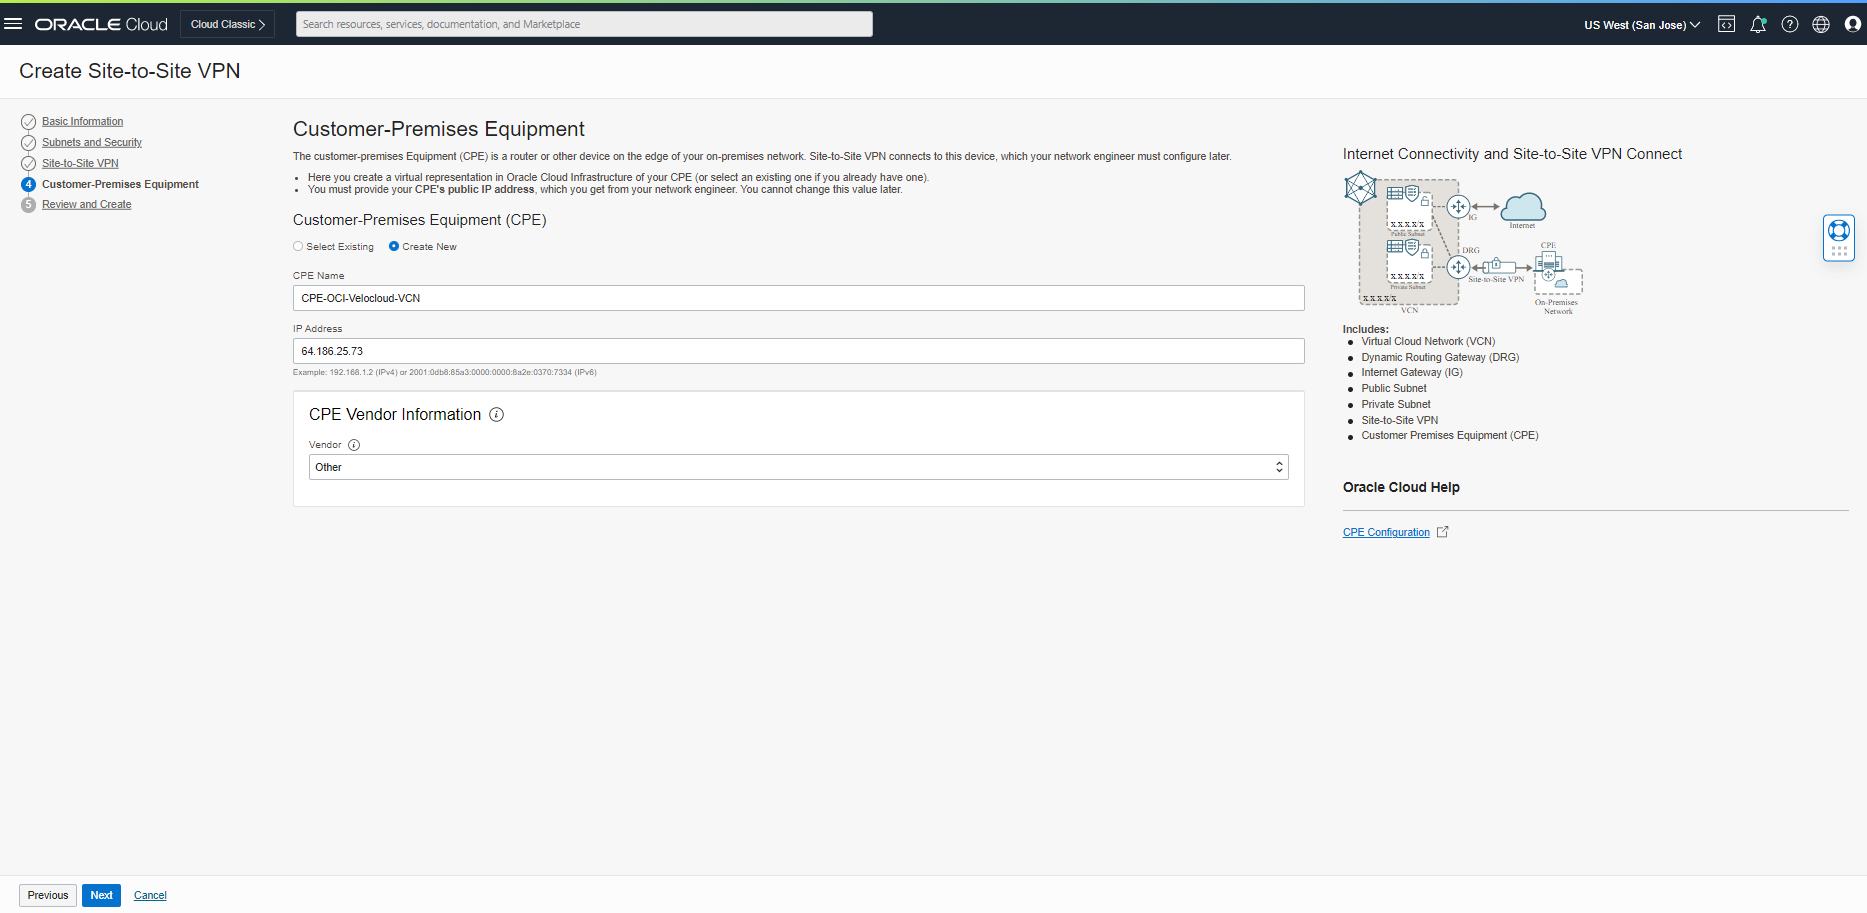
On the Customer-Premises Equipment page, you need to create a new CPE with the IP address of Velocloud Gateway (64.186.25.73), which we got from step 1. Please check the screenshot below.
Note: In our case, the CPE Vendor Information type is “Other.”
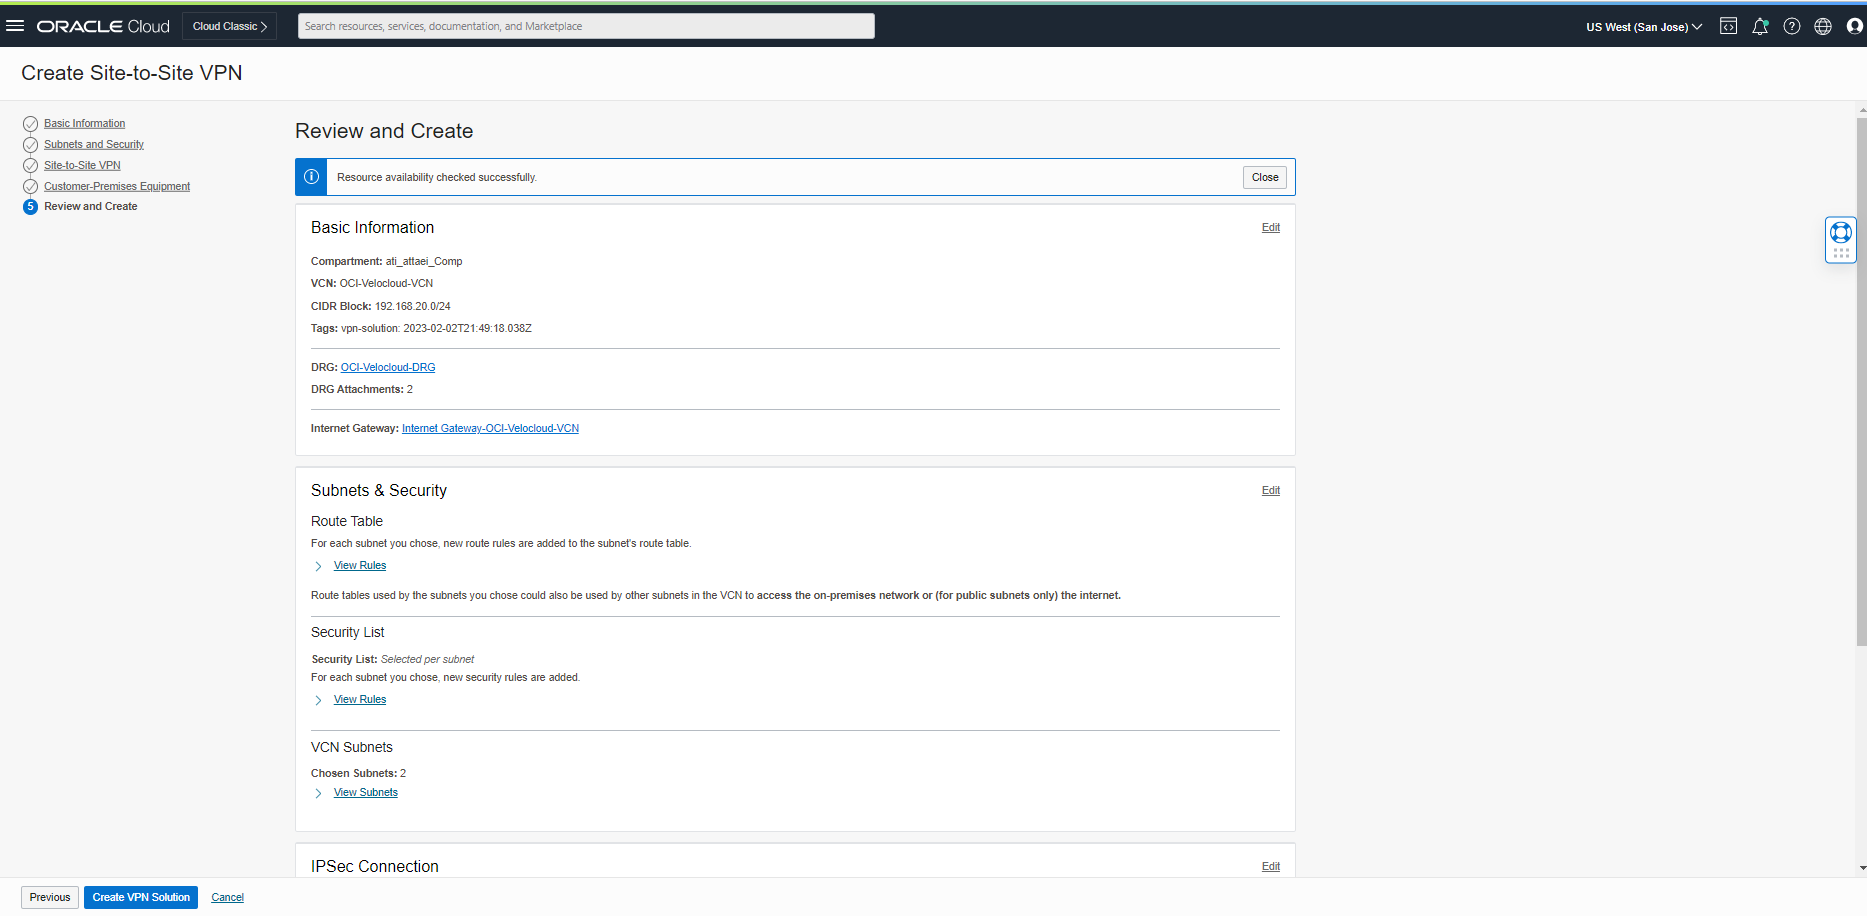
Click “Next” to review and create the Site-to-Site VPN, then click “Create VPN Solution.”
VPN solution just created. Please click on ” View VPN Solution Summary” to see the result.
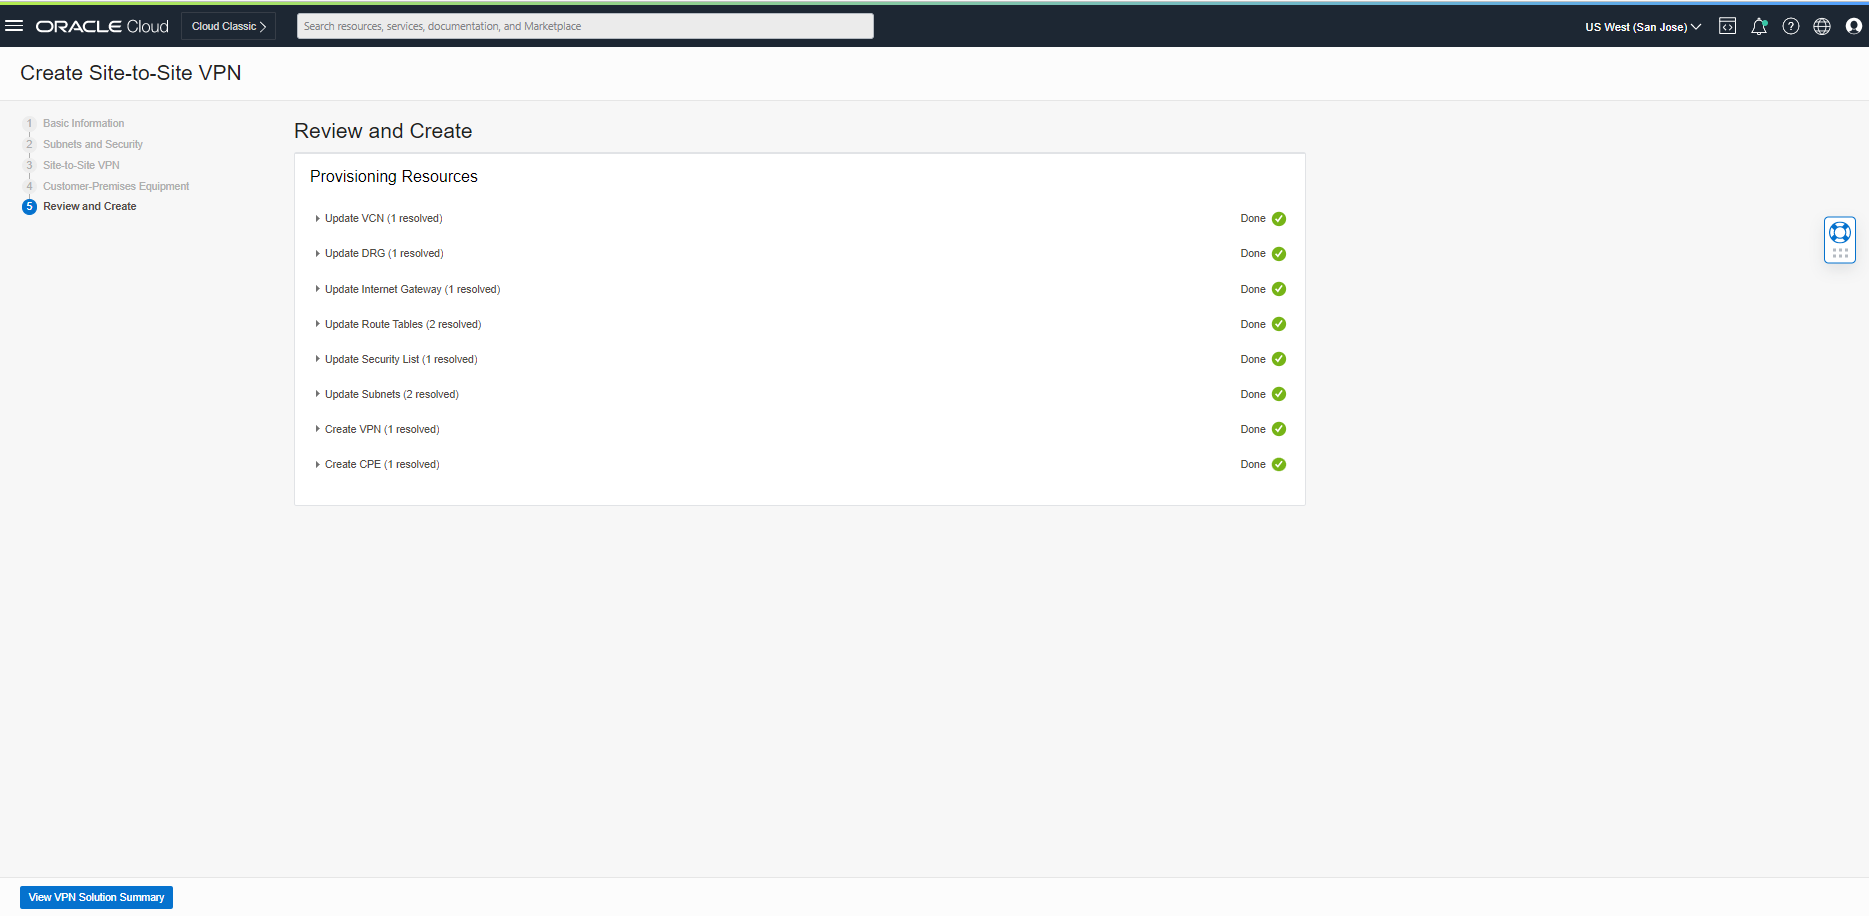
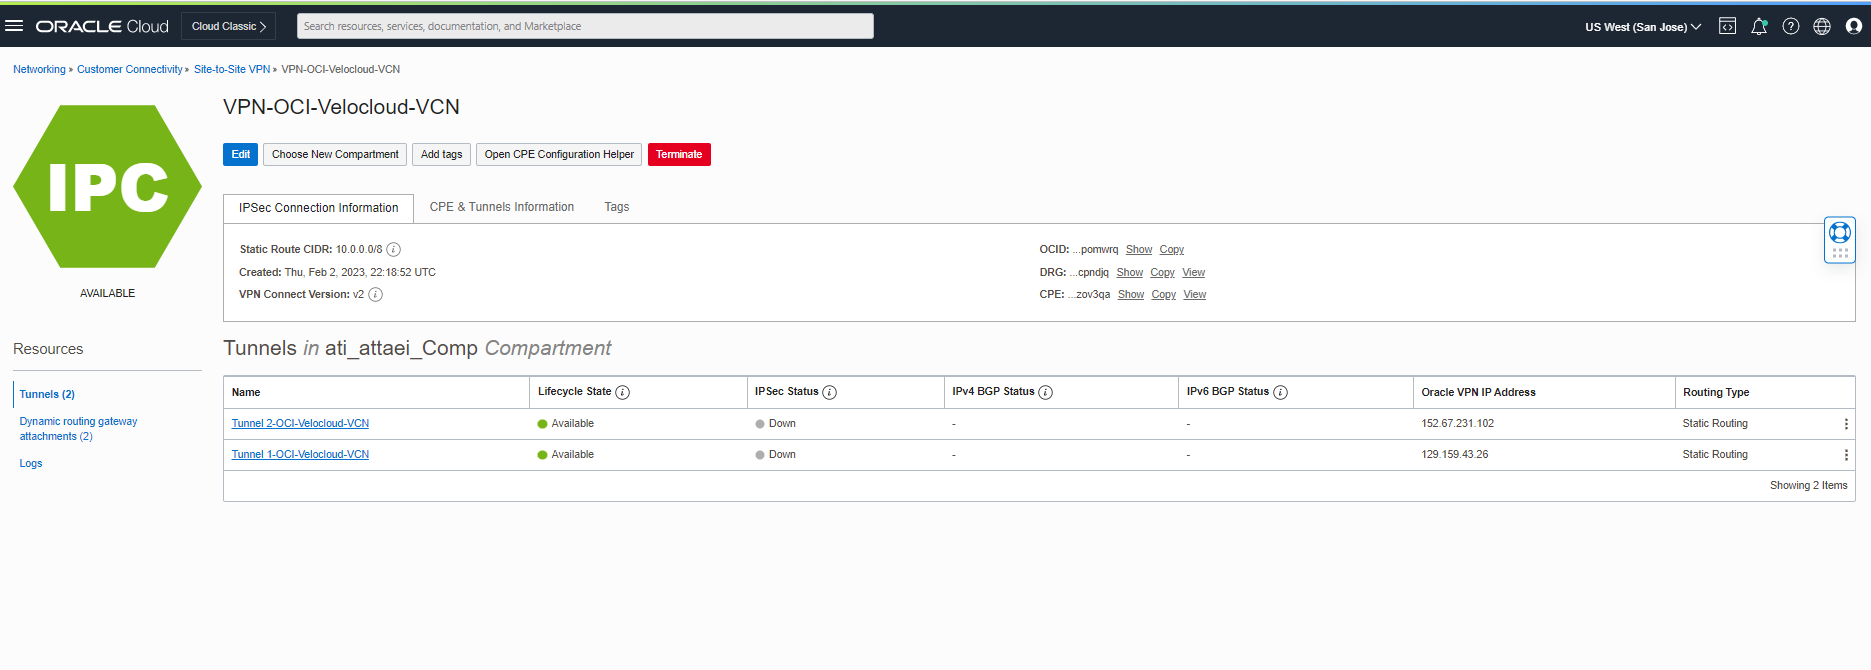
As you see above, Oracle VPN IP Addresses are ready to be updated on the Velocloud side.
Tunnel 1- OCI-Velocloud-VCN 129.159.43.26
Tunnel 2- OCI-Velocloud-VCN 152.67.231.102
Step 3: Edit Tunnels Phase One and Shared Secret Key.
Before we jump to the Velocloud orchestrator to update the tunnel IPs, I applied some custom configurations to follow the best practice with VPN configs, like Phase one and Shared Secret Key (Velocloud Secret Key password must be between 8 and 63 characters)!
Click the three dots on the right side of the page in front of Tunnel 1- OCI-Velocloud-VCN to see the Edit option; check the screenshot below.

As soon as you click on “Edit,” you will see the window below. Click on “Show advance options” to continue.
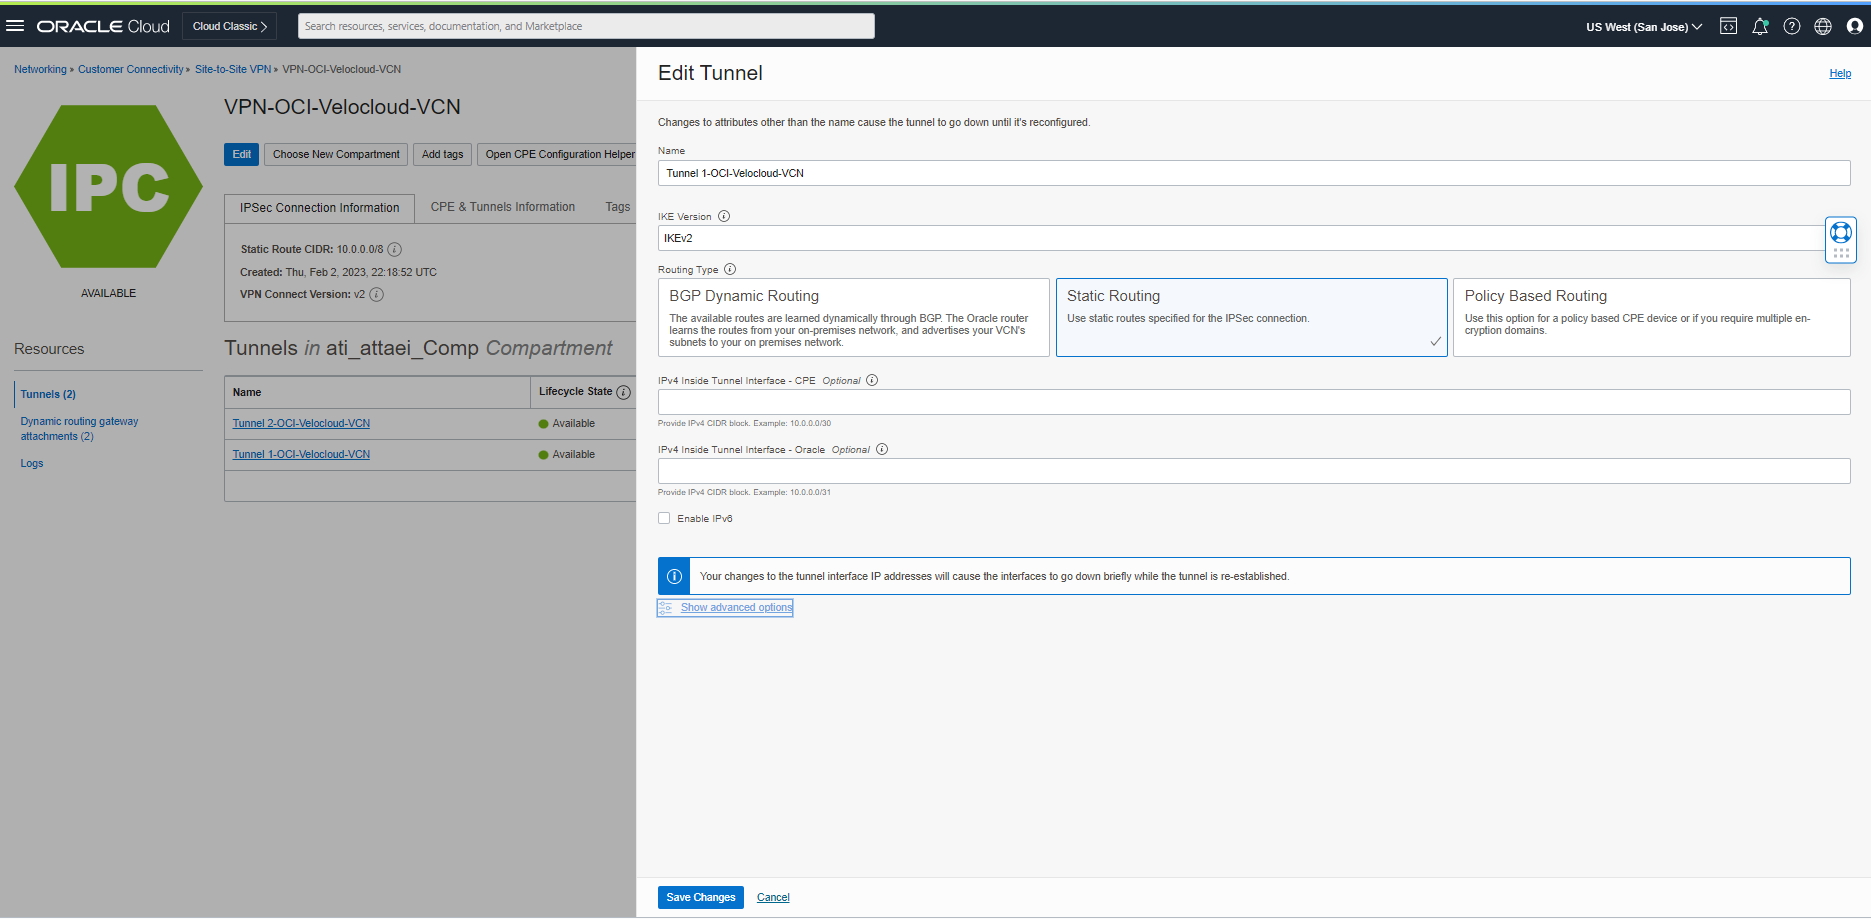
Check the “Set Custom Configurations” box under Phase One (ISAKMP) Configuration and choose your desired Encryption and Authentication Algorithms plus Diffe-Helman Group.
Note: Please check the reference links for the supported IPSec parameters.
OCI Supported IPSec Parameters (oracle.com)
Velocloud VMware-SD-WAN-IPSec
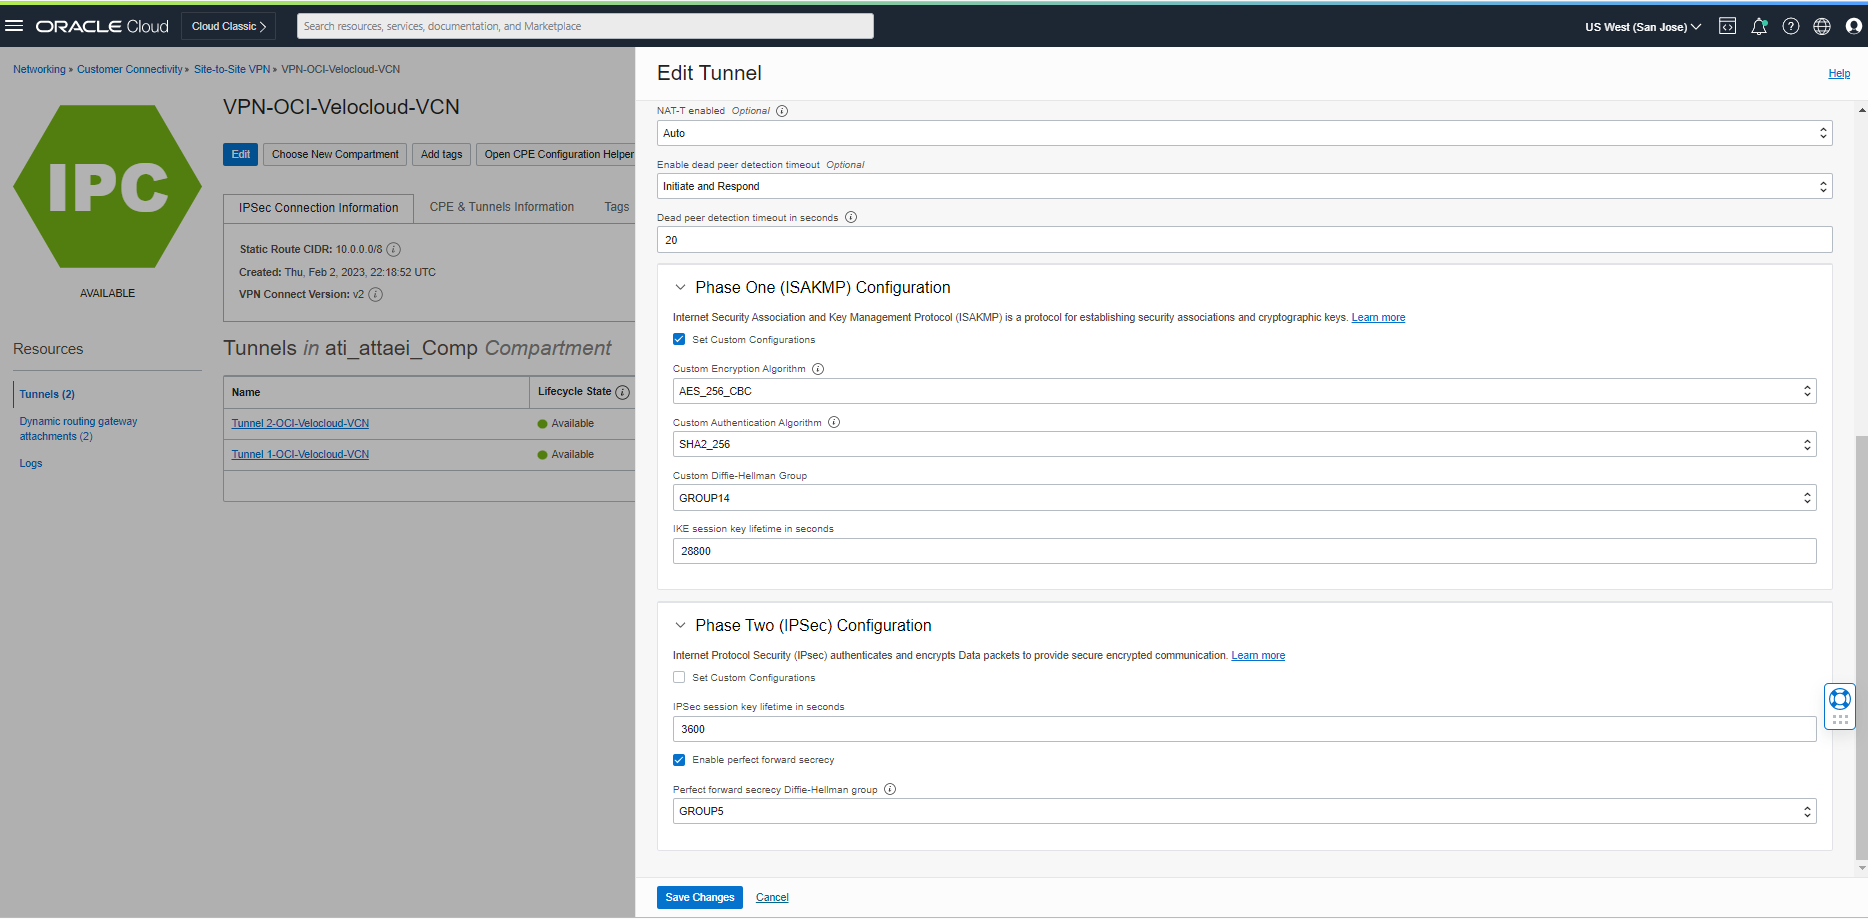
Save the changes and wait for Tunnel 1 Lifecycle state status to be green again. Re-do the step above for tunnel 2.
To have the custom Shred Secret for each tunnel, please click “CPE & Tunnels Information” See the screenshot below.
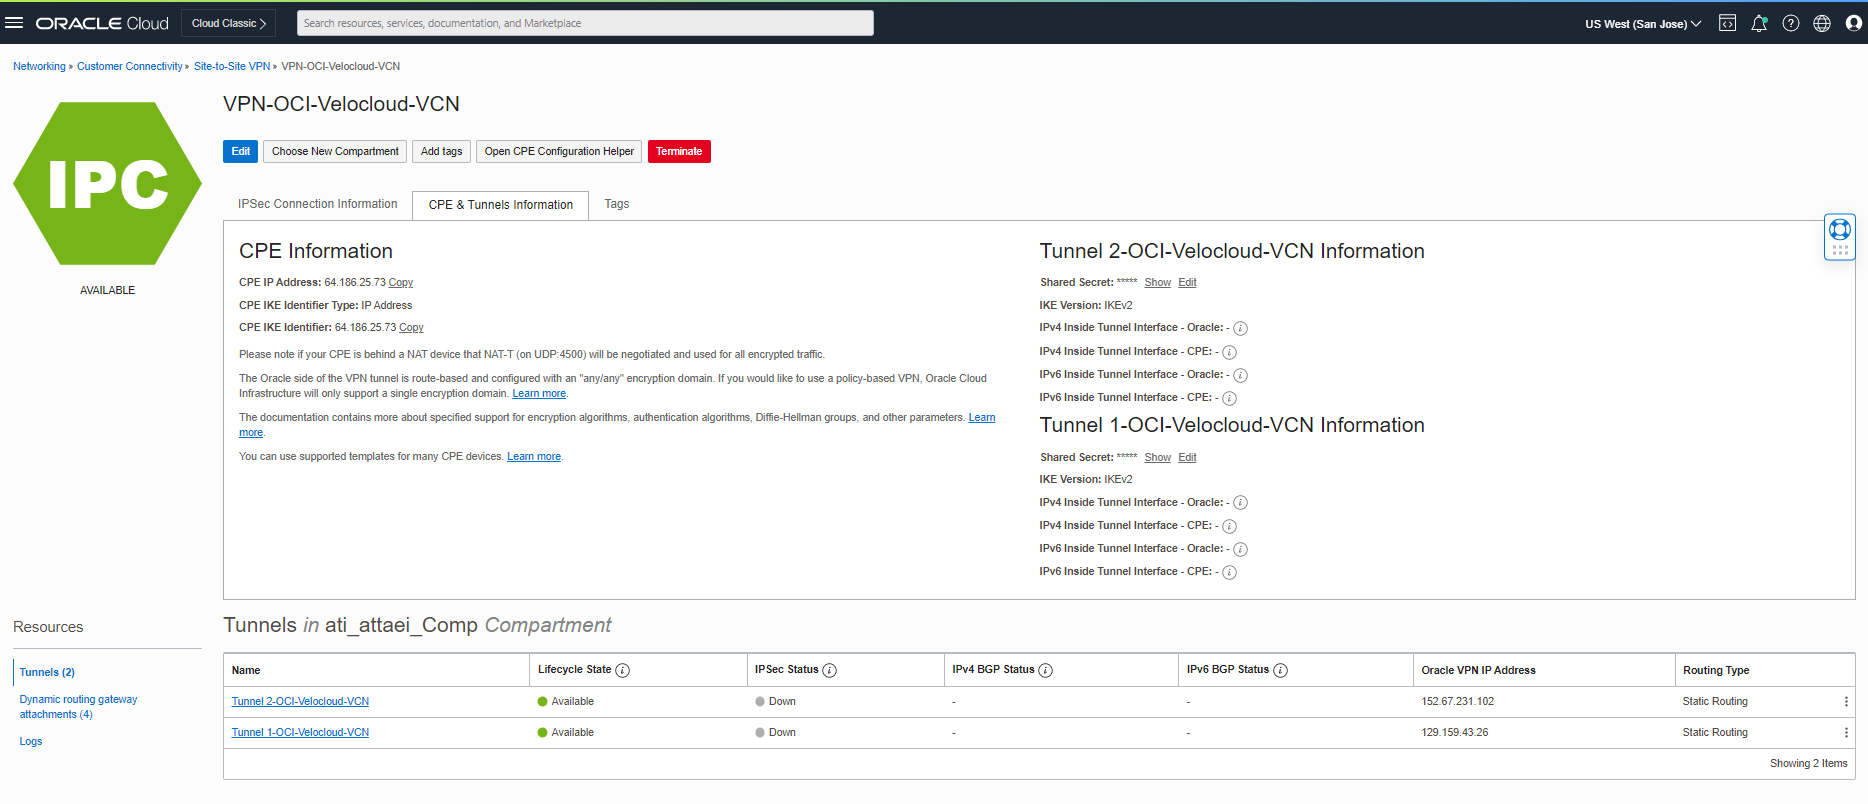
Click on Edit next to the Shared Secret under tunnels information and put your custom password there.
(We will need that to update the Velocloud side for having the same secret key on both sides)
Step 4: Edit and match the Tunnels with OCI public IP addresses, Phase one, and PreSharedKey.
Login to the Velocloud orchestrator.
From the navigation panel on the left side, click on Configure > Network Services.
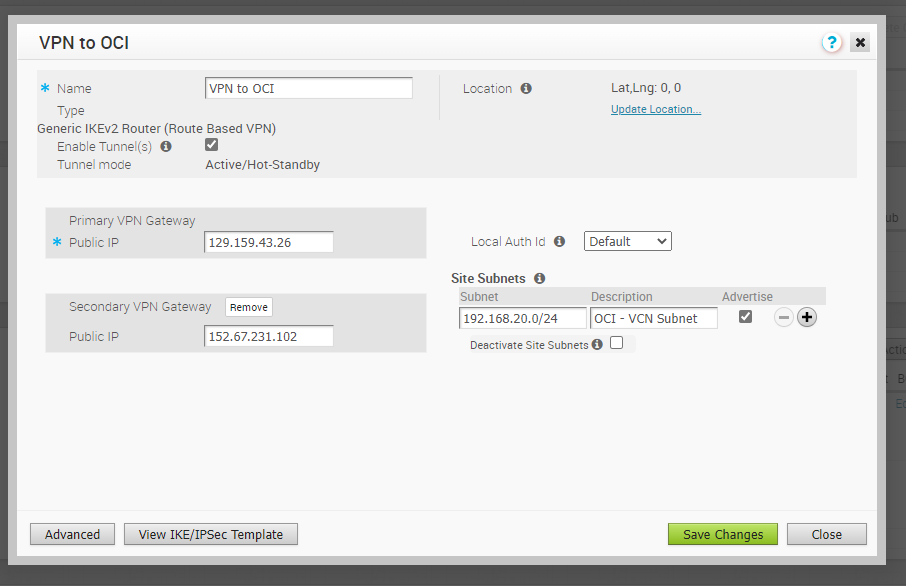
From the Services screen, find the Non SD-WAN Destination via Gateway service and click on the “VPN to OCI.”
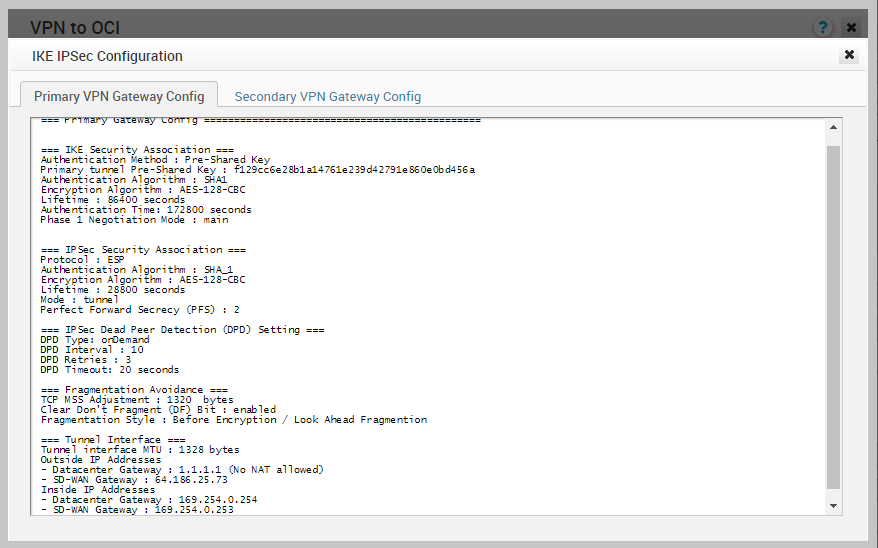
After the VPN to OCI dialog box appears, click on the “Advanced” button and modify the Public IPs for Primary and Secondary VPN Gateways, PSKs, Encryption, DH Group, and Authentication Algorithm. Check the screenshots below.

Save the Changes. Then you need to Enable the Tunnels check box, add the OCI VCN CIDR under the Site Subnets, and “Save Changes.”
Step 5: Enable the Cloud VPN at the Profile level and associate the created “Non-SD-WAN Destination via Edge” VPN.
From the Navigation panel, Click on Configure > Profiles.
Select the profile you plan to associate your Non SD-WAN Destination (OCI IPSec VPN) to, move to the Device tab
Enabling the Cloud VPN and apply the “VPN to OCI” Non SD-WAN Destination via Gateway there.
Check below, please.
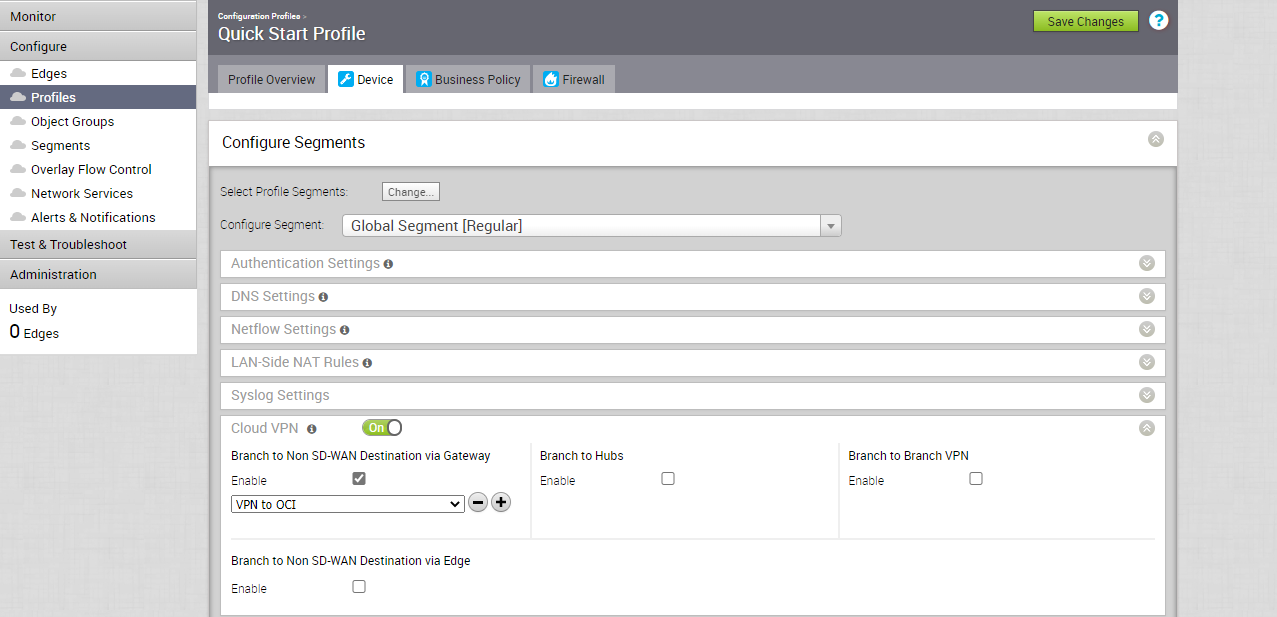
Click on “Save Changes.”
Step 6: Confirm the connection from both sides!
Velocloud
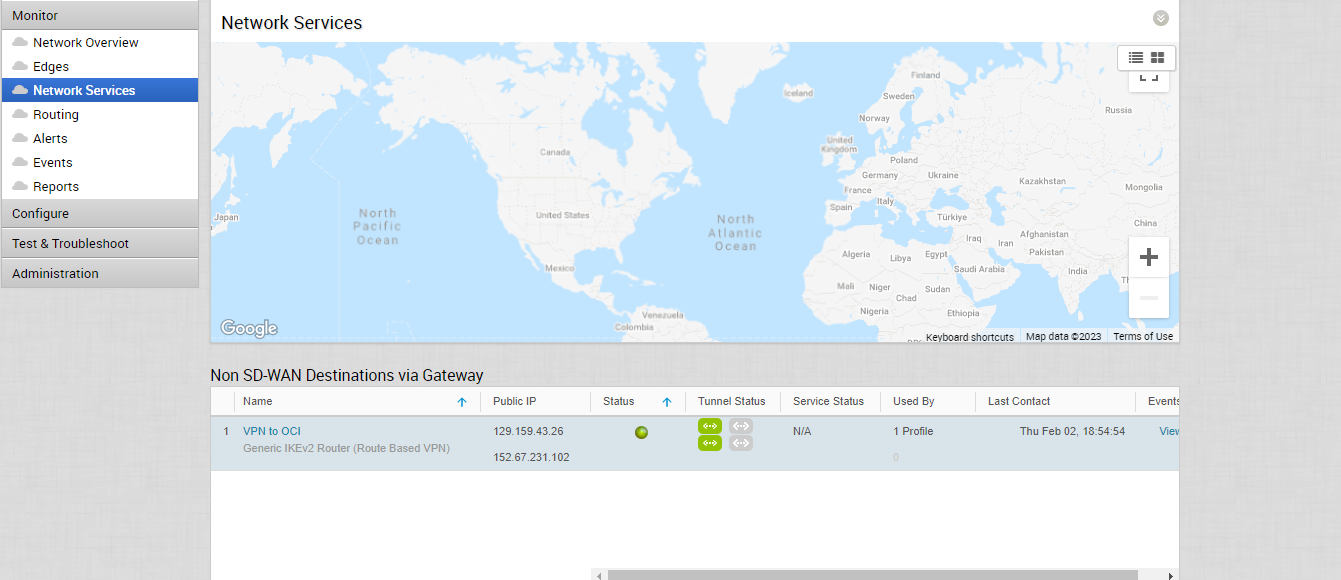
From the navigation menu, Click on Monitor > Network Services.
Check the Non SD_WAN Destinations via Gateway. As you see below, the tunnels are up!
OCI
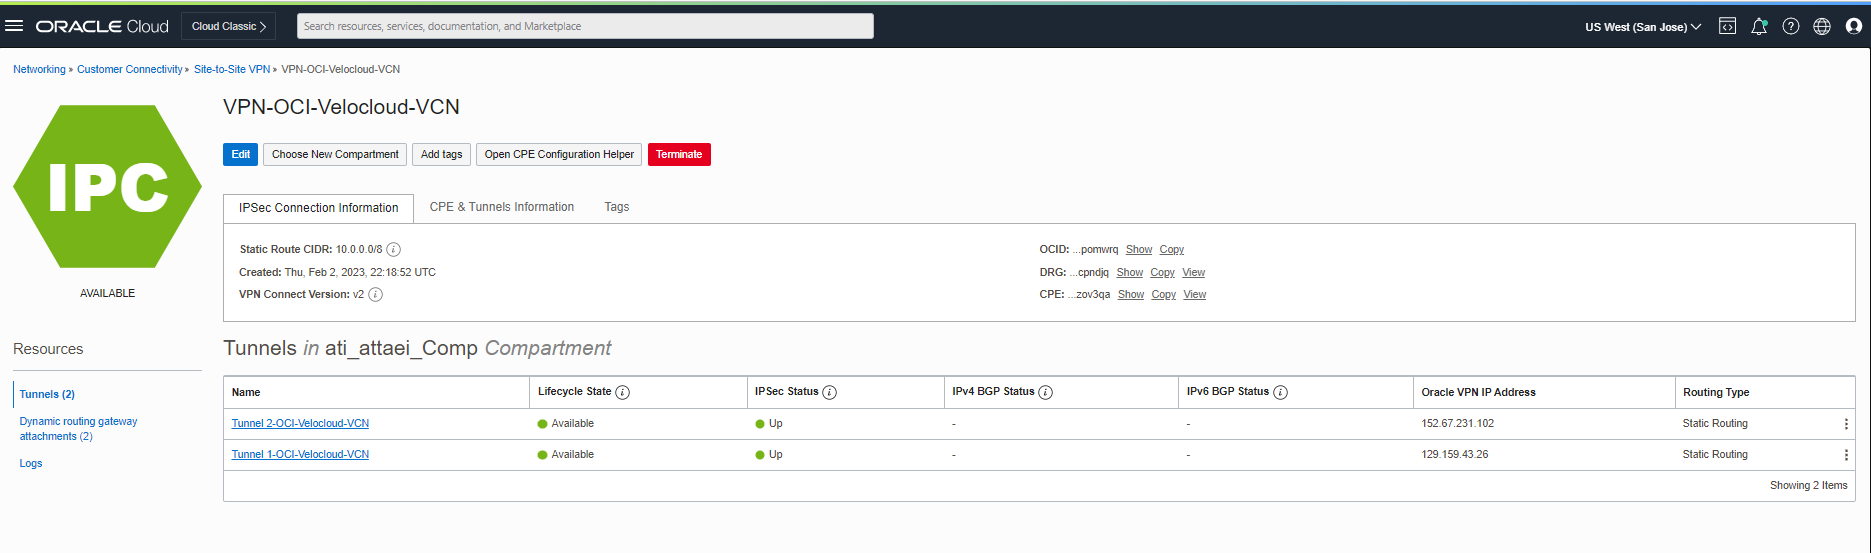
Navigate to the Networking menu> Customer Connectivity > Site-to-Site VPN> VPN-OCI-Velocloud-VCN .
As you also see below, both tunnels are up!
Step 7: Conclusion
As I demonstrated, you can quickly establish a secure IPSec VPN tunnel directly from your VMware Velocloud SD-WAN Edge to your OCI Public Cloud Solution.
I hope you enjoyed it!
Atefeh(Ati) Yousefi Attaei