Introduction
In many enterprise environments, load balancers are not just used for traffic distribution, they also act as the first security control point, performing authentication and forwarding user identity to backend applications through HTTP headers.
Recently, I worked with a customer who was migrating from a traditional enterprise load balancer to the OCI Load Balancer. In their existing setup, the load balancer authenticated users for a critical application and injected the authenticated username into the request headers before forwarding it to the backend. The application was built to trust this header and did not handle authentication on its own.
When moving to OCI, they wanted to preserve the same behavior without modifying the application.We achieved this by introducing OCI API Gateway in front of the OCI Load Balancer.
Architecture Overview
The API Gateway now:
- Authenticates users using Okta (OIDC)
- Extracts the required identity claims
- Uses header transformations to forward the username to the backend
From the application’s perspective, nothing changed, it still receives the same trusted identity header.This pattern is extremely powerful because it decouples authentication from the application and centralizes it at the edge.
Modern cloud-native architectures increasingly rely on centralized identity providers for authentication while exposing services through managed gateways. In Oracle Cloud Infrastructure (OCI), API Gateway provides a scalable and secure entry point for APIs, and Okta is widely used as an enterprise-grade identity provider for implementing OpenID Connect (OIDC).
In this blog, we will build an end-to-end solution based on this real-world architecture and explore:
- Custom domains and the root deployment strategy
- Securing APIs using Okta OIDC
- Header transformations for identity propagation
- Stock responses for redirection
- Dynamic routing using path variables
- A simple method for verifying the headers sent to backend services
By the end of this guide, you will have a production-ready reference architecture for implementing centralized authentication, clean URL access, and identity-aware backend services in OCI.
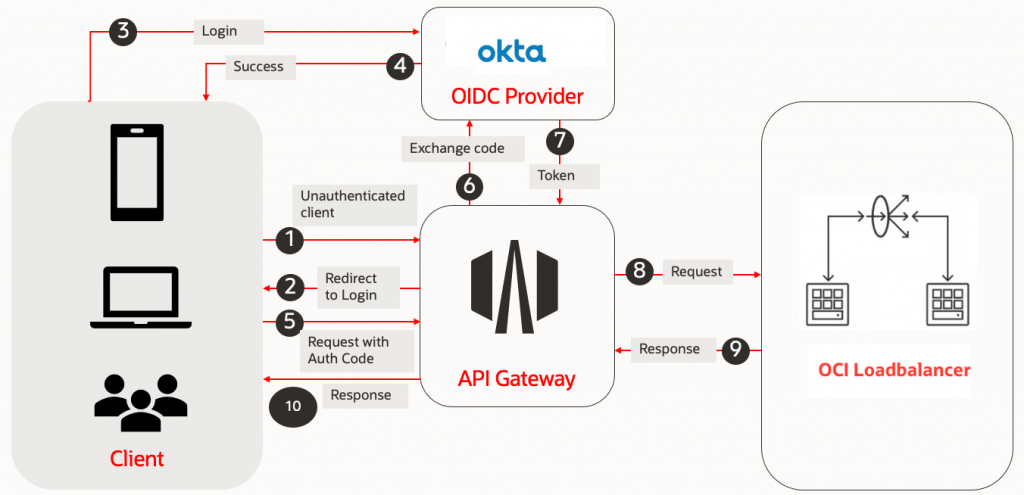
Part 1. The Secure Front Door: OCI API Gateway & Okta OIDC
Our journey begins by integrating OCI API Gateway with Okta. Here, OCI API Gateway functions as the Resource Server, responsible for protecting your APIs/Application, while Okta serves as OpenID Provider, handling user authentication and issuing identity tokens.
Okta Configuration (The Identity Provider)
- Create an OIDC Web Application:
- Log into your Okta Console.
- Navigate to Applications > Applications > Create App Integration.
- Choose OIDC – OpenID Connect and Web Application.
- Provide an App Integration Name (e.g., OCI-API-Gateway-App).
- Grant Type: Select Authorization Code.
- Sign-in redirect URIs: For now, you can put a placeholder like
https://localhost:8080/callback. We’ll update this with your actual API Gateway URL later. For real deployments, this would be your<api-gateway-hostname>/<deployment-name>/<route>. - Sign-out redirect URIs: Add a placeholder if needed, like
https://localhost:8080/logout. - Assignments: Assign to “Everyone” or specific groups as per your needs.
- Click Save.
- Gather Okta Credentials:
- From your newly created application’s General tab, note down the
Client IDandClient Secret. The Client Secret is highly sensitive; and needs to be stored in OCI Vault. - Append the Okta domain with
/.well-known/openid-configurationto get the discovery URL, which provides all the OIDC endpoints required by the API Gateway
- From your newly created application’s General tab, note down the
Note: Create a dynamic group that matches the API Gateway and write an IAM policy to allow it to read secrets. Dynamic Group Matching Rule: All {resource.type = ‘ApiGateway’, resource.compartment.id = ‘ocid1.compartment.oc1..aaaaa…’}. IAM Policy: Allow dynamic-group <Dynamic-Group-Name> to use secret-bundles in compartment <Vault-Compartment-Name>
OCI API Gateway Configuration (The Resource Server)
- Create an OCI API Gateway
- In the OCI Console, navigate to Developer Services → API Gateway → Gateways.
- Click Create Gateway.Provide a name, select the gateway type, choose a compartment, and select a VCN and subnet. and then Click Create Gateway.
- Once the gateway becomes active, note the Hostname. This will be part of your API endpoint.
- Create an API Deployment
- Select your gateway and navigate to Deployments → Create Deployment.
- Provide a name and a Path Prefix (for example, /v1).
- Under Authentication, select Single Authentication.
- Set Authentication Type to OAuth 2.0 / OpenID Connect.
- Authentication Configuration
- Token Settings
- Token Location: Header
- JWT Token Header Name: Authorization
- Authorization Scheme: Bearer
- Token Validation
- Select OAuth 2.0 Introspection Endpoint as the validation type.
- Enter the Client ID.
- Select the Vault and Secret containing the client secret.
- Provide the Discovery URL constructed earlier.
- Validation Failure Policy
- Select OAuth 2.0 redirect client to identity provider.This ensures unauthenticated or invalid users are redirected to Okta’s login page.
- OAuth Settings
- Scope: openid
- Response Type: CODE
- Enable Use the OAuth2 introspect endpoint client credentials.
- Cookie Settings (Expand show Advanced options)
- Enable Use Cookies for session – Stores the new JWT token in a session cookie
- Enable Use Cookies for Intermediate steps
- Token Settings
- Authentication Configuration
- Configure Routes and Backend
- Add a route with the following details:
- Path:
/myapi - Methods:
GET - Backend Type: HTTP
- URL: Load balancer URL or Your web application URL
- Path:
- Click Next, then Create.
- Add a route with the following details:
- Access Application
- Construct the URL using the following format and use it to access your application.
https://<api-gateway-hostname>/<deployment-name>/<route>
- When users access this URL, they are redirected to Okta for authentication.
- After successful login, they are redirected back and can access the web application. At this point, your OCI API Gateway is fully configured to authenticate requests using Okta OIDC.
- Construct the URL using the following format and use it to access your application.
Note: Update the Redirect URI in your Okta OIDC application with the URL constructed above.
Note: When you define a validation policy of type OAuth 2.0 introspection endpoint and a validation failure policy of type OAuth 2.0, and select Use cookies for session to store the new JWT in a session cookie, to prevent potential CSRF attacks, the API gateway also returns a CSRF token in an X-CSRF-TOKEN response header. Subsequent mutation requests to the API gateway (such as POST, PUT, and DELETE requests, but not GET requests) must include the CSRF token in an X-CSRF-TOKEN request header, in addition to the JWT token in the session cookie that is included automatically.
The Logout Strategy: Configuring the OIDC Logout Backend
Handling logout in an OIDC-based architecture is often more complex than login. The Identity Provider (Okta) must be informed about which user session to terminate, which typically requires passing parameters such as id_token_hint and post_logout_redirect_uri to the logout endpoint.
OCI API Gateway simplifies this process by providing a built-in Logout Backend type. By configuring a dedicated /logout route with this backend, you avoid the complexity of manually constructing logout URLs and handling tokens.
How It Works
- Automatic Token Handling
The gateway automatically retrieves the activeid_tokenfrom the authenticated session and includes it asid_token_hintin the logout request. - Session Cleanup
The gateway clears its internal session and authentication cookies. - Seamless Redirect to Okta
Using the OIDC discovery metadata, the gateway locates Okta’send_session_endpointand redirects the user to it.
The request includes:id_token_hint(to identify the session)
post_logout_redirect_uri(to return the user after logout)
- Identity Provider Logout
Okta terminates the user’s SSO session and redirects the browser back to the specified post-logout URL.
This ensures that both the API Gateway session and the Okta session are properly terminated.
Configuration Steps
To configure logout support in OCI API Gateway:
- Create a route with the path
/logout. - Set the Backend Type to Logout.
- Configure Allowed Post-Logout Redirect URIs.
These are the whitelisted URLs where users are permitted to land after logout. Only URLs listed here will be accepted by the gateway.- Example – https://api.example.com/logout-success
- (Optional) Set the Logout Path to the same route path (for example,
/logout) under Authentication tab in Validation Failure policy.
Supplying the Post-Logout URL from the Application
The actual post-logout redirect URL is not hardcoded in API Gateway. Instead, it must be supplied by the application when initiating logout. Typically, this is done from the frontend or backend when the user clicks a Logout button or link.
Example (HTML hyperlink):
<a href="/logout?postLogoutUrl=https://api.example.com/logout-success">
  Logout
</a>
Part 2: Refining the Experience
Now that the security handshake is solid, let’s look at how to handle real-world deployment challenges like custom branding and complex routing.
1. A Clean URL: Custom Domains and the “Root” Deployment
Users often prefer accessing APIs via a clean, memorable custom domain like https://api.example.com/ rather than the default OCI Gateway hostname with deployment name and route paths (https://<api-gateway-hostname>/<deployment-name>/<route>). Let’s configure that.
The “Root Deployment” Strategy
To make your custom domain serve content directly from its root, you need a deployment with a path prefix of /.
Create a New Deployment (or Edit Existing):
When creating or editing a deployment, set the Path Prefix to /. Within this deployment, your routes can then be configured relative to the root (e.g., a route for /products would be accessed as https://api.example.com/products).
Note: Only one deployment can have the / path prefix per API Gateway. If you have multiple distinct APIs, you’ll need to either nest them under different routes within this single root deployment or create separate API Gateways.
Custom Domains & SSL/TLS Certificates
For https://api.example.com to work, you need an SSL/TLS certificate and DNS configuration.
- OCI Certificates Service:
- Navigate to Identity & Security > Certificates.
- Click Import Certificate.
- Upload your Certificate, Private Key, and Certificate Chain.
- Click Create.
- Associate Custom Domain with Gateway:
- Go back to your API Gateway details.
- Click Edit Gateway
- Select the Certificate that you just uploaded.
- Update DNS Records:
- Visit your DNS provider and add an A record for the API Gateway IP address to your domain’s DNS configuration.
Now, https://api.example.com/your-route will securely route through your OCI API Gateway.
2. Handling the Root Redirect (Stock Responses)
When a user hits https://api.example.com/, they are hitting the “root.” Often, you don’t want them to see a 404; you want to send them to a specific home page, like https://api.example.com/brs/home.
Since the gateway is already handling the / prefix, you can use a route with Stock Response to perform this redirect without any backend code:
The Configuration:
- Path:
/ - Methods:
GET - Backend Type:
Stock Response - Status Code:
302(Found) - Header Name:
Location - Header Value:
/brs/home(Or the full URLhttps://api.example.com/brs/home)
This effectively “points” the front door of your domain to the actual application home page.
3. Dynamic Routing with Variables
Instead of creating 50 different routes for 50 different services, you can use Path Parameters to create a “Smart Proxy.” This allows you to pass parts of the URL directly to your backend.
The Strategy: Capture a segment of the URL as a variable and inject it into the backend URL.
- Route Path: /{path*}
- Backend Type: HTTP
- URL: https://load-balancer-address/${request.path[path]}
Why this is powerful: If a user hits api.example.com/orders, the Gateway dynamically translates the backend request to internal-load-balancer-address/orders. This reduces deployment maintenance significantly.
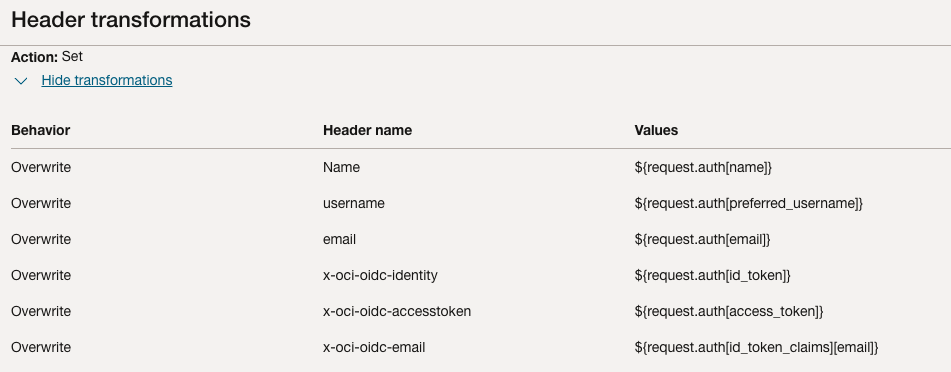
4. Dynamic Data Flow: Implementing Header Transformations
One of the most powerful features of OCI API Gateway is its ability to transform requests and responses dynamically. Your backend services often need user data (like username or email) but shouldn’t have to parse raw JWT tokens. Once OCI API Gateway validates the token issued by Okta, it can extract the required claims and forward them to the backend as clean, meaningful HTTP headers using Header Transformations.
Header Transformations are under Route request policies for a route. They are applied before the request is forwarded to the backend.
The following example shows how to configure header transformations in the API Gateway, which transforms the claims from the Okta-issued token into custom HTTP headers that are sent to the backend service.
Optional: Debugging the Headers Sent to the Backend: The Echo Function
While designing transformations, it can be useful to verify exactly what headers the API Gateway is forwarding.A simple way to do this is to temporarily configure a lightweight backend (for example, an OCI Function) that returns all the headers it receives.
Create a simple OCI Function that just returns all the headers it receives. This will be our temporary backend for debugging.
import io
import json
from fdk import response

def handler(ctx, data: io.BytesIO = None):
    # Extract all request headers
    headers = dict(ctx.Headers())
    # Prepare a JSON response with the headers
    response_data = json.dumps({"received_headers": headers}, indent=2)

    return response.Response(
        ctx,
        response_data=response_data,
        headers={"Content-Type": "application/json"}
    )
Configure API Gateway Route to Echo Function:
- Edit your API Deployment.
- Add a new route (e.g.,
/echo). - Methods:
GET - Backend Type:
Oracle Functions - Select your Function Application and the
header-echo-function. - Save/Update Deployment.
Now, if you call https://api.example.com/echo, you’ll get a JSON response showing all the headers the OCI Function received. This includes headers added by the Gateway, such as claims from the JWT.

This output is invaluable for understanding how data flows and for planning your transformations.
Conclusion
By leveraging OCI API Gateway with Okta OIDC, custom domains, stock responses, and powerful header transformations, you can build a highly secure, flexible, and developer-friendly API infrastructure. This approach ensures that your backend services only receive validated, transformed, and authorized requests, simplifying your microservice development and strengthening your overall security posture.