The aim of this blog is to provide Oracle Cloud Applications users a reference architecture to design their data extractions to replicate their operational data from Finance, Supply chain, HCM or Customer Experience into our Oracle Autonomous Database (ADB).
You may have read this blog we wrote with Jay back in 2019 walking you through how to use Oracle Data Integrator (ODI) on Marketplace to replicate data from Fusion SaaS to ADB. ODI, though to my opinion, one of the best entreprise data integration tool, is offered on an Infrastructure as a Service (IaaS) model and this offering implies that users need to maintain applications, data, runtime, middleware as well as O/S updates. And this typically translate into operational overhead that can become costly over time.
For several years now, Oracle has made significant efforts and investments to build Data Integration solutions in a Platform as a Service model (PaaS), where users only maintains the application and the data. This solution has take the form of Oracle Data Transforms, that is provisioned as a Data Studio component in every Autonomous Database instance.
Oracle has also defined migration path and developed a migration utility for allow users to move from ODI to Data Transforms , as described in this blog.
So what is Oracle Data Transforms exaclty? In a nutshell, it allows you to design graphical data transformations in the form of data loads, data flows, and workflows. Data Loads provide a convenient way of loading data into Oracle Autonomous Database.
Oracle Data Transforms provides an easy-to-use user interface to create your data inetgrations without requiring you to write any code. Data flows define how the data is moved and transformed between different systems, while the workflows define the sequence in which the data flows are executed. You can drag and drop the components, that is data entities and operators, such as Join, Split, and Aggregate, on the Design Canvas of the Data Flow editor and connect them to complete you data flow. You can then add your data flows to workflows.
In addition to being able to perform full and incremental extracts from our Fusion SaaS applications, the latest release of Oracle Data Transforms offers a new feature to synchronize the data has been deleted in Fusion SaaS with the data that is residing in the Autonomous Database tables. And this is one of the focus of this blog.
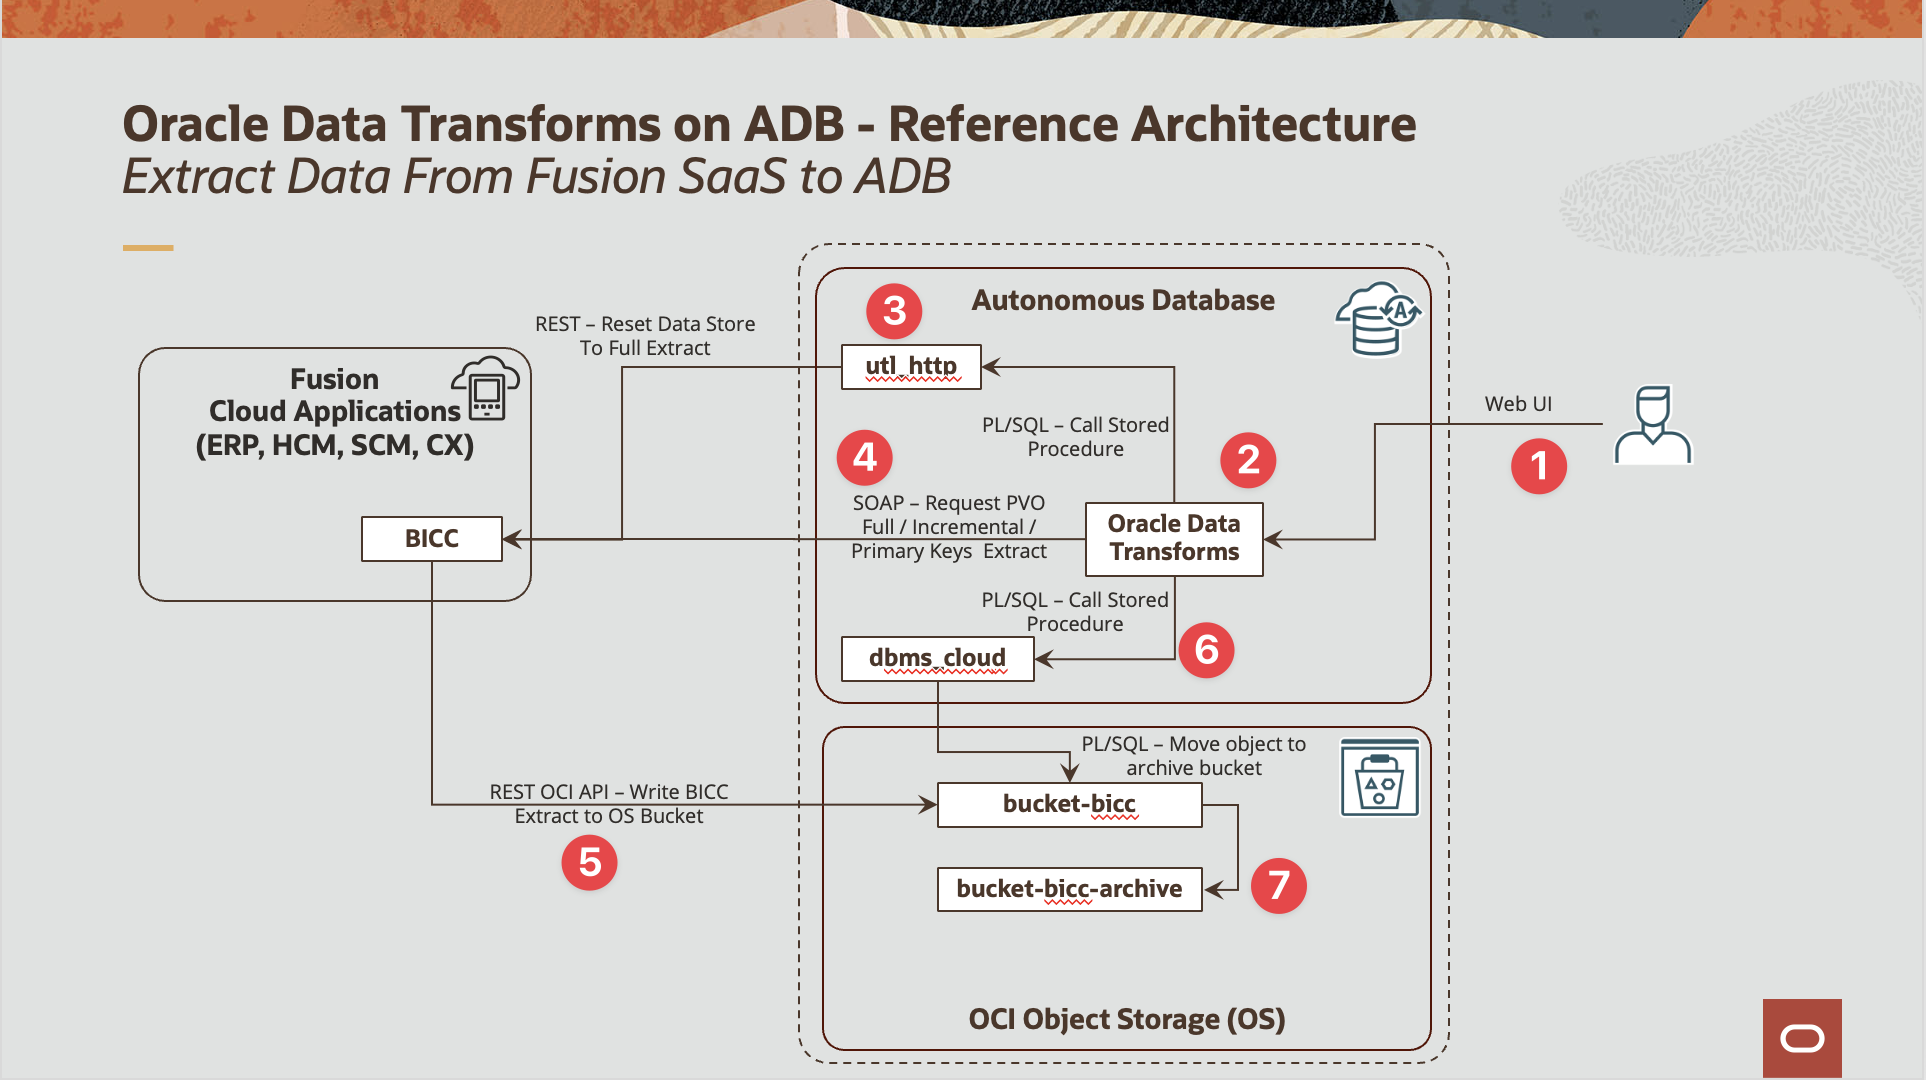
The diagram below details the reference architecture we will be detailing in the following sections :
Figure 1: Oracle Data Transforms – Reference Architecture for Replication Fusion SaaS Data to ADB
The corresponding logical flow is comprised of the below steps:
A Data Engineer user logs in to Oracle Data Studio using his user and password credentials
The Data Engineer access the Oracle Data Studio (namely Data Transforms and SQL Developer)
The Data Engineer builds a PL/SQL procedure based on the utl_http package to call BICC REST API in order to reset a data store to Full Extract, that is clear the Last Extract Date parameter value from this data store so when the next extract job is requested to BICC, it will be a full extract of the Data Store
The Data Engineer builds in Data Transforms
Full Load
A Data flow to perform full extract of the BICC data store
A Workflow with two steps : a call to the PL/SQL procedure to reset the data store to full extract and the Data Flow created above
Incremental load
A variable to read the last extract date for the data store from the Data Transform session logs
A Data flow to perform incremental extract the data store, that is with the Last Load Date option set to the variable above
A Workflow with two steps : the refresh variable step and the data flow above for incremental load
Incremental load with synchronization of deletes
A variable to read the last extract date for the data store from the Data Transform session logs
A Data flow to perform incremental data extract and primary key extract and with delete synchronization option set to true
A Workflow with two steps : the refresh variable step and the data flow above for incremental load with delete synchronizatio
When the BICC extract (Data or Keys) are executed, then the extract files are written to the Object Storage bucket, here bucket-bicc
The Data Engineer then builds a PL/SQL procedure to move the extract files from bucket-bicc to bucket-bicc-archive and this procedure can be called in the workflows described in step 4
This current article covers all the aspects of using Oracle Data Transforms to extract data from Fusion SaaS and load it into ADB tables, that is:
Provisioning and configuring Data Transforms
Setting up the database objects (User and grants, HTTP Requests, PL/SQL SDK for OCI Object Storage) once ADB is provisioned
Setting up Data Transforms connections to source Fusion SaaS Application and target ADB
Creating Data Integration Artifacts for full and incremental loads, including the synchronization of source deleted records.
Suggested Prerequisite Collateral Material (Reading / Viewing):
Have configured OCI Storage target for Fusion BI Cloud Connector as described in this blog
Have access to the OCI Console in your region of choice
Have OCI user details like AuthToken
Have provisionned and autonomous database and retained wallet and ADMIN password
Provisioning and Initial Set up
In this section, we will create the necessary objects and grants in the Autonomous Database so we can succesfully implement all the data integration flows in the subsequent sections
Creating the ADB User and role
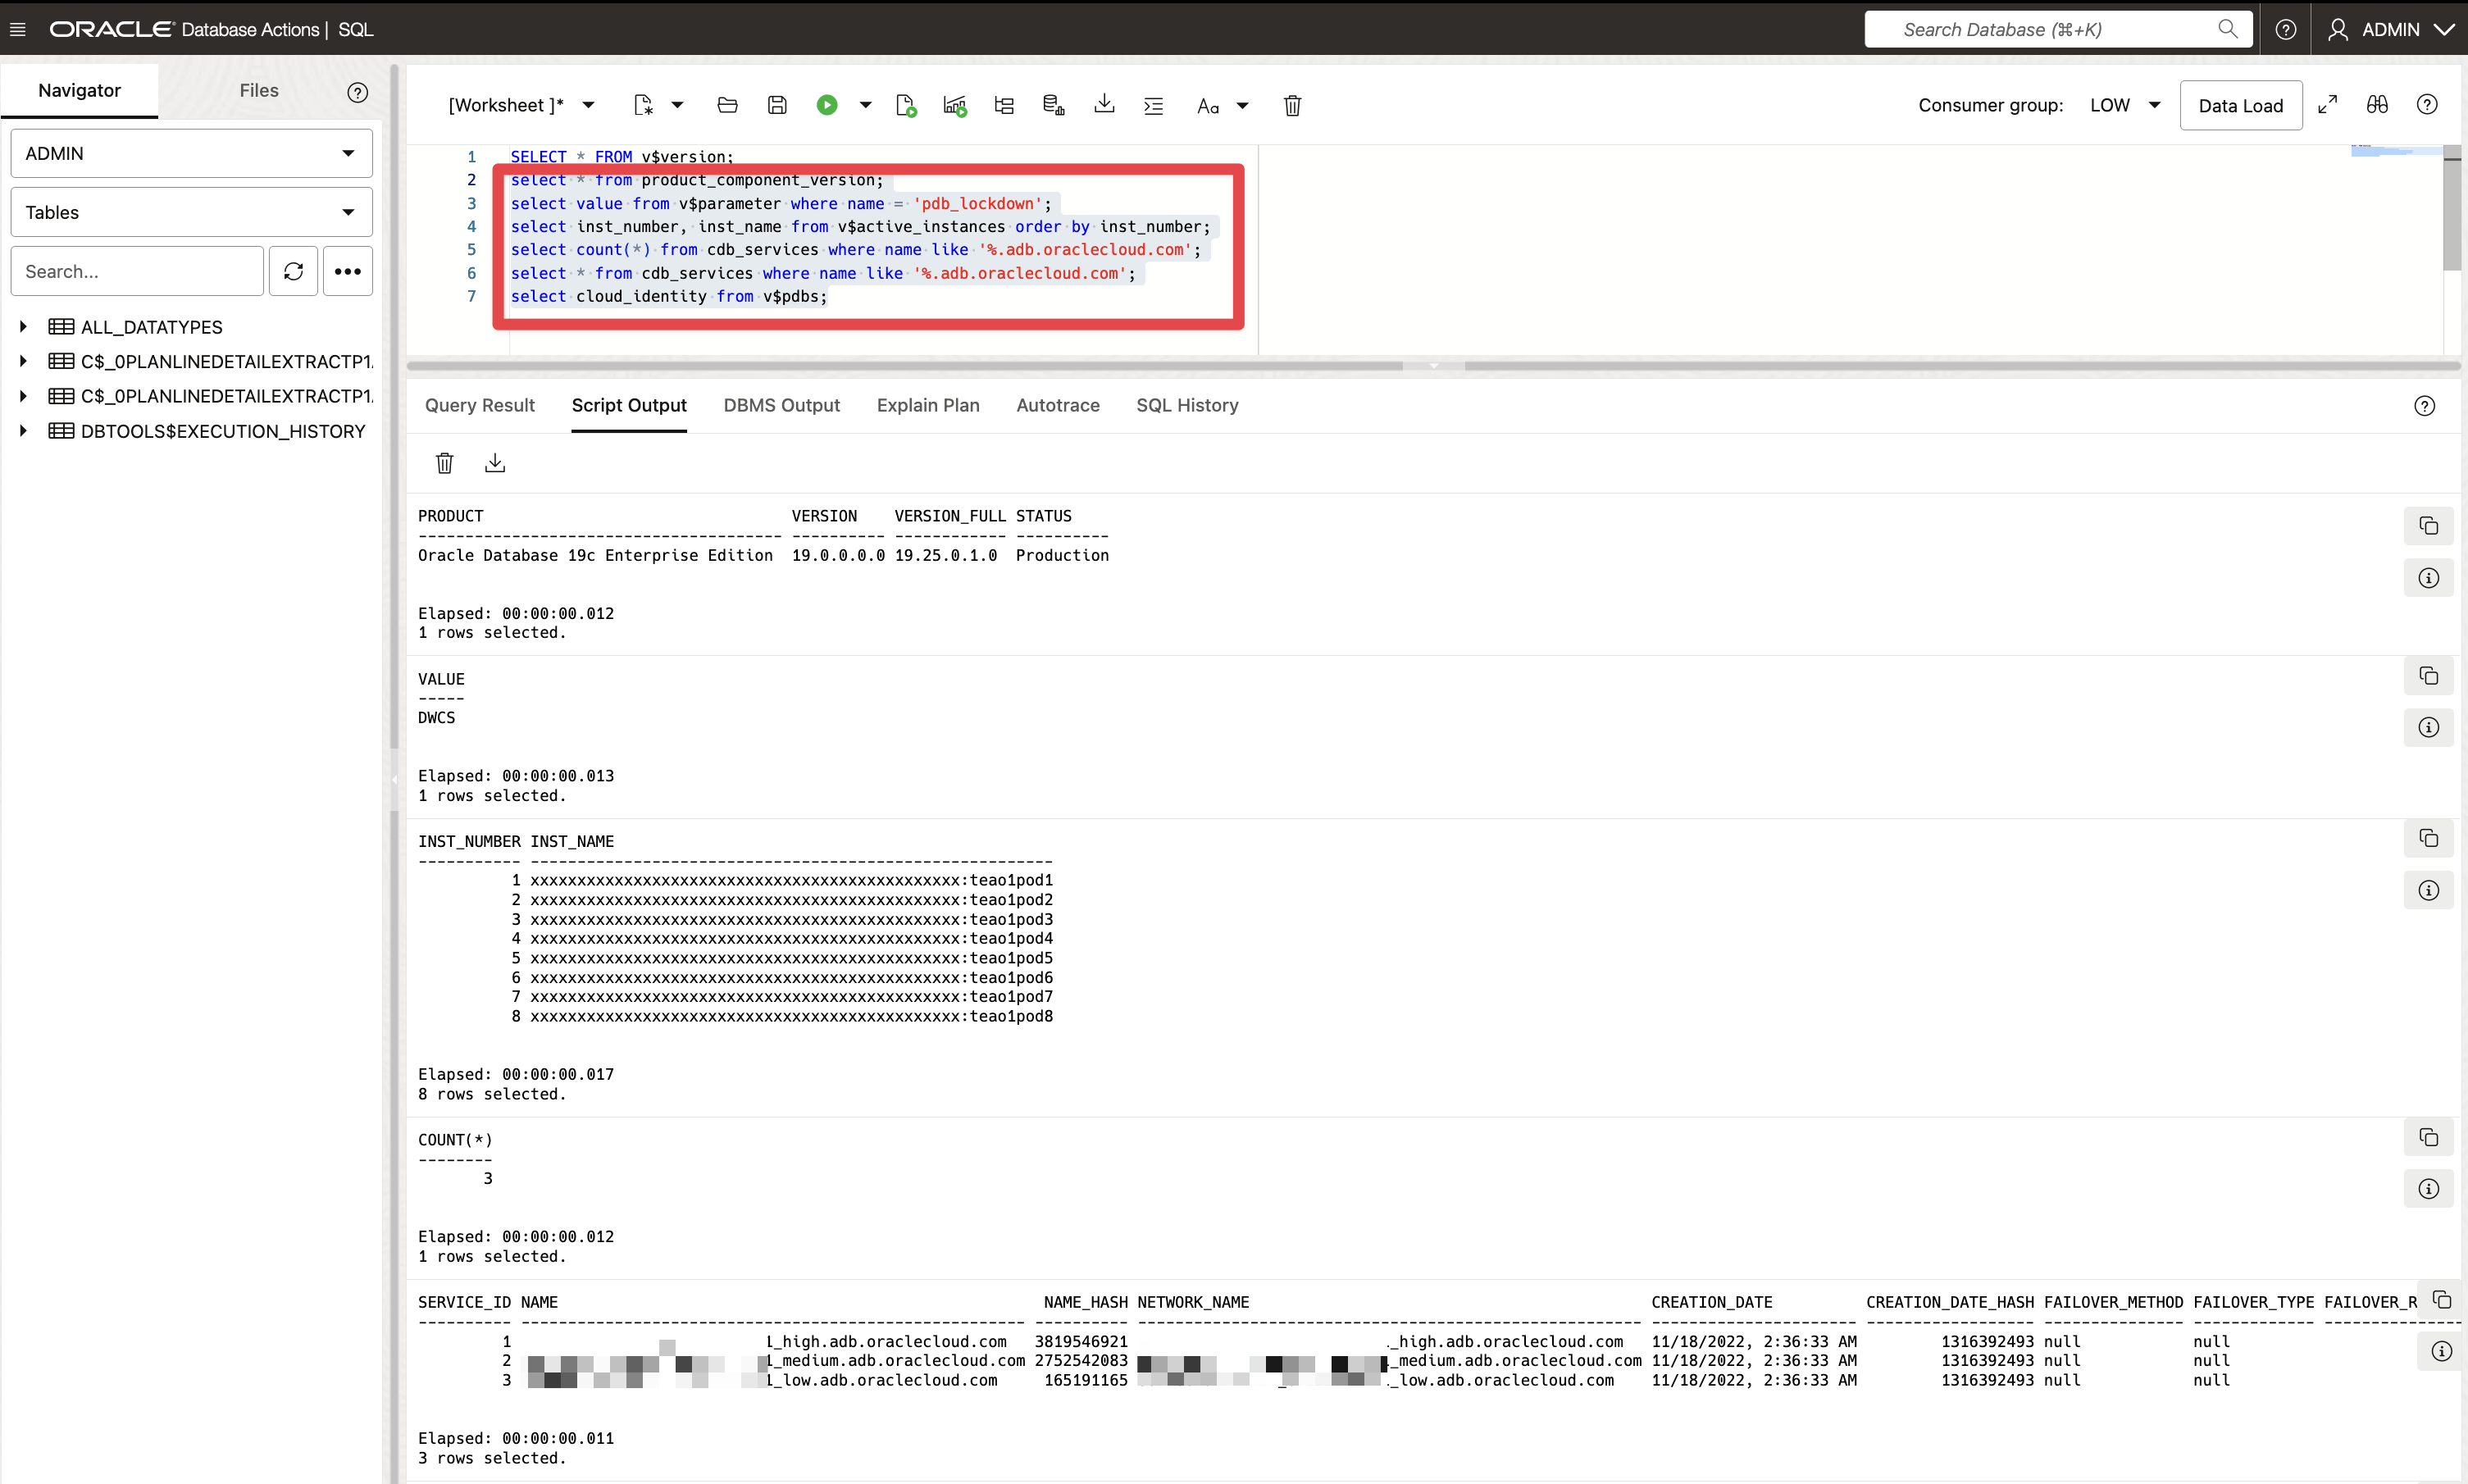
Before actually creating the database user to store the data extracted from Fusion SaaS, let run the below queries to check the database details and review what make the Autonomous Database unique, as described in this blog.
Click to toggle and display the queries
select * from product_component_version;
select value from v$parameter where name = 'pdb_lockdown';
select inst_number, inst_name from v$active_instances order by inst_number;
select count(*) from cdb_services where name like '%.adb.oraclecloud.com';
select * from cdb_services where name like '%.adb.oraclecloud.com';
select cloud_identity from v$pdbs;
Figure 2: Oracle Data Transforms – Reference Architecture for Replication Fusion SaaS Data to ADB
Now let’s create the user name ATEAM to host data and to use in Oracle Data Transforms
Click to toggle and display the queries
-- USER SQL
CREATE USER "ATEAM" IDENTIFIED BY "<your super hard to guess password>"
DEFAULT TABLESPACE "DATA"
TEMPORARY TABLESPACE "TEMP";

-- QUOTAS
ALTER USER "ATEAM" QUOTA UNLIMITED ON "DATA";

-- ROLES
GRANT "CONNECT" TO "ATEAM" ;
GRANT "RESOURCE" TO "ATEAM" ;
GRANT "ODI_DEVELOPER" TO "ATEAM" ;
GRANT "DWROLE" TO "ATEAM" ;
GRANT "ODIADMIN" TO "ATEAM" ;
GRANT "DATA_TRANSFORM_USER" TO "ATEAM" ;
Setting up ADB user
Now that the ATEAM user is created, we need to ensure the user can issue REST API calls, for instance to be able to interact with the BI Cloud Connector data store to rest a data store to full extract when running full load.
One can review the SOAP API and REST API documentation available for BICC.
As we want this user to be able to interact with OCI Object storage to move files from one bucket to another, to delete file and so on. And to do so, we need to give our user grants to the PL/SQL OCI SDK methods and types.
Finally, we will create a set of supporting tables and views to allow to refresh our variable later on.
Enable HTTP Requests
The below queries are meant to allow ATEAM user to execute HTTP Requests.
Click to toggle and display the queries
set define off;

grant execute on utl_http to ATEAM;
grant execute on dbms_lock to ATEAM;

BEGIN
DBMS_NETWORK_ACL_ADMIN.create_acl (
acl => 'bicc.xml',
description => 'API DEV - ACL functionality',
principal => 'ATEAM',
is_grant => TRUE,
privilege => 'connect',
start_date => SYSTIMESTAMP,
end_date => NULL);
end;
/

BEGIN

DBMS_NETWORK_ACL_ADMIN.ADD_PRIVILEGE (acl => 'bicc.xml'
, principal => 'ATEAM'
, is_grant => TRUE
, privilege => 'resolve');
end;
/

set define off;

begin
DBMS_NETWORK_ACL_ADMIN.assign_acl (
acl => 'bicc.xml',
host => 'fa-ewul-dev3-saasfaprod1.fa.ocs.oraclecloud.com',
lower_port => 1,
upper_port => 50000);
end;
/
commit;
OCI Object storage PL/SQL SQK
The below queries are meant to allow ATEAM user to use the OCI PL/SQL SDK.
Click to toggle and display the queries
grant execute on dbms_cloud to ATEAM;

grant execute on DBMS_CLOUD_OCI_OBS_OBJECT_STORAGE to ATEAM;
grant execute on DBMS_CLOUD_OCI_OBS_OBJECT_STORAGE_ABORT_MULTIPART_UPLOAD_RESPONSE_T to ATEAM;
grant execute on DBMS_CLOUD_OCI_OBS_OBJECT_STORAGE_CANCEL_WORK_REQUEST_RESPONSE_T to ATEAM;
grant execute on DBMS_CLOUD_OCI_OBS_OBJECT_STORAGE_COMMIT_MULTIPART_UPLOAD_RESPONSE_T to ATEAM;
grant execute on DBMS_CLOUD_OCI_OBS_OBJECT_STORAGE_COPY_OBJECT_RESPONSE_T to ATEAM;
grant execute on DBMS_CLOUD_OCI_OBS_OBJECT_STORAGE_CREATE_BUCKET_RESPONSE_T to ATEAM;
grant execute on DBMS_CLOUD_OCI_OBS_OBJECT_STORAGE_CREATE_MULTIPART_UPLOAD_RESPONSE_T to ATEAM;
grant execute on DBMS_CLOUD_OCI_OBS_OBJECT_STORAGE_CREATE_PREAUTHENTICATED_REQUEST_RESPONSE_T to ATEAM;
grant execute on DBMS_CLOUD_OCI_OBS_OBJECT_STORAGE_CREATE_REPLICATION_POLICY_RESPONSE_T to ATEAM;
grant execute on DBMS_CLOUD_OCI_OBS_OBJECT_STORAGE_CREATE_RETENTION_RULE_RESPONSE_T to ATEAM;
grant execute on DBMS_CLOUD_OCI_OBS_OBJECT_STORAGE_DELETE_BUCKET_RESPONSE_T to ATEAM;
grant execute on DBMS_CLOUD_OCI_OBS_OBJECT_STORAGE_DELETE_OBJECT_LIFECYCLE_POLICY_RESPONSE_T to ATEAM;
grant execute on DBMS_CLOUD_OCI_OBS_OBJECT_STORAGE_DELETE_OBJECT_RESPONSE_T to ATEAM;
grant execute on DBMS_CLOUD_OCI_OBS_OBJECT_STORAGE_DELETE_PREAUTHENTICATED_REQUEST_RESPONSE_T to ATEAM;
grant execute on DBMS_CLOUD_OCI_OBS_OBJECT_STORAGE_DELETE_REPLICATION_POLICY_RESPONSE_T to ATEAM;
grant execute on DBMS_CLOUD_OCI_OBS_OBJECT_STORAGE_DELETE_RETENTION_RULE_RESPONSE_T to ATEAM;
grant execute on DBMS_CLOUD_OCI_OBS_OBJECT_STORAGE_GET_BUCKET_RESPONSE_T to ATEAM;
grant execute on DBMS_CLOUD_OCI_OBS_OBJECT_STORAGE_GET_NAMESPACE_METADATA_RESPONSE_T to ATEAM;
grant execute on DBMS_CLOUD_OCI_OBS_OBJECT_STORAGE_GET_NAMESPACE_RESPONSE_T to ATEAM;
grant execute on DBMS_CLOUD_OCI_OBS_OBJECT_STORAGE_GET_OBJECT_LIFECYCLE_POLICY_RESPONSE_T to ATEAM;
grant execute on DBMS_CLOUD_OCI_OBS_OBJECT_STORAGE_GET_OBJECT_RESPONSE_T to ATEAM;
grant execute on DBMS_CLOUD_OCI_OBS_OBJECT_STORAGE_GET_PREAUTHENTICATED_REQUEST_RESPONSE_T to ATEAM;
grant execute on DBMS_CLOUD_OCI_OBS_OBJECT_STORAGE_GET_REPLICATION_POLICY_RESPONSE_T to ATEAM;
grant execute on DBMS_CLOUD_OCI_OBS_OBJECT_STORAGE_GET_RETENTION_RULE_RESPONSE_T to ATEAM;
grant execute on DBMS_CLOUD_OCI_OBS_OBJECT_STORAGE_GET_WORK_REQUEST_RESPONSE_T to ATEAM;
grant execute on DBMS_CLOUD_OCI_OBS_OBJECT_STORAGE_HEAD_BUCKET_RESPONSE_T to ATEAM;
grant execute on DBMS_CLOUD_OCI_OBS_OBJECT_STORAGE_HEAD_OBJECT_RESPONSE_T to ATEAM;
grant execute on DBMS_CLOUD_OCI_OBS_OBJECT_STORAGE_LIST_BUCKETS_RESPONSE_T to ATEAM;
grant execute on DBMS_CLOUD_OCI_OBS_OBJECT_STORAGE_LIST_MULTIPART_UPLOADS_RESPONSE_T to ATEAM;
grant execute on DBMS_CLOUD_OCI_OBS_OBJECT_STORAGE_LIST_MULTIPART_UPLOAD_PARTS_RESPONSE_T to ATEAM;
grant execute on DBMS_CLOUD_OCI_OBS_OBJECT_STORAGE_LIST_OBJECTS_RESPONSE_T to ATEAM;
grant execute on DBMS_CLOUD_OCI_OBS_OBJECT_STORAGE_LIST_OBJECT_VERSIONS_RESPONSE_T to ATEAM;
grant execute on DBMS_CLOUD_OCI_OBS_OBJECT_STORAGE_LIST_PREAUTHENTICATED_REQUESTS_RESPONSE_T to ATEAM;
grant execute on DBMS_CLOUD_OCI_OBS_OBJECT_STORAGE_LIST_REPLICATION_POLICIES_RESPONSE_T to ATEAM;
grant execute on DBMS_CLOUD_OCI_OBS_OBJECT_STORAGE_LIST_REPLICATION_SOURCES_RESPONSE_T to ATEAM;
grant execute on DBMS_CLOUD_OCI_OBS_OBJECT_STORAGE_LIST_RETENTION_RULES_RESPONSE_T to ATEAM;
grant execute on DBMS_CLOUD_OCI_OBS_OBJECT_STORAGE_LIST_WORK_REQUESTS_RESPONSE_T to ATEAM;
grant execute on DBMS_CLOUD_OCI_OBS_OBJECT_STORAGE_LIST_WORK_REQUEST_ERRORS_RESPONSE_T to ATEAM;
grant execute on DBMS_CLOUD_OCI_OBS_OBJECT_STORAGE_LIST_WORK_REQUEST_LOGS_RESPONSE_T to ATEAM;
grant execute on DBMS_CLOUD_OCI_OBS_OBJECT_STORAGE_MAKE_BUCKET_WRITABLE_RESPONSE_T to ATEAM;
grant execute on DBMS_CLOUD_OCI_OBS_OBJECT_STORAGE_PUT_OBJECT_LIFECYCLE_POLICY_RESPONSE_T to ATEAM;
grant execute on DBMS_CLOUD_OCI_OBS_OBJECT_STORAGE_PUT_OBJECT_RESPONSE_T to ATEAM;
grant execute on DBMS_CLOUD_OCI_OBS_OBJECT_STORAGE_REENCRYPT_BUCKET_RESPONSE_T to ATEAM;
grant execute on DBMS_CLOUD_OCI_OBS_OBJECT_STORAGE_REENCRYPT_OBJECT_RESPONSE_T to ATEAM;
grant execute on DBMS_CLOUD_OCI_OBS_OBJECT_STORAGE_RENAME_OBJECT_RESPONSE_T to ATEAM;
grant execute on DBMS_CLOUD_OCI_OBS_OBJECT_STORAGE_RESTORE_OBJECTS_RESPONSE_T to ATEAM;
grant execute on DBMS_CLOUD_OCI_OBS_OBJECT_STORAGE_UPDATE_BUCKET_RESPONSE_T to ATEAM;
grant execute on DBMS_CLOUD_OCI_OBS_OBJECT_STORAGE_UPDATE_NAMESPACE_METADATA_RESPONSE_T to ATEAM;
grant execute on DBMS_CLOUD_OCI_OBS_OBJECT_STORAGE_UPDATE_OBJECT_STORAGE_TIER_RESPONSE_T to ATEAM;
grant execute on DBMS_CLOUD_OCI_OBS_OBJECT_STORAGE_UPDATE_RETENTION_RULE_RESPONSE_T to ATEAM;
grant execute on DBMS_CLOUD_OCI_OBS_OBJECT_STORAGE_UPLOAD_PART_RESPONSE_T to ATEAM;


grant READ,WRITE ON directory DATA_PUMP_DIR TO ATEAM;
Setting up Data Transforms Connections to BICC and ADB
This section details how to create connections to BI Cloud Connector to build extract jobs and to Autonomous Database.
The reference official documentation link are available below.
The following video walks you through how to , because I think a picture is worth a thousand words:
Figure 3: Creating BICC and ADB connections in Data Transforms
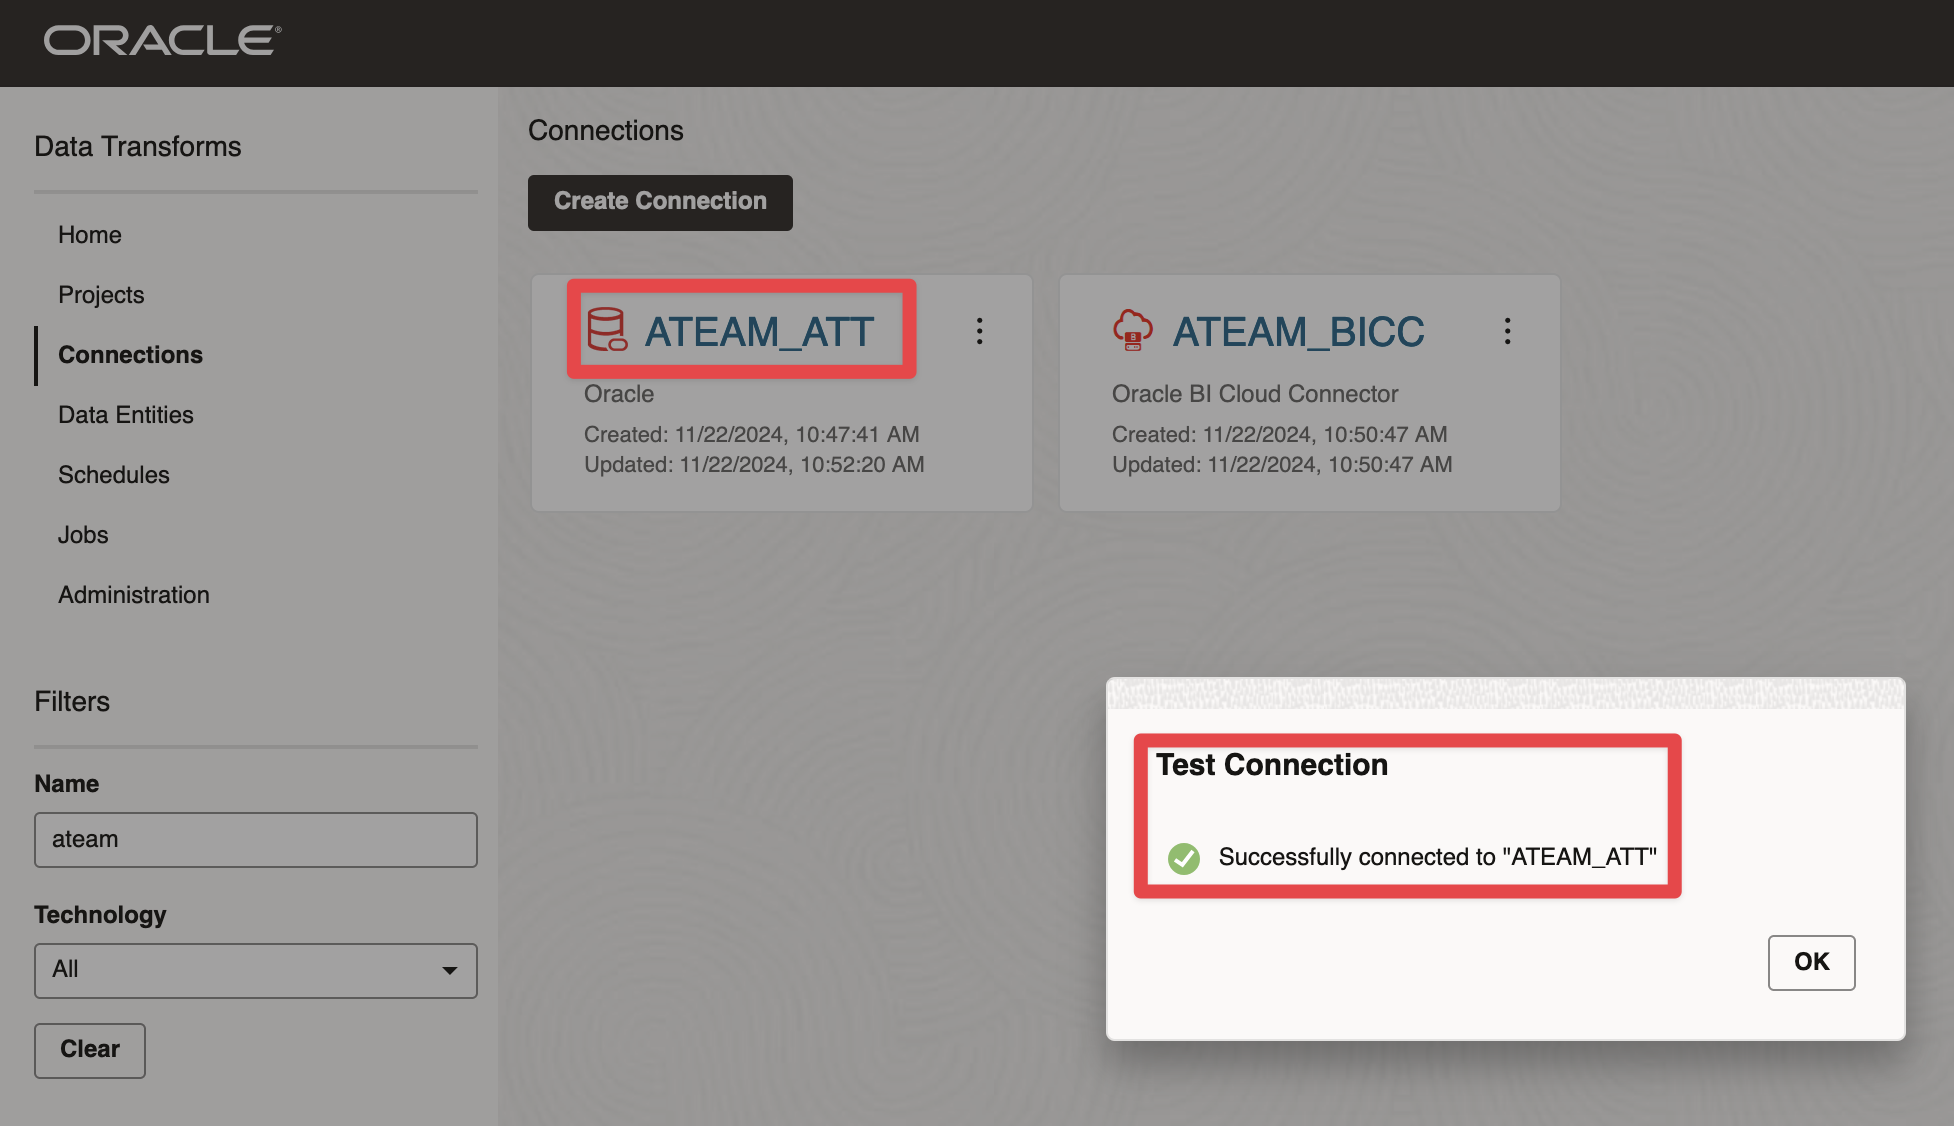
We have set up these two connections :
Connection to ADW
Figure 4: Creating BICC and ADB connections in Data Transforms
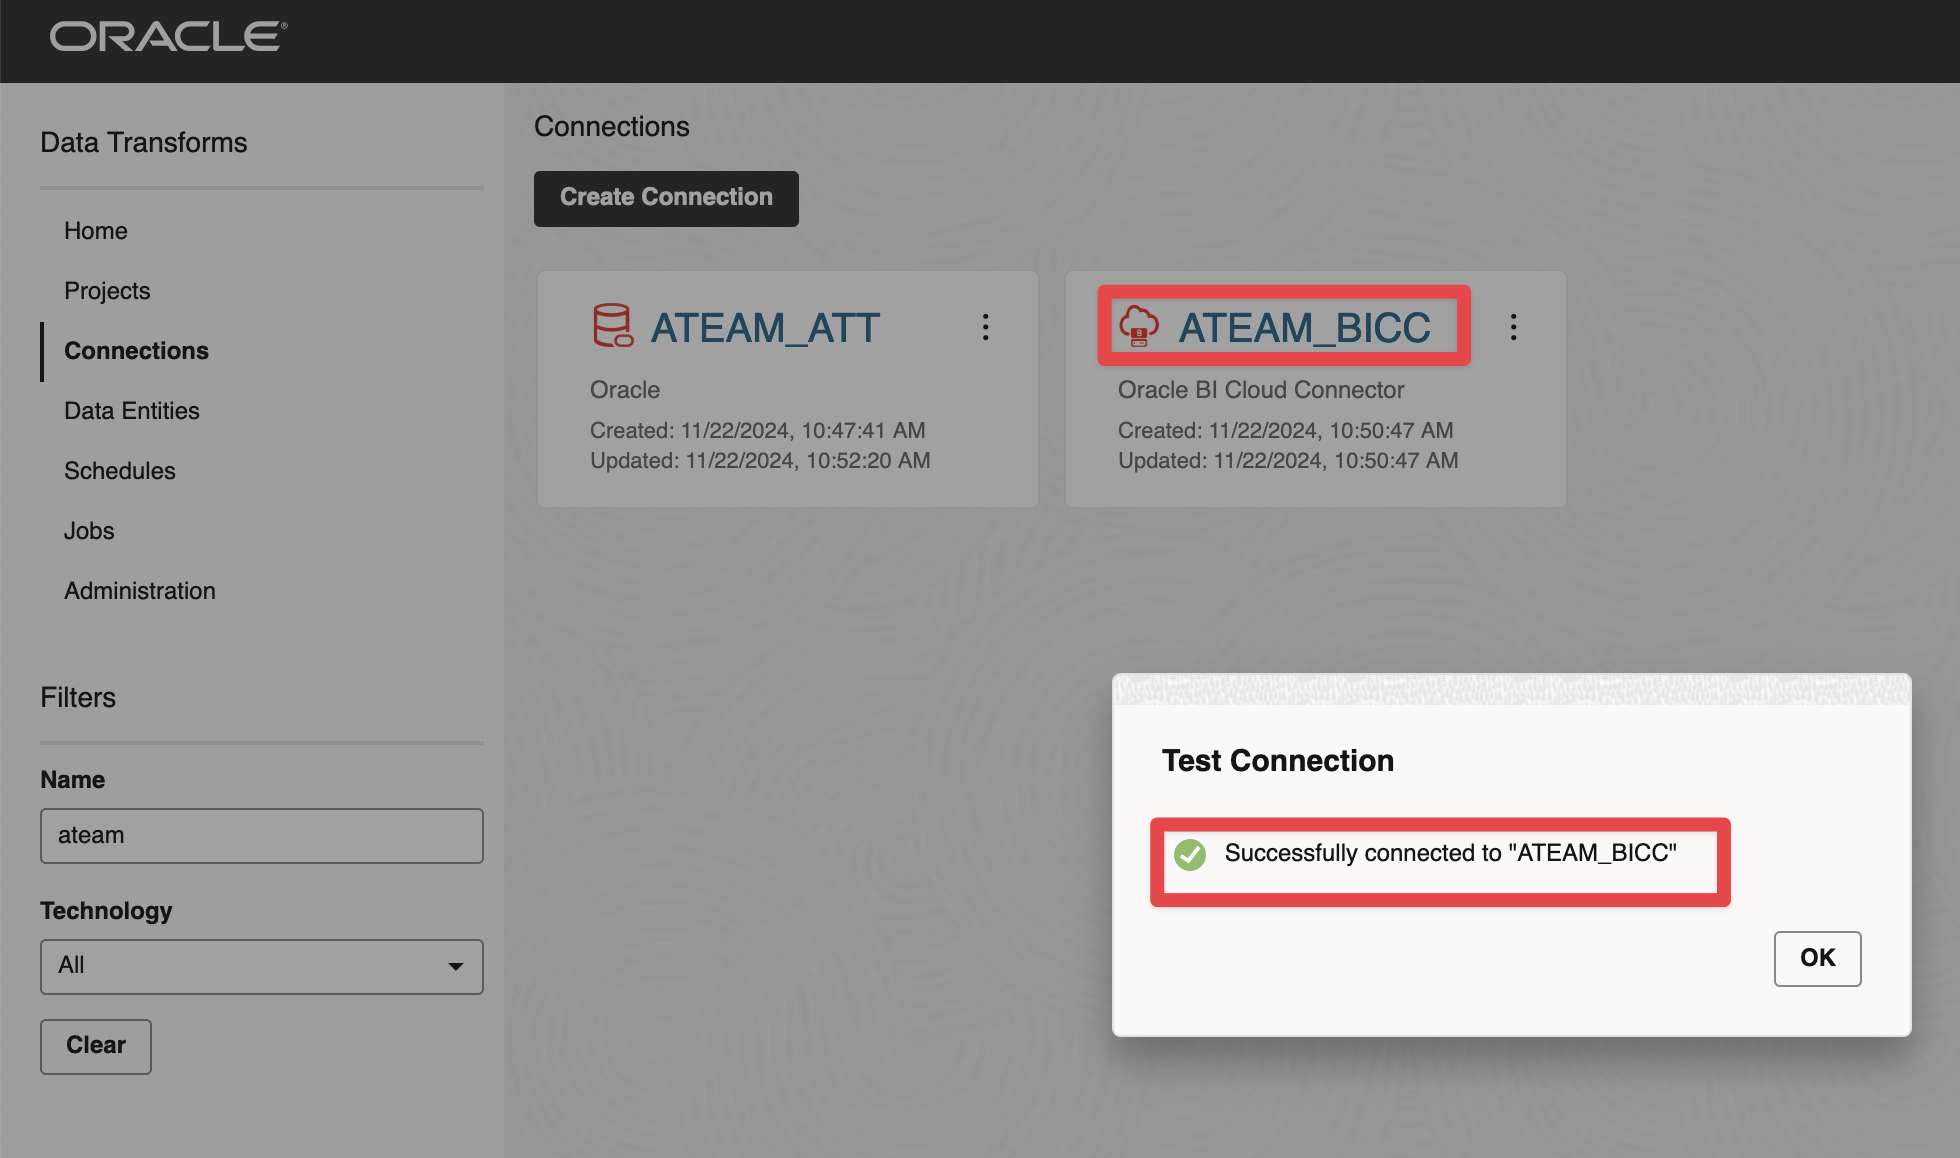
Connection to BICC
Figure 5: Creating BICC and ADB connections in Data Transforms
Creating Data Integration Artifacts
Setting the Data Transform Project and Importing Data Entities
Creating the project
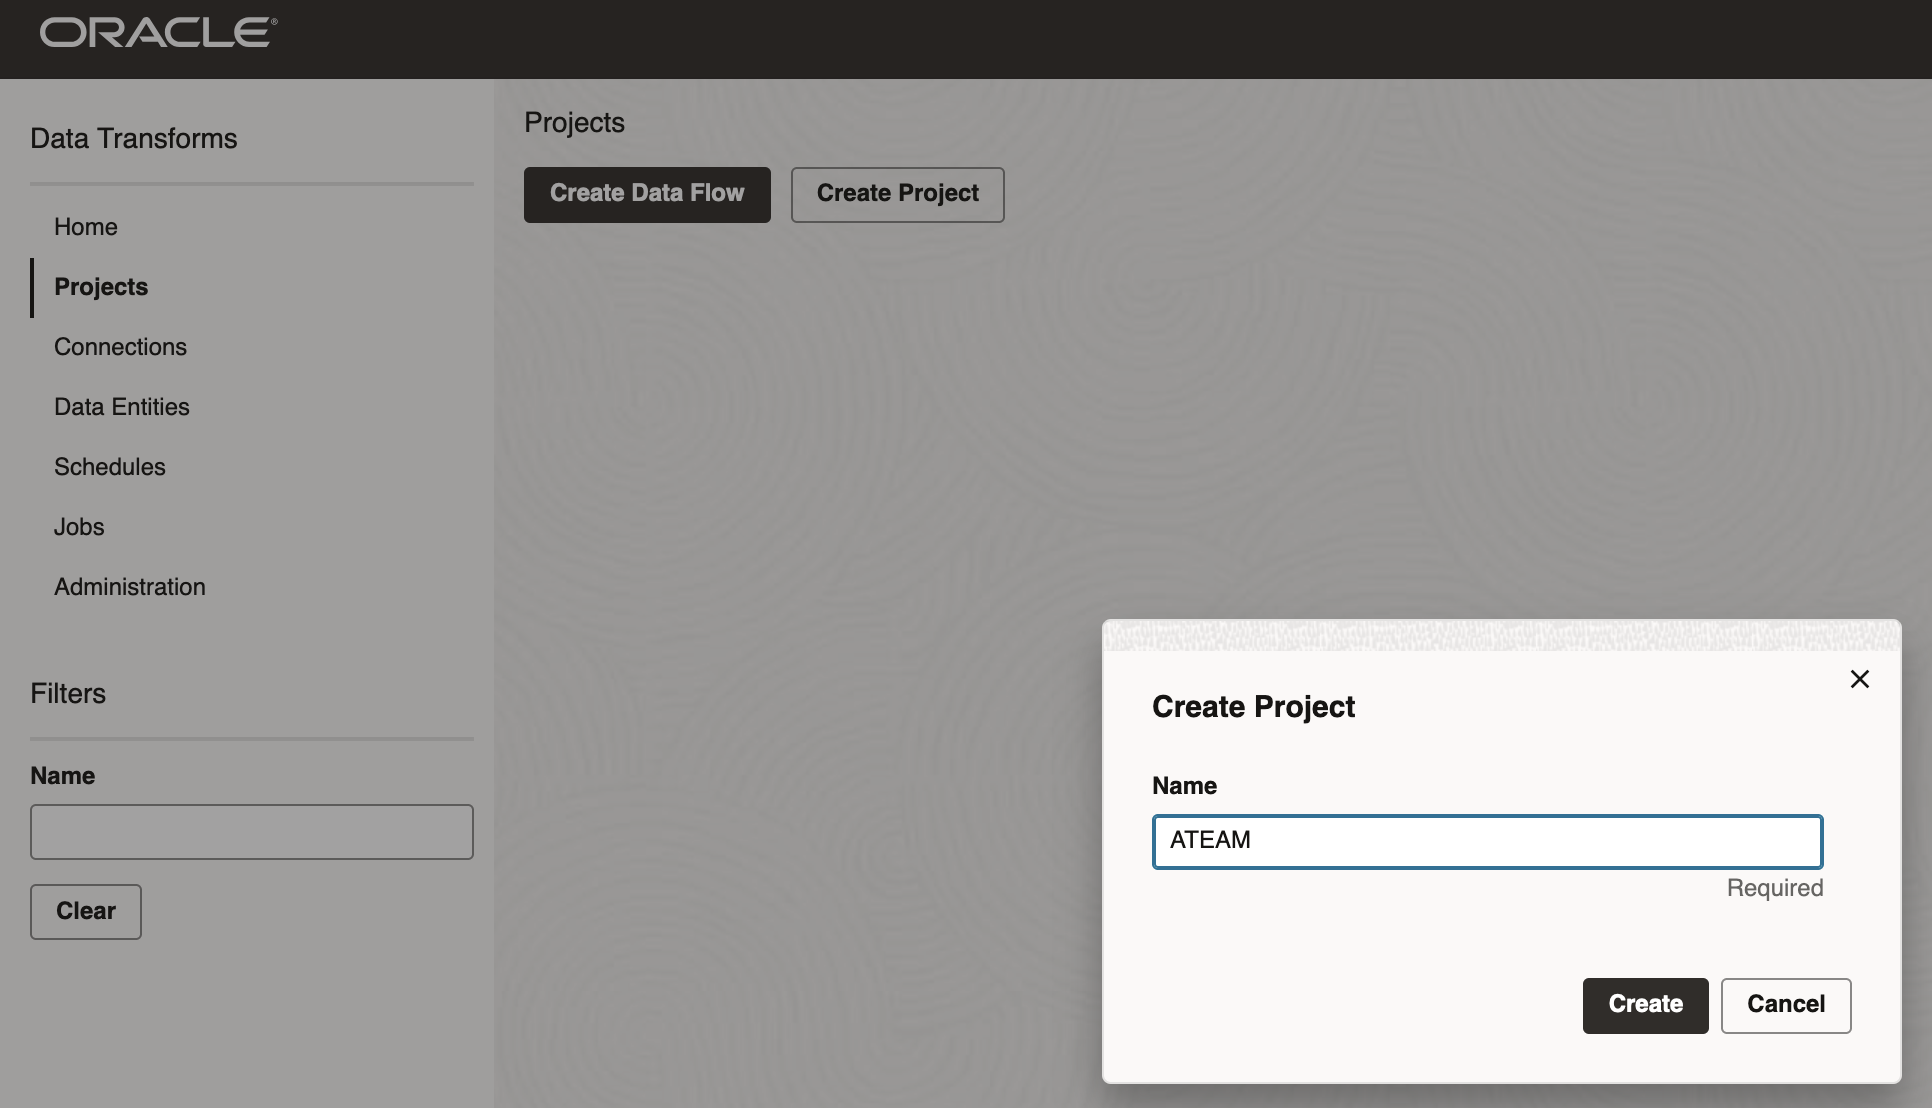
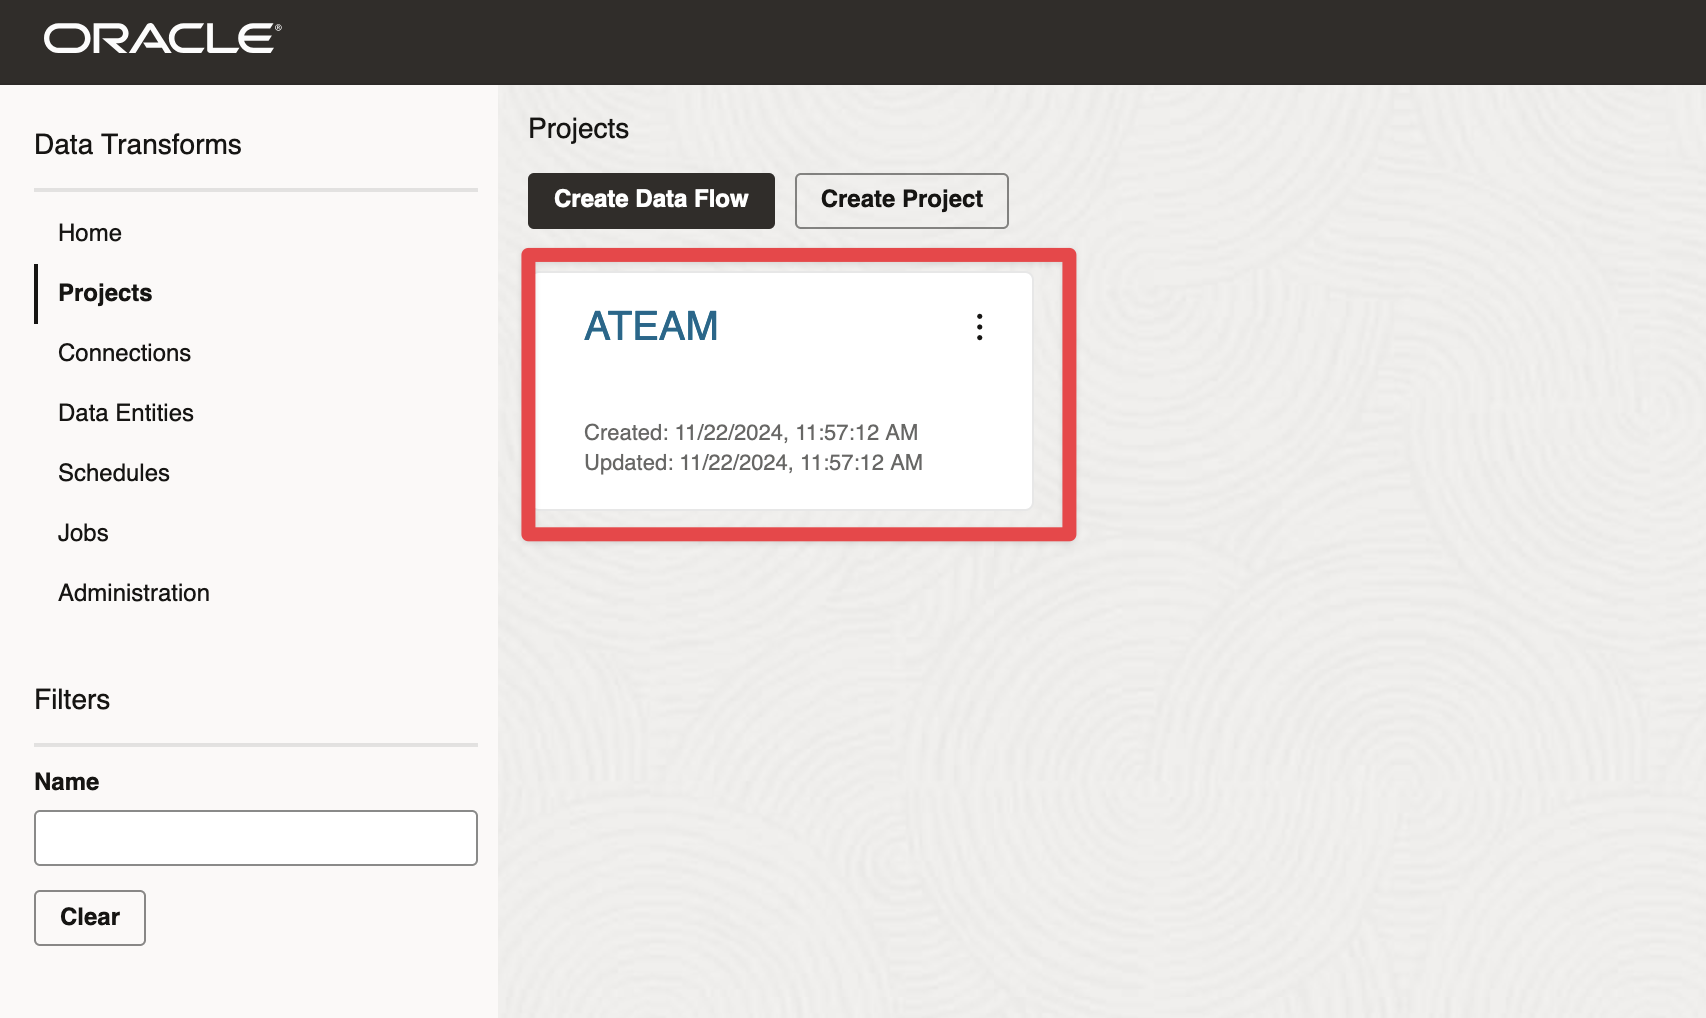
Now that our database objects are set up, we will create a new project in Data Transforms. To do so, we will go to the Projects menu and click the button Create Project.
Then we will enter a name and click Create
Figure 6: Creating Project in Data Transforms
Importing Data Entities for BI Cloud Connector
Now that our project is ready, we can reverse engineer the data structure (table names, column names and data types, constraints) of the source data store we want to extract.
To do so, we will go to the Data Entities menu and click Import Data Entities button
Figure 7: Importing Data Entities
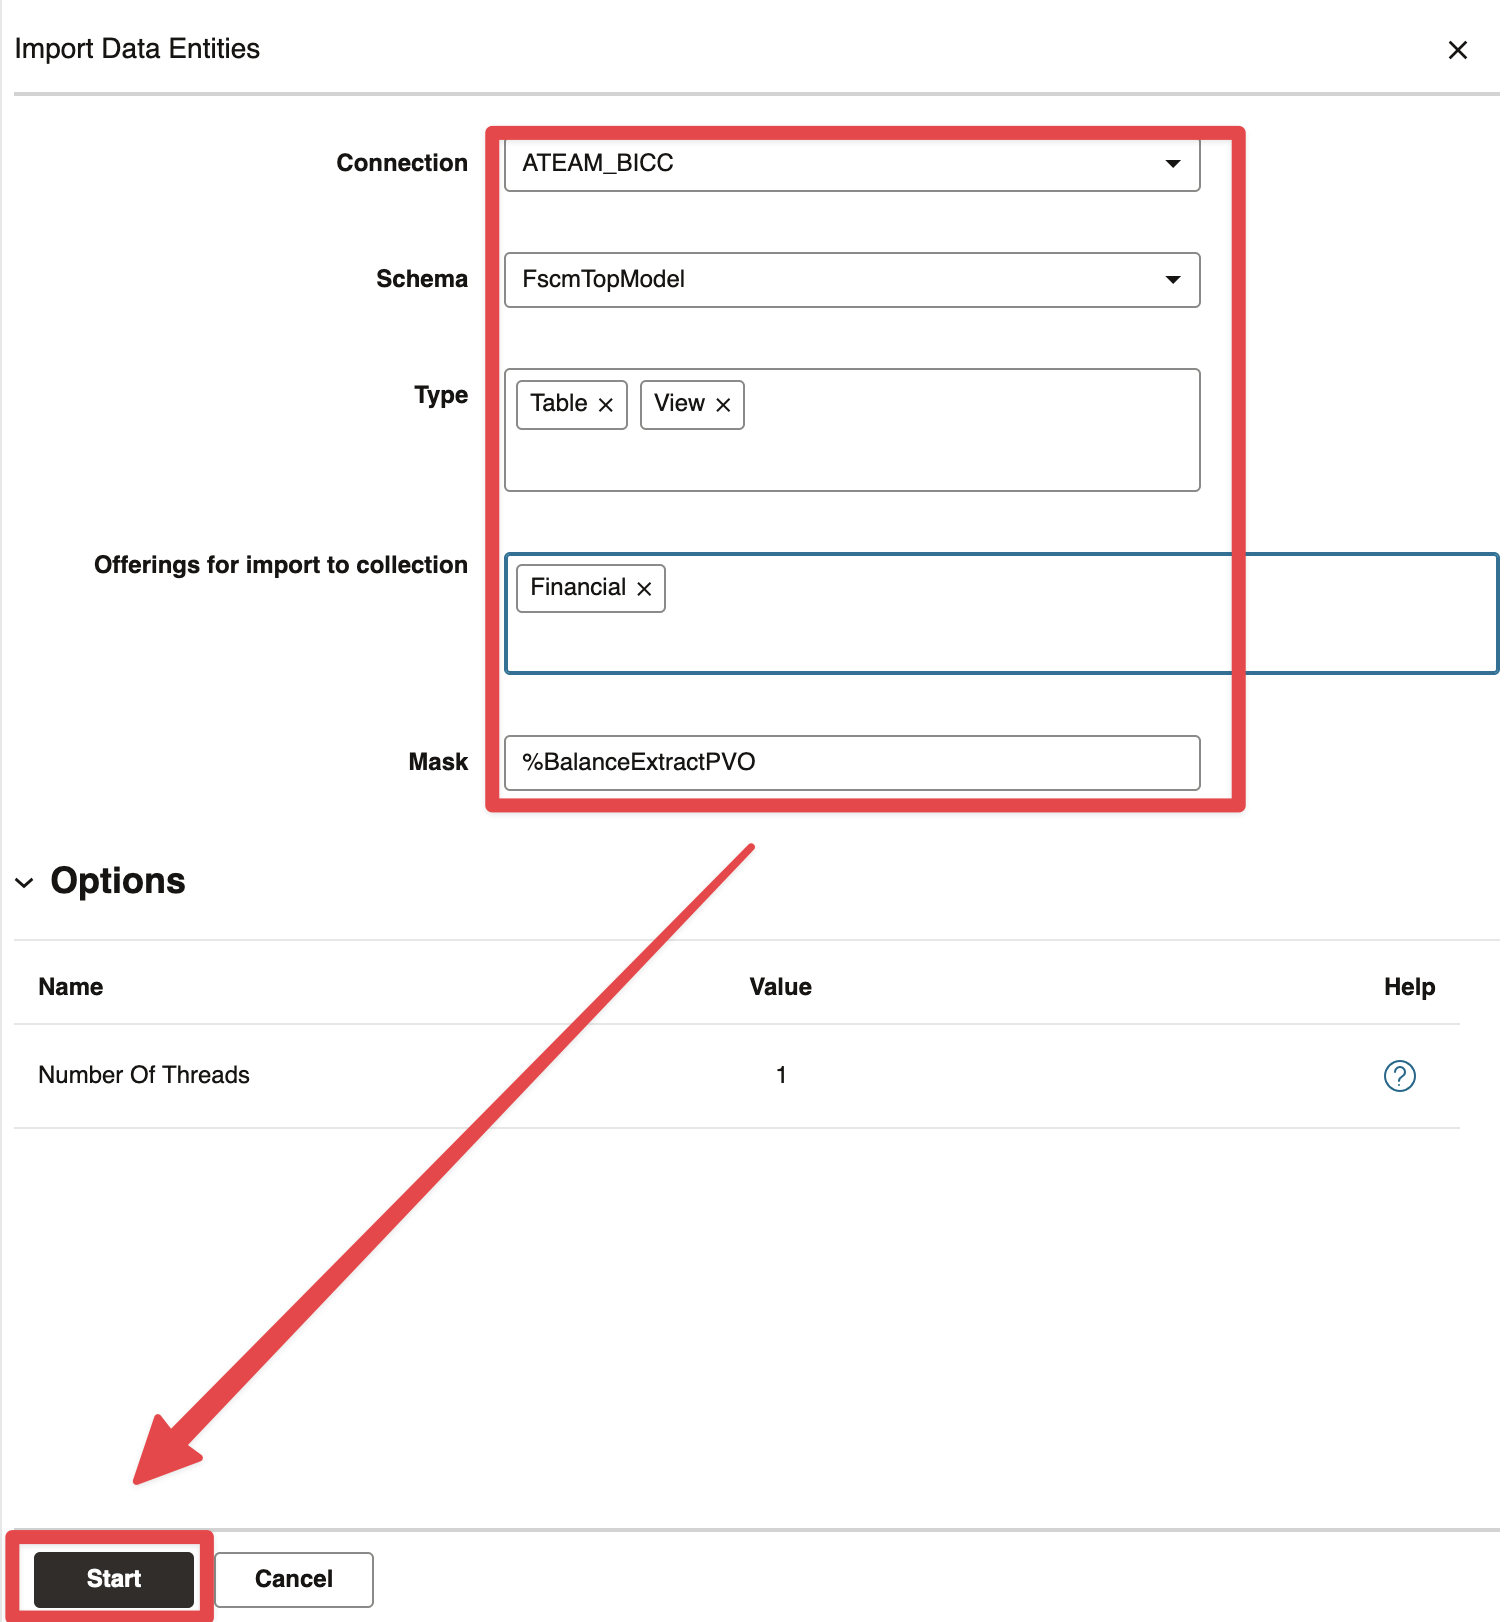
Then, enter a connection name, a schema (here FscmTopModel as we are extracting from ERP), an offering (here Financial) and a Mask (here %BalanceExtractPVO as we would like to extract the GL balance data). Click Start
Figure 8: Choosing BICC Connection, Schema, Offering and mask
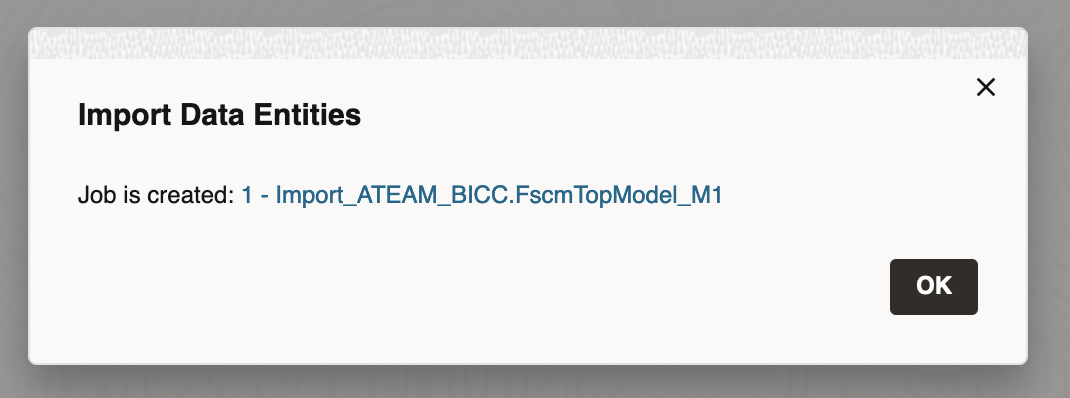
The job is started. Click ok.
Figure 9: Import Job Started
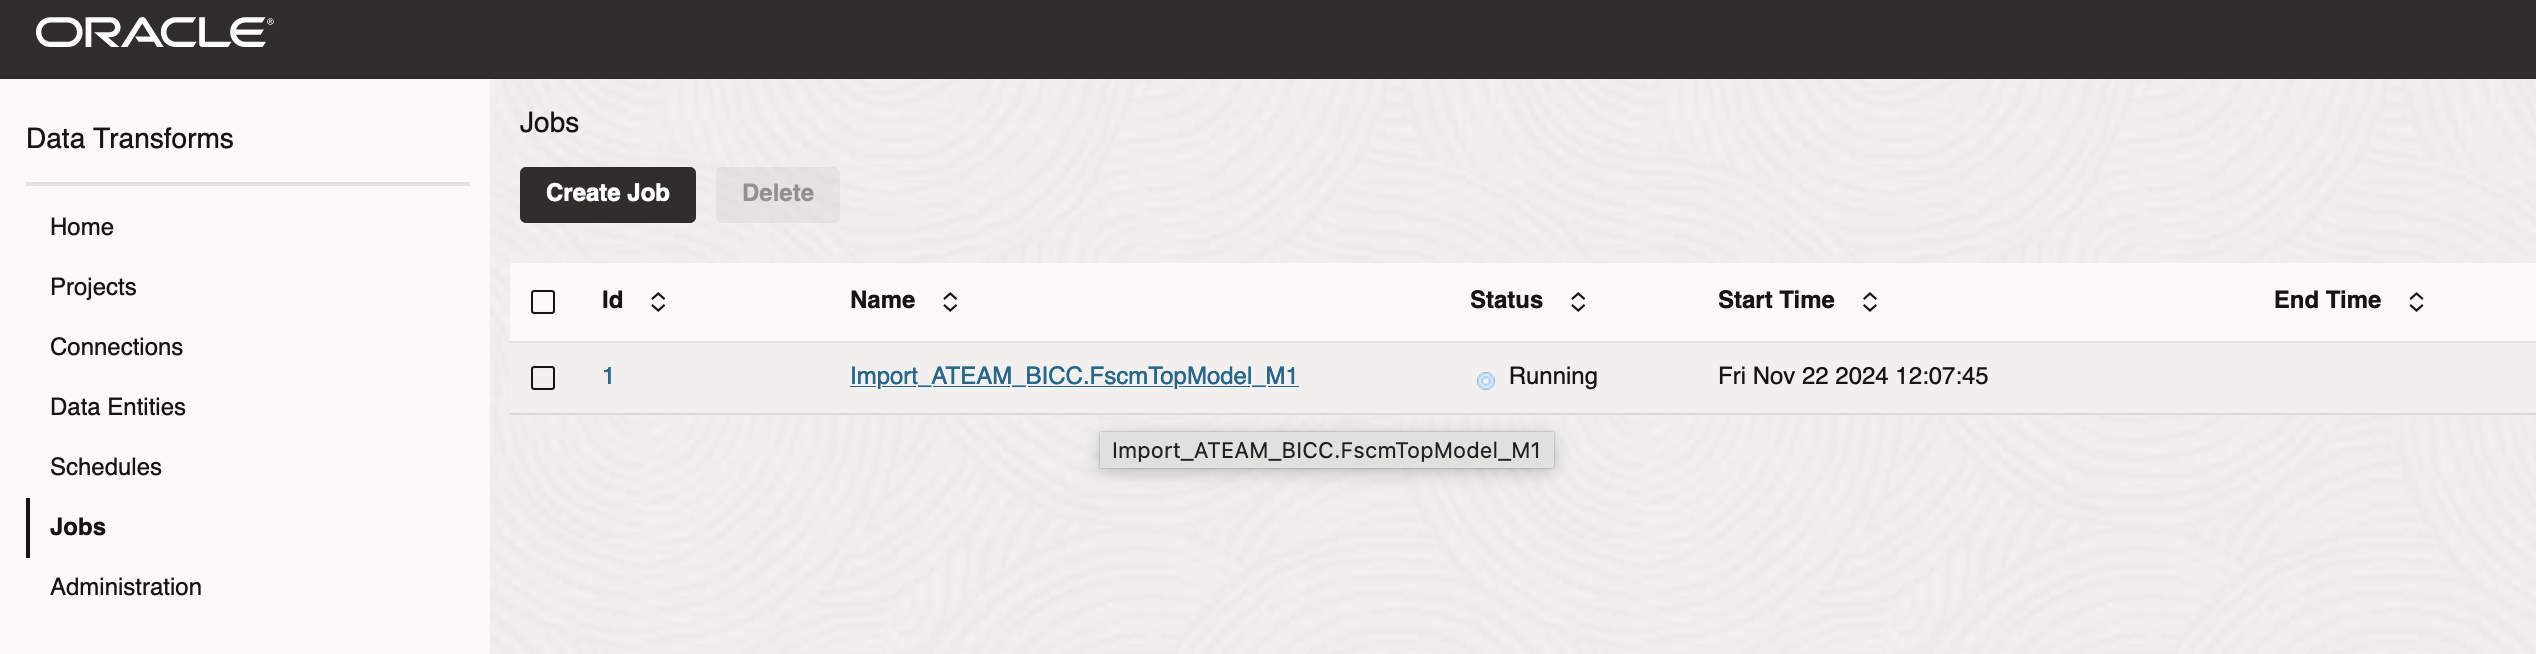
Then click on Jobs Menu and review the job is actually running.
Figure 10: Import Job Running
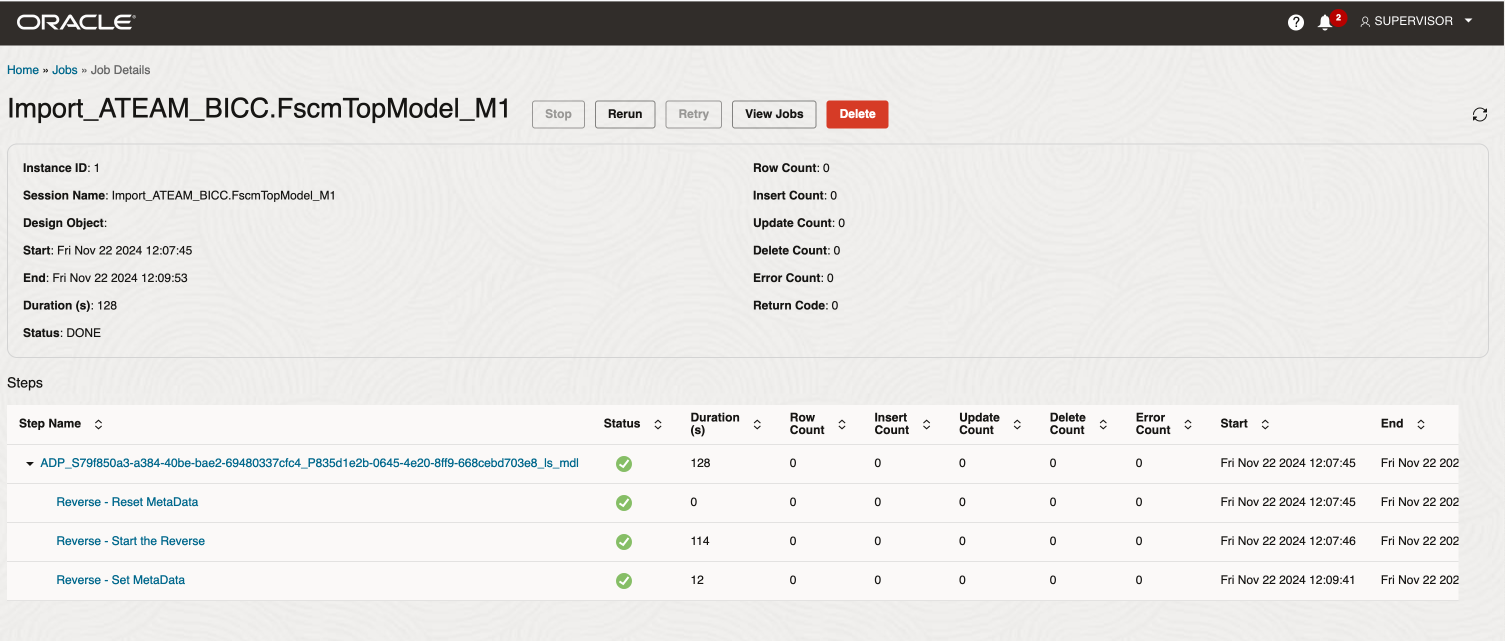
Click on the Job Name to review the job steps and wait for completion
Figure 11: Import Job Completed
Then go back to the Data Entities menu and review the entites that have been imported
Figure 12: Review Imported Data Entities
Importing Data Entities for ADW
Now that we have reversed engineer the source data store we want to extract, we are going to repeat the steps above to import data entities of the target stores.
Click on Data Entities > Import Data Entities button
Figure 13: Import ADW Data Entities
Select ATEAM_ATT connection, ATEAM schema, leave the default type and mask and click Start button
Figure 14: Select ADW connection, schema and mask. Click Start to kick off Data Entities import job
Click ok in the Import Data Entities pop up window
Figure 15: Import Data Entities job started
Click on the Jobs menu and then click on the Import job
Figure 16: Open Import Data Entities job details
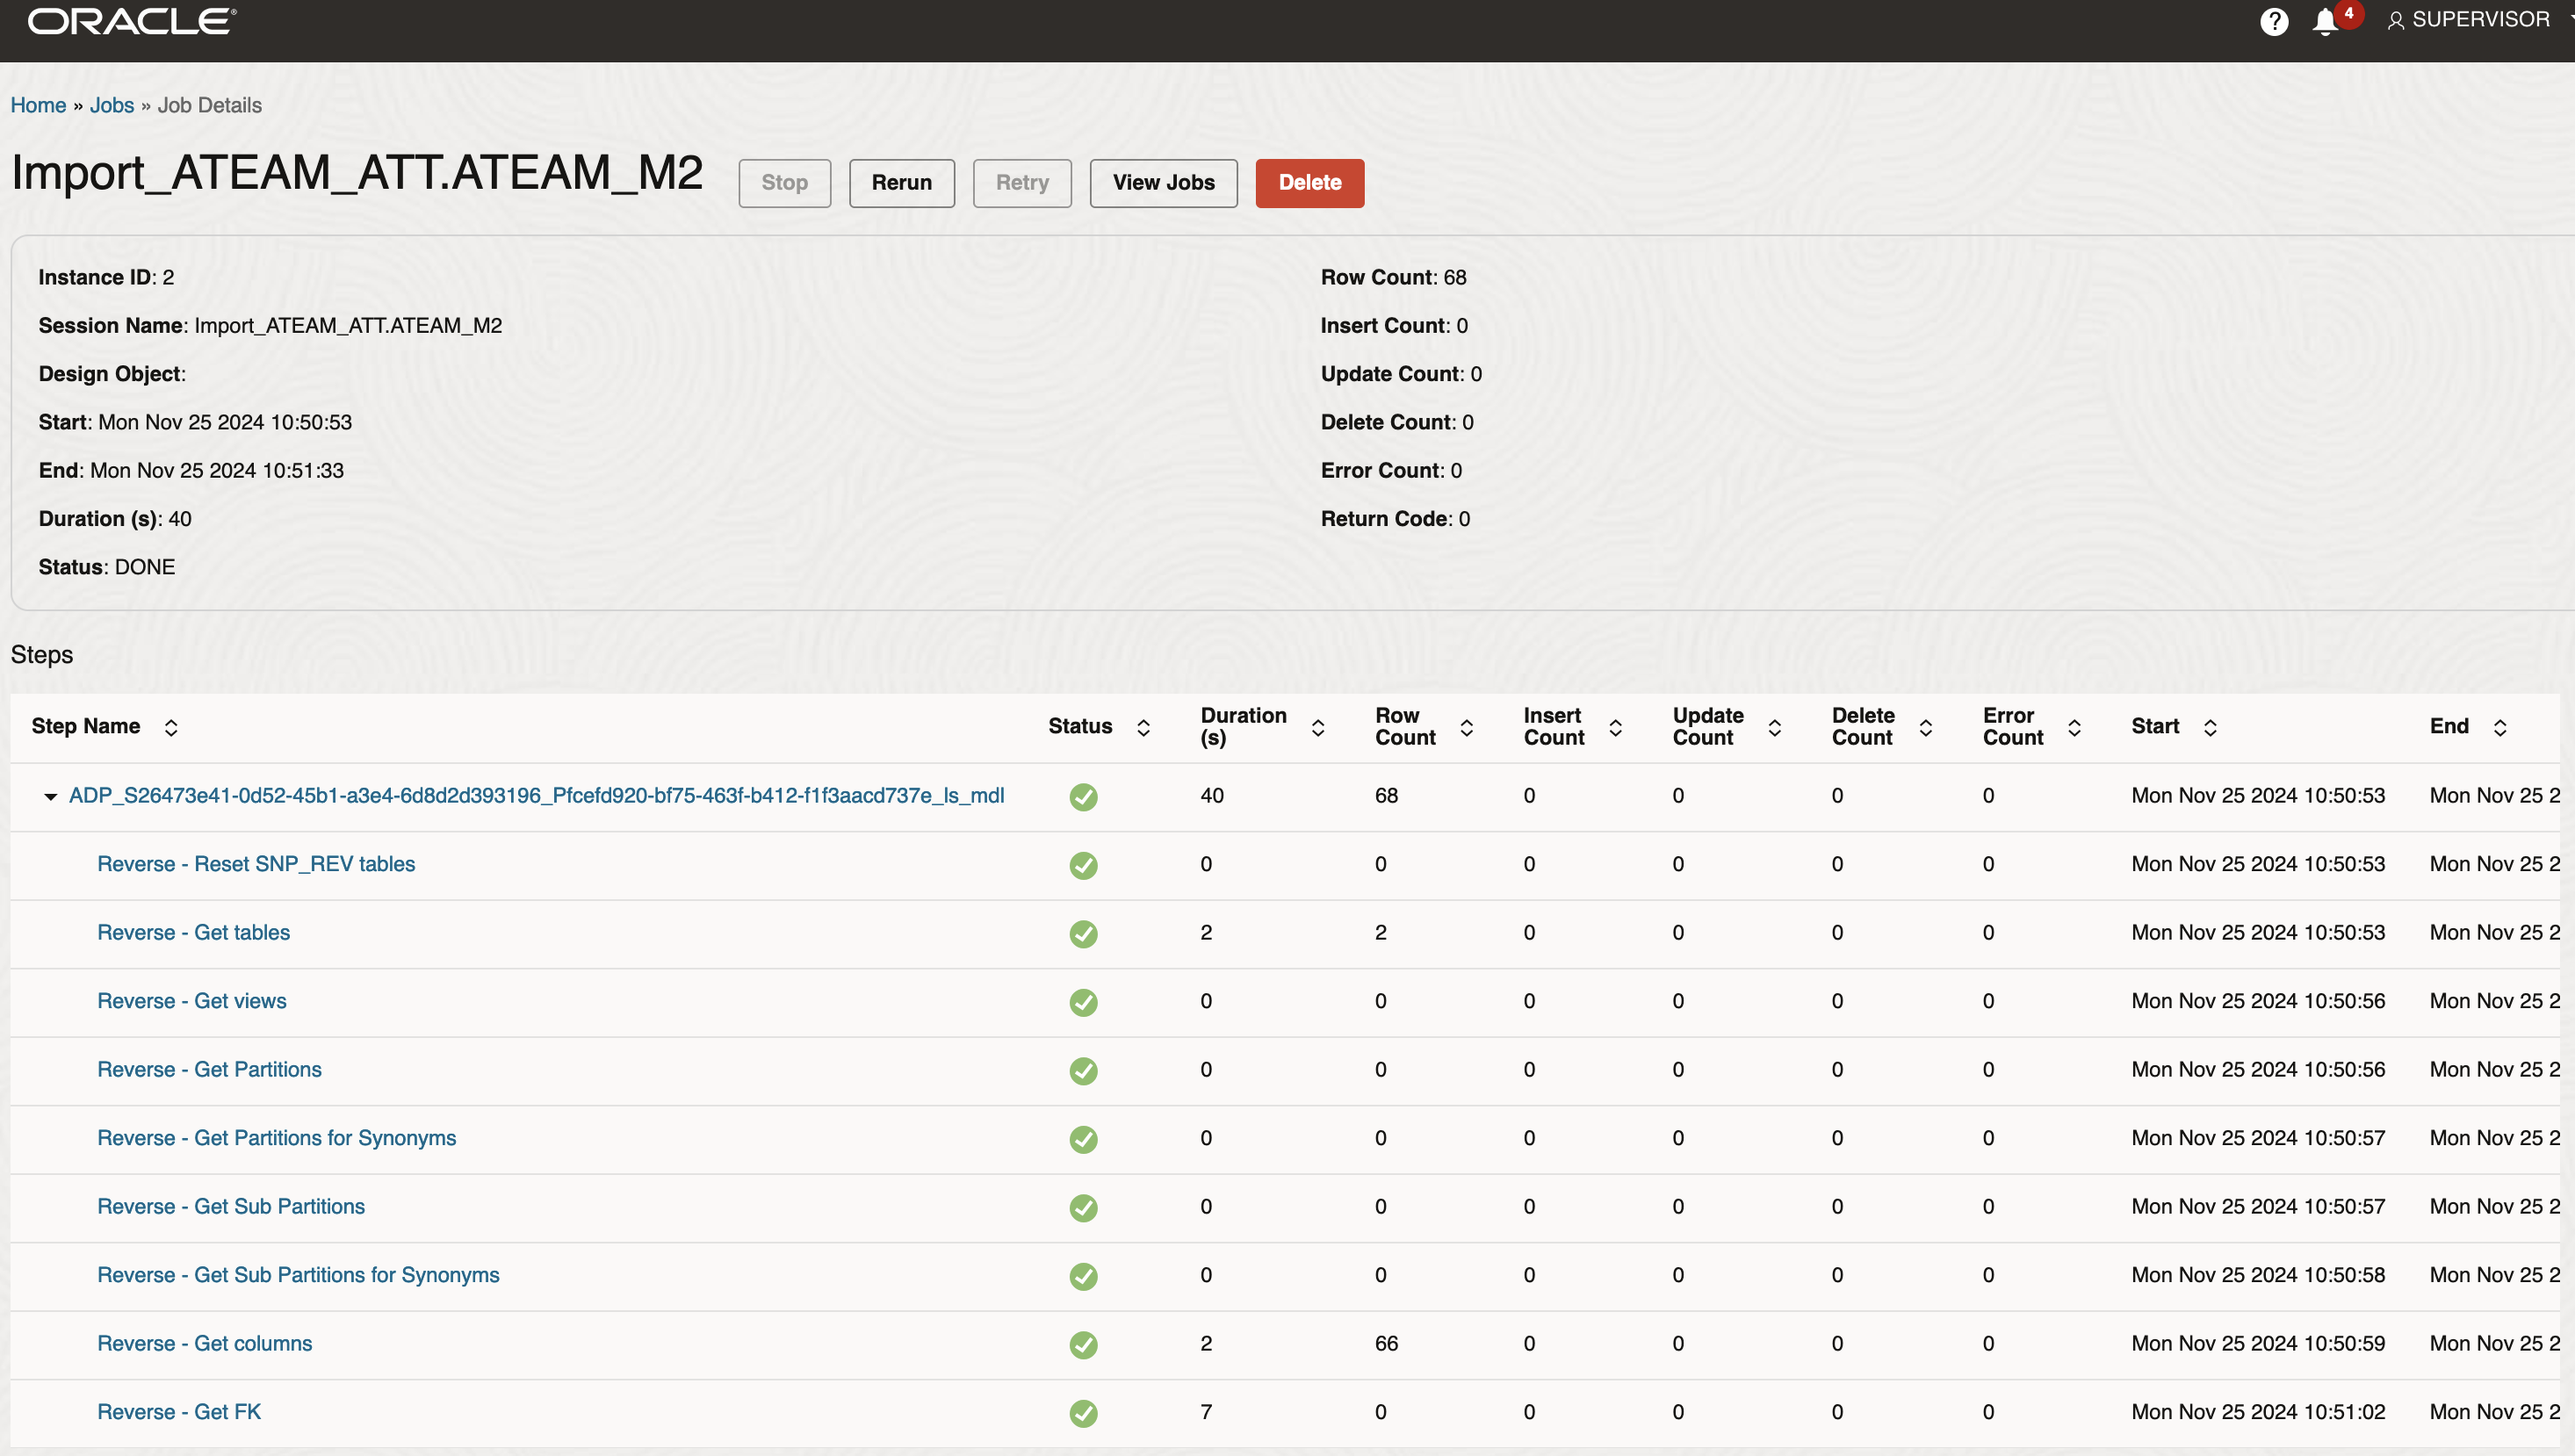
Review the import job steps and check the number of tables (2), the number of columns, primary keys, foreign keys etc…
Figure 17: Review Import Data Entities job
Filter the schema to display only ATEAM data entities and review the data entities. The two table we created earlier are displayed
Figure 18: Review Imported Data Entities
Full load Artifacts – GL Balances and GL Journals
Reset to Full Stored procedure
Below is the query to execute in order to create the PL/SQL procedure that will reset a BICC data store to Full Extract. This procedure has four parameter
USERNAME, the Fusion BICC Username
PASSWORD, the Fusion BICC Username password
IN_DATASTORE_ID, the name of the BICC data store, i.e. FscmTopModelAM.FinExtractAM.GlBiccExtractAM.BalanceExtractPVO
IN_URL, the BICC console url, i.e. https://fa-zzzz
-saasfaprod1.fa.ocs.oraclecloud.com/biacm
Click to toggle and display the queries
create or replace PROCEDURE           PRC_REST_BICC_REST_PVO_TO_FULL_EXTRACT
(
  USERNAME IN VARCHAR2
, PASSWORD IN VARCHAR2
, in_datastore_id in varchar2
, in_url in varchar2
) AS
BEGIN
  declare
    v_req       utl_http.req;
    v_response      clob;
    v_res       utl_http.resp;
    v_buffer    varchar2(4000);
    v_body      varchar2(4000) := '{"field":"value"}'; -- Your JSON
    v_url varchar2(4000) := in_url;
    v_datastore_id varchar2(4000) := in_datastore_id; --
    l_resp clob;
begin

    dbms_output.put_line('start' );
     -- Set connection and invoke REST API.
    v_url := v_url || '/rest/meta/datastores/' || v_datastore_id || '/actions/resetToFull';
    dbms_output.put_line('v_url : ' || v_url );

    -- Set connection.
    v_req := utl_http.begin_request(v_url, 'POST');

    utl_http.set_authentication(v_req, USERNAME,PASSWORD);
    utl_http.set_header(v_req, 'content-type', 'application/json');
    utl_http.set_header(v_req, 'Content-Length', length(v_body));

    -- Invoke REST API.
    utl_http.write_text(v_req, v_body);

    -- Get response.
    v_res := utl_http.get_response(v_req);
    begin
        loop
            utl_http.read_line(v_res, v_buffer);
            -- Do something with buffer.
            dbms_output.put_line(v_buffer);
        end loop;
        utl_http.end_response(v_res);
    exception
        when utl_http.end_of_body then
            utl_http.end_response(v_res);
    end;
end;
END PRC_REST_BICC_REST_PVO_TO_FULL_EXTRACT;
/
Below is a sample PL/SQL Block to call this procedure, as we will be calling it from Data Transforms
The following video walks through how to configure Oracle Data Transforms to perform a Fusion SaaS source data store full extract with BI Cloud Connector and load it into an Oracle Autonomous Database target table.
Figure 19: Oracle Data Transforms – Fusion SaaS Initial Load
Incremental Load – GL Balances
The following video walks through how to configure Oracle Data Transforms to perform a Fusion SaaS source data store incremental extract with BI Cloud Connector and load it into an Oracle Autonomous Database target table.
Figure 20: Oracle Data Transforms – Fusion SaaS Incremental Load
Full and Incremental Load with Sync Deletes – GL Journals
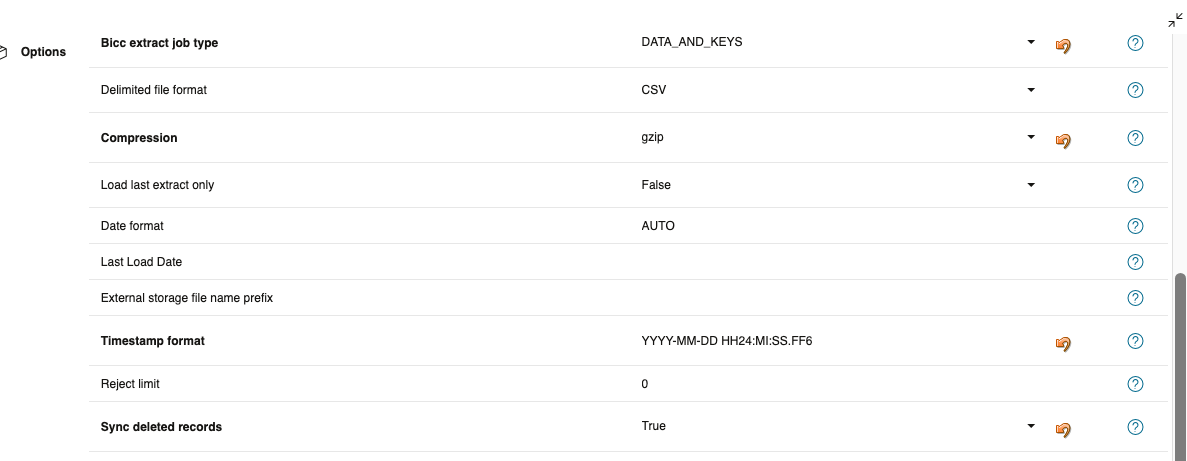
As you have read earlier, Data Transforms can now handle the deleted records from Fusion SaaS. There are a series of new options that can be set in the Transfer node between a BICC VO and an ADB table as per the figure below:
Figure 21: Oracle Data Transforms – Fusion SaaS Incremental Load
When a Data Flow has a BICC VO as a source and an ADB Table as a target, the following things happen when executing the Data Flow. The items in italic blod are new for this feature
An Extract Job for the VO is started in BICC. (This can be disabled by a Transfer Option)
Data files are extracted from BICC If “Bicc extract job type” Transfer option is set to DATA or DATA_AND_KEYS, This takes any new records since the last extract and puts them in Object Storage in the form of compressed CSV files
A File containing Keys is created If “Bicc extract job type” Transfer option is set to KEYS or DATA_AND_KEYS. The Key file is put in Object Storage
Data Transforms will wait for the extract to complete
Data Transforms will find the files created since the “Last Load Date” Transfer Option (typically set by a variable) and load them into the Target Table. Note, this will occur whatever the Extract type is set to.
If “sync deleted records” Transfer option is set
Data Transforms will use the KEYs file to compare with the Target table and remove any rows in the target that do not exist in the KEYS file
The table below details the Options related to this new feature
Sync deleted records
True
This could be an expensive operation, so consider having duplicate Data Flows,
one that you would run daily without sync and another you run each week
Submit BICC Job
True (default)
If you want to schedule the extracts within BICC instead of Data Transforms,
make sure you extract KEYs if you want to sync deleted records
BICC extract job type
DATA_AND_KEYS (default)
You could set KEYS only if Data extraction is done in another mapping or by BICC
KEY files MUST exist if sync deleted records is selected, otherwise the Data Flow will end in an error
The following video walks through how to configure Oracle Data Transforms to perform a Fusion SaaS source data store incremental extract with BI Cloud Connector and load it into an Oracle Autonomous Database target table.
Figure 22: Oracle Data Transforms – Fusion SaaS Incremental Load
Archiving file from one bucket to another
The last step of the flow is now to archive / move the BICC extract files from one source object storage bucket to an archive object storage bucket. The following PL/SQL procedure leverages the PL/SQL SDK for object storage to move the files
Click to toggle and display the queries
--credential for api key
begin
  dbms_cloud.create_credential(
    credential_name => 'BICC_ADW_KEY'
    , user_ocid => '

    '
    , tenancy_ocid => '

     '
    , private_key => 'MIIEvwIBADANBgkqhkiG9w0BAQEFAASCBKkwggSlAgEAAoIBAQDeQbUsEE2vaGTO
...


P6bSP72VIX22oPC+qdn3D9J+Mg=='
    , fingerprint => '

       '
  );
end;
/

--check credentials
select credential_name, username from user_credentials;

--validate credentials
select
    object_name,
    bytes
from
    dbms_cloud.list_objects(
    'BICC_ADW_KEY',
    'https://ateamsaas.objectstorage.us-ashburn-1.oci.customer-oci.com/n/ateamsaas/b/bucket-bicc/o/'
)
;

--create procedure to archive BICC extract objects from landing to archive bucket
CREATE OR REPLACE EDITIONABLE PROCEDURE "ATEAM"."PRC_ARCHIVE_OS_OBJ"
(
    in_namespace IN VARCHAR2
    ,in_region IN VARCHAR2
    ,in_credential IN VARCHAR2
    ,in_end_point_file_prefix IN VARCHAR2
    ,in_landing_bucketname IN VARCHAR2
    ,in_archive_bucketname IN VARCHAR2

) AUTHID CURRENT_USER AS
BEGIN
  DECLARE

    l_namespace varchar2(20) := in_namespace;
    l_region varchar2(20) := in_region;
    l_credential varchar2(20) := in_credential;
    l_end_point_file_prefix varchar2(255) := in_end_point_file_prefix;
    l_landing_bucketname varchar2(100) := in_landing_bucketname;
    l_archive_bucketname varchar2(100) := in_archive_bucketname;
    l_landing_uri_root varchar2(4000);
    l_archive_uri_root varchar2(4000);

    BEGIN

        --** build URIs for l_landing_uri_root and l_archive_uri_root
        l_landing_uri_root  := 'https://' || l_namespace || '.objectstorage.' || l_region || '.oci.customer-oci.com/n/' || l_namespace || '/b/' || l_landing_bucketname || '/o/' ;
        l_archive_uri_root  := 'https://' || l_namespace || '.objectstorage.' || l_region || '.oci.customer-oci.com/n/' || l_namespace || '/b/' || l_archive_bucketname || '/o/' ;

        --dbms_output.put_line('Archiving file with prefix  ' || l_end_point_file_prefix || ' from ' || l_landing_bucketname ||' to ' || l_archive_bucketname);

        --** moving MANIFEST files from l_landing_uri_root to l_archive_uri_root
        dbms_cloud.bulk_move(
            source_credential_name => l_credential,
            source_location_uri    => l_landing_uri_root ,
            target_location_uri    => l_archive_uri_root ,
            regex_filter           => 'MANIFEST'
        );

        --** moving MANIFEST files from l_landing_uri_root to l_archive_uri_root
        dbms_cloud.bulk_move(
            source_credential_name => l_credential,
            source_location_uri    => l_landing_uri_root ,
            target_location_uri    => l_archive_uri_root ,
            regex_filter           => 'EXTRACT_STATUS'
        );
        --** moving pvo files from l_landing_uri_root to l_archive_uri_root
        dbms_cloud.bulk_move(
            source_credential_name => l_credential,
            source_location_uri    => l_landing_uri_root ,
            target_location_uri    => l_archive_uri_root ,
            regex_filter           => l_end_point_file_prefix
        );

    END;
END PRC_ARCHIVE_OS_OBJ;
/

--set grants
GRANT EXECUTE ON "ATEAM"."PRC_ARCHIVE_OS_OBJ" TO "ATEAM";
Below is a sample PL/SQL Block to call this procedure, as we will be calling it from Data Transforms
The following video walks through how to configure Oracle Data Transforms to archive / move the BICC extract files from one source object storage bucket to an archive object storage bucket.
Figure 23: Oracle Data Transforms – Archive BICC Extract files from object storage
Want to Learn More?
Click here to sign up to the RSS feed to receive notifications for when new A-team blogs are published.
Summary
This article covered all the aspects of using Oracle Data Transforms to extract data from Fusion SaaS and load it into ADB tables, that is:
Provisioning and configuring Data Transforms
Setting up the database objects (User and grants, HTTP Requests, PL/SQL SDK for OCI Object Storage) once ADB is provisioned
Setting up Data Transforms connections to source Fusion SaaS Application and target ADB
Creating Data Integration Artifacts for full and incremental loads, including the synchronization of source deleted records.
Bookmark this post to stay up-to-date on changes made to this blog as our products evolve.
Authors
Matthieu Lombard
Consulting Solution Architect
The Oracle A-Team is a central, outbound, highly technical team of enterprise architects, solution specialists, and software engineers.
The Oracle A-Team works with external customers and Oracle partners around the globe to provide guidance on implementation best practices, architecture design reviews, troubleshooting, and how to use Oracle products to solve customer business challenges.
I focus on data integration, data warehousing, Big Data, cloud services, and analytics (BI) products. My role included acting as the subject-matter expert on Oracle Data Integration and Analytics products and cloud services such as Oracle Data Integrator (ODI), and Oracle Analytics Cloud (OAC, OA For Fusion Apps, OAX).