Hi! In this blog entry, we will talk about a common network architecture for the Oracle Database@AWS product, which is how to use an AWS Transit Gateway to connect to an Oracle database deployed in AWS.
Oracle Database@AWS
Oracle Databases of various types can now be deployed in AWS, Azure and GCP. Since the database now lives in that Cloud, it has to follow the network rules and constructs defined there. Particularly for AWS, we have the following details:
– The database will live in a new network construct called an ODB Network.
– The ODB Network will be peered to one AWS VPC so application instances can connect to the databases.
– If the application instances are spread across multiple VPCs and/or regions then it is required to use one of the following constructs to provide connectivity:
- AWS Transit Gateway
- AWS Cloud WAN
Note: AWS Virtual Private Gateway (VGW) is not a supported method to connect to Oracle ODB Networks.
The purpose of this blog is to provide a step-by-step guide on implementing a Transit Gateway architecture. In the interest of not making this blog extremely long, please read the official documentation or this blog to learn more about the product basics.
Before we begin, we need to talk about limitations and deployment details.
1. The ODB Network cannot directly attach to a Transit Gateway, it will need to peer to an AWS VPC and have that VPC forward packets to the Transit Gateway, through its own attachment.
2. The ODB Network will be deployed in a single AWS Availability Zone which you have to choose to match the AZ location of the Oracle Exadata Infrastructure.
3. Whenever you attach a TGW to a VPC you are required to input one or more VPC subnets for the TGW to create Network interfaces in. At the time of writing this blog the TGW must be attached to only subnets that are in the same AZ as the ODB Network. In general, the VPC will become a “transit” VPC which will have only one subnet.
4. The ODB Network Client CIDR will not be automatically shared across TGW attachments (propagated). Any TGW Attachment in the environment will need a static route towards the Transit VPC, for the ODB CIDR.
Let’s begin.
DEMO
First, let’s put all the details on a detailed diagram.
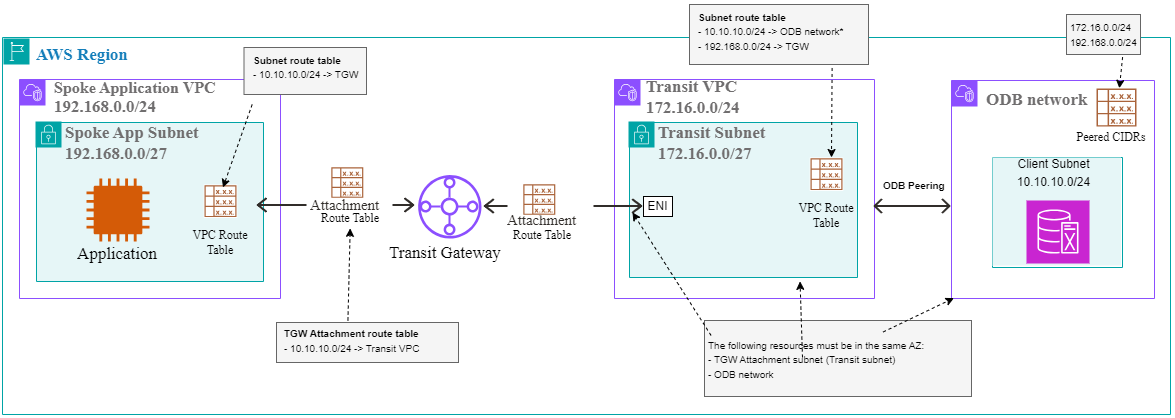
A. The ODB Network
Let’s start with the ODB Network deployment. In the AWS search box, look for Oracle Database@AWS and click the service. Click on “Dashboard” and then click on ODB Networks on the left. Press Create ODB network.
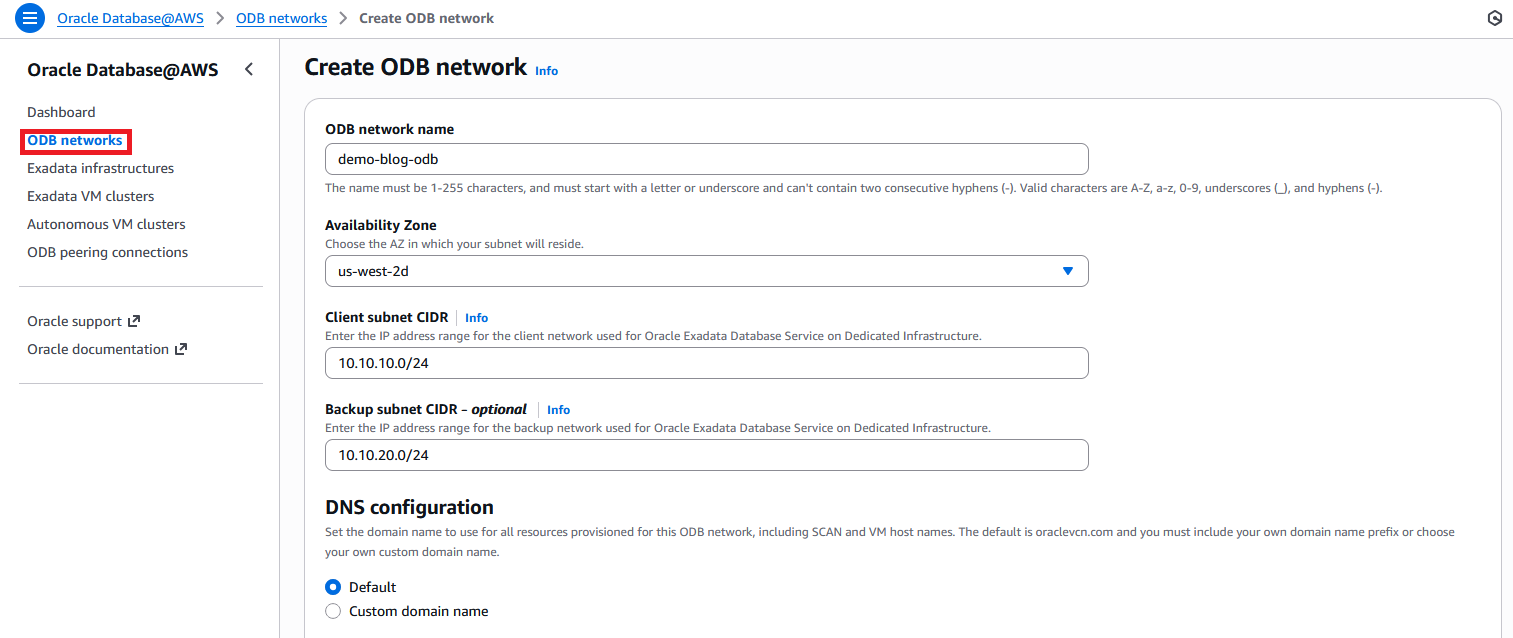
I am choosing 10.10.10.0/24 for the Client Subnet. This will be the subnet to which you will connect from the rest of AWS. Note that the ODB Network can take 1h+ to get deployed and become Available.
B. The AWS VPCs
While the ODB Network gets deployed, we can continue with the deployment for the rest of the AWS infrastructure. I will deploy 2 VPCs, with the following setup:
Transit VPC:
– CIDR: 172.16.0.0/24
– Subnet – Transit subnet with CIDR 172.16.0.0/27. Make sure the subnet is in the same AZ as the ODB Network. For me, that’s us-west-2d.
Application VPC:
– CIDR: 192.168.0.0/24
– Subnet – APP Subnet with CIDR 192.168.0.0/27. This subnet can be in any AWS Availability Zone.
To not make this very long, I will hop over the deployment menus and only show the result.

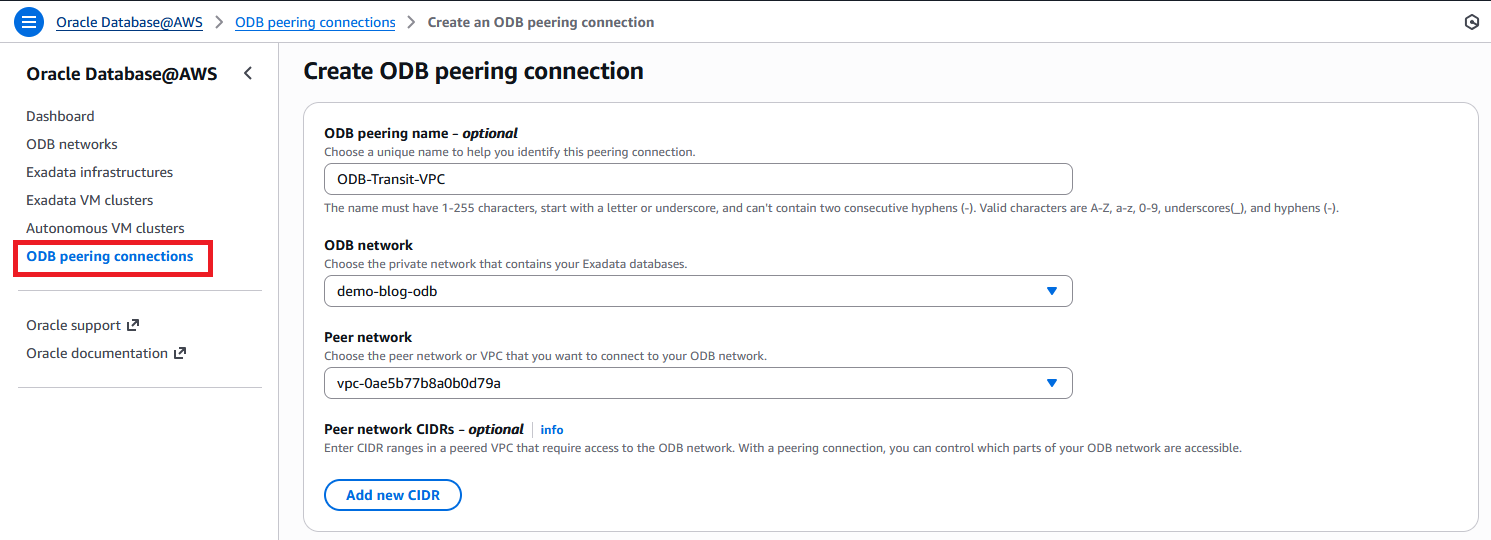
C. The ODB Peering
After the ODB Network is in an Available state, select ODB peering connections from the left menu and create a peering connection to the Transit VPC.
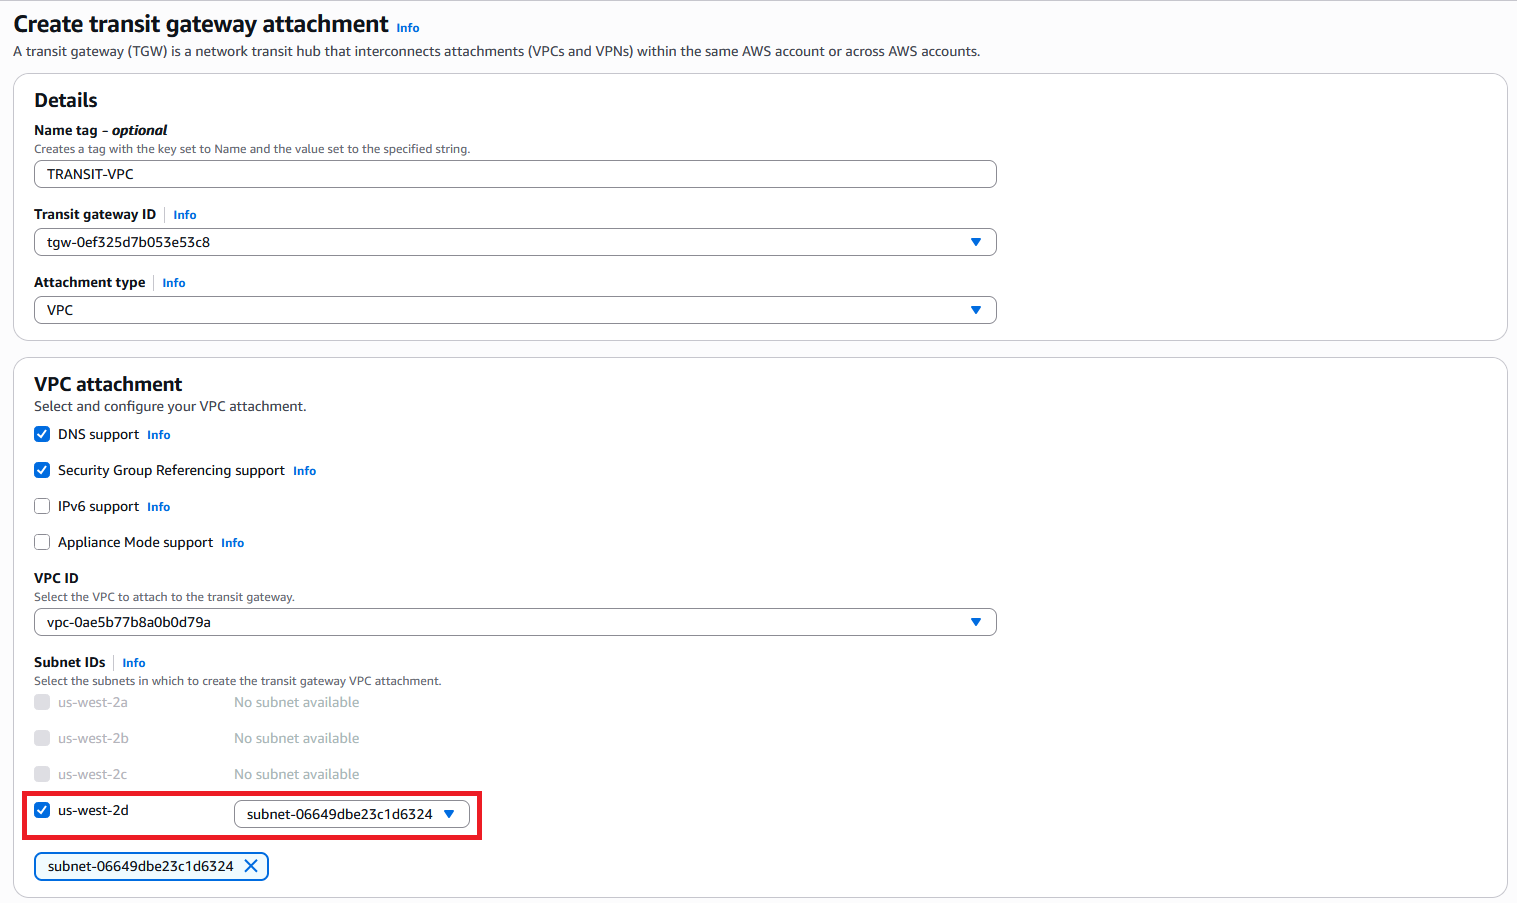
D. The Transit Gateway
Create one Transit Gateway and attach it to both the Transit VPC and the Application VPC. Make sure the Transit VPC Attachment subnet is in the same AZ as the ODB.

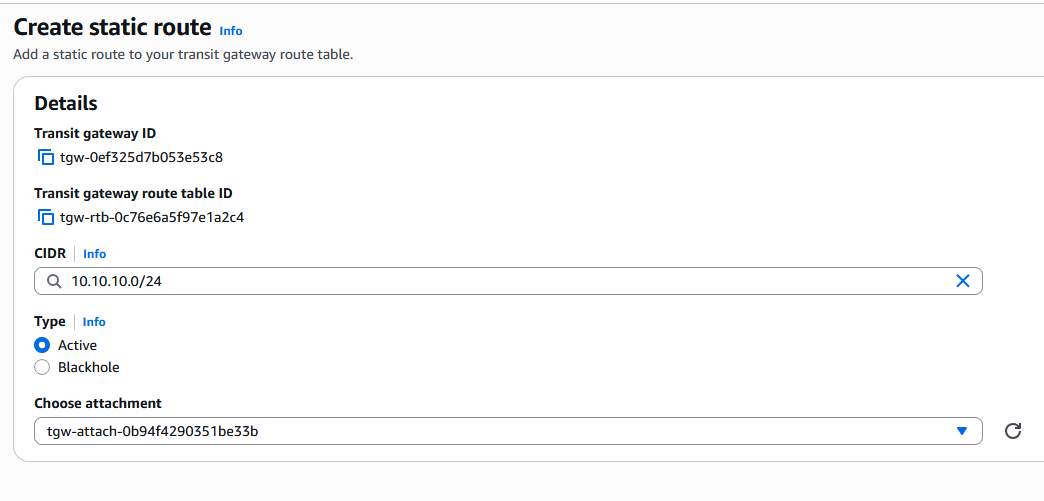
Next, in the Transit Gateway Attachments menu, scroll to the right and click on the Association route table ID for the Application VPC attachment. Note that for default deployments both VPC attachments will use the same TGW Route table but they can be different too so you need to make sure that you edit the correct table which is the one on the Application VPC.

In the menu that opens, add a Static Route for the ODB Network Client subnet with next hop the Transit VPC.

E. VPC Routing
In each of the 2 VPCs we need to adjust the VPC Route table.
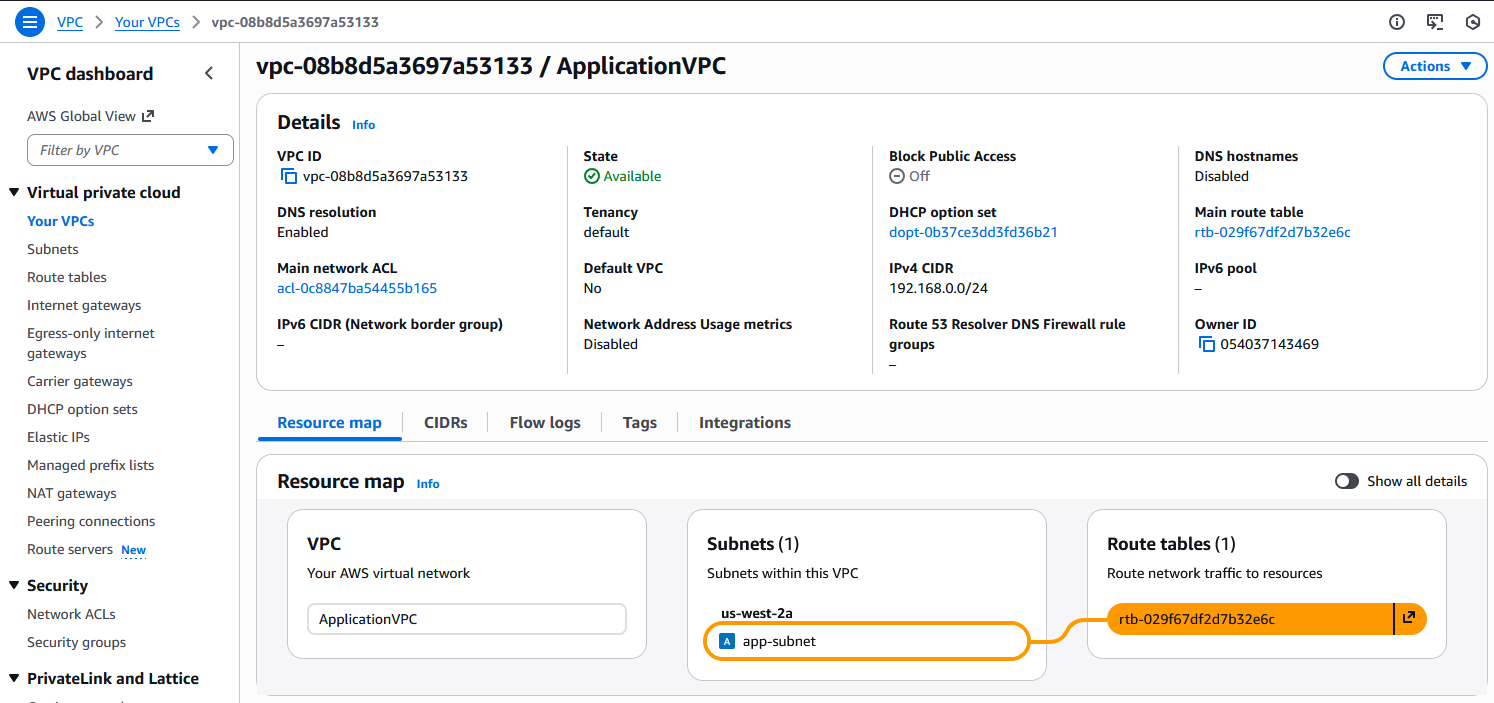
In the Application VPC, you need to point 10.10.10.0/24 to the TGW attachment. Make sure you add the entry to the correct VPC route table that controls the subnet. You can easily view that in the Resource MAP menu of the VPC.
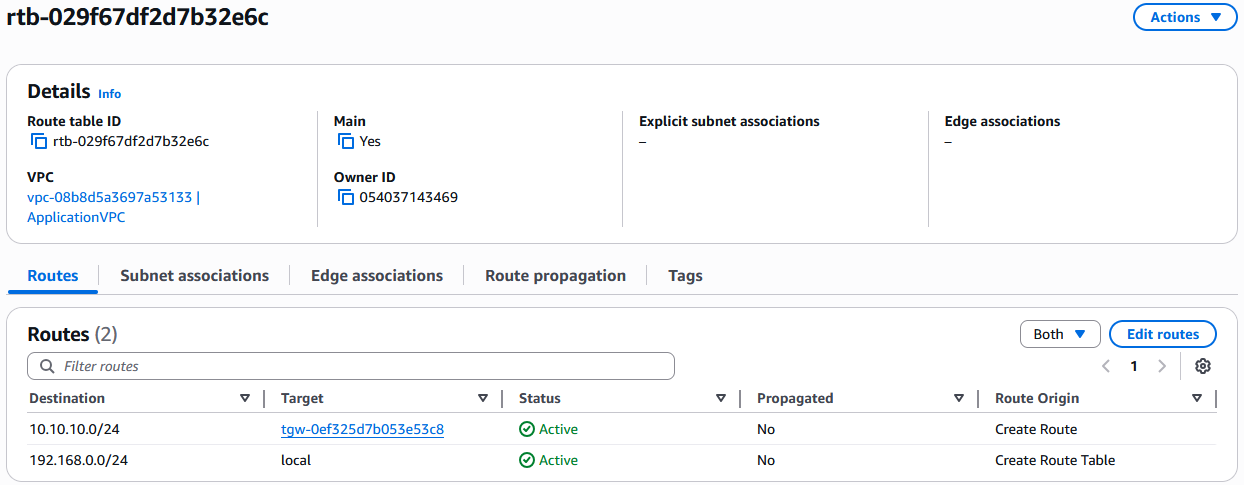
Note that there is no need for routes for the CIDR of the Transit VPC as there is nothing in that VPC that you will connect to.
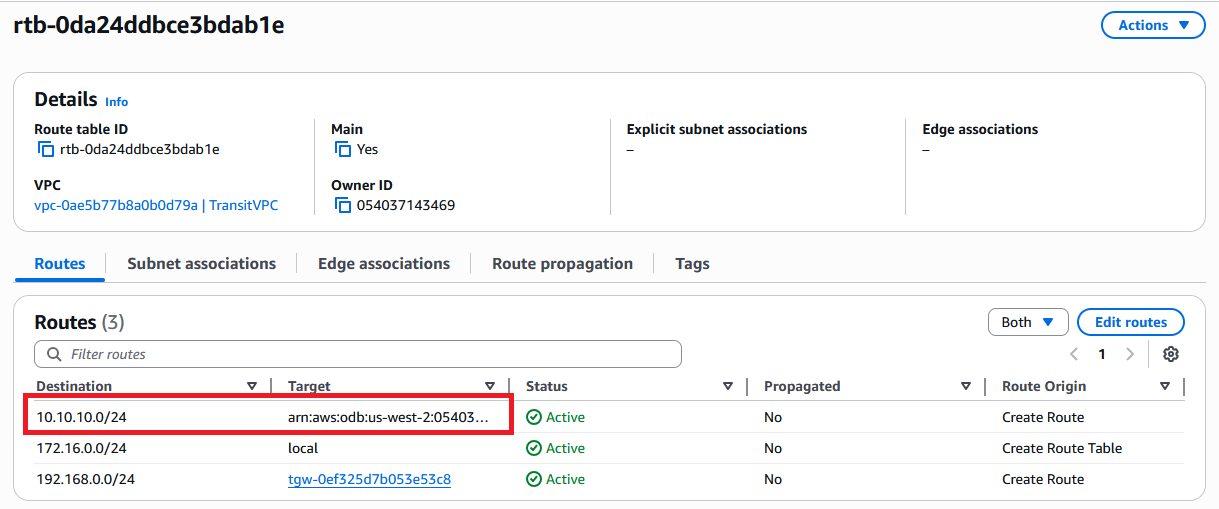
In the Transit VPC, we need two routes.
– 10.10.10.0/24 targeting the ODB Network
– 192.168.0.0/24 (APP VPC) targeting the TGW.
The TGW route is easy to add from the AWS Console but the ODB Route is only available via the AWS CLI command (at this moment). The command is in the format:
aws ec2 create-route \
        --route-table-id  <ROUTE_TABLE_ID> \
        --destination-cidr-block <OCI_CLIENT_SUBNET_CIDR> \
        --odb-network-arn <ODB_NETWORK_ARN>
Let’s gather the info required:
– Destination block is the ODB client subnet: 10.10.10.0/24.
– Route table ID – is the VPC route table controlling the transit subnet.
– ODB Network ARN can be found in the ODB details page.
My command will look like this:
aws ec2 create-route \
        --route-table-id  rtb-0da24ddbce3bdab1e \
        --destination-cidr-block 10.10.10.0/24 \
        --odb-network-arn arn:aws:odb:us-west-2:054037143469:odb-network/odbnet_z429fwy1t8
One easy way to get access to AWS CLI is to open an AWS CloudShell instance and put the command there.
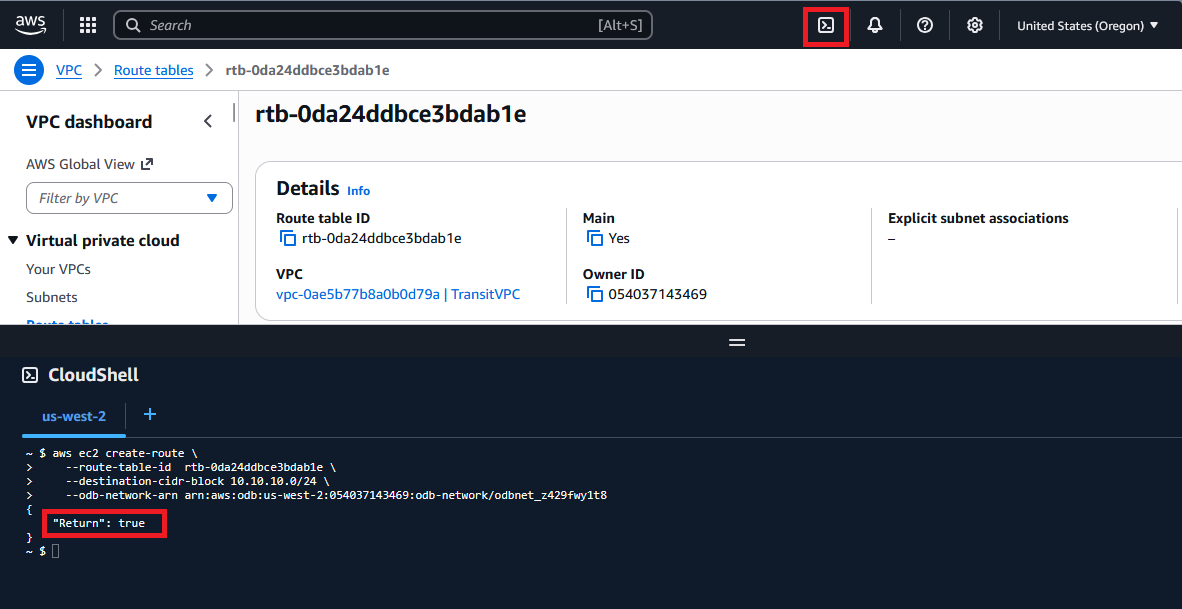
Make sure you get the “Return”: true status code.
After you add the command via AWS CLI, confirm it is visible in the AWS portal, in the VPC route table.
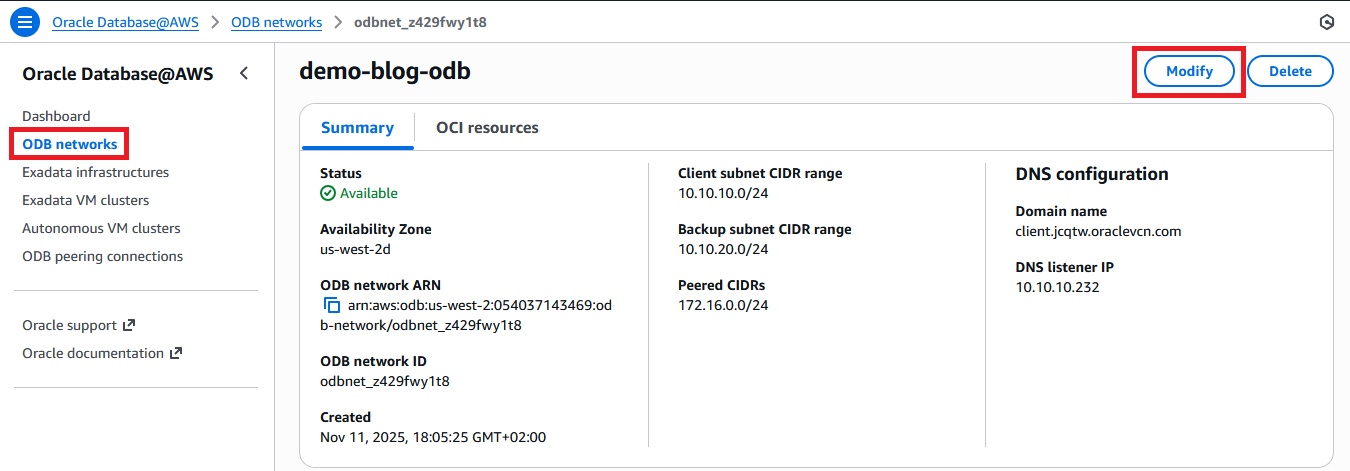
F. ODB Network Peered CIDRs
The final step is to “tell” the ODB Network about the Application VPC CIDR. This is done in a menu called “Peered CIDRs”. Go to the previously deployed ODB Network details page and press modify:
In the menu that opens, add the CIDR for the Application VPC.
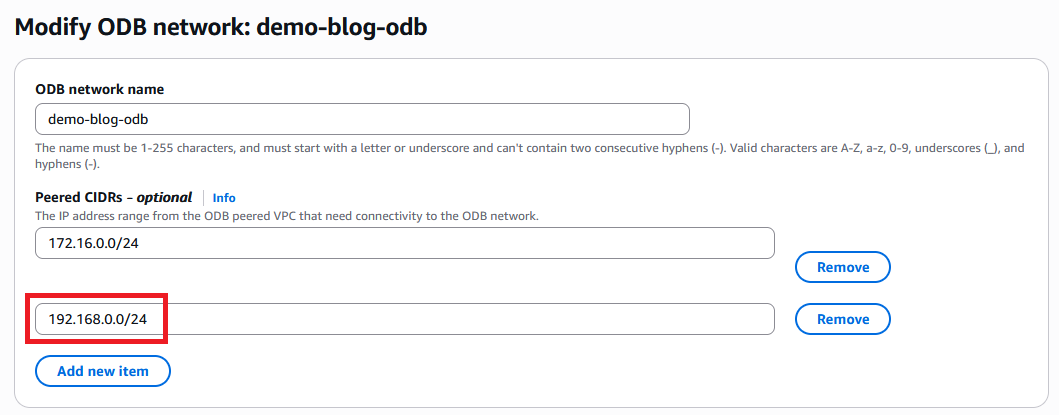
After you press Save you need to wait for the ODB Network to become Available again.
Note: It is very important that you perform this step AFTER the VPC routes in the Transit VPC are in place, mainly the TGW routes. Adding Peered CIDRs for subnets that are not part of a route pointing at the Transit Gateway, in the Transit VPC, may put your ODB in a “Failed” state.
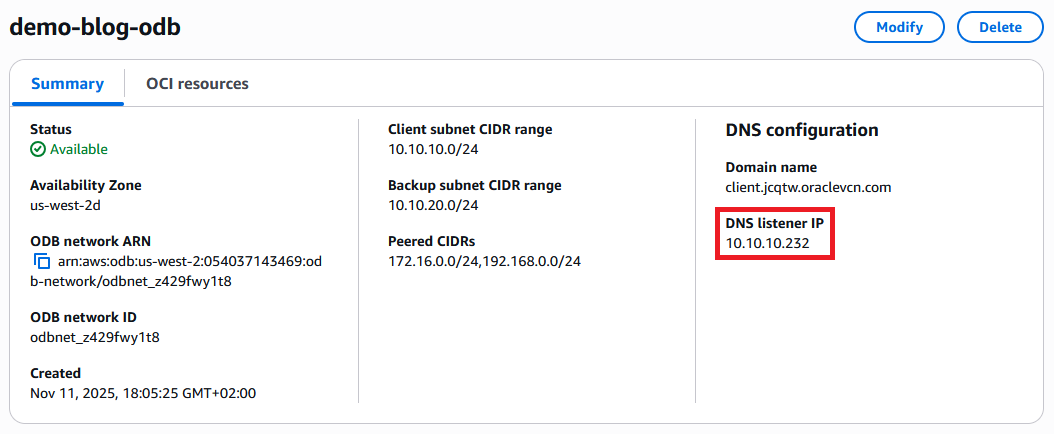
G. Testing connectivity
After the ODB Network becomes Available again and has the correct Peered CIDRs, we can test connectivity from the Application VPC. Even with no databases deployed yet, the ODB Network has a DNS Endpoint which responds to packets on TCP and UDP, port 53.
Let’s test connectivity from an EC2 instance I have in the Application VPC.

And there it is, the APP VPC instances can now connect to any database that will be deployed in the ODB Network.
A few notes on network security:
- The ODB network will automatically allow communication from any “peered CIDR” on ports 22, 1521, 2484 and DNS (UDP/TCP 53).
- If you need to connect on any other port, you will need to manually edit the Network Security Group on the Oracle Console (menu not available in AWS).
- Any AWS side network security constructs must allow the communication, such as:
- The Security Group of the source EC2 instance and the Network ACL of the subnet
- The Network ACL of the Transit subnet, from the Transit VPC.
