Introduction
Multicloud strategies are becoming essential for enterprises that want flexibility, performance, and resilience across cloud providers. Oracle Database@AWS brings this vision to life by allowing organizations to run OCI-managed databases directly within AWS regions, combining the strengths of both cloud providers.
This approach lets teams leverage Exadata and Autonomous Database services while seamlessly integrating with AWS tools, simplifying operations, improving connectivity, and enabling powerful Multicloud solutions.
Agenda
- What is Oracle Database@AWS?
- Networking Fundamentals – The ODB Network
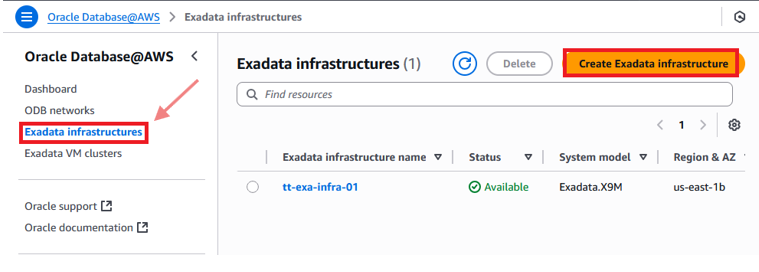
- Create Exadata Infrastructure
- Create ODB Network
- Route 53 DNS Configuration
- Create VM Cluster
- Create an Exadata Database
- Conclusion
What is Oracle Database@AWS?
Oracle Database@AWS is a service that brings OCI-managed Oracle Database infrastructure into AWS data centers. Unlike running Oracle workloads on Amazon EC2 or RDS, this offering is built on Exadata systems operated by Oracle, giving you the same high-performance platform, you’d expect on OCI, but accessible through AWS tools.
The service is fully integrated into the AWS experience. You can purchase, provision, and manage your Oracle database through the AWS Console, CLI, or APIs, while Oracle ensures the database stack runs on optimized Exadata hardware withing AWS.
Key Features
Oracle Database@AWS combines best-of-breed Oracle technology with AWS-native services:
- Exadata Database Service and Autonomous Database- enterprise grade performance with fully managed automation.
- AWS Integration – works seamlessly with CloudWatch, EventBridge, CloudTrail, VPC Lattice, and CloudFormation.
- Analytics with Zero-ETL -Reel time data replication into Amazon Redshift for analytics without complex pipelines.
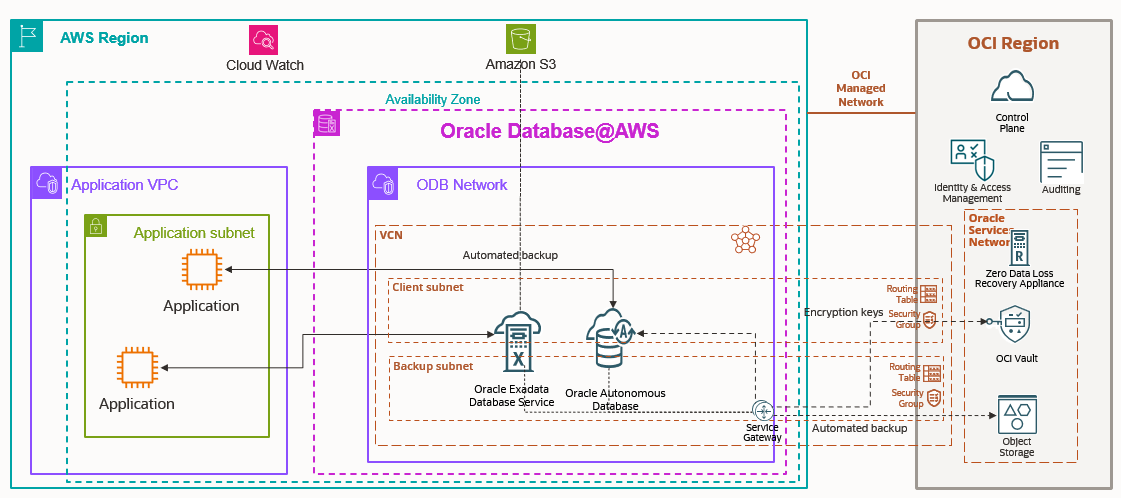
- Durable Backups – backup Oracle databases into Amazon S3 with high durability and easy recovery.
- Private Networking – use the ODB Network to connect Oracle DBs with AWS workloads through peering, ensuring secure, low-latency communication.
Networking Fundamentals – The ODB Network
Before proceeding, please ensure you’ve completed the onboarding tasks, which are not covered in this blog. Refer to the link below for more details.
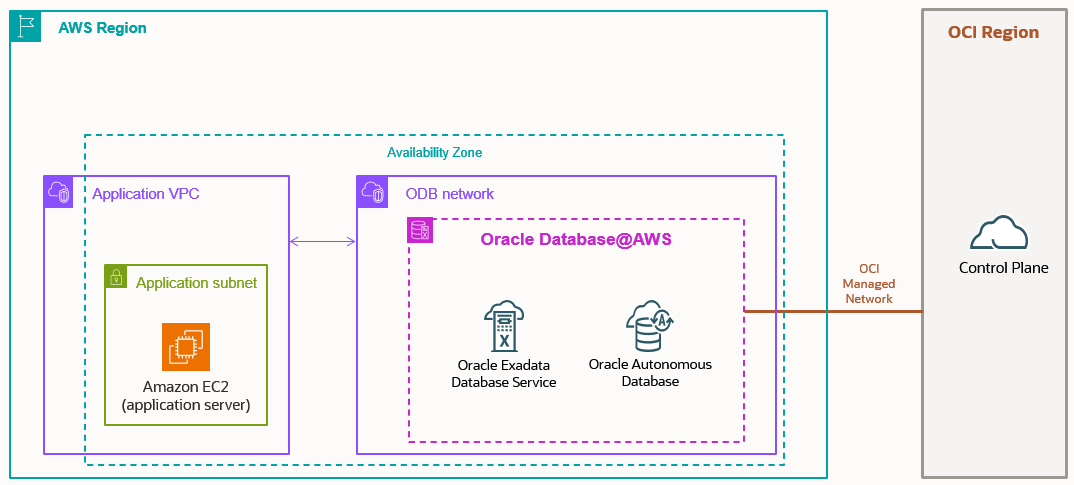
One of the most unique aspects of Oracle Database@AWS instance, a dedicated Oracle Database (ODB) Network is created inside AWS. This is a private, isolated network that Oracle manages for database connectivity. To link your applications running on EC2 or other AWS services, you establish an ODB Peering connection between your VPC and the ODB Network.
ODB network is basically representation of Oracle VCN inside the AWS. So, we have ODB network and ODB peering.
This approach eliminates the need for complex third-party direct connect or VPN. Instead, your applications communicate with the database over a private, secure channel with minimal latency, as if both were running inside the same environment.
Why these matters:
- Reduced network hops and lower latency.
- No exposure to the public internet.
- Simple setup via AWS networking constructs.
For customers with latency sensitive workloads like financial systems or e-commerce platform, this design ensures database calls remain fast and predictable while keeping traffic private.
Benefits for Customers
Deploying Oracle Database@AWS offers several practical advantages:
- Performance – Exadata infrastructure provides unmatched throughput and scalability.
- Flexibility – Keep workloads close to AWS-native applications while leveraging Oracle’s database strengths.
- Multicloud Strategy – No longer an either-or decision combine Oracle + AWS to get the best of both worlds.
- Simplify management and operation – With Oracle DB@AWS, you will utilize a unified experience for collaborative support, purchasing, management, and operations.
- Pricing – Purchase Oracle DB@AWS through the AWS Marketplace. Pricing is the same as for Oracle Exadata Datebase Service running on OCI.
Availability
Oracle Database@AWS became generally available in July 2025. Current regions in North America: US East(N.Virginia) and US West(Oregon).
More AWS regions are expected to follow soon.
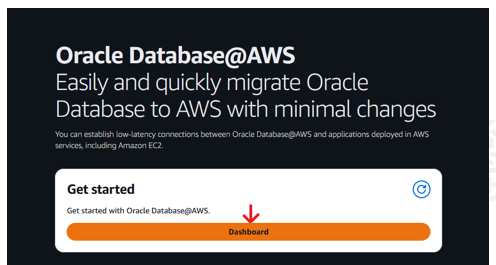
Now, let’s getting started with provisioning Oracle DB@AWS.
Log in to the AWS console.
Search by Oracle Database@AWS and create Exadata Database Service or Autonomous Database.
After finished with database infrastructure creation, continue with configuring your ODB network to connect and peer the database with your VPC.
Note: ODB peering (It’s a 1 to 1 peering, not many to 1) is different with VPC peering because they have a different functionality.
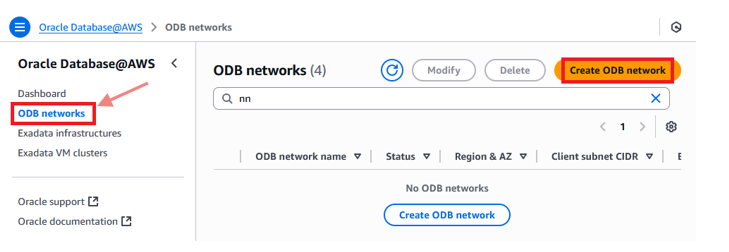
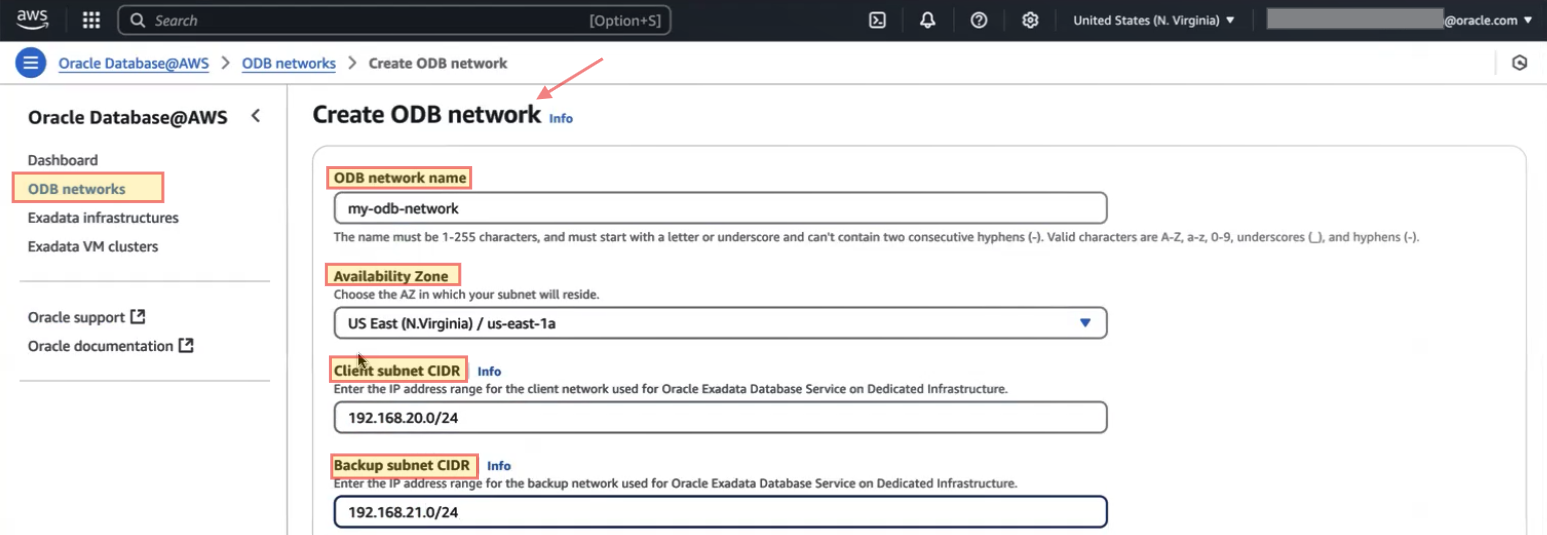
Click Create ODB network and fill out all the requirements. In the step below, you need to enter CIDR values for Client subnet CIDR and Backup subnet CIDR.
Please check the link below, for more information about the client and backup subnets requirements.
Getting started with Oracle Database@AWS – Oracle Database@AWS
To continue you need to peer this ODB network to an existing VPC inside the AWS.
Note: You don’t need to create ODB network for Exadata Infra.
Note: VPC and application subnets need to be on a same AZ ID or Availability Zone ID as the ODB network.
So, if your ODB network is in AZ4, VPC and application must have a subnet in AZ4 (Availability Zone ID number 4).

Please note that the screenshot above shows the older interface. Oracle has now added a dedicated menu for ODB and VPC peering, which I’ll cover in detail in an upcoming blog.
For DNS configuration, you have two options available for Oracle Exadata Database, Default DNS domain or Custom domain name.
With default DNS option, you will use the oraclevcn.com for all hosts or services. And with custom domain option you can have your custom private domain with this setup.
Note: As of now, default DNS set up is the only DNS option available for ADB-D.

At the end, click on Create ODB Network.  This creation will take around 20 minutes, and after that completed, we need to add the route manually in routing table associated to the VPC and need to configure Route 53 for DNS management with AWS or on-premises to resolve the Database endpoints.
Route 53 DNS configuration
After you created your ODB network, you will get DNS configuration with DNS listener IP reserved for that inside the AWS console.

The ODB Network allows you to use either a default or custom domain name. With the default domain (oraclevcn.com), the domain prefix can be up to 15 characters. With a custom domain (yourcustomdomain.com), you can use up to 253 characters, and an OCI private view is created in the VCN resolver. Custom domains are available only for ExaDB-D.
To enable DNS resolution of ‘oraclevcn.com’ (default DNS) from within AWS or on-premises environments using the default DNS setup, customers should configure an outbound endpoint rule in AWS Route 53 to direct the DNS queries to the listener IP address.
Let’s navigate to Route 53 from the AWS console to create outbound endpoint, and rule.
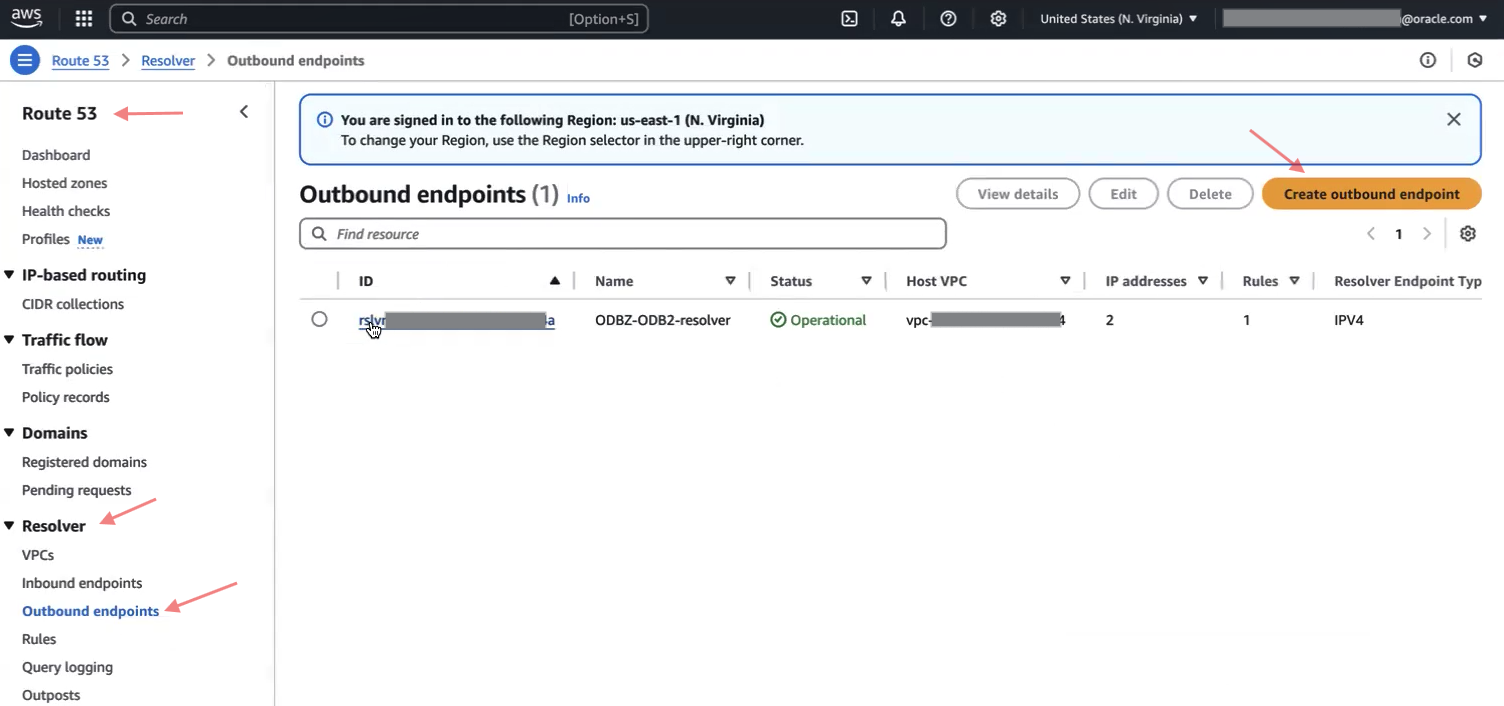 Basically, the rule and target IP say forward any request to “hostname.oraclevcn.com” to this endpoint. (Listener with IP address 172.16.10.81).

 For more information on DB@AWS DNS configuration, please refer to the recent blog published by Catalin Andrei listed below.
DNS resolution for Oracle Database at AWS
Configure the DNS resolution for Oracle Database at AWS
Note: You need to associate each VPC that is peered with ODB network while you are configuring outbound endpoints, in addition with Target IP address.
Note: If you need to resolve DNS queries from Exadata DB to AWS or on-premises hosts, you will need to create a forwarding endpoint in OCI.
Routing and Security
When you are peering VPC to ODB network, and then on that VPC we need to add the route with destination of ODB network with target ODB peering connection. (As of now, it’s a manual step that we do it from CLI, we cannot add it through the AWS console).
And for a reverse route from ODB to VPC, we don’t need to add any route because ODB knows how to reach the VPC through the ODB peering. (Specific VPC CIDR will add it automatically inside the VCN routing table from the OCI side).
When you peer the ODB network with a VPC, in addition to configuring routing, an adjustable Network Security Group (NSG) will create in OCI to accept ingress traffic from the VPC CIDR on the appropriate port and protocol. However, you will still need to add specific rules to allow DNS traffic.
Now that we’ve finished creating the ODB network, let’s proceed to create the VM Cluster, using the ODB target network from the previous step before setting up the databases.
Create VM Cluster
An Exadata VM cluster is a group of virtual machines where you can run and manage your own Oracle Exadata databases on dedicated Exadata hardware. You can create several VM clusters on different Exadata systems within the same ODB network and have full control over these databases.
An Autonomous VM cluster, on the other hand, is a virtualized set of resources that runs Autonomous Databases, which are managed and maintained automatically by Oracle.
When creating a VM cluster, keep in mind:
- It must be in the same availability zone as your ODB network and Exadata infrastructure.
- If not shared across AWS accounts, the VM cluster and Exadata infrastructure must be in the same account. Shared resources via AWS RAM can be used by trusted accounts.
- Only VM clusters can be deployed in your ODB network.
- Storage size cannot be changed after the VM cluster is created.
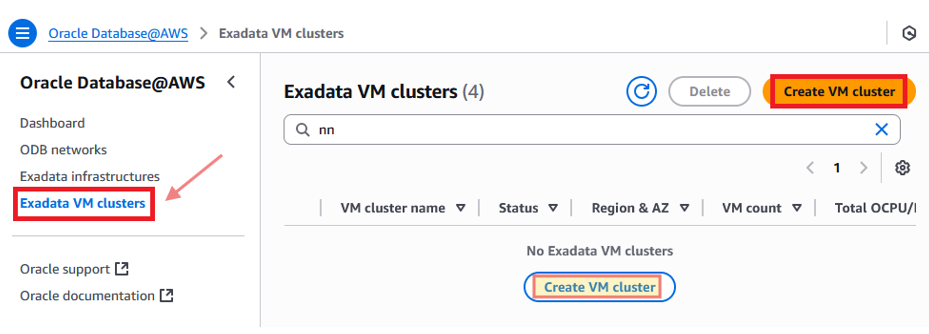
Navigate to Oracle Database@AWS, click on Exadata VM cluster, and create VM cluster.
Note: Setting up the VM cluster may take more than 6 hours, depending on its size.
With Oracle Database@AWS, you can use the AWS console, CLI, or APIs to create and manage ODB networks, Exadata infrastructure, VM clusters, Autonomous VM clusters, and peering connections.
However, to create and manage Oracle Exadata databases, you need to use the Oracle Cloud Infrastructure (OCI) console, not the Oracle Database@AWS dashboard. In OCI, you can set up user managed Exadata databases on Exadata VM clusters or Autonomous Databases on Autonomous VM clusters.
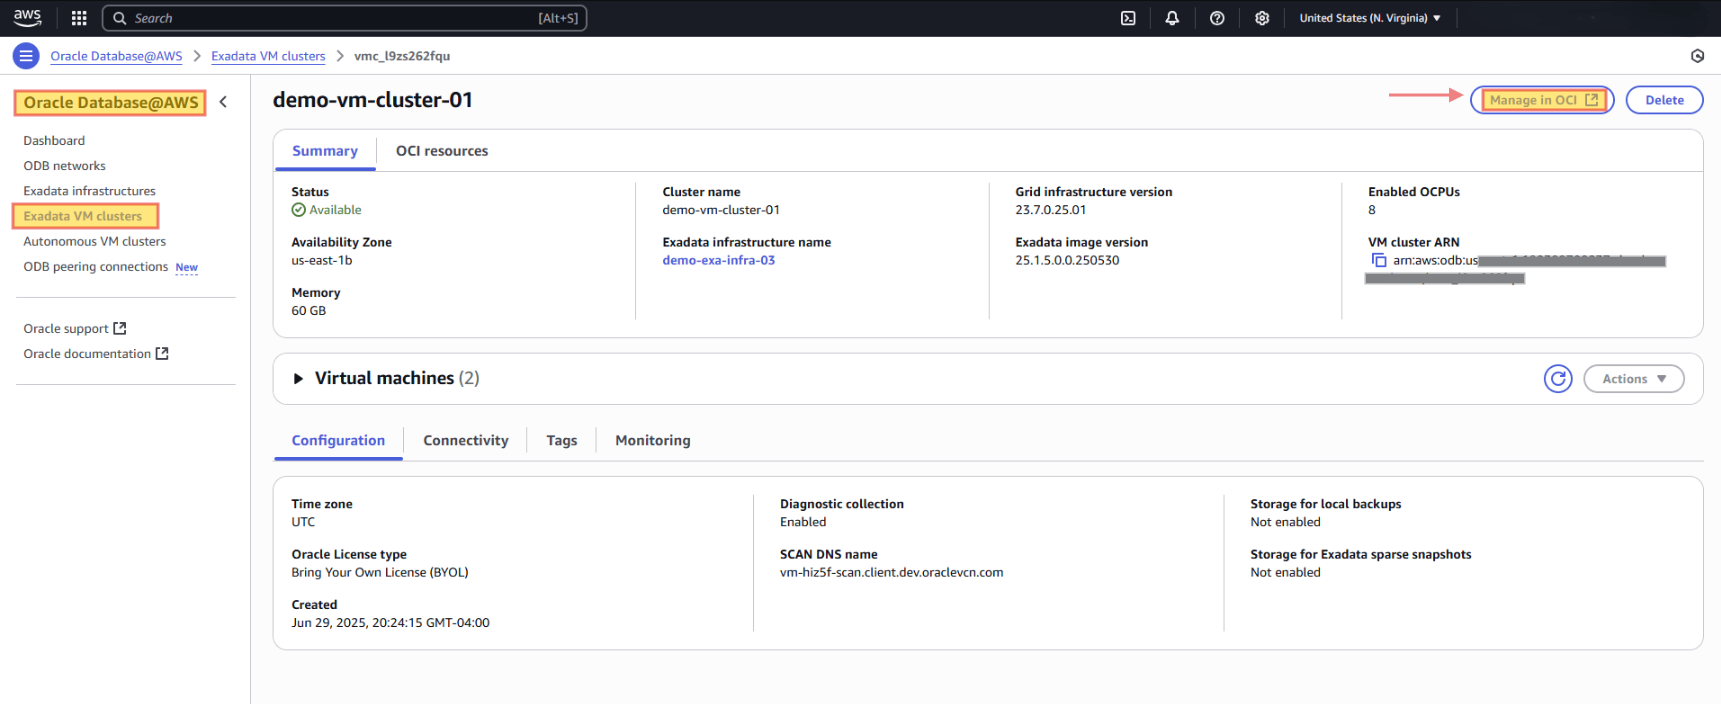
To create an Exadata database, let’s navigate to the AWS Management Console and open Oracle Database@AWS.
Select either Exadata VM clusters (you created in a previous step) or Autonomous VM clusters.
Choose the VM cluster you want.
Click “Manage in OCI” to go to the OCI console.
Create your database in OCI.
Database provision is beyond the scope of this blog. Please refer to the links below for more details.
Conclusion
Oracle Database@AWS delivers a powerful combination, the reliability and performance of Oracle Exadata and Autonomous Database in AWS regions, with seamless integration into the AWS environment. This unique approach to multicloud design allows organization to run mission critical applications closer to their AWS workloads while relying on Oracle’s proven database and cloud technology.
For enterprise balancing between performance, simplicity, and flexibility, Oracle Database@AWS represents not just another cloud service, but a milestone in multicloud strategy.
In this blog, I focused on high level design for Oracle Database@AWS within a single availability zone setup. In my next blog, I’ll dive into the design considerations for a Hub-and -Spoke architecture in this environment.
I hope you enjoyed it!