
Introduction
By setting up Single Sign-On (SSO) between OCI IAM and Auth0, OCI administrators can seamlessly log in to the OCI Console using their Auth0 credentials. Auth0 acts as the external Identity Provider (IdP), while the OCI IAM identity domain acts as the Service Provider (SP).
This integration is useful for organizations that use Auth0 as their authentication platform and want to provide federated access to Oracle Cloud Infrastructure without maintaining a separate password-based authentication experience for users.
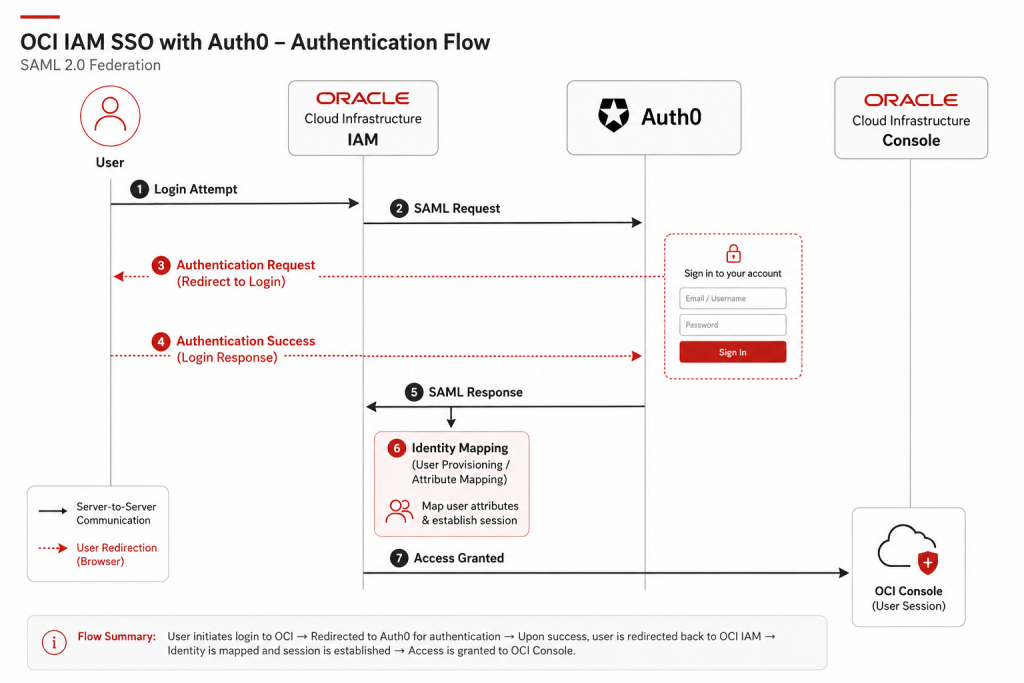
The architecture describes the process of user authentication for the OCI Console using Auth0 as the Identity Provider (IdP) via SAML 2.0.
- Login Attempt: The user attempts to log in to the OCI Console.
- SAML Request: OCI IAM, acting as the Service Provider, redirects the user to Auth0 and sends a SAML authentication request.
- Authentication Request: Auth0 presents the login page to the user and prompts for authentication.
- Authentication Success: The user successfully authenticates using the authentication methods configured in Auth0.
- SAML Response: Upon successful authentication, Auth0 generates a signed SAML assertion and sends the response to the OCI IAM Assertion Consumer Service (ACS).
- Identity Mapping: OCI IAM reads the SAML Subject/NameID and maps it to the corresponding user in the IAM identity domain.
- Access Granted: OCI IAM validates the SAML response, establishes the user session and grants access to the OCI Console.
Further more, the OCI IAM users can be placed in groups. These groups can be referenced in IAM policies for defining authorization and access to OCI resources.
Objectives
- Set up SAML based SSO for access management
- Configure Auth0 to pass the user’s email address as the SAML Subject/NameID
- Test and validate the federated login
Prerequisites
- Access to an OCI tenancy
- Identity domain administrator role for the OCI IAM identity domain
- Access to an Auth0 tenant
- Administrator privileges to create and configure applications in Auth0
- Test users available in Auth0 & OCI IAM
Note:
- This article does not cover SCIM or Just-in-Time (JIT) provisioning for automated identity management. At the time of writing, Auth0 does not support outbound SCIM natively.
- A workaround using event streams to trigger custom code that synchronising users only (not groups) is documented in Auth0 Code Customization.
- Therefore, for testing SSO, users should already exist in the OCI IAM identity domain.
Section 1: Set up SAML based SSO for Access Management
Auth0 acts as the Identity Provider (IdP), authenticating users and passing authentication information securely to OCI IAM, which functions as the Service Provider (SP). To set up SAML federation, configuration information needs to be exchanged between both parties.
Task 1.1: Get the Service Provider Metadata from OCI IAM
The Service Provider metadata from the OCI IAM identity domain is exported first. These values will be used to configure the SAML application in Auth0.
- Open a browser tab and enter the OCI Console URL: https://cloud.oracle.com
- Enter Cloud Account Name, also referred to as the tenancy name, and click Next.
- Select the identity domain that will be used to configure SSO.
- Enter the administrator credentials to log in to the OCI Console.
- Navigate to Identity & Security, then go to Identity and click Domains. Click the name of the identity domain where SSO needs to be configured.
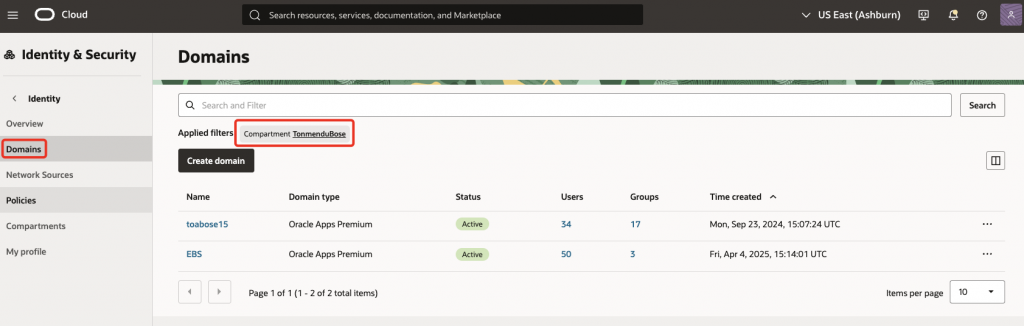
Note: If the domain is not visible, change the compartment to locate the appropriate identity domain.
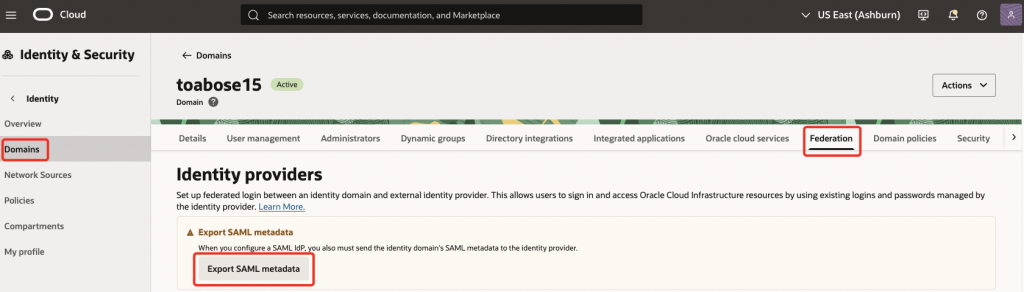
- Click Federation. Under Identity providers, click Export SAML metadata.
- Select Manual export and make note of the values. Sample values are shown below for reference.
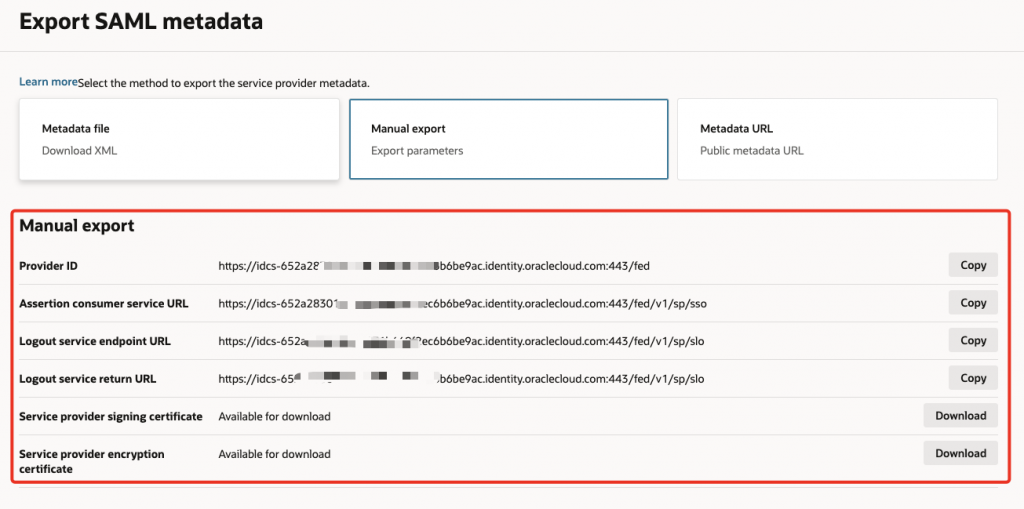
Provider ID
https://idcs-XXX.identity.oraclecloud.com:443/fed

Assertion consumer service URL
https://idcs-XXX.identity.oraclecloud.com/fed/v1/sp/sso

Logout service endpoint URL
https://idcs-XXX.identity.oraclecloud.com/fed/v1/sp/slo

Logout service return URL
https://idcs-XXX.identity.oraclecloud.com/fed/v1/sp/slo
Task 1.2: Create and configure the SSO Application in Auth0
An application is created and configured in Auth0 to represent the OCI IAM identity domain.
- Sign in to the Auth0 tenant with an administrator account, and navigate to the Dashboard.
- From Applications, select Applications and click Create Application.
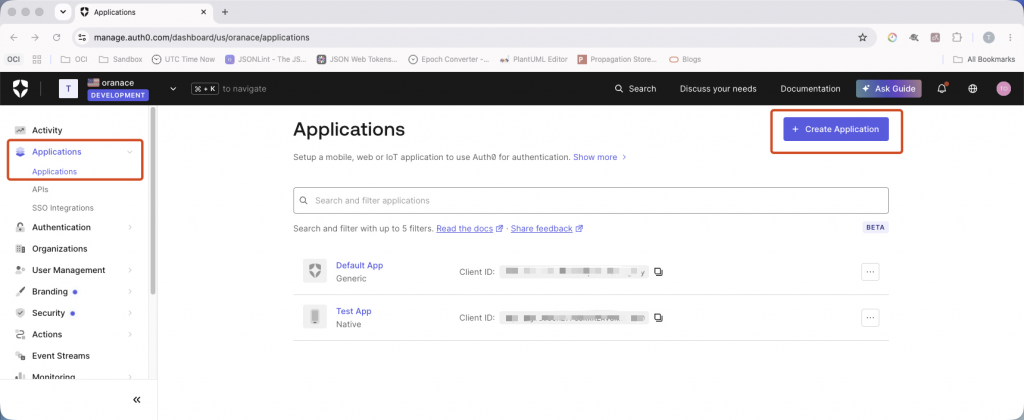
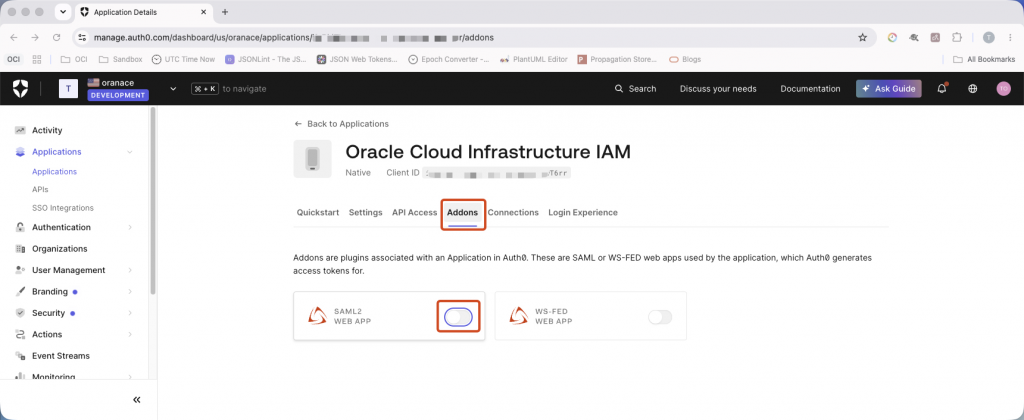
- Enter a name for the application, for example: Oracle Cloud Infrastructure IAM. Choose the type as Native and click Create.
- Open the newly created application and go to the Addons tab. Enable SAML2 Web App.
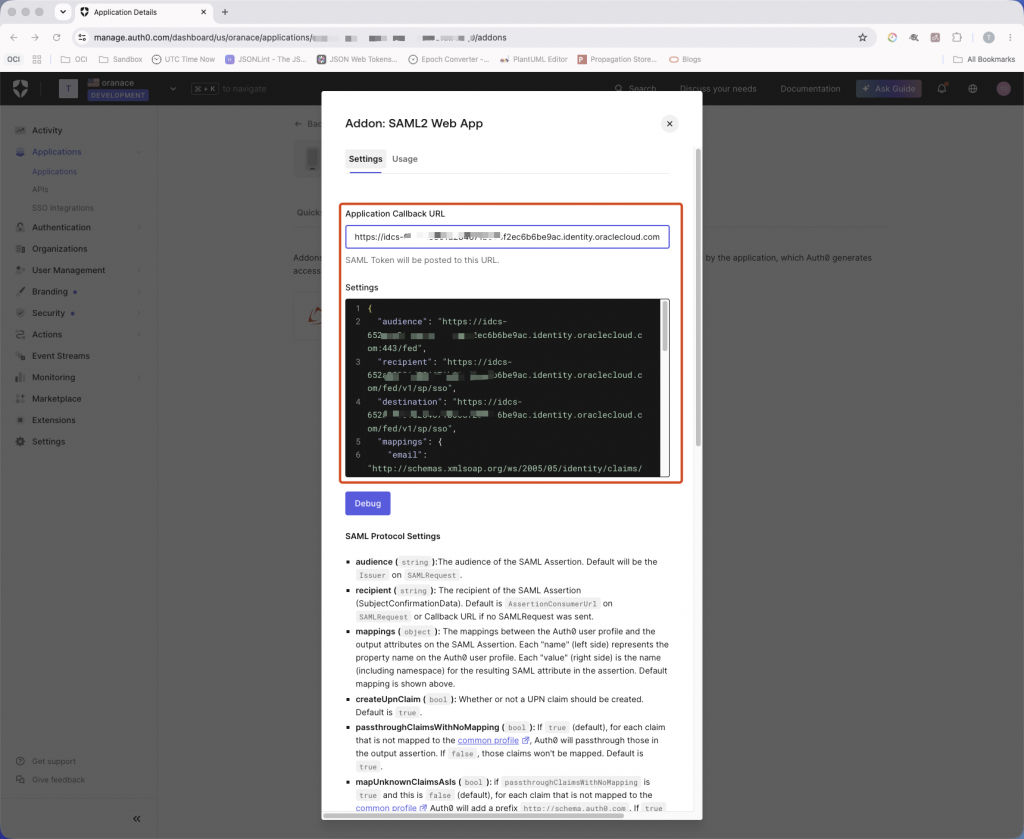
- Under the Settings tab of the SAML2 Web App addon, enter the Assertion Consumer Service URL collected in Task 1.1 as the Application Callback URL.
https://idcs-XXX.identity.oraclecloud.com/fed/v1/sp/sso- Next, in the settings section, configure the SAML parameters. Replace the placeholder values below with the exact values exported from OCI IAM in Task 1.1.
{
  "audience": "<OCI_PROVIDER_ID>",
  "recipient": "<OCI_ACS_URL>",
  "destination": "<OCI_ACS_URL>",
  "mappings": {
    "email": "http://schemas.xmlsoap.org/ws/2005/05/identity/claims/emailaddress",
    "name": "http://schemas.xmlsoap.org/ws/2005/05/identity/claims/name",
    "given_name": "http://schemas.xmlsoap.org/ws/2005/05/identity/claims/givenname",
    "family_name": "http://schemas.xmlsoap.org/ws/2005/05/identity/claims/surname"
  },
  "createUpnClaim": false,
  "passthroughClaimsWithNoMapping": false,
  "mapUnknownClaimsAsIs": false,
  "mapIdentities": false,
  "signatureAlgorithm": "rsa-sha256",
  "digestAlgorithm": "sha256",
  "signResponse": false,
  "typedAttributes": true,
  "includeAttributeNameFormat": true,
  "nameIdentifierFormat": "urn:oasis:names:tc:SAML:1.1:nameid-format:emailAddress",
  "nameIdentifierProbes": [
    "http://schemas.xmlsoap.org/ws/2005/05/identity/claims/emailaddress"
  ],
  "authnContextClassRef": "urn:oasis:names:tc:SAML:2.0:ac:classes:unspecified",
  "binding": "urn:oasis:names:tc:SAML:2.0:bindings:HTTP-POST",
  "logout": {
    "callback": "<OCI_SLO_URL>",
    "slo_enabled": true
  }
}
Important: The
nameIdentifierFormatandnameIdentifierProbessettings are important for this integration. By default, Auth0 uses the Auth0user_idas the SAML Subject/NameID.OCI IAM in this configuration maps the SAML NameID to the identity domain Username. Therefore, Auth0 is explicitly configured to use the email claim for NameID.
The following settings defines the NameID format and the value:
"nameIdentifierFormat": "urn:oasis:names:tc:SAML:1.1:nameid-format:emailAddress"
"nameIdentifierProbes": [
  "http://schemas.xmlsoap.org/ws/2005/05/identity/claims/emailaddress"
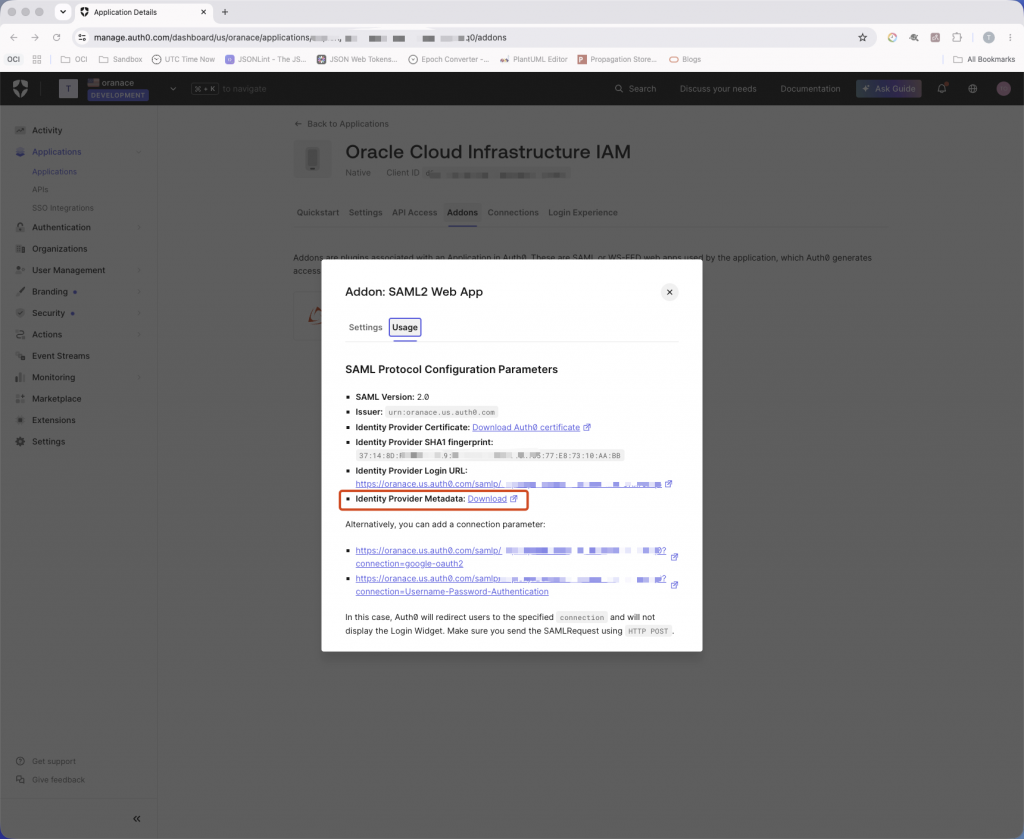
]- Save and navigate to the Usage section. Locate Identity Provider Metadata and Download the metadata XML file. The metadata will be imported into OCI IAM in the next task.
- Close the window and verify that the add-on is active.
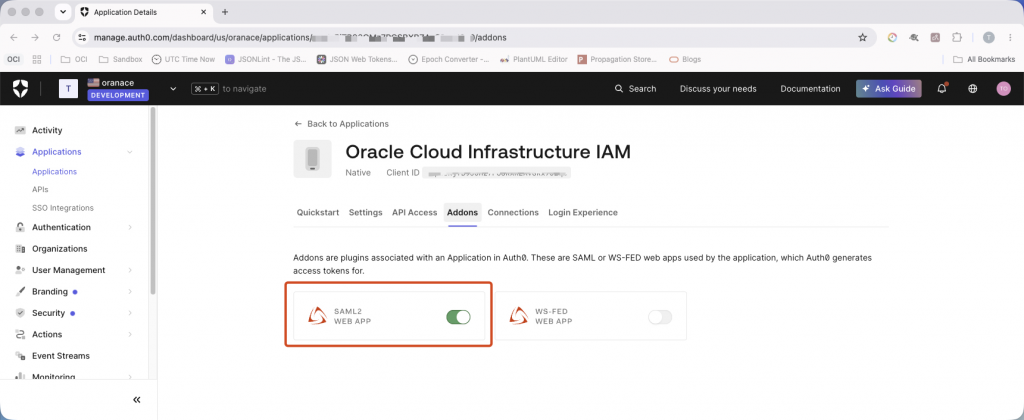
Task 1.3: Enable Auth0 as IdP for OCI IAM
A new SAML Identity Provider is created in OCI IAM to represent Auth0. Once configured, an Identity Provider policy is created to enable Auth0 authentication for the OCI Console.
- In the OCI Console, navigate to the identity domain used in Task 1.1 and select Federation. Under Identity providers, click Actions and choose Add SAML IdP.
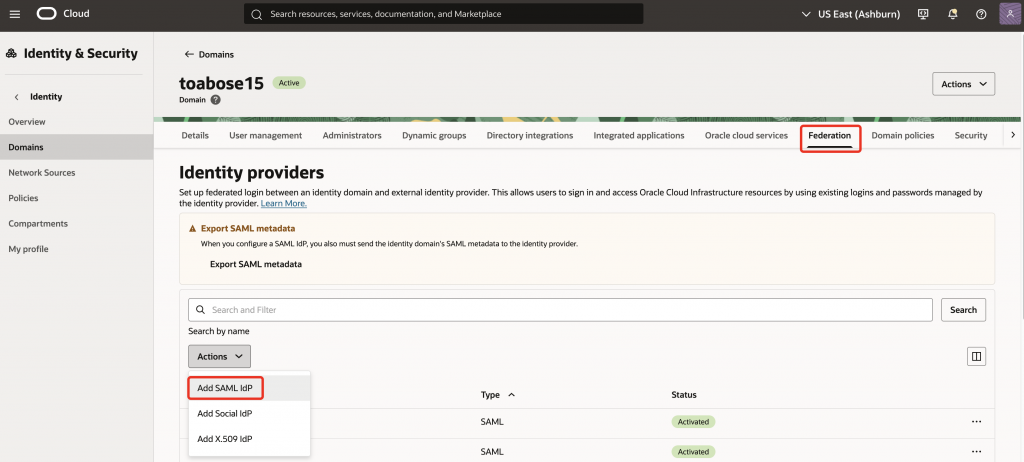
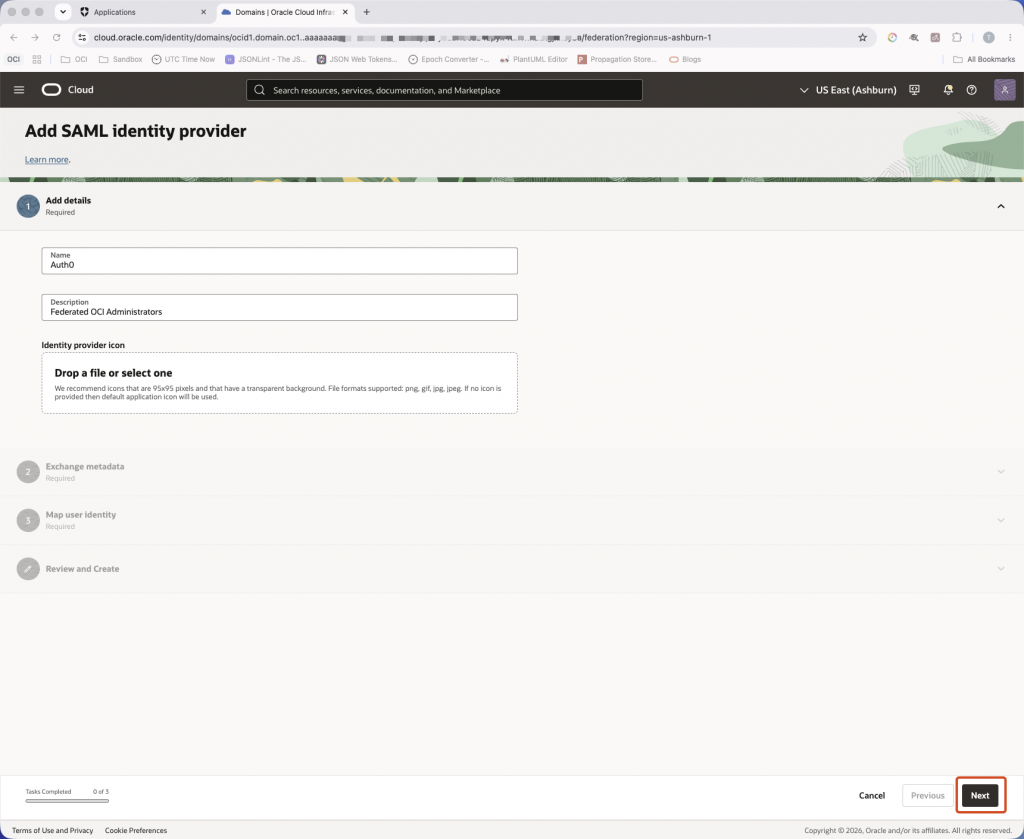
- Enter a Name, for example Auth0, for the SAML Identity Provider and click Next.
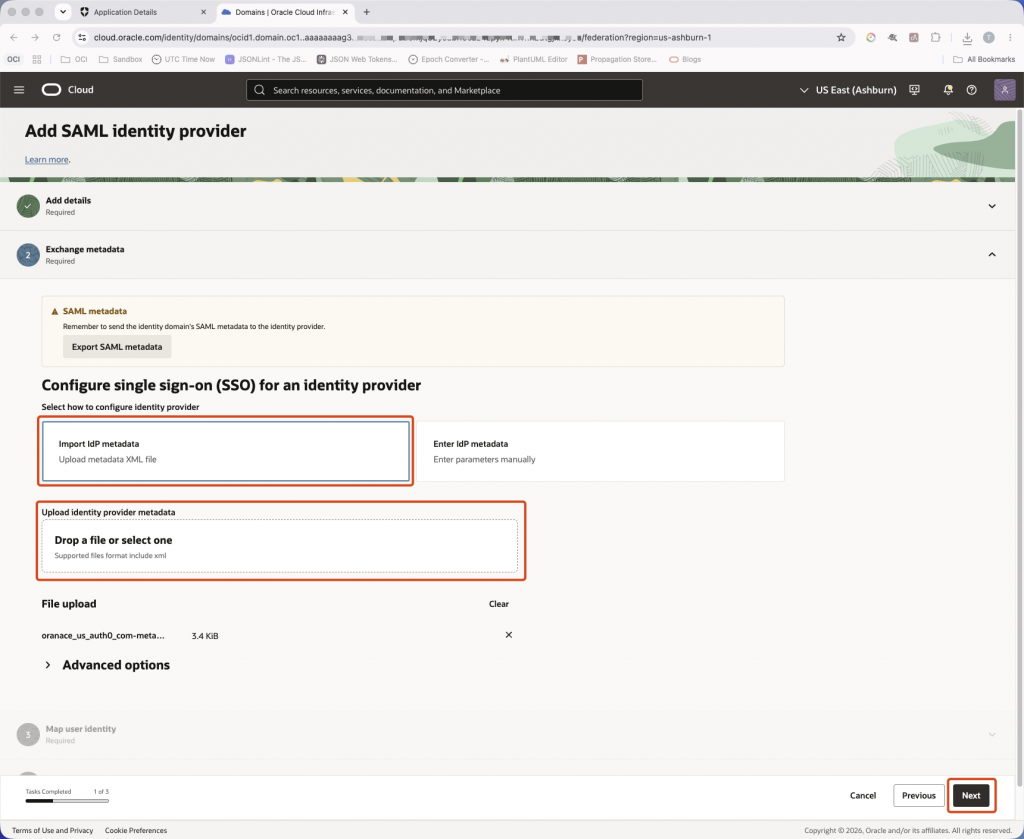
- Select Import IdP metadata. Under Upload identity provider metadata, upload the Auth0 metadata XML file downloaded in Task 1.2 and click Next.
- In Map user identity, ensure that the attributes are configured as below.
- Requested NameID format: Select Email address.
- Identity provider user attribute: Select SAML assertion Name ID.
- Identity domain user attribute: Select Username.
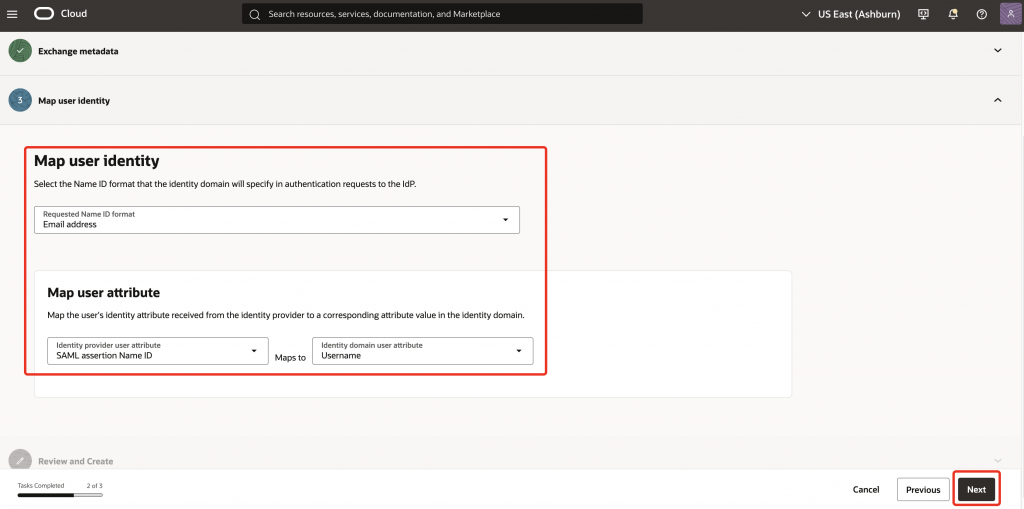
Note: This mapping ensures the email address sent as the Auth0 SAML Subject/NameID matches the Username of the corresponding OCI IAM user, assuming that username and email address of users are same in OCI. If they are not, the mapping can be changed to another attribute.
- In Review and Create, verify the configuration and click Create IdP.
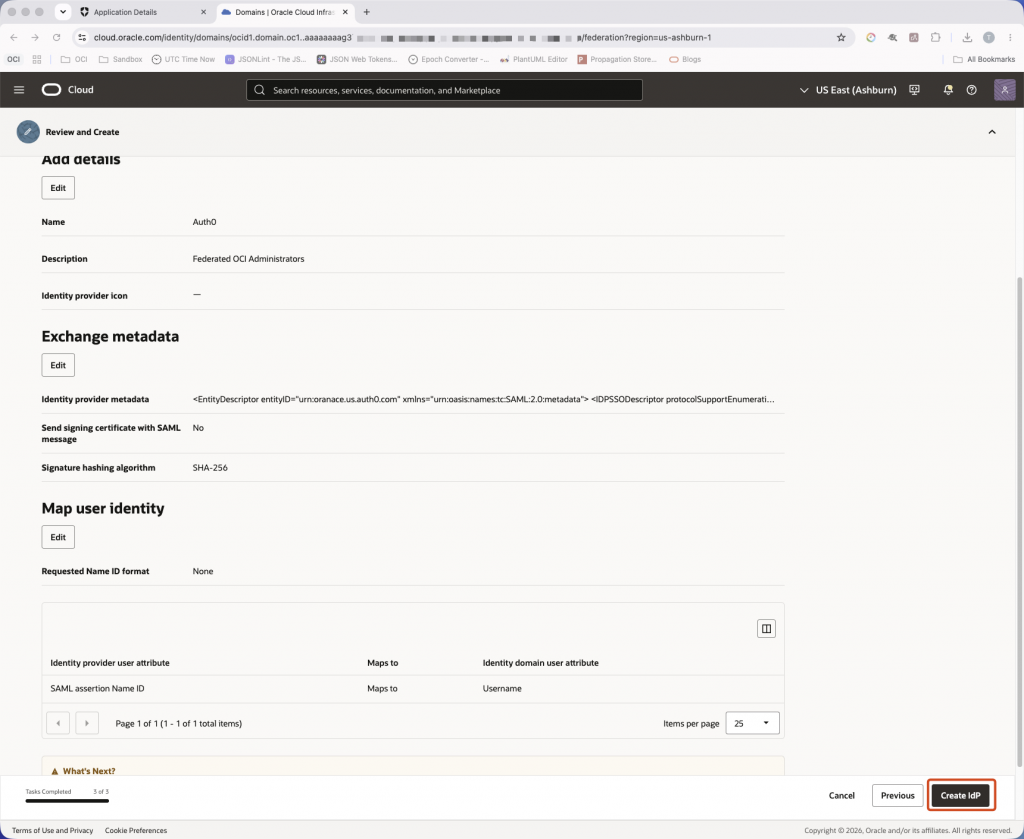
- Once the IdP is created, click Activate IdP.
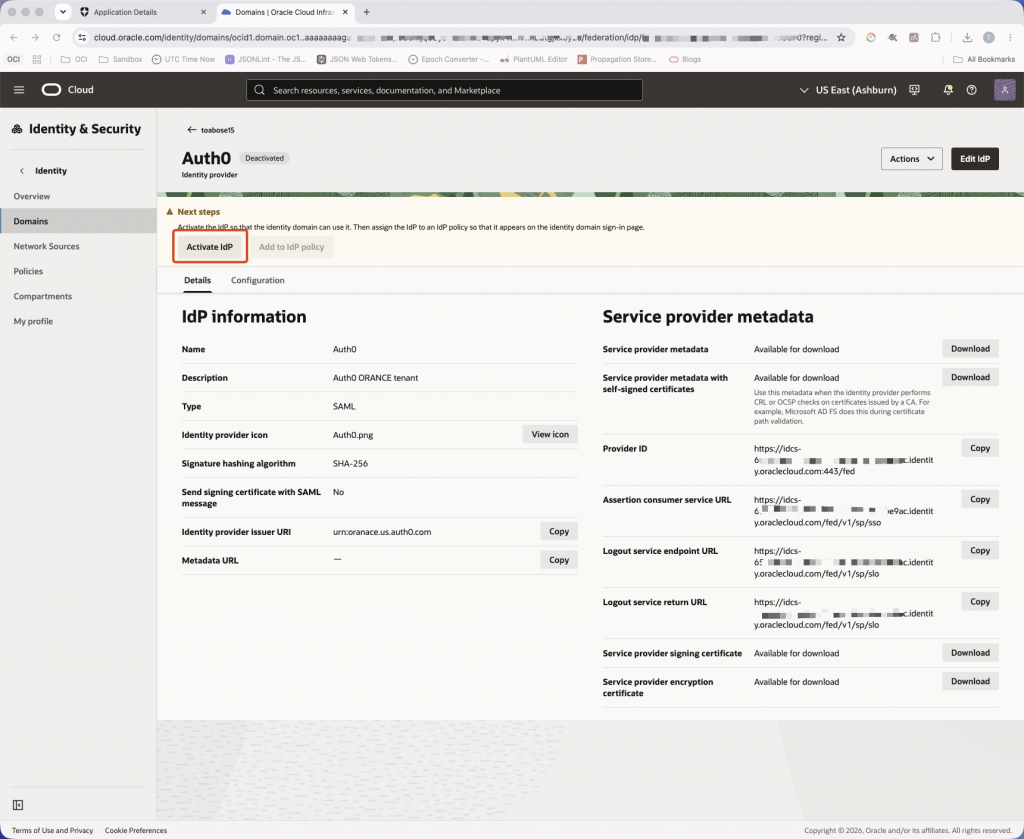
Note: A new Identity Provider policy will be created to target the OCI Console application. Both Username-Password and Auth0 can be made available as authentication methods. Retaining a local authentication option provides an alternate administrative access path for break-glass scenarios.
- In the IAM domain, navigate to Identity provider policies and click Create IdP policy.
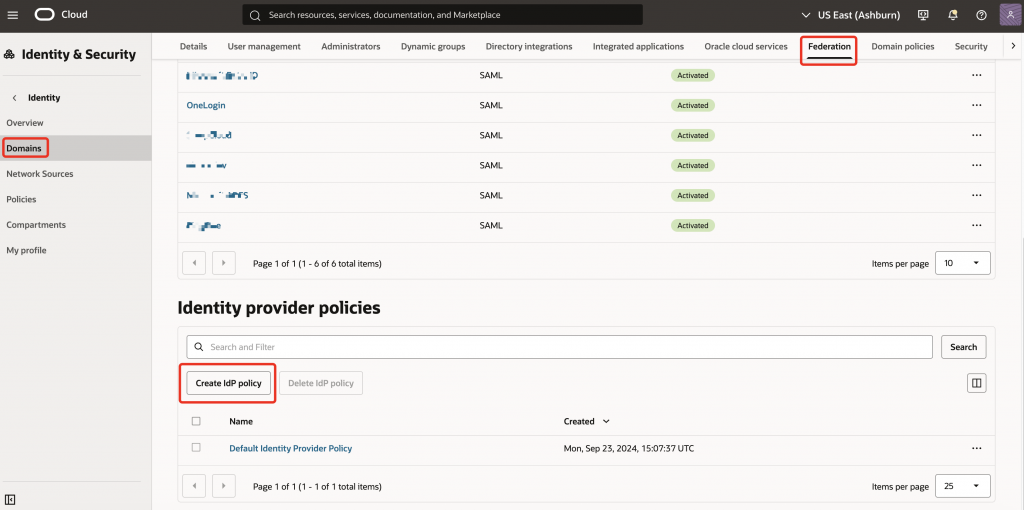
- Enter a Name, for example Auth0 policy for OCI admins, and click Create identity provider policy.
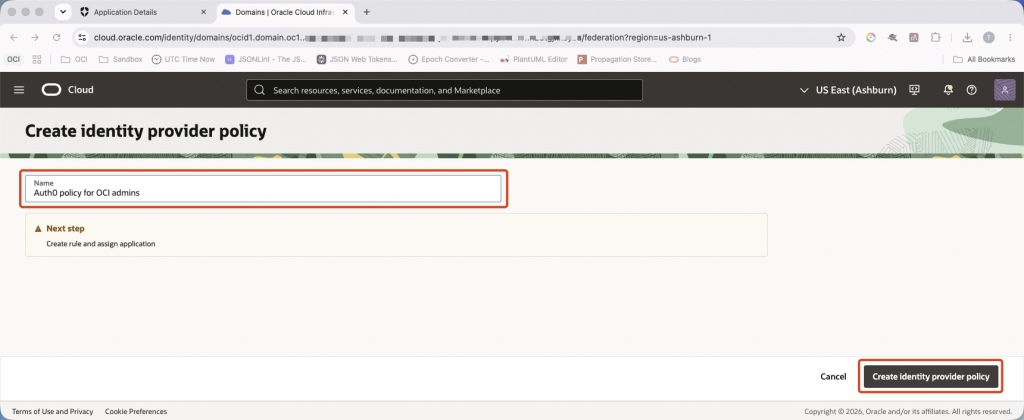
- Go to the Identity provider rules tab and click Add IdP rule.
- Enter a Rule name, for example OCI Console access rule. Under Assign identity providers, select Username-Password and Auth0. Once done, add the IdP rule.
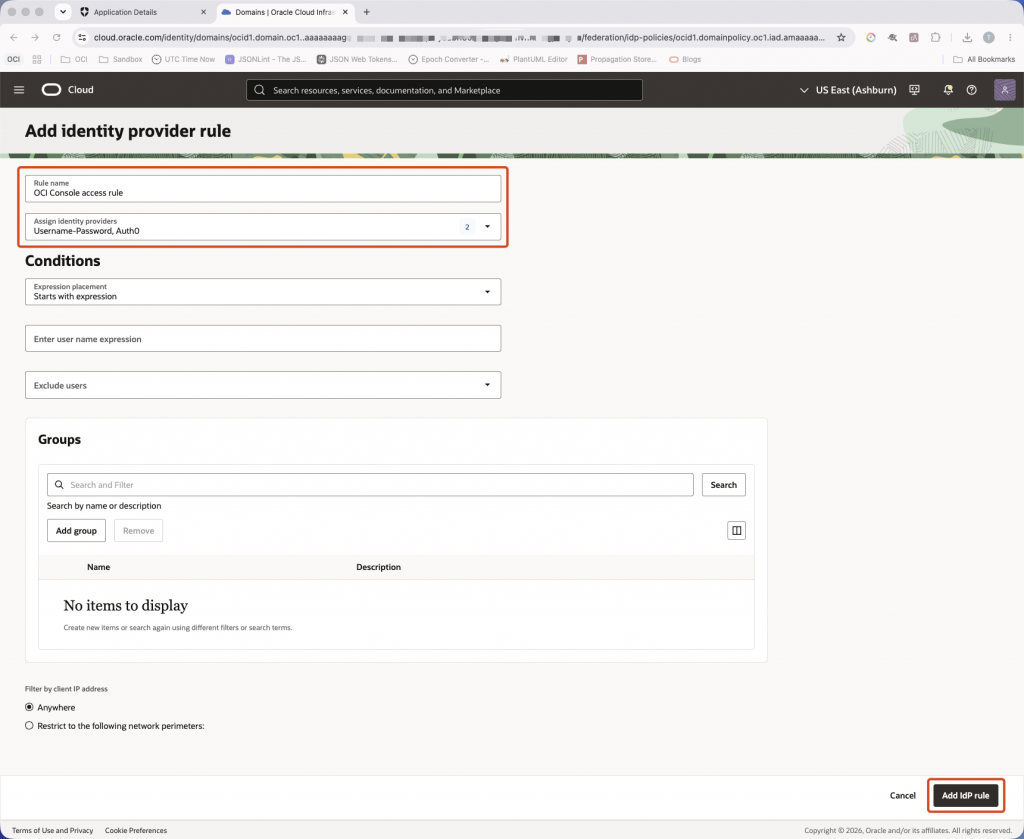
- In the Applications tab, click Add app, search and select OCI Console from the list. Add the application and close the dialog.
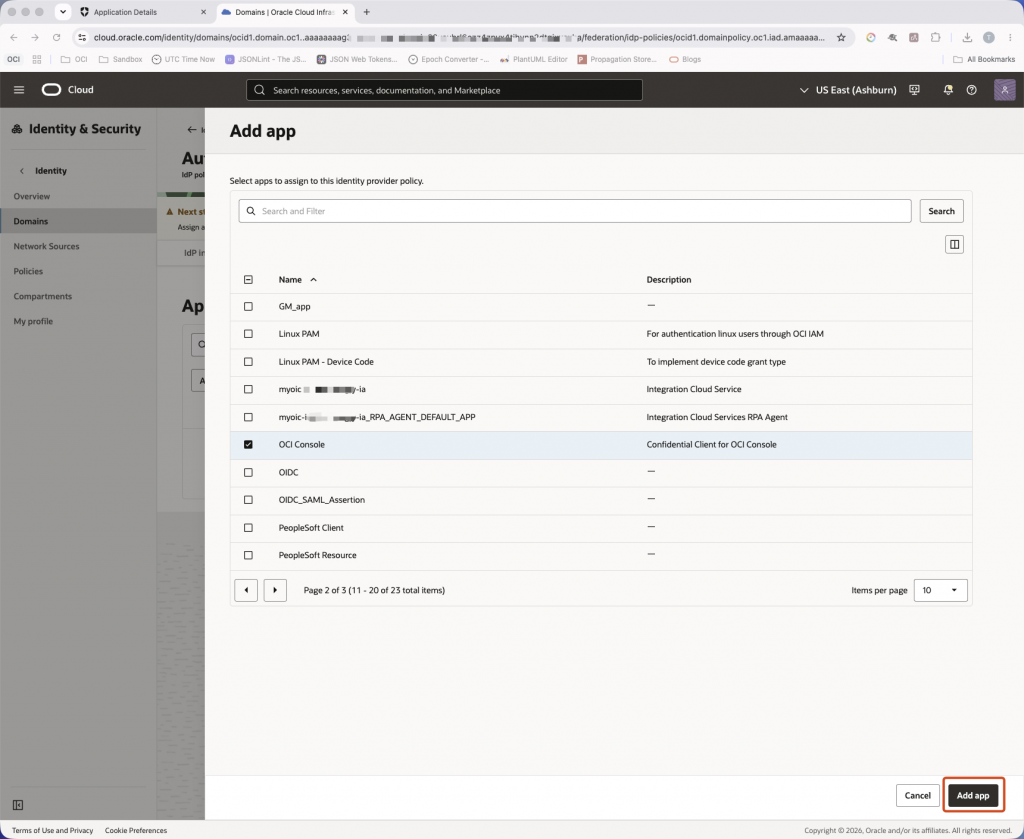
Note: The below steps 12-15 are optional to implement. Some customers prefer to configure MFA at the IdP layer and bypass the Oracle MFA. If this is the preferred approach, ensure MFA is enforced in Auth0 as required. Please review the sign-on and MFA policies applied to the OCI Console carefully before proceeding. Consider retaining an appropriate break-glass admin access method to avoid a lockout.
- Back in the IAM domain, goto Domain policies tab and click on the sign-on policy Security Policy for OCI Console.
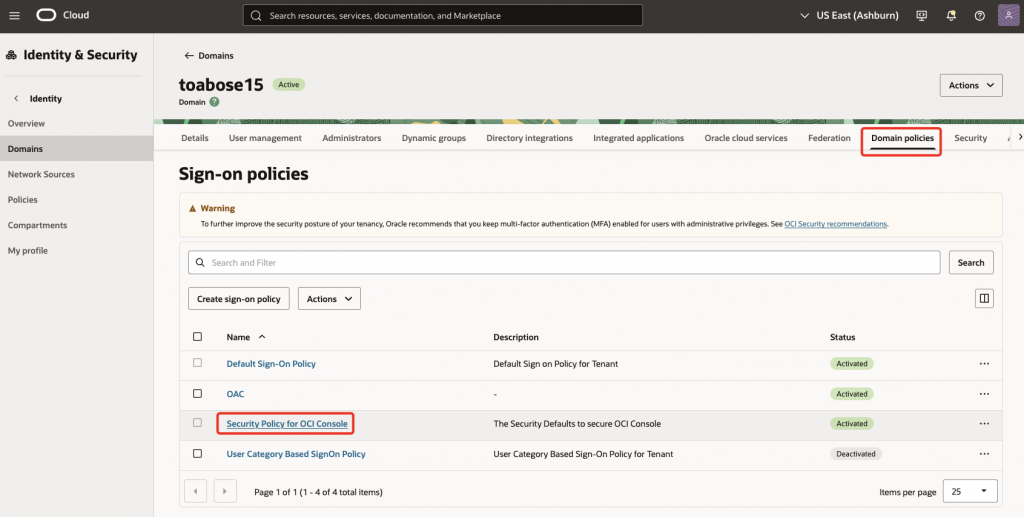
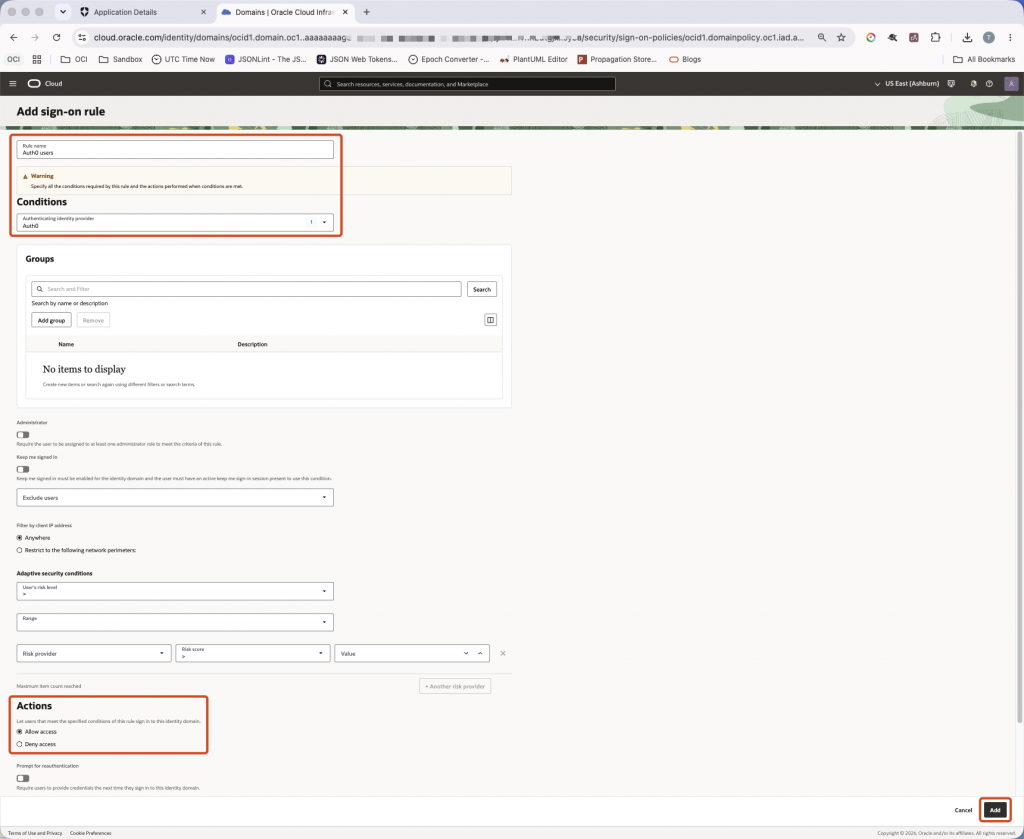
- Under Sign-on rules click on Add sign-on rule. Enter a Rule name, for example Auth0 users. Choose the Authenticating identity provider as Auth0, and under Actions ensure Allow access is selected. Click Add.
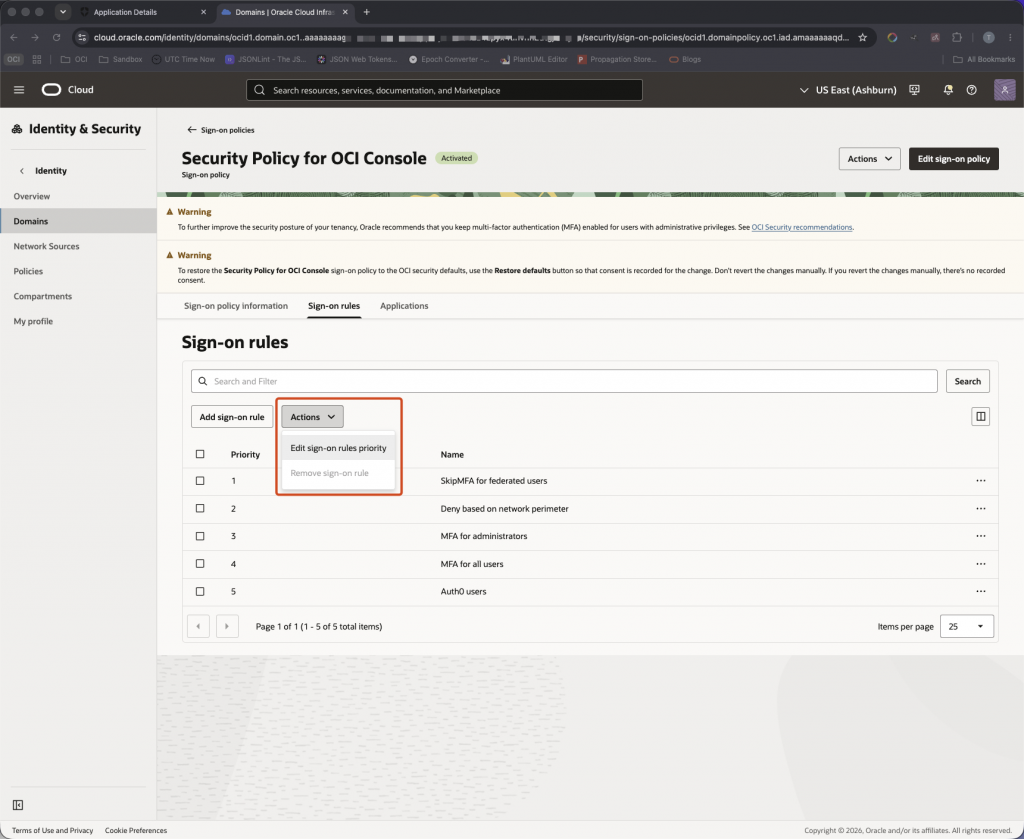
- In the same section, under Actions, click on Edit sign-on rules priority.
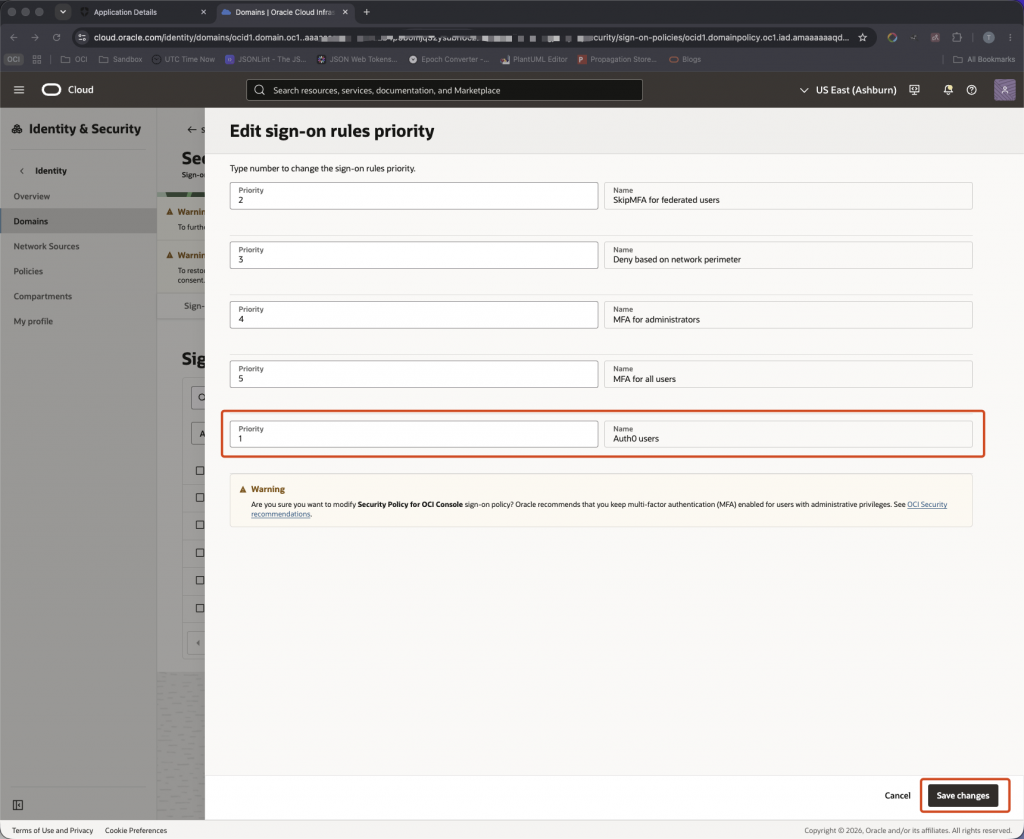
- Update the priority number of the new rule to 1. Also update the priority of the other rules by increasing the corresponding number by 1. Once done, click on Save changes.
Section 2: Test and validate the login
Finally, the federated authentication is put to test.
- Ensure that the test user exists in the OCI IAM identity domain.
- Open a new browser window and navigate to the OCI Console.
- Enter Cloud Account Name, also referred to as the tenancy name, and click Next.
- Select the identity domain in which Auth0 federation has been configured.
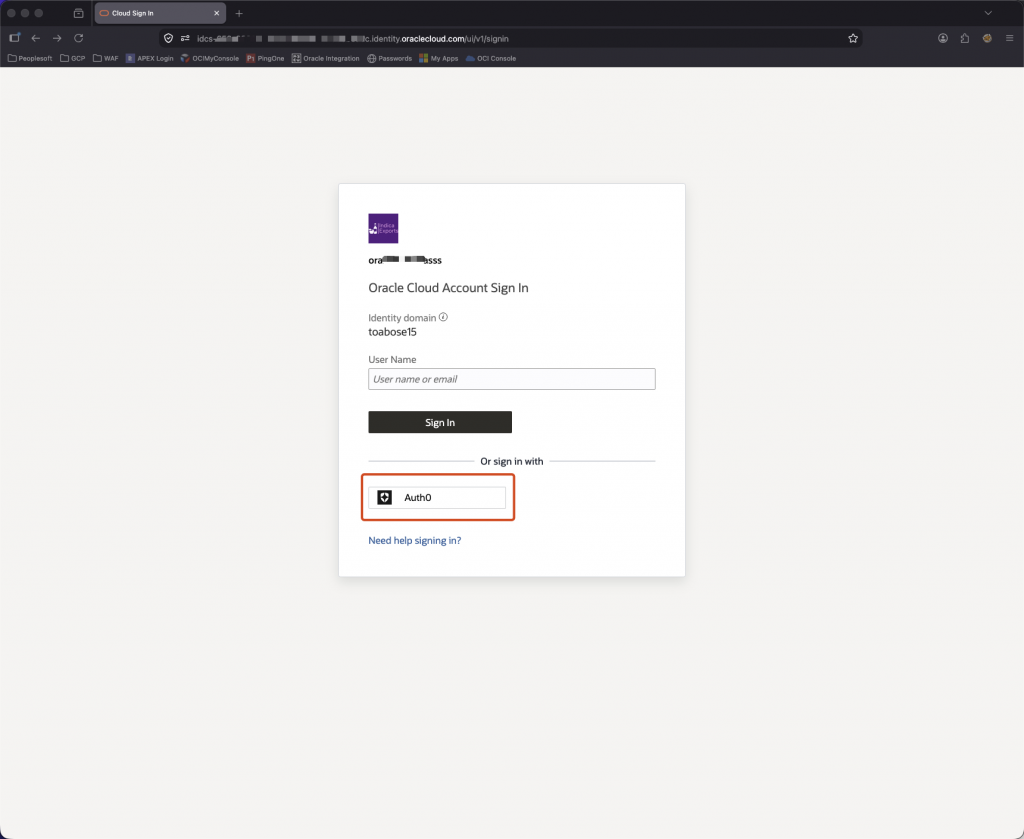
- In the Oracle Cloud Account Sign In page, select Auth0. The browser should redirect to the Auth0 login page.
- Login using the Auth0 credentials for the federated user.
- Upon successful authentication, the user is redirected to the OCI Console.
Note: If Auth0 authentication succeeds but OCI IAM does not recognize the user, inspect the SAML Subject/NameID first. Ensure that the value is the user’s email address, the NameID format is
emailAddress, and the email exactly matches the OCI IAM Username.
Conclusion
Before using the configuration in production, validate the federated sign-in flow with a test user and retain an appropriate local administrative access method for break-glass scenarios. This provides a controlled path to centralized authentication while preserving administrative access if the external identity provider is unavailable.