Recently a customer came to us asking how to enable Web Application Firewall (WAF) policies on their OCI Load Balancer (LB). They had set up the load balancer in TCP mode so TLS could be terminated further in the network, which was preventing the WAF policies from working correctly. The reason for using a TCP (layer 4) listener instead of a HTTP/HTTPS (layer 7) listener was due to a requirement that they need to support many different TLS certificates for a multitude of domains. They saw that each listener on the OCI LB ran on it’s own port and supported only a single TLS certificate, so made the decision to run layer 4 on the LB to pass the traffic and terminate TLS deeper in the stack. Unfortunately the WAF won’t work on an LB running TCP listeners, leaving this customer open to abusive traffic. How could they securely route traffic to their services hosted on OCI while running in a mode that would work with the WAF?
The answer was simple, use virtual hostnames to manage listeners by hostname instead of port. However, it’s far from immediately obvious how this works and reading through the OCI documentation doesn’t scream “Look here to learn how to manage certificates by hostname!” Thus, I’m writing a short article so the next time someone is looking for a solution on how to manage multi-domain routing and TLS termination in OCI, they can skip the wailing and gnashing of teeth with this artcile.
The Architecture
What You Need
- OCI Load Balancer (not Network Load Balancer)
- One or more backend hosts
- One or more certificate bundles OR an OCI managed Certificate Authority
- OCI DNS or another DNS provider
How It Works
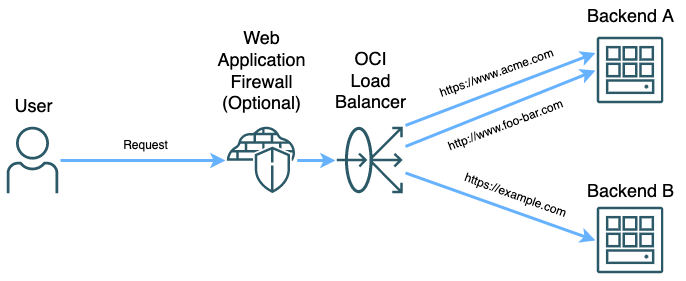
OCI Load Balancers can do many things. They’re capable of running either at TCP or HTTP layers to route different kinds of traffic. The OCI Load Balancer can also act as a Web Application Firewall (WAF) enforcement point if running at the HTTP layer. The WAF capability can help secure your workloads in OCI by filtering out traffic attempting to exploit OWASP top 10 attacks, restrict traffic based on origin, headers, or other factors, and implement rate limiting rules among other things. However, the WAF functions only work when the load balancer is running in layer 7 mode so it can have access to the whole packet.
There are several components that compose a successful load balancer implementation. The ones that are relevant to this post are listeners and backends. Backends are one or more locations where traffic can be routed, think of backend servers running a web server or something of that nature. The other component is listeners. Listeners in their most basic form serve as an endpoint running at either layer 4 or layer 7 to receive traffic on a specific port. When a request is received on the load balancer, it routes the traffic to the backend assigned to the listener on that port.
TLS can be terminated at the listener. So, if you have multiple different listeners and a different certificate can be assigned to each listener. However, since there can only be one certificate per listener you will end up with https://www.acme.com, https://www.foo.com:444, and https://www.bar.com:445 as hostnames to give your users. This is not a good solution for most users. We can fix it by using virtual hostnames.
Virtual Hostnames are just hostnames that can be assigned to listeners in an OCI Load Balancer. They don’t serve any function outside the load balancer, but when assigned to a listener they can be used to routing to backends based off hostname instead of port. That way, you can have all your https services running on port 443 like your users expect.
How to Use the OCI Console to Implement Virtual Hostnames
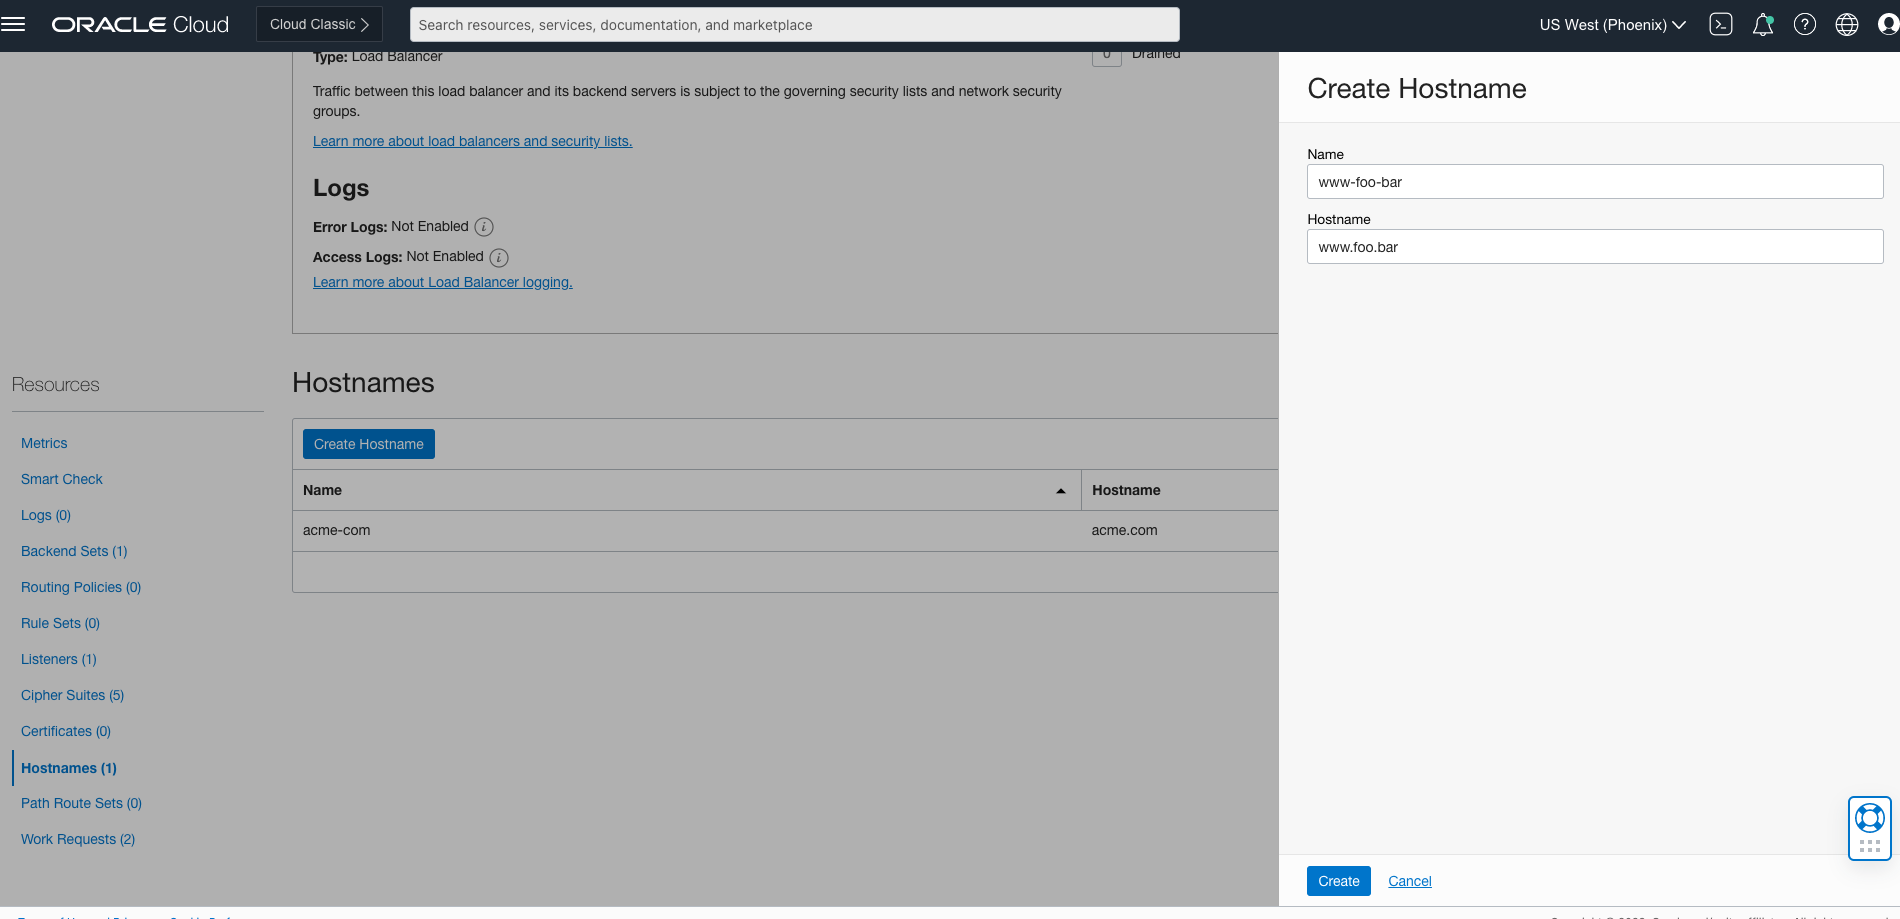
In the console, navigate to the details of the OCI Load Balancer and select Hostnames from the Resources menu on the left side of the window. Click the Create Hostname button and enter a name and hostname. Click Create and a work request will be submitted to create the hostname. It only takes a few seconds for this work request to be completed, take an opportunity to stretch
Once your hostname is created, it can be attached to a listener. Either go into the Listeners menu and edit a listener by clicking the three vertical dots on the right side of the list, or create a new listener with the Create Listener button. In the new menu that opens, select a name for the listener, the protocol, port, and backend set. You will be able to select one or more hostnames for this listener to operate on in the Hostnames dropdown. In this screenshot, I’m specifying the hostname as well as selecting a certificate for TLS termination from the OCI Certificates Service. The other option for certificates is using a Load Balancer Managed Certificate, which can be added to the load balancer from the Certificates menu under Resources.

Click Create Listener to submit a work request for the listener to be added. In a few seconds you have a new listener which accepts traffic based on hostname, as well as TLS termination if a certificate was assigned to the listener. All traffic that is bound for the specified host in the load balancer is routed to the assigned backend, which can either be shared with other listeners if needed.
Finally, use a service like OCI DNS to direct your users to the load balancer. TLS termination and routing to a the correct backend will happen based on how we configured the listeners. For maximum utility use an OCI Web Application Firewall Policy with the load balancer as the enforcement point. This will allow you to implement access controls, rate limiting, and protection from OWASP Top 10 threats.
What Does All This Mean?
In many cases you are able to replace your entire web tier with a Load Balancer as a Service model using OCI Load Balancer. The LB endpoint will reside in a subnet of your choice, but you won’t have to manage any hardware or software packages. OCI will ensure that there is a highly available set of hardware behind the scenes, so all you have to worry about is configuration. Although this article focuses on virtual hostnames, TLS certificates and backend sets, the OCI LB has many more features to ensure the web tier operates as needed. If you want to learn more about the full set of features available for the OCI Load Balancer, take a look at the documentation here.
Finally, you may see that the limit on listeners is 16. Please note that this is a soft limit, meaning it can be increased simply by asking. You can have hundreds of listeners attached to a single load balancer by filing a support request asking for the limit to be increased. If you need to support 100 hostnames, go ahead and ask for a limit of 100+ listeners. There’s no cost associated with listeners, just the load balancer itself!
Happy routing!