
Introduction
AI agents become valuable in enterprises when they can access real systems such as databases, APIs, documents, tickets, and operational tools. However, once an agent is capable of interacting with a database tool, the critical question is not merely, “Can it connect to the database and provide an answer?“
Instead, it is:
Who is it connecting to the database as?
This blog will explore an end-to-end identity propagation pattern using Oracle Database Tools MCP Server, OCI IAM, Oracle Autonomous Database, and a straightforward expense claims scenario.
A Database Tools MCP Server exposes selected Database Tools capabilities to MCP clients. It is the boundary that the MCP client calls, and it uses the configured Database Tools connection to reach the database.
The proof point is simple:
Same prompt. Same MCP tool. Same SQL. Different signed-in IAM user. Different authorized database result.
Why Identity Propagation Matters?
Without identity propagation, the backend identity becomes the security boundary. For example, if every request connects to the database as the same privileged database account, the database cannot tell which signed-in user send the query. The agent may feel personalized, but database authorization is actually shared. The problem identity propagation solves is:
The agent can ask the question. The database still decides what the signed-in user may see.
The End-to-End Flow
The end-to-end path looks like this:

The identity propagation-friendly configuration is:

In plain English:
- The user signs in through IAM.
- The MCP Server runs in the signed-in user’s context.
- The Database Tools connection also uses the signed-in user’s context.
- The database connection uses IAM token-based authentication.
- Oracle Database receives session context that application SQL and PL/SQL can use for access control.
This is different from a service-account-only pattern, where every user reaches the database through one backend identity.
What Reaches the Database Session
There are three useful identity signals to understand:
SESSION_USER tells which database user is executing the SQL.
AUTHENTICATED_IDENTITY tells which external IAM user authenticated to the database.
CLIENTCONTEXT tells which MCP/OAuth user and roles were propagated by Database Tools MCP.
For Database Tools MCP Server, the documented identity propagation mechanism is the database session context namespace:
CLIENTCONTEXT
When a Custom SQL tool or SQL report runs through the Database Tools MCP Server, Oracle propagates end-user identity attributes into CLIENTCONTEXT.
Useful values include:
SYS_CONTEXT('CLIENTCONTEXT', 'OAUTH_SUB')
SYS_CONTEXT('CLIENTCONTEXT', 'OAUTH_USER_OCID')
SYS_CONTEXT('CLIENTCONTEXT', 'OAUTH_CLIENT_NAME')
SYS_CONTEXT('CLIENTCONTEXT', 'OAUTH_DOMAIN_NAME')
SYS_CONTEXT('CLIENTCONTEXT', 'IAM_DOMAIN_APP_ROLES')
The Expense Claims Scenario:
Let’s walk through identity propagation using a simple expense-claims scenario and test it using the Cline plugin in VS Code. Assume there are three IAM users with the following business personas:
Alice -> employee, sees only her own claims
Bob -> manager, sees claims waiting for his approval
FinOps -> finance user, sees all claims and sensitive payment details
Through the MCP agent and Database Tools MCP Server, they all ask the same question:
Show the expense claims I can access.
The agent should not decide the row and column security by itself. Oracle Database should make that decision using the identity that came through the MCP path.
Step 0: Create or Choose an Autonomous Database:
In this blog post, we use an Autonomous Database Serverless instance.
Provision an Autonomous Database if you do not already have one.
From the Autonomous Database details page, click Database connection and download the instance wallet. You will use this wallet when creating the Database Tools connection.
Before testing token-based database access, enable IAM authentication for the database. Connect as ADMIN or a database user with the required privilege and run:
BEGIN
   DBMS_CLOUD_ADMIN.ENABLE_EXTERNAL_AUTHENTICATION(
      type => 'OCI_IAM' );
END;
/
You can verify the setting with:
SELECT name, value
FROM v$parameter
WHERE name = 'identity_provider_type';Step 1: Create the IAM Group and Example Users
Create an IAM group named: ExpenseMcpUsers
Create the below sample users and assign them to the group created above:
alice@oracle.com
bob@oracle.com
finops@oracle.com
Step 2: Create the Database Users
Use a privileged database account only for setup. Create a shared global database user mapped to the IAM group:
CREATE USER expense_mcp
IDENTIFIED GLOBALLY AS 'IAM_GROUP_NAME=<identity_domain_name>/ExpenseMcpUsers';

GRANT CREATE SESSION TO expense_mcp;
Create an application owner schema:
CREATE USER expense_app IDENTIFIED BY "<password>";

GRANT CREATE SESSION, CREATE TABLE, CREATE VIEW, CREATE PROCEDURE, CREATE SEQUENCE
TO expense_app;

ALTER USER expense_app QUOTA UNLIMITED ON DATA;
EXPENSE_APP is not required by MCP itself. Any schema with the required privileges could own the tables. This walkthrough uses a dedicated application owner schema so application data is not mixed with administrative accounts such as ADMIN.
For this walkthrough, allow EXPENSE_APP to create the VPD policy:
GRANT EXECUTE ON DBMS_RLS TO expense_app;Note: In production, many teams keep VPD policy administration with a privileged deployment or administration account instead of granting this package privilege directly to the application schema.
Optional: Enable Database Actions for EXPENSE_APP if you want to run the setup SQL from a browser instead of installing a local SQL client such as SQL*Plus or SQL Developer. Run the following as ADMIN or another privileged database user:
BEGIN
  ORDS_ADMIN.ENABLE_SCHEMA(
    p_enabled             => TRUE,
    p_schema              => 'EXPENSE_APP',
    p_url_mapping_type    => 'BASE_PATH',
    p_url_mapping_pattern => 'expense_app',
    p_auto_rest_auth      => FALSE
  );
  COMMIT;
END;
/
After ORDS is enabled, open Database Actions for the schema using your Autonomous Database ORDS host:
https://<adb-host>/ords/expense_app/sign-in/?r=_sdw%2FEXPENSE_APP owns the tables, views, and policies. EXPENSE_MCP is the shared database user used by the MCP path.
Step 3: Create the Expense Claims Objects
As EXPENSE_APP, create a simple claims table:
CREATE TABLE expense_claims (
  claim_id      NUMBER GENERATED BY DEFAULT AS IDENTITY PRIMARY KEY,
  claimant_iam  VARCHAR2(320) NOT NULL,
  approver_iam  VARCHAR2(320),
  dept          VARCHAR2(64),
  amount        NUMBER(12,2),
  merchant      VARCHAR2(128),
  purpose       VARCHAR2(256),
  status        VARCHAR2(32),
  bank_account  VARCHAR2(64)
);
Create a small role mapping table:
CREATE TABLE iam_user_access (
  iam_identity  VARCHAR2(320) PRIMARY KEY,
  display_name  VARCHAR2(128),
  app_role      VARCHAR2(32)
);

INSERT INTO iam_user_access VALUES ('alice@oracle.com', 'Alice Employee', 'EMPLOYEE');
INSERT INTO iam_user_access VALUES ('bob@oracle.com', 'Bob Manager', 'MANAGER');
INSERT INTO iam_user_access VALUES ('finops@oracle.com', 'FinOps', 'FINANCE');| IAM user | Persona | App role |
|---|---|---|
| alice@oracle.com | Employee | EMPLOYEE |
| bob@oracle.com | Manager | MANAGER |
| finops@oracle.com | Finance user | FINANCE |
Insert three claims:
INSERT INTO expense_claims
  (claimant_iam, approver_iam, dept, amount, merchant, purpose, status, bank_account)
VALUES
  ('alice@oracle.com', 'bob@oracle.com', 'Sales', 420, 'Marriott', 'Customer visit', 'PENDING', 'ACCT-ALICE-001');

INSERT INTO expense_claims
  (claimant_iam, approver_iam, dept, amount, merchant, purpose, status, bank_account)
VALUES
  ('someoneelse@oracle.com', 'bob@oracle.com', 'Sales', 220, 'Uber', 'Airport travel', 'PENDING', 'ACCT-OTHER-002');

INSERT INTO expense_claims
  (claimant_iam, approver_iam, dept, amount, merchant, purpose, status, bank_account)
VALUES
  ('otherdept@oracle.com', 'othermanager@oracle.com', 'HR', 900, 'Hilton', 'Conference', 'APPROVED', 'ACCT-HR-003');

COMMIT;| Claim | Claimant | Approver | Dept | Amount | Status | Bank account |
|---|---|---|---|---|---|---|
| 1 | alice@oracle.com | bob@oracle.com | Sales | 420 | PENDING | ACCT-ALICE-001 |
| 2 | someoneelse@oracle.com | bob@oracle.com | Sales | 220 | PENDING | ACCT-OTHER-002 |
| 3 | otherdept@oracle.com | othermanager@oracle.com | HR | 900 | APPROVED | ACCT-HR-003 |
Create a view that masks the bank account unless the propagated IAM user has the Finance role:
CREATE OR REPLACE VIEW expense_claims_v AS
SELECT
  claim_id,
  claimant_iam,
  approver_iam,
  dept,
  amount,
  merchant,
  purpose,
  status,
  CASE
    WHEN EXISTS (
      SELECT 1
      FROM iam_user_access
      WHERE LOWER(iam_identity) = LOWER(SYS_CONTEXT('CLIENTCONTEXT', 'OAUTH_SUB'))
        AND UPPER(app_role) = 'FINANCE'
    )
    THEN bank_account
    ELSE 'MASKED'
  END AS bank_account
FROM expense_claims;
Use VPD to filter rows based on the same propagated identity:
CREATE OR REPLACE FUNCTION expense_claims_rls (
  object_schema VARCHAR2,
  object_name   VARCHAR2
) RETURN VARCHAR2
AS
  l_user VARCHAR2(320);
  l_role VARCHAR2(32);
BEGIN
  l_user := LOWER(SYS_CONTEXT('CLIENTCONTEXT', 'OAUTH_SUB'));

  SELECT UPPER(app_role)
  INTO l_role
  FROM iam_user_access
  WHERE LOWER(iam_identity) = l_user;

  IF l_role = 'FINANCE' THEN
    RETURN '1=1';
  ELSIF l_role = 'MANAGER' THEN
    RETURN 'LOWER(approver_iam) = ''' || REPLACE(l_user, '''', '''''') || '''';
  ELSE
    RETURN 'LOWER(claimant_iam) = ''' || REPLACE(l_user, '''', '''''') || '''';
  END IF;
EXCEPTION
  WHEN NO_DATA_FOUND THEN
    RETURN '1=0';
END;
/

BEGIN
  DBMS_RLS.ADD_POLICY(
    object_schema   => 'EXPENSE_APP',
    object_name     => 'EXPENSE_CLAIMS',
    policy_name     => 'EXPENSE_CLAIMS_BY_IAM_USER',
    function_schema => 'EXPENSE_APP',
    policy_function => 'EXPENSE_CLAIMS_RLS',
    statement_types => 'SELECT'
  );
END;
/
Grant the MCP database user access only to the approved view:
GRANT SELECT ON expense_app.expense_claims_v TO expense_mcp;Step 4: Add IAM Policies for Identity Propagation
Create the following IAM policies for the propagation path:
allow group <identity_domain_name>/ExpenseMcpUsers to use database-tools-mcp-servers-invocation in compartment <compartment_name>

allow group <identity_domain_name>/ExpenseMcpUsers to use database-connections in compartment <compartment_name>

allow group <identity_domain_name>/ExpenseMcpUsers to use database-tools-connections in compartment <compartment_name>

allow group <identity_domain_name>/ExpenseMcpUsers to read secret-bundles in compartment <compartment_name>
For token-based database authentication, the MCP Server also needs permission to obtain database tokens on behalf of users:
allow any-user to use database-tools-db-connect-obo in tenancy where request.principal.id = '<mcp-server-ocid>'Because this policy uses the MCP Server OCID, you may add the group policies first, create the MCP Server, then return and add this database-tools-db-connect-obo policy after you have the server OCID.
Step 5: Create the Database Tools Connection
A Database Tools connection is an OCI resource that stores the database connection configuration. In this walkthrough, the MCP Server uses this connection to reach Autonomous Database.
Create a Database Tools connection for the target Autonomous Database.
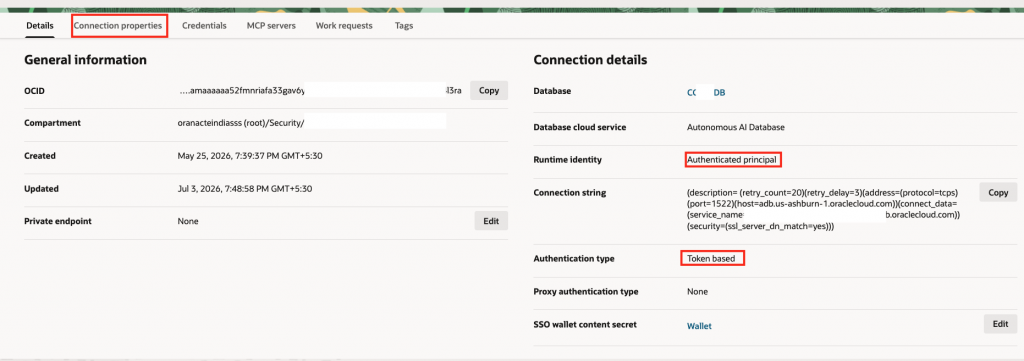
From the OCI Console:
- Open the navigation menu.
- Go to Developer Services.
- Select Database Tools.
- Open Connections.
- Click Create connection.
- Select the target Autonomous Database and enter the connection details.
- Do not enter a database username and do not create a password secret.
- Under SSL details, click Create wallet content secret. Give the wallet secret a name, select the Vault and encryption key, select Upload wallet, upload the wallet downloaded in Step 0, and create the secret.
- Expand Advanced options, enable Runtime support, and select Authenticated principal as the runtime identity.
- Expand Authentication and enable Use token-based authentication.
- Click Create to create the Database Tools connection.
In the connection properties, verify that the token scope is populated. If it is not populated automatically, set:
iam.db.token.scope = urn:oracle:db::id::<compartment_ocid>::<adb_ocid>This property controls which Oracle Database resources an IAM database token can be issued for.
After creating the connection, log in to the OCI Console as one of the sample users, such as alice@oracle.com, and validate it from the Database Tools connection page by clicking Actions and then Validate.
Step 6: Create the Database Tools MCP Server
Create a Database Tools MCP Server and associate it with the Database Tools connection.
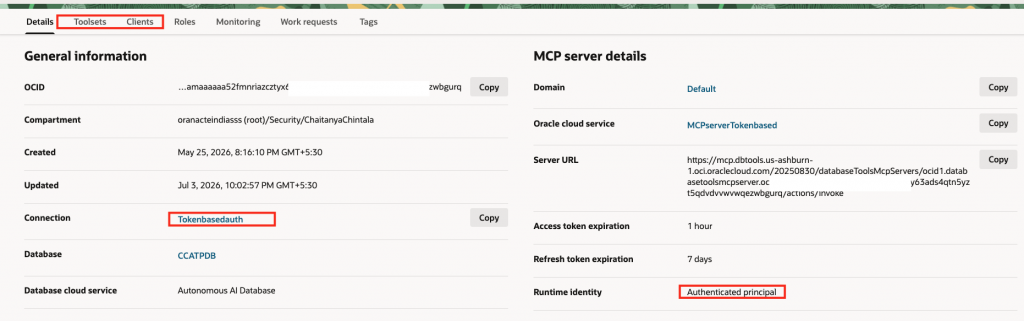
From the OCI Console:
- Open the navigation menu.
- Go to Developer Services.
- Select Database Tools.
- Open Model Context Protocol Servers.
- Click Create MCP Server.
- Select the compartment, select the IAM domain, and name the server.
- Select the Database Tools connection created in Step 5.
- Expand Advanced options, expand Settings, and ensure that Authenticated principal is selected as the runtime identity. When the selected Database Tools connection uses Authenticated principal, this value may already be selected and read-only.
- Create the MCP Server.
Create a tool or SQL report for the approved expense query:
- Open the MCP Server.
- Go to Toolsets.
- Click Create MCP Toolset.
- Choose Custom SQL tools.
- Create a synchronous tool.
- Enter a tool name, such as
expense_claims_i_can_access. - Enter a short tool description.
- For allowed roles, select
MCP_Userfor this toolset. - Paste the SQL source below.
SELECT
  claim_id,
  claimant_iam,
  approver_iam,
  dept,
  amount,
  merchant,
  purpose,
  status,
  bank_account
FROM expense_app.expense_claims_v
ORDER BY claim_id;
That keeps the proof simple: the same tool and same SQL produce different results only because the signed-in IAM user changed.
Step 7: Register the MCP Client
From the OCI Console:
- Open the Database Tools MCP Server created in Step 6.
- Go to the Clients tab.
- Click Register Model Context Protocol client.
- Enter a client name.
- Select the client type.
- Add the redirect URI.
- Click Register to register the client.
- Click the registered MCP client to view the registration details and note down the server URL, client ID, and scopes.
For Cline running locally on a desktop, use:
Client type: Public
Grant types: Authorization code and Refresh Token
Redirect URI: http://localhost:8080/oauth/callback
For a server-side application that can securely store credentials, use the client type that matches that deployment model.
Note: Before using the client from Cline, make sure the registered MCP client application is allowed by the sign-on policy. Also enable Bypass consent for the application by opening it from the identity domain’s Integrated applications page.
Assign the IAM group to the MCP application role:
- In the OCI Console, go to the identity domain where the MCP Server application was created.
- Click Oracle Cloud Services.
- Open the application that was automatically created for the Database Tools MCP Server.
- Go to Application roles.
- For
MCP_User, click the three-dot actions menu. - Click Manage groups.
- Assign the
ExpenseMcpUsersgroup.
At this point, make sure the Step 4 database-tools-db-connect-obo policy is also created with this MCP Server OCID. That policy allows the MCP Server to obtain database tokens on behalf of the signed-in users.
Step 8: Configure Cline with mcp-remote
Configure Cline in VS Code:
- Install the Cline extension in VS Code.
- Open Cline.
- Click the MCP server icon at the top.
- Open Remote Servers.
- Add a server name and the Database Tools MCP Server URL.
- Select Streamable HTTP as the transport type.
- Add the server.
- Click Edit Config.
- Modify the generated configuration as shown below and replace
<mcp_server_url>,<allowed_oauth_scope>, and<oauth_client_id>with the values noted in Step 7.
Example Cline MCP configuration:
{
  "mcpServers": {
    "oracle-expense-scenario": {
      "autoApprove": [],
      "disabled": false,
      "timeout": 60,
      "type": "stdio",
      "command": "npx",
      "args": [
        "-y",
        "mcp-remote",
        "<mcp_server_url>",
        "8080",
        "--transport",
        "http-only",
        "--static-oauth-client-metadata",
        "{ \"scope\": \"<allowed_oauth_scope>\" }",
        "--static-oauth-client-info",
        "{ \"client_id\": \"<oauth_client_id>\" }"
      ]
    }
  }
}
When Cline starts the MCP server, the browser opens for IAM login. Sign in as each example user and run the same prompt. Clear the local mcp-remote token cache before switching to the next user. mcp-remote stores tokens locally under ~/.mcp-auth/...; remove the token file for this MCP server before signing in as the next user.
Step 9: Validate Identity Propagation
After the MCP client is configured, sign in as each example user and ask the same question:
Show the expense claims I can access.
Expected results:
Alice

Bob

FinOps

That is the identity propagation proof:
Each run starts with a different signed-in IAM user in the MCP client. The MCP server and Database Tools connection preserve that user context. Oracle Database receives that context in CLIENTCONTEXT.
The same SQL returns the result authorized for that user.
Step 10: Inspect the Identity Signals
After the result check works, inspect the identity values behind the scenes.
For authorization logic in this walkthrough, CLIENTCONTEXT.OAUTH_SUB is the value the view and VPD policy use to identify the signed-in user. CLIENTCONTEXT.IAM_DOMAIN_APP_ROLES is also available if you want to drive application logic from IAM application roles.
Open SQL Worksheet through the IAM-authenticated Database Tools connection as one of the example users, such as Alice, and run:
SELECT
  SYS_CONTEXT('USERENV', 'SESSION_USER') AS session_user,
  SYS_CONTEXT('USERENV', 'AUTHENTICATED_IDENTITY') AS authenticated_identity,
  SYS_CONTEXT('CLIENTCONTEXT', 'OAUTH_SUB') AS oauth_sub
FROM dual;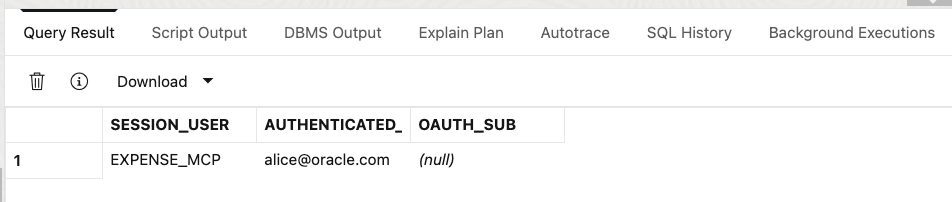
This confirms that the database session uses the shared global user while still knowing which IAM user authenticated to the database. OAUTH_SUB can be null in SQL Worksheet because the SQL is not being executed through a Database Tools MCP Custom SQL tool or SQL report.
To inspect the MCP-propagated identity, create a small Database Tools MCP SQL report or Custom SQL tool as shown in Step 6, for example who_am_i, and run it through the MCP client:
SELECT
  SYS_CONTEXT('USERENV', 'SESSION_USER') AS session_user,
  SYS_CONTEXT('USERENV', 'AUTHENTICATED_IDENTITY') AS authenticated_identity,
  SYS_CONTEXT('CLIENTCONTEXT', 'OAUTH_SUB') AS oauth_sub,
  SYS_CONTEXT('CLIENTCONTEXT', 'OAUTH_USER_OCID') AS oauth_user_ocid,
  SYS_CONTEXT('CLIENTCONTEXT', 'OAUTH_CLIENT_NAME') AS oauth_client_name,
  SYS_CONTEXT('CLIENTCONTEXT', 'OAUTH_DOMAIN_NAME') AS oauth_domain_name,
  SYS_CONTEXT('CLIENTCONTEXT', 'IAM_DOMAIN_APP_ROLES') AS app_roles
FROM dual;
Expected output:
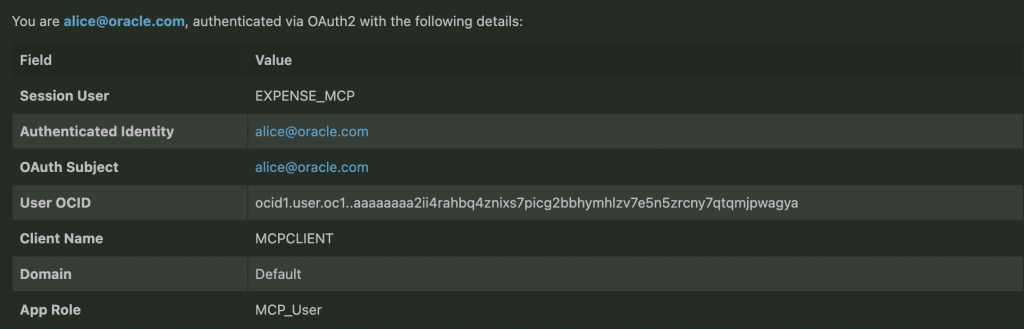
This confirms that the MCP execution path propagated the signed-in OAuth user into CLIENTCONTEXT.
Summary
Same prompt. Same MCP tool. Same SQL. Different signed-in IAM user. Different authorized database result.
MCP makes the tool call reusable, while identity propagation keeps Oracle Database in charge of authorization.