This blog is part one of a two-part series. In this blog, we’ll cover the basic OCI network constructs needed to join OCI instances to an on-prem Windows domain. Part two covers common architecture patterns and best practices to ensure Windows Domain availability, security, scalability, and performance.
Please be sure to also view the companion video that demonstrates an OCI network capable of connecting to an On-prem Windows Domain:
Prerequisites
A solid understanding of Microsoft Active Directory Domain Services is necessary. This service is not covered in depth here, details can be gathered from Microsoft’s official documentation guides along with the reference links provided at the bottom of this blog. Intermediate knowledge of OCI network constructs is also required, OCI documentation is located here.
Building our OCI Network Architecture
We’ll create a scenario that uses a VPN connection between on-prem and OCI with the Domain Controller located on-prem as shown in the diagram below. The goal will be to join a Windows VM hosted in OCI to the on-prem Active Directory Domain named tech.corp.
Note: We recommend deploying at least one secondary DC in OCI as well to improve performance and availability to your OCI instances. This is covered in part two of this series.

We’ll start by verifying that we’re receiving on-prem networks and advertising the VCN network in all our OCI route tables. The OCI Dynamic Routing Gateway (DRG) is used to provide connectivity between our OCI and on-prem networks. In our design, we’ll need to check the IPSec VPN Attachment DRG Route Table to confirm that our VCN networks are advertised across the VPN.
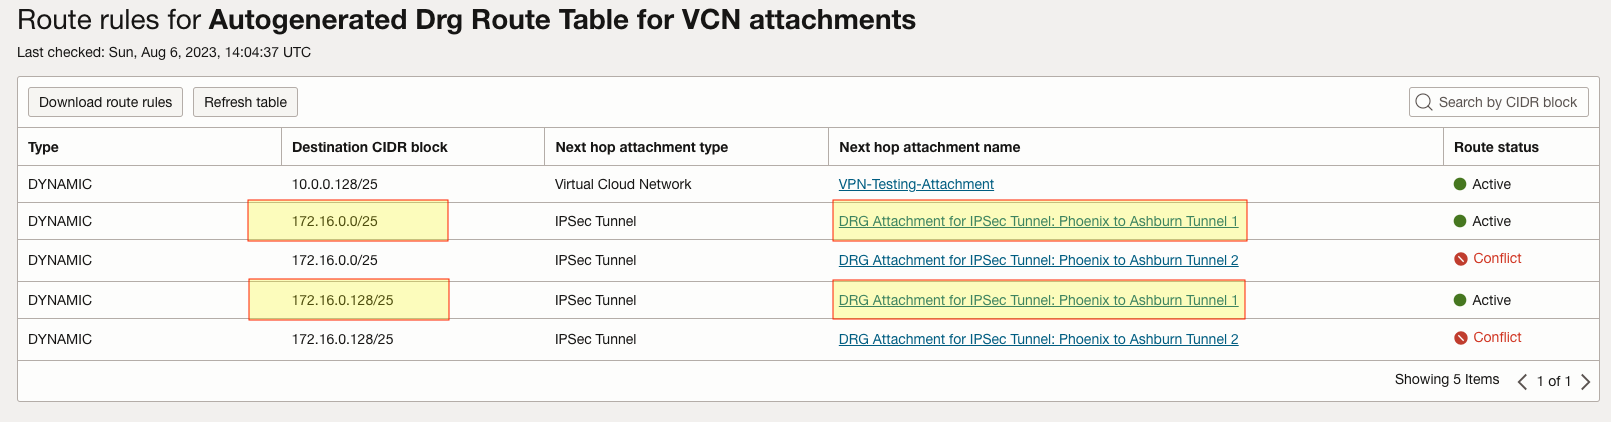
Here we can see both VCN subnets are listed in the VCN Attachments Route Table:
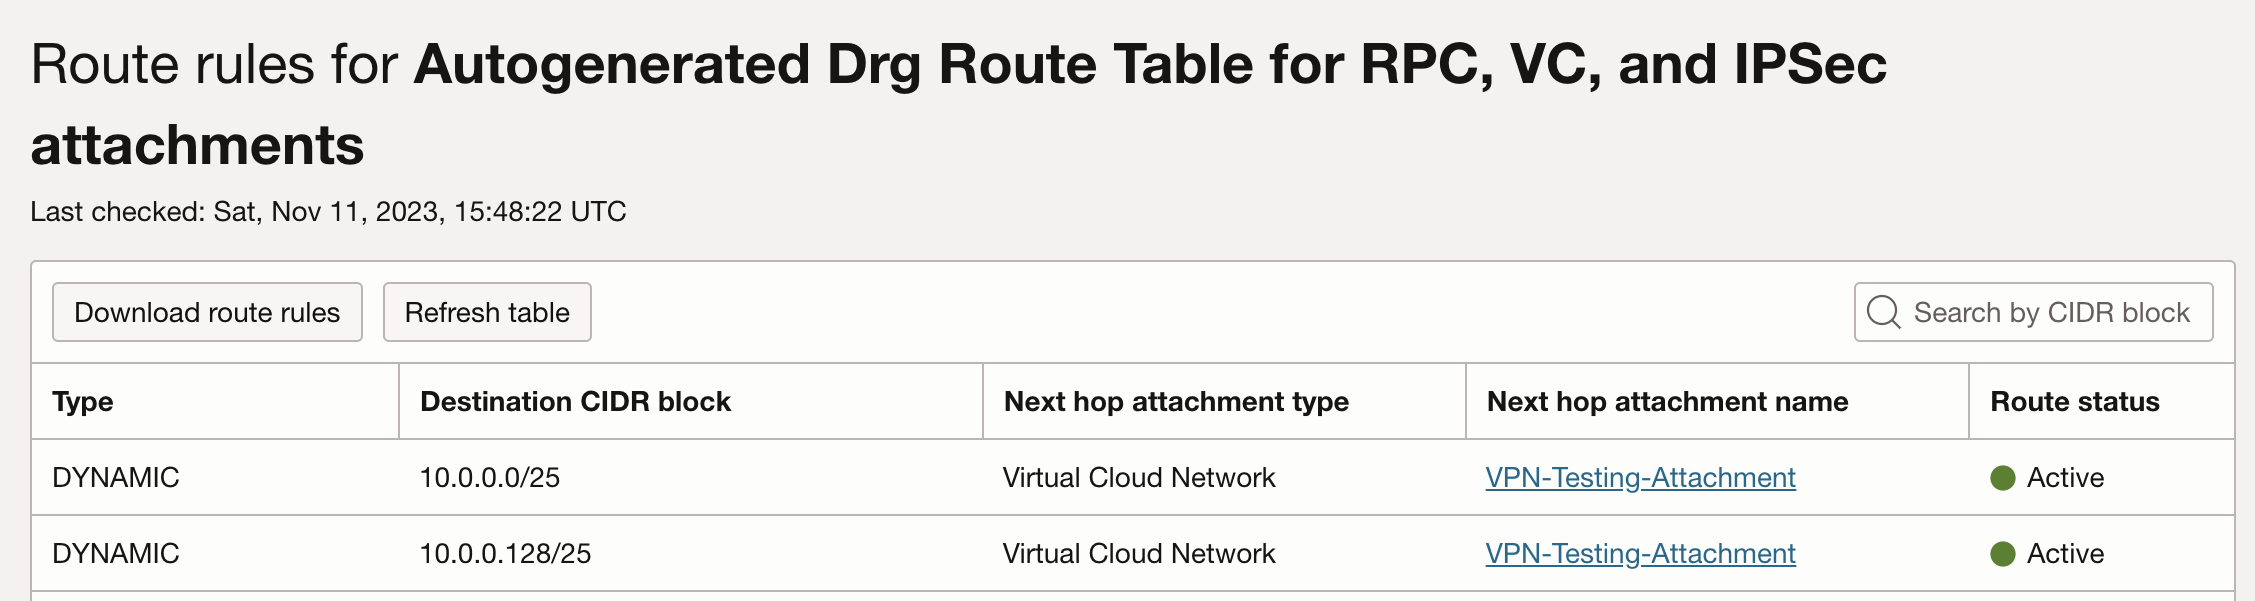
Now we need to confirm that our VCN Attachment is receiving the correct routes in its DRG Route Table. We can see that both on-prem subnets are advertised to us across both Tunnels. Note that only one Tunnel is Active in our configuration. Tunnel 2 is our backup connection to On-Prem:
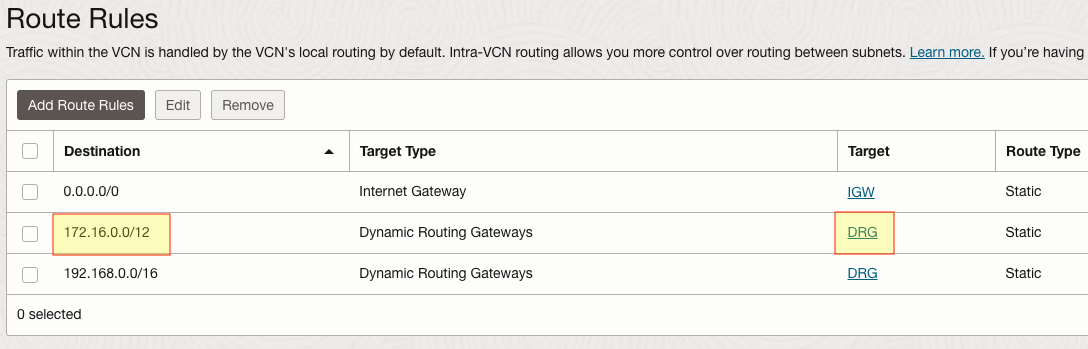
So far we’ve confirmed bi-directional connectivity between the VPN circuit and the VCN attachment. We need to also confirm that the VCN itself has a route to on-prem via our DRG. We can verify this by looking at the route table assigned to the VCN subnet hosting our Windows VMs:
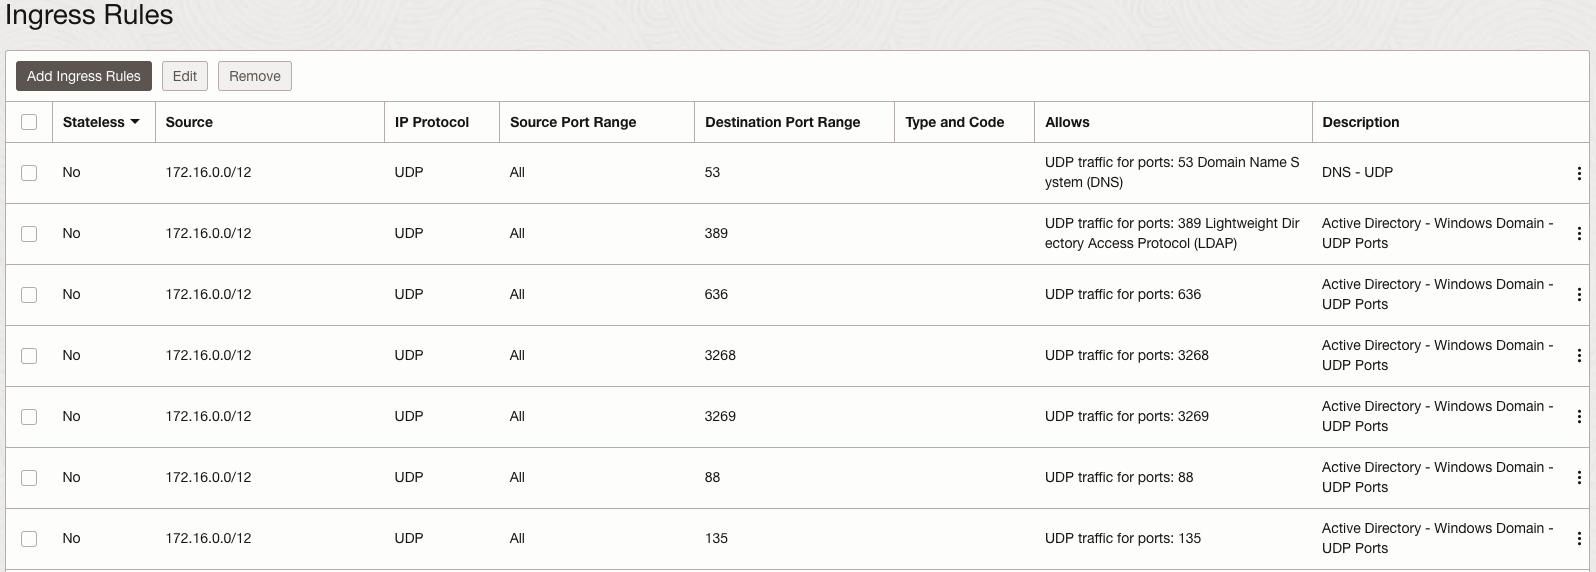
Our routing is in place but we need to ensure that the proper TCP/UDP ports are allowed to complete the domain join. To find the entire list of ports needed view Microsoft’s official documentation. Some ports in particular that stand out as essential are the LDAP (389) and DNS (53) UDP ports.
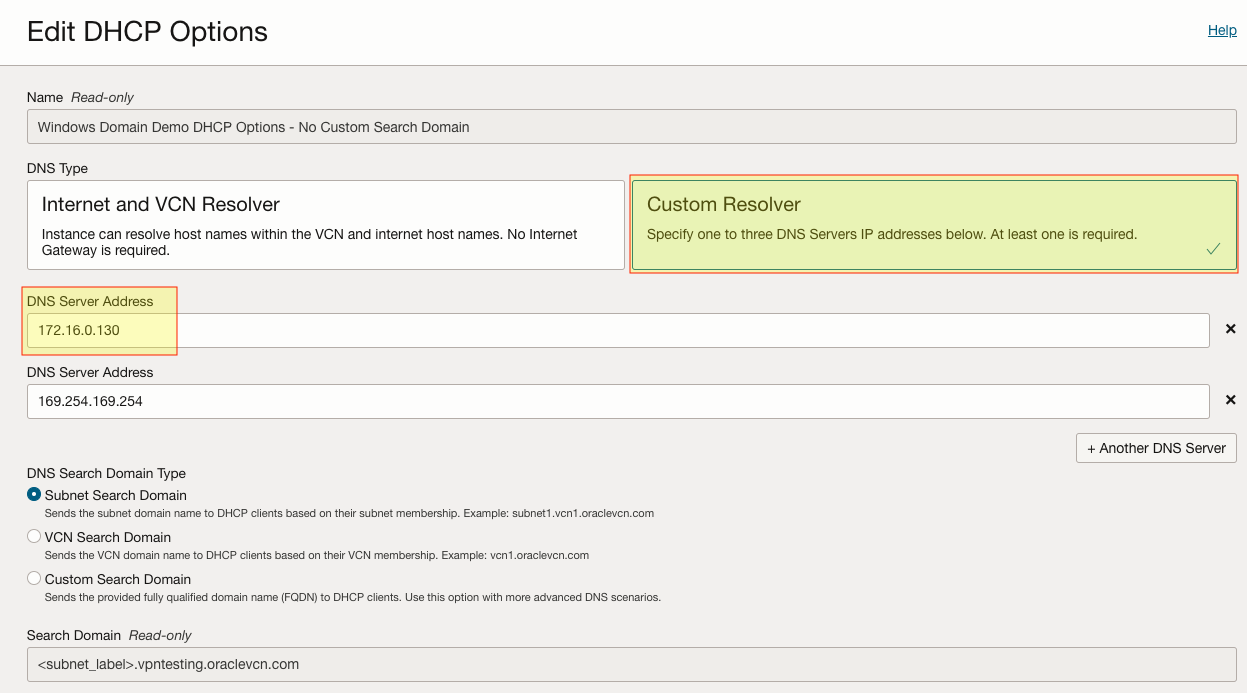
Last but not least, we’ll need a way for the OCI instances to resolve the tech.corp domain name. The two most common ways are to use the DHCP Options service or DNS Forwarder Endpoints. Both options are available within the VCN itself. I will not cover these services here but I’ve provided documentation on both in the bottom references section.
I created a custom DHCP Options set that uses both the On-Prem AD Domain Controller (172.16.0.130) and the local OCI DNS Resolver. When an instance boots up and grabs a DHCP IP, it will use both of these DNS servers for DNS resolution:
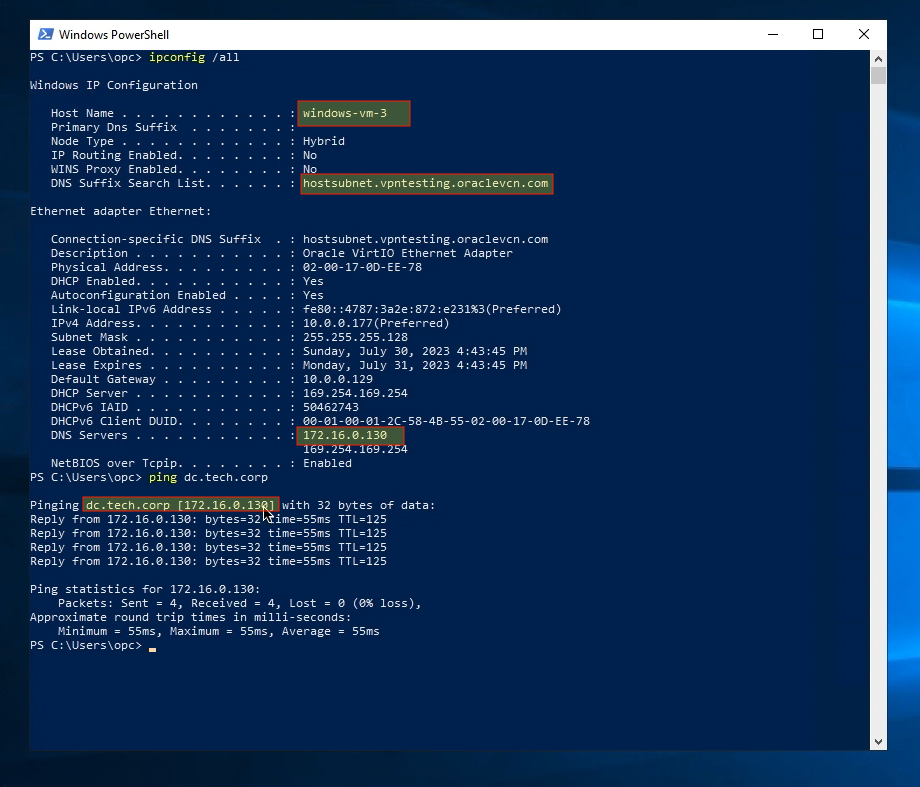
At this point, we’re ready to move on to the Windows instance itself and attempt to join it with the on-prem tech.corp domain. I’ve created a new instance named “windows-vm-3” in our VCN subnet (10.0.0.128/25) that exists alongside two other Windows instances already a part of the tech.com domain. With the hostnames “windows-vm-1” & “windows-vm-2“.
Once we RDP into this instance and run an “ipconfig /all” command we can see that the instance is still in a local workgroup but has the tech.corp AD Domain Controller is listed as its primary DNS server. Also note that we can ping the FQDN of the DC (dc.tech.corp) even though the instance hasn’t joined the domain yet:
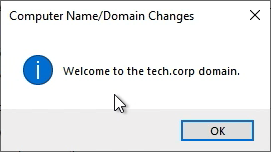
Now with our routing, security rules, and DNS config in place, let’s add the instance to the tech.corp domain. If successful we should receive the following prompt:
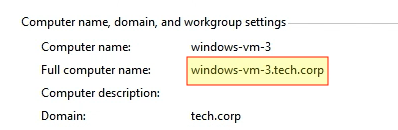
After rebooting the instance, let’s verify that the instance is indeed now a part of the tech.corp domain. Notice the workgroup settings now show the computers’ new FQDN domain name (windows-vm-3.tech.corp) and the domain (tech.corp) it’s joined to:
Let’s run the “ipconfig /all” command again, notice now that we see the new DNS suffix while our DNS servers remain unchanged:

We can also ping other computers in the domain by their hostname, including both instances and the DC:

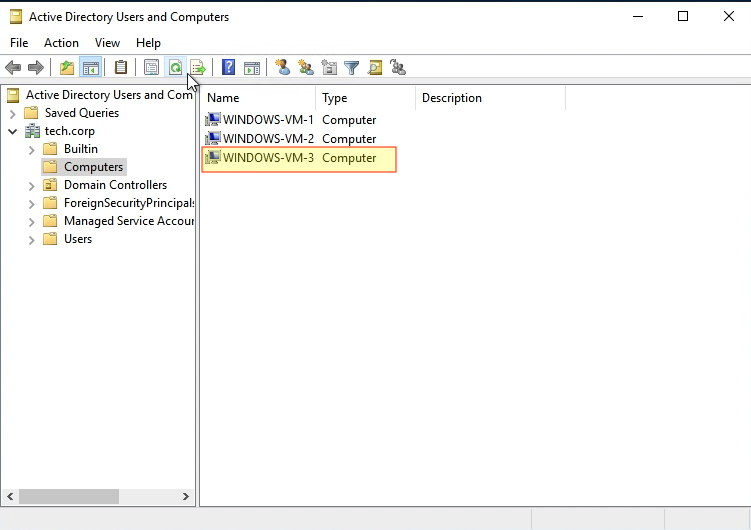
One final verification is to check from the Domain Controller. If we look at both the Active Directory Users & Computers and DNS management consoles we see the new instance and its correspoding DNS A record:

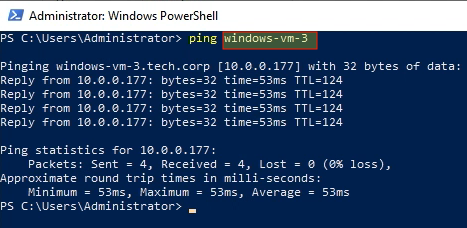
We can also ping the newly joined instance by it’s hostname from the Domain Controller as well:
Conclusion
In this how-to guide, we showed how to simply extend your Windows domain to your OCI environment. In the next blog, we provide you design guide and best practices for ensuring performance and resiliency with domain-joined OCI instances.
References