Introduction
This is the third post on Oracle Integration Cloud v3, in case you did not read the post, where we configured a custom endpoint, you can find it here. The second post, where we configured a sample application and oauth 2.0 using client credentials can be found here.
In this blog post we are using the official documentation for the configuration of disaster recovery for the OIC v3 as a starting point, and we will leverage the DNS traffic steering policies to configure an automatic failover of the DNS.
We are focusing only on the networking required to have this disaster recovery (the failover of the DNS). The provisioning of the Service and the replication of the metadata to the disaster recovery region is not in the scope of this blog.
If you are interested in the configuration of DR for OIC v2, please check this post.
Configure custom endpoint for the OCI instances and a sample application
We are following this blog post for the configuration of a custom endpoint (the same endpoint for both of the OIC instances) and this post for the configuration of the sample application.
For the purpose of this blog we are using oicv6.ateam-oracle.cloud as a custom endpoint FQDN on both of the instances.
Our instances are in two regions Phoenix (PHX) active region and Ashburn (IAD) the disaster recovery (DR) region. Throughout the post we will show configuration made on the active region (PHX). Please replicate the same configuration to the DR region (IAD).
Configure manual Disaster Recovery Solution using DNS
In the official documentation for configuring a DR solution for OIC v3, DNS is used to point the FQDN of the custom endpoint to the instance from the DR region.
Below you can find the Network Architecture for this scenario.
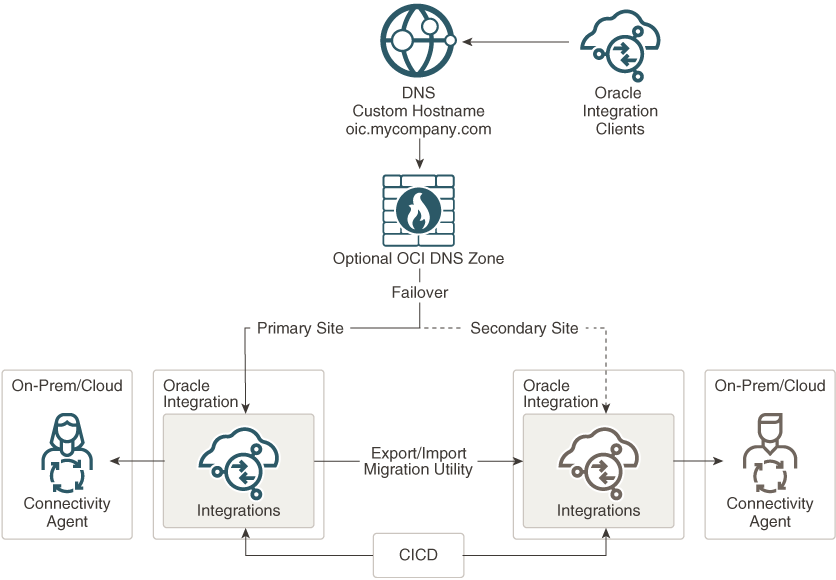
The switch over from primary to secondary is done by modifying the DNS record for the custom endpoint. The OIC instances are configured in each region and both of them run concurrently.
During normal operation, in the DNS zone there is an A-record configured for the custom endpoint FQDN that points to the IP address of the LB from the active region.
Remember that the DNS zones can be updated only in the region where they were created. For this reason, a third region should be used for DNS. In our example IAD and PHX are used for OIC and San Jose (SJC) is used to managed the DNS records for the ateam-oracle.cloud zone.
In case of a disaster (PHX region is down), an administrator will connect to OCI, switch to SJC region, navigate to the DNS zone that holds the custom endpoint FQDN, and edit the A-record of the OIC custom endpoint with the IP address of the LB from the disaster recovery region (from IAD).
Please also consider to plan for the metadata migration from active instance to the DR. A good place to start is the official documentation that can be found here.
Configure Disaster Recovery Solution using Traffic Management
In the previous section, the switch over is manual and is triggered by a change in the DNS record.
For an automated way of editing the DNS record using OCI core services, we will use OCI traffic management configured with a failover traffic management policy. The service will leverage a health check, and in case the primary instance is unreachable, it will modify the DNS to point to the LB from the disaster recovery region.
Before proceeding with the configuration, please read the documentation about the trafic management.
Configure the failover traffic management
Navigate to “Networking >> DNS management >> Traffic management steering policies” and create a new policy:
– Policy Type should be Failover;
– Create a name for the policy;
– Select a TTL for the policy;

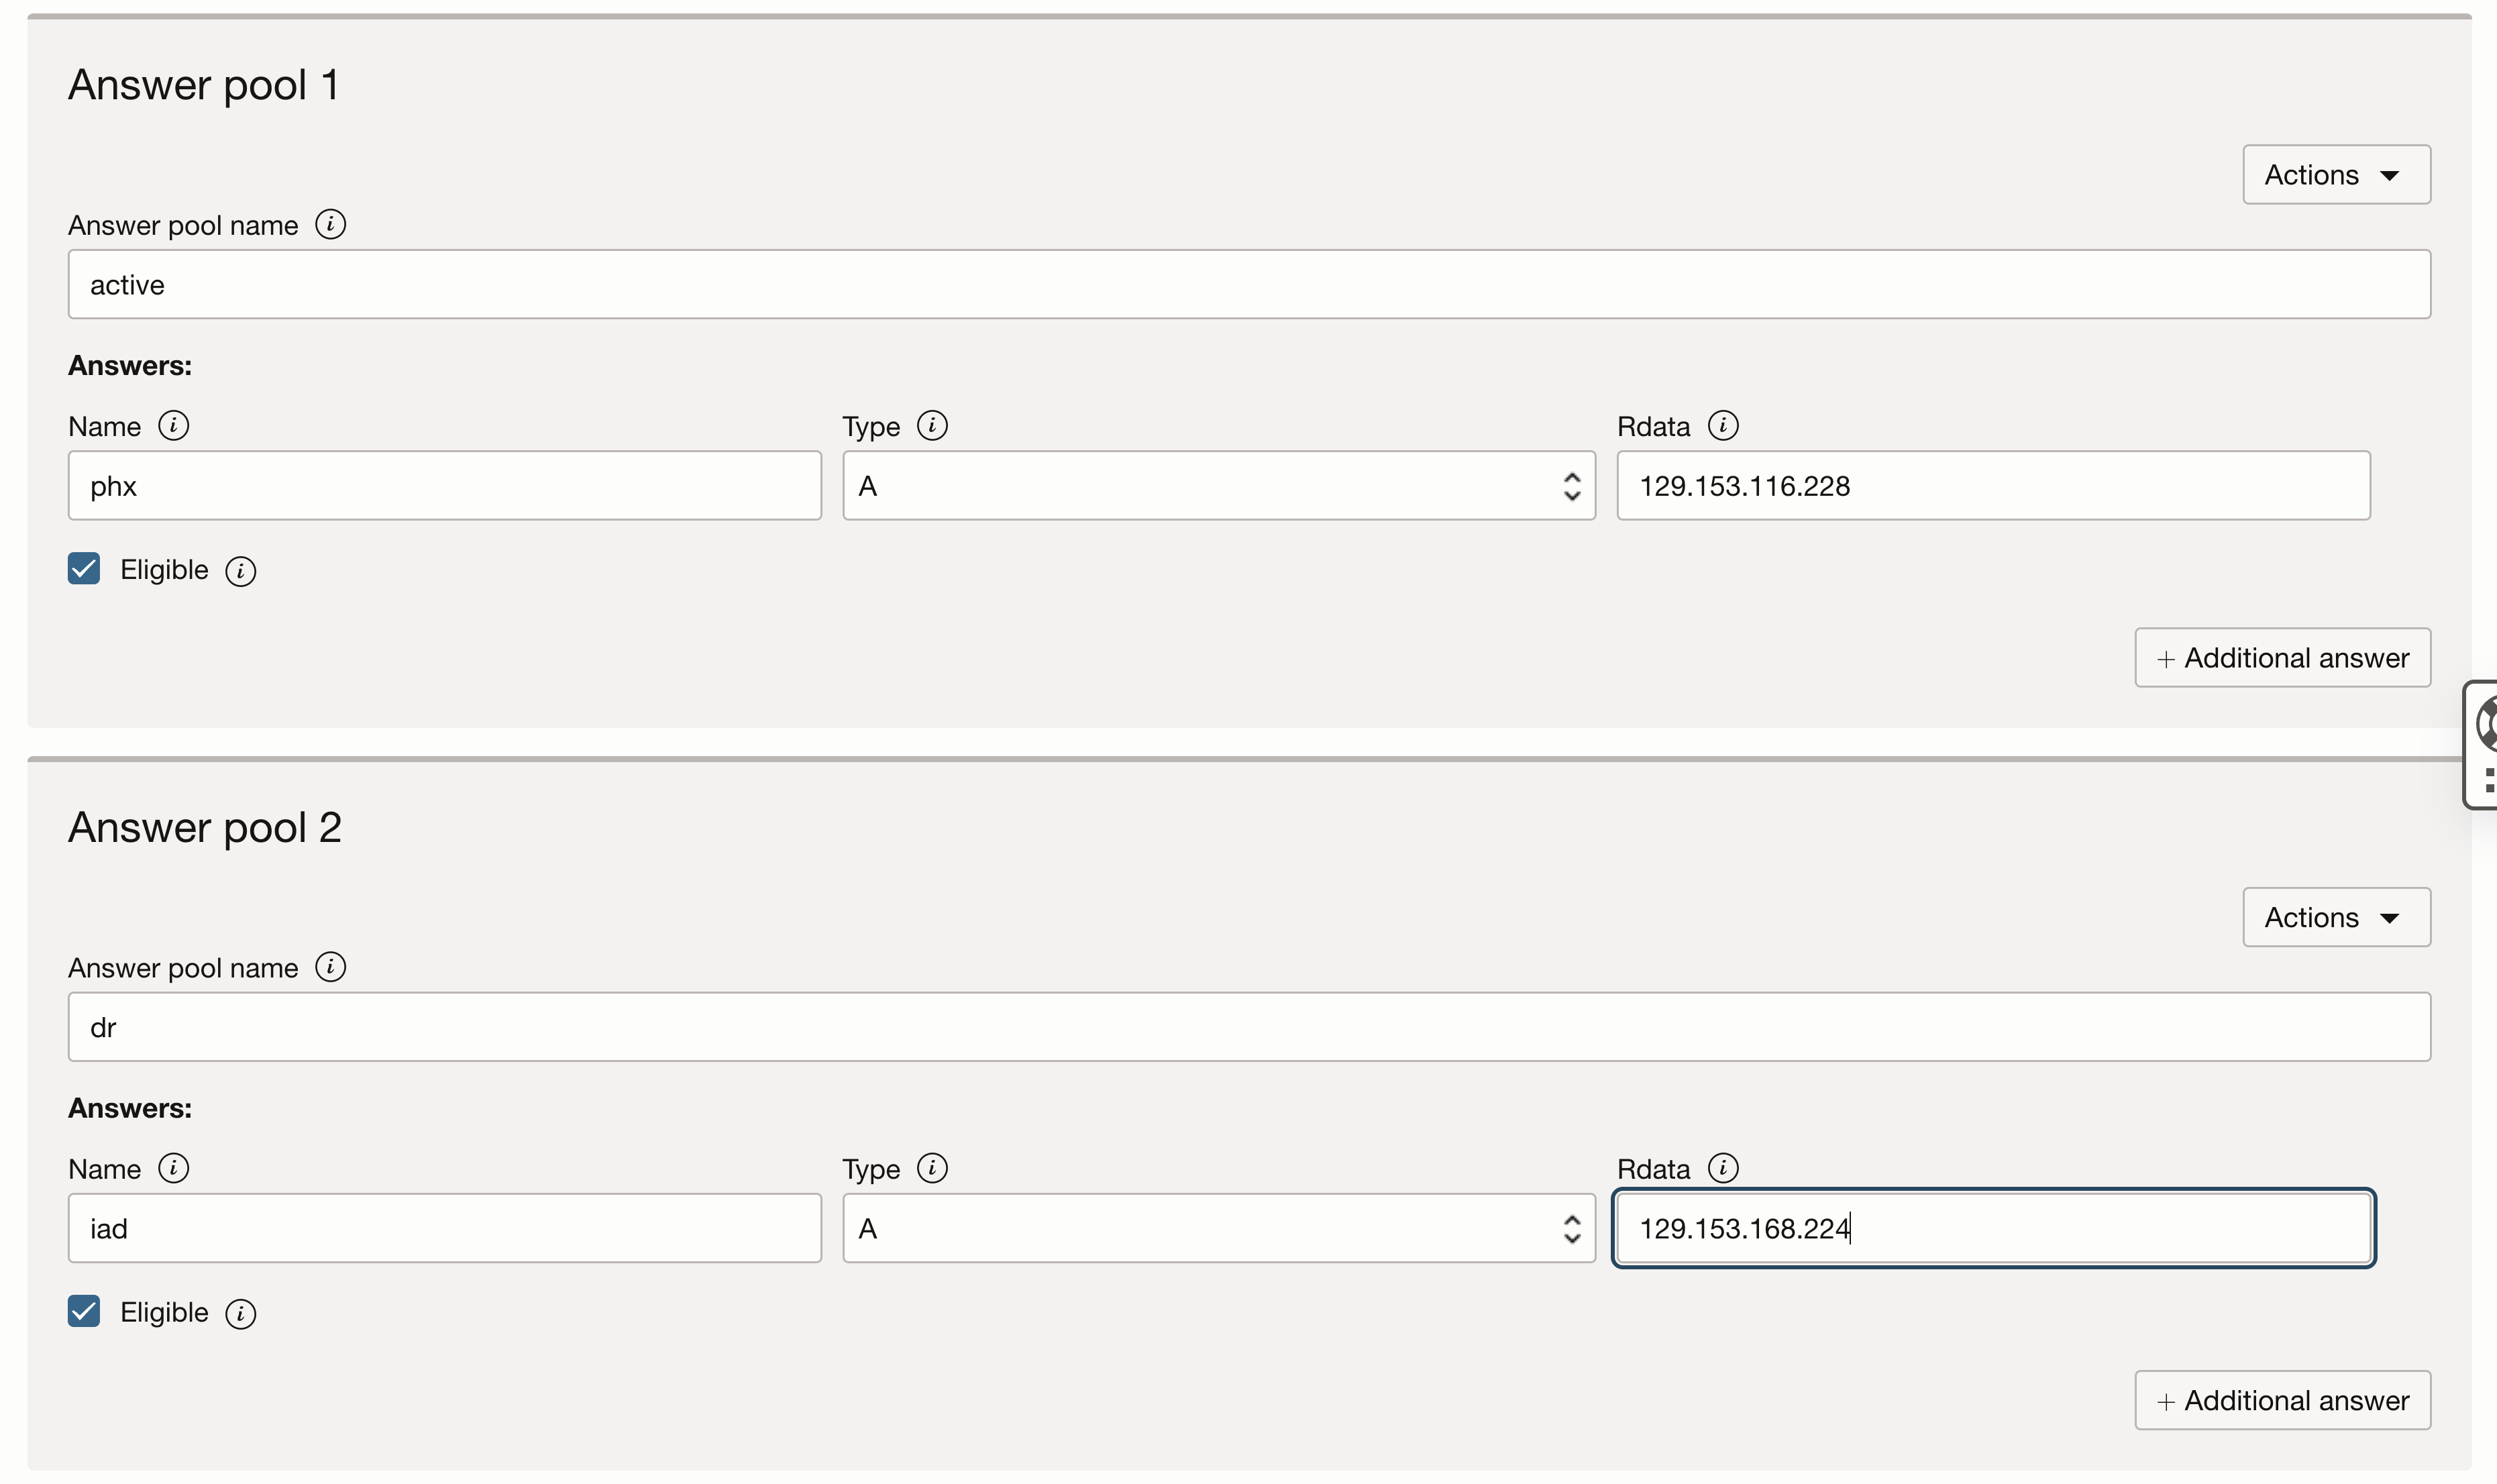
– Create the “Answer Pool 1” for the primary region. The type should be A-record, and the Rdata should be the IP address of the LB from the active region. Mark it as Eligible;
– Create the “Answer Pool 2” for the failover region. The type should be A-record, and the Rdata should be the IP address of the LB from the DR region. Mark it as Eligible;
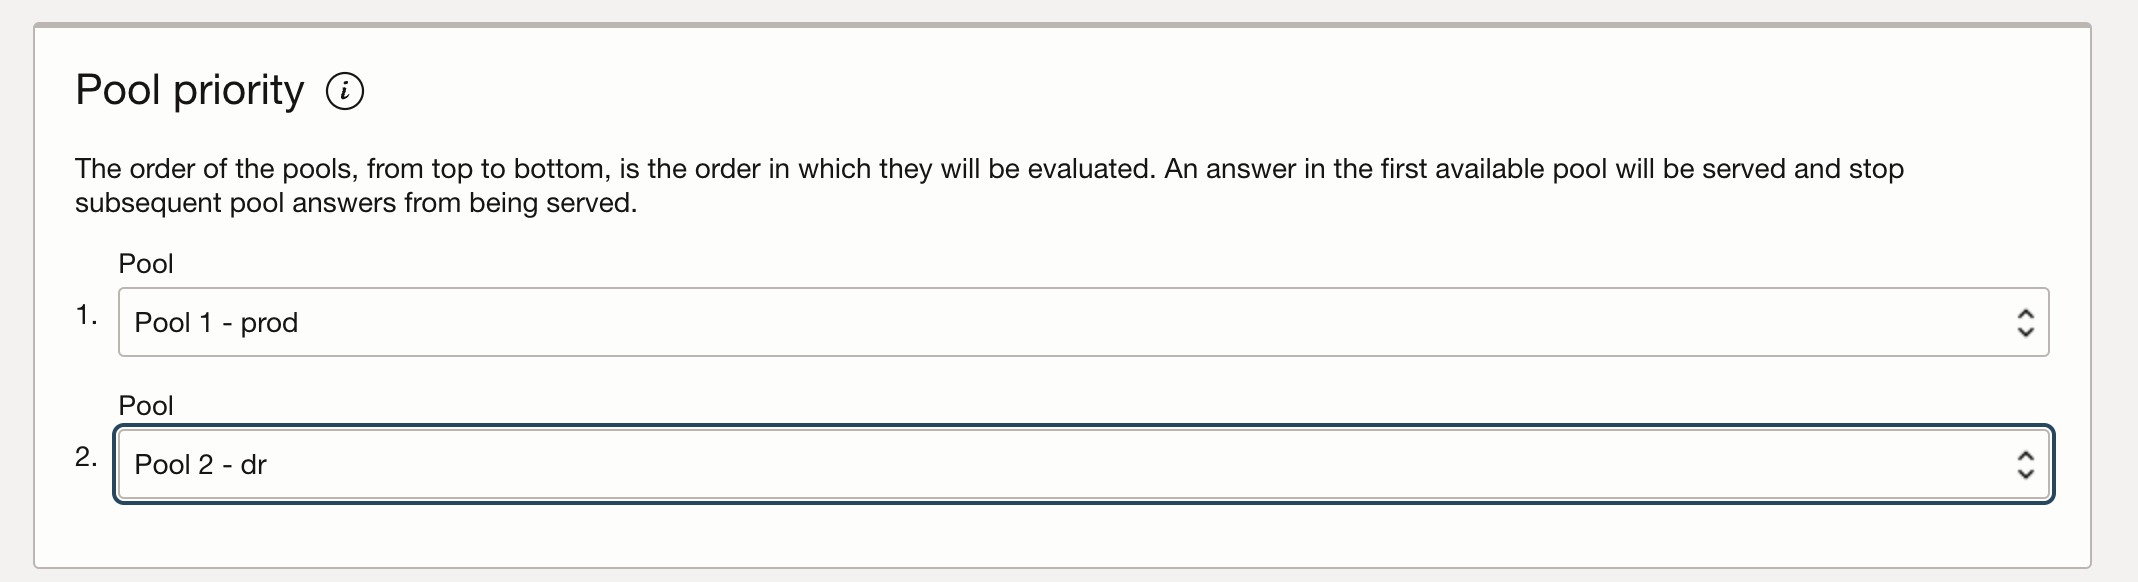
– Select the Pool Priority: 1 for the primary region and 2 for the failover region;
– Create a new health check:
– Put a name for the health check;
– Select an interval for it to run (for the purpose of this blog we selected 10 seconds);
– Select the HTTPS protocol and port 443;
– Put the path to the metadata of your integration. In this blog i am using a test template inegration called “echo”. Please read this blog which explains how to install it.
– Select GET as method;
– Select a timeout value (for the purpose of this blog we selected 10 seconds);
– Under “Headers” add the “Host” header with the value of the custom endpoint.

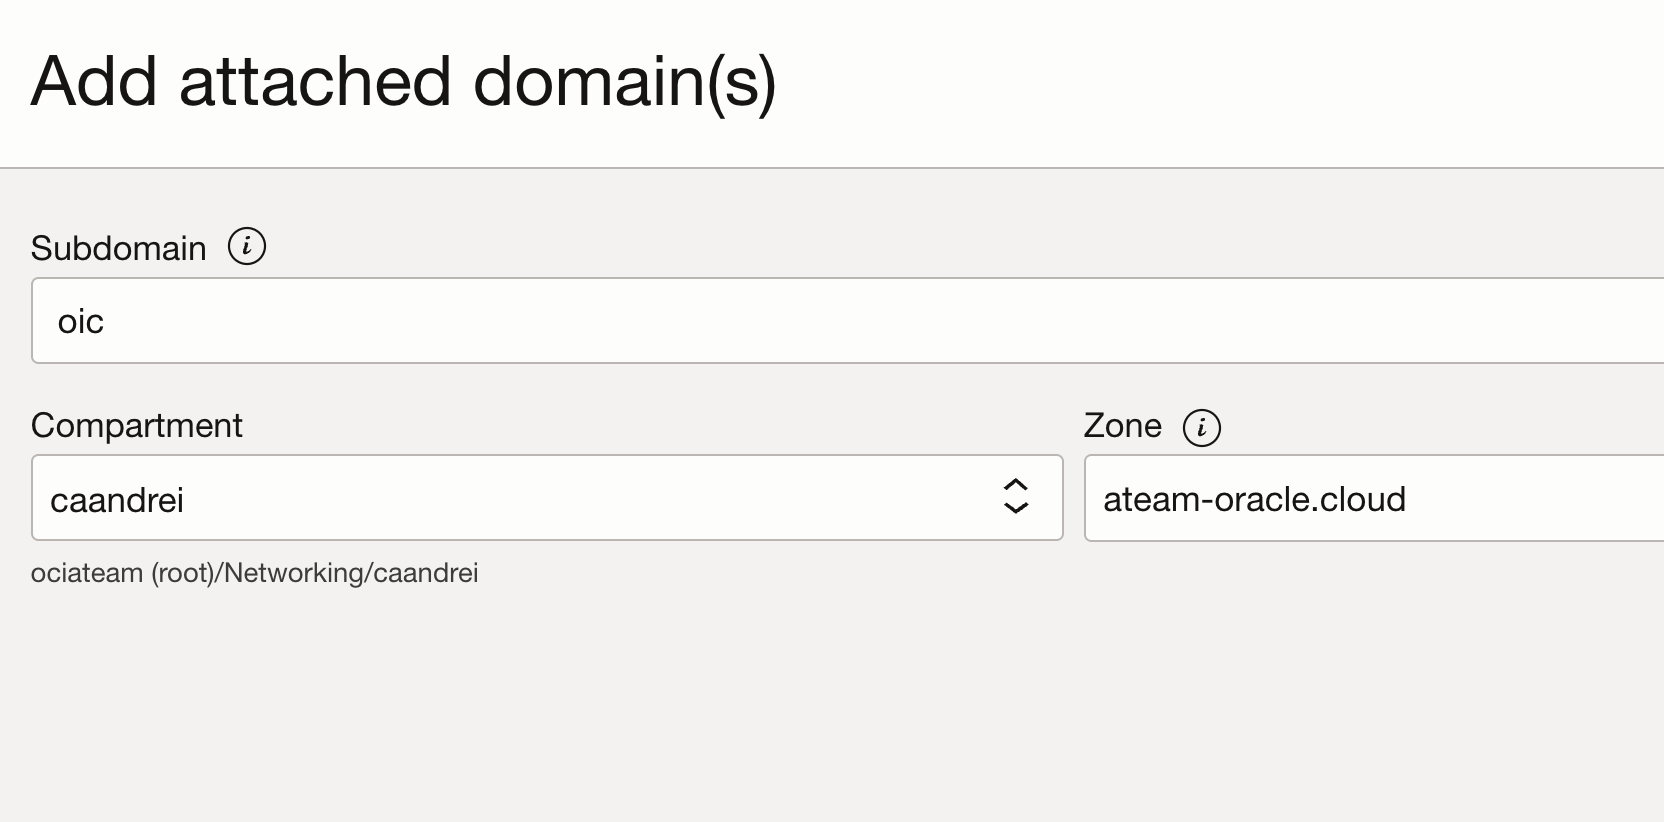
– Select the Attached Domain. In our case the domain is “oic”.
– Select the compartment where the DNS zone was created and the zone.
This failover method assumes that the DNS zone for the custom endpoint for the OIC is managed on OCI.
After the creation of the Traffic steering policy, the A record created for the custom endpoint should look like:

Whatever you had under the custom endpoint record will be superseded by the traffic steering policy. For example, for our oic.ateam-oracle.cloud we have an A record pointing to the ip address of the LB from the active region. When the traffic steering was created, this A record is superseded with the data from the traffic steering policy.
Configure the Authentication
Following the steps above would result in the configuration of two OIC instances one in the Active region and one in the DR, both of them configured with the same custom endpoint FQDN and a traffic management failover policy that will update the DNS record of the custom endpoint if the primary instance fails with the IP address of the LB from the DR region.
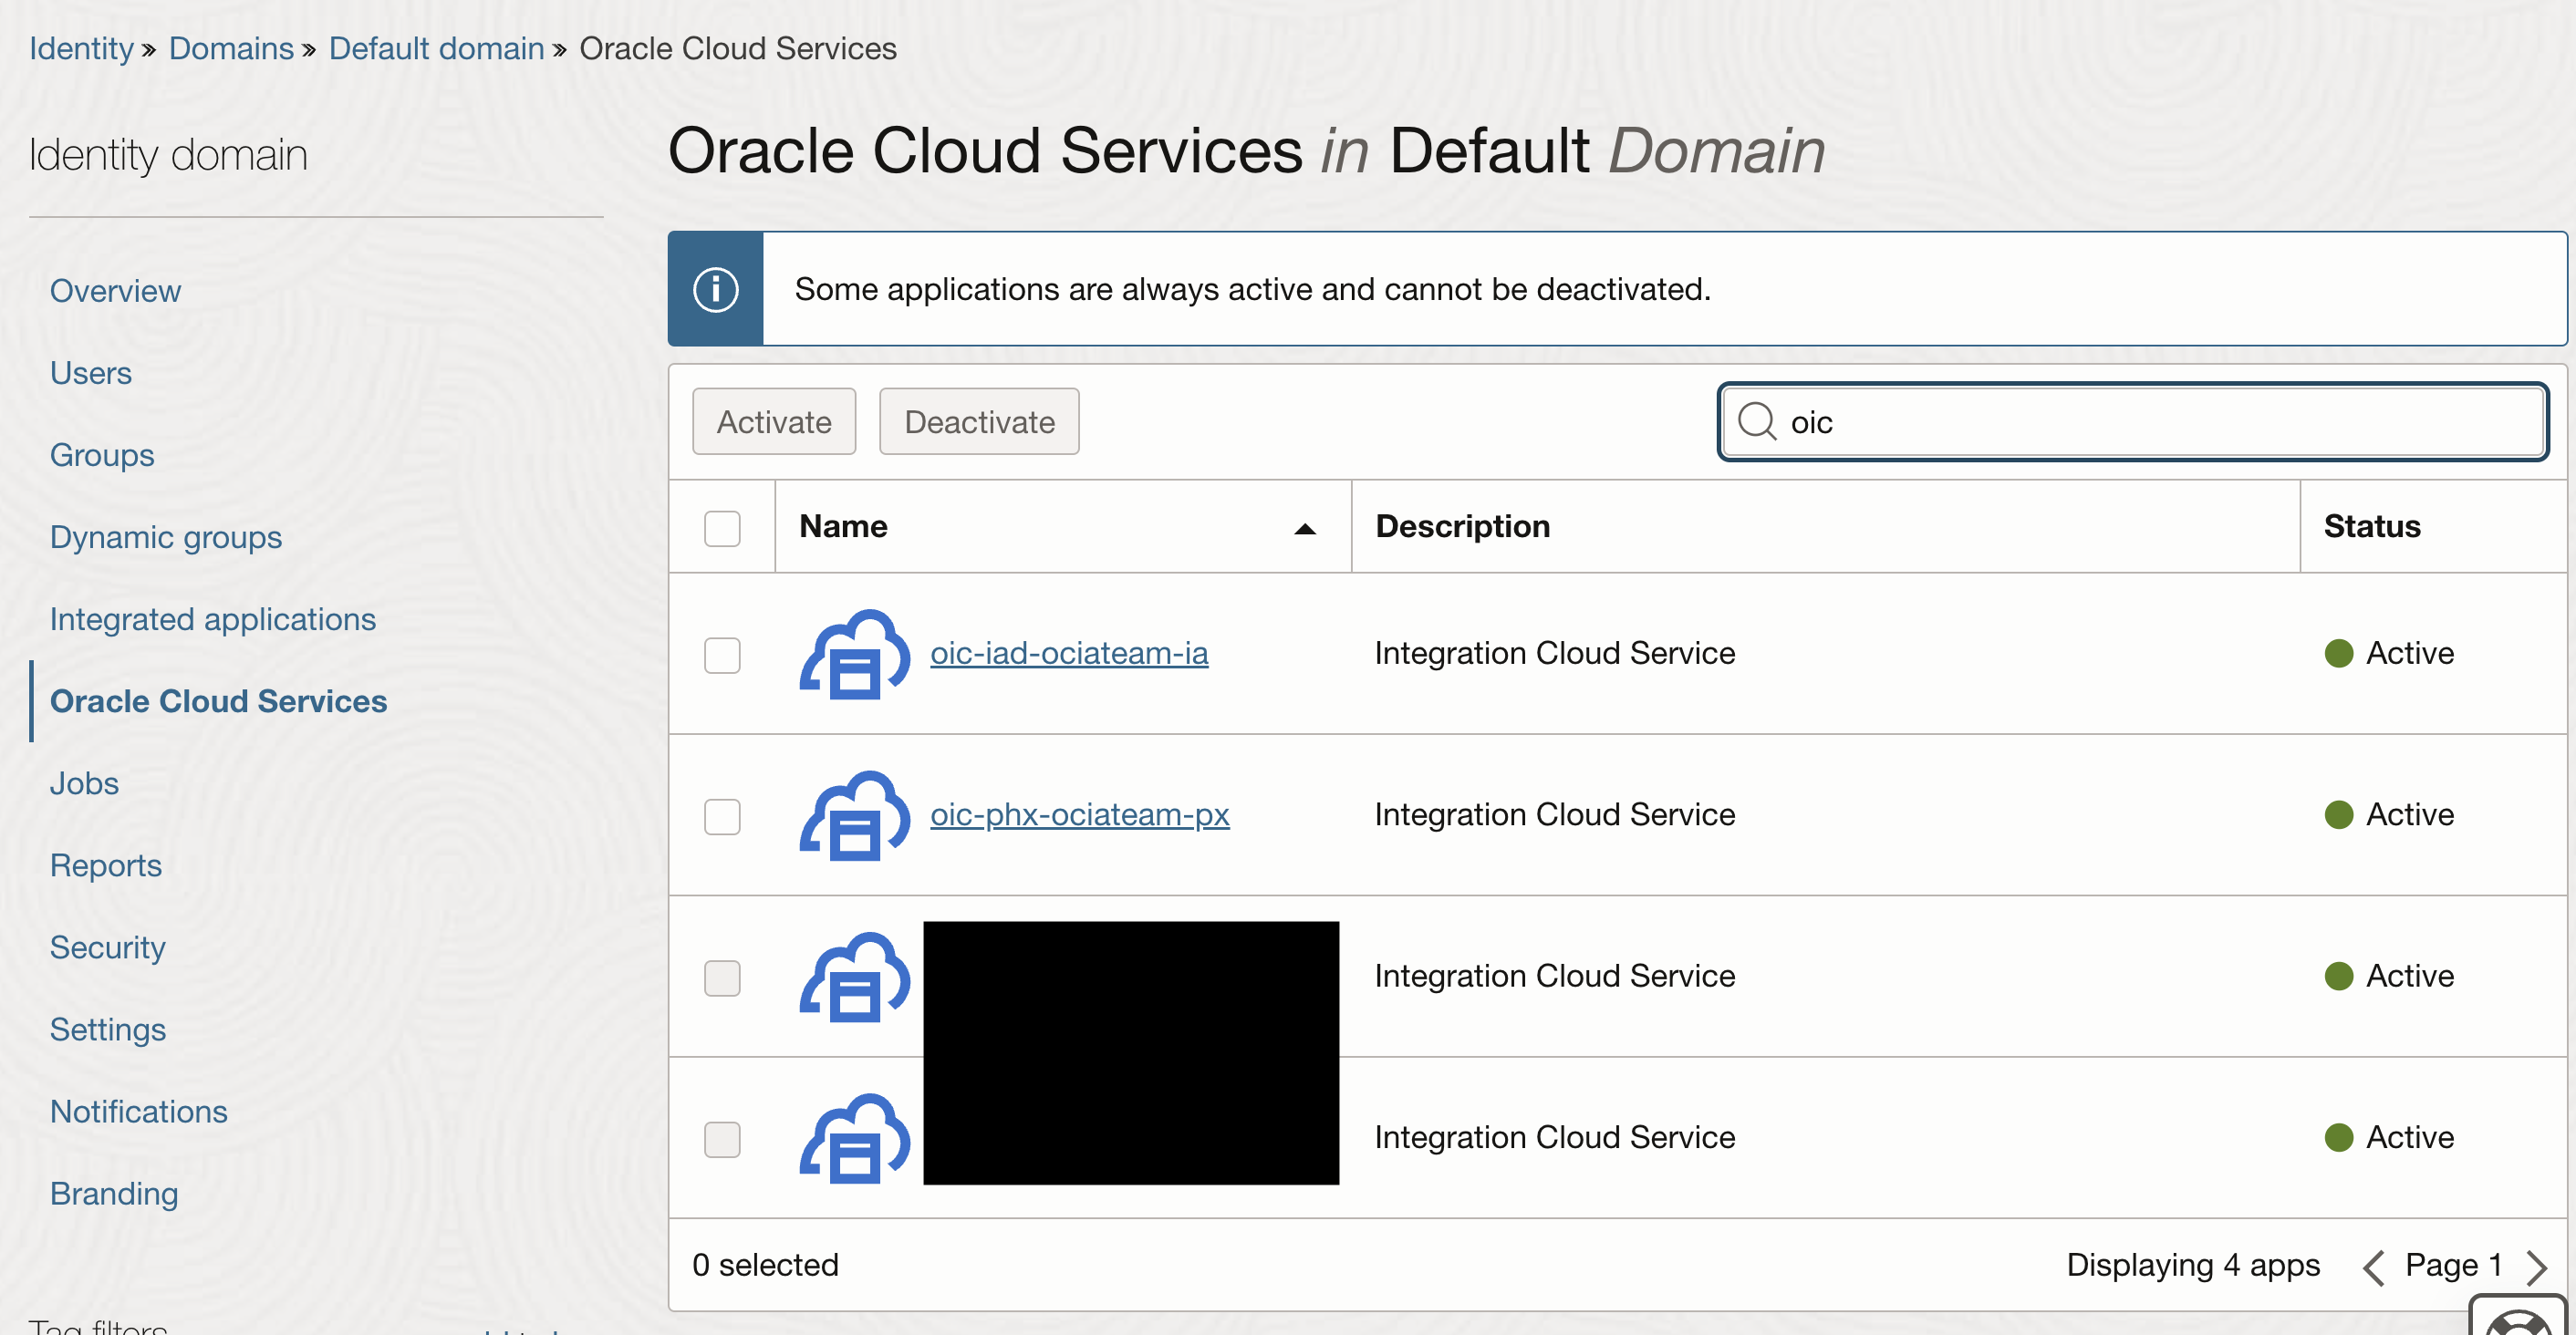
Navigating to “Identity and Security >> Identity >> Domains”, and choose your configured Identity domain (in my example it is the default domain), under Oracle Cloud Services, you will observe the identity applications configured when you provisioned the integration instances (one for the prod and one for the dr)
Following the entire “Configure the OAuth 2.0 client credential authentication” section from my previous blog , you will configure an “Integrated Application” used in the Oracle Cloud Services Identity application for the OIC instance from the prod region.
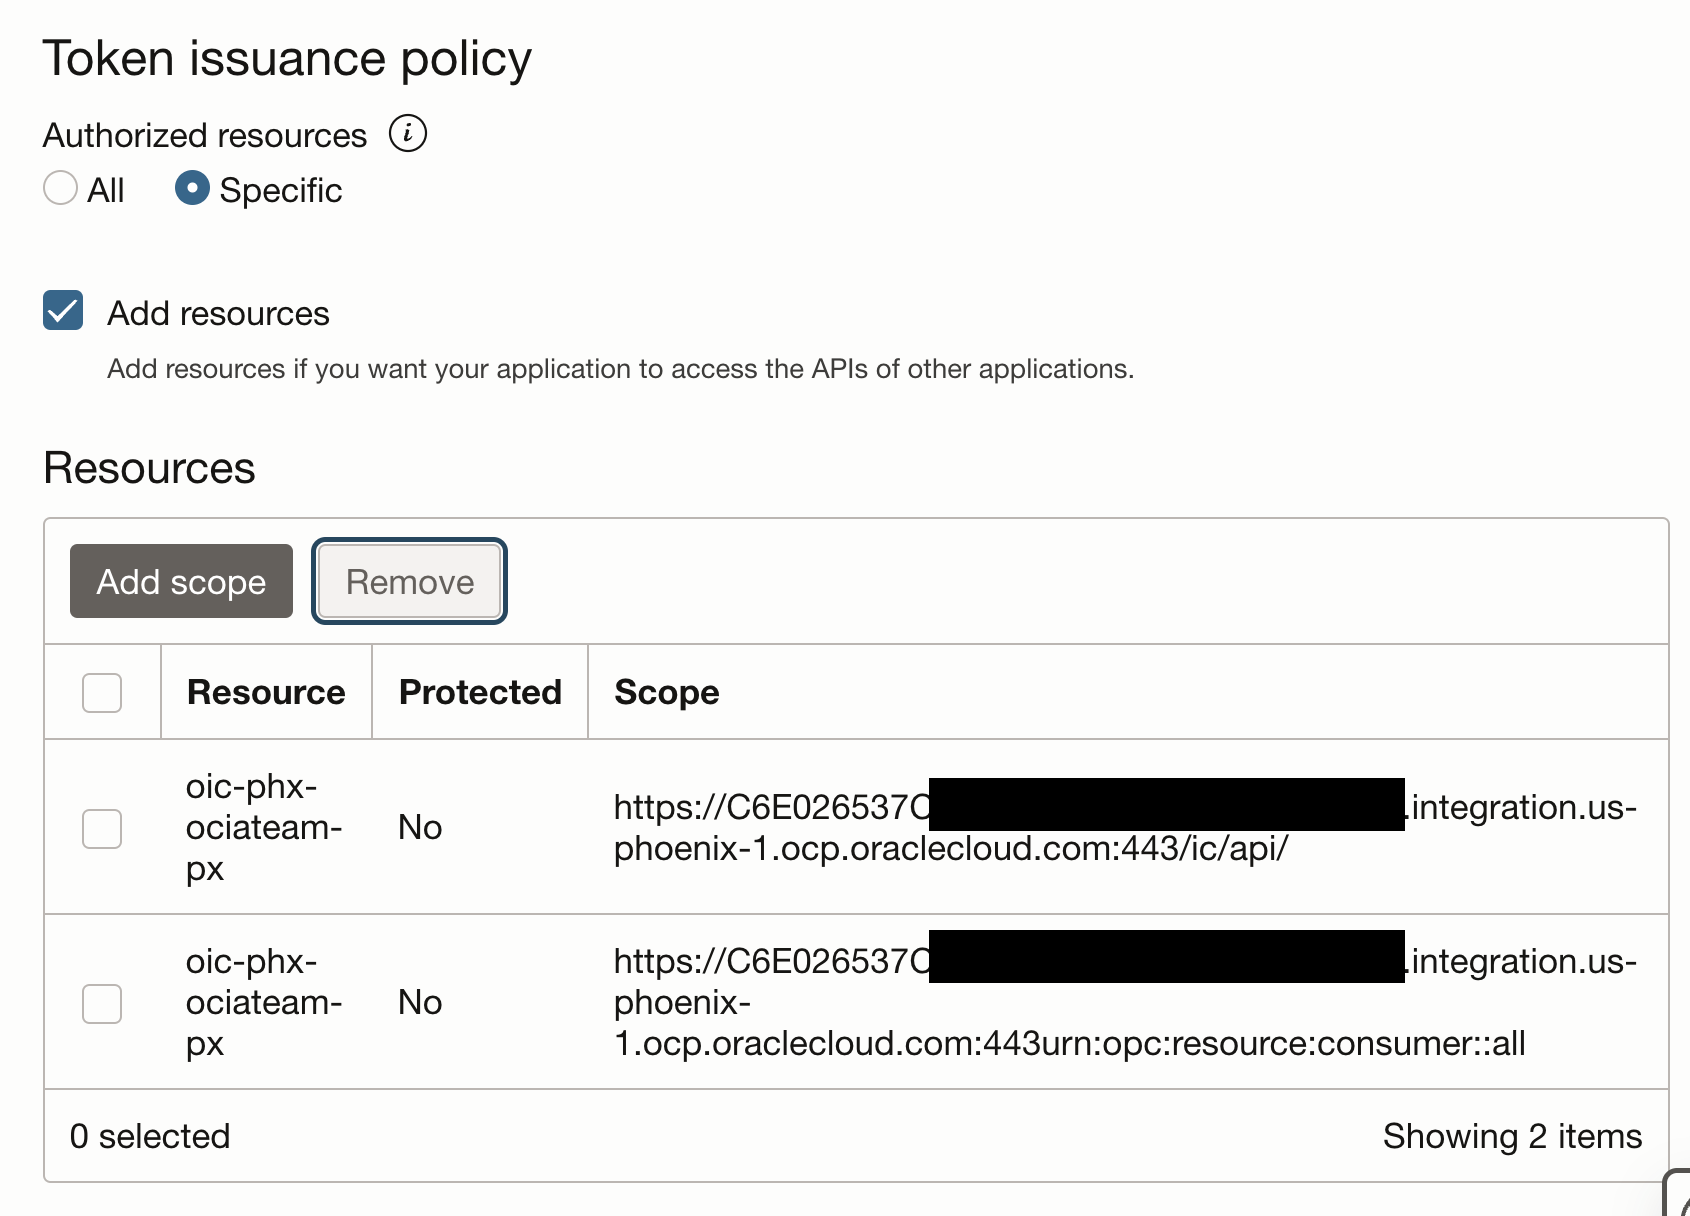
Under the Integrated Application, “edit the OAuth configuration”, find the “Token issuance policy” section and notice that under “Resources” the scope for the prod instance.
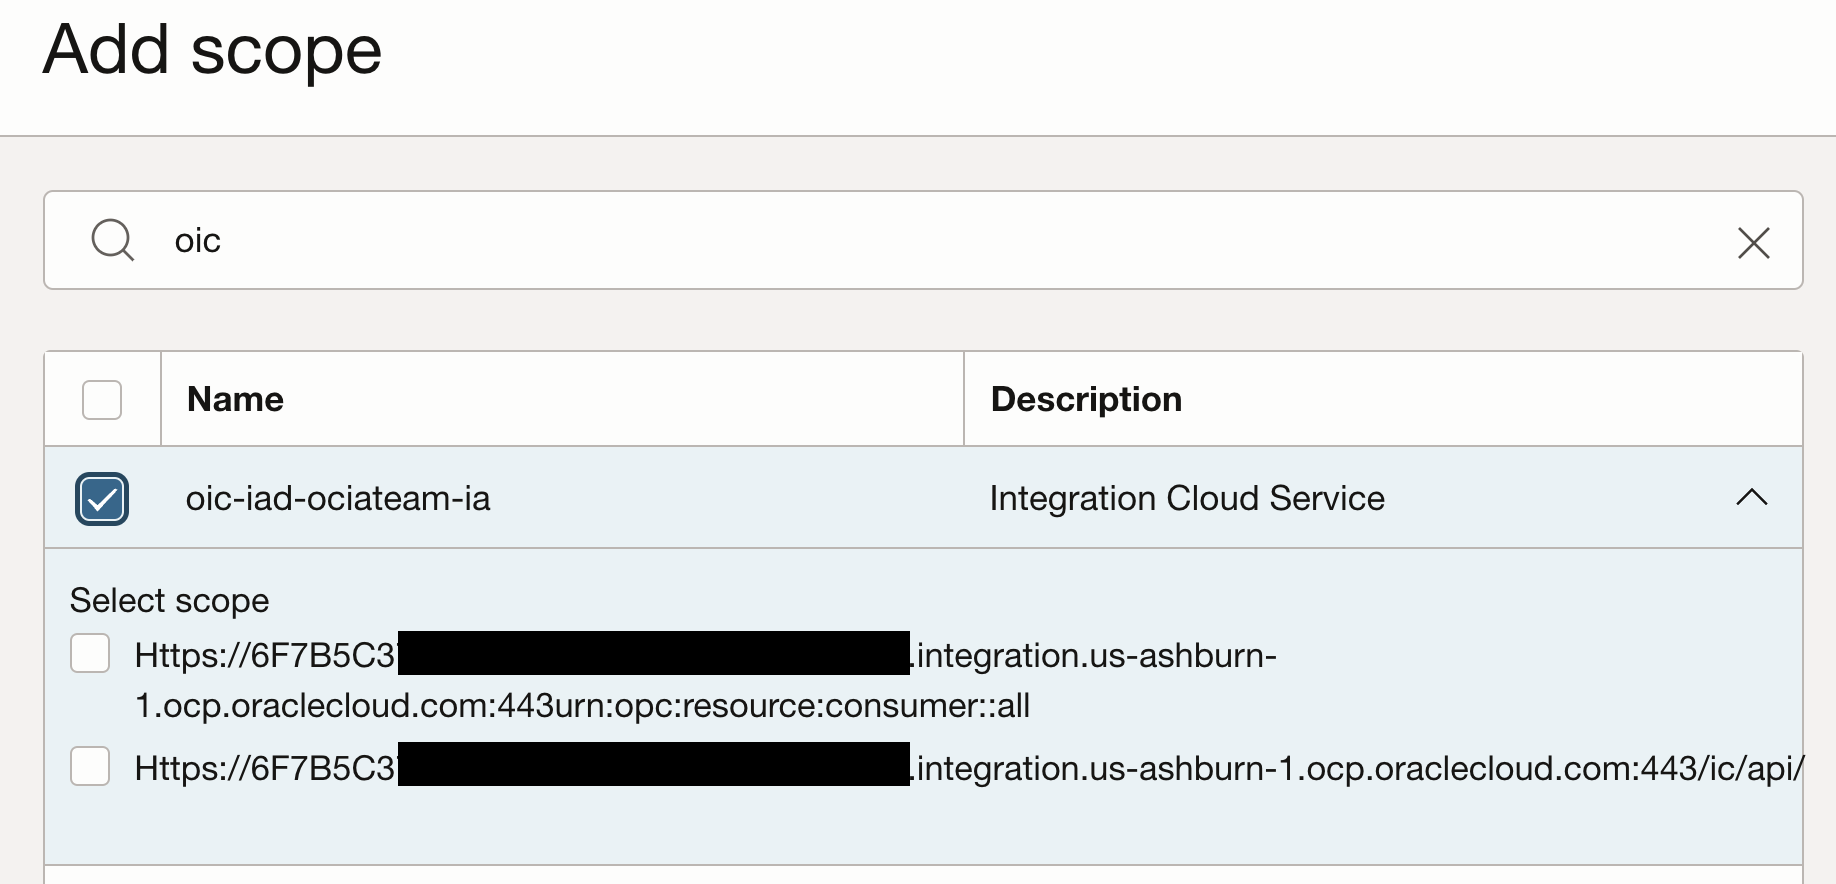
Add scope”, search your provisioned integration instance from the DR region, expand it, select the scopes and hit add.
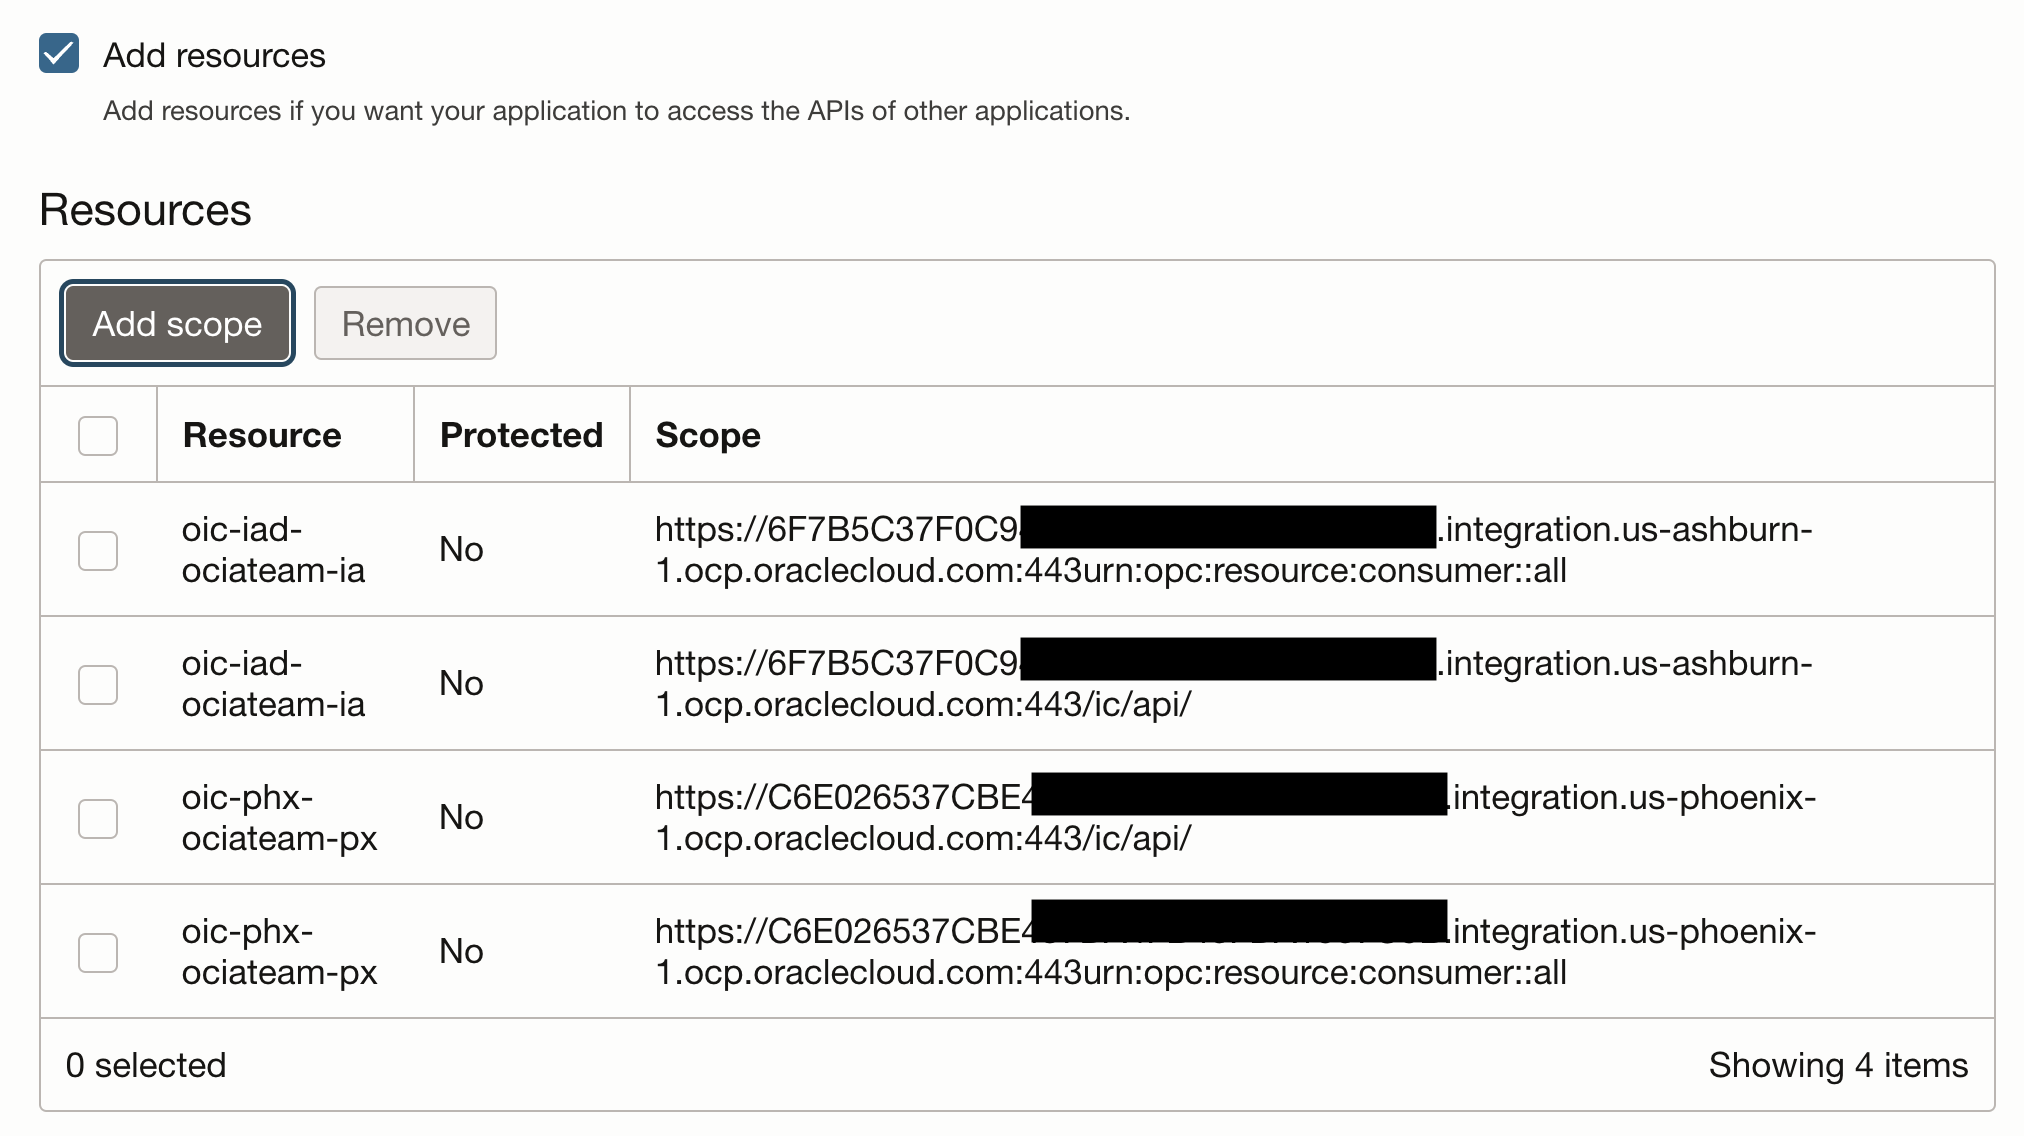
The scope will look like this:
Under Oracle Cloud Services, search the identity application for the OIC instance from the DR region and open it.
Under “Resources”, navigate to “Application roles”, expand the “ServiceUser” role and under “Assigned application” hit “Manage”
Under “Available applications” search for the integrated application that was just configured and hit “Assign”.
Test the disaster recovery
The simplest way to force the failover from prod to dr is removing the tcp 443 policy from the security list attached to the public subnet where the prod LB is attached.
Under the traffic management, the health check status will change.
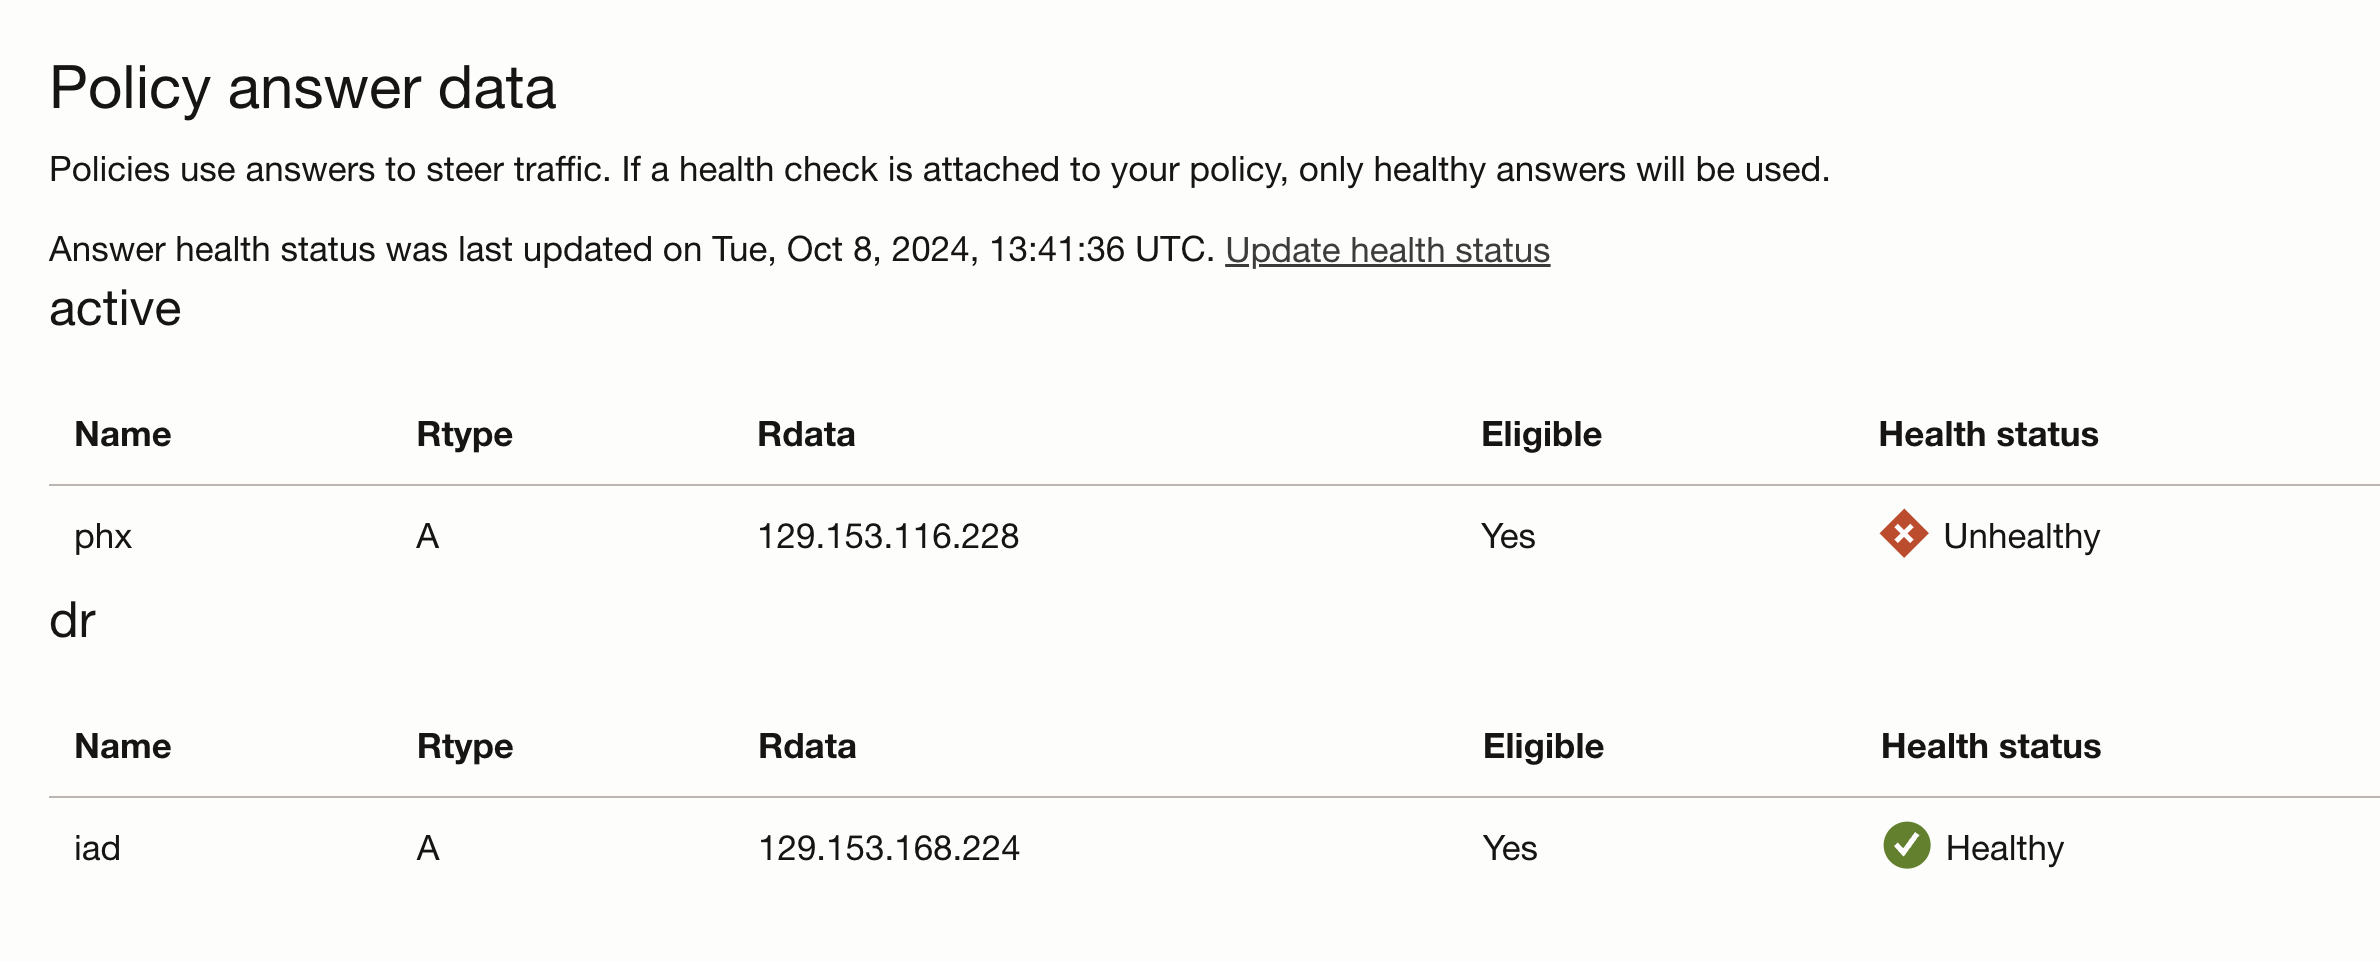
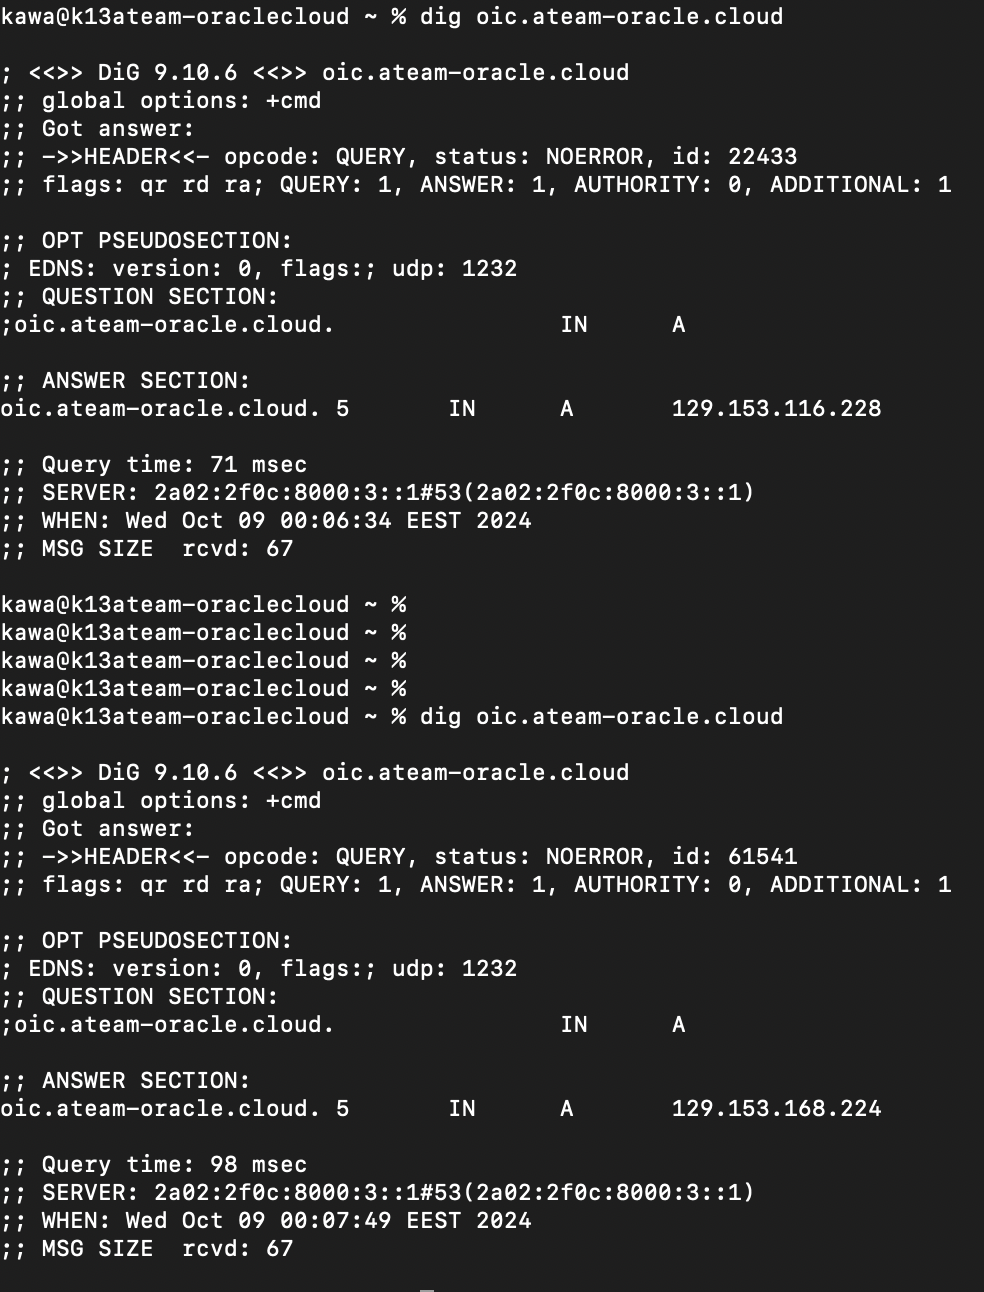
Observe the change of the IP address of the private endpoint DNS record from prod to dr:
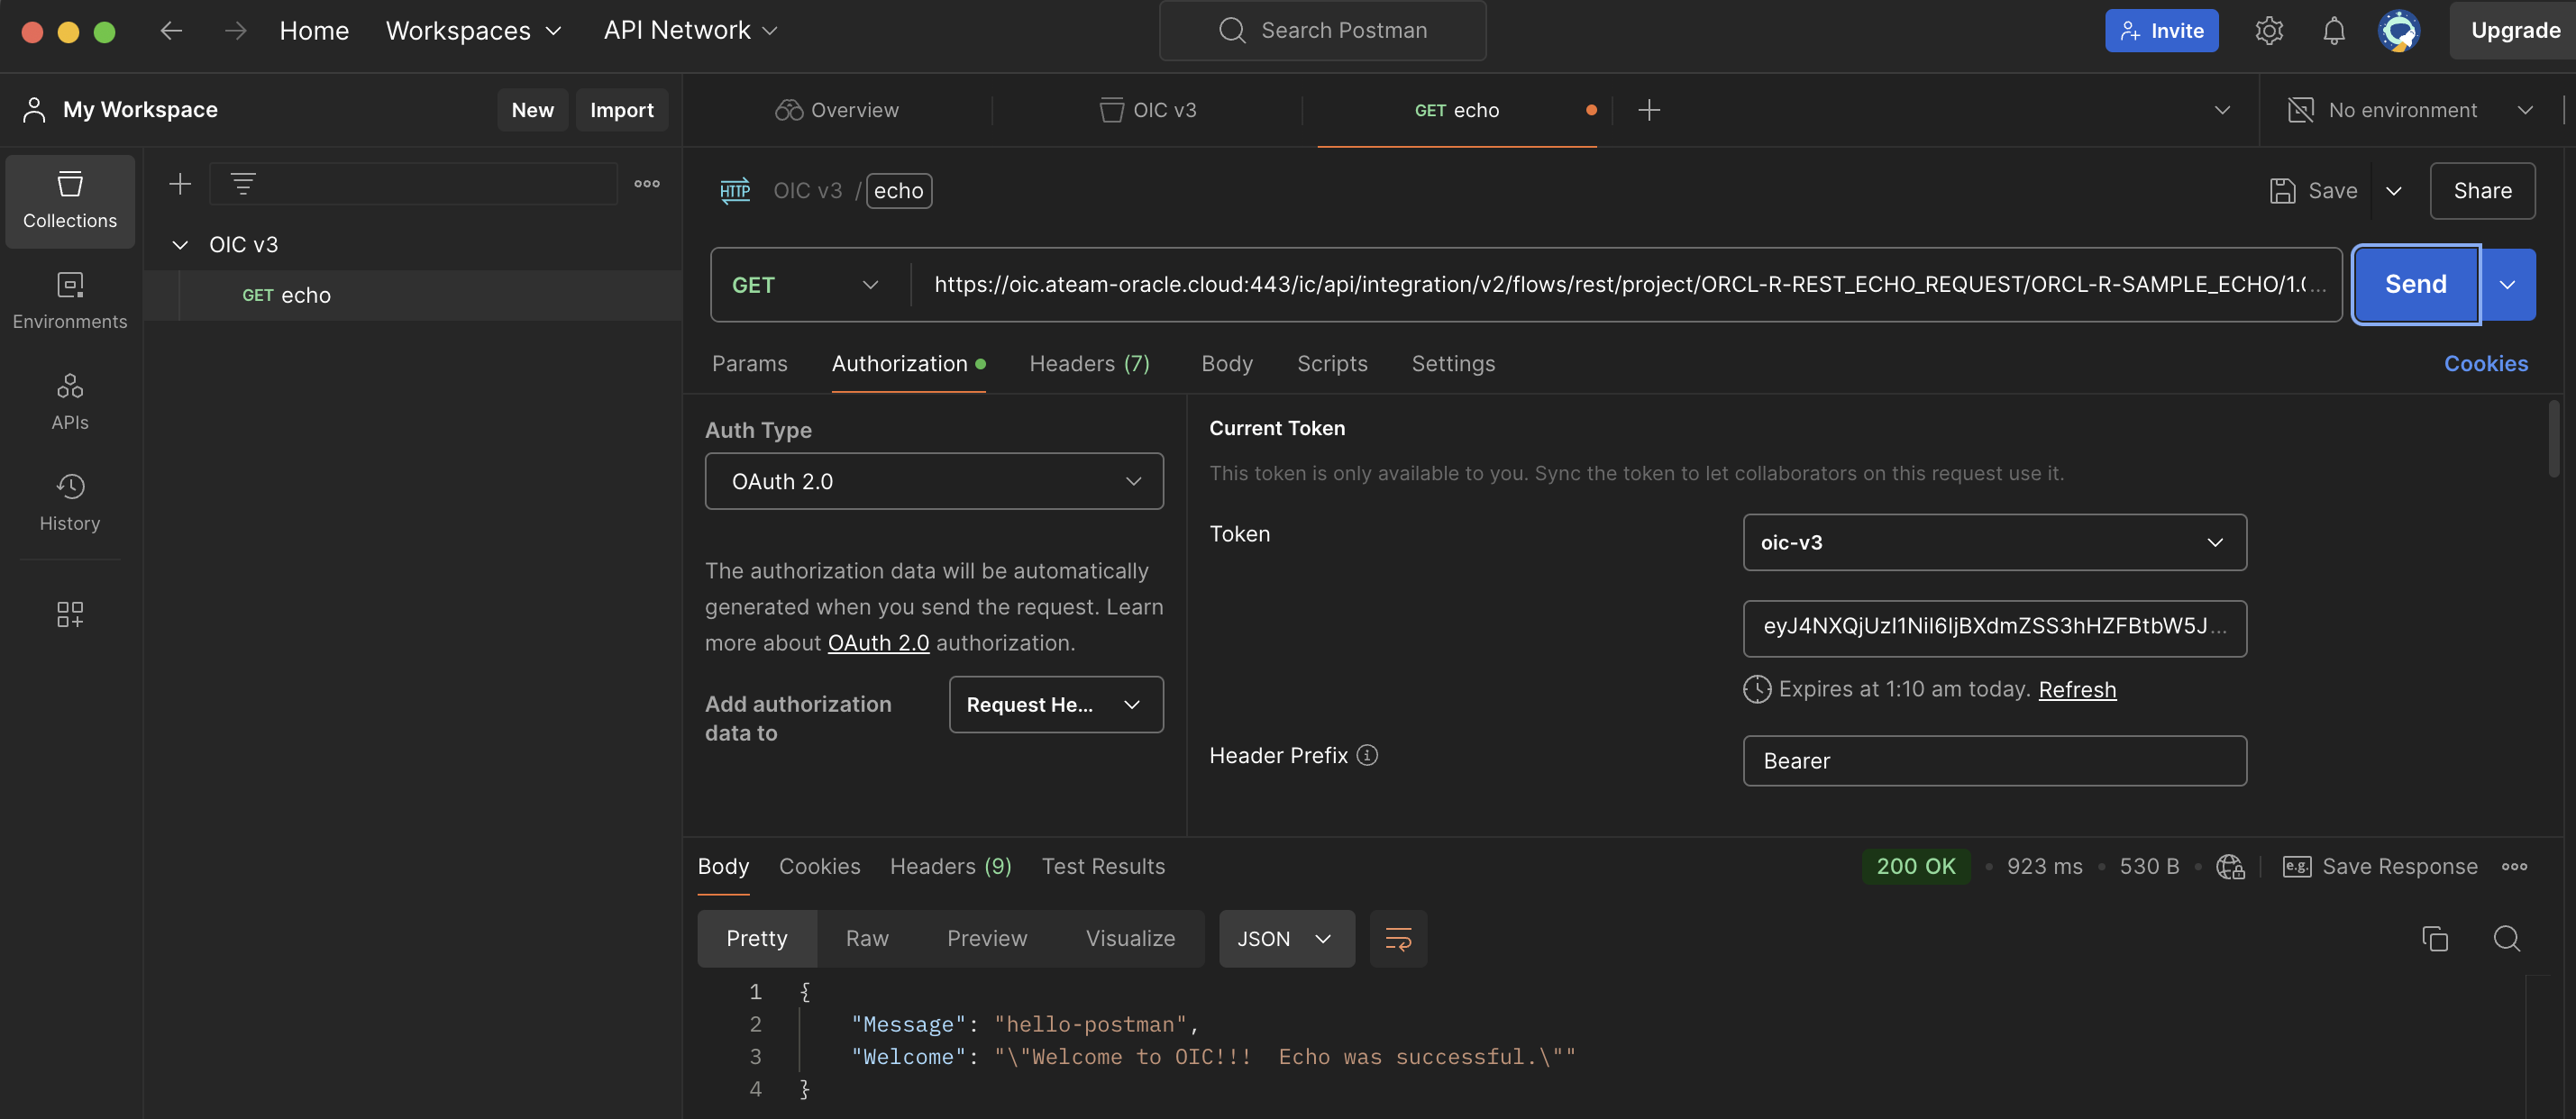
Use Postman to create a request to your private endpoint. The result will be a 200 OK.
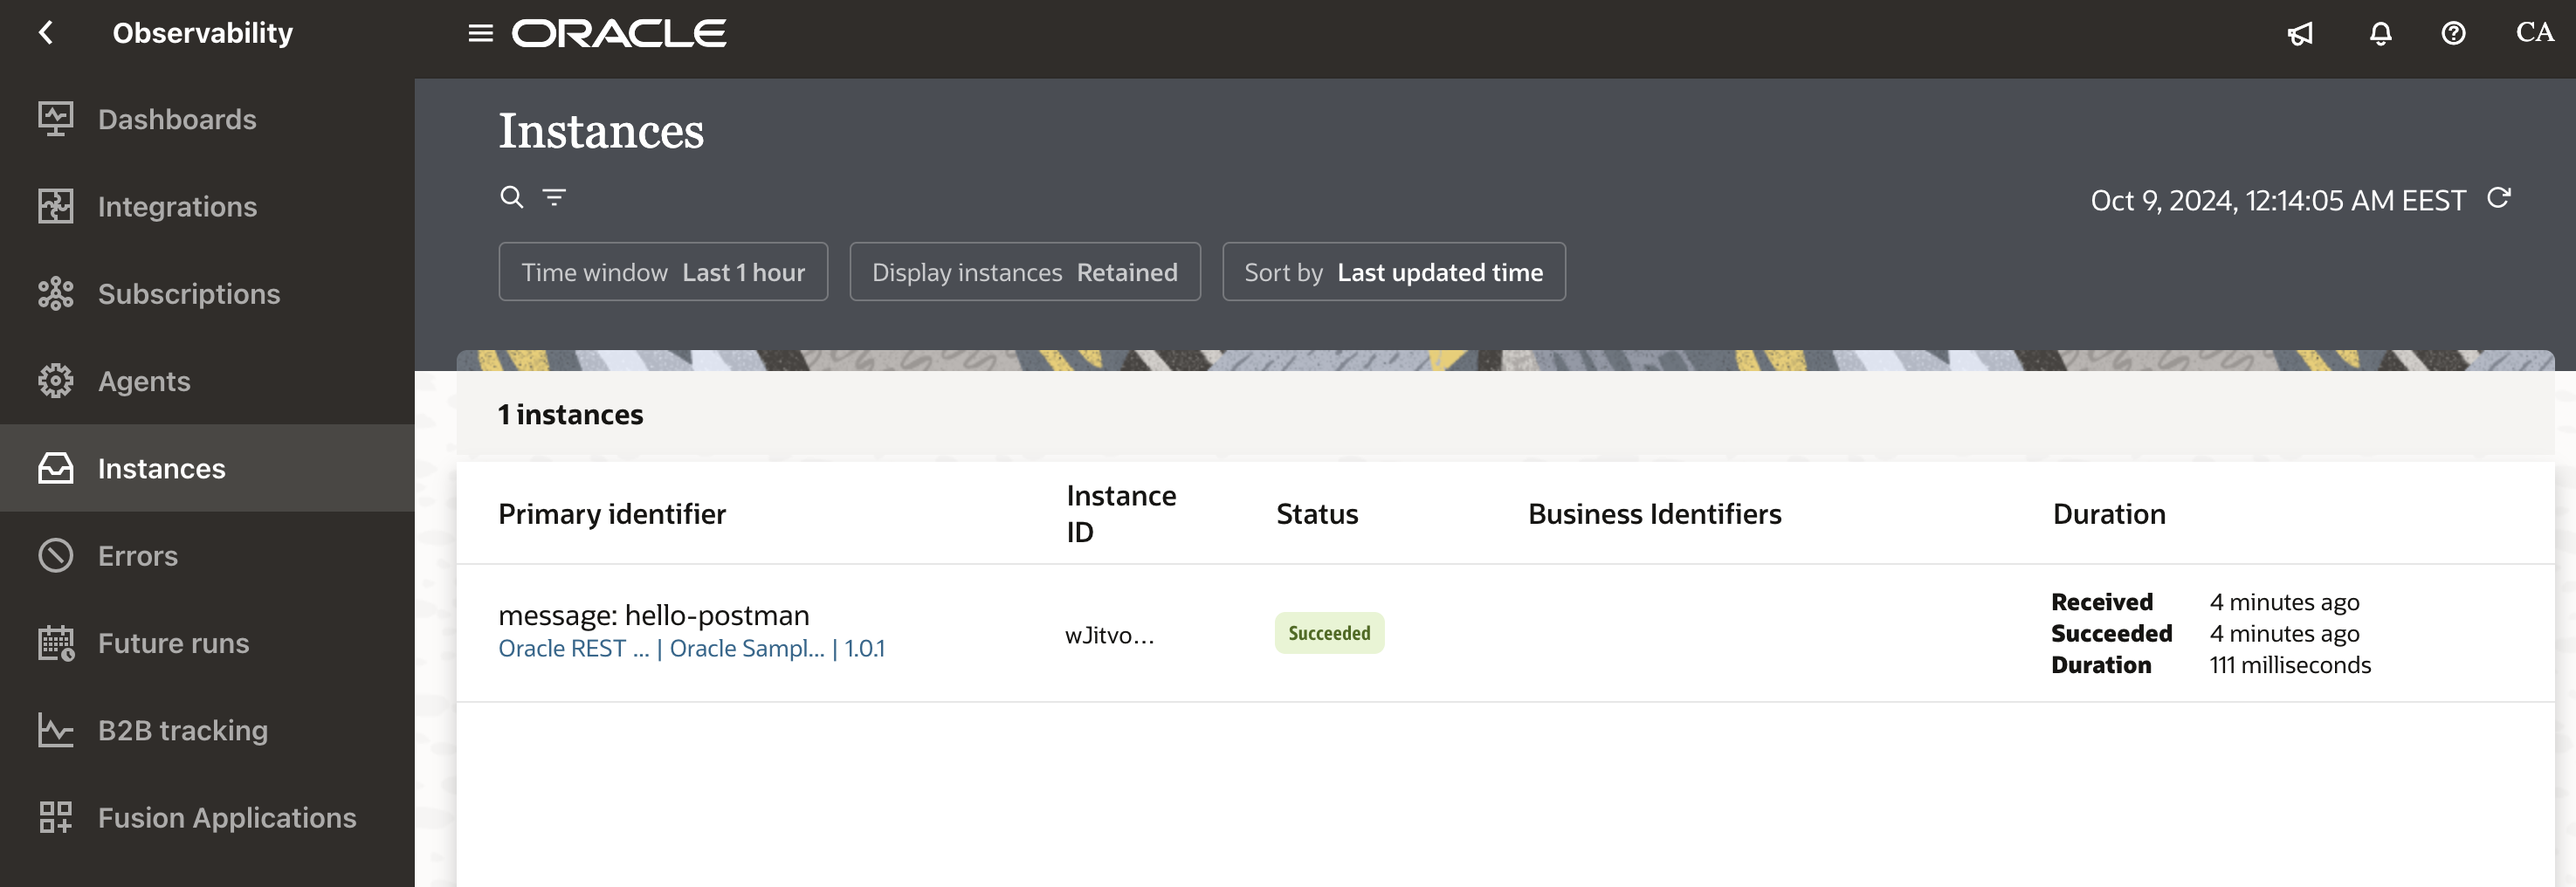
Login to the designer time url from the DR region, navigate to Observability >> Instances and you will be able to observe the call that we just sent from Postman.
Conclusion
In this post we configured the disaster recovery for the OCI according to the public documentation and we also showed a step by step method to do a fail over with the aid of the traffic steering management policies. This scenario is covered from the Networking point of view and we did not covered any OIC specific tasks needed to do the failover. Please consult the public documentation for the metadata migration from prod to dr OIC instance.