Introduction
A Visual Builder (VB) instance which is provisioned in the Fusion IAM identity domain will have advantages over external OCI IAM identity domains -like preconfigured SSO, OAuth and user sync. But external identity domains/tenancies have often been used for OCI SaaS extensions (ie. Oracle Integration Cloud (OIC)/Visual Builder) in the past, previously referred as PaaS extensions.
So, provisioning Visual Builder instances in the Fusion IAM identiy domain is nowadays the recommended approach over provisioning them in a separate identity domain or tenancy. However, please note this is only supported for Fusion Application extension and integration use cases.
We have covered this in blog Part 1 – Extending Fusion Applications using VBCS: OAuth Configurations
Customers who have only a SaaS subscription and are not using external IAM (ie. a PaaS subscription in a separate tenancy) can use the JWT-based API authentication mechanism out-of-the-box – Implement JWT Token Authentication with Fusion Cloud Application (REST/SOAP) & extend in Node.js based applications
However there are a few cases where VB applications are created in external identity domains (Non-Fusion IAM). In such cases the same token-based authentication to access Fusion Applications might be desired. In this blog we will provide details how the same API authentication mechanism using JWT can be achieved when creating VB service connections/backends.
Details:
We will cover two use cases which are available in VB service connections. These can be used to access data from Fusion applications using OAuth2.0 configuration in external OCI IAM identity domains.
- OAuth 2.0 Client Credentials (CC) – Fixed credentials used as service account to access resource, ignoring the signed-in end user’s identity and credentials.
- OAuth 2.0 User Assertion (UA) – Identity Propagation. This is used where the logged-in user identity is needed to access resource.
There are a few common steps (Step 1 – Step 5) listed below which need to be configured for both use cases. After that please follow steps in OAuth 2.0 Client Credentials (CC) or OAuth 2.0 User Assertion (UA) as per use case.
Summary of Steps –
- Step 1 : Create New Identity Domain in External OCI IAM
- Step 2: Set Up Trust Between Oracle Fusion Applications and External Identity Domain
- Step 3: Enable CORS in Fusion Application for Visual Builder Application.
- Step 4: Create Resource Confidential Application for Fusion Applications in External Identity Domain.
- Step 5: Optional – Sync User/Groups from Oracle Fusion Applications with the External Identity Domain
- Follow OAuth 2.0 Client Credentials (CC) or OAuth 2.0 User Assertion (UA) as per use case.
Step 1 : Create New Identity Domain in External IAM (if not yet existing)
- Login to the OCI Console for your OCI tenancy with an administrator account – most likely this is your PaaS tenancy
- Navigate to the domain screen and create a new domain, in our example we have created a domain with name – FA_OAuthAccess
- Please select the appropriate IAM domain type for your scenario – the types are discussed in detail here, for this blog we have taken the Free domain type.
- Create a domain administrator with separate credentials to your tenancy account administrator
- Activate the IAM domain via the link that is emailed to the domain administrator account.
- Make sure your Visual Builder instance is associated with this IAM domain. This is accomplished by provisioning the Visual Builder instance while logged into this domain as domain administrator.
Step 2 : Set Up Trust Between Oracle Fusion Applications and External Identity Domain
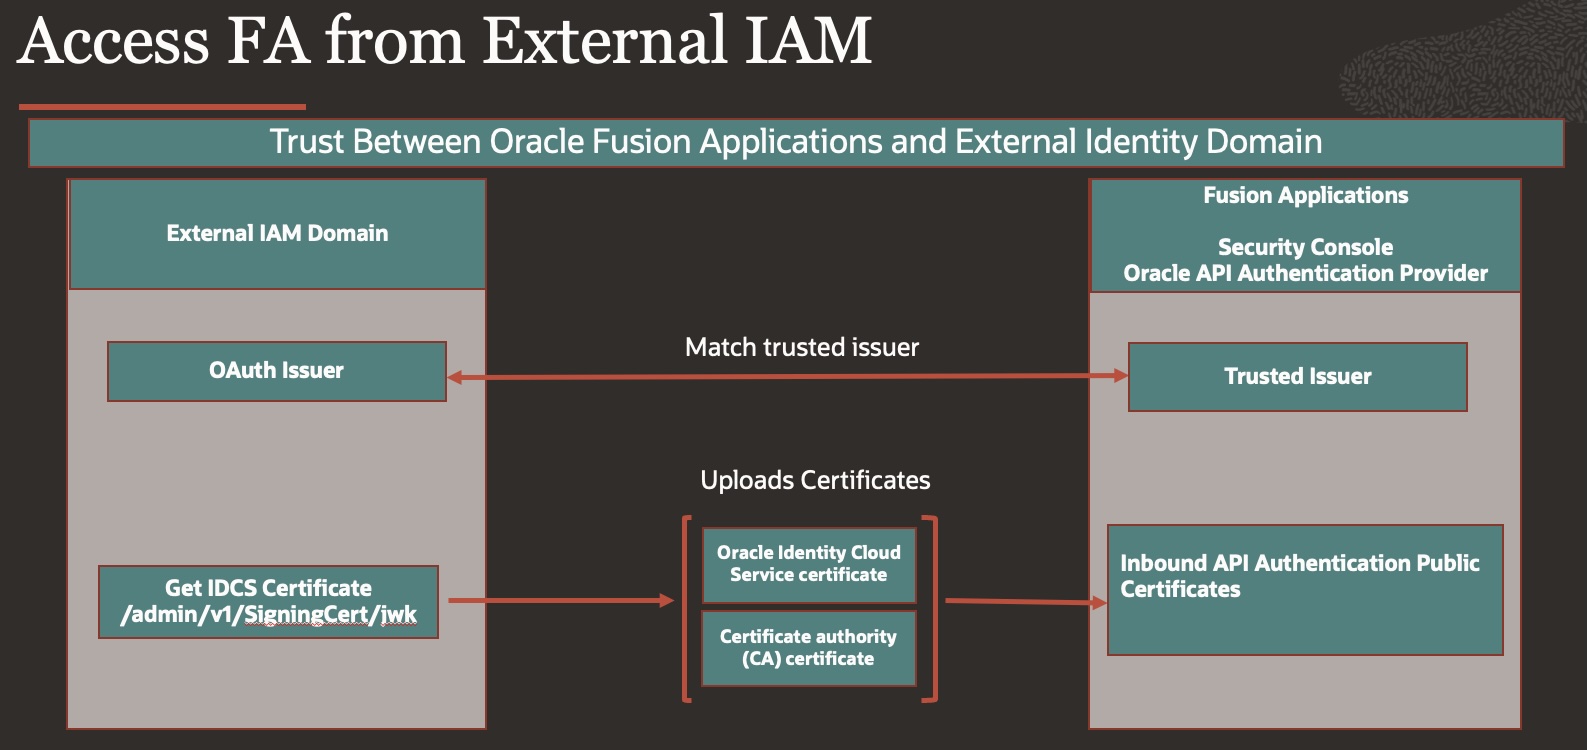
- Log back into External domain as the domain administrator
- Change OAuth issuer name
Navigate to
Identity>Domains>FA_OAuthAccess domain>Security>OAuth
Update OAuth issuer name to your IDCS domain URL [https://idcs-XX.identity.oraclecloud.com], the only requirements is to change it to a non-default value (different to https://identity.oraclecloud.com/). This will then be used in the Fusion Applications Security console while uploading the JWT signing certificates
- Enable Access Signing certificate
Navigate to
Identity>Domains>FA_OAuthAccess domain>Settings>Domain settings>>Access Signing Certificate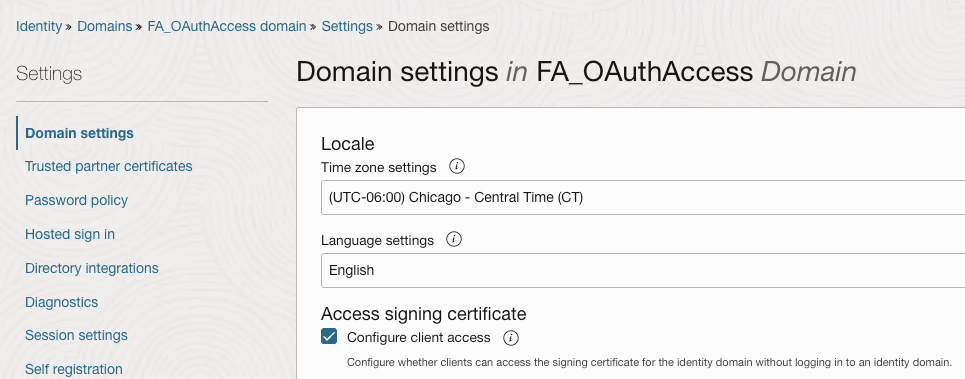
- Get the signing certificates from the Oracle OCI IAM identity domain’s JWK endpoint
-
- Get the URL of the Oracle OCI IAM JWK endpoint that gives you the signing certificates.
<OCI IAM identity domain URL>/admin/v1/SigningCert/jwk
You can look up the domain URL in the OCI IAM identity domain overview page.
-
- Call the JWT endpoint in your browser to retrieve the payloads of the certificates. There are two values in the “x5C” sections within the output
-
-
- First value: OCI identity domain certificate – oci_identity_domain_signing.cer
- Second value: Certificate authority (CA) certificate – oci_identity_domain_ca.cer
-
Refer – Retrieve the Tenant’s Signing Certificate in JWK Format.
-
-
Copy each certificate value into a separate file. Note that the headers and footers in the files must be in the following exact format without any additional preceding or trailing characters to be successfully uploaded to Oracle Fusion Applications
—–BEGIN CERTIFICATE—–
MIIDZjCCAk6gAwIBAgIGAZyQll3…..
—–END CERTIFICATE—–You can validate the certificate. For example:
openssl x509 -in oci_identity_domain_signing.cer -noout -text
openssl x509 -in oci_identity_domain_ca.cer -noout -text- Create API authentication provider in Fusion Cloud Application
- Login to Fusion Cloud Application & navigate to Tools>>Security Console>> API Authentication
- Press Button – Create Oracle API Authentication Provider and press Edit button
- Use same issuer name (IDCS Domail URL)as you have created in step 2
(in our example: https://idcs-XX.identity.oraclecloud.com).
The default IAM domain issuer name “https://identity.oraclecloud.com/” is reserved for the IAM identity domain already associated with FA, so it can’t be used for an additional domain, Therefore we needed to change the issuer name in our identity domain in step 2 to be able to use it here.
- Upload OCI IAM domain certificates in Fusion Security Console
- Within the “Oracle API Authentication Provider Details” page from the previous step under tab “Inbound API Authentication Public Certificates” upload both certificates downloaded in step 4.
-
- OCI identity domain certificate
- Certificate authority (CA) certificate
-

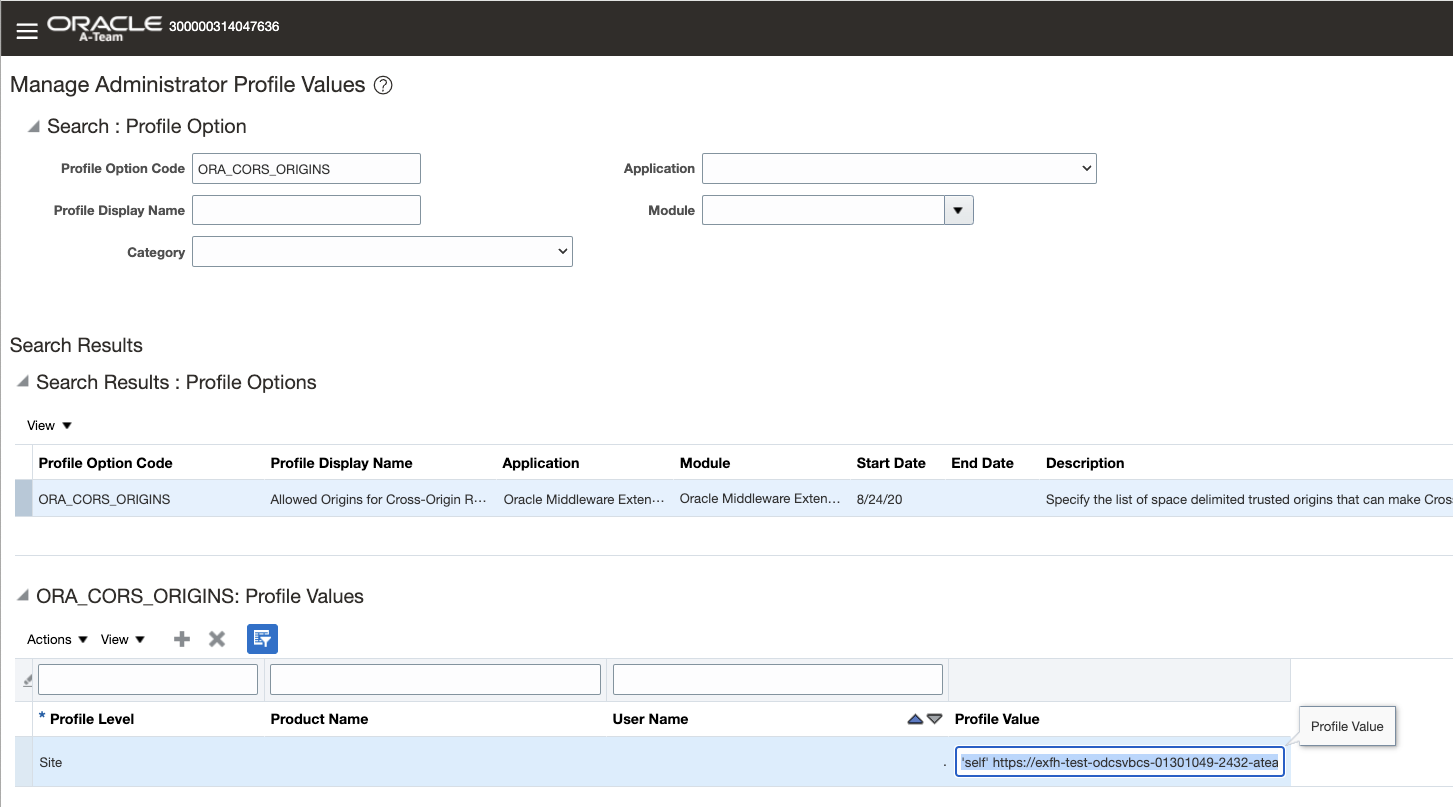
Step 3: Enable CORS in Fusion Application for Visual Builder Application.
- Navigate to Manage Administrator Profile Values in Fusion Applications.
- Search for Profile option code – ORA_CORS_ORIGIN
- Add Visual Builder application URL as below in profile value.
E.g.
‘self’ https://fa-<domain>.builder.us-ashburn-1.ocp.oraclecloud.com
Refer here – Configure Cross-Origin Resource Sharing
- Navigate to Identity>Domains>FA_OAuthAccessdomain>Integrated applications
- Press Button – Add Application
- Choose Confidential Applications, choose Resource server configuration, Provide Name , in this case – FA Resource
- In primary Audience add – Fusion Application URL
- In Scope provide – /
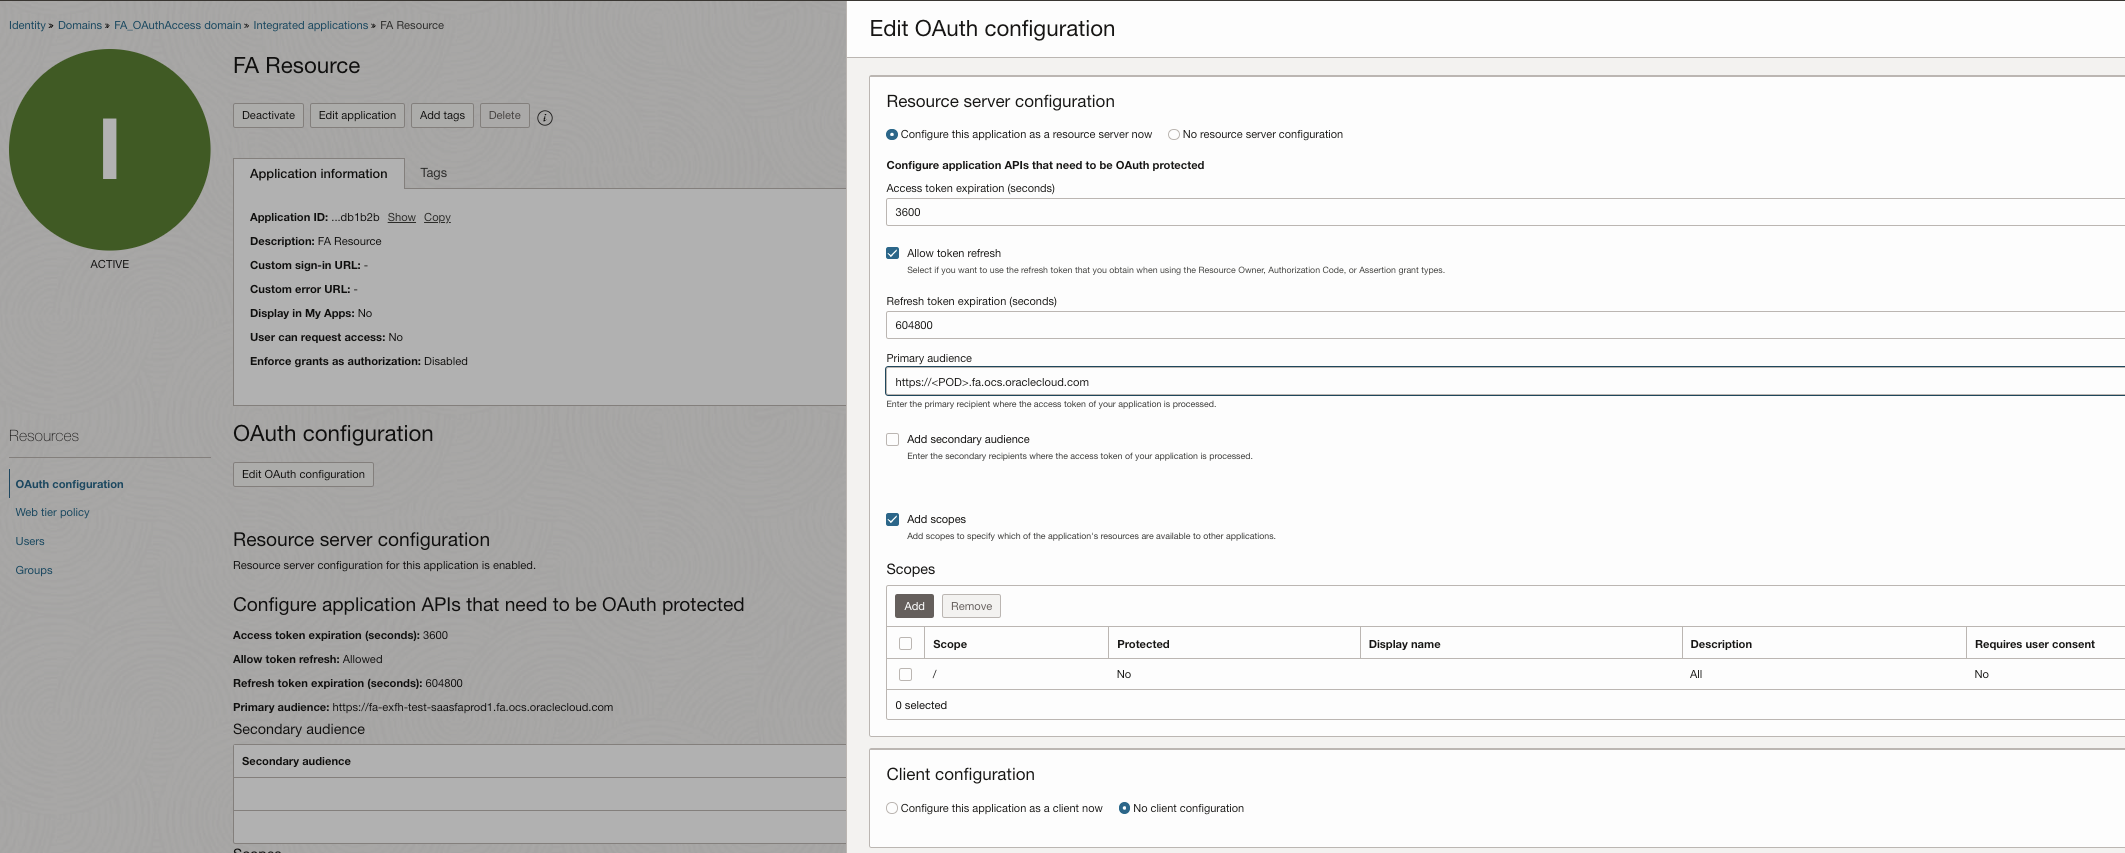
- Save and Activate Application
- If we want to use User Assertion (UA) to use identity propagation method, we need to Sync User/Groups from Oracle Fusion Applications with the External Identity Domain , Refer here for details.
- Additionally if you want to embed VBS Application as iframe into FA that requires SAML identity federation (Web-SSO) with Oracle Fusion App(Oracle Fusion Applications user federated with the External Identity Domain), Refer to Support Note Doc ID 2746354.1 for details.
OAuth 2.0 Client Credentials (CC)
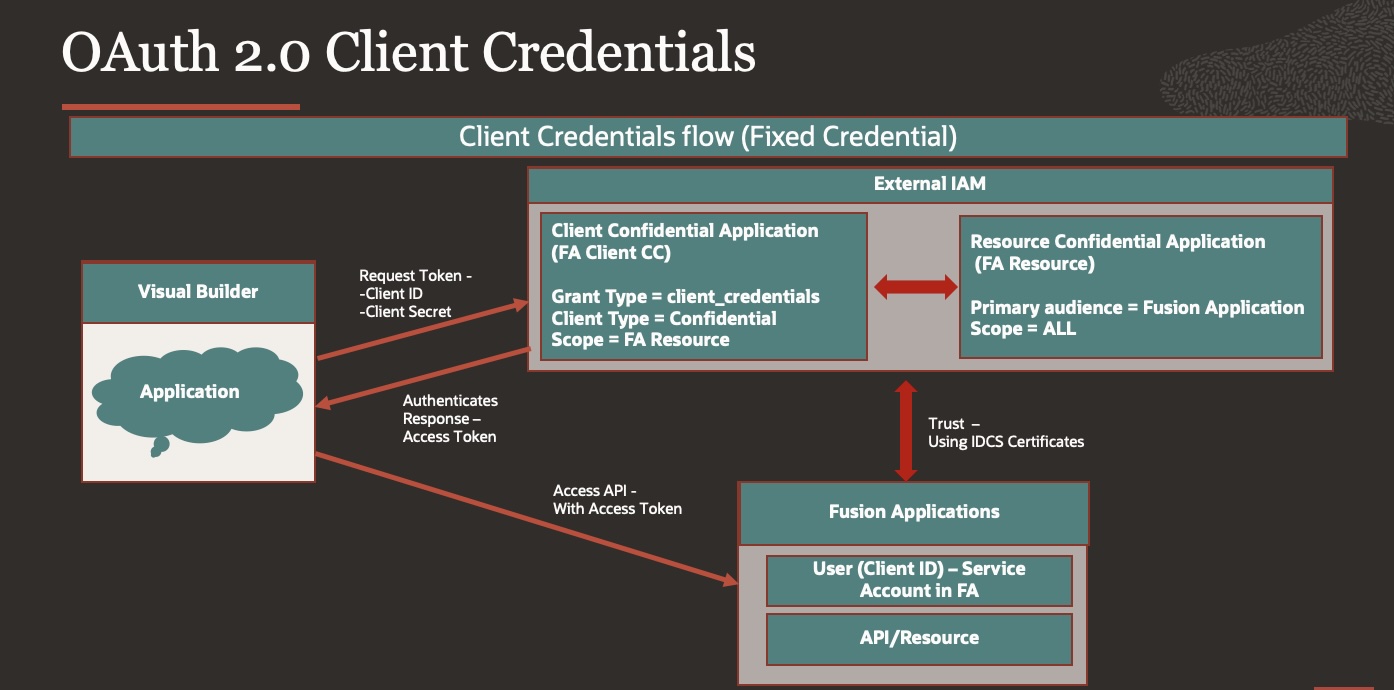
This method is used for application-to-application authentication scenarios where you don’t need a specific user’s credentials to connect to the service e.g. service accounts created inside Fusion application.
Step 1: Register your application with the authorization server
- Login into the newly created external domain as the domain administrator
- Navigate to Identity>Domains>FA_OAuthAccessdomain>Integrated applications
- Press Button – Add Application
- Choose Confidential Applications
-
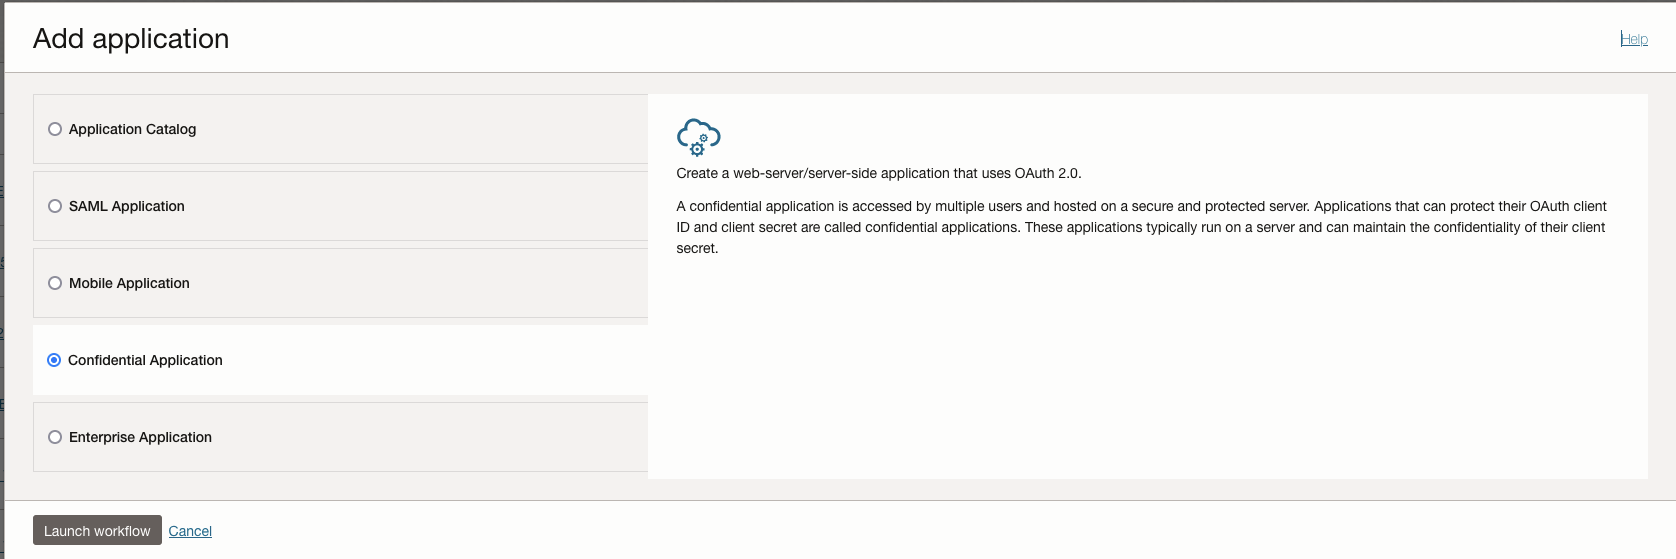
- In Add Application details – Give name, description of your choice –
FA Client CC - Press Next for Configure OAuth
- Choose Client configuration
- Authorization – Client credentials
- Client Type – Confidential
- Resources – Add Scope
- FA Resource
- Press Next for Configure Policy
- Finish.
- Activate Application.
- Make note of the application’s Client ID and Client Secret & Scope.
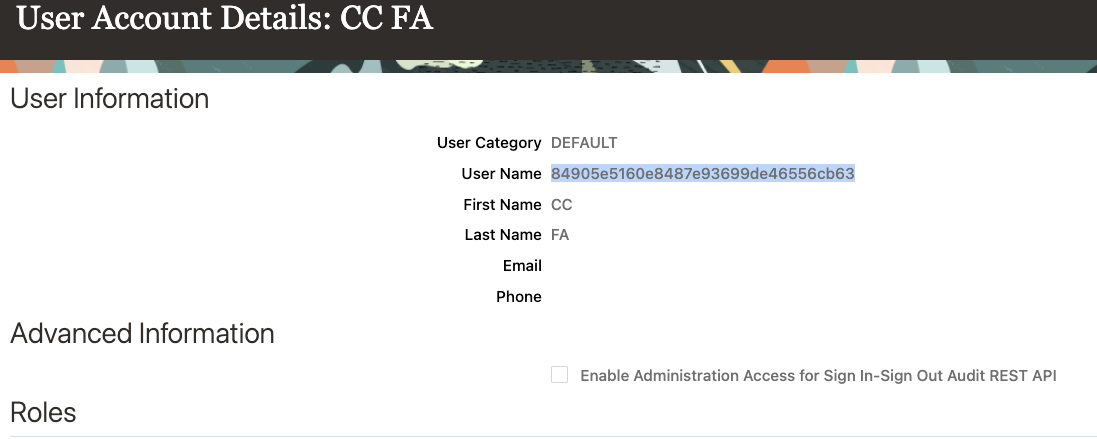
Step 2: Create the Client ID as a user in Oracle Applications Cloud
In Client Credentials flows, any call is invoked in the context of the application itself and not in the context of a user. Therefore, you must model the application’s client ID as a user in Oracle Applications Cloud.
By creating the Client ID as a user, you are indicating that the user (application) has the necessary role and privileges and is authorized to access the resources.
Complete the following steps to create the Client ID as a user:
Note: The user creation process takes a few minutes and is not completed instantly.
-
- Sign in to Oracle Application Cloud.
- On the Security Console, click Users.
- Click Add User Account.
- Under User Information in the Username field, specify the Client ID of the application that you registered with Oracle IAM.
- Enter the other details under User Information.
- Click Add Role.
- Based on the resources that you want this application to access, add the appropriate roles.
You can test configuration using Postman as a client to request access token
- In the Configure New Token section, enter the following client configuration information:
| Fields |
Values |
| Access Token URL |
The identity domain URL appended with /oauth2/v1/token is used as the Access Token URL. |
| Client ID |
Enter the Client ID value collected from OCI IAM domain. |
| Client Secret |
Enter the Client Secret value collected from OCI IAM domain. |
| Scope |
Enter the Scope value defined in OCI IAM domain. |
| Token Name |
Generic name, can be anything. |
| Grant Type |
Client Credentials |
| Client Authentication |
Send as Basic Auth Header. |
- Click Get New Access Token.
- Postman passes on the information to OCI IAM domain.
- After successful authentication, OCI IAM returns the access token to Postman.
- Click Use Token and to use this token to access the resources.
Step 3: Create Service Connections in VB
- Login to VB Applications.
- Navigate to Service connections > Press + Button to create new.
- Use Define by End Point
- Provide Resource URL which you want to access
- Go to Server tab and provide below details –
- Authentication as – Oauth2.0 Client Credentials
- Client ID – Refer from Confidential Client
- Secret – Refer from Confidential Client
- Scope – Refer from Confidential Client
- Token URL – <Replace with OCI IAM domain URL>/oauth2/v1/token
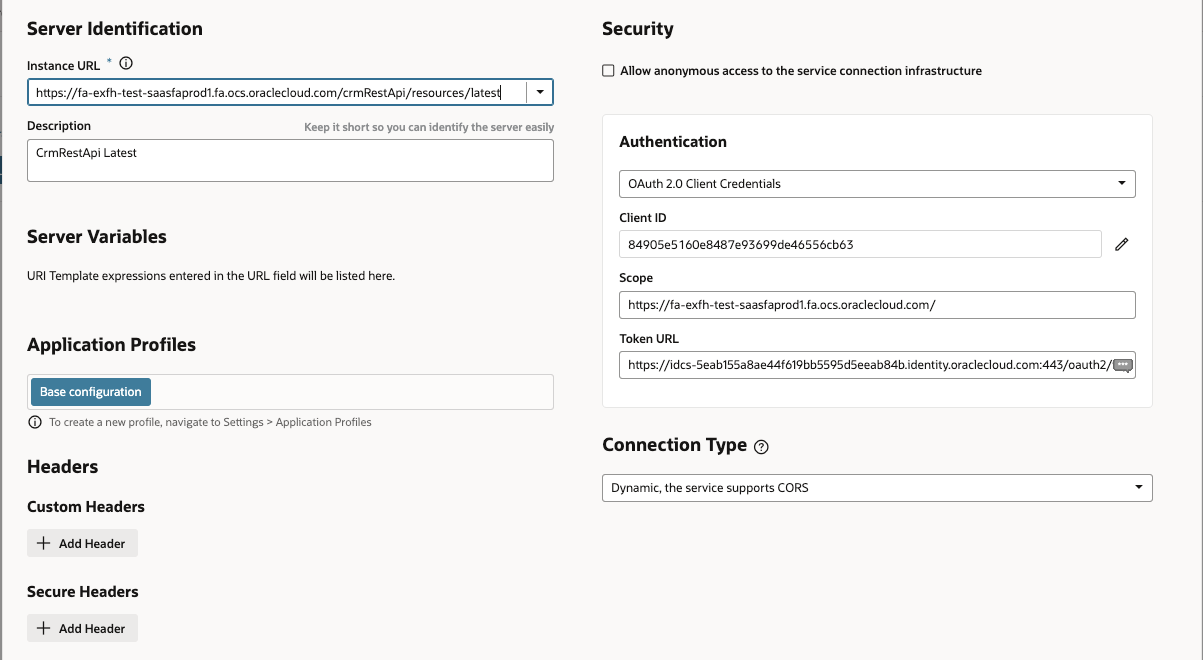
- Click Save and Exit Screen
- Go Back to Service connection
- Go to end Points>>Press Send request to test your service connection.
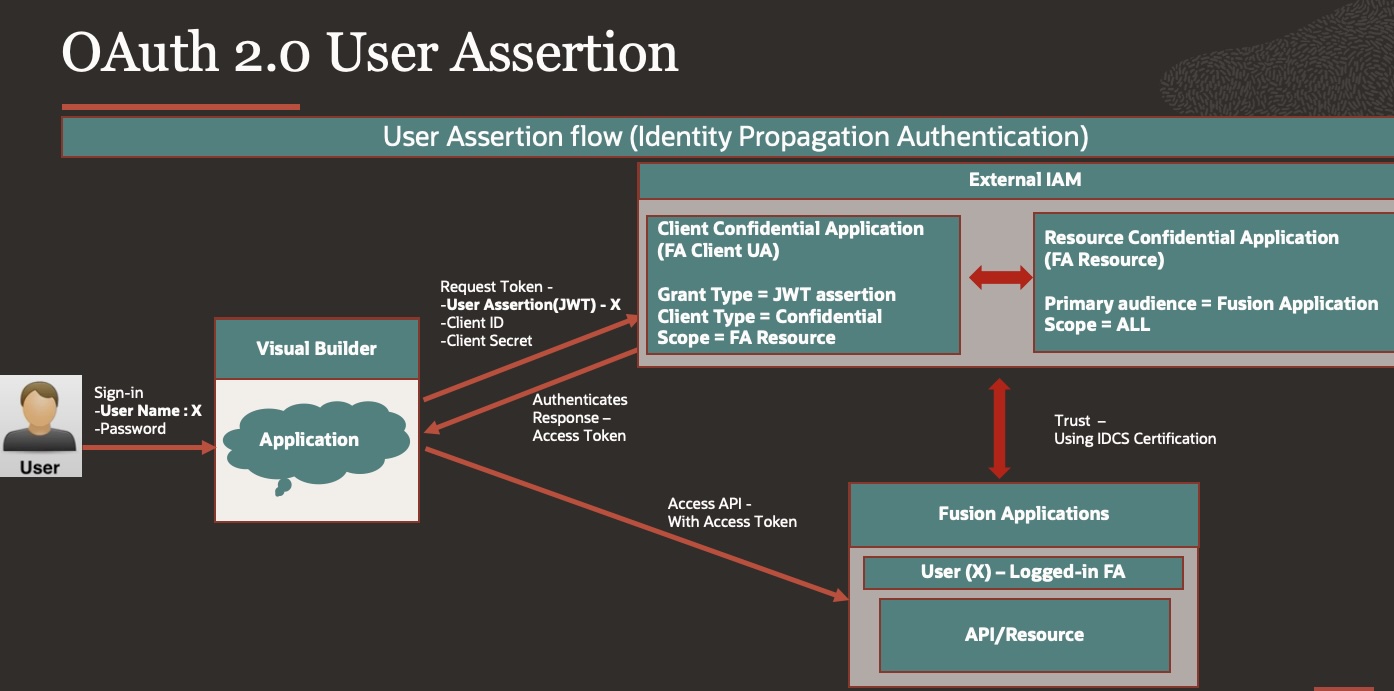
This method is used when person who is logged in application will be used to connect to the fusion application, this also requires the user to sign with a valid Oracle IAM identity domain user account which is synchronized with Oracle Fusion Application i.e… User must exist in both OCI IAM domain & FA.
Step 1: Register your application with the authorization server
- Login into the newly created external domain as the domain administrator
- Navigate to Identity>Domains>FA_OAuthAccessdomain>Integrated applications
- Press Button – Add Application
- Choose Confidential Applications
- In Add Application details – Give name, description of your choice – FA_Client_UA
- Press Next for Configure OAuth
- Choose Client configuration
- Authorization – JWT assertion
- Client Type – Confidential
- Resources – Add Scope
- FA Resource
- Press Next for Configure Policy
- Finish.
- Make note of the application’s Client ID and Client Secret & Scope.
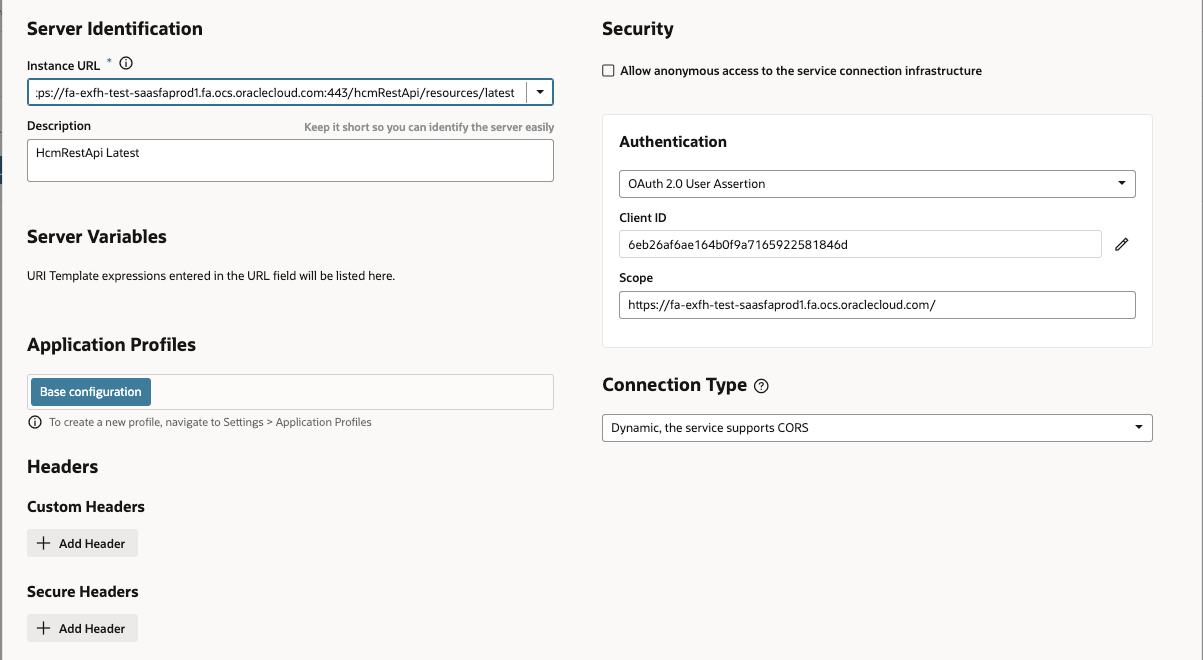
Step 2: Create Service Connections in VB
- Login to VB Applications.
- Navigate to Service connections > Press + Button to create new.
- Use Define by End Point
- Provide Resource URL which you want to access
- Go to Server tab and provide below details –
- Authentication as – Oauth2.0 User Assertion
- Client ID – Refer from Confidential Client [This field is optional for User Assertion, leave blank]
- Secret – Refer from Confidential Client [This field is optional for User Assertion, leave blank]
- Scope – Refer from Confidential Client
Conclusion
We hope with this blog you will be able to connect Visual Builder from an external domain to Fusion Applications using OAuth2.0 grant types, this blog provides a mechanism how to configure it and illustrates when to use it with which connection types.
References:
- Securing Authorizations in Oracle Cloud
- Visual Builder Service Connections
- Set Up the OAuth Authorization Code Credentials Security Policy with a Non-Oracle Fusion Applications Identity Domain
- Add a Confidential Application
https://docs.oracle.com/en/cloud/paas/identity-cloud/uaids/add-confidential-application.html